Wheels SKODA FABIA 2004 1.G / 6Y Owner's Guide
[x] Cancel search | Manufacturer: SKODA, Model Year: 2004, Model line: FABIA, Model: SKODA FABIA 2004 1.G / 6YPages: 247
Page 207 of 247
Accessories, changes and replacement of parts
206
Accessories, changes an d replacement of parts
Accessories and replacement parts
Škoda vehicles have been built according to the latest discoveries in
safety engineering. Thus one should not change the condition in which the
vehicle was delivered from the manufacturer without some thought.
The following guidelines should be observed when a vehicle is to be retro-
fitted with accessories, have technical changes made to it or a part has to
be replaced at some time in the future.
•Advise should always be obtained from a Škoda dealer before buying
any accessories and before making any technical changes ⇒.
•This is particularly the case when accessories are bought in a foreign
country.
•Škoda accessories which have been released for use and original
Skoda parts can be obtained from Škoda dealers. They will install them
professionally and correctly.
•All Škoda original accessories which are listed in the catalogue such
as tilting roofs, spoilers, wheels etc. must have an official stamp of
approval.
•Radios, aerials and other electrical accessories should only be
installed by an authorised workshop.
•The guidelines issued by Škoda Auto must be observed when making
technical changes.
•This is to ensure that no technical damage occurs to the vehicle, that
travelling and operating safety are maintained and that the chnages are
permissible. Škoda dealers undertake this work professionally or refer it
to an specialist company in special cases.
Any damage which is done caused by technical changes made
without consulting a Škoda Auto is excluded from the warranty.
WARNING
•We advise you, in your own interest, to only use Škoda Genuine
Accessories and Škoda original parts which have been expressly
approved for use on your Škoda. Reliability, safety and suitabiliity
have been established for these Škoda original parts.
•We cannot guarantee suitability of installation into your vehicle
of other products despite keeping a constant eye on market devel-
opments (also not in the case where there is an attestation or
permission can be produced).
Technical changes
Interference on the electronic components and their software can lead to
operational faults. This interference can also impair not directly affected
systems because of the networking of the electronic components. This
means that the operating safety of your vehicle can be considerably jeop-
ardized, a greater wear of vehicle parts can occur and finally the vehicle
registration documents expire.
We trust that you will understand that your Škoda dealer cannot be liable
for damage resulting from unprofessional work.
We therefore recommend that you have all work carried out with Škoda
original parts at your authorised Škoda dealer.
Page 214 of 247
Breakdown assistance213
Using the systemSafetyDriving TipsGeneral MaintenanceBreakdown assistanceTechnical Data
– If a trailer is coupled, uncouple it.
– Take the vehicle tool kit and the spare wheel ⇒ page 210
out of the luggage compartment.
WARNING
•If you find yourself in flowing traffic switch on the hazard
warning lights system and place the warning triangle on the side of
the road at the prescribed distance from your vehicle while
observing all national legal provisions. In this way you are
protecting not only yourself but also other road users.
•Never start the engine with the vehicle sitting on the raised jack
- danger of suffering injury!
Caution
If you have to change a wheel on a slope first block the opposite wheel
with a stone or similar object in order to secure the vehicle from unexpect-
edly rolling away.
Note
Comply with the national legal regulations.
Changing a wheel
Always change a wheel on a level surface as far as possible.
– Take off the full wheel trim* ⇒page 214 or the caps
⇒ page 215. – In the case of light alloy wheels remove the wheel trim cap
⇒page 215.
– Slacken the wheel bolts ⇒page 216.
– Jack up the vehicle until the wheel to be changed is clear of the ground ⇒page 216.
– Unscrew the wheel bolts and place them on a clean surface (cloth, paper etc.).
– Take off the wheel.
– Fit on the spare wheel and tighten the wheel bolts slightly.
– Lower the car.
– Tighten the wheel bolts firmly, alternately and diagonally using the wheel wrench ⇒page 216.
– Mount the full wheel trim/wheel trim cap or the caps.
Note
•All bolts must be clean and must turn easily.
•You must never grease or oil the wheel bolts!
•When fitting on unidirectional tyres, ensure that the tyres rotate in the
correct direction ⇒page 199.
Subsequent steps
After changing the wheel, you must perform the following steps.
Page 215 of 247
Breakdown assistance
214
– Stow and attach the replaced wheel in the spare wheel well.
– Stow the vehicle tool kit in the space provided.
–Check the tyre pressure on the spare wheel just mounted as
soon as possible.
– Have the tightening torque of the wheel bolts checked with
a torque wrench as soon as possible. The tightening torque for
steel and light alloy wheels must be 120 Nm.
– Have the defective tyre repaired as soon as possible.
WARNING
It is necessary to observe the guidelines given on ⇒page 202,
“New tyres and wheels” if the vehicle is subsequently fitted with
tyres which are different to those it was fitted with at the works.
Note
•If you find, when changing the wheel, that the wheel bolts are corroded
and difficult to turn, the bolts must be replaced before checking the tight-
ening torque.
•Drive cautiously and only at a moderate speed to a workshop where
the tightening torque can be checked.
Full wheel trim*
Removing
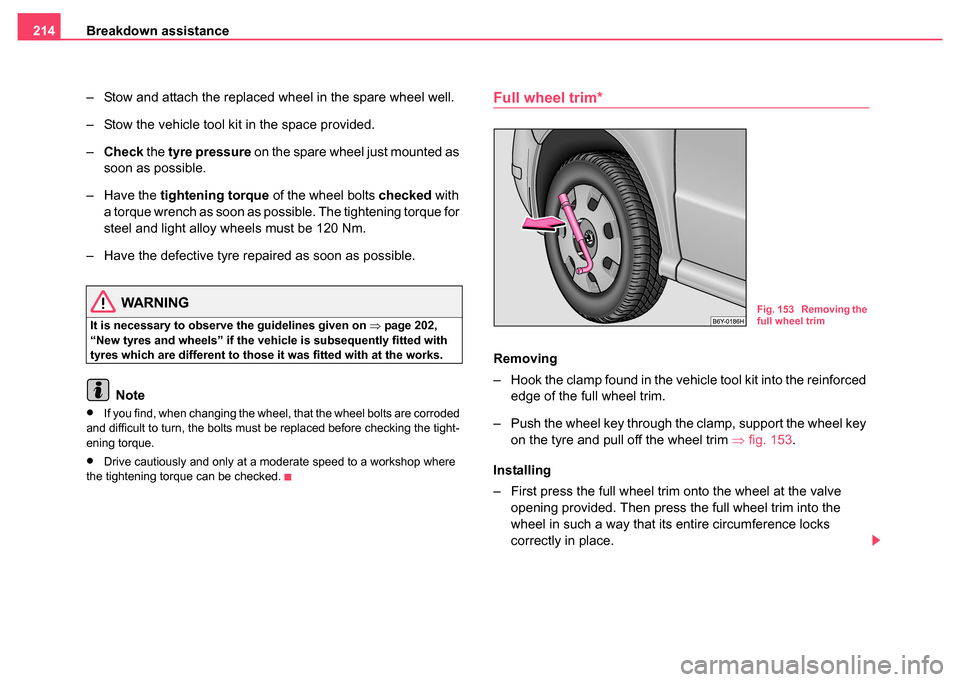
– Hook the clamp found in the vehicle tool kit into the reinforced edge of the full wheel trim.
– Push the wheel key through the clamp, support the wheel key on the tyre and pull off the wheel trim ⇒fig. 153 .
Installing
– First press the full wheel trim onto the wheel at the valve opening provided. Then press the full wheel trim into the
wheel in such a way that its entire circumference locks
correctly in place.
Fig. 153 Removing the
full wheel trim
Page 216 of 247
Breakdown assistance215
Using the systemSafetyDriving TipsGeneral MaintenanceBreakdown assistanceTechnical Data
Caution
•Use the pressure of your hand, do not knock on the full wheel trim!
Heavy knocks mainly on the points where the full wheel trim has not been
inserted into the wheel, can result in damage to the guide and centering
elements of the full wheel trim.
•First check for yourself that the theft-deterrent wheel bolt is located
⇒ page 217, “Securing wheels against being stolen*” in the hole in the
area of the valve before fitting the full wheel trim onto a steel wheel which
is attached with a theft-deterrent wheel bolt.
Wheel trim caps*
Removing
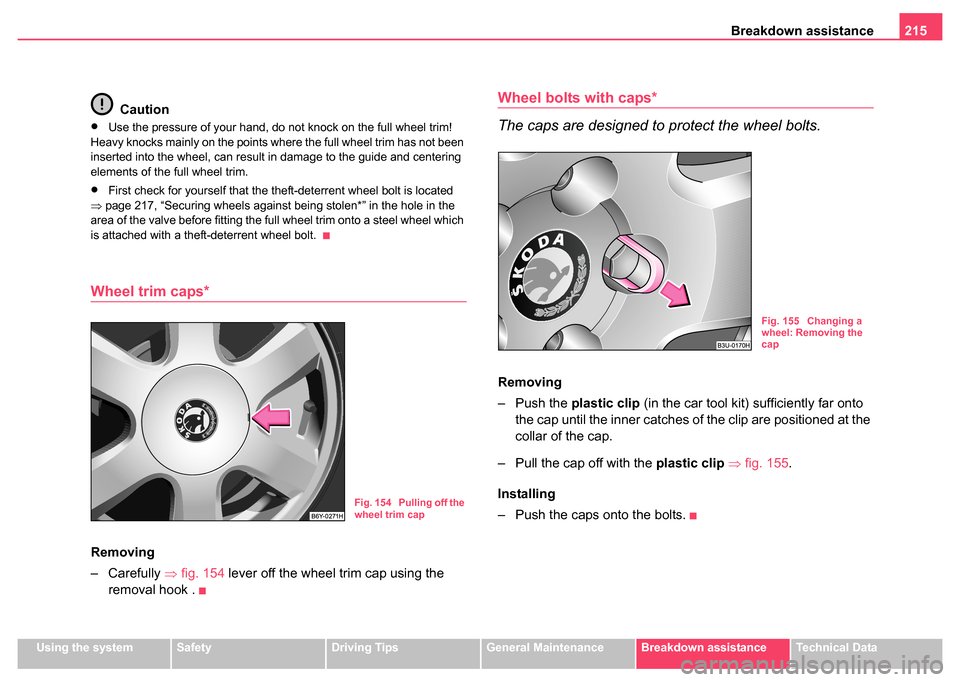
– Carefully ⇒fig. 154 lever off the wheel trim cap using the
removal hook .
Wheel bolts with caps*
The caps are designed to protect the wheel bolts.
Removing
– Push the plastic clip (in the car tool kit) sufficiently far onto
the cap until the inner catches of the clip are positioned at the
collar of the cap.
– Pull the cap off with the plastic clip ⇒fig. 155.
Installing
– Push the caps onto the bolts.
Fig. 154 Pulling off the
wheel trim cap
Fig. 155 Changing a
wheel: Removing the
cap
Page 218 of 247
Breakdown assistance217
Using the systemSafetyDriving TipsGeneral MaintenanceBreakdown assistanceTechnical Data
– Position the lifting jack by selecting the jacking point - lower sill
- which is closest to the wheel to be removed ⇒page 216,
fig. 157.
– Position the lifting jack below the jacking point and move it up until its claw is positioned directly below the vertical web of the
lower sill.
– Align the lifting jack so that its claw grasps the web of the lower sill and the moving base plate of the jack is resting flat
against firm ground.
– Turn the lifting jack up further until the wheel is just clear of the ground.
Ground below the lifting jack which is soft and slippery can cause the
vehicle to slip off the jack. It is therefore always necessary to place the
lifting jack on a solid surface or use a wide and stable base. Use a non-
slip base (e.g. a rubber foot mat) if the surface is smooth, such as
cobbled stones, a tiled floor,etc.
WARNING
•Always raise the vehicle with th e doors closed - risk of injury.
•Take suitable measures to prevent the base of the lifting jack
from slipping off - risk of injury!
•Place the lifting jack only on a solid and even surface.
•Not positioning the lifting jack at the specified points can result
in damage to the vehicle. The jack can also slip off if it does not
have sufficient grip - risk of injury!
•Never start the engine if the vehicle is lifted - risk of accident.
•Never lie under the vehicle if the vehicle is only lifted with the
vehicle lifting jack.
•It is important to support the vehicle with suitable supporting
blocks if you wish to work under the lifted vehicle - risk of injury!
Securing wheels against being stolen*
You need a special adapter for slackening the safety
wheel bolts.
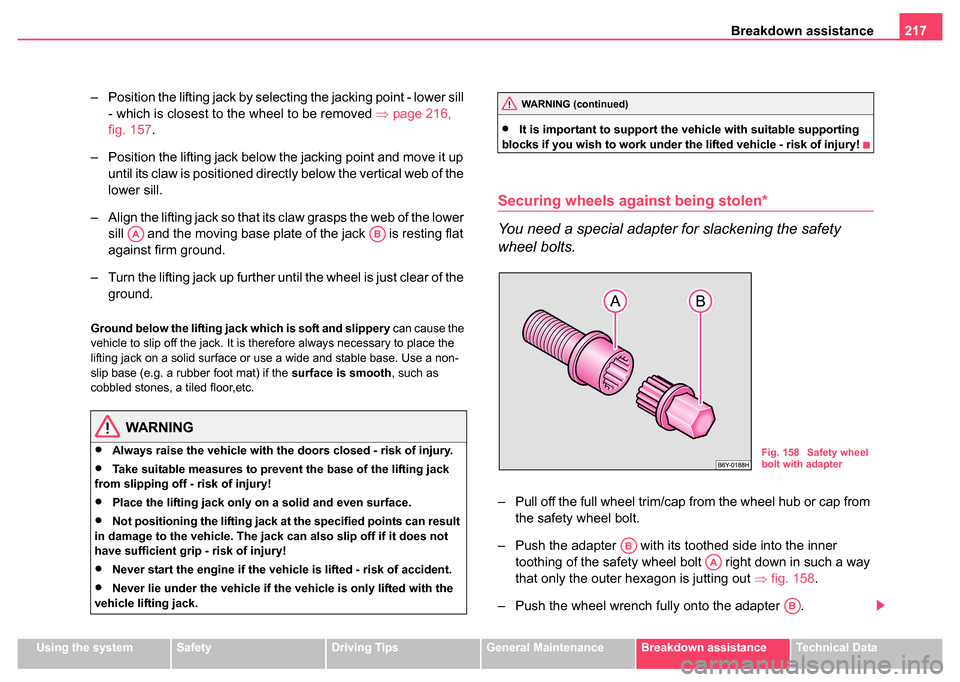
– Pull off the full wheel trim/cap from the wheel hub or cap from the safety wheel bolt.
– Push the adapter with its toothed side into the inner toothing of the safety wheel bolt right down in such a way
that only the outer hexagon is jutting out ⇒fig. 158 .
– Push the wheel wrench fully onto the adapter .
AAAB
WARNING (continued)
Fig. 158 Safety wheel
bolt with adapter
AB
AA
AB
Page 219 of 247
Breakdown assistance
218
– Slacken the wheel bolt, or tighten it firmly ⇒page 216.
– Reinstall the full wheel trim/wheel cap after removing the adapter or place the cap onto the safety wheel bolt.
– Have the tightening torque checked with a torque wrench as
soon as possible. Steel and light alloy wheels must be tight-
ened to a tightening torque of 120 Nm.
The safety wheel bolts on vehicles fitted with them (one safety wheel bolt
per wheel) can only be loosened or tighten up by using the adapter
provided.
It is meaningful to note the code number hammered into the rear side of
the adapter or the rear side of the safety wheel bolts. You can obtain a
replacement adapter from a Škoda dealer, if necessary, by quoting this
number.
We recommend that you always carry the adapter for the wheel bolts with
you in the vehicle. It should be stowed in the vehicle tool kit.
Caution
•Damage can occur to the adapter and safety wheel bolt if the safety
wheel bolt is tightened up too much.
•On steel wheels, the theft-deterrent wheel bolt must always be
installed in the hole, which is close to the valve. Otherwise the full wheel
trim cannot be mounted and the full wheel trim can be damaged during the
assembly.
Note
The set of safety wheel bolts can be obtained from your Škoda dealer.
Jump-starting
Initial steps
You can use the battery of another vehicle for jump-starting yours if the
engine does not start because the battery on your vehicle is flat. You will
require jump-start cables for this purpose.
Both batteries must have a rated voltage of 12 V. The capacity (Ah) of the
battery supplying the power must not be significantly less than the
capacity of the discharged battery in your vehicle.
Jump-start cables
Only use jump-start cables which have an adequately large cross-section
and insulated terminal clamps. Please pay attention to the manufacturer's
instructions.
Positive cable - colour coding in the majority of cases red.
Negative cable - colour coding in the majority of cases black.
WARNING
•A discharged battery may already freeze at temperatures just
below 0°C. It is essential to thaw out a frozen battery before you
connect the jump-start cables - risk of an explosion!
•Please pay attention to the warning instructions relating to
working in the engine compartment ⇒page 183.
Note
•There must not be any contact between the two vehicles otherwise
current may flow as soon as the negative terminals are connected.
•The discharged battery must be properly connected to the system of
the vehicle.
Page 222 of 247

Breakdown assistance221
Using the systemSafetyDriving TipsGeneral MaintenanceBreakdown assistanceTechnical Data
damage resulting at the points to which you attach the tow rope or tow bar
when you attempt to tow a vehicle which is not standing on a paved road.
Caution
If the gearbox of your vehicle no longer contains any oil because of a
defect, your vehicle must only be towed in with the driven wheels raised
clear of the ground, or on a special vehicle transporter or trailer.
Note
•Please comply with any legal requirements particularly regarding the
switched on signal systems, when towing in or tow-starting another
vehicle.
•The tow rope must not be twisted as it may in certain circumstances
result in the front towing eye being unscrewed out of your vehicle.
Front towing eye
The towing eye is stored in the box for the vehicle tool kit.
Remove the protective grille carefully as follows:
Fig. 160 Front
bumper: Protective
grille
Fig. 161 Front
bumper: Installing the
towing eye
Page 224 of 247
Breakdown assistance223
Using the systemSafetyDriving TipsGeneral MaintenanceBreakdown assistanceTechnical Data
– Switch on the ignition.
– Wait until both vehicles are moving then release the clutch
pedal slowly.
– Depress the clutch pedal fully when the engine fires and take the vehicle out of gear.
For technical reasons it is not possible to tow-start a car fitted with an
automatic gearbox .
WARNING
There is high risk of having an accident when tow-starting a
vehicle, when for example the towe d vehicle runs into the towing
vehicle.
Caution
Vehicles which are fitted with a catalytic converter should not be tow-
started over a distance of more than 50 metres. Unburnt fuel may get into
the catalytic converter and damage it.
Towing in a vehicle fitted with a manual gearbox
Please refer to the notes ⇒page 220.
The car can be towed in with a tow bar or a tow rope or with the front or
rear wheels raised. The maximum towing speed is 50 km/h.
Towing of a vehicle with an automatic gearbox
Please refer to the notes ⇒page 220.
The car can be towed in with a tow bar or a tow rope. Refer at the same
time to the following guidelines:
•Move selector lever into N .
•The maximum towing speed is 50 km/h.
•The maximum permissible towing distance is 50 km. The gear oil
pump does not operate when the engine is not running and the gear would
not be adequately lubricated at higher speeds and over longer towing
distance.
Caution
If the vehicle is towed in by a recovery vehicle, it should only be towed in
with the front wheels raised. If the vehicle is raised at rear, the automatic
gearbox is damaged!
Note
The vehicle must be transported on a special vehicle or trailer if it is not
possible to tow in the vehicle in the way described or if the towing distance
is greater than 50 km.
Page 240 of 247
Index239
Index
A
Abroad . . . . . . . . . . . . . . . . . . . . . . . . . . . . . 164
ABS . . . . . . . . . . . . . . . . . . . . . . . . . . . . . . . 155
Warning light . . . . . . . . . . . . . . . . . . . . . . 34
Accessories . . . . . . . . . . . . . . . . . . . . . . . . . 206
Adjusting seats . . . . . . . . . . . . . . . . . . . 67, 119
Adjusting the steering wheel . . . . . . . . . . . . 100
Air outlet vents . . . . . . . . . . . . . . . . . . . . . . . . 98
Airbag . . . . . . . . . . . . . . . . . . . . . . . . . . . . . 130 Deployment . . . . . . . . . . . . . . . . . . . . . . 131
Front airbags . . . . . . . . . . . . . . . . . . . . . 132
Side airbags . . . . . . . . . . . . . . . . . . . . . . 134
Warning light . . . . . . . . . . . . . . . . . . . . . . 35
Airbag system . . . . . . . . . . . . . . . . . . . . . . . 130 Warning light . . . . . . . . . . . . . . . . . . . . . . 35
Airbags . . . . . . . . . . . . . . . . . . . . . . . . . . . . 130
Alarm . . . . . . . . . . . . . . . . . . . . . . . . . . . . . . . 48
An overview Cockpit . . . . . . . . . . . . . . . . . . . . . . . . . . . 11
Antilock Brake System . . . . . . . . . . . . . . . . 155
Antilock brake system - ABS Warning light . . . . . . . . . . . . . . . . . . . . . . 34
Anti-theft alarm system . . . . . . . . . . . . . . . . . 48
Armrest . . . . . . . . . . . . . . . . . . . . . . . . . . . . . 90
Ashtray . . . . . . . . . . . . . . . . . . . . . . . . . . . . . 83
Auto Check Control . . . . . . . . . . . . . . . . . . . . 23
Auto Computer . . . . . . . . . . . . . . . . . . . . . . . 17 Automatic gearbox . . . . . . . . . . . . . . . . . . . . 110
Emergency programme . . . . . . . . . . . . . 114
Kickdown . . . . . . . . . . . . . . . . . . . . . . . . 113
Automatic vehicle wash systems . . . . . . . . . 170
Avoiding damage to your vehicle . . . . . . . . . 164
B
Before setting off . . . . . . . . . . . . . . . . . . . . . 118
Belt tensioners . . . . . . . . . . . . . . . . . . . . . . . 129
Belts . . . . . . . . . . . . . . . . . . . . . . . . . . . . . . . 123
Biodiesel . . . . . . . . . . . . . . . . . . . . . . . . . . . 178
Bonnet . . . . . . . . . . . . . . . . . . . . . . . . . . . . . 182
Boot lid . . . . . . . . . . . . . . . . . . . . . . . . . . . . . . 44 Lighting . . . . . . . . . . . . . . . . . . . . . . . . . . . 60
Warning light . . . . . . . . . . . . . . . . . . . . . . 33
Brake Handbrake . . . . . . . . . . . . . . . . . . . . . . . 105
Brake booster . . . . . . . . . . . . . . . . . . . . . . . 155
Brake fluid . . . . . . . . . . . . . . . . . . . . . . . . . . 191
Brake pads Warning light . . . . . . . . . . . . . . . . . . . . . . 32
Brake system Warning light . . . . . . . . . . . . . . . . . . . . . . 35
Brakes . . . . . . . . . . . . . . . . . . . . . . . . . . . . . 154
Bulbs . . . . . . . . . . . . . . . . . . . . . . . . . . . . . . 227 Warning light . . . . . . . . . . . . . . . . . . . . . . 33 Button on the driver's door
Central locking system . . . . . . . . . . . . . . . 43
C
Car jack . . . . . . . . . . . . . . . . . . . . . . . . . . . . 210
Catalytic converter . . . . . . . . . . . . . . . . . . . . 158
Central locking system . . . . . . . . . . . . . . . . . . 40locking . . . . . . . . . . . . . . . . . . . . . . . . . . . 42
unlocking . . . . . . . . . . . . . . . . . . . . . . . . . 42
Changing a wheel . . . . . . . . . . . . . . . . . . . . 212
Changing the engine oil . . . . . . . . . . . . . . . . 188
Changing wheels around . . . . . . . . . . . . . . . 201
Charging the battery . . . . . . . . . . . . . . . . . . 196 Warning light . . . . . . . . . . . . . . . . . . . . . . . 29
Chassis number . . . . . . . . . . . . . . . . . . . . . . 237
Child safety . . . . . . . . . . . . . . . . . . . . . . . . . 140 Side airbags . . . . . . . . . . . . . . . . . . . . . . 143
Child safety locks . . . . . . . . . . . . . . . . . . . . . . 40
Child safety seats ISOFIX system . . . . . . . . . . . . . . . . . . . . 148
Child seat . . . . . . . . . . . . . . . . . . . . . . . . . . . 144 Classification into groups . . . . . . . . . . . . 144
on the front passenger seat . . . . . . . . . . 142
Safety instructions . . . . . . . . . . . . . . . . . 140
Children and safety . . . . . . . . . . . . . . . . . . . 140
Chrome parts . . . . . . . . . . . . . . . . . . . . . . . . 172
Cigarette lighter . . . . . . . . . . . . . . . . . . . . . . . 84
Page 245 of 247
Index
244
U
Underbody protection . . . . . . . . . . . . . . . . . 174
Unidirectional tyres . . . . . . . . . . . . . . . . . . . 204
Unlocking . . . . . . . . . . . . . . . . . . . . . . . . . . . 40
Remote control . . . . . . . . . . . . . . . . . . . . 46
V
Vanity mirror . . . . . . . . . . . . . . . . . . . . . . . . . 61
Vehicle condition . . . . . . . . . . . . . . . . . . . . . . 23
Vehicle data sticker . . . . . . . . . . . . . . . . . . . 237
Vehicle identification data . . . . . . . . . . . . . . 237
Vehicle immobiliser . . . . . . . . . . . . . . . . . . . . 39Warning light . . . . . . . . . . . . . . . . . . . . . . 31
Vehicle tool kit . . . . . . . . . . . . . . . . . . . . . . . 210
Visors . . . . . . . . . . . . . . . . . . . . . . . . . . . . . . 61
W
Warning lights . . . . . . . . . . . . . . . . . . . . . . . . 27
Warning symbols . . . . . . . . . . . . . . . . . . . . . 27
Warning triangle . . . . . . . . . . . . . . . . . . . . . 209
Washing . . . . . . . . . . . . . . . . . . . . . . . . . . . 170 with high-pressure cleaner . . . . . . . . . . 171
Washing the vehicle . . . . . . . . . . . . . . . . . . 169
Washing vehicle by hand . . . . . . . . . . . . . . 170
Wax treatment . . . . . . . . . . . . . . . . . . . . . . 171
Wheel Changing . . . . . . . . . . . . . . . . . . . . . . . . 212
Spare . . . . . . . . . . . . . . . . . . . . . . . . . . . 212 Wheel bolts . . . . . . . . . . . . . . . . . . . . . . . . . 203
Safety . . . . . . . . . . . . . . . . . . . . . . . . . . 217
Slackening and tightening . . . . . . . . . . . 216
Wheel rims . . . . . . . . . . . . . . . . . . . . . . . . . 199
Wheel trim . . . . . . . . . . . . . . . . . . . . . . . . . . 214
Wheels . . . . . . . . . . . . . . . . . . . . . . . . . . . . 199
Window . . . . . . . . . . . . . . . . . . . . . . . . . . . . . 49 De-icing . . . . . . . . . . . . . . . . . . . . . . . . . 172
Window lifter . . . . . . . . . . . . . . . . . . . . . . . . . 49
Windows De-icing . . . . . . . . . . . . . . . . . . . . . . . . . 172
Windscreen washer nozzles . . . . . . . . . . . . . 61
Windscreen Wiper and Washer System . . . 197 Warning light . . . . . . . . . . . . . . . . . . . . . . 33
Windscreen wipers . . . . . . . . . . . . . . . . . . . . 61
Windshield washer fluid reservoir . . . . . . . . 197 Warning light . . . . . . . . . . . . . . . . . . . . . . 33
Winter tyres . . . . . . . . . . . . . . . . . . . . . . . . . 204
Wiper blades Replacing windscreen wiper blades . . . . 63
X
Xenon headlights . . . . . . . . . . . . . . . . . . . . 227