automatic SKODA FABIA 2004 1.G / 6Y Owner's Guide
[x] Cancel search | Manufacturer: SKODA, Model Year: 2004, Model line: FABIA, Model: SKODA FABIA 2004 1.G / 6YPages: 247
Page 59 of 247
Lights and Visibility
58
Information concerning the function of the lights.
•The turn signal system only operates when the ignition is switched
on. The corresponding indicator light or in the instrument cluster also
flashes.
•The turn signal is automatically cancelled after negotiating a curve.
•The side light and rear light on the appropriate side of the vehicle are
switched on when the parking light is selected. The parking light function
only operates if the ignition is switched off.
•An acoustic warning signal will sound when the driver's door is opened
if the lever is not in the middle position after removing the ignition key. The
acoustic warning signal will stop just as soon as the driver's door is closed.
Caution
Use main beam or the headlight flasher only if this does not risk dazzling
other road users.
Note
Use only in accordance with the legal requirements the described lighting
and signal systems.
Interior lighting
Front interior lighting and storage compartment on
front passenger side
Door contact switch ing mechanism (on the front and rear*
door)
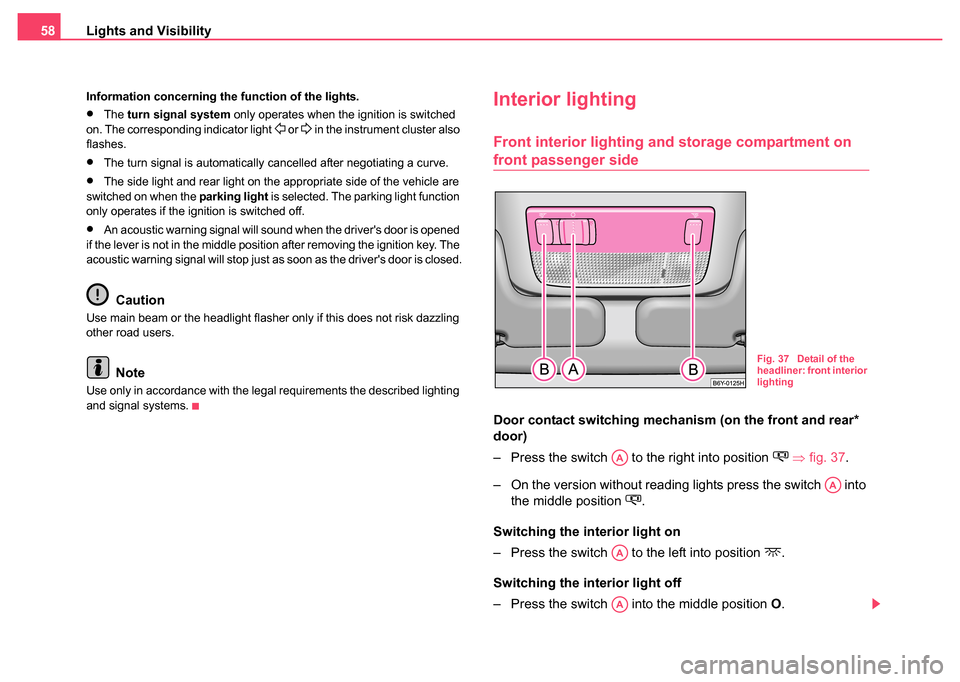
– Press the switch to the right into position
⇒ fig. 37 .
– On the version without reading lights press the switch into the middle position
.
Switching the interior light on
– Press the switch to the left into position
.
Switching the interior light off
– Press the switch into the middle position O.
Fig. 37 Detail of the
headliner: front interior
lighting
AA
AA
AA
AA
Page 60 of 247
Lights and Visibility59
Using the systemSafetyDriving TipsGeneral MaintenanceBreakdown assistanceTechnical Data
– On the version without reading lights press the switch to
the right, the symbol O appears.
Reading lights
– Press on one of the switches ⇒page 58, fig. 37 in order to
switch the right or left reading light on or off.
Lighting of storage compar tment on the front passenger
side
– Open the flap of the storage compartment on the front passenger side.
– The light switches on automatically when the parking light is switched on and goes out when the flap is closed.
The interior light is switched on for about 20 seconds when a vehicle with
a central locking system is unlocked, when a door is opened or when the
ignition key is removed. The requirement for this is that the switch is in
the door contact position. The inner light goes out out immediately after
the ignition is switched on.
A time delay switch* causes the inner lighting on vehicles without a central
locking system stays on for a few seconds after the doors have been
closed. The inner light goes out out immediately after the ignition is
switched on.
The interior lighting is switched off after about 30 minutes when a door has
been left open in order to avoid discharging the battery of the vehicle.
Interior lighting at the r ear* (estate vehicle, sedan)
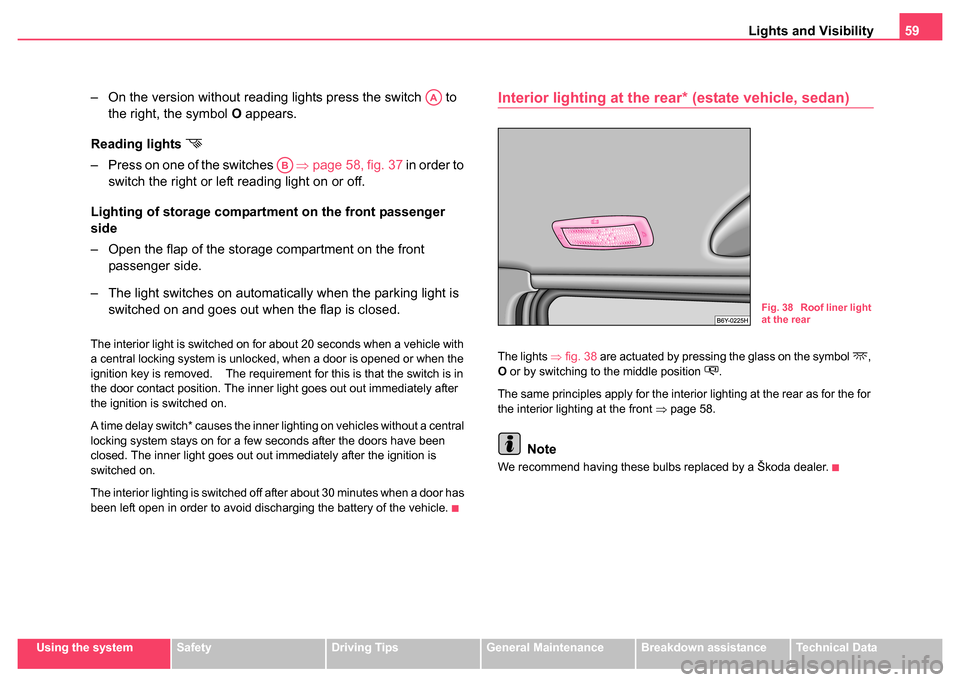
The lights ⇒fig. 38 are actuated by pressing the glass on the symbol ,
O or by switching to the middle position .
The same principles apply for the interior lighting at the rear as for the for
the interior lighting at the front ⇒ page 58.
Note
We recommend having these bulbs replaced by a Škoda dealer.
AA
AB
Fig. 38 Roof liner light
at the rear
Page 61 of 247
Lights and Visibility
60
Front door warning light*
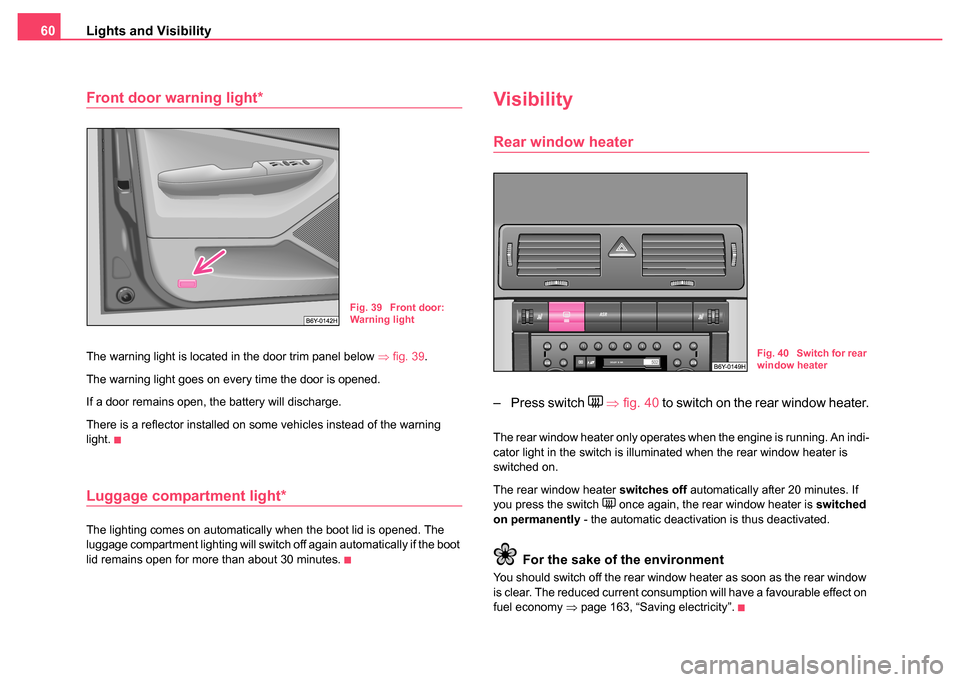
The warning light is located in the door trim panel below ⇒fig. 39 .
The warning light goes on every time the door is opened.
If a door remains open, the battery will discharge.
There is a reflector installed on some vehicles instead of the warning
light.
Luggage compartment light*
The lighting comes on automatically when the boot lid is opened. The
luggage compartment lighting will switch off again automatically if the boot
lid remains open for more than about 30 minutes.
Visibility
Rear window heater
– Press switch ⇒ fig. 40 to switch on the rear window heater.
The rear window heater only operates when the engine is running. An indi-
cator light in the switch is illuminated when the rear window heater is
switched on.
The rear window heater switches off automatically after 20 minutes. If
you press the switch
once again, the rear window heater is switched
on permanently - the automatic deactivation is thus deactivated.
For the sake of the environment
You should switch off the rear window heater as soon as the rear window
is clear. The reduced current consumption will have a favourable effect on
fuel economy ⇒page 163, “Saving electricity”.
Fig. 39 Front door:
Warning light
Fig. 40 Switch for rear
window heater
Page 62 of 247
Lights and Visibility61
Using the systemSafetyDriving TipsGeneral MaintenanceBreakdown assistanceTechnical Data
Sun visors
Using the sun visors can contribute to increasing road
safety.
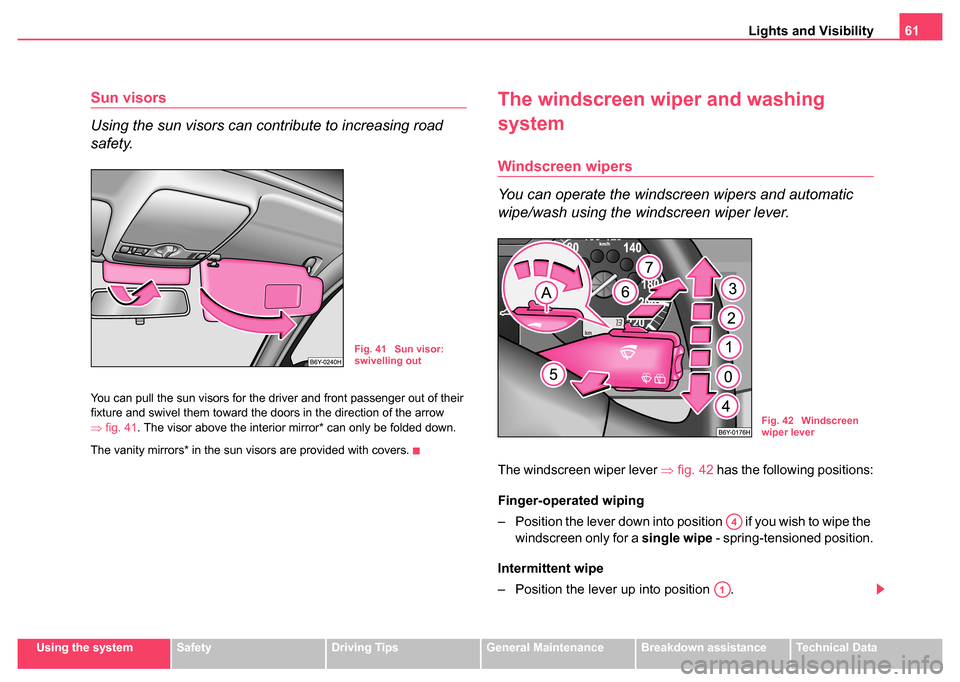
You can pull the sun visors for the driver and front passenger out of their
fixture and swivel them toward the doors in the direction of the arrow
⇒fig. 41 . The visor above the interior mirror* can only be folded down.
The vanity mirrors* in the sun visors are provided with covers.
The windscreen wiper and washing
system
Windscreen wipers
You can operate the windscreen wipers and automatic
wipe/wash using the windscreen wiper lever.
The windscreen wiper lever ⇒fig. 42 has the following positions:
Finger-operated wiping
– Position the lever down into position if you wish to wipe the windscreen only for a single wipe - spring-tensioned position.
Intermittent wipe
– Position the lever up into position .
Fig. 41 Sun visor:
swivelling out
Fig. 42 Windscreen
wiper lever
A4
A1
Page 63 of 247
Lights and Visibility
62
– Set with the switch the desired break between the indi-vidual wiper strokes
Slow wipe
– Position the lever up into position .
Fast wipe
– Position the lever up into position .
Automatic wipe/wash for windscreen
– Pull the lever towards the steering wheel into position and the widescreen wiper and wash system will operate - in the
sprung position.
– Release the lever. The winds creen wash system stops and
the wiper continues for another 1 - 3 wiper strokes (depending
on the period of spraying of the windscreen). The wiper wipes
once again 5 seconds after the last wiper stroke, in order to
wipe the last drops from the windscreen.
Wiping the rear window pane*
– Push the lever away from the steering wheel into position ⇒page 61, fig. 42 , the widescreen wiper will operate every 6
seconds.
Automatic wipe/wash for the rear window pane*
– Push the lever away from the steering wheel into position - the widescreen wiper and wash system will operate - in the
sprung position. – Letting go of the lever will cause the windscreen wash system
to stop and the wiper to continue for another 1 - 3 wiper
strokes (depending on the period of spraying of the wind-
screen). The lever will stay in position after releasing it .
Switching windscreen wipers off
– Move the lever back into its home position .
The windscreen wipers and the windscreen washer system only operate
if the ignition is switched on.
The rear window will be wiped again if the window wipers are on when
reverse gear is selected.
The windscreen washer nozzles are heated* when the ignition is switched
on.
Top up with wash liquid ⇒page 197.
WARNING
•Properly maintained windscreen wiper blades are essential for
clear visibility and safe driving ⇒page 63, “Replacing wiper blades
for the windscreen wipers”.
•Do not use the windscreen washer system at low temperatures,
without heating the windscreen beforehand. Otherwise the window
cleaner could freeze on the windscreen and restrict the view to the
front.
Caution
In frosty weather, please first of all check whether the windscreen wiper
blades are not frozen to the windscreen before switching them on.
Switching on windscreen wipers when the blades are frozen to the wind-
AA
A2
A3
A5
A6
A7
A6
A0
Page 65 of 247
Lights and Visibility
64
Juddering or smearing of the wiper blades could be due to wax residues
left on the windscreen by vehicle washing in automatic vehicle wash
systems. It is therefore important to degrease the lips of the winscreen
wiper blades after every pass through an automatic vehicle wash
system .
WARNING
•If the windscreen wipers are handled carelessly, there is a risk
of damage to the windscreen.
•You should clean the wiper blades regularly with a windscreen
cleaner in order to avoid any smears. Clean a wiper blade with a
sponge or cloth if it is very dirty, for example from insect residues.
•Replace the windscreen wiper blades once or twice a year for
safety reasons. Windscreen wiper blades are available from Škoda
dealers.
Replacing the wiper blade on the rear window wiper
Taking off the wiper blade
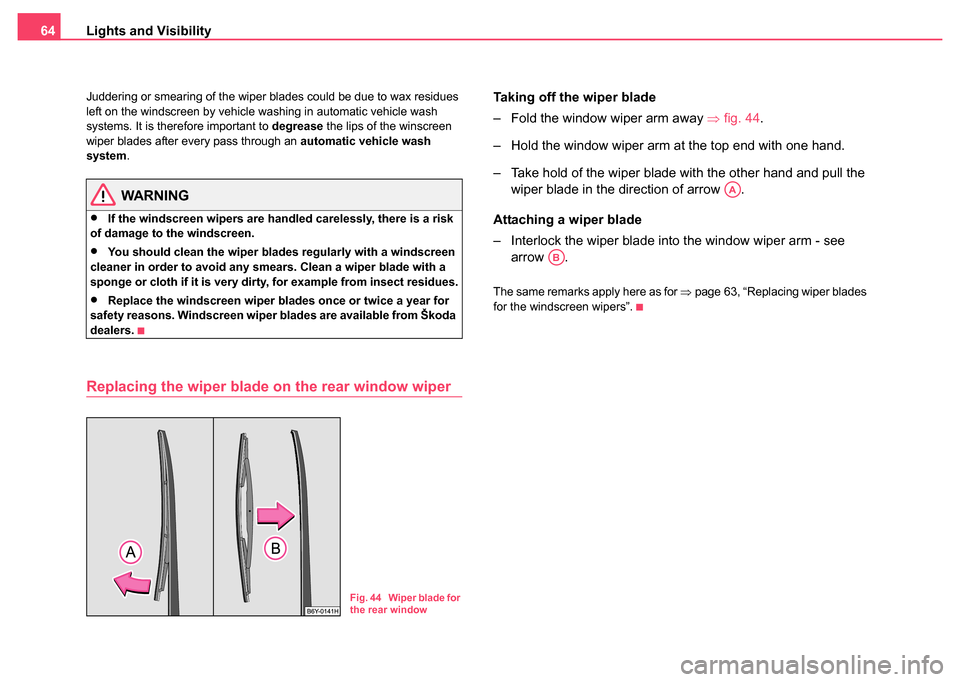
– Fold the window wiper arm away ⇒fig. 44 .
– Hold the window wiper arm at the top end with one hand.
– Take hold of the wiper blade with the other hand and pull the wiper blade in the direction of arrow .
Attaching a wiper blade
– Interlock the wiper blade into the window wiper arm - see arrow .
The same remarks apply here as for ⇒page 63, “Replacing wiper blades
for the windscreen wipers”.
Fig. 44 Wiper blade for
the rear window
AA
AB
Page 94 of 247
Heating and air conditioning system 93
Using the systemSafetyDriving TipsGeneral MaintenanceBreakdown assistanceTechnical Data
•Open air outlet vents 3 and 4 ⇒ page 93, fig. 85
The control dial can be set to other positions as required.
Recirculated air mode
In recirculated air mode air is sucked out of the interior of
the vehicle and then fed back into the interior.
Recirculated air mode prevents polluted air outside the vehicle
from getting into the vehicle, for example when driving through a
tunnel or when standing in a traffic jam.
Switching recirculated air mode on
– Press button , the button symbol
lights up ⇒page 91,
fig. 84.
Switching recirculated air mode off
– Press button again, the button symbol
goes out.
The recirculated air mode is switched off automatically if the air distribu-
tion control is in position ⇒ page 91, fig. 84 .
WARNING
You should not leave recirculated air mode on over a longer period
of time. “Stale air” may result in fatigue in the driver and passen-
gers, reduce attention levels and also cause the windows to mist
up. The risk of having an accident increases. Switch recirculated
air mode off as soon as the windows begin misting up.
Air outlet vents
Fig. 85 Air outlet vents
Open air outlet vents
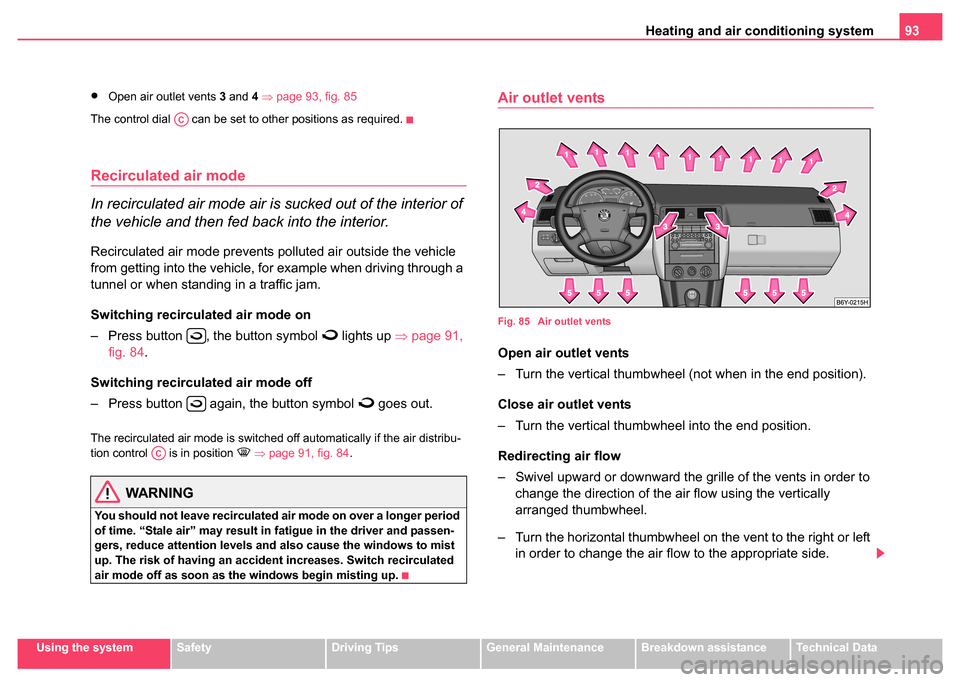
– Turn the vertical thumbwheel (not when in the end position).
Close air outlet vents
– Turn the vertical thumbwheel into the end position.
Redirecting air flow
– Swivel upward or downward the gr ille of the vents in order to
change the direction of the air flow using the vertically
arranged thumbwheel.
– Turn the horizontal thumbwheel on the vent to the right or left in order to change the air flow to the appropriate side.
AC
AC
Page 96 of 247
Heating and air conditioning system 95
Using the systemSafetyDriving TipsGeneral MaintenanceBreakdown assistanceTechnical Data
Note
We recommend that you do not smoke in the vehicle when the recircu-
lating air mode is operating since the smoke which is drawn at the evap-
orator from the interior of the vehicle forms deposits in the evaporator of
the air conditioning system. This produces a permanent odour when the
air conditioning system is operating which can only be eliminated through
considerable effort and expense (replacement of compressor).
Using the system
Setting temperature
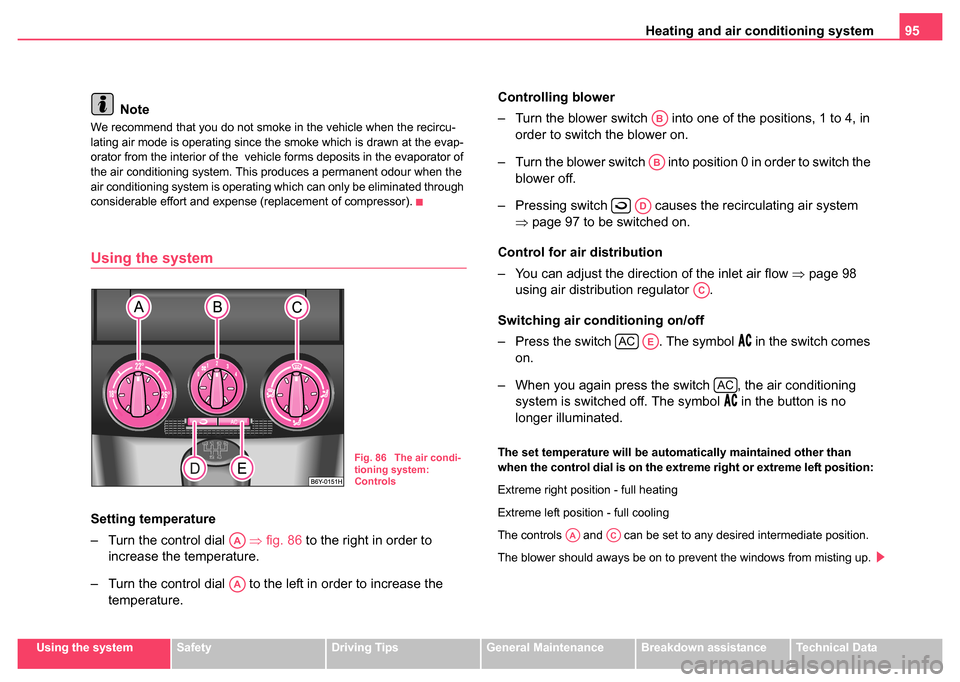
– Turn the control dial ⇒fig. 86 to the right in order to
increase the temperature.
– Turn the control dial to the left in order to increase the temperature. Controlling blower
– Turn the blower switch into one of the positions, 1 to 4, in
order to switch the blower on.
– Turn the blower switch into position 0 in order to switch the blower off.
– Pressing switch causes the recirculating air system ⇒page 97 to be switched on.
Control for air distribution
– You can adjust the direction of the inlet air flow ⇒page 98
using air distribution regulator .
Switching air conditioning on/off
– Press the switch . The symbol
in the switch comes
on.
– When you again press the switch , the air conditioning system is switched off. The symbol
in the button is no
longer illuminated.
The set temperature will be automatically maintained other than
when the control dial is on the extreme right or extreme left position:
Extreme right position - full heating
Extreme left position - full cooling
The controls and can be set to any desired intermediate position.
The blower should aways be on to prevent the windows from misting up.Fig. 86 The air condi-
tioning system:
Controls
AA
AA
AB
AB
AD
AC
ACAE
AC
AAAC
Page 98 of 247
Heating and air conditioning system 97
Using the systemSafetyDriving TipsGeneral MaintenanceBreakdown assistanceTechnical Data
•Open the air outlet vents 3 and 4
•Switch on the air conditioning system by pressing button
•Switch on recirculated air mode by pressing button .
•we recommend that you press the switch - recirculated air
mode - for a short time
Optimum cooling
•Control dial at the desired heat temperature. This temperature will
be maintained automatically.
•Blower switch in position 1, 2 , or 3
•Turn the air distribution control into the position
•Open the air outlet vents 3 and 4
•Switch on the air conditioning system by pressing button
•We recommend setting the air outlet vents 3 and 4 in such a way that
the air flows to the rear over the heads of the occupants. Do not press
button - recirculated air mode.
Fresh air mode (ventilation)
Non pre-warmed fresh air streams through the air inlet nozzles 3 and 4 for
the following settings.
•Turn the control dial ⇒page 95, fig. 86 to the left up to the stop
•Blower switch in the desired position
•Turn the air distribution control into the position
•Open air outlet vents 3 and 4 ⇒ page 98, fig. 87
•Switch off the recirculated air mode by pressing button .
•Switch off the cooling by pressing button
The control dial can be set to other positions as required.
Recirculated air mode
In recirculated air mode air is sucked out of the interior of
the vehicle and then fed back into the interior.
Recirculated air mode prevents polluted air outside the vehicle
from getting into the vehicle, for example when driving through a
tunnel or when standing in a traffic jam.
Switching recircul ated air mode on
– Press button ⇒ page 95, fig. 86, the button symbol
lights up.
Switching recirculated air mode off
– Press button again, the button symbol
goes out.
Recirculated air mode is switched off automatically if the air distribution
control is in position ⇒ page 95, fig. 86 . You can also switch recir-
culated air mode on again from this setting by repeatedly pressing button .
WARNING
You should not leave recirculated air mode on over a longer period
of time. “Stale air” may result in fatigue in the driver and passen-
gers, reduce attention levels and also cause the windows to mist
up. The risk of having an accident increases. Switch recirculated
air mode off as soon as the windows begin misting up.
AE
AD
AD
AA
AB
AC
AE
AD
AA
AB
AC
AD
AE
AC
AC
AD
Page 100 of 247
Heating and air conditioning system 99
Using the systemSafetyDriving TipsGeneral MaintenanceBreakdown assistanceTechnical Data
•The cooling system has switched off automatically for a short time
because the coolant temperature of the engine is too hot ⇒page 13.
If you are not able to rectify the operational problem yourself, or if the
cooling capacity decreases, switch the air conditioning system off. Please
contact your Škoda dealer.