gearbox SKODA FABIA 2005 1.G / 6Y Owner's Guide
[x] Cancel search | Manufacturer: SKODA, Model Year: 2005, Model line: FABIA, Model: SKODA FABIA 2005 1.G / 6YPages: 260
Page 193 of 260

Inspecting and Replenishing
192
•If your vehicle is fitted with a manual gearbox, move the gear-
shift lever into Neutral, or if it is fitted with automatic gearbox, move
the selector leve r into position P.
•Allow the engine to cool down.
•Keep children clear of the engine compartment.
•Do not touch any hot engine parts - risk of burns!
•Never spill oil and other fluids over the hot engine. Such fluids
(e.g. the antifreeze contained in the coolant) may ignite!
•Avoid short circuits in the electrical system - particularly on the
battery.
•Never place your hand into the radiator fan as long as the
engine is still warm. The fan might suddenly start running!
•Never open the cap of the coolant expansion bottle as long as
the engine is still warm. The cooling system is pressurized!
•Cover over the cap of the coolant expansion reservoir with a
large cloth when opening it as protection for your face, hands and
arms from hot steam or hot coolant.
•Do not let objects, such as e.g cl eaning cloth or tools lie in the
engine compartment.
•If you wish to work under the vehicle, you must secure the
vehicle from rolling away and support it with suitable supporting
blocks: the car jack is not sufficient for this - risk of injury!
•In cases where it be necessary to carry out inspection work
when the engine is running there is an additional risk from rotating
parts (e.g. the V-ribbed belt, alternator, radiator fan) and from the
high-voltage ignition system. Pl ease observe in addition the
following:
−Never touch the electrical cables of the ignition system.
− Absolutely avoid any jewellery, loose items of clothing or
long hair from getting into the rotating parts of the engine - Hazard! Therefore remove any jewellery beforehand, tie up your
hair and wear tight fitting clothing.
•Please also comply with the warning instructions stated below
when carrying out any essential work on the fuel system or on the
electrical system:
−Always separate the car battery from the electrical system.
− Do not smoke.
− Never carry out any work close to naked flames.
− Always keep a working fire extinguisher at hand.
Caution
When replenishing fluids in the engine, always ensure that the fluids are
on no account mixed up. This may result in major operating problems and
also vehicle damage!
WARNING (continued)WARNING (continued)
sqc.1.book Seite 192 Mittwoch, 13. April 2005 1:09 13
Page 221 of 260
Breakdown assistance
220
Spare wheel*
The spare wheel is stowed in the spare wheel well in the
luggage compartment below the floor covering.
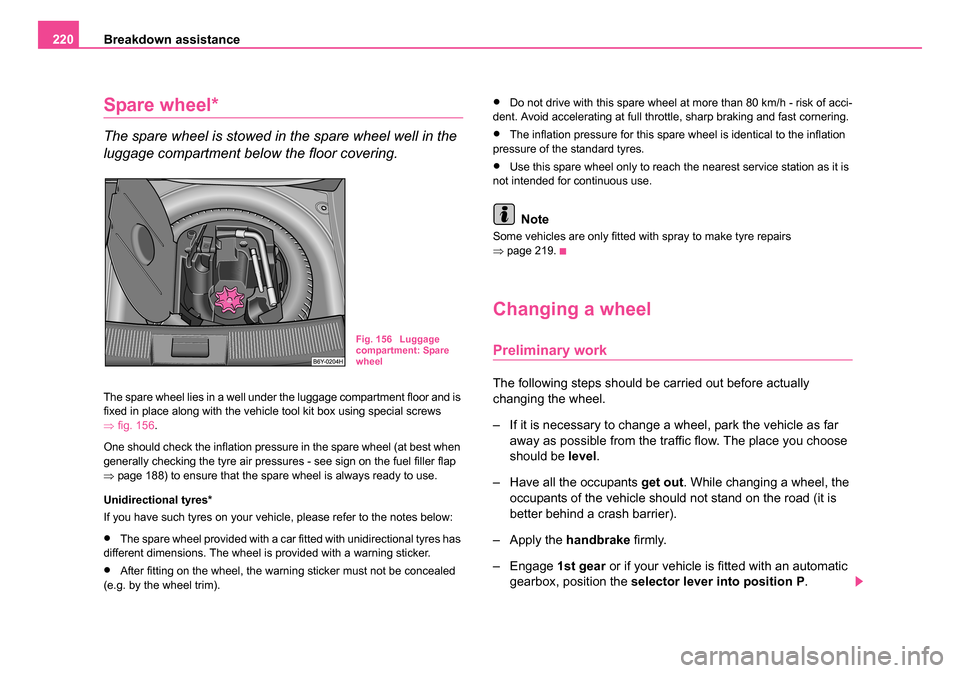
The spare wheel lies in a well under the luggage compartment floor and is
fixed in place along with the vehicle tool kit box using special screws
⇒ fig. 156 .
One should check the inflation pressure in the spare wheel (at best when
generally checking the tyre air pressures - see sign on the fuel filler flap
⇒ page 188) to ensure that the spare wheel is always ready to use.
Unidirectional tyres*
If you have such tyres on your vehicle, please refer to the notes below:
•The spare wheel provided with a car fitted with unidirectional tyres has
different dimensions. The wheel is provided with a warning sticker.
•After fitting on the wheel, the warning sticker must not be concealed
(e.g. by the wheel trim).
•Do not drive with this spare wheel at more than 80 km/h - risk of acci-
dent. Avoid accelerating at full throttle, sharp braking and fast cornering.
•The inflation pressure for this spare wheel is identical to the inflation
pressure of the standard tyres.
•Use this spare wheel only to reach the nearest service station as it is
not intended for continuous use.
Note
Some vehicles are only fitted with spray to make tyre repairs
⇒ page 219.
Changing a wheel
Preliminary work
The following steps should be carried out before actually
changing the wheel.
– If it is necessary to change a wheel, park the vehicle as far
away as possible from the traffic flow. The place you choose
should be level.
– Have all the occupants get out. While changing a wheel, the
occupants of the vehicle should not stand on the road (it is
better behind a crash barrier).
– Apply the handbrake firmly.
– Engage 1st gear or if your vehicle is fitted with an automatic
gearbox, position the selector lever into position P .
Fig. 156 Luggage
compartment: Spare
wheel
sqc.1.book Seite 220 Mittwoch, 13. April 2005 1:09 13
Page 229 of 260

Breakdown assistance
228
out the battery being ignited by the strong spark which results from
the engine being started.
•Do not affix the cable end to parts of the fuel and brake
system.
•Run the jump-start cables so that they cannot be caught by any
rotating parts in the engine compartment.
•Do not bend over the batteries - risk of caustic burns!
•The vent screws of the battery cells must be tightened firmly.
•Keep any sources of ignition (naked flame, smouldering ciga-
rettes etc.) away from the battery - risk of an explosion!
Tow-starting and towing vehicle
General
Please pay attention to the following instructions if you are going
to use a tow rope:
Driver of the towing vehicle
– Do not drive off until the tow rope is taught.
– Release the clutch particularly gently when starting off or depress the accelerator particularly gently if your vehicle is
fitted with an automatic gearbox. Driver of the towed vehicle
– Switch the ignition on so that the steering wheel is not blocked
and you can also operate the turn signal lights, the headlight
flasher, the windscreen wipers and windscreen washer
system.
– Take the vehicle out of gear or move the selector lever into position N if your vehicle is fitted with an automatic gearbox.
– Note that the brake servo unit and power steering only operate if the engine is running. You will require significantly greater
physical force to depress the brake pedal and to steer the
vehicle if the engine is not running.
– Ensure that the tow rope is always kept taught.
Tow rope or tow bar
A tow bar is safest way of towing a vehicle and also minimizes any
shocks. You can use a tow rope only if a suitable tow bar is not available.
The tow rope must be elastic to protect the vehicle. Thus one should only
use plastic fibre rope or a rope made out of a similarly elastic material.
Attach the tow rope or the tow bar only to the towing eyes provided for
this purpose ⇒page 229, “Front towing eye” and ⇒ page 230, “Rear
towing eye”.
Driving style
Towing another vehicle requires a certain amount of practice. Both drivers
should be familiar with the particular points about towing a vehicle.
Unskilled drivers should not attempt to tow in another vehicle or to be
towed in.
One should be constantly vigilant not to allow impermissibly high towing
forces or jerky loadings. There is always a risk of excessive stresses and
WARNING (continued)
A4
sqc.1.book Seite 228 Mittwoch, 13. April 2005 1:09 13
Page 230 of 260

Breakdown assistance229
Using the systemSafetyDriving TipsGeneral MaintenanceBreakdown assist-
anceTechnical DataFabia Praktik
damage resulting at the points to which you attach the tow rope or tow bar
when you attempt to tow a vehicle which is not standing on a paved road.
Caution
If the gearbox of your vehicle no longer contains any oil because of a
defect, your vehicle must only be towed in with the driven wheels raised
clear of the ground, or on a special vehicle transporter or trailer.
Note
•Please comply with any legal requirements particularly regarding the
switched on signal systems, when towing in or tow-starting another
vehicle.
•The tow rope must not be twisted as it may in certain circumstances
result in the front towing eye being unscrewed out of your vehicle.
Front towing eye
The towing eye is stored in the box for the vehicle tool kit.
Fig. 164 Front
bumper: Protective
grille
Fig. 165 Front
bumper: Installing the
towing eye
sqc.1.book Seite 229 Mittwoch, 13. April 2005 1:09 13
Page 232 of 260

Breakdown assistance231
Using the systemSafetyDriving TipsGeneral MaintenanceBreakdown assist-
anceTechnical DataFabia Praktik
– Switch on the ignition.
– Wait until both vehicles are moving then release the clutch
pedal slowly.
– Depress the clutch pedal fully when the engine fires and take the vehicle out of gear.
For technical reasons it is not possible to tow-start a car fitted with an
automatic gearbox .
WARNING
There is high risk of having an accident when tow-starting a
vehicle, when for example the towed vehicle runs into the towing
vehicle.
Caution
Vehicles which are fitted with a catalytic converter should not be tow-
started over a distance of more than 50 metres. Unburnt fuel may get into
the catalytic converter and damage it.
Towing in a vehicle fitted with a manual gearbox
Please refer to the notes ⇒page 228.
The car can be towed in with a tow bar or a tow rope or with the front or
rear wheels raised. The maximum towing speed is 50 km/h.
Towing of a vehicle with an automatic gearbox
Please refer to the notes ⇒page 228.
The car can be towed in with a tow bar or a tow rope. Refer at the same
time to the following guidelines:
•Move selector lever into N .
•The maximum towing speed is 50 km/h .
•The maximum permissible towing distance is 50 km. The gear oil
pump does not operate when the engine is not running and the gear would
not be adequately lubricated at higher speeds and over longer towing
distance.
Caution
If the vehicle is towed in by a recovery vehicle, it should only be towed in
with the front wheels raised. If the vehicle is raised at rear, the automatic
gearbox is damaged!
Note
The vehicle must be transported on a special vehicle or trailer if it is not
possible to tow in the vehicle in the way described or if the towing distance
is greater than 50 km.
sqc.1.book Seite 231 Mittwoch, 13. April 2005 1:09 13
Page 235 of 260
Fuses and light bulbs
234
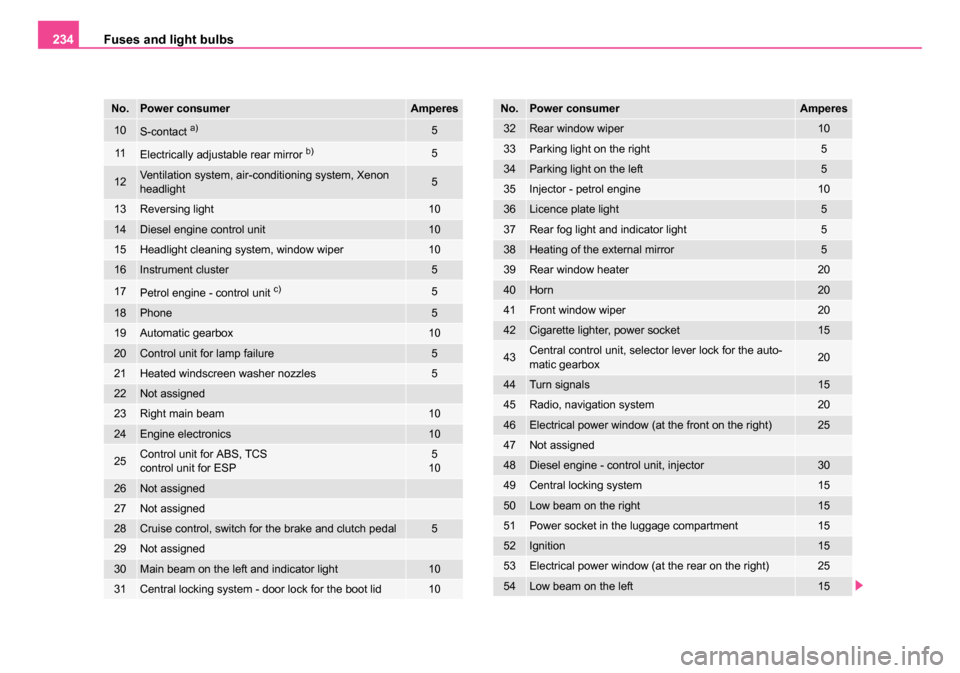
10S-contact a)5
11Electrically adjustable rear mirror b)5
12Ventilation system, air-conditioning system, Xenon
headlight5
13Reversing light10
14Diesel engine control unit10
15Headlight cleaning system, window wiper10
16Instrument cluster5
17Petrol engine - control unit c)5
18Phone5
19Automatic gearbox10
20Control unit for lamp failure5
21Heated windscreen washer nozzles5
22Not assigned
23Right main beam10
24Engine electronics10
25Control unit for ABS, TCS
control unit for ESP5
10
26Not assigned
27Not assigned
28Cruise control, switch for the brake and clutch pedal5
29Not assigned
30Main beam on the left and indicator light10
31Central locking system - door lock for the boot lid10
No.Power consumerAmperes
32Rear window wiper10
33Parking light on the right5
34Parking light on the left5
35Injector - petrol engine10
36Licence plate light5
37Rear fog light and indicator light5
38Heating of the external mirror5
39Rear window heater20
40Horn20
41Front window wiper20
42Cigarette lighter, power socket15
43Central control unit, selector lever lock for the auto-
matic gearbox20
44Turn signals15
45Radio, navigation system20
46Electrical power window (at the front on the right)25
47Not assigned
48Diesel engine - control unit, injector30
49Central locking system15
50Low beam on the right15
51Power socket in the luggage compartment15
52Ignition15
53Electrical power window (at the rear on the right)25
54Low beam on the left15
No.Power consumerAmperes
sqc.1.book Seite 234 Mittwoch, 13. April 2005 1:09 13
Page 238 of 260

Fuses and light bulbs237
Using the systemSafetyDriving TipsGeneral MaintenanceBreakdown assist-
anceTechnical DataFabia Praktik
Note
Some vehicles are fitted with another fuse box ⇒page 237, “Fuse assign-
ment at battery - version 2”.
Fuse assignment at battery - version 2
Bulbs
Replacing bulbs
The relevant lamp must always be switched off before a light bulb is
replaced.
10Engine control unit15
11Central control unit5
12Automatic gearbox5
a)Only for diesel engine 1.9/96 kW.
No.Power consumerAmperes
Fig. 172 Schematic
representation of fuse
assignment at battery
No.Power consumerAmperes
1Dynamo175
2Interior11 0
3Power steering50
4Glow plugs40
5The radiator fan40
6ABS or TCS or ESP40
7ABS or TCS or ESP25
8The radiator fan30
9Not assigned
10Central control unit5
11The air conditioning system5
12Not assigned
13Automatic gearbox5
14Not assigned
15Not assigned
16Not assigned
sqc.1.book Seite 237 Mittwoch, 13. April 2005 1:09 13
Page 248 of 260

General247
Using the systemSafetyDriving TipsGeneral MaintenanceBreakdown assist-
anceTechnical DataFabia Praktik
Technical Data
General
Identification data
Vehicle data sticker
The vehicle data sticker ⇒fig. 187 is located on the floor of the luggage
compartment and is also stated in the Service schedule.
The vehicle data sticker contains the following data:
Vehicle identification number (VIN)
Vehicle type
Gearbox code, paint number, interior equipment number, engine
output, engine code
partial description of the vehicle Vehicle identification number (VIN)
The vehicle identification number - VIN (vehicle body number) is stamped
into the engine compartment on the right hand shock absorber dome. This
number is also located on a sign on the lower left hand edge below the
windscreen (together with a VIN bar code).
Engine number
The engine number is stamped into the engine block.
Type plate (production plate)
The type plate is located in the engine compartment at the front on the left
hand shock absorber dome.
Homologation sign
The homologation sign is located on the lock carrier. Vehicles for certain
countries do not have an homologation sign.
Sticker on inside of fuel filler flap
The sticker is affixed to the inside of the fuel filler flap. The sticker contains
the following data:
•The prescribed types of fuel,
•Tyre size,
•Tyre pressure.
Note
•You will find the technical data of your vehicle in the separate brochure
"Technical Data".
Fig. 187 Vehicle data
sticker
A1
A2
A3
A4
sqc.1.book Seite 247 Mittwoch, 13. April 2005 1:09 13
Page 252 of 260
Index251
Index
A
Abroad . . . . . . . . . . . . . . . . . . . . . . . . . . . . . 171
ABS . . . . . . . . . . . . . . . . . . . . . . . . . . . . . . . 161
Warning light . . . . . . . . . . . . . . . . . . . . . . 35
Accessories . . . . . . . . . . . . . . . . . . . . . . . . . 215
Adjusting seats . . . . . . . . . . . . . . . . . . . 68, 125
Adjusting the steering wheel . . . . . . . . . . . . 102
Air outlet vents . . . . . . . . . . . . . . . . . . . . . . . 100
Airbag . . . . . . . . . . . . . . . . . . . . . . . . . . . . . 137 Deployment . . . . . . . . . . . . . . . . . . . . . . 138
Front airbags . . . . . . . . . . . . . . . . . . . . . 139
Side airbags . . . . . . . . . . . . . . . . . . . . . . 141
Warning light . . . . . . . . . . . . . . . . . . . . . . 36
Airbag system . . . . . . . . . . . . . . . . . . . . . . . 137 Warning light . . . . . . . . . . . . . . . . . . . . . . 36
Airbags . . . . . . . . . . . . . . . . . . . . . . . . . . . . 137
Alarm . . . . . . . . . . . . . . . . . . . . . . . . . . . . . . . 49
An overview Cockpit . . . . . . . . . . . . . . . . . . . . . . . . . . . 11
Antilock Brake System . . . . . . . . . . . . . . . . 161
Antilock brake system - ABS Warning light . . . . . . . . . . . . . . . . . . . . . . 35
Anti-theft alarm system . . . . . . . . . . . . . . . . . 49
Armrest . . . . . . . . . . . . . . . . . . . . . . . . . . . . . 91
Ashtray . . . . . . . . . . . . . . . . . . . . . . . . . . . . . 84
Auto Check Control . . . . . . . . . . . . . . . . . . . . 24
Auto Computer . . . . . . . . . . . . . . . . . . . . . . . 18 Automatic gearbox . . . . . . . . . . . . . . . . . . . . 112
Emergency programme . . . . . . . . . . . . . 116
Kickdown . . . . . . . . . . . . . . . . . . . . . . . . 115
Automatic vehicle wash systems . . . . . . . . . 178
Avoiding damage to your vehicle . . . . . . . . . 171
B
Before setting off . . . . . . . . . . . . . . . . . . . . . 124
Belt tensioners . . . . . . . . . . . . . . . . . . . . . . . 135
Belts . . . . . . . . . . . . . . . . . . . . . . . . . . . . . . . 129
Biodiesel . . . . . . . . . . . . . . . . . . . . . . . . . . . 186
Bonnet . . . . . . . . . . . . . . . . . . . . . . . . . . . . . 190
Boot lid . . . . . . . . . . . . . . . . . . . . . . . . . . . . . . 45 Lighting . . . . . . . . . . . . . . . . . . . . . . . . . . . 61
Warning light . . . . . . . . . . . . . . . . . . . . . . 34
Brake Handbrake . . . . . . . . . . . . . . . . . . . . . . . 107
Brake booster . . . . . . . . . . . . . . . . . . . . . . . 161
Brake fluid . . . . . . . . . . . . . . . . . . . . . . . . . . 199
Brake pads Warning light . . . . . . . . . . . . . . . . . . . . . . 33
Brake system Warning light . . . . . . . . . . . . . . . . . . . . . . 36
Brakes . . . . . . . . . . . . . . . . . . . . . . . . . . . . . 160
Bulbs . . . . . . . . . . . . . . . . . . . . . . . . . . . . . . 237 Warning light . . . . . . . . . . . . . . . . . . . . . . 33 Button on the driver's door
Central locking system . . . . . . . . . . . . . . . 44
C
Car jack . . . . . . . . . . . . . . . . . . . . . . . . . . . . 218
Catalytic converter . . . . . . . . . . . . . . . . . . . . 165
Central locking system . . . . . . . . . . . . . . . . . . 41locking . . . . . . . . . . . . . . . . . . . . . . . . . . . 43
unlocking . . . . . . . . . . . . . . . . . . . . . . . . . 43
Changing a wheel . . . . . . . . . . . . . . . . . . . . 220
Changing the engine oil . . . . . . . . . . . . . . . . 196
Changing wheels around . . . . . . . . . . . . . . . 210
Charging the battery . . . . . . . . . . . . . . . . . . 205 Warning light . . . . . . . . . . . . . . . . . . . . . . . 30
Chassis number . . . . . . . . . . . . . . . . . . . . . . 247
Child safety . . . . . . . . . . . . . . . . . . . . . . . . . 147 Side airbags . . . . . . . . . . . . . . . . . . . . . . 150
Child safety locks . . . . . . . . . . . . . . . . . . . . . . 41
Child safety seats ISOFIX system . . . . . . . . . . . . . . . . . . . . 155
Child seat . . . . . . . . . . . . . . . . . . . . . . . . . . . 151 Classification into groups . . . . . . . . . . . . 151
on the front passenger seat . . . . . . . . . . 149
Safety instructions . . . . . . . . . . . . . . . . . 147
Children and safety . . . . . . . . . . . . . . . . . . . 147
Chrome parts . . . . . . . . . . . . . . . . . . . . . . . . 180
Cigarette lighter . . . . . . . . . . . . . . . . . . . . . . . 85
sqc.1.book Seite 251 Mittwoch, 13. April 2005 1:09 13
Page 254 of 260

Index253
Fog lights . . . . . . . . . . . . . . . . . . . . . . . . . . . . 56
Warning light . . . . . . . . . . . . . . . . . . . . . . 30
For the first 1 500 kilometres . . . . . . . . . . . . 164
Front airbags . . . . . . . . . . . . . . . . . . . . . . . . 139
Fuel . . . . . . . . . . . . . . . . . . . . . . . . . . . . . . . 186 Diesel . . . . . . . . . . . . . . . . . . . . . . . . . . . 186
Fuel gauge . . . . . . . . . . . . . . . . . . . . . . . . 14
Petrol . . . . . . . . . . . . . . . . . . . . . . . . . . . 186
Warning light . . . . . . . . . . . . . . . . . . . . . . 32
Fuel consumption . . . . . . . . . . . . . . . . . 21, 166 Saving energy . . . . . . . . . . . . . . . . . . . . 166
Fuel gauge . . . . . . . . . . . . . . . . . . . . . . . . . . 14
Fuel reserve Warning light . . . . . . . . . . . . . . . . . . . . . . 32
Full wheel trim . . . . . . . . . . . . . . . . . . . . . . . 222
Fuse Assignment . . . . . . . . . . . . . . . . . . . . . . 233
Fuses . . . . . . . . . . . . . . . . . . . . . . . . . . . . . . 232
G
Gearbox Automatic . . . . . . . . . . . . . . . . . . . . . . . . 112
mechanical . . . . . . . . . . . . . . . . . . . . . . . 106
Glass roof . . . . . . . . . . . . . . . . . . . . . . . . . . . 52
Glow plug system . . . . . . . . . . . . . . . . . . . . 105 Warning light . . . . . . . . . . . . . . . . . . . . . . 31
H
Handbrake . . . . . . . . . . . . . . . . . . . . . . . . . . 107 Hazard warning light system . . . . . . . . . . . . . 58
Warning light . . . . . . . . . . . . . . . . . . . . . . 29
Hazard warning lights system . . . . . . . . . . . . 58
Head restraint . . . . . . . . . . . . . . . . . . . . . . . . 69
Headlight cleaning system . . . . . . . . . . . . . . . 64
Headlight flasher . . . . . . . . . . . . . . . . . . . . . . 59
Headlights Fog lights . . . . . . . . . . . . . . . . . . . . . . . . . 56
Headlight cleaning system . . . . . . . . . . . . 64
Heated windscreen washer nozzles . . . . . . . 63
Heating . . . . . . . . . . . . . . . . . . . . . . . . . . . . . 93
Heating of the external mirror . . . . . . . . . . . . 66
Heating the front seats . . . . . . . . . . . . . . . . . . 70
Horn . . . . . . . . . . . . . . . . . . . . . . . . . . . . . . . . 11
I
Ignition . . . . . . . . . . . . . . . . . . . . . . . . . . . . . 103
Ignition lock . . . . . . . . . . . . . . . . . . . . . . . . . 103
Information display . . . . . . . . . . . . . . . . . . . . . 22
Inspecting the engine oil level . . . . . . . . . . . 194
Instrument cluster . . . . . . . . . . . . . . . . . . . . . 13
Instrument lighting . . . . . . . . . . . . . . . . . . . . . 57
Interior light Luggage compartment . . . . . . . . . . . . . . . 61
Interior lighting at the front . . . . . . . . . . . . . . . . . . . . . . . . 60
at the rear . . . . . . . . . . . . . . . . . . . . . . . . . 61
Intermittent wipe . . . . . . . . . . . . . . . . . . . . . . 63
ISOFIX . . . . . . . . . . . . . . . . . . . . . . . . . . . . . 155 ISOFIX system . . . . . . . . . . . . . . . . . . . . . . . 155
J
Jacking points . . . . . . . . . . . . . . . . . . . . . . . 224
Jump-starting . . . . . . . . . . . . . . . . . . . . 226, 227
K
Keys . . . . . . . . . . . . . . . . . . . . . . . . . . . . . . . . 38
L
Lashing eyes . . . . . . . . . . . . . . . . . . . . . . . . . 75
Leather care . . . . . . . . . . . . . . . . . . . . . . . . . 183
Lighting of the interior of the vehicle
at the front . . . . . . . . . . . . . . . . . . . . . . . . 60
Lights Converting/masking over . . . . . . . . . . . . 171
Range adjustment . . . . . . . . . . . . . . . . . . 57
switching them on and off . . . . . . . . . . . . . 55
Warning lights . . . . . . . . . . . . . . . . . . . . . . 28
Lights and Visibility . . . . . . . . . . . . . . . . . . . . 57
Liquid in reservoir for windscreen washer system Warning light . . . . . . . . . . . . . . . . . . . . . . . 34
Loading . . . . . . . . . . . . . . . . . . . . . . . . . . . . . 74
Locking . . . . . . . . . . . . . . . . . . . . . . . . . . . 40, 41 Central locking system . . . . . . . . . . . . . . . 43
Remote control . . . . . . . . . . . . . . . . . . . . . 47
locking Central locking system . . . . . . . . . . . . . . . 43
Locking and unlocking from inside . . . . . . . . . 44
sqc.1.book Seite 253 Mittwoch, 13. April 2005 1:09 13