length SKODA FABIA 2005 1.G / 6Y Owner's Manual
[x] Cancel search | Manufacturer: SKODA, Model Year: 2005, Model line: FABIA, Model: SKODA FABIA 2005 1.G / 6YPages: 260
Page 56 of 260
Lights and Visibility55
Using the systemSafetyDriving TipsGeneral MaintenanceBreakdown assist-
anceTechnical DataFabia Praktik
Lights and Visibility
Lights
Switching lights on and off
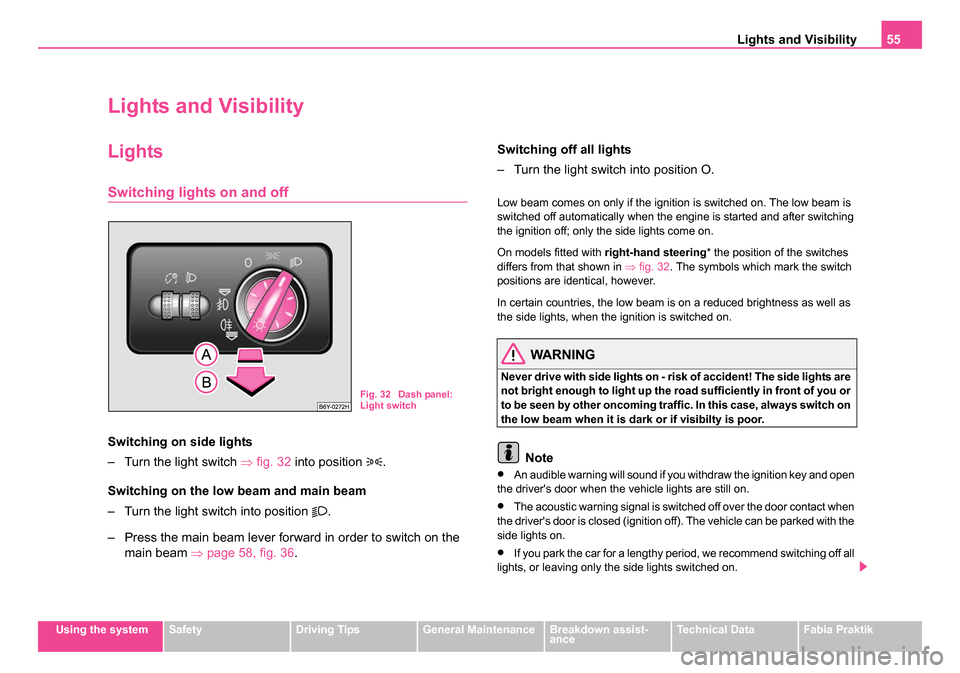
Switching on side lights
– Turn the light switch ⇒fig. 32 into position
.
Switching on the low beam and main beam
– Turn the light switch into position
.
– Press the main beam lever forward in order to switch on the main beam ⇒ page 58, fig. 36 . Switching off all lights
– Turn the light switch into position O.
Low beam comes on only if the ignition is switched on. The low beam is
switched off automatically when the engine is started and after switching
the ignition off; only the side lights come on.
On models fitted with
right-hand steering* the position of the switches
differs from that shown in ⇒fig. 32 . The symbols which mark the switch
positions are identical, however.
In certain countries, the low beam is on a reduced brightness as well as
the side lights, when the ignition is switched on.
WARNING
Never drive with side lights on - risk of accident! The side lights are
not bright enough to light up the road sufficiently in front of you or
to be seen by other oncoming traffic. In this case, always switch on
the low beam when it is dark or if visibilty is poor.
Note
•An audible warning will sound if you withdraw the ignition key and open
the driver's door when the vehicle lights are still on.
•The acoustic warning signal is switched off over the door contact when
the driver's door is closed (ignition off). The vehicle can be parked with the
side lights on.
•If you park the car for a lengthy period, we recommend switching off all
lights, or leaving only the side lights switched on.
Fig. 32 Dash panel:
Light switch
sqc.1.book Seite 55 Mittwoch, 13. April 2005 1:09 13
Page 97 of 260
Heating and air conditioning system
96
You can set the air supply to the individual vents with the air distribution
control ⇒page 93, fig. 85 . Air outlet vents 3 and 4 can also be opened
or closed individually.
Unwarmed or cooled air will flow out of the opened air outlet vents
according to the setting of the control dial ⇒page 93, fig. 85 and
according to atmospheric conditions.
The air conditioning system*
Description
The air conditioning system is a combined cooling and
heating system. It makes it possible to optimally control
the air temperature at any season of the year.
Description of the air conditioning system
It is important for your safety and for your driving comfort that the air condi-
tioning system is operating properly.
The air conditioning system operates when switch ⇒page 97, fig. 87
is pressed and the following conditions are met:
•engine running,
•outside temperature above +5 °C,
•blower switch switched on (positions 1 to 4).
If the air conditioning system is switched on, the temperature and air
humidity drops in the vehicle. The wellbeing of the occupants of the car is
enhanced as a result of this particularly at high outside temperatures and
a high air humidity. The system prevents the windows misting up during
the cold season of the year. The heating effect is dependent upon the coolant temperature, thus full
heat output only occurs when the engine has reached its operating
temperature.
It is possible to briefly activate recirculated air mode in order to enhance
the cooling effect
⇒.
Air at a temperature of about 5°C may flow out of the vents under certain
circumstances when the air conditioning system is operating. Lengthy and
uneven distribution of the air flow out of the vents (in particular at the leg
area) and large differences in temperature, for example when getting out
of the vehicle, can result in chills in sensitive persons.
The air inlet in front of the windscreen must be free of ice, snow or leaves
in order to ensure that the heating and ventilation systems operate prop-
erly.
After switching on the air conditioning Condensation from the evaporator
of the air conditioning may drip down and form a puddle below the vehicle.
This is quite normal and not an indication of a leak!
WARNING
•For your own safety and that of other road users, ensure that all
the windows are free of ice, snow and misting. Please familiarize
yourself about how to correctly operate the heating and ventilation
systems, how to demist and defrost the windows, as well as with
the cooling mode.
•You should not leave recirculated air mode on over a longer
period of time. “Stale air” may result in fatigue in the driver and
passengers, reduce attention levels and also cause the windows to
mist up. The risk of having an accident increases. Switch recircu-
lated air mode off as soon as the windows begin misting up.
AC
AA
ACAE
sqc.1.book Seite 96 Mittwoch, 13. April 2005 1:09 13
Page 99 of 260
Heating and air conditioning system
98
Note
•The whole heat output will be needed to unfrost the windscreen and
side windows. No warm air will be fed to the footwell. This can lead to
restriction of the heating comfort.
•The used air streams out through the air removal openings in the
luggage compartment.
•If the air conditioning system has not been switched on for a lengthy
period, odours may be produced at the evaporator because of deposits.
Switch the air conditioning system on at least once a month for approxi-
mately 5 minutes at the highest blower stage - also during the cold season
of the year - in order to remove such odours. Also open a window for a
short time.
•Please refer to the information regarding recirculated air mode
⇒ page 99.
Setting air conditioning system
Recommended settings of air conditioning controls:
Defrosting the windscreen and side windows
•Turn control dial ⇒ page 97, fig. 87 to the right up to the stop
•Blower switch in position 4
•Turn the air distribution control into the position
•Close the air outlet vents 3
•Open air outlet vents 4 ⇒ page 100, fig. 88 and point towards the side
window.
Keeping windscreen and side windows demisted
We recommend that you use the following setting in cases where the
windows are misted up more than usual (e.g. when it is raining):
•Blower switch in position 2
•Turn the air distribution control into the position
•Close the air outlet vents 3
•Open air outlet vents 4 ⇒ page 100, fig. 88 and point towards the side
window.
•Switch on the cooling system by pressing button .
Warming up the inside of the ve hicle as rapidly as possible
•Turn control dial to the right up to the stop
•Blower switch in position 4
•Turn the air distribution control into the position
•Open the air outlet vents 4
•We recommend pressing button air recirculation mode. The
windows can steam up in this position however.
Heating the vehicle to a comfortable temperature
We recommend the following setting once the windows are no longer
misted up and the desired teperature has been reached:
•Control dial at the desired heat temperature
•Blower switch in position 2 or 3
•Turn the air distribution control into the position
•Open the air outlet vents 4
•Set the air distribution regulator as required between positions
and , if the windscreen gets misted up again.
Cooling down the inside of the vehicle as rapidly as possible
•close all windows and the sliding/tilting roof
•Turn the control dial to the left up to the stop
•Blower switch in position 4
•Turn the air distribution control into the position
•Open the air outlet vents 3 and 4
AA
AB
AC
AB
AC
AE
AA
AB
AC
AD
AA
AB
AC
AC
AA
AB
AC
sqc.1.book Seite 98 Mittwoch, 13. April 2005 1:09 13
Page 107 of 260
Starting-off and Driving
106
WARNING
•Never switch off the engine before the vehicle is stationary - risk
of accident!
•The brake booster only operates when the engine is running.
Greater physical effort for braking is required when engine is
switched off. Because if you do not stop as normal, this can cause
an accident and severe injuries.
Caution
you should not switch the engine off right away at the end of your journey
after the engine has been operated for a lengthy period at high loads but
should be allowed it to run at idling speed for about 2 minutes. This
prevents any accumulation of heat when the engine is switched off.
Note
•The radiator fan may continue running for a further 10 minutes or so
after the engine and the ignition have been switched off. The coolant fan
may, however, also switch on again after some time if the coolant temper-
ature rises because of an accumulation of heat in the engine or if the
engine is warm and the engine compartment is additionally heated by
strong sunlight.
•This is why particular care is required when carrying out any work in
the engine compartment ⇒page 191, “Working in the engine
compartment”.
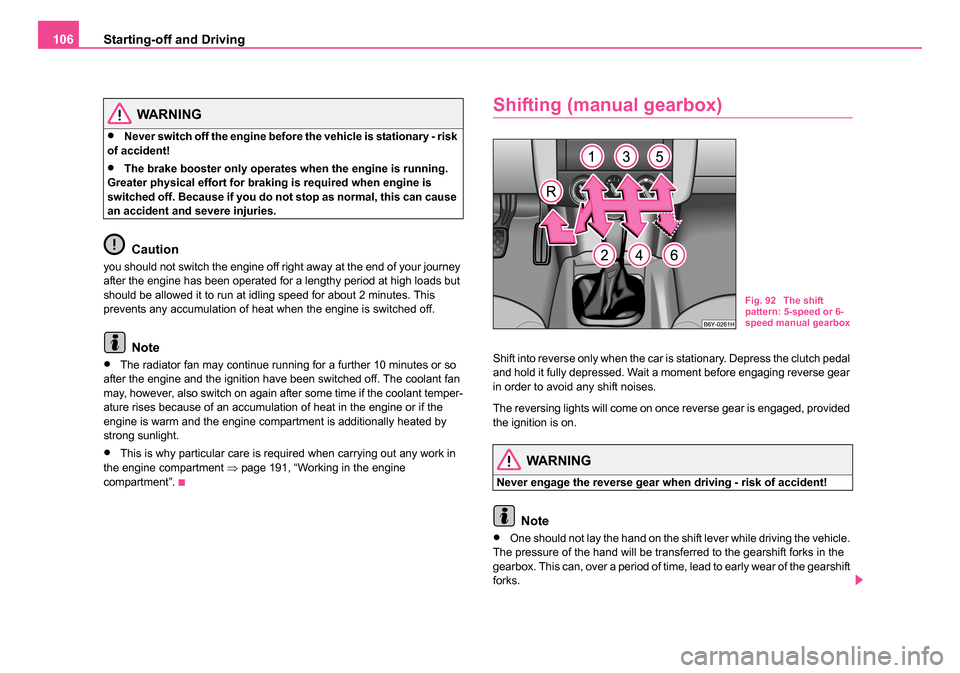
Shifting (manual gearbox)
Shift into reverse only when the car is stationary. Depress the clutch pedal
and hold it fully depressed. Wait a moment before engaging reverse gear
in order to avoid any shift noises.
The reversing lights will come on once reverse gear is engaged, provided
the ignition is on.
WARNING
Never engage the reverse gear when driving - risk of accident!
Note
•One should not lay the hand on the shift lever while driving the vehicle.
The pressure of the hand will be transferred to the gearshift forks in the
gearbox. This can, over a period of time, lead to early wear of the gearshift
forks.
Fig. 92 The shift
pattern: 5-speed or 6-
speed manual gearbox
sqc.1.book Seite 106 Mittwoch, 13. April 2005 1:09 13
Page 135 of 260

Seat belts
134
– Press the red button in the belt lock ⇒fig. 110 . The spring
force causes the tongue of the lock to jump out.
– Guide the belt back with your hand to enable the inertia reel to wind up the belt webbing more easily.
A plastic knob in the belt webbing holds the belt tongue in a position which
is easy to get hold of.
The pelvic belt
The middle rear seat is fitt ed with a two-point pelvic belt.
The lock part of the two-point pelvic belt is operated in the same
way as for a three-point safety belt.
Extending the pelvic belt
– Hold the lock tongue at right angles to the belt webbing and
pull through the desired amount of belt webbing ⇒f i g . 111 .
Shortening the pelvic belt
– Pull on the free end of the belt ⇒fig. 112 .
– Slide the excess belt length through the plastic slider.
A classic three-point safety belt is used on some vehicles instead of a
pelvic belt ⇒page 135.
Fig. 111 Extending the
pelvic belt
Fig. 112 Shortening
the pelvic belt
sqc.1.book Seite 134 Mittwoch, 13. April 2005 1:09 13
Page 168 of 260

Driving and the Environment167
Using the systemSafetyDriving TipsGeneral MaintenanceBreakdown assist-
anceTechnical DataFabia Praktik
Shifting gears and saving energy
Shifting up early saves on fuel.
Manual gearbox
– Drive no more than about one length of your vehicle in first
gear. Always shift up into the next higher gear at approx. 2 000
to 2 500 revs.
Automatic gearbox
– Depress the accelerator pedal slowly. Do not depress it
beyond the kickdown position, however.
An effective way of achieving good fuel economy is to shift up early. You
will consume more fuel if you drive at unnecessarily high revolutions in
any given gear. The
⇒fig. 132 shows the ratio of fuel consumption to the speed of your
vehicle for the individual gears. Fuel consumption in 1st gear is the
highest, while that in 5th or the 6th gear is the lowest.
Only depress the accelerator pedal slowly if your vehicle is fitted with an
automatic gearbox in order to automatically select an economic driving
programme. You will achieve good fuel economy by shifting up early and
shifting down late.
Note
Also use the information supplied by the multi-functional indicator*
⇒ page 18.
Avoiding full throttle
Driving more slowly means saving fuel.Fig. 132 Fuel
consumption in
litres/100 km. and
speed in km/h.
Fig. 133 Fuel
consumption in
litres/100 km. and
speed in km/h.
sqc.1.book Seite 167 Mittwoch, 13. April 2005 1:09 13
Page 169 of 260
Driving and the Environment
168
Sensitive use of the accelerator will not only significantly reduce fuel
consumption but also positively influence environmental pollution and
wear of your vehicle.
You should avoid fully exploiting the top speed of your vehicle wherever
possible. Fuel consumption, pollutant emissions and vehicle noises
increase disproportionally at high speeds.
The ⇒page 167, fig. 133 shows the ratio of fuel consumption to the
speed of your vehicle. You will cut your fuel consumption by half if you only
make use three-quarters of the possible top speed of your vehicle.
Reducing idling
Idling also costs fuel.
It is worthwhile switching off the engine in a traffic jam or when waiting at
a level crossing or at traffic lights with a lengthy red phase. Even after just
30 - 40 seconds you will have saved more fuel than that is needed when
you start the engine up again.
If an engine is only idling it takes much longer for it to reach its normal
operating temperature. Wear-and-tear and pollutant emissions, though,
are particularly high in the warming-up phase. This is why you should
drive off right after starting the engine. Do avoid high engine revolutions at
this time, however.
Regular servicing
A poorly tuned engine consumes an unnecessarily high
amount of fuel.
Having your vehicle serviced regularly at a specialist garge enables you
to satisfy one of the requirements for economical motoring even before
you set off on your journey. Keeping your vehicle properly serviced not
only has a positive effect on the safety of your vehicle and maintaining its
value, but also saves on fuel.
A poorly tuned engine can result in a fuel consumption which is 10%
higher than normal.
The foreseen maintenance work should be undertaken exactly according
to the Service schedule by a specialist garage.
Also check the oil level after refueling. Oil consumption is dependent to
a considerable extent on the load and speed of the engine. Oil consump-
tion could be as high as 0.5 litres/1 000 km depending on your style of
driving.
It is quite normal that a new engine has a higher oil consumption at first,
and reaches its lowest level only after a certain running in time. It is there-
fore not possible to correctly assess the oil consumption of a new vehicle
until after you have driven about 5 000 km.
For the sake of the environment
•You can achieve additional improvements in your fuel economy by
using high-lubricity oils.
•Check the ground below your car at regular intervals to detect any
leakages in good time. Please have your vehicle inspected by a specialist
garge if you find any stains caused by oil or other fluids on the floor.
sqc.1.book Seite 168 Mittwoch, 13. April 2005 1:09 13
Page 175 of 260
Towing a trailer
174
before negotiating a downhill section to allow the engine to also act as a
brake.
Engine overheating
Please keep a check on the coolant temperature gauge if you have to
negotiate a lengthy slope in a low gear at a high engine speed when the
outside temperature is very high ⇒page 14.
If the needle of the coolant temperature gauge moves into the right-hand
area or even the red area of the scale, reduce your speed immediately.
Stop and switch off the engine if the warning light
in the instrument
cluster begins flashing. Wait a few minutes and check the level of coolant
in the coolant expansion bottle ⇒page 197, “Inspecting the coolant level”.
Please refer to the following guidelines ⇒page 31, “Coolant tempera-
ture/coolant level ”.
The coolant temperature can be reduced by switching on the heating.
Any increase in the cooling effect of the coolant fan through shifting down
a gear and increasing the engine speed is not possible since the fan
speed is independent of the engine speed. One should also not drop a
gear for this reason when towing a trailer as long as the engine can
manage the slope without any drop in speed.
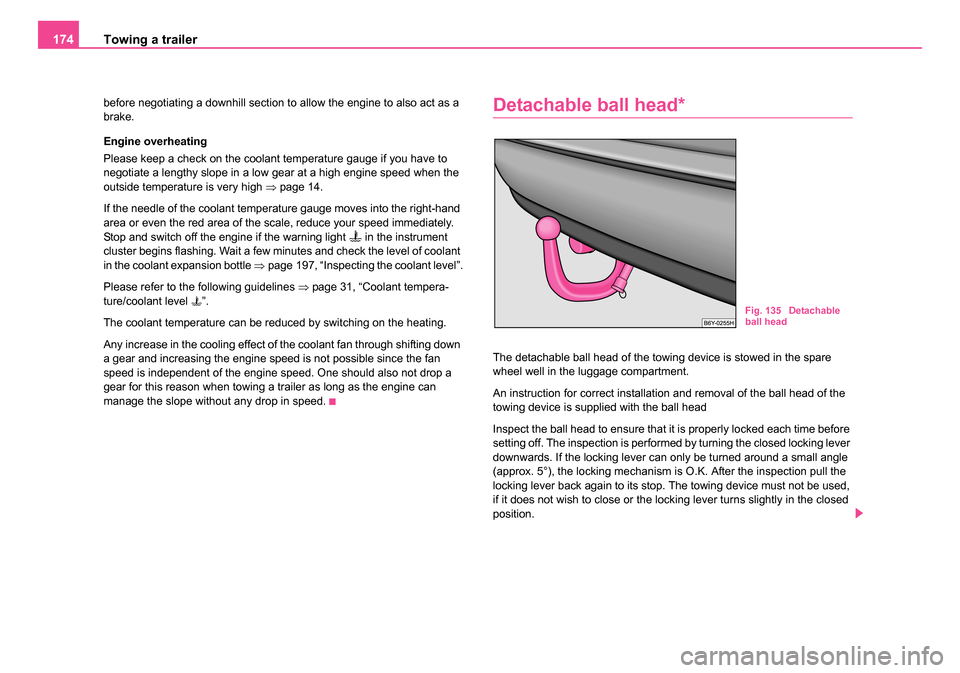
Detachable ball head*
The detachable ball head of the towing device is stowed in the spare
wheel well in the luggage compartment.
An instruction for correct installation and removal of the ball head of the
towing device is supplied with the ball head
Inspect the ball head to ensure that it is properly locked each time before
setting off. The inspection is performed by turning the closed locking lever
downwards. If the locking lever can only be turned around a small angle
(approx. 5°), the locking mechanism is O.K. After the inspection pull the
locking lever back again to its stop. The towing device must not be used,
if it does not wish to close or the locking lever turns slightly in the closed
position.
Fig. 135 Detachable
ball head
sqc.1.book Seite 174 Mittwoch, 13. April 2005 1:09 13
Page 185 of 260

Care and cleaning
184
– Remove fresh stains on a fat base (e.g. butter, mayonnaise,
chocolate etc.) with an absorbent cloth or household cleaning
paper or with the cleaner from the care set if the stain has not
yet penetrated into the surface.
– Use a grease dissolver for grease stains which have dried
in .
–Eliminate special stains (e.g. ball-point pens, felt pen, nail
varnish, dispersion paint, shoe cream etc.) with a special stain
remover suitable for leather.
Leather care
– Treat the leather every six months with the leather care product available from Škoda dealers.
– Apply only a small amount of the care product.
– Dry the leather off with a soft cloth
We recommend that you consult your Škoda dealer, if you have any ques-
tions regarding cleaning and care of the leather interior.
Caution
•You must on no account treat the leather with solvents (e.g. gasoline,
turpentine), floor wax, shoe cream or such like.
•Avoid leaving your vehicle for lengthy periods in bright sunlight in order
to avoid bleaching the leather. If you leave your vehicle parked in the open
for lengthy periods, protect the leather from the direct rays of the sun by
covering it over.
•Sharp-edged objects on items of clothing such as zip fasteners, rivets,
sharp-edged belts may leave permanent scratches or signs of rubbing on
the surface.
Note
•Use a care cream with light blocker and impregnation effect regularly
and each time after cleaning the leather. The cream nourishes the leather,
allows it to breathe and keeps it supple and also provides moisture. It also
creates surface protection.
•Clean the leather every 2 to 3 months, remove fresh soiling each time
this occurs.
•Remove fresh stains such as those from ball-point pens, ink, lipstick,
shoe cream etc., as quickly as possible.
•Care also for the leather dye. Refreshen areas which have lost their
colour with a special coloured leather cream as required.
Seat belts
– Keep the seat belts clean!
– Wash seat belts which have become soiled using a mild soapy solution.
– Inspect the seat belts regularly to ensure they are in good condition.
Belt webbing which has become severely soiled may prevent the inertia
reel from reeling up the belt properly.
WARNING
•The seat belts must not be removed for cleaning.
•Never clean the seat belts chemically as dry cleaning may
destroy the fabric. The seat belts must also not be allowed to come
into contact with corrosive liquids (such as acids etc.).
sqc.1.book Seite 184 Mittwoch, 13. April 2005 1:09 13
Page 196 of 260

Inspecting and Replenishing195
Using the systemSafetyDriving TipsGeneral MaintenanceBreakdown assist-
anceTechnical DataFabia Praktik
Oil level within range
– You may top up the oil. It is possible that the oil level may then
be within range after doing this.
Oil level within range
– You must top up the oil. It is sufficient, once this is done, to
keep the oil level is within range .
It is normal for the engine to consume oil. The oil consumption may be as
much as 0.5 l/1 000 km depending on your style of driving and the condi-
tions under which you operate your vehicle. The oil consumption may be
slightly higher than this during the first 5 000 kilometres.
One should therefore check the oil level at regular intervals, preferably
every time after the fuel tank is filled or after driving for long stretches.
We recommend maintaining the oil level within the range if the engine
has been operating at high loads, for example during a lengthy motorway
trip during the summer months, towing a trailer or negotiating a high
mountain pass, but not above this.
The warning light in the instrument cluster* will indicate ⇒page 32
whether the oil level is too low. In this case, check the oil level as soon as
possible. Top up with an appropriate quantity of oil.
WARNING
Read and observe the warning notes ⇒page 191, “Working in the
engine compartment” before working in the engine compartment.
Caution
•Always check the oil level on vehicles with engine 1.2 l/47 kW when
the engine is warm. Otherwise the measuring result is incorrect und oil
could be incorrectly replenished - risk of engine damage!
•The oil level must on no account extend beyond the range . Danger
of damaging the catalytic converter.
•Do not continue your journey if for some reason it is not possible
under the conditions prevailing to top up with oil. Switch the engine off
and obtain professional assistance from a specialist garage, otherwise it
could lead to severe engine damage.
Replenishing engine oil
– Inspect the oil level ⇒page 194.
– Unscrew the cap of the engine oil filler opening.
– Pour in a suitable grade of oil in portions of 0.5 litres ⇒page 193, “Engine oil specifications”.
– Inspect the oil level ⇒page 194.
– Carefully screw on the cap of the filler opening and push the dipstick in fully.
WARNING
•Avoid dripping oil onto hot parts of the engine when topping up
will oil - a risk of fire!
•Read and observe the warning notes ⇒page 191, “Working in
the engine compartment” before working in the engine compart-
ment.
Ab
Aa
Ac
Ab
Ab
Aa
sqc.1.book Seite 195 Mittwoch, 13. April 2005 1:09 13