park assist SKODA FABIA 2005 1.G / 6Y Owner's Manual
[x] Cancel search | Manufacturer: SKODA, Model Year: 2005, Model line: FABIA, Model: SKODA FABIA 2005 1.G / 6YPages: 260
Page 12 of 260
Cockpit11
Using the systemSafetyDriving TipsGeneral MaintenanceBreakdown assist-
anceTechnical DataFabia Praktik
Cockpit
An overview
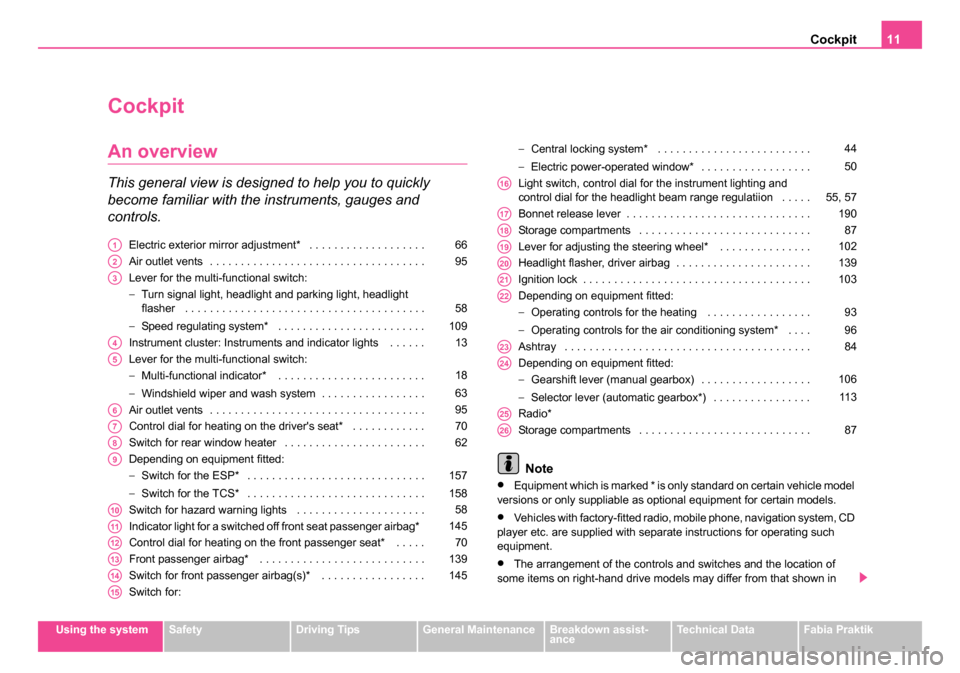
This general view is designed to help you to quickly
become familiar with the instruments, gauges and
controls.
Electric exterior mirror adjustment* . . . . . . . . . . . . . . . . . . .
Air outlet vents . . . . . . . . . . . . . . . . . . . . . . . . . . . . . . . . . . .
Lever for the multi-functional switch:
−Turn signal light, headlight and parking light, headlight
flasher . . . . . . . . . . . . . . . . . . . . . . . . . . . . . . . . . . . . . . .
− Speed regulating system* . . . . . . . . . . . . . . . . . . . . . . . .
Instrument cluster: Instruments and indicator lights . . . . . .
Lever for the multi-functional switch:
− Multi-functional indicator* . . . . . . . . . . . . . . . . . . . . . . . .
− Windshield wiper and wash system . . . . . . . . . . . . . . . . .
Air outlet vents . . . . . . . . . . . . . . . . . . . . . . . . . . . . . . . . . . .
Control dial for heating on the driver's seat* . . . . . . . . . . . .
Switch for rear window heater . . . . . . . . . . . . . . . . . . . . . . .
Depending on equipment fitted:
− Switch for the ESP* . . . . . . . . . . . . . . . . . . . . . . . . . . . . .
− Switch for the TCS* . . . . . . . . . . . . . . . . . . . . . . . . . . . . .
Switch for hazard warning lights . . . . . . . . . . . . . . . . . . . . .
Indicator light for a switched off front seat passenger airbag*
Control dial for heating on the front passenger seat* . . . . .
Front passenger airbag* . . . . . . . . . . . . . . . . . . . . . . . . . . .
Switch for front passenger airbag(s)* . . . . . . . . . . . . . . . . .
Switch for: −
Central locking system* . . . . . . . . . . . . . . . . . . . . . . . . .
− Electric power-operated window* . . . . . . . . . . . . . . . . . .
Light switch, control dial for the instrument lighting and
control dial for the headlight beam range regulatiion . . . . .
Bonnet release lever . . . . . . . . . . . . . . . . . . . . . . . . . . . . . .
Storage compartments . . . . . . . . . . . . . . . . . . . . . . . . . . . .
Lever for adjusting the steering wheel* . . . . . . . . . . . . . . .
Headlight flasher, driver airbag . . . . . . . . . . . . . . . . . . . . . .
Ignition lock . . . . . . . . . . . . . . . . . . . . . . . . . . . . . . . . . . . . .
Depending on equipment fitted:
− Operating controls for the heating . . . . . . . . . . . . . . . . .
− Operating controls for the air conditioning system* . . . .
Ashtray . . . . . . . . . . . . . . . . . . . . . . . . . . . . . . . . . . . . . . . .
Depending on equipment fitted:
− Gearshift lever (manual gearbox) . . . . . . . . . . . . . . . . . .
− Selector lever (automatic gearbox*) . . . . . . . . . . . . . . . .
Radio*
Storage compartments . . . . . . . . . . . . . . . . . . . . . . . . . . . .
Note
•Equipment which is marked * is only standard on certain vehicle model
versions or only suppliable as optional equipment for certain models.
•Vehicles with factory-fitted radio, mobile phone, navigation system, CD
player etc. are supplied with separate instructions for operating such
equipment.
•The arrangement of the controls and switches and the location of
some items on right-hand drive models may differ from that shown in
A166
A295
A3
58
109
A413
A5
18
63
A695
A770
A862
A9
157
158
A1058
A11145
A1270
A13139
A14145
A15
44
50
A1655, 57
A17190
A1887
A19102
A20139
A21103
A22
93
96
A2384
A24
106 11 3
A25
A2687
sqc.1.book Seite 11 Mittwoch, 13. April 2005 1:09 13
Page 33 of 260
Instruments and Indicator/Warning Lights
32
3 peeps sound as an additional warning signal.
In this case stop and switch the engine off and check the coolant level;
top up the coolant as necessary.
Do not continue your journey if for some reason it is not possible under
the conditions prevailing to top up with coolant. Keep the engine
switched off and obtain professional assistance from a specialist garage,
otherwise it could lead to severe engine damage.
If the coolant is within the specified range, the increased temperature may
be caused by an operating problem at the coolant fan. Check the fuse for
the coolant fan, replace it if necessary ⇒page 236, “Fuse assignment at
battery - version 1”.
Do not continue driving if the warning light does not go off although the
fluid is at the correct level and also the fuse of the fan is in proper order.
Contact a specialist garage to obtain assistance.
Please also refer to the additional instructions ⇒page 196, “Cooling
system”.
The following text will be displayed in the information display*:
STOP CHECK COOLANT SERVICE MANUAL (STOP! CHECK
COOLANT LEVEL OWNER'S MANUAL)
WARNING
•If you must stop for technical reasons, then park the vehicle at
a safe distance from the traffic and switch off the engine and switch
on the hazard warning light system ⇒page 58.
•Take care when opening the coolant expansion bottle. If the
engine is hot, the cooling system is pressurized - risk of scalding.
It is best to allow the engine to cool down before removing the cap.
•Do not touch the coolant fan! The coolant fan may switch on
automatically even if the ignition is off.
Electronic immobiliser
Data is compared between the ignition key and the control unit when
switching on the ignition. The indicator light will light up for a few
s
econds when ignition key authorisation is confirmed.
The warning light will start flashing continuously if a non-authorised igni-
tion key (for example the wrong ignition key) has been used. The engine
cannot be started ⇒page 40.
It is only possible to start the engine of the vehicle with a Genuine Škoda
key with the matching code.
Fuel reserve
The warning light comes on, if the fuel level is still about 7 litres.
A peep sounds as an additional warning signal.
The following text will be displayed in the information display*:
PLEASE REFUEL
Engine oil
The warning light lights up red (low oil pressure)
The warning light comes on for a few seconds 2) when the ignition is
switched on.
2)The warning light on vehicles fitted with information display does not come on
after switching the ignition on, but only if a fault exists or the engine oil level is too
low.
sqc.1.book Seite 32 Mittwoch, 13. April 2005 1:09 13
Page 34 of 260
Instruments and Indicator/Warning Lights33
Using the systemSafetyDriving TipsGeneral MaintenanceBreakdown assist-
anceTechnical DataFabia Praktik
Stop the vehicle and switch the engine off
if the warning light does not
go off after the engine has started or flashes while driving. Check the oil
level and top up with oil as necessary ⇒ page 194.
3 peeps sound as an additional warning signal.
Do not continue your journey if for some reason it is not possible under
the conditions prevailing to top up with oil. Keep the engine switched off
and obtain professional assistance from a specialist garage, otherwise it
could lead to severe engine damage.
Do not drive any further if the warning light flashes even if the oil is at
the correct level. Do not run the engine not at idling speed either. Contact
the nearest specialist garage to obtain professional assistance.
The following text will be displayed in the information display*:
STOP! OIL PRESS. STOP MOTOR! SERVICE MANUAL (STOP! OIL
PRESSURE STOP ENGINE! OWNER'S MANUAL)
The warning light
lights up yellow* (oil quantity too low)
If the warning light lights up yellow, the quantity of oil in the engine is prob-
ably too low. Check as soon as possible the oil level or top up ⇒page 194
with engine oil.
A peep sounds as an additional warning signal.
The following text will be displayed in the information display*:
CHECK OIL LEVEL
The warning light will go out if the bonnet is left open for more than 30
seconds. If no engine oil has been replenished, the warning light will come
on again after driving about 100 km.
The warning light
flashes yellow* (engine oil level sensor faulty)
A fault on the engine oil level sensor is indicated additionally by an audible
signal and the warning light coming on several times after the ignition has
been switched on. In this case have the engine inspected without delay by a specialist
garage.
The following text will be displayed in the information display*:
OIL SENSOR WORKSHOP! (OIL SENSOR WORKSHOP)
WARNING
•If you must stop for technical reasons, then park the vehicle at
a safe distance from the traffic and switch off the engine and switch
on the hazard warning light system ⇒page 58.
•The red oil pressure light is not an oil le vel indicator! One
should therefore check the oil level at regular intervals, preferably
after every refueling stop.
Thickness of the brake pads*
If the warning light comes on, contact a specialist garage immediately
and have the brake pads on all of the wheels inspected.
A peep sounds as an additional warning signal.
The following text will be displayed in the information display*: CHECK BRAKE PADS
Light bulbs*
The warning light comes on if a light bulb is damaged:
•brakes applied (brake light),
•in lighting (low beam and/or rear light).
sqc.1.book Seite 33 Mittwoch, 13. April 2005 1:09 13
Page 56 of 260
Lights and Visibility55
Using the systemSafetyDriving TipsGeneral MaintenanceBreakdown assist-
anceTechnical DataFabia Praktik
Lights and Visibility
Lights
Switching lights on and off
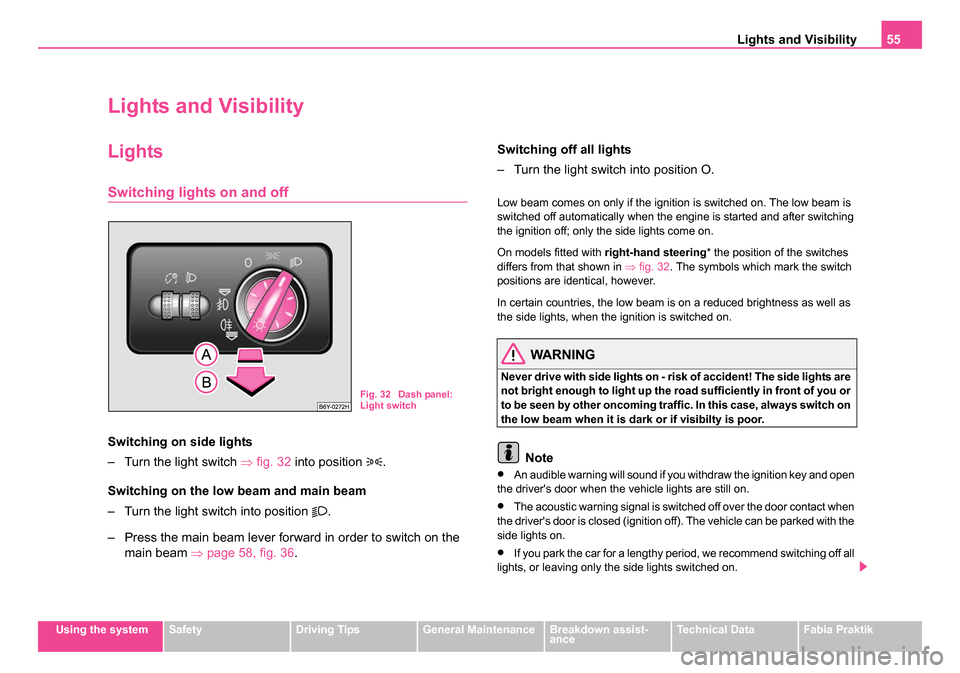
Switching on side lights
– Turn the light switch ⇒fig. 32 into position
.
Switching on the low beam and main beam
– Turn the light switch into position
.
– Press the main beam lever forward in order to switch on the main beam ⇒ page 58, fig. 36 . Switching off all lights
– Turn the light switch into position O.
Low beam comes on only if the ignition is switched on. The low beam is
switched off automatically when the engine is started and after switching
the ignition off; only the side lights come on.
On models fitted with
right-hand steering* the position of the switches
differs from that shown in ⇒fig. 32 . The symbols which mark the switch
positions are identical, however.
In certain countries, the low beam is on a reduced brightness as well as
the side lights, when the ignition is switched on.
WARNING
Never drive with side lights on - risk of accident! The side lights are
not bright enough to light up the road sufficiently in front of you or
to be seen by other oncoming traffic. In this case, always switch on
the low beam when it is dark or if visibilty is poor.
Note
•An audible warning will sound if you withdraw the ignition key and open
the driver's door when the vehicle lights are still on.
•The acoustic warning signal is switched off over the door contact when
the driver's door is closed (ignition off). The vehicle can be parked with the
side lights on.
•If you park the car for a lengthy period, we recommend switching off all
lights, or leaving only the side lights switched on.
Fig. 32 Dash panel:
Light switch
sqc.1.book Seite 55 Mittwoch, 13. April 2005 1:09 13
Page 60 of 260
Lights and Visibility59
Using the systemSafetyDriving TipsGeneral MaintenanceBreakdown assist-
anceTechnical DataFabia Praktik
Right and left turn signal light
– Push the lever upwards or downwards ⇒page 58, fig. 36 .
– If you only wish to flash three times (the so-called conven- ience turn signal*), push the lever briefly up to the upper or
lower pressure point and release it.
– Turn signal for changing lanes, in order to only flash briefly - move the lever up or down to the pressure point and hold it in
this position.
Main beam
– Switch on the low beam.
– Push the lever forwards.
– Pull the lever back into the initial position in order to switch the main beam off again.
Headlight flasher
– Pull on the lever of the steering wheel (sprung position) - the main beam and warning light in the instrument cluster come
on.
Parking light
– Switch off the ignition.
– Push the lever up or down - the right-hand or left-hand parking light is switched on.
Information concerning the function of the lights.
•The turn signal system only operates when the ignition is switched
on. The corresponding indicator light or in the instrument cluster also
flashes.
•The turn signal is automatically cancelled after negotiating a curve.
•The side light and rear light on the appropriate side of the vehicle are
switched on when the parking light is selected. The parking light function
only operates if the ignition is switched off.
•An acoustic warning signal will sound when the driver's door is opened
if the lever is not in the middle position after removing the ignition key. The
acoustic warning signal will stop just as soon as the driver's door is closed.
Caution
Use main beam or the headlight flasher only if this does not risk dazzling
other road users.
Note
Use only in accordance with the legal requirements the described lighting
and signal systems.
sqc.1.book Seite 59 Mittwoch, 13. April 2005 1:09 13
Page 114 of 260

Automatic gearbox*113
Using the systemSafetyDriving TipsGeneral MaintenanceBreakdown assist-
anceTechnical DataFabia Praktik
Selector lever positions
The selector lever position you have engaged is shown in the information
display of the instrument cluster with the corresponding gear symbol high-
lighted ⇒fig. 97. P - Parklock
The driven wheels are locked mechanically in this position.
The Parklock must only be engaged when the vehicle is stationary
⇒.
If you wish to move the selector lever into or out of this position, you must
press the Shiftlock button in the handle of the selector lever and at the
same time depress the brake pedal.
R - Reverse
Reverse gear must only be engaged when the vehicle is stationary and
the engine idling ⇒.
The brake pedal must be depressed and at the same time the Shiftlock
must be pressed, if you wish to obtain the selector lever positions R, P or
N .
The reversing lights come on when the selector lever is moved into posi-
tion R when the ignition is also on.
N - Neutral
The transmission is in Neutral in this position.
The brake pedal must be depressed (if the lever is in its position for longer
than 2 seconds) in order to move the selector lever out of the position N
into another position, with the ignition switched on, on a vehicle travelling
at less than 5 km/hour or on a stationary vehicle.
D - Drive, position for driving forward
When the selector lever is in this position, the forward gears are shifted up
and down automatically in line with engine load, vehicle speed and the
dynamic shift programme (DSP).
You must depress the brake pedal ⇒ if you wish to move the selector
lever into position D from N when the vehicle is travelling at less than
5 km/hour or is stationary.
Fig. 96 Selector lever
Fig. 97 Information
display in the instru-
ment cluster Selector
lever positions
sqc.1.book Seite 113 Mittwoch, 13. April 2005 1:09 13
Page 166 of 260
Driving and the Environment165
Using the systemSafetyDriving TipsGeneral MaintenanceBreakdown assist-
anceTechnical DataFabia Praktik
New brake pads
Allow for the fact that new brake pads do not achieve their full braking effi-
ciency until approximately 200 kilometres. New brake pads must be first
“run in” before they develop their optimal friction force. You can, however,
compensate for this slightly reduced braking force by increasing the pres-
sure on the brake pedal.
This guideline also applies to any new brake pads installed at a future
date.
During the running-in period, you should avoid excessive stresses on the
brakes. This includes, for example, violent braking, particularly from very
high speeds, and also when crossing mountain passes.
Catalytic converter
Proper operation of the emission control system (catalytic
converter) is of major significance for driving your vehicle
in an environmentally conscious way.
Please refer to the following guidelines:
– For vehicles with petrol engine only refuel with unleaded petrol
⇒page 186, “Grades of petrol”.
– Never run the fuel tank completely empty.
– Do not switch off the ignition while you are driving the vehicle.
– Do not pour too much oil into the engine ⇒page 195,
“Replenishing engine oil”. – Do not tow-start the vehicle over a distance of more than 50
metres ⇒page 230, “Tow-starting a vehicle”.
If you drive your vehicle in a country in which unleaded petrol is not avail-
able, you must have the catalytic converter replaced later when driving the
vehicle into a country in which use of a catalytic converter is mandatory.
WARNING
•In view of the high temperatures which may be produced in the
catalytic converter, one should always park a vehicle in such a way
that the catalytic converter cannot come into contact with easily
flammable materials below the vehicle - a risk of fire!
•Never use additional underbody protection or corrosion-protec-
tion agents for the exhaust pipes, catalytic converters or heat
shields. Such substances might ignite when driving - risk of fire!
Caution
•Vehicles fitted with catalytic converter should never be allowed to let
the fuel tank to run completely empty. An irregular fuel supply can result
in poor ignition or misfiring. Unburnt fuel may get into the exhaust system
and damage the catalytic converter.
•Filling the tank even only once with leaded petrol will result in the cata-
lytic converter being destroyed.
•If you detect misfiring, a drop in performance or irregular engine
running when driving, reduce your speed immediately and have the
vehicle inspected by the nearest specialist garage. The symptoms
described may be caused by a fault in the ignition system. Unburnt fuel
may get into the exhaust system and damage the catalytic converter.
sqc.1.book Seite 165 Mittwoch, 13. April 2005 1:09 13
Page 178 of 260

Care and cleaning177
Using the systemSafetyDriving TipsGeneral MaintenanceBreakdown assist-
anceTechnical DataFabia Praktik
General Maintenance
Care and cleaning
General
Proper care retains the value of your vehicle.
Regular and proper care retains the value of your vehicle. It may also be
one of the requirements for the acceptance of warranty claims relating to
corrosion damage and paint defects on the bodywork.
We recommend using a preservative from Škoda genuine accessories
offered by your Škoda dealer. Please follow the instructions for use on the
package.
WARNING
•Care products may be harmful to your health if not used
according to the instructions.
•Always store care products in a safe place, out of the reach of
children - risk of poisoning!
For the sake of the environment
•Always select environmentally-friendly products when purchasing
vehicle care products.
•Do not dispose of residues of care products in domestic waste.
Care of the exterior of vehicle
Washing the vehicle
Frequent washing protects your vehicle.
The best protection for your vehicle against harmful environmental influ-
ences is frequent washing and wax treatment. How often you should
wash your vehicle depends on a wide range of factors, such as:
•Frequency of use,
•The parking situation (garage, below trees etc.),
•Season of the year,
•Weather conditions,
•Environmental influences.
The longer insect residues, bird droppings, tree sap, road and industrial
dust, tar, soot particles, road salt and other aggressive deposits remain
adhering to the paintwork of your vehicle, the more detrimental their
destructive effect can be. High temperatures, such as those caused by
intensive sun's rays, accentuate this caustic effect.
It may therefore be necessary, in certain circumstances, to wash the car
once a week . It may also be sufficient, however, to wash the car once a
month followed by appropriate wax treatment.
It is essential to also thoroughly wash the underside of your vehicle at
the end of the winter road salting and gritting period.
sqc.1.book Seite 177 Mittwoch, 13. April 2005 1:09 13
Page 202 of 260

Inspecting and Replenishing201
Using the systemSafetyDriving TipsGeneral MaintenanceBreakdown assist-
anceTechnical DataFabia Praktik
The battery
Working on the battery
The battery is located in the engine compartment below a plastic
box.
– Unlock the interlock on the positive terminal side of the battery
⇒fig. 145 .
– Open the cover in direction of arrow.
– The installation of the battery cover on the positive terminal side takes place in the reverse order.
Removal and installation of the battery is not recommended since it can,
under certain circumstances, lead to major damage to the battery and
fuse boxes. Contact a specialist garage. There is a risk of injuries, scalding, accidents and burns when carrying out
any work on the battery and on the electrical system. It is essential to
comply with the warning instructions stated below ⇒
and with the
general applicable rules of safety.
WARNING
•The battery acid is strongly corrosive and must, therefore, be
handled with the greatest of care. Always wear protective gloves,
eye and skin protection when handling batteries. Corrosive fumes
in the air irritate the air passages and lead to conjunctivitis and
inflammation of the air passages in the lungs. Battery acid
corrodes dental enamel and creates deep wounds after contact
with the skin which take a long time to heal. Repeated contact with
diluted acids causes skin diseases (inflammations, ulcers, slin
cracks). Acids coming into contact with water are diluted accompa-
nied by significant development of heat.
•Do not tilt the battery otherwise battery electrolyte may flow out
of the battery vent openings. Protect the eyes with safety glasses
or a shield! There is the danger of suffering blindness! If any
battery electrolyte gets into your eye, rinse out your eye immedi-
ately with clear water for several minutes. Contact a doctor without
delay.
•Splashes of acid on your skin or clothes should be neutralised
as soon as possible using soap suds and then rinsed with plenty
of water. Contact a doctor immediately if you swallow battery elec-
trolyte.
•Keep batteries out of the reach of children.
•Hydrogen is released when you charge a battery and a highly
explosive gas mixture is produced . An explosion can be caused
through sparkling over during unclamping or loosening of the
cable plug while the ignition is on.
•Bridging of the poles will create a short circuit (e.g. through
metal objects, cables). Possible consequences of a short circuit:
Fig. 145 The battery:
Open up the cover
sqc.1.book Seite 201 Mittwoch, 13. April 2005 1:09 13
Page 221 of 260
Breakdown assistance
220
Spare wheel*
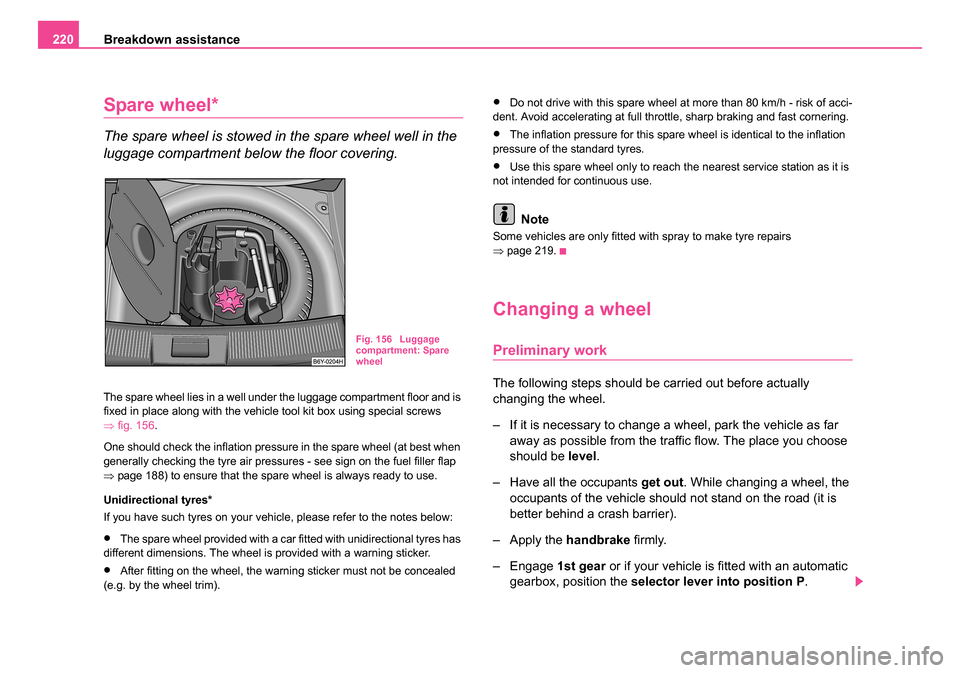
The spare wheel is stowed in the spare wheel well in the
luggage compartment below the floor covering.
The spare wheel lies in a well under the luggage compartment floor and is
fixed in place along with the vehicle tool kit box using special screws
⇒ fig. 156 .
One should check the inflation pressure in the spare wheel (at best when
generally checking the tyre air pressures - see sign on the fuel filler flap
⇒ page 188) to ensure that the spare wheel is always ready to use.
Unidirectional tyres*
If you have such tyres on your vehicle, please refer to the notes below:
•The spare wheel provided with a car fitted with unidirectional tyres has
different dimensions. The wheel is provided with a warning sticker.
•After fitting on the wheel, the warning sticker must not be concealed
(e.g. by the wheel trim).
•Do not drive with this spare wheel at more than 80 km/h - risk of acci-
dent. Avoid accelerating at full throttle, sharp braking and fast cornering.
•The inflation pressure for this spare wheel is identical to the inflation
pressure of the standard tyres.
•Use this spare wheel only to reach the nearest service station as it is
not intended for continuous use.
Note
Some vehicles are only fitted with spray to make tyre repairs
⇒ page 219.
Changing a wheel
Preliminary work
The following steps should be carried out before actually
changing the wheel.
– If it is necessary to change a wheel, park the vehicle as far
away as possible from the traffic flow. The place you choose
should be level.
– Have all the occupants get out. While changing a wheel, the
occupants of the vehicle should not stand on the road (it is
better behind a crash barrier).
– Apply the handbrake firmly.
– Engage 1st gear or if your vehicle is fitted with an automatic
gearbox, position the selector lever into position P .
Fig. 156 Luggage
compartment: Spare
wheel
sqc.1.book Seite 220 Mittwoch, 13. April 2005 1:09 13