technical data SKODA FABIA 2006 2.G / 5J Owner's Guide
[x] Cancel search | Manufacturer: SKODA, Model Year: 2006, Model line: FABIA, Model: SKODA FABIA 2006 2.G / 5JPages: 258, PDF Size: 44.86 MB
Page 64 of 258

Lights and Visibility63
Using the systemSafetyDriving TipsGeneral MaintenanceBreakdown assistanceTechnical Data
Rear interior lighting* - type 2
The rear interior lighting is operated by pressing the button ⇒fig. 42.
The same principles apply for the interior lighting at the rear as for the for the interior lighting at the front.
Note
We recommend having the bulb re placed by a specialist garage.
Luggage compartment light
The lighting comes on automatically when the tailgate is opened. The luggage compartment lighting will switch off agai n automatically if the boot lid remains open for more than about 30 minutes.
Visibility
Rear window heater
– Press switch ⇒fig. 43 to switch on the rear window heater.
The rear window heater only operates when the engine is running. An indicator light in the switch is illuminated when the rear window heater is switched on.
The rear window heater switches off automatically after 20 minutes. If you press the switch once again, the rear window heater is switched on perma- nently - the automatic deactivation is thus deactivated.
For the sake of the environment
You should switch off the rear window heater as soon as the rear window is clear. The reduced current consumption will have a favourable effect on fuel economy ⇒page 178, “Saving electricity”.
Fig. 42 Roof liner light at the rear
Fig. 43 Switch for rear window heater
NKO A05Fabia 20.book Page 63 Tuesday, September 26, 2006 8:38 AM
Page 66 of 258
Lights and Visibility65
Using the systemSafetyDriving TipsGeneral MaintenanceBreakdown assistanceTechnical Data
Slow wipe
– Position the lever up into position .
Fa st w i p e
– Position the lever up into position .
Automatic wipe/wash for windscreen
– Pull the lever towards the steering wheel into position and the
widescreen wiper and wash system will operate - in the sprung
position.
– Release the lever. The windscreen wash system stops and the
wiper continues for another 1 - 3 wiper strokes (depending on the
period of spraying of the windscreen).
Wiping the rear window pane*
– Push the lever away from the steering wheel into position
⇒ page 64, fig. 45, the widescreen wiper will operate every 6
seconds.
Automatic wipe/wash for the rear window pane*
– Push the lever away from the steering wheel into position - the
widescreen wiper and wash system will operate - in the sprung
position.
– Letting go of the leve r will cause the windscreen wash system to
stop and the wiper to continue for another 1 - 3 wiper strokes
(depending on the period of spraying of the windscreen). The
lever will stay in position after releasing it .
Switching windscreen wipers off
– Move the lever back into its home position .
The windscreen wipers and the windscreen washer system only operate if the ignition is switched on.
The rear window will be wiped again if the front window wipers are on when reverse gear is selected.
The windscreen washer nozzles are heated* when the ignition is switched on.
Top up with wash liquid ⇒page 211.
WARNING
•Properly maintained windscreen wiper blades are essential for clear visibility and safe driving ⇒page 66.
•Do not use the windscreen washer system at low temperatures, without heating the windscreen beforehand. Otherwise the window cleaner could freeze on the windscreen and restrict the view to the front.
•In the event of a freezing up of the windscreen, first of all eliminate the ice ⇒page 188 and then operate the windscreen wiper otherwise the windscreen wiper blades could be damaged.
Caution
In frosty weather, please first of all check whether the windscreen wiper blades are not frozen to the windscreen before switching them on. Switching on wind- screen wipers when the blades are frozen to the windscreen may result in damage both to the blades and the motor of the windscreen wipers!
Headlight cleaning system*
The headlights are being cleaned after the windscreen washer system has been operated for the fifth time, the low beam or main beam are switched on as well as the windscreen wiper lever is held in the position ⇒page 64, fig. 45 for about 1 second.
A2
A3
A5
A6
A7
A6
A0
A5
NKO A05Fabia 20.book Page 65 Tuesday, September 26, 2006 8:38 AM
Page 68 of 258
Lights and Visibility67
Using the systemSafetyDriving TipsGeneral MaintenanceBreakdown assistanceTechnical Data
Replacing the wiper blade on the rear window wiper
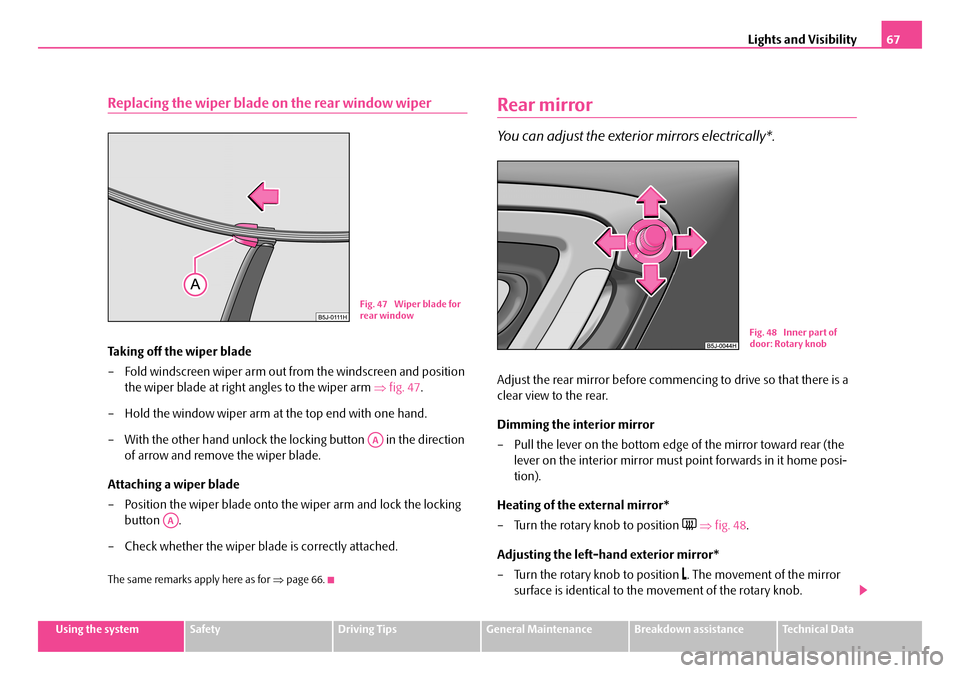
Taking off the wiper blade
– Fold windscreen wiper arm out fr om the windscreen and position
the wiper blade at right angles to the wiper arm ⇒fig. 47.
– Hold the window wiper arm at the top end with one hand.
– With the other hand unlock the locking button in the direction
of arrow and remove the wiper blade.
Attaching a wiper blade
– Position the wiper blade onto th e wiper arm and lock the locking
button .
– Check whether the wiper blade is correctly attached.
The same remarks apply here as for ⇒page 66.
Rear mirror
You can adjust the exterior mirrors electrically*.
Adjust the rear mirror before commencing to drive so that there is a
clear view to the rear.
Dimming the interior mirror
– Pull the lever on the bottom edge of the mirror toward rear (the
lever on the interior mirror must point forwards in it home posi-
tion).
Heating of the external mirror*
– Turn the rotary knob to position ⇒fig. 48.
Adjusting the left-hand exterior mirror*
– Turn the rotary knob to position . The movement of the mirror
surface is identical to the movement of the rotary knob.
Fig. 47 Wiper blade for rear window
AA
AA
Fig. 48 Inner part of door: Rotary knob
NKO A05Fabia 20.book Page 67 Tuesday, September 26, 2006 8:38 AM
Page 70 of 258
Seats and Stowage69
Using the systemSafetyDriving TipsGeneral MaintenanceBreakdown assistanceTechnical Data
Seats and Stowage
Front seats
Basic information
The front seats have a wide range of different settings and can thus be matched to the physical characteristics of the driver and front passenger. Correct adjust-ment of the seats is particularly important for
•safely and quickly reaching the controls,
•a relaxed, fatigue-free body position,
•achieving the maximum protection offered by the seat belts and the airbag system.
The chapters which follow describe th e procedure which you should adopt for adjusting the seats.
WARNING
•Never transport more occupants than the maximum seating in the vehicle.
•Each occupant must correctly fasten the seat belt belonging to the seat. Children must be fastened ⇒page 155, “Transporting children safely” with a suitable restraint system.
•The front seats and the head restraints must always be adjusted to match the body size of the seat occupant as well as the seat belts must always be correctly fastened in order to provide an optimal protection for you and your occupants.
•Always keep your feet in the footwell when the car is being driven - never place your feet on the instrument panel, out of the window or on the surfaces of the seats. This is particularly important for the front seat
passenger. You will be exposed to increased risk of injury if it becomes necessary to apply the brake or in the ev ent of an accident. If an airbag is deployed, you may suffer fatal injuries when adopting an incorrect seated position!
•It is important for the driver and front passenger to maintain a distance of at least 25 cm from the steering wheel or dash panel. Not maintaining this minimum distance will mean that the airbag system will not be able to properly protect you - hazard! The front seats and the head restraints must always also be correctly adjusted to match the body size of the occupant.
•Ensure that there are no objects in the footwell as any objects may get behind the pedals during a drivin g or braking manoeuvre. You would then no longer be able to operate the clutch, to brake or accelerate.
WARNING (continued)
NKO A05Fabia 20.book Page 69 Tuesday, September 26, 2006 8:38 AM
Page 72 of 258

Seats and Stowage71
Using the systemSafetyDriving TipsGeneral MaintenanceBreakdown assistanceTechnical Data
Head restraints
Best protection is achieved if the top edge of the head restraint is at
the same level as the u pper part of your head.
Adjusting the height of a head restraint
– Grasp the side of the head restraint with both hands and push the
head restraint in the direction of axle of the metal guide rods, in the
direction of arrow ⇒page 71, fig. 50 to the top or to the bottom.
– Move the head restraint downwards if required by pressing the
locking button ⇒page 71, fig. 51 and by pressing with the other
hand the head restraint downwards.
Removing and installing a head restraint
– Pull the head restraint out of the ba ckrest of the seat as far as the
stop.
– Press the locking button in the direction of arrow ⇒page 71,
fig. 51 and pull the head restraint out.
– To re-insert the head restraint, push it down into the backrest of the
seat far enough until you hear the locking button engage.
The position of the front, rear outer head restraints and the rear middle head restraint* is adjustable for height.
The head restraints must be adjusted to match the size of the seat occupant. Correctly adjusted head restraints togeth er with the seat belts offer effective protection for the occupants ⇒page 135.
WARNING
•The head restraints must be correctly adjusted in order to offer effec- tive protection for the occupants in the event of an accident.
•Do not drive under any circumstance with removed head restraints - risk of injury!
Fig. 50 Adjusting head restraint
Fig. 51 Removing a head restraint
NKO A05Fabia 20.book Page 71 Tuesday, September 26, 2006 8:38 AM
Page 74 of 258

Seats and Stowage73
Using the systemSafetyDriving TipsGeneral MaintenanceBreakdown assistanceTechnical Data
Rear seats
Folding the rear seats forwards
To enlarge the luggage compartment, the rear seats can be folded
forwards or the rear seats can be removed ⇒page 74. The rear seats
can be folded forward individually on vehicles with divided rear
seats*.
Folding the rear seats forwards
– Before folding the rear seats forwar d adjust the front seats in such
a way that they are not damaged when folding forward the rear
seats.
– Pull up the rear seat in the direction of arrow ⇒fig. 53 and fold
forwards in direction of arrow .
– Unlock the rear seat backrest by pulling the securing knob and
fold it forward ⇒fig. 54.
– Pull the head restraints out of the seat backrest.
– The head restraints can be inserted into the relevant holes of the
folded forwards rear seats ⇒fig. 55.
– Fold the seat backrests forwards completely.
Folding the rear seats back into position
– Install the head restraint in the slightly lifted rear seat backrest.
– Then push the seat backrest back into the upright position until the
securing knob clicks into place - check by pulling on the rear seat
backrest.
– Make sure that the red surface of the securing knob is not
visible ⇒page 73, fig. 54.
– Fold the rear seat back into its original position.
Fig. 53 Folding the rear seat forwards
Fig. 54 Unlock the seat backrest
A1
A2
AA
AA
NKO A05Fabia 20.book Page 73 Tuesday, September 26, 2006 8:38 AM
Page 76 of 258
Seats and Stowage75
Using the systemSafetyDriving TipsGeneral MaintenanceBreakdown assistanceTechnical Data
Pedals
You should use only footmats which do not obstruct the movement of the pedals and have an anti-slip protection.
We recommend only to use footmats from Škoda genuine accessories offered by your Škoda dealer.
Operation of the pedals must not be hindered!
WARNING
•Greater pedal distances may be need ed when there is a fault in the brake system.
•Do not place any footmats or other additional floor coverings in the area of the pedals in order to ensure that all the pedals can be fully depressed and are able to return unobstructed to their initial position - risk of accident!
•There must be no objects on the floor which could roll under the pedals. You would then no longer be able to apply the brakes, operate the clutch or accelerator - risk of accident!
luggage compartment
Loading the luggage compartment
Please observe the following in the interest of having good handling
characteristics of your vehicle:
– Distribute the items of luggage as evenly as possible.
– Place heavy objects as far forward as possible.
– Attach the items of luggage to the lashing eyes or the safety net*
⇒ page 76.
In the event of an accident, there is such a high kinetic energy which is produced by small and light objects that they can cause severe injuries. The magnitude of the kinetic energy depends on the speed at which the vehicle is travelling and on the weight of the object. The speed at which the vehicle is travelling is in this case the more significant factor.
Example: In the event of a frontal collision at a speed of 50 km/h, an unsecured object with a weight of 4.5 kg produc es an energy, which corresponds to 20 times its own weight. This means that it results in a weight of approx. 90 kg. You can imagine the injuries that can occur, if this “bullet” is flying through the inte- rior compartment and hits an occupant.
WARNING
•Store the objects in the luggage comp artment and attach them to the lashing eyes.
•Loose objects in the passenger compartment can be thrown forward during a sudden manoeuvre or in case of an accident and can injure the occupants or other oncoming traffic. This risk is still increased, if the objects which are flying around are hit by a deployed airbag. In this case, the objects which are thrown back can injure the occupants - hazard.
•Please note that the handling properties of your vehicle may be affected when transporting heavy objects as a result of the displacement of the centre of gravity. The speed an d style of driving must be adjusted accordingly.
•The items carried in the luggage compartment should be stored in such a way that no objects are able to slip forward if there are any sudden driving or braking manoeuvres undertaken - risk of injury!
•When transporting fastened objects which are sharp and dangerous in the luggage compartment enlarged by folding the rear seats forward or removing the rear seats, ensure the safety of the passengers trans-
NKO A05Fabia 20.book Page 75 Tuesday, September 26, 2006 8:38 AM
Page 78 of 258

Seats and Stowage77
Using the systemSafetyDriving TipsGeneral MaintenanceBreakdown assistanceTechnical Data
•The load to be transported must be fixed in place in such a way that it cannot move during the journey and when braking.
Folding hooks*
A folding hook* for attaching small items of luggage, such as bags etc., is provided on both sides of the luggage compartment ⇒fig. 58.
An item of luggage weighing up to 10 kg can be attached to the hook.
The luggage compartment cover
You can use the luggage compartment cover behind the head
restraints for storing light and soft items.
The luggage compartment cover can be removed as required if one
must transport bulky goods.
– Unhook the support straps on the tailgate ⇒fig. 59.
– Slightly raise the luggage compartment cover.
– Remove the luggage compartment cover from the holders by
pulling to the rear or with adequa te blows to the bottom side of the
luggage compartment cover in the area between the holders.
WARNING (continued)
Fig. 58 Luggage compartment: folding hooks
Fig. 59 Removing the luggage compartment cover
A1
A2
NKO A05Fabia 20.book Page 77 Tuesday, September 26, 2006 8:38 AM
Page 80 of 258
Seats and Stowage79
Using the systemSafetyDriving TipsGeneral MaintenanceBreakdown assistanceTechnical Data
The luggage compartment cover can also be put into the lower position on the supporting elements ⇒fig. 60.
The luggage compartment cover in the lower position is foreseen for storage of small objects of up to 6 kg. in weight.
The luggage compartment cover can also be stowed behind the rear seats ⇒ fig. 61.
WARNING
No objects should be placed on the luggage compartment cover, the vehicle occupants could be endangered if there is sudden braking or the vehicle collides with something.
Caution
Please ensure that the heating elements of the rear window heater are not damaged as a result of obje cts placed in this area.
Note
When opening the tailgate, lift the luggage compartment cover - risk that objects placed in this area can slip forward!
The roof rack*
Description
Pay attention to the following points if you wish to transport luggage or other items on the roof of your vehicle:
•A special roof luggage rack system was developed for the vehicle, that is why you should only use a roof luggage rack which has been released for use by Škoda Auto a.s.
•The base carrier is the basis for a comp lete roof luggage rack system. Sepa- rate additional holders are required for safety reasons for transporting luggage, bikes, surfboards, skis and boats.
•The basic version of the roof luggage rack system and further components are obtainable as accessories from Škoda Service Partners.
Caution
•If you use other roof rack systems or if the roof bars are not properly fitted, then any damage which may result to yo ur car is not covered by the warranty agreements. It is therefore essential to pay attention to the fitting instructions supplied with the roof luggage rack system.
•On models fitted with a power sliding/ tilting roof, ensure that the opened sliding/tilting roof does not strike any items of luggage transported on the roof.
•Ensure that the opened tailgate does not collide with the roof load.
For the sake of the environment
The increased aerodynamic drag results in a higher fuel consumption. One should therefore take off the roof bar system after use.
NKO A05Fabia 20.book Page 79 Tuesday, September 26, 2006 8:38 AM
Page 82 of 258

Seats and Stowage81
Using the systemSafetyDriving TipsGeneral MaintenanceBreakdown assistanceTechnical Data
Front cup holder
You can place two cups or beverage cans into the recesses ⇒fig. 63.
WARNING
•Do not place any hot beverages into the cup holder. If the vehicle moves, the hot beverages may spill - risk of scalding!
•Do not use any cups or beakers which are made of brittle material (e.g. glass, porcelain). You might be injured by them in the event of an accident.
Caution
Do not open the beverages in the cup holder while driving. There is a risk of spilling e.g. when braking and therefore the electrical components or the seat upholstery can be damaged.
Rear cup holder*
You can place one cup or beverage can into the recess ⇒fig. 64.
WARNING
•Do not place any hot beverages into the cup holder. If the vehicle moves, the hot beverages may spill - risk of scalding!
•Do not use any cups or beakers wh ich are made of brittle material (e.g. glass, porcelain). You might be injured by them in the event of an accident.
Caution
Do not open the beverages in the cup hold er while driving. There is a risk of spilling e.g. when braking and therefore the electrical components or the seat upholstery can be damaged.
Fig. 63 Front centre console: Cup holderFig. 64 Centre console: Cup holder
NKO A05Fabia 20.book Page 81 Tuesday, September 26, 2006 8:38 AM