warning lights SKODA FABIA 2006 2.G / 5J Service Manual
[x] Cancel search | Manufacturer: SKODA, Model Year: 2006, Model line: FABIA, Model: SKODA FABIA 2006 2.G / 5JPages: 258, PDF Size: 44.86 MB
Page 69 of 258
Lights and Visibility68
Adjusting the right-hand exterior mirror*
– Turn the rotary knob to position . The movement of the mirror
surface is identical to the movement of the rotary knob.
The exterior mirror heater only operates when the engine is running.
WARNING
•Convex (curved outward) or a spherical exterior mirrors increase the vision field. They do, however, ma ke objects appear smaller in the mirror. These mirrors are only of limited use, therefore, for estimating distances to the following vehicles.
•Use whenever possible the interior rear mirror, for estimating the distances to the following vehicles.
Note
•Do not touch the surfaces of the exterior mirrors if the exterior mirror heater is switched on.
•You can set the exterior mi rrors by hand, if the power setting function fails at any time, by pressing on the edge of the mirror surface.
•Contact your specialist garage if a fault exists with the power setting of the exterior mirrors.
NKO A05Fabia 20.book Page 68 Tuesday, September 26, 2006 8:38 AM
Page 94 of 258

Heating and air conditioning system93
Using the systemSafetyDriving TipsGeneral MaintenanceBreakdown assistanceTechnical Data
Recirculated air mode
In recirculated air mode air is sucked out of the interior of the
vehicle and then fed back into the interior.
Recirculated air mode prevents polluted air outside the vehicle from
getting into the vehicle, for example when driving through a tunnel or
when standing in a traffic jam.
Switching recirculated air mode on
– Press button , the button symbol lights up ⇒page 91,
fig. 81 .
Switching recirculated air mode off
– Press button again, the button symbol goes out.
The recirculated air mode is switched of f automatically if the air distribution control is in position ⇒page 91, fig. 81. You can also switch recirculated air mode on again from this setting by repeatedly pressing button .
WARNING
You should not leave recirculated air mode on over a longer period of time, as “stale” air may result in fatigue in the driver and occupants, divert your attention and also cause the windows to mist up. The risk of having an accident increases. Switch recirculated air mode off as soon as the windows begin misting up.
Air outlet vents
Fig. 82 Air outlet vents
Open air outlet vents
– Turn the rotary knob into the upper position.
Close air outlet vents
– Turn the rotary knob into the lower position.
Redirecting air flow
– The horizontal as well as the vertic al direction of the air flow is set
with the handle in the middle of the air outlet vents.
You can set the air supply to the individual vents with the air distribution control ⇒page 91, fig. 81. Air outlet vents 3 and 4 can also be opened or closed individually.
Unwarmed or cooled air will flow out of the opened air outlet vents according to the setting of the control dial ⇒page 91, fig. 81 and according to atmos- pheric conditions.
AC
AC
AA
NKO A05Fabia 20.book Page 93 Tuesday, September 26, 2006 8:38 AM
Page 98 of 258

Heating and air conditioning system97
Using the systemSafetyDriving TipsGeneral MaintenanceBreakdown assistanceTechnical Data
Recirculated air mode
In recirculated air mode air is sucked out of the interior of the
vehicle and then fed back into the interior.
Recirculated air mode prevents polluted air outside the vehicle from
getting into the vehicle, for example when driving through a tunnel or
when standing in a traffic jam.
Switching recirculated air mode on
– Press switch ⇒page 95, fig. 83 the switch symbol lights up.
Switching recirculated air mode off
– Press button again, the button symbol goes out.
The recirculated air mode is switched of f automatically if the air distribution control is in position ⇒page 95, fig. 83. You can also switch recirculated air mode on again from this setting by repeatedly pressing button .
WARNING
You should not leave recirculated air mode on over a longer period of time, as “stale” air may result in fatigue in the driver and occupants, divert your attention and also cause the windows to mist up. The risk of having an accident increases. Switch recirculated air mode off as soon as the windows begin misting up.
Air outlet vents
Fig. 84 Air outlet vents
Open air outlet vents
– Turn the rotary knob into the upper position.
Close air outlet vents
– Turn the rotary knob into the lower position.
Redirecting air flow
– The horizontal as well as the vertic al direction of the air flow is set
with the handle in the middle of the air outlet vents.
You can set the air supply to the individual vents with the air distribution control ⇒page 95, fig. 83. Air outlet vents 3 and 4 can also be opened or closed individually:
Unwarmed or cooled air will flow out of the air outlet vents according to the setting of control dial ⇒page 95, fig. 83 and the atmospheric conditions.
AC
AC
AA
NKO A05Fabia 20.book Page 97 Tuesday, September 26, 2006 8:38 AM
Page 103 of 258
Heating and air conditioning system102
Lengthy and uneven distribution of the air flow out of the vents (in particular at the leg area) and large differences in temperature, for example when getting out of the vehicle, can result in chills in sensitive persons.
Controlling blower
There are a total of seven blower stages available.
The Climatronic system controls the blower stages automatically in
line with the interior temperature. You can also, however, adapt the
blower stages manually to suit your particular needs.
– Turn the control dial ⇒page 99, fig. 85 to the left (reduce
blower speed) or right (increase blower speed).
Switch off the blowers, the Climatronic is switched off and in the display shows OFF .
The set blower speed is displayed next to the control dial when the respec- tive number of warning lights come on.
WARNING
•“Stale air” may result in fatigue in the driver and occupants, reduce attention levels and also cause the windows to mist up. The risk of having an accident increases.
•Do not switch the Climatronic system off for longer than necessary.
•Switch the Climatronic system on as soon as the windows mist up.
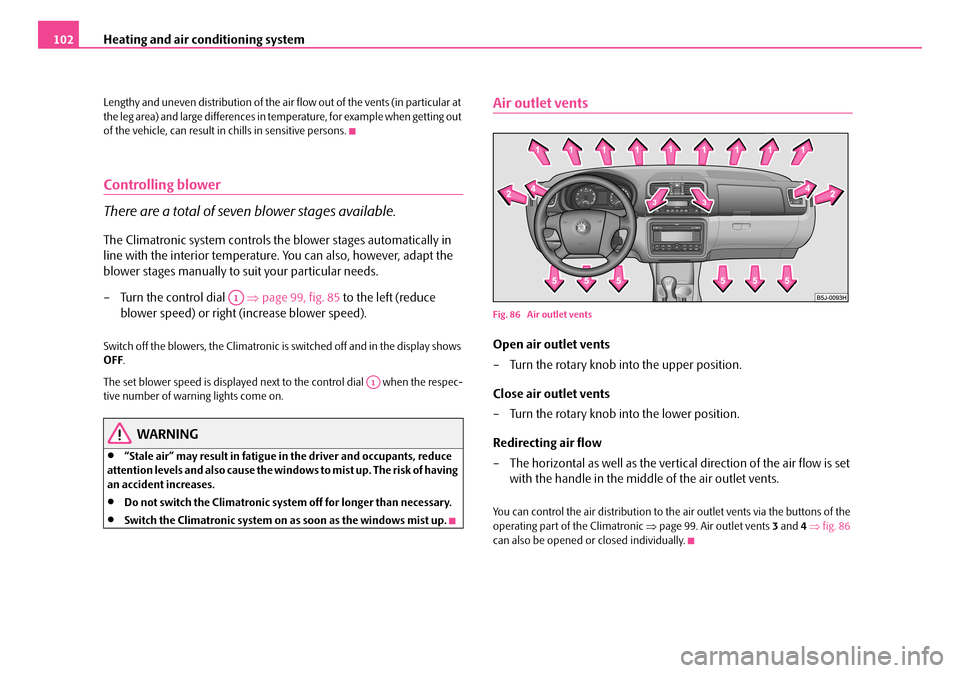
Air outlet vents
Fig. 86 Air outlet vents
Open air outlet vents
– Turn the rotary knob into the upper position.
Close air outlet vents
– Turn the rotary knob into the lower position.
Redirecting air flow
– The horizontal as well as the vertic al direction of the air flow is set
with the handle in the middle of the air outlet vents.
You can control the air distribution to the air outlet vents via the buttons of the operating part of the Climatronic ⇒page 99. Air outlet vents 3 and 4 ⇒fig. 86 can also be opened or closed individually.
A1
A1
NKO A05Fabia 20.book Page 102 Tuesday, September 26, 2006 8:38 AM
Page 105 of 258
Starting-off and Driving104
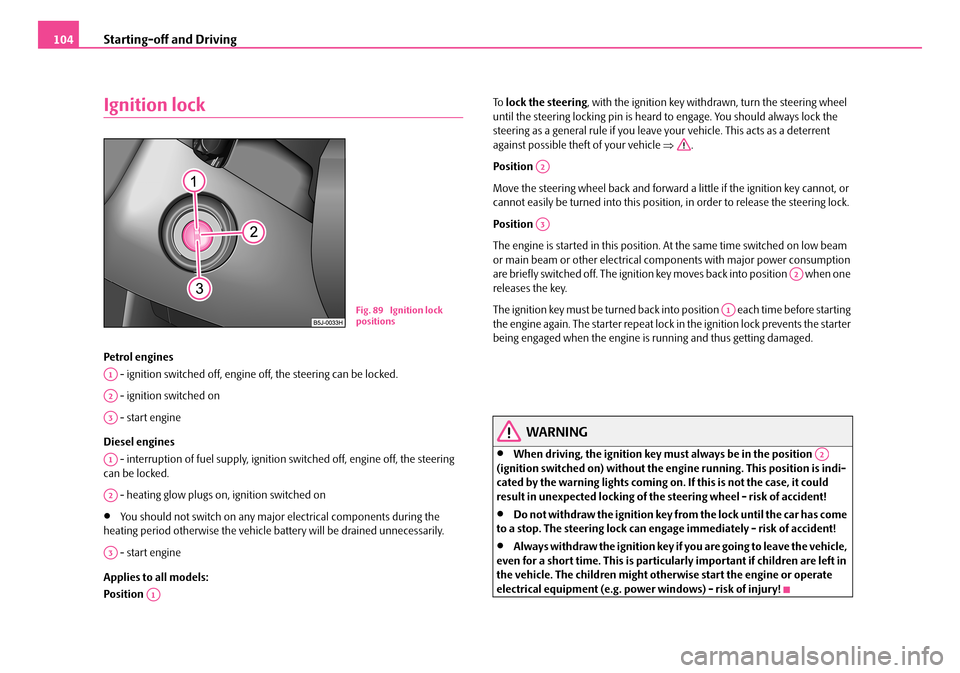
Ignition lock
Petrol engines
- ignition switched off, engine off, the steering can be locked.
- ignition switched on
- start engine
Diesel engines
- interruption of fuel supply, ignition switched off, engine off, the steering can be locked.
- heating glow plugs on, ignition switched on
•You should not switch on any major electrical components during the heating period otherwise the vehicle ba ttery will be drained unnecessarily.
- start engine
Applies to all models:
Position
To lock the steering, with the ignition key withdrawn, turn the steering wheel until the steering locking pin is heard to engage. You should always lock the steering as a general rule if you leave your vehicle. This acts as a deterrent against possible thef t of your vehicle ⇒.
Position
Move the steering wheel back and forward a little if the ignition key cannot, or cannot easily be turned into this position, in order to release the steering lock.
Position
The engine is started in this position. At the same time switched on low beam or main beam or other electrical co mponents with major power consumption are briefly switched off. The ignition key moves back into position when one releases the key.
The ignition key must be turned back into position each time before starting the engine again. The starter repeat lock in the ignition lock prevents the starter being engaged when the engine is running and thus getting damaged.
WARNING
•When driving, the ignition key must always be in the position (ignition switched on) without the engine running. This position is indi- cated by the warning lights coming on. If this is not the case, it could result in unexpected locking of the steering wheel - risk of accident!
•Do not withdraw the ignition key from the lock until the car has come to a stop. The steering lock can enga ge immediately - risk of accident!
•Always withdraw the ignition key if you are going to leave the vehicle, even for a short time. This is particularly important if children are left in the vehicle. The children might othe rwise start the engine or operate electrical equipment (e.g. power windows) - risk of injury!
Fig. 89 Ignition lock positions
A1
A2
A3
A1
A2
A3
A1
A2
A3
A2
A1
A2
NKO A05Fabia 20.book Page 104 Tuesday, September 26, 2006 8:38 AM
Page 109 of 258
Starting-off and Driving108
The handbrake warning light lights up when the handbrake is applied, provided the ignition is on.
A warning signal sounds and the following text appears in the display* if you have inadvertently driven off with the handbrake applied:
HANDBRAKE ON
The handbrake warning is activated if you drive at a speed of more than 6 km/h for more than 3 seconds.
WARNING
•Please note that the handbrake must be fully released. A handbrake which is only partially released can re sult in the rear brakes overheating which will have a negative effect on the operation of the brake system - risk of accident! In addition this can result in premature wear of the rear brake pads.
•Never leave children unattended in the vehicle. The children might, for example, release the handbrake or take the vehicle out of gear. The vehicle might then move off - risk of accident!
Caution
After the car has come to a stop, always first of all apply the handbrake firmly before then additionally engaging a gear (manual gearbox) or moving the selector lever into position P (automatic gearbox).
Parking aid*
The parking aid provides a warning of obstacles behind the
vehicle.
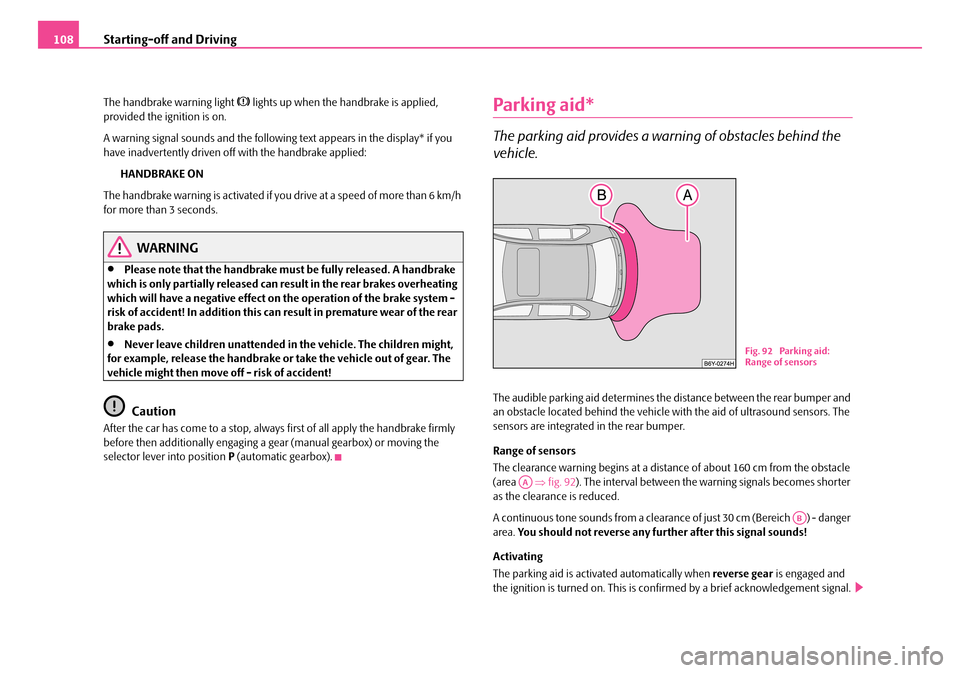
The audible parking aid determines the distance between the rear bumper and an obstacle located behind the vehicle wi th the aid of ultrasound sensors. The sensors are integrated in the rear bumper.
Range of sensors
The clearance warning begins at a distan ce of about 160 cm from the obstacle (area ⇒fig. 92). The interval between the warning signals becomes shorter as the clearance is reduced.
A continuous tone sounds fr om a clearance of just 30 cm (Bereich ) - danger area. You should not reverse any further after this signal sounds!
Activating
The parking aid is activated automatically when reverse gear is engaged and the ignition is turned on. This is conf irmed by a brief acknowledgement signal.
Fig. 92 Parking aid: Range of sensors
AA
AB
NKO A05Fabia 20.book Page 108 Tuesday, September 26, 2006 8:38 AM
Page 115 of 258
Automatic gearbox114
When the ignition is switched on and the selector lever is in position R, the reverse lights will come on.
N - Neutral
The transmission is in Neutral in this position.
The brake pedal must be depressed (if the lever is in its position for longer than 2 seconds) in order to move the se lector lever out of the position N into the position D, with the ignition switched on, on a vehicle travelling at less than 5 km/hour or on a stationary vehicle.
The brake pedal must be depressed (if the lever is in its position for longer than 2 seconds) in order to move the se lector lever out of the position N into the position R, with the ignition switched on, on a vehicle travelling at less than 5 km/hour or on a stationary vehicle.
D - Drive, position for driving forward
When the selector lever is in this position, the forward gears are shifted up and down automatically in line with engi ne load, vehicle speed and the dynamic shift programme.
You must depress the brake pedal ⇒ if you wish to move the selector lever into position D from N when the vehicle is travelling at less than 5 km/hour or is stationary.
In certain circumstances (e.g. when driving in mountainous regions or when towing a trailer) it may be beneficial to select the manual shift programme ⇒ page 116 for a short time in order to adapt the gearbox ratios manually to the driving situations.
S - Position for sporty style of driving
Shifting up later into a higher gear make s it possible to fully exploit the power potential of the engine. The gearbox also then shifts down at higher engine speeds as in the position D.
The gearbox does not shift into the 6th gear in the position S, because the maximum speed is achieved with the 5th gear.
The Shiftlock on the selector lever grip must be pressed when moving the selector lever out of the position D into the position S.
WARNING
•Never move the selector lever into position R or P when driving - risk of an accident!
•When the engine is running and the vehicle is stationary, it is neces- sary to hold the car with the brak e pedal in all the positions of the selector lever (except P and N) since the power transmission is never completely interrupted, also not when the engine is idling - the vehicle "creeps".
•You must on no account unintentionally operate the throttle (e.g. by hand from the engine compartment) if a drive position is engaged when the car is stationary. The vehicle wo uld otherwise immediately start off - also when the handbrake is firmly applied - risk of an accident!
•You must move the selector lever into position P and firmly apply the handbrake first before you or any other person opens the bonnet and starts working on the engine when it is running - risk of accident! It is also essential to observe all warnings ⇒page 198, “Working in the engine compartment”.
Selector lever lock
Automatic selector lever lock
With the ignition on, the selector lever is locked when it is in the positions P and N . You must first of all depress the brake pedal in order to move the selector lever out of this position. The warning light ⇒page 33 lights up in the instru- ment cluster as a reminder for the driver when the selector lever is in position P and N:
A time delay element ensures that the selector lever is not blocked when rapidly switching over the position N (e.g. from R to D). This does, for example, allow
NKO A05Fabia 20.book Page 114 Tuesday, September 26, 2006 8:38 AM
Page 124 of 258

Communication123
Using the systemSafetyDriving TipsGeneral MaintenanceBreakdown assistanceTechnical Data
You can operate the mobile phone via the voice control ⇒page 120 or via the buttons of the multi-functional module* ⇒page 119.
Note
It a yellow or red warning symbol lights up in the information display, the menu phonebook cannot be selected.
Voice commands
Voice commands for mobile phone operation
Voice commands for operating the phone phone book
Other possible commands
Voice commandActivity
ENTER PIN/PIN CODEAfter this command the PIN code of the mobile phone can be entered ⇒page 124.
DIAL NUMBERAfter this command a telephone number can be entered which establishe s a connection to the requested partner ⇒page 124.
REDIALAfter this command the last selected telephone number is selected again ⇒page 125.
Voice commandActivity
SAVE/STORE NAMES/NAME/NUMB ER
After this command a name with its telephone number can be stored in the phone phone book ⇒ page 125.
SELECT NAMES/NAMEAfter this command a telephone number which was stored under its given name in the phone phone book can be selected ⇒page 126.
DELETE NAMES/NAMEAfter this command a name in the phone phone book can be erased ⇒page 127.
LISTEN TO/PLAY PHONEBOOKAfter this command you can listen-in to the phone phone book ⇒page 126.
DELETE PHONEBOOKAfter this command the complete phone book or a name can be erased ⇒page 127.
Voice commandActivity
DIALThe telephone number is selected.
STOREThe name and the telephone number are stored in the phone phonebook or the entered PIN code is stored.
REPEATThe entered name or the digits are repeated. Then the system requests with voice response “ please proceed ” the entry of further digits or commands.
NKO A05Fabia 20.book Page 123 Tuesday, September 26, 2006 8:38 AM
Page 154 of 258
Airbag system153
Using the systemSafetyDriving TipsGeneral MaintenanceBreakdown assistanceTechnical Data
If the airbag was switched of f using diagnostic equipment:
•The airbag indicator light in the instrument cluster lights up for about 3 seconds after switching on the ignition an d then flashes after that for about 12 seconds.
If the airbag was switched off using the airbag switch* on the side of the dash panel:
•The airbag warning light comes on in the instrument cluster for about 3 seconds each time the ig nition is switched on.
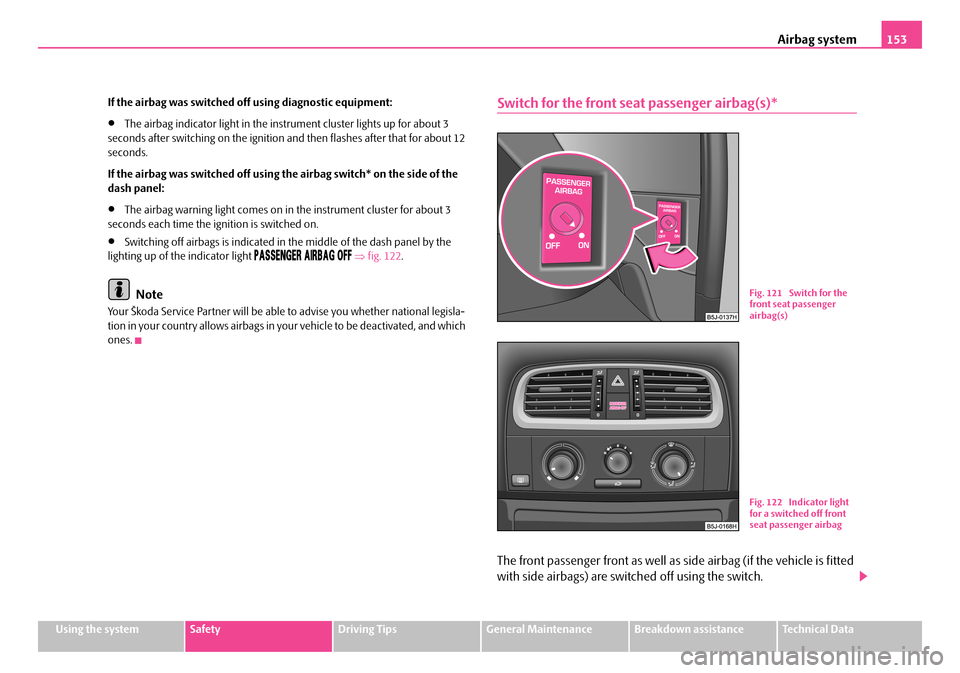
•Switching off airbags is indicated in the middle of the dash panel by the lighting up of the indicator light ⇒fig. 122.
Note
Your Škoda Service Partner will be able to advise you whether national legisla- tion in your country allows airbags in yo ur vehicle to be deactivated, and which ones.
Switch for the front seat passenger airbag(s)*
The front passenger front as well as side airbag (if the vehicle is fitted
with side airbags) are switched off using the switch.
Fig. 121 Switch for the front seat passenger airbag(s)
Fig. 122 Indicator light for a switched off front seat passenger airbag
NKO A05Fabia 20.book Page 153 Tuesday, September 26, 2006 8:38 AM
Page 155 of 258
Airbag system154
Deactivating an airbag
– Switch off the ignition.
– Turn the slot of the airbag switch using the ignition key in the direc-
tion of the arrow to the position OFF ⇒page 153, fig. 121.
– Check whether the airbag indicator light in
the middle of the dash panel lights up ⇒page 153, fig. 122 when
the ignition is turned on.
Switching on an airbag
– Switch off the ignition.
– Turn the slot of the airbag switch using the ignition key in the direc-
tion of the arrow to the position ON ⇒page 153, fig. 121.
– Check whether the airbag indicator light in
the middle of the dash panel lights up ⇒page 153, fig. 122 when
the ignition is turned on.
The airbags should only be switched off under exceptional circumstances ⇒ page 152.
Indicator light (airbag switched off)
The airbag indicator light is located in the middle of the dash panel ⇒page 153, fig. 122 .
If the front passenger airbag is switched on, the airbag warning light comes on for a few seconds each time the ignition is switched on.
In cases where the front passenger front airbag or side airbag is switched off the airbag indicator light comes on for a few seconds after switching on the igni- tion, goes out for about a second and then comes on again.
There is a system fault present in the airbag switch off ⇒ if the indicator light flashes.
WARNING
•The driver is responsible for whethe r the airbags are switched on or switched off.
•Only switch off the airbag when the ignition is switched off! Other- wise a fault can occur in the system for the airbag deactivation.
•If the warning light (airbag switched off) flashes:
− Front passenger airbag is not deployed in the event of an accident!
− It is also important to have the system inspected without delay by a specialist garage.
NKO A05Fabia 20.book Page 154 Tuesday, September 26, 2006 8:38 AM