service SKODA FABIA 2008 2.G / 5J User Guide
[x] Cancel search | Manufacturer: SKODA, Model Year: 2008, Model line: FABIA, Model: SKODA FABIA 2008 2.G / 5JPages: 252, PDF Size: 40.88 MB
Page 32 of 252
Unlocking and locking31
Using the systemSafetyDriving TipsGeneral MaintenanceBreakdown assistanceTechnical Data
Changing the key battery
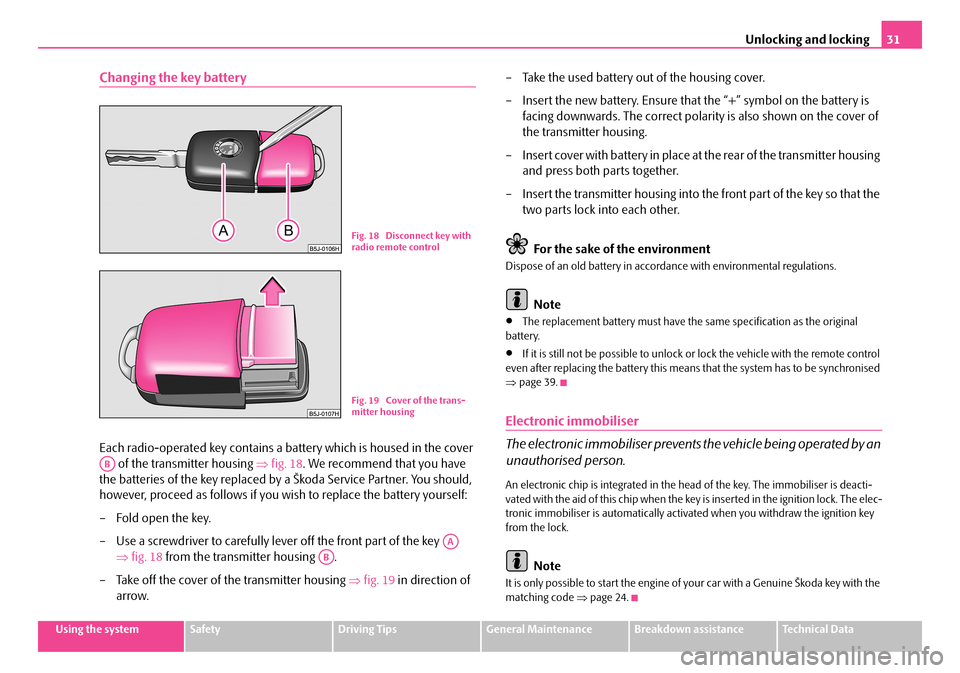
Each radio-operated key contains a battery which is housed in the cover
of the transmitter housing ⇒fig. 18. We recommend that you have
the batteries of the key replaced by a Škoda Service Partner. You should,
however, proceed as follows if you wish to replace the battery yourself:
– Fold open the key.
– Use a screwdriver to carefully lever off the front part of the key
⇒fig. 18 from the transmitter housing .
– Take off the cover of the transmitter housing ⇒fig. 19 in direction of
arrow.
– Take the used battery out of the housing cover.
– Insert the new battery. Ensure that the “+” symbol on the battery is
facing downwards. The correct polarity is also shown on the cover of
the transmitter housing.
– Insert cover with battery in place at the rear of the transmitter housing
and press both parts together.
– Insert the transmitter housing into the front part of the key so that the
two parts lock into each other.
For the sake of the environment
Dispose of an old battery in accordance with environmental regulations.
Note
•The replacement battery must have the same specification as the original battery.
•If it is still not be possible to unlock or lock the vehicle with the remote control even after replacing the battery this means that the system has to be synchronised ⇒page 39.
Electronic immobiliser
The electronic immobiliser prevents the vehicle being operated by an
unauthorised person.
An electronic chip is integrated in the head of the key. The immobiliser is deacti-vated with the aid of this chip when the key is inserted in the ignition lock. The elec-tronic immobiliser is automatically activated when you withdraw the ignition key from the lock.
Note
It is only possible to start the engine of your car with a Genuine Škoda key with the matching code ⇒page 24.
Fig. 18 Disconnect key with radio remote control
Fig. 19 Cover of the trans-mitter housing
AB
AA
AB
NKO A05F 20.book Page 31 Wednesday, April 2, 2008 1:02 PM
Page 34 of 252
Unlocking and locking33
Using the systemSafetyDriving TipsGeneral MaintenanceBreakdown assistanceTechnical Data
Central locking system*
Description
Unlocking or locking the vehicle causes all doors to be unlocked or locked at the same time by the central locking system. The boot lid is unlocked when opening. It can be opened by pressing the hand grip above the licence plate.
Operation of the central locking system is possible:
•from the outside using the vehicle key ⇒page 34,
•using the buttons for the central locking system ⇒page 35,
•by using the remote control ⇒page 37.
Indicator light in the driver's door on vehicles without anti-theft alarm system
After the car is locked, the indicator light flashes after 2 seconds.
After the car is locked with the deactivated safe securing system, the indicator light flashes only after 30 seconds.
Indicator light in the driver's door on vehicles with anti-theft alarm system
After locking the vehicle the indicator light flashes for 2 seconds fast, then more slowly.
If the vehicle is locked and the safe securing system ⇒page 34 is not operating, the indicator light in the driver door flashes for about 2 seconds fast, goes out and starts to flash slowly after about 30 seconds.
If the indicator light first of all flashes fast for about 2 seconds, afterwards lights up for about 30 seconds and then flashes slowly, there is a fault in the system of the central locking or the interior monitor* ⇒page 40. Contact a specialist garage to obtain assistance.
Convenience operation of windows
One can open and close the electrically powered windows when unlocking and locking the vehicle ⇒page 42, “Window convenience operation”.
Opening a single door*
This function allows one to just unlock the driver's door. The other doors remain locked and are only unlocked when the command is repeated. The single door opening function can be first activated by recoding the control unit of the central locking system. This work is undertaken by a Škoda Service Partner can give you more information.
Automatic locking*
All the doors and the boot lid are locked automatically once the car reaches a speed of about 15 km/h.
If the ignition key is withdrawn, the car is then automatically unlocked again. In addition, it is possible for the driver to unlock the car by pressing the central locking button or by pulling the door opening lever.
If you wish, your Škoda Service Partner can convert the central locking system of your car to the automatic locking mode.
WARNING
•Locking the doors prevents involuntary opening in an exceptional situa-tion (an accident). Locked doors prevent unwanted entry into the vehicle from outside, for example at road crossings. Locked doors do, however, make it more difficult for rescuers to get into the vehicle in an emergency - danger to life!
Note
•In the event of an accident in which the airbags are deployed, the locked doors are automatically unlocked in order to enable rescuers to gain access to the vehicle.
•Only the front doors can be unlocked and locked using the key if the central locking system fails. You can operate the rear door manually.
−Emergency locking of the door ⇒page 36.
NKO A05F 20.book Page 33 Wednesday, April 2, 2008 1:02 PM
Page 38 of 252
Unlocking and locking37
Using the systemSafetyDriving TipsGeneral MaintenanceBreakdown assistanceTechnical Data
•Do not press on the rear window when closing the boot lid, it could crack - risk of injury!
Note
•After closing the boot lid, it is automatically locked within 1 seconds and the anti-theft alarm system* is activated. This applies only if the vehicle was locked before closing the boot lid.
•The function of the hand grip above the licence plate is deactivated when starting off or as of a speed of more than 5 km/hour for vehicles with central locking. The function of the hand grip is activated again when the vehicle has stopped and a door is opened.
•Hold the boot lid when opening.
Emergency unlocking of the boot lid
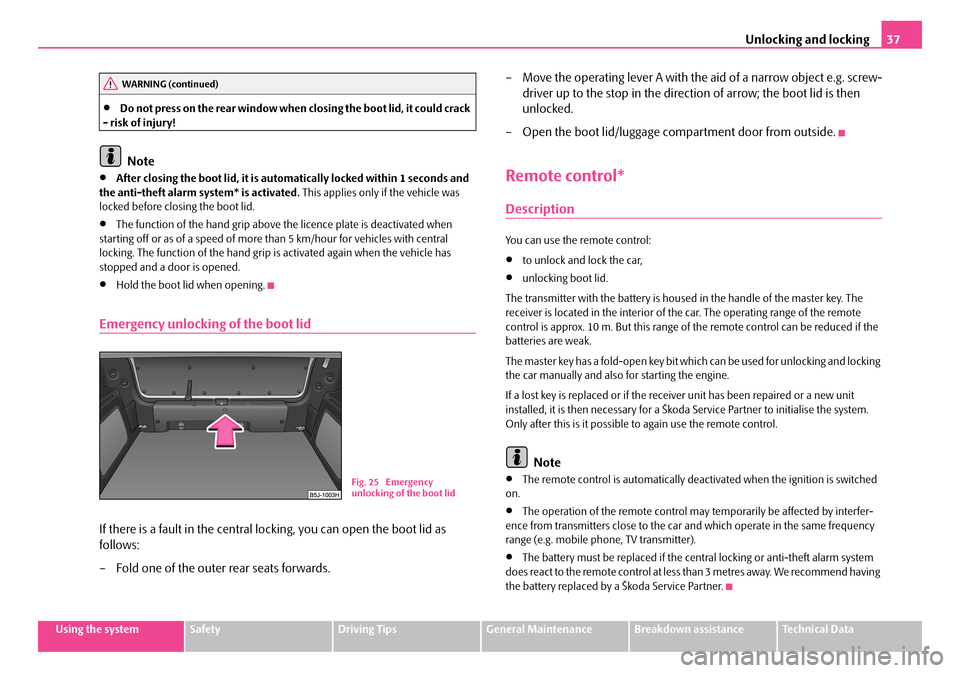
If there is a fault in the central locking, you can open the boot lid as
follows:
– Fold one of the outer rear seats forwards.
– Move the operating lever A with the aid of a narrow object e.g. screw-
driver up to the stop in the direction of arrow; the boot lid is then
unlocked.
– Open the boot lid/luggage compartment door from outside.
Remote control*
Description
You can use the remote control:
•to unlock and lock the car,
•unlocking boot lid.
The transmitter with the battery is housed in the handle of the master key. The receiver is located in the interior of the car. The operating range of the remote control is approx. 10 m. But this range of the remote control can be reduced if the batteries are weak.
The master key has a fold-open key bit which can be used for unlocking and locking the car manually and also for starting the engine.
If a lost key is replaced or if the receiver unit has been repaired or a new unit installed, it is then necessary for a Škoda Service Partner to initialise the system. Only after this is it possible to again use the remote control.
Note
•The remote control is automatically deactivated when the ignition is switched on.
•The operation of the remote control may temporarily be affected by interfer-ence from transmitters close to the car and which operate in the same frequency range (e.g. mobile phone, TV transmitter).
•The battery must be replaced if the central locking or anti-theft alarm system does react to the remote control at less than 3 metres away. We recommend having the battery replaced by a Škoda Service Partner.
WARNING (continued)
Fig. 25 Emergency unlocking of the boot lid
NKO A05F 20.book Page 37 Wednesday, April 2, 2008 1:02 PM
Page 40 of 252
Unlocking and locking39
Using the systemSafetyDriving TipsGeneral MaintenanceBreakdown assistanceTechnical Data
Synchonisation of the remote control
If the vehicle cannot be unlocked by actuating the remote control system then it is possible that the code in the key and the control unit in the vehicle are no longer synchronised. This can occur when the buttons on the radio-operated key are actu-ated a number of times outside of the operative range of the equipment or the battery on the remote control was replaced.
This means it is necessary to synchronise the code as follows:
•Press any button on the remote control.
•pressing of the button means that the door will unlock with the key within 1 minute.
Anti-theft alarm system*
The anti-theft alarm system increases the level of protection against people seeking to break into the vehicle. The system triggers audible and visual warning signals if an attempt is made to break into the vehicle.
How is the alarm system switched on?
The anti-theft alarm system is activated automatically when the vehicle is locked with the key on the closed driver's door or by using the remote control. It is acti-vated 30 seconds after closing the door.
How is the alarm system switched off?
The anti-theft alarm system is switched off if the vehicle is unlocked by only using the remote control. The vehicle is automatically locked again if the vehicle is not opened within 30 seconds after reactivating the anti-theft alarm system.
Once you unlock the vehicle by inserting the key into the driver door you then have to insert the key into the ignition lock and switch the ignition on within 15 seconds after unlocking the door in order to deactivate the anti-theft alarm system. The alarm will be triggered if you do not switch on the ignition within 15 seconds.
When is the alarm triggered?
The following security areas of the locked vehicle are monitored:
•Bonnet,
•Boot lid,
•Doors,
•Ignition lock,
•Vehicle interior* ⇒page 40,
•Angle of the vehicle*,
•A drop in voltage of the on-board power supply.
An alarm is immediately triggered if either of the two battery terminals is discon-nected while the anti-theft alarm system is activated.
How is the alarm switched off?
You switch the alarm off if you unlock the car with the radio remote control in the key or if you switch the ignition on.
Note
•The working life of the alarm siren is 5 years. More detailed information is avail-able from your Škoda Service Partner.
•Before leaving the car, check that all the doors, windows and the electric sliding/tilting roof* are properly closed in order to ensure that the anti-theft alarm system is fully operational.
•Coding of the radio remote control and the receptor part precludes the use of the radio remote control from other vehicles.
NKO A05F 20.book Page 39 Wednesday, April 2, 2008 1:02 PM
Page 55 of 252
Lights and Visibility54
therefore important to degrease the lips of the wiper blades after every pass through an automatic vehicle wash system.
WARNING
•If the windscreen wipers are handled carelessly, there is a risk of damage to the windscreen.
•You should clean the wiper blades regularly with a windscreen cleaner in order to avoid any smears. Clean a wiper blade with a sponge or cloth if it is very dirty, for example from insect residues.
•Replace the wiper blades once or twice a year for safety reasons. The wiper blades are available from Škoda Service Partners.
Replacing the wiper blade on the rear window wiper
Taking off the wiper blade
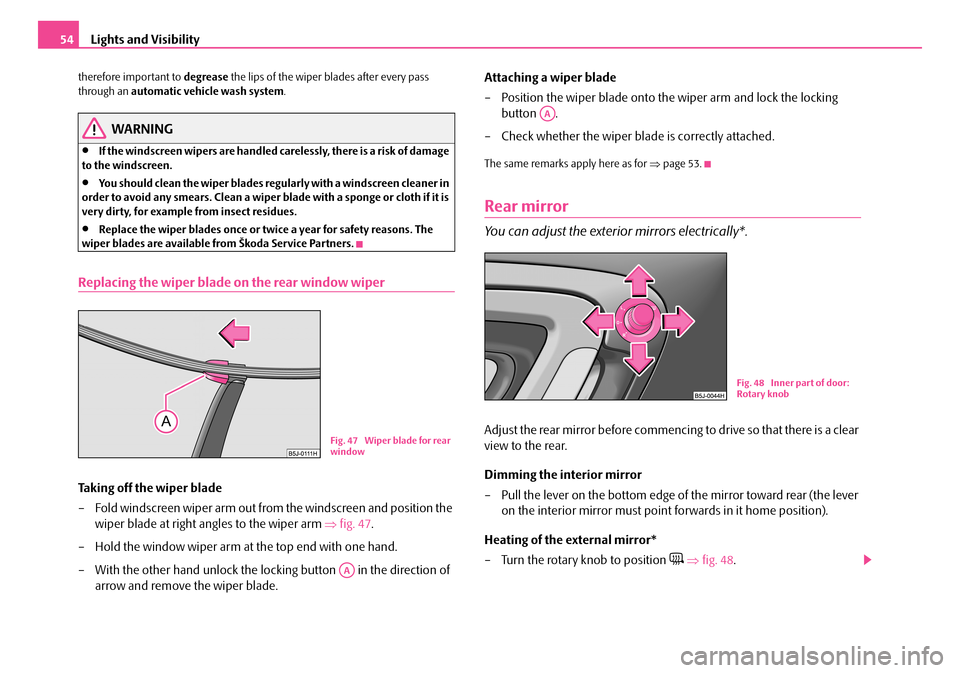
– Fold windscreen wiper arm out from the windscreen and position the
wiper blade at right angles to the wiper arm ⇒fig. 47.
– Hold the window wiper arm at the top end with one hand.
– With the other hand unlock the locking button in the direction of
arrow and remove the wiper blade.
Attaching a wiper blade
– Position the wiper blade onto the wiper arm and lock the locking
button .
– Check whether the wiper blade is correctly attached.
The same remarks apply here as for ⇒page 53.
Rear mirror
You can adjust the exterior mirrors electrically*.
Adjust the rear mirror before commencing to drive so that there is a clear
view to the rear.
Dimming the interior mirror
– Pull the lever on the bottom edge of the mirror toward rear (the lever
on the interior mirror must point forwards in it home position).
Heating of the external mirror*
– Turn the rotary knob to position ⇒fig. 48.
Fig. 47 Wiper blade for rear window
AA
AA
Fig. 48 Inner part of door: Rotary knob
NKO A05F 20.book Page 54 Wednesday, April 2, 2008 1:02 PM
Page 74 of 252
Seats and Stowage73
Using the systemSafetyDriving TipsGeneral MaintenanceBreakdown assistanceTechnical Data
– When transporting two bicycles tension the strap ⇒fig. 82 between
the saddle rods, by pushing the bicycles apart.
– Hang the carabines at the ends of the strap into the lashing eyes
behind the rear seats.
– Pull the strap through the tensioning clasp, first of all on the one side
and then on the other side.
– If it is necessary, the position of the bicycles in the vehicle can be addi-
tionally rectified.
WARNING
•When transporting passengers and objects, which require the seats to be folded forwards, ensure the safety of the passengers being transported.
•Place the bicycles in the bicycle carrier in such a position that no collision between the steering arm and the rear window can occur.
The roof rack*
Roof rail*
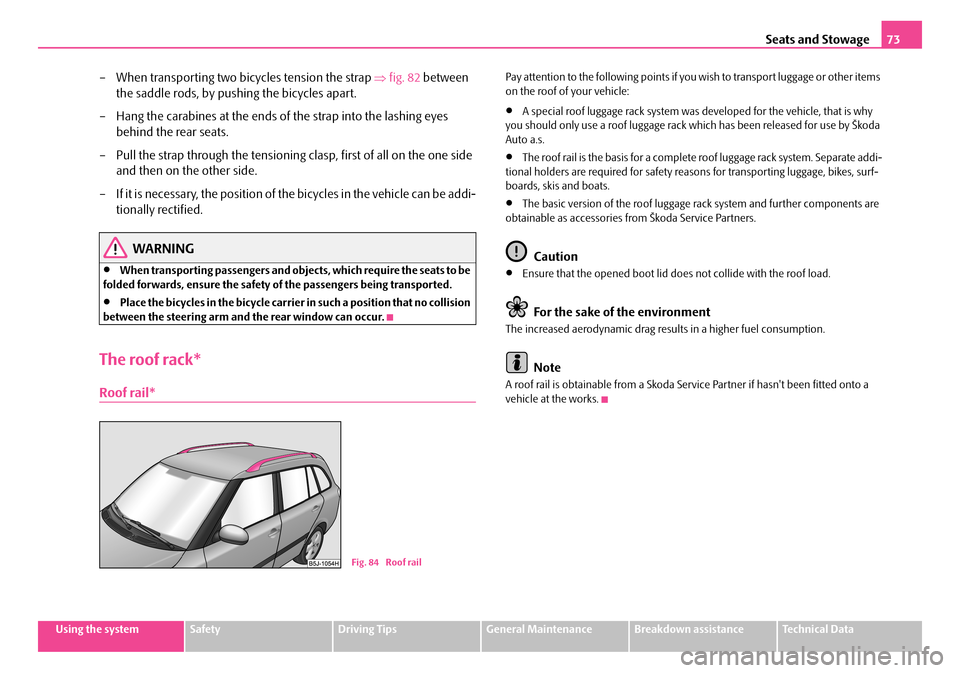
Pay attention to the following points if you wish to transport luggage or other items on the roof of your vehicle:
•A special roof luggage rack system was developed for the vehicle, that is why you should only use a roof luggage rack which has been released for use by Škoda Auto a.s.
•The roof rail is the basis for a complete roof luggage rack system. Separate addi-tional holders are required for safety reasons for transporting luggage, bikes, surf-boards, skis and boats.
•The basic version of the roof luggage rack system and further components are obtainable as accessories from Škoda Service Partners.
Caution
•Ensure that the opened boot lid does not collide with the roof load.
For the sake of the environment
The increased aerodynamic drag results in a higher fuel consumption.
Note
A roof rail is obtainable from a Skoda Service Partner if hasn't been fitted onto a vehicle at the works.
Fig. 84 Roof rail
NKO A05F 20.book Page 73 Wednesday, April 2, 2008 1:02 PM
Page 109 of 252
Communication108
Radio and mobile phone operation
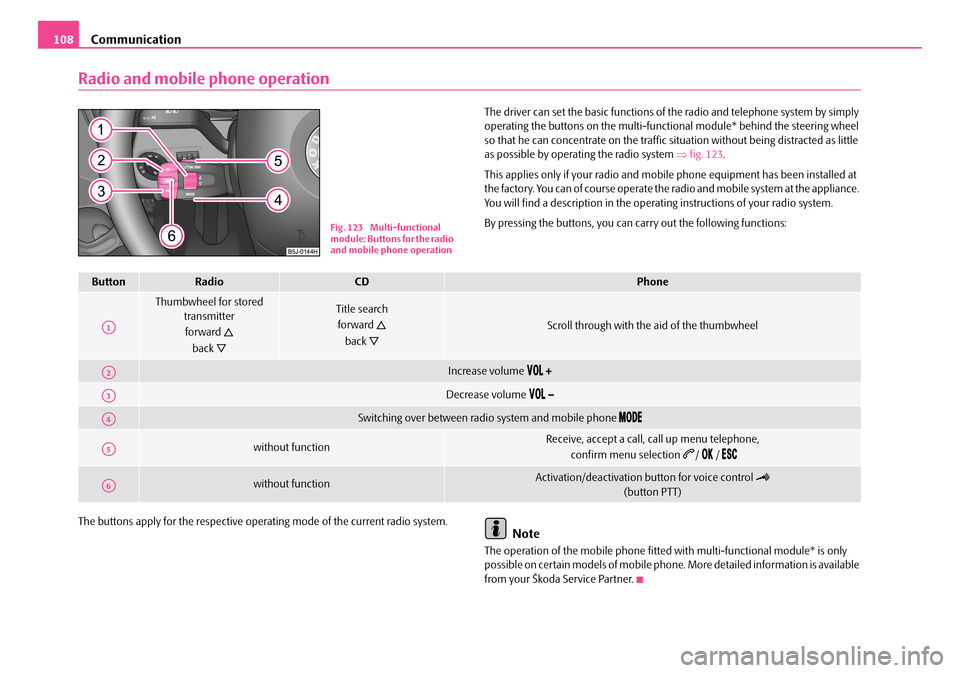
The driver can set the basic functions of the radio and telephone system by simply operating the buttons on the multi-functional module* behind the steering wheel so that he can concentrate on the traffic situation without being distracted as little as possible by operating the radio system ⇒fig. 123.
This applies only if your radio and mobile phone equipment has been installed at the factory. You can of course operate the radio and mobile system at the appliance. You will find a description in the operating instructions of your radio system.
By pressing the buttons, you can carry out the following functions:
The buttons apply for the respective operating mode of the current radio system.Note
The operation of the mobile phone fitted with multi-functional module* is only possible on certain models of mobile phone. More detailed information is available from your Škoda Service Partner.
Fig. 123 Multi-functional module: Buttons for the radio and mobile phone operation
ButtonRadioCDPhone
Thumbwheel for stored transmitter
forward
back
Title search
forward
back
Scroll through with the aid of the thumbwheel
Increase volume
Decrease volume
Switching over between radio system and mobile phone
without functionReceive, accept a call, call up menu telephone,
confirm menu selection / /
without functionActivation/deactivation button for voice control
(button PTT)
A1
A2
A3
A4
A5
A6
NKO A05F 20.book Page 108 Wednesday, April 2, 2008 1:02 PM
Page 111 of 252
Communication110
Caution
Taking the mobile phone out of the adapter during the call can lead to interruption of the connection. When taking out the mobile phone, the connection to the factory-fitted antenna is interrupted, this reduces the quality of the transmitting and receiving signal. This might result additionally in harmful radiation from the mobile phone in the interior of the vehicle and the charging of the telephone battery is interrupted.
Note
•Please also refer to the additional instructions ⇒page 117, “Mobile phones and two-way radio systems”.
•Please contact your Škoda Service Partner if there are any points which are not clear.
•The voice control of the telephone is only possible for adapters with PTT button. Suitable adapters are available at a Škoda Service Partner.
Inserting the mobile phone and adapter
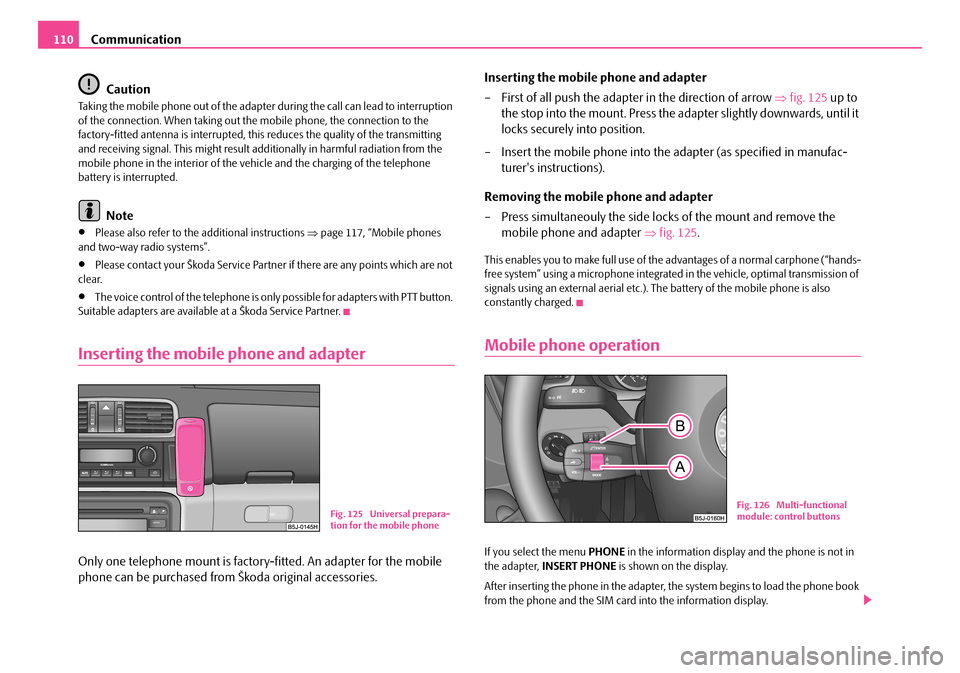
Only one telephone mount is factory-fitted. An adapter for the mobile
phone can be purchased from Škoda original accessories.
Inserting the mobile phone and adapter
– First of all push the adapter in the direction of arrow ⇒fig. 125 up to
the stop into the mount. Press the adapter slightly downwards, until it
locks securely into position.
– Insert the mobile phone into the adapter (as specified in manufac-
turer's instructions).
Removing the mobile phone and adapter
– Press simultaneouly the side locks of the mount and remove the
mobile phone and adapter ⇒fig. 125.
This enables you to make full use of the advantages of a normal carphone (“hands-free system” using a microphone integrated in the vehicle, optimal transmission of signals using an external aerial etc.). The battery of the mobile phone is also constantly charged.
Mobile phone operation
If you select the menu PHONE in the information display and the phone is not in the adapter, INSERT PHONE is shown on the display.
After inserting the phone in the adapter, the system begins to load the phone book from the phone and the SIM card into the information display.
Fig. 125 Universal prepara-tion for the mobile phone
Fig. 126 Multi-functional module: control buttons
NKO A05F 20.book Page 110 Wednesday, April 2, 2008 1:02 PM
Page 112 of 252

Communication111
Using the systemSafetyDriving TipsGeneral MaintenanceBreakdown assistanceTechnical Data
When inserting the mobile phone the next time only perform an update of the rele-vant phone book. The updating takes a few minutes, first of all the last read phone-book appears on the information display. Newly stored telephone numbers are only shown after the updating has ended.
The telephone numbers are loaded from the mobile phone depending on the memory date, beginning with the oldest entry. If the number of telephone numbers exceed 1 500, the newly stored telephone numbers are not loaded from the mobile phone. If several telephone numbers in the phonebook are under one name, all the telephone numbers with the same name are loaded separately.
If a telephone event (e.g. incoming or outgoing call, dialogue of the voice control) occurs during the updating procedure, the updating is interrupted. After the tele-phone event has ended, the updating starts anew.
The following is shown one after the other on the display:
PLEASE WAIT
LOADING... LAST CALLS
LOADING... ACCEPTED CALLS
LOADING... MISSED CALLS
LOADING... PHONE BOOK
After loading is completed, phone book, last calls, accepted calls, missed calls and memory appear in the display.
Using the system
•You can scroll through the telephone memory for individual names or menus by slowly turning the thumbwheel ⇒page 110, fig. 126.
•You can scroll through from A to Z or from Z to A within the telephone memory by slowly turning the thumbwheel downwards or upwards.
•You can always return to one level higher in the menu of the information display by pressing the button at the top for a lengthy period.
•The selected menu is displayed by briefly pressing the button .
Overview of the possible functions and read outs:
You can operate the mobile phone via the voice control ⇒page 109 or via the buttons of the multi-functional module* ⇒page 108.
Note
It a yellow or red warning symbol lights up in the information display, the menu phonebook cannot be selected.
Voice commands
Voice commands for mobile phone operation
AA
AA
AB
AB
ActivityRead out in display
Call terminatedINCOMING CALL TERMINATED
Number engagedLINE BUSY
No service foundNO SERVICE
Enter PIN codeENTER PIN
Voice commandActivity
ENTER PIN/PIN CODEAfter this command the PIN code of the mobile phone can be entered ⇒page 112.
DIAL NUMBERAfter this command a telephone number can be entered which establishes a connection to the requested partner ⇒page 113.
REDIALAfter this command the last selected telephone number is selected again ⇒page 113.
NKO A05F 20.book Page 111 Wednesday, April 2, 2008 1:02 PM
Page 118 of 252

Communication117
Using the systemSafetyDriving TipsGeneral MaintenanceBreakdown assistanceTechnical Data
Establishing the Bluetooth connection
After switching on the ignition, the Bluetooth connection is automatically estab-lished for the already adapted mobile phone 4). You can hear an increasing tone sequence from the loudspeakers of the vehicle.
Disconnecting the Bluetooth connection
After withdrawing the ignition key, the Bluetooth connection is disonnected. You can hear an increasing tone sequence from the loudspeakers of the vehicle.
WARNING
•Pay attention primarily to the traffic situation! As the driver you are fully responsible for road safety. Use the telephone system only to such an extent, so that you are in full control of your vehicle at any time - risk of accident!
•In the event of air transport, the Bluetooth function of the handsfree-system must be switched off by a specialist garage.
Caution
Taking the mobile phone out of the adapter during the call can lead to interruption of the connection. When taking out the mobile phone, the connection to the factory-fitted antenna is interrupted, this reduces the quality of the transmitting and receiving signal. This might result additionally in harmful radiation from the mobile phone in the interior of the vehicle and the charging of the telephone battery is interrupted.
Note
•Not valid for all mobile phones which enable a communication via Bluetooth.
•Please operate your mobile phone exclusively with a suitable adapter, in order to keep a low radiation in the vehicle.
•Inserting the mobile phone into the adapter ensures an optimal sending and receiving power and offers at the same time the advantage of the battery charging.
•If you insert the mobile telephone into the adapter, the connection is estab-lished via the interface in the adapter set and the Bluetooth connection is discon-
nected. You can hear an increasing tone sequence from the loudspeakers of the vehicle.
•Note that the range of the Bluetooth connection to the handsfree-system is limited to the vehicle interior. The range is dependent on local factors, e.g. obstacles between the devices and interferences with other devices. If your mobile phone is e.g. in a jacket pocket, this can lead to difficulties when establishing the Bluetooth connection with the handsfree-system or the data transfer.
•If you have set the Portuguese language in the information display, it is used automatically for the mobile phone operation, as this is the language, which was entered during coding of the handsfree-system.
•On certain mobile phones with operating system, it is necessary to install on the mobile phone an application of the mobile phone manufacturer, which enables the take-over of the phone phonebook via Bluetooth.
Mobile phones and two-way radio systems
We recommend that you have the installation of a mobile phone and two-way radio system in a vehicle carried out by a Škoda Service Partner.
Škoda Auto a.s. permits the operation of mobile phones and two-way radio systems with a professionally installed external aerial and a maximum transmission power of up to 10 watts.
Our Škoda Service Partners are also happy to inform you about the possibilities available for installing and operating mobile telephones and radio transmitters which have an output greater than 10 watts. The Škoda Service Partners can provide you with details about the technical possibilities for retrofitting of mobile tele-phones and radio transmitters.
Operation of mobile phones or two-way radio systems may interfere with func-tioning of the electronic systems of your vehicle. The reasons for this may be:
•no external aerial,
•external aerial incorrectly installed,
•transmission power greater than 10 watts.
NKO A05F 20.book Page 117 Wednesday, April 2, 2008 1:02 PM