SKODA FABIA 2008 2.G / 5J Owner's Manual
Manufacturer: SKODA, Model Year: 2008, Model line: FABIA, Model: SKODA FABIA 2008 2.G / 5JPages: 252, PDF Size: 40.88 MB
Page 221 of 252
Fuses and light bulbs220
– Remove the grille next to the fog light (for turning light) or the grille
around the round fog light (for fog light) ⇒page 210.
– Release the screws ⇒page 219, fig. 201 and remove the fog light.
– Turn the connector with the light bulb up to the stop towards the left
and remove.
– Change the light bulb, put the connector back into the headlight and
secure by turning to the right.
– Put the fog light in place with the catch on the side opposite the grille
and then press in the opposite part. Applies to turning light, for round
fog light screw in the 3 screws.
– Screw in the screws ⇒page 219, fig. 201 and re-insert the grille
⇒page 210.
Storage compartment lighting*
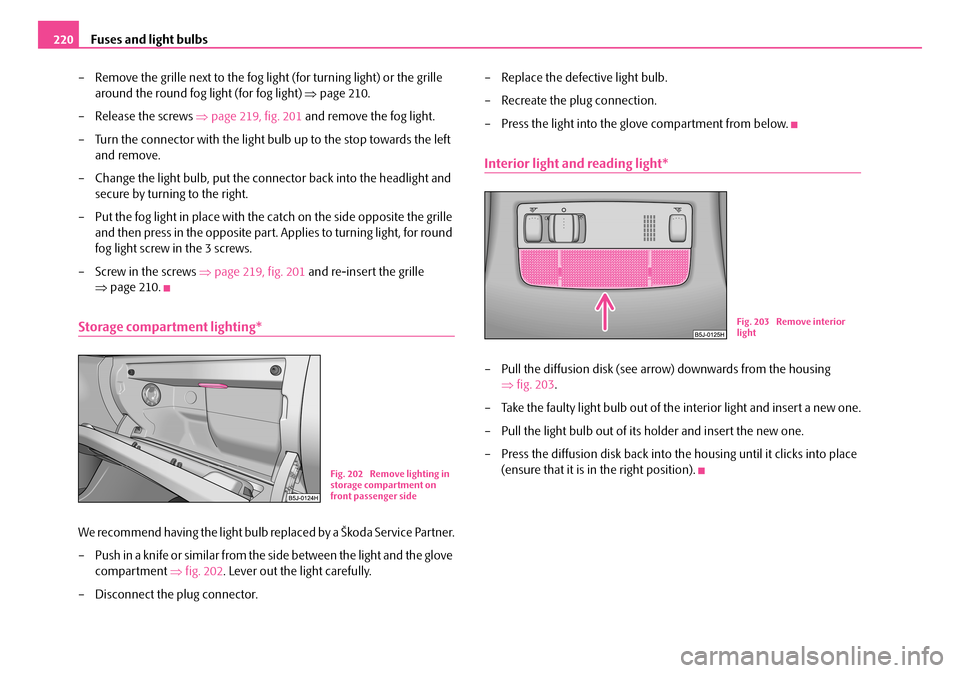
We recommend having the light bulb replaced by a Škoda Service Partner.
– Push in a knife or similar from the side between the light and the glove
compartment ⇒fig. 202. Lever out the light carefully.
– Disconnect the plug connector.
– Replace the defective light bulb.
– Recreate the plug connection.
– Press the light into the glove compartment from below.
Interior light and reading light*
– Pull the diffusion disk (see arrow) downwards from the housing
⇒fig. 203.
– Take the faulty light bulb out of the interior light and insert a new one.
– Pull the light bulb out of its holder and insert the new one.
– Press the diffusion disk back into the housing until it clicks into place
(ensure that it is in the right position).Fig. 202 Remove lighting in storage compartment on front passenger side
Fig. 203 Remove interior light
NKO A05F 20.book Page 220 Wednesday, April 2, 2008 1:02 PM
Page 222 of 252

Fuses and light bulbs221
Using the systemSafetyDriving TipsGeneral MaintenanceBreakdown assistanceTechnical Data
Licence plate light
– Open the boot lid and unscrew the light glass.
– Take the faulty bulb out of the fixture and insert a new one.
– Re-insert the light glass. Press the light glass in up to the stop - check
for correct seating of the sealing rubber.
– Screw on the light glass but not too tightly.
Rear light unit
– Open the boot lid/luggage compartment door.
– Hold tight the rear light unit with one hand and unscrew the plastic nut
with the other hand ⇒fig. 205.
– Grip the rear light unit and remove it carefully with loosening move-
ments at an angle to the rear. Do not pull the grommet with the cables
out of the body.
– Replace the defective light bulb ⇒page 222.
– When re-installing, first insert the rear light unit with the screw into
the opening of the body ⇒fig. 206.
– Carefully press the rear light unit into the body in such a way that the
pins engage into the supports of the body.
– Hold the rear light unit tight with one hand, screw on the plastic nut
with the other hand and tighten it ⇒fig. 205.
Caution
When removing and installing the rear light unit make sure not to damage the paintwork of the vehicle and the rear light unit.
Fig. 204 Remove the licence plate light
Fig. 205 Remove the rear light unit
Fig. 206 Install the rear light unit
A
A
NKO A05F 20.book Page 221 Wednesday, April 2, 2008 1:02 PM
2
1
Page 223 of 252
Fuses and light bulbs222
Note
For slackening and tightening the plastic nut use a coin.
Changing light bulbs in the rear light unit
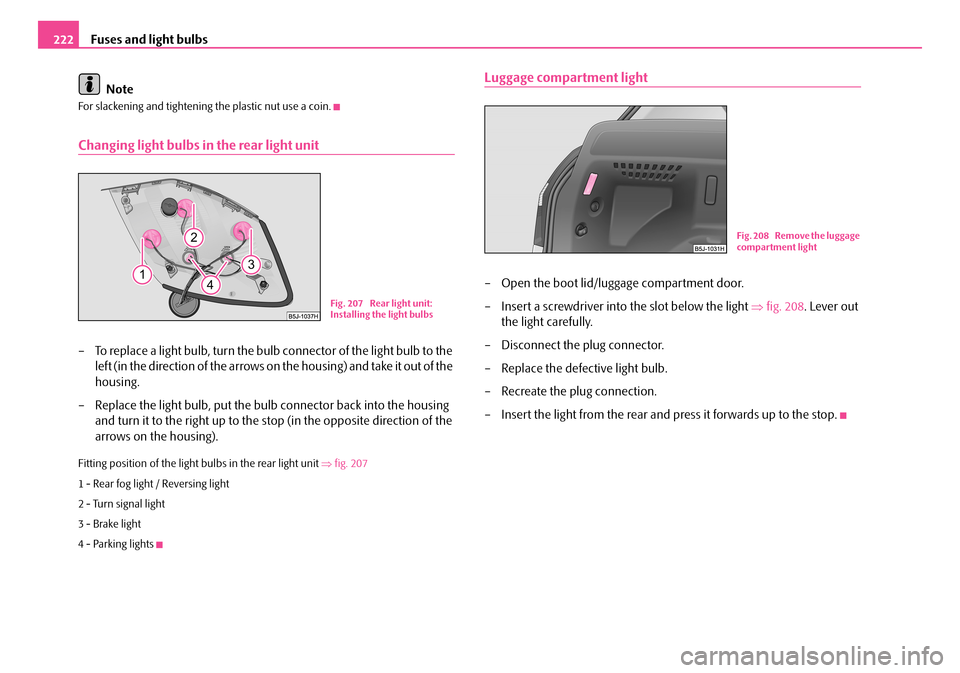
– To replace a light bulb, turn the bulb connector of the light bulb to the
left (in the direction of the arrows on the housing) and take it out of the
housing.
– Replace the light bulb, put the bulb connector back into the housing
and turn it to the right up to the stop (in the opposite direction of the
arrows on the housing).
Fitting position of the light bulbs in the rear light unit ⇒fig. 207
1 - Rear fog light / Reversing light
2 - Turn signal light
3 - Brake light
4 - Parking lights
Luggage compartment light
– Open the boot lid/luggage compartment door.
– Insert a screwdriver into the slot below the light ⇒fig. 208. Lever out
the light carefully.
– Disconnect the plug connector.
– Replace the defective light bulb.
– Recreate the plug connection.
– Insert the light from the rear and press it forwards up to the stop.
Fig. 207 Rear light unit: Installing the light bulbs
Fig. 208 Remove the luggage compartment light
NKO A05F 20.book Page 222 Wednesday, April 2, 2008 1:02 PM
Page 224 of 252
Technical Data223
Using the systemSafetyDriving TipsGeneral MaintenanceBreakdown assistanceTechnical Data
Technical Data
Technical Data
General information
The details given in the official vehicle registration documents always take prece-dence over the details in the Owner's Manual. Please refer to the official vehicle registration documents or consult your Škoda Service Partner concerning the engine with which your vehicle is equipped.
Used abbreviations
Performances
The listed performance values were determined without performance-reducing equipment, e.g. air conditioning system.
Weight
The loading capacity is reduced in line with the range of the special equipment. The unloaden weight contains a fuel tank topped up to 90%. A driver with a weight of 75 kg is also included in the value.
Identification details
Vehicle data sticker
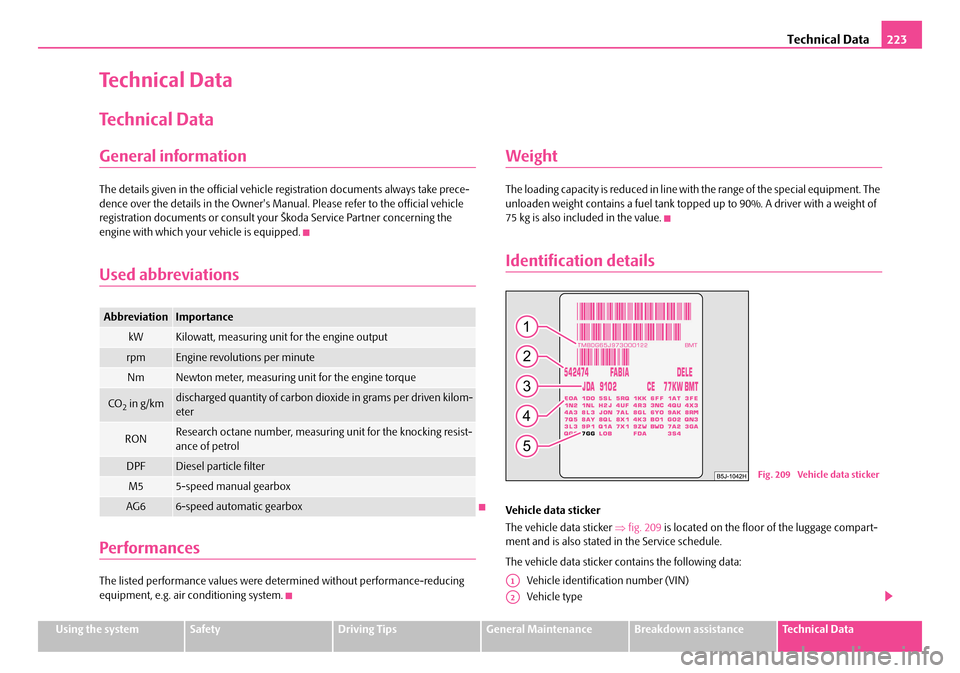
The vehicle data sticker ⇒fig. 209 is located on the floor of the luggage compart-ment and is also stated in the Service schedule.
The vehicle data sticker contains the following data:
Vehicle identification number (VIN)
Vehicle type
AbbreviationImportance
kWKilowatt, measuring unit for the engine output
rpmEngine revolutions per minute
NmNewton meter, measuring unit for the engine torque
CO2 in g/kmdischarged quantity of carbon dioxide in grams per driven kilom-eter
RONResearch octane number, measuring unit for the knocking resist-ance of petrol
DPFDiesel particle filter
M55-speed manual gearbox
AG66-speed automatic gearbox
Fig. 209 Vehicle data sticker
A1
A2
NKO A05F 20.book Page 223 Wednesday, April 2, 2008 1:02 PM
Page 225 of 252
Technical Data224
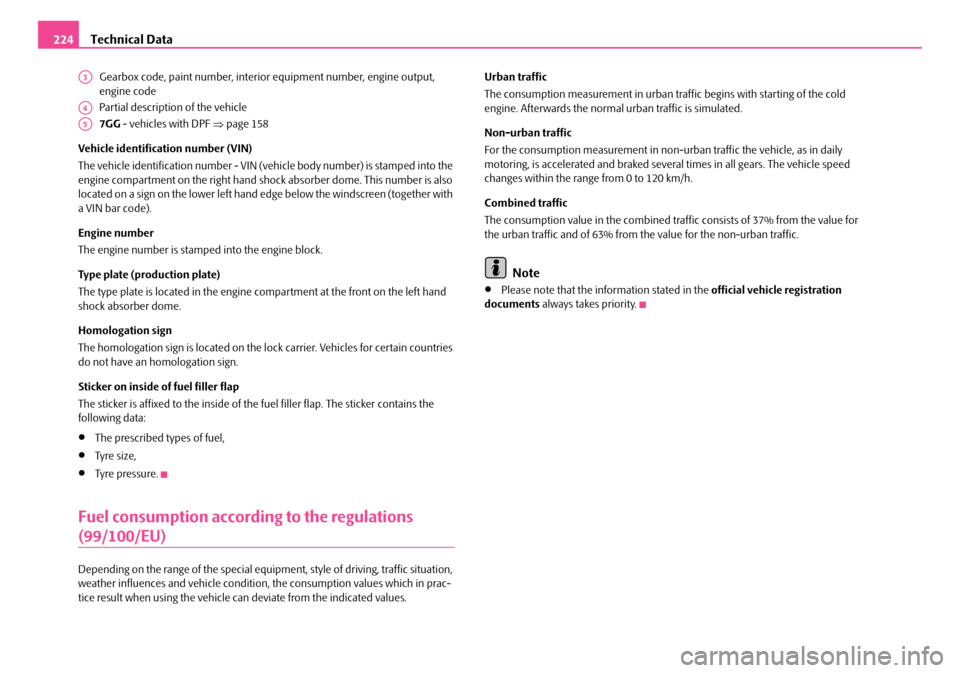
Gearbox code, paint number, interior equipment number, engine output, engine code
Partial description of the vehicle
7GG - vehicles with DPF ⇒page 158
Vehicle identification number (VIN)
The vehicle identification number - VIN (vehicle body number) is stamped into the engine compartment on the right hand shock absorber dome. This number is also located on a sign on the lower left hand edge below the windscreen (together with a VIN bar code).
Engine number
The engine number is stamped into the engine block.
Type plate (production plate)
The type plate is located in the engine compartment at the front on the left hand shock absorber dome.
Homologation sign
The homologation sign is located on the lock carrier. Vehicles for certain countries do not have an homologation sign.
Sticker on inside of fuel filler flap
The sticker is affixed to the inside of the fuel filler flap. The sticker contains the following data:
•The prescribed types of fuel,
•Tyre si z e,
•Tyre pressure.
Fuel consumption according to the regulations
(99/100/EU)
Depending on the range of the special equipment, style of driving, traffic situation, weather influences and vehicle condition, the consumption values which in prac-tice result when using the vehicle can deviate from the indicated values.
Urban traffic
The consumption measurement in urban traffic begins with starting of the cold engine. Afterwards the normal urban traffic is simulated.
Non-urban traffic
For the consumption measurement in non-urban traffic the vehicle, as in daily motoring, is accelerated and braked several times in all gears. The vehicle speed changes within the range from 0 to 120 km/h.
Combined traffic
The consumption value in the combined traffic consists of 37% from the value for the urban traffic and of 63% from the value for the non-urban traffic.
Note
•Please note that the information stated in the official vehicle registration documents always takes priority.
A3
A4
A5
NKO A05F 20.book Page 224 Wednesday, April 2, 2008 1:02 PM
Page 226 of 252
Technical Data225
Using the systemSafetyDriving TipsGeneral MaintenanceBreakdown assistanceTechnical Data
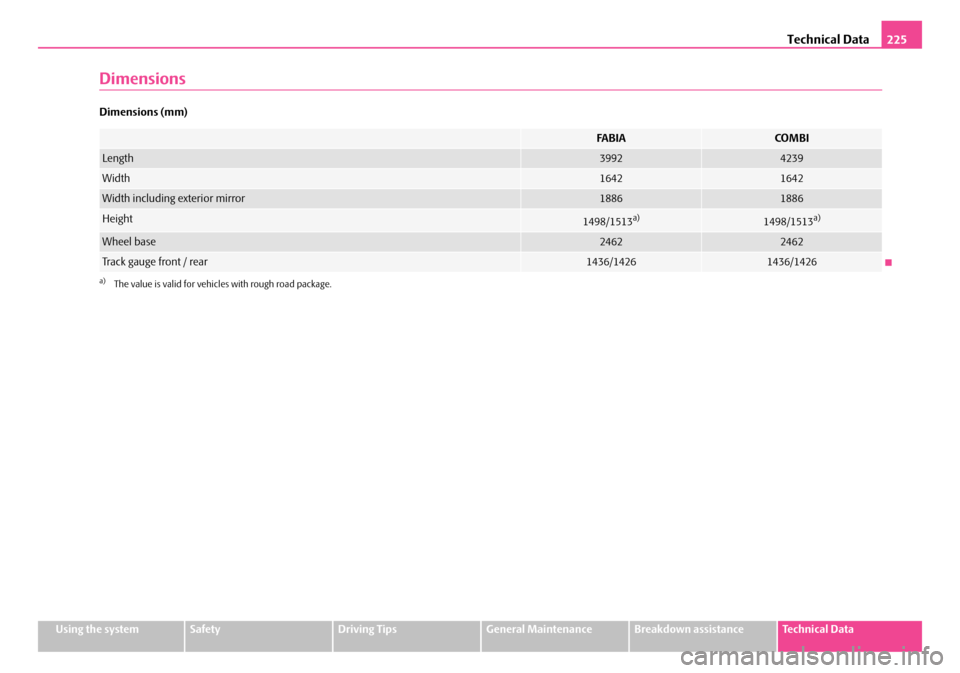
Dimensions
Dimensions (mm)
FA B I ACOMBI
Length39924239
Width16421642
Width including exterior mirror18861886
Height1498/1513a)
a)The value is valid for vehicles with rough road package.
1498/1513a)
Wheel base24622462
Tr a c k g a u g e f r o n t / r e a r1436/14261436/1426
NKO A05F 20.book Page 225 Wednesday, April 2, 2008 1:02 PM
Page 227 of 252

Technical Data226
1.2 l/44 kW - EU 4/EU 2DDK
Engine
Performances
Fuel consumption (in ltr./100 km) and CO2 emission (in g/km)
Power outputkW per rpm44/5200
Maximum torqueNm per rpm108/3000
Number of cylinders/Displacement (cm3)3/1198
Fuel - unleaded petrol min. RON95
FA B I ACO M B I
Maximum speedkm/h155156
Acceleration 0 - 100 km/hs16,516,8
Urban7,8
Non-urban4,8
Combination5,9
CO2 emission - combination140
NKO A05F 20.book Page 226 Wednesday, April 2, 2008 1:02 PM
Page 228 of 252
Technical Data227
Using the systemSafetyDriving TipsGeneral MaintenanceBreakdown assistanceTechnical Data
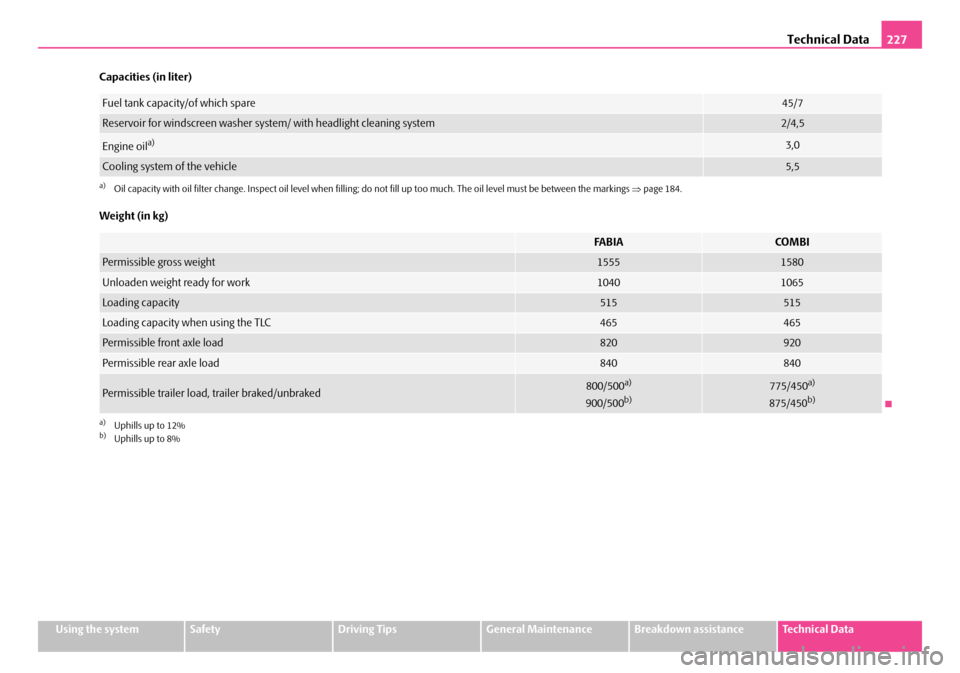
Capacities (in liter)
Weight (in kg)
Fuel tank capacity/of which spare45/7
Reservoir for windscreen washer system/ with headlight cleaning system2/4,5
Engine oila)
a)Oil capacity with oil filter change. Inspect oil level when filling; do not fill up too much. The oil level must be between the markings ⇒page 184.
3,0
Cooling system of the vehicle5,5
FA B I ACOMBI
Permissible gross weight15551580
Unloaden weight ready for work10401065
Loading capacity515515
Loading capacity when using the TLC465465
Permissible front axle load820920
Permissible rear axle load840840
Permissible trailer load, trailer braked/unbraked800/500a)
900/500b)
a)Uphills up to 12%b)Uphills up to 8%
775/450a)
875/450b)
NKO A05F 20.book Page 227 Wednesday, April 2, 2008 1:02 PM
Page 229 of 252

Technical Data228
1.2 l/51 kW - EU 4/EU 2DDK
Engine
Performances
Fuel consumption (in ltr./100 km) and CO2 emission (in g/km)
Power outputkW per rpm51/5400
Maximum torqueNm per rpm112/3000
Number of cylinders/Displacement (cm3)3/1198
Fuel - unleaded petrol min. RON95
FA B I ACOMBI
Maximum speedkm/h163164
Acceleration 0 - 100 km/hs14,915,1
Urban7,7
Non-urban4,9
Combination5,9
CO2 emission - combination140
NKO A05F 20.book Page 228 Wednesday, April 2, 2008 1:02 PM
Page 230 of 252
Technical Data229
Using the systemSafetyDriving TipsGeneral MaintenanceBreakdown assistanceTechnical Data
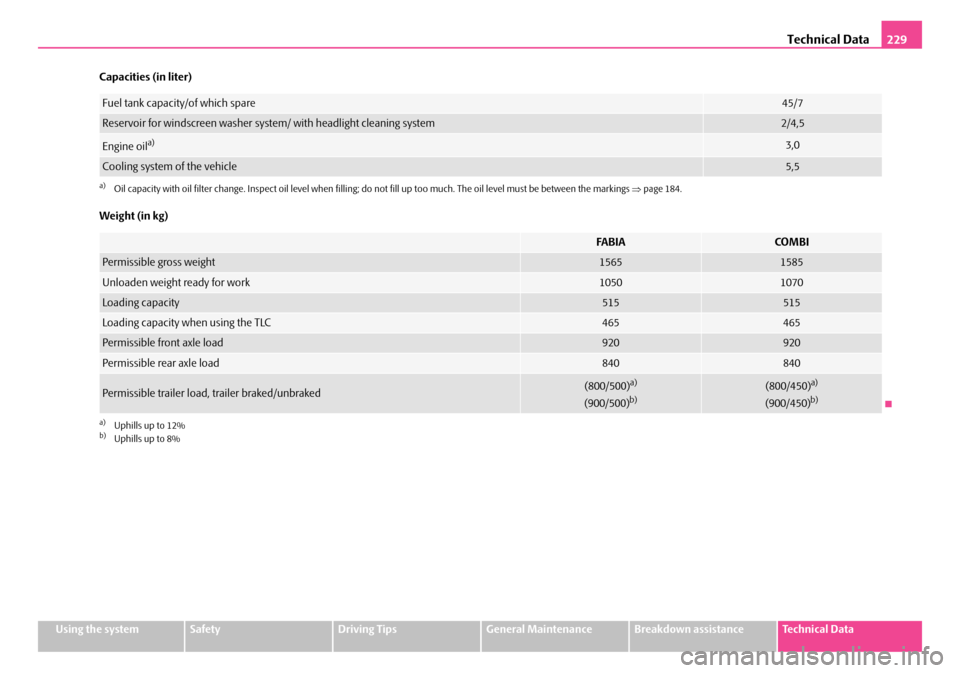
Capacities (in liter)
Weight (in kg)
Fuel tank capacity/of which spare45/7
Reservoir for windscreen washer system/ with headlight cleaning system2/4,5
Engine oila)
a)Oil capacity with oil filter change. Inspect oil level when filling; do not fill up too much. The oil level must be between the markings ⇒page 184.
3,0
Cooling system of the vehicle5,5
FA B I ACOMBI
Permissible gross weight15651585
Unloaden weight ready for work10501070
Loading capacity515515
Loading capacity when using the TLC465465
Permissible front axle load920920
Permissible rear axle load840840
Permissible trailer load, trailer braked/unbraked(800/500)a)
(900/500)b)
a)Uphills up to 12%b)Uphills up to 8%
(800/450)a)
(900/450)b)
NKO A05F 20.book Page 229 Wednesday, April 2, 2008 1:02 PM