warning lights SKODA FABIA 2008 2.G / 5J Owner's Guide
[x] Cancel search | Manufacturer: SKODA, Model Year: 2008, Model line: FABIA, Model: SKODA FABIA 2008 2.G / 5JPages: 252, PDF Size: 40.88 MB
Page 49 of 252
Lights and Visibility48
All seats occupied, luggage compartment laden.
Driver seat occupied, luggage compartment laden.
Caution
Set the headlight beam adjustment in such a way as to avoid dazzling oncoming traffic.
Switch for hazard warning lights
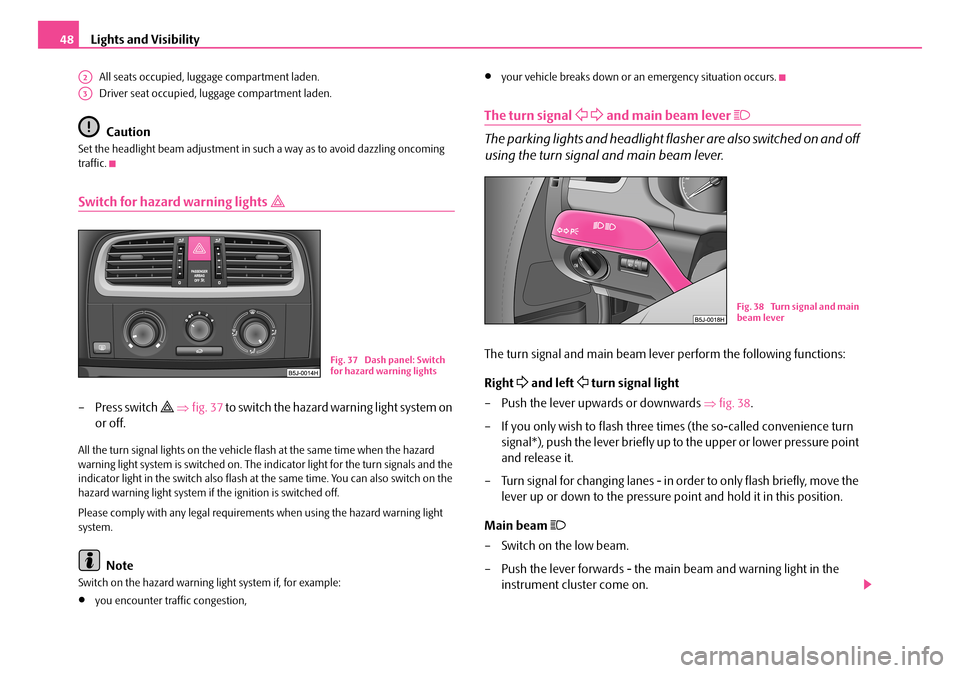
– Press switch ⇒fig. 37 to switch the hazard warning light system on
or off.
All the turn signal lights on the vehicle flash at the same time when the hazard warning light system is switched on. The indicator light for the turn signals and the indicator light in the switch also flash at the same time. You can also switch on the hazard warning light system if the ignition is switched off.
Please comply with any legal requirements when using the hazard warning light system.
Note
Switch on the hazard warning light system if, for example:
•you encounter traffic congestion,
•your vehicle breaks down or an emergency situation occurs.
The turn signal and main beam lever
The parking lights and headlight flasher are also switched on and off
using the turn signal and main beam lever.
The turn signal and main beam lever perform the following functions:
Right and left turn signal light
– Push the lever upwards or downwards ⇒fig. 38.
– If you only wish to flash three times (the so-called convenience turn
signal*), push the lever briefly up to the upper or lower pressure point
and release it.
– Turn signal for changing lanes - in order to only flash briefly, move the
lever up or down to the pressure point and hold it in this position.
Main beam
– Switch on the low beam.
– Push the lever forwards - the main beam and warning light in the
instrument cluster come on.
A2
A3
Fig. 37 Dash panel: Switch for hazard warning lights
Fig. 38 Turn signal and main beam lever
NKO A05F 20.book Page 48 Wednesday, April 2, 2008 1:02 PM
Page 50 of 252
Lights and Visibility49
Using the systemSafetyDriving TipsGeneral MaintenanceBreakdown assistanceTechnical Data
– Pull the lever back into the initial position in order to switch the main
beam off again.
Headlight flasher
– Pull on the lever of the steering wheel (sprung position) - the main
beam and warning light in the instrument cluster come on.
Parking light
– Switch off the ignition.
– Push the lever up or down - the right-hand or left-hand parking light
is switched on.
Information concerning the function of the lights.
•The turn signal system only operates when the ignition is switched on. The corresponding indicator light or in the instrument cluster also flashes.
•The turn signal is automatically cancelled after negotiating a curve.
•The side light and rear light on the appropriate side of the vehicle are switched on when the parking light is selected. The parking light function only operates if the ignition is switched off.
•An acoustic warning signal will sound when the driver's door is opened if the lever is not in the middle position after removing the ignition key. The acoustic warning signal will stop just as soon as the driver's door is closed.
Caution
Use main beam or the headlight flasher only if this does not risk dazzling other road users.
Note
Use only in accordance with the legal requirements the described lighting and signal systems.
Interior lighting
Front interior lighting and storage compartment on front
passenger side
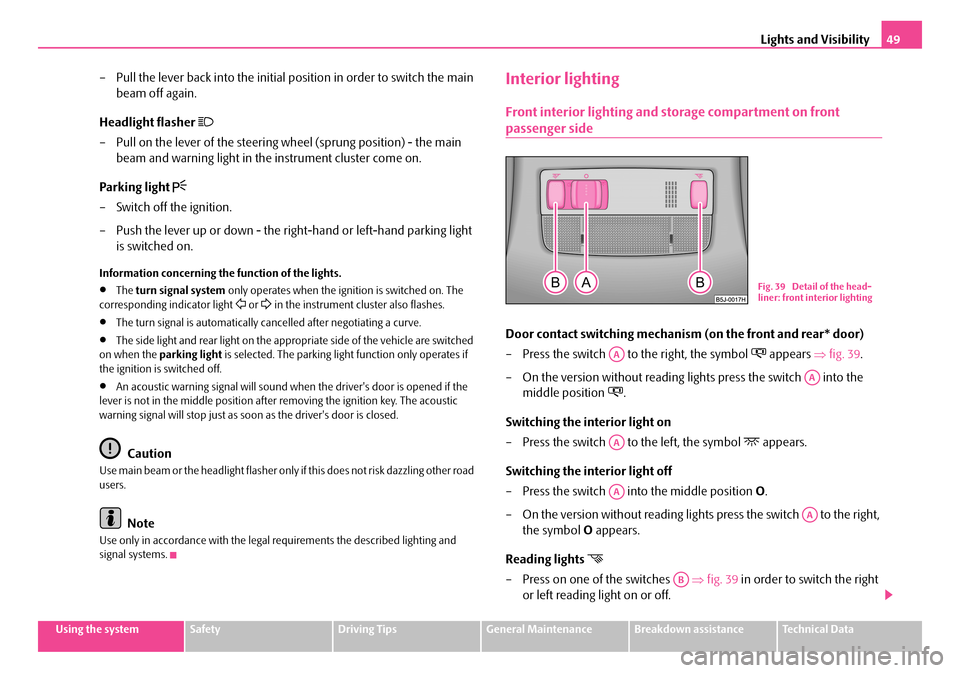
Door contact switching mechanism (on the front and rear* door)
– Press the switch to the right, the symbol appears ⇒fig. 39.
– On the version without reading lights press the switch into the
middle position .
Switching the interior light on
– Press the switch to the left, the symbol appears.
Switching the interior light off
– Press the switch into the middle position O.
– On the version without reading lights press the switch to the right,
the symbol O appears.
Reading lights
– Press on one of the switches ⇒fig. 39 in order to switch the right
or left reading light on or off.
Fig. 39 Detail of the head-liner: front interior lighting
AA
AA
AA
AA
AA
AB
NKO A05F 20.book Page 49 Wednesday, April 2, 2008 1:02 PM
Page 53 of 252
Lights and Visibility52
WARNING
The sun visors must not be swivelled to the side windows into the deploy-ment area of the head airbags if any objects, such as ball-point pens etc. are attached to them. This might result in injuries to the occupants if the head airbag is deployed.
Windshield wiper and wash system
Windshield wiper
You can operate the windscreen wipers and automatic wipe/wash
using the windscreen wiper lever.
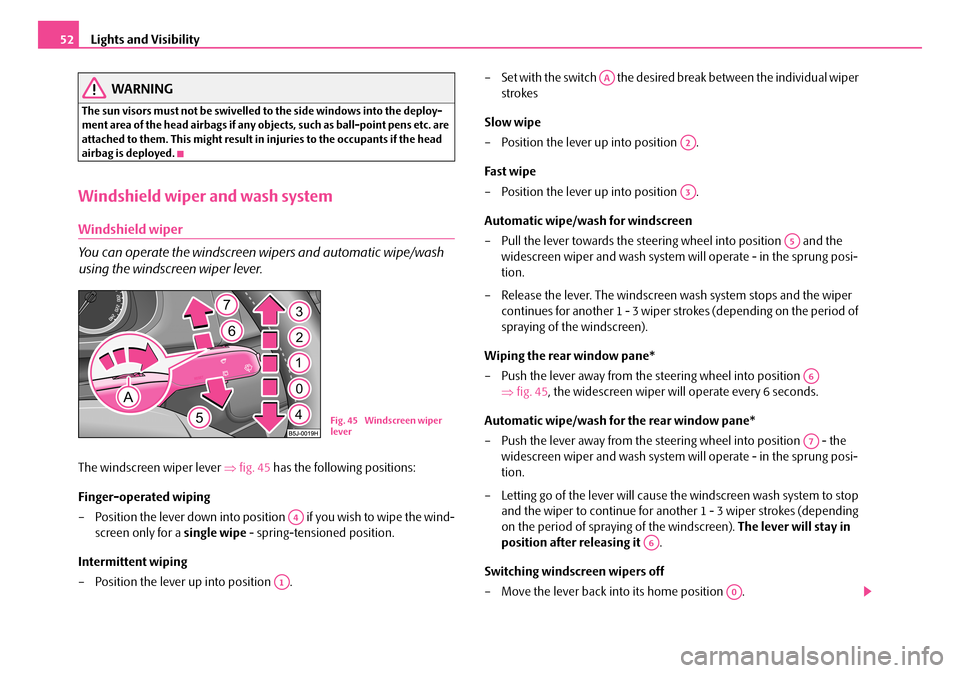
The windscreen wiper lever ⇒fig. 45 has the following positions:
Finger-operated wiping
– Position the lever down into position if you wish to wipe the wind-
screen only for a single wipe - spring-tensioned position.
Intermittent wiping
– Position the lever up into position .
– Set with the switch the desired break between the individual wiper
strokes
Slow wipe
– Position the lever up into position .
Fast wipe
– Position the lever up into position .
Automatic wipe/wash for windscreen
– Pull the lever towards the steering wheel into position and the
widescreen wiper and wash system will operate - in the sprung posi-
tion.
– Release the lever. The windscreen wash system stops and the wiper
continues for another 1 - 3 wiper strokes (depending on the period of
spraying of the windscreen).
Wiping the rear window pane*
– Push the lever away from the steering wheel into position
⇒fig. 45, the widescreen wiper will operate every 6 seconds.
Automatic wipe/wash for the rear window pane*
– Push the lever away from the steering wheel into position - the
widescreen wiper and wash system will operate - in the sprung posi-
tion.
– Letting go of the lever will cause the windscreen wash system to stop
and the wiper to continue for another 1 - 3 wiper strokes (depending
on the period of spraying of the windscreen). The lever will stay in
position after releasing it .
Switching windscreen wipers off
– Move the lever back into its home position .
Fig. 45 Windscreen wiper lever
A4
A1
AA
A2
A3
A5
A6
A7
A6
A0
NKO A05F 20.book Page 52 Wednesday, April 2, 2008 1:02 PM
Page 54 of 252

Lights and Visibility53
Using the systemSafetyDriving TipsGeneral MaintenanceBreakdown assistanceTechnical Data
The windscreen wipers and the windscreen washer system only operate if the igni-tion is switched on.
The rear window will be wiped again if the front window wipers are on when reverse gear is selected.
The windscreen washer nozzles are heated* when the ignition is switched on.
Top up with wash liquid ⇒page 193.
WARNING
•Properly maintained windscreen wiper blades are essential for clear visi-bility and safe driving ⇒page 53.
•Do not use the windscreen washer system at low temperatures, without heating the windscreen beforehand. Otherwise the window cleaner could freeze on the windscreen and restrict the view to the front.
•In the event of a freezing up of the windscreen, first of all eliminate the ice ⇒page 172 and then operate the windscreen wiper otherwise the wind-screen wiper blades could be damaged.
Caution
In frosty weather, please first of all check whether the windscreen wiper blades are not frozen to the windscreen before switching them on. Switching on windscreen wipers when the blades are frozen to the windscreen may result in damage both to the blades and the motor of the windscreen wipers!
Headlight cleaning system*
The headlights are being cleaned after the windscreen washer system has been operated for the fifth time, the low beam or main beam are switched on as well as the windscreen wiper lever is held in the position ⇒page 52, fig. 45 for about 1 second.
You should remove stubborn dirt (such as insect residues) from the headlight lenses at regular intervals, for example when refuelling. Please refer to the following guidelines ⇒page 172, “The headlight lenses”.
You should remove any snow from the fixtures of the washer nozzles and clear ice in winter with a de-icing spray in order to ensure proper operation of the cleaning system.
Replacing wiper blades for the windscreen wipers
Taking off the wiper blade
– Fold windscreen wiper arm away from the windscreen.
– Press the locking button, in order to unlock the wiper blade and pull
off in the direction of arrow.
Attaching a wiper blade
– Push the wiper blade until it locks up to the stop.
– Check whether the wiper blade is correctly attached.
– Fold the windscreen wiper arm back onto the windscreen.
Wiper blades in proper condition are essential to obtain good visibility. Wiper blades should not be allowed to become dirtied by dust, insect remains and preserving wax.
Juddering or smearing of the wiper blades could then be due to wax residues left on the windscreen by vehicle washing in automatic vehicle wash systems. It is
A5
Fig. 46 Wiper blade for the windscreen wiper
NKO A05F 20.book Page 53 Wednesday, April 2, 2008 1:02 PM
Page 55 of 252
Lights and Visibility54
therefore important to degrease the lips of the wiper blades after every pass through an automatic vehicle wash system.
WARNING
•If the windscreen wipers are handled carelessly, there is a risk of damage to the windscreen.
•You should clean the wiper blades regularly with a windscreen cleaner in order to avoid any smears. Clean a wiper blade with a sponge or cloth if it is very dirty, for example from insect residues.
•Replace the wiper blades once or twice a year for safety reasons. The wiper blades are available from Škoda Service Partners.
Replacing the wiper blade on the rear window wiper
Taking off the wiper blade
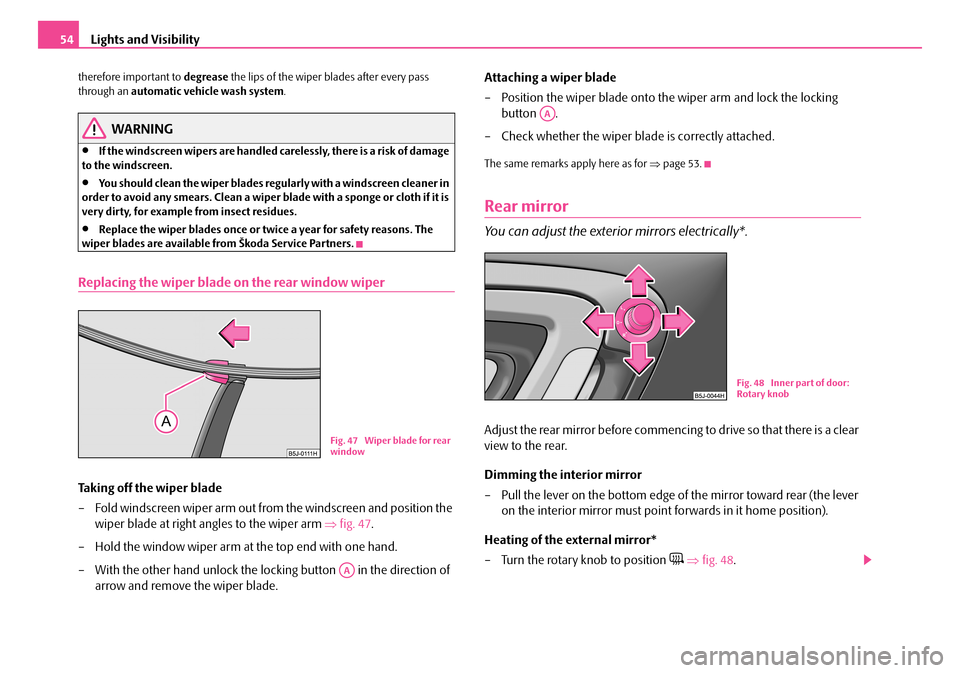
– Fold windscreen wiper arm out from the windscreen and position the
wiper blade at right angles to the wiper arm ⇒fig. 47.
– Hold the window wiper arm at the top end with one hand.
– With the other hand unlock the locking button in the direction of
arrow and remove the wiper blade.
Attaching a wiper blade
– Position the wiper blade onto the wiper arm and lock the locking
button .
– Check whether the wiper blade is correctly attached.
The same remarks apply here as for ⇒page 53.
Rear mirror
You can adjust the exterior mirrors electrically*.
Adjust the rear mirror before commencing to drive so that there is a clear
view to the rear.
Dimming the interior mirror
– Pull the lever on the bottom edge of the mirror toward rear (the lever
on the interior mirror must point forwards in it home position).
Heating of the external mirror*
– Turn the rotary knob to position ⇒fig. 48.
Fig. 47 Wiper blade for rear window
AA
AA
Fig. 48 Inner part of door: Rotary knob
NKO A05F 20.book Page 54 Wednesday, April 2, 2008 1:02 PM
Page 56 of 252
Lights and Visibility55
Using the systemSafetyDriving TipsGeneral MaintenanceBreakdown assistanceTechnical Data
Adjusting the left-hand exterior mirror*
– Turn the rotary knob to position . The movement of the mirror surface
is identical to the movement of the rotary knob.
Adjusting the right-hand exterior mirror*
– Turn the rotary knob to position . The movement of the mirror
surface is identical to the movement of the rotary knob.
The vehicle can also be equipped with a second rear mirror*, which is attached above the inner main rear mirror. The second rear mirror* enables an extensive look into the area of the rear seats, e.g. to check on the seated passengers. You can adjust it in the horizontal as well as vertical direction regardless of the inner main rear mirror.
The exterior mirror heater only operates when the engine is running.
WARNING
•Convex (curved outward) or a spherical exterior mirrors increase the vision field. They do, however, make objects appear smaller in the mirror. These mirrors are only of limited use, therefore, for estimating distances to the following vehicles.
•Use whenever possible the interior rear mirror, for estimating the distances to the following vehicles.
Note
•Do not touch the surfaces of the exterior mirrors if the exterior mirror heater is switched on.
•You can set the exterior mirrors by hand, if the power setting function fails at any time, by pressing on the edge of the mirror surface.
•Contact your specialist garage if a fault exists with the power setting of the exte-rior mirrors.
NKO A05F 20.book Page 55 Wednesday, April 2, 2008 1:02 PM
Page 89 of 252
Heating and air conditioning system88
Cooling down the inside of the vehicle as rapidly as possible
•close all windows
•Control dial at the desired heat temperature
•Blower switch in position 4
•Turn the air distribution control into the position
•Open the air outlet vents 3 and 4
•Switch on the cooling system by pressing button
•We recommend that you briefly switch on the recirculated air mode with the pushbutton .
optimal cooling
•Control dial at the desired heat temperature. This temperature will be main-tained automatically.
•Blower switch in position 1, 2 or 3
•Turn the air distribution control into the position
•Open the air outlet vents 3 and 4
•Switch on the cooling system by pressing button
•We recommend setting the air outlet vents 3 and 4 in such a way that the air flows to the rear over the heads of the occupants. Do not switch to recirculated air mode.
Recirculated air mode
In recirculated air mode air is sucked out of the interior of the vehicle
and then fed back into the interior.
Recirculated air mode prevents polluted air outside the vehicle from
getting into the vehicle, for example when driving through a tunnel or
when standing in a traffic jam.
Switching recirculated air mode on
– Press switch ⇒page 86, fig. 107 the switch symbol lights up.
Switching recirculated air mode off
– Press button again, the button symbol goes out.
The recirculated air mode is switched off automatically if the air distribution control is in position ⇒page 86, fig. 107. You can also switch recirculated air mode on again from this setting by repeatedly pressing button .
WARNING
You should not leave recirculated air mode on over a longer period of time, as “stale” air may result in fatigue in the driver and occupants, divert your attention and also cause the windows to mist up. The risk of having an acci-dent increases. Switch recirculated air mode off as soon as the windows begin misting up.
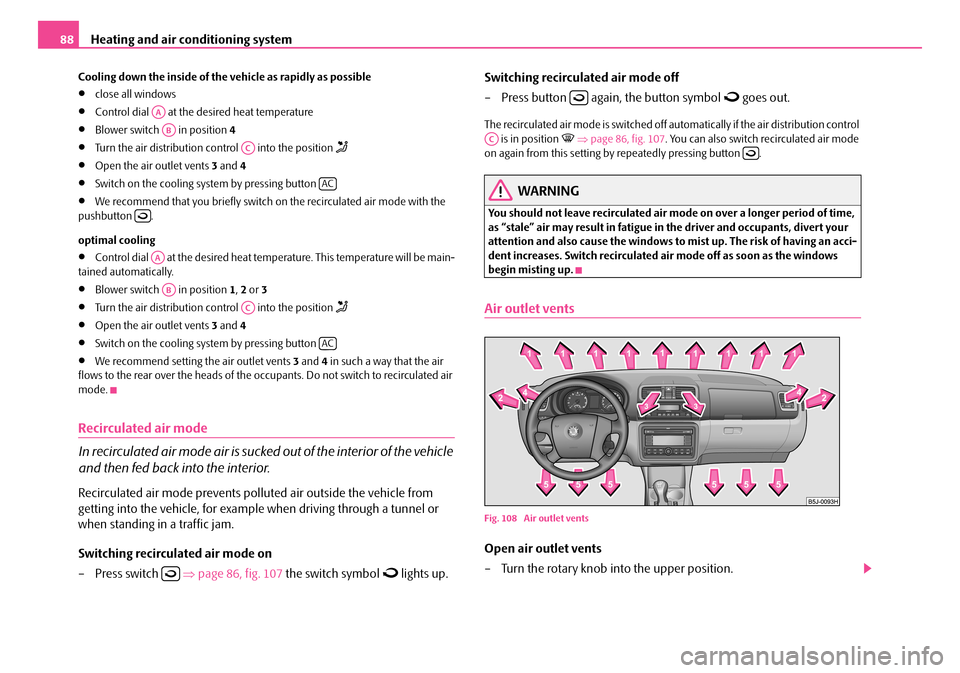
Air outlet vents
Fig. 108 Air outlet vents
Open air outlet vents
– Turn the rotary knob into the upper position.
AA
AB
AC
AC
AA
AB
AC
AC
AC
NKO A05F 20.book Page 88 Wednesday, April 2, 2008 1:02 PM
Page 94 of 252

Heating and air conditioning system93
Using the systemSafetyDriving TipsGeneral MaintenanceBreakdown assistanceTechnical Data
– Turn the control dial ⇒page 90, fig. 109 to the left (reduce blower
speed) or right (increase blower speed).
Switch off the blowers, the Climatronic is switched off and in the display shows OFF.
The set blower speed is displayed next to the control dial when the respective number of warning lights come on.
WARNING
•“Stale air” may result in fatigue in the driver and occupants, reduce attention levels and also cause the windows to mist up. The risk of having an accident increases.
•Do not switch the Climatronic system off for longer than necessary.
•Switch the Climatronic system on as soon as the windows mist up.
Air outlet vents
Fig. 110 Air outlet vents
Open air outlet vents
– Turn the rotary knob into the upper position.
Close air outlet vents
– Turn the rotary knob into the lower position.
Redirecting air flow
– The horizontal as well as the vertical direction of the air flow is set with
the handle in the middle of the air outlet vents.
You can control the air distribution to the air outlet vents via the buttons of the operating part of the Climatronic ⇒page 90. Air outlet vents 3 and 4 ⇒fig. 110 can also be opened or closed individually.
A1
A1
NKO A05F 20.book Page 93 Wednesday, April 2, 2008 1:02 PM
Page 96 of 252
Starting-off and Driving95
Using the systemSafetyDriving TipsGeneral MaintenanceBreakdown assistanceTechnical Data
Ignition lock
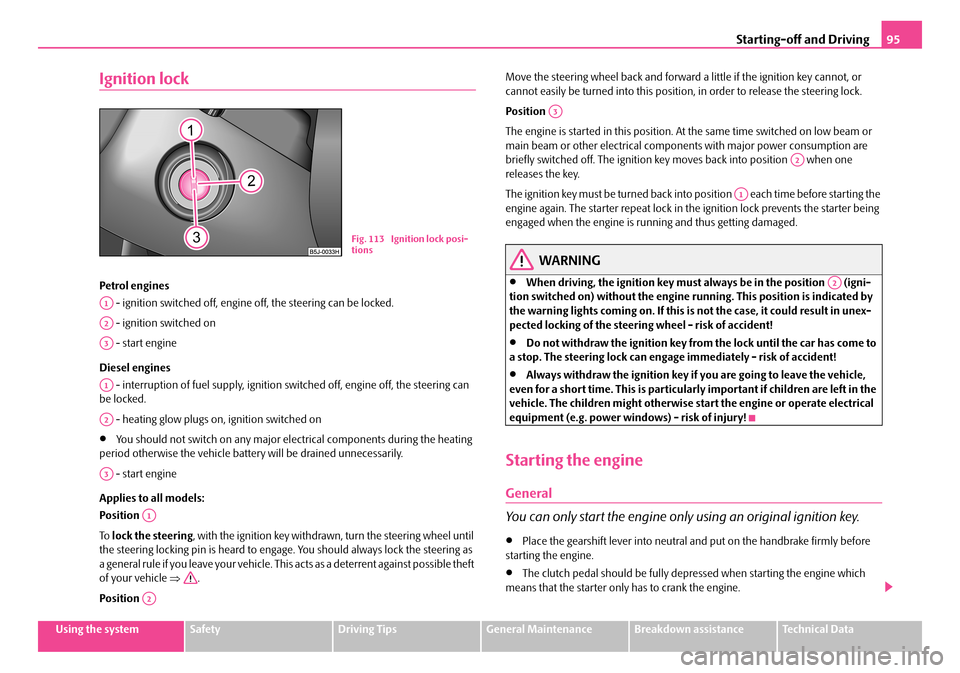
Petrol engines
- ignition switched off, engine off, the steering can be locked.
- ignition switched on
- start engine
Diesel engines
- interruption of fuel supply, ignition switched off, engine off, the steering can be locked.
- heating glow plugs on, ignition switched on
•You should not switch on any major electrical components during the heating period otherwise the vehicle battery will be drained unnecessarily.
- start engine
Applies to all models:
Position
To lock the steering, with the ignition key withdrawn, turn the steering wheel until the steering locking pin is heard to engage. You should always lock the steering as a general rule if you leave your vehicle. This acts as a deterrent against possible theft of your vehicle ⇒.
Position
Move the steering wheel back and forward a little if the ignition key cannot, or cannot easily be turned into this position, in order to release the steering lock.
Position
The engine is started in this position. At the same time switched on low beam or main beam or other electrical components with major power consumption are briefly switched off. The ignition key moves back into position when one releases the key.
The ignition key must be turned back into position each time before starting the engine again. The starter repeat lock in the ignition lock prevents the starter being engaged when the engine is running and thus getting damaged.
WARNING
•When driving, the ignition key must always be in the position (igni-tion switched on) without the engine running. This position is indicated by the warning lights coming on. If this is not the case, it could result in unex-pected locking of the steering wheel - risk of accident!
•Do not withdraw the ignition key from the lock until the car has come to a stop. The steering lock can engage immediately - risk of accident!
•Always withdraw the ignition key if you are going to leave the vehicle, even for a short time. This is particularly important if children are left in the vehicle. The children might otherwise start the engine or operate electrical equipment (e.g. power windows) - risk of injury!
Starting the engine
General
You can only start the engine only using an original ignition key.
•Place the gearshift lever into neutral and put on the handbrake firmly before starting the engine.
•The clutch pedal should be fully depressed when starting the engine which means that the starter only has to crank the engine.
Fig. 113 Ignition lock posi-tions
A1
A2
A3
A1
A2
A3
A1
A2
A3
A2
A1
A2
NKO A05F 20.book Page 95 Wednesday, April 2, 2008 1:02 PM
Page 99 of 252
Starting-off and Driving98
Handbrake
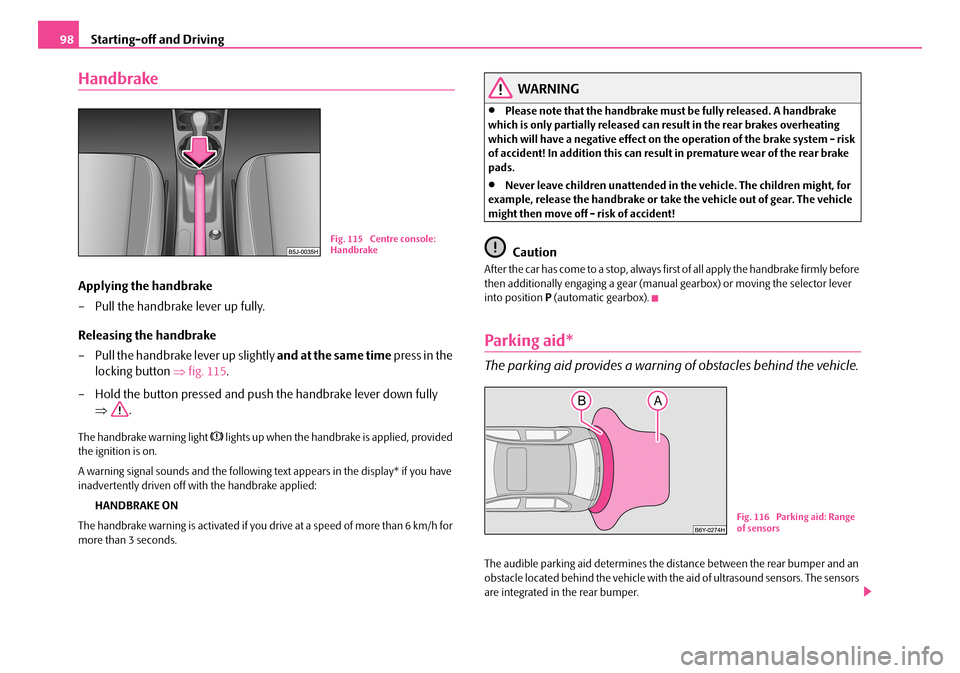
Applying the handbrake
– Pull the handbrake lever up fully.
Releasing the handbrake
– Pull the handbrake lever up slightly and at the same time press in the
locking button ⇒fig. 115.
– Hold the button pressed and push the handbrake lever down fully
⇒.
The handbrake warning light lights up when the handbrake is applied, provided the ignition is on.
A warning signal sounds and the following text appears in the display* if you have inadvertently driven off with the handbrake applied:
HANDBRAKE ON
The handbrake warning is activated if you drive at a speed of more than 6 km/h for more than 3 seconds.
WARNING
•Please note that the handbrake must be fully released. A handbrake which is only partially released can result in the rear brakes overheating which will have a negative effect on the operation of the brake system - risk of accident! In addition this can result in premature wear of the rear brake pads.
•Never leave children unattended in the vehicle. The children might, for example, release the handbrake or take the vehicle out of gear. The vehicle might then move off - risk of accident!
Caution
After the car has come to a stop, always first of all apply the handbrake firmly before then additionally engaging a gear (manual gearbox) or moving the selector lever into position P (automatic gearbox).
Parking aid*
The parking aid provides a warning of obstacles behind the vehicle.
The audible parking aid determines the distance between the rear bumper and an obstacle located behind the vehicle with the aid of ultrasound sensors. The sensors are integrated in the rear bumper.
Fig. 115 Centre console: Handbrake
Fig. 116 Parking aid: Range of sensors
NKO A05F 20.book Page 98 Wednesday, April 2, 2008 1:02 PM