trailer SKODA FABIA 2009 2.G / 5J Owner's Manual
[x] Cancel search | Manufacturer: SKODA, Model Year: 2009, Model line: FABIA, Model: SKODA FABIA 2009 2.G / 5JPages: 259, PDF Size: 31.99 MB
Page 5 of 259
Contents 4Important safety information regarding the use of seat
belts . . . . . . . . . . . . . . . . . . . . . . . . . . . . . . . . . . . . . . . . .
How are seat belts correctly fastened? . . . . . . . . . .
Belt tensioner . . . . . . . . . . . . . . . . . . . . . . . . . . . . . . . . Airbag system
. . . . . . . . . . . . . . . . . . . . . . . . . . . . . . . . .
Description of the airbag system . . . . . . . . . . . . . . .
Front airbags . . . . . . . . . . . . . . . . . . . . . . . . . . . . . . . . .
Side airbags* . . . . . . . . . . . . . . . . . . . . . . . . . . . . . . . . .
Head airbags* . . . . . . . . . . . . . . . . . . . . . . . . . . . . . . . .
Deactivating airbags . . . . . . . . . . . . . . . . . . . . . . . . . .
Transporting children safely
. . . . . . . . . . . . . . . . . .
What you should know about transporting children!
Child seat . . . . . . . . . . . . . . . . . . . . . . . . . . . . . . . . . . . .
Attaching a child seat using the “ISOFIX” system*
Attaching child seat using the “Top Tether” system
Driving Tips
. . . . . . . . . . . . . . . . . . . . . . . . . . . . . .
Intelligent Technology
. . . . . . . . . . . . . . . . . . . . . . . .
Electronic stability programme (ESP)* . . . . . . . . . .
Brakes . . . . . . . . . . . . . . . . . . . . . . . . . . . . . . . . . . . . . . .
Brake booster . . . . . . . . . . . . . . . . . . . . . . . . . . . . . . . .
Antilock brake system (ABS)* . . . . . . . . . . . . . . . . . .
Brake Assist* . . . . . . . . . . . . . . . . . . . . . . . . . . . . . . . . .
Electrohydraulic power steering . . . . . . . . . . . . . . .
Tyre inflation pressure-control system* . . . . . . . . .
Diesel particle filter* (diesel engine) . . . . . . . . . . . .
Driving and the Environment
. . . . . . . . . . . . . . . . .
The first 1 500 kilometres and then afterwards . .
Catalytic converter . . . . . . . . . . . . . . . . . . . . . . . . . . . .
Driving in an economical and environmentally
conscious manner . . . . . . . . . . . . . . . . . . . . . . . . . . . .
Environmental compatibility . . . . . . . . . . . . . . . . . . .
Motoring abroad . . . . . . . . . . . . . . . . . . . . . . . . . . . . .
Avoiding damage to your vehicle . . . . . . . . . . . . . .
To w i n g a t r a i l e r
. . . . . . . . . . . . . . . . . . . . . . . . . . . . . . . .
Towing a trailer . . . . . . . . . . . . . . . . . . . . . . . . . . . . . . .
General Maintenance
. . . . . . . . . . . . . . .
Taking care of your vehicle and cleaning the
vehicle
. . . . . . . . . . . . . . . . . . . . . . . . . . . . . . . . . . . . . . . . .
General . . . . . . . . . . . . . . . . . . . . . . . . . . . . . . . . . . . . . .
Care of the exterior of vehicle . . . . . . . . . . . . . . . . . .
Care of the interior of vehicle . . . . . . . . . . . . . . . . . .
Fuel
. . . . . . . . . . . . . . . . . . . . . . . . . . . . . . . . . . . . . . . . . . . .
Petrol . . . . . . . . . . . . . . . . . . . . . . . . . . . . . . . . . . . . . . . .
Diesel . . . . . . . . . . . . . . . . . . . . . . . . . . . . . . . . . . . . . . . .
Refuelling . . . . . . . . . . . . . . . . . . . . . . . . . . . . . . . . . . . .
Inspecting and replenishing
. . . . . . . . . . . . . . . . . .
Engine compartment . . . . . . . . . . . . . . . . . . . . . . . . .
Engine oil . . . . . . . . . . . . . . . . . . . . . . . . . . . . . . . . . . . .
Cooling system . . . . . . . . . . . . . . . . . . . . . . . . . . . . . . .
Brake fluid . . . . . . . . . . . . . . . . . . . . . . . . . . . . . . . . . . .
Battery . . . . . . . . . . . . . . . . . . . . . . . . . . . . . . . . . . . . . . .
Windshield washer system . . . . . . . . . . . . . . . . . . . .
Wheels and Tyres
. . . . . . . . . . . . . . . . . . . . . . . . . . . . . .
Wheels . . . . . . . . . . . . . . . . . . . . . . . . . . . . . . . . . . . . . .
Accessories, changes and replacement of partsAccessories and replacement parts . . . . . . . . . . . . .
Technical changes . . . . . . . . . . . . . . . . . . . . . . . . . . . .
Vehicles of the group N1 . . . . . . . . . . . . . . . . . . . . . .Breakdown assistance
. . . . . . . . . . . . . .
Breakdown assistance
. . . . . . . . . . . . . . . . . . . . . . . .
First-aid box* and Warning triangle* . . . . . . . . . . .
Fire extinguisher* . . . . . . . . . . . . . . . . . . . . . . . . . . . . .
Vehicle tool kit . . . . . . . . . . . . . . . . . . . . . . . . . . . . . . . .
Tyre repair kit* . . . . . . . . . . . . . . . . . . . . . . . . . . . . . . . .
Spare wheel* . . . . . . . . . . . . . . . . . . . . . . . . . . . . . . . . .
Changing a wheel . . . . . . . . . . . . . . . . . . . . . . . . . . . . .
Jump-starting . . . . . . . . . . . . . . . . . . . . . . . . . . . . . . . .
Tow-starting and towing vehicle . . . . . . . . . . . . . . .
Fuses and light bulbs
. . . . . . . . . . . . . . . . . . . . . . . . . .
Electric fuses . . . . . . . . . . . . . . . . . . . . . . . . . . . . . . . . .
Bulbs . . . . . . . . . . . . . . . . . . . . . . . . . . . . . . . . . . . . . . . .
Technical Data
. . . . . . . . . . . . . . . . . . . . . . . . . .
Technical Data
. . . . . . . . . . . . . . . . . . . . . . . . . . . . . . . . .
General information . . . . . . . . . . . . . . . . . . . . . . . . . . .
Used abbreviations . . . . . . . . . . . . . . . . . . . . . . . . . . .
Performances . . . . . . . . . . . . . . . . . . . . . . . . . . . . . . . . .
Weight . . . . . . . . . . . . . . . . . . . . . . . . . . . . . . . . . . . . . . .
Identification details . . . . . . . . . . . . . . . . . . . . . . . . . .
Fuel consumption according to the regulations
(99/100/EU) . . . . . . . . . . . . . . . . . . . . . . . . . . . . . . . . . .
Dimensions . . . . . . . . . . . . . . . . . . . . . . . . . . . . . . . . . .
Engine oil specifications . . . . . . . . . . . . . . . . . . . . . . .
1.2 ltr./44 kW - EU 4/EU 2DDK . . . . . . . . . . . . . . . . .
1.2 ltr./51 kW - EU 4/EU 2DDK . . . . . . . . . . . . . . . . .
1.4 ltr./63 kW - EU 4/EU 2DDK . . . . . . . . . . . . . . . . .
1.6 ltr./77 kW - EU 4/EU 2DDK . . . . . . . . . . . . . . . . .
1.4 ltr./51 kW TDI PD - EU 4 . . . . . . . . . . . . . . . . . . . .
1.4 ltr./59 kW TDI PD - EU 4 . . . . . . . . . . . . . . . . . . . .
1.9 ltr./77 kW TDI°PD - EU°4 . . . . . . . . . . . . . . . . . . .
Fabia - Vehicles of the group N1 . . . . . . . . . . . . . . . .
Fabia Combi - Vehicles of the group N1 . . . . . . . . .
Index
. . . . . . . . . . . . . . . . . . . . . . . . . . . . . . . . . . . . . . . . 133
134
136
138
138
139
142
143
145
147
147
150
153
154
155
155
155
158
158
159
159
160
160
162
163
163
164
164
167
168
169
170
170173
173
173
173
178
181
181
181
182
184
184
187
189
191
192
197
198
198
204
204
204
204
205
205
205
205
206
206
206
207
211
213216
216
221
227
227
227
227
227
227
227
228
229
230
231
233
235
237
239
241
243
245
246
247
s3f4.1.book Page 4 Thursday, June 18, 2009 11:07 AM
Page 27 of 259
Instruments and Indicator/Warning Lights 26Warning lightsOverview
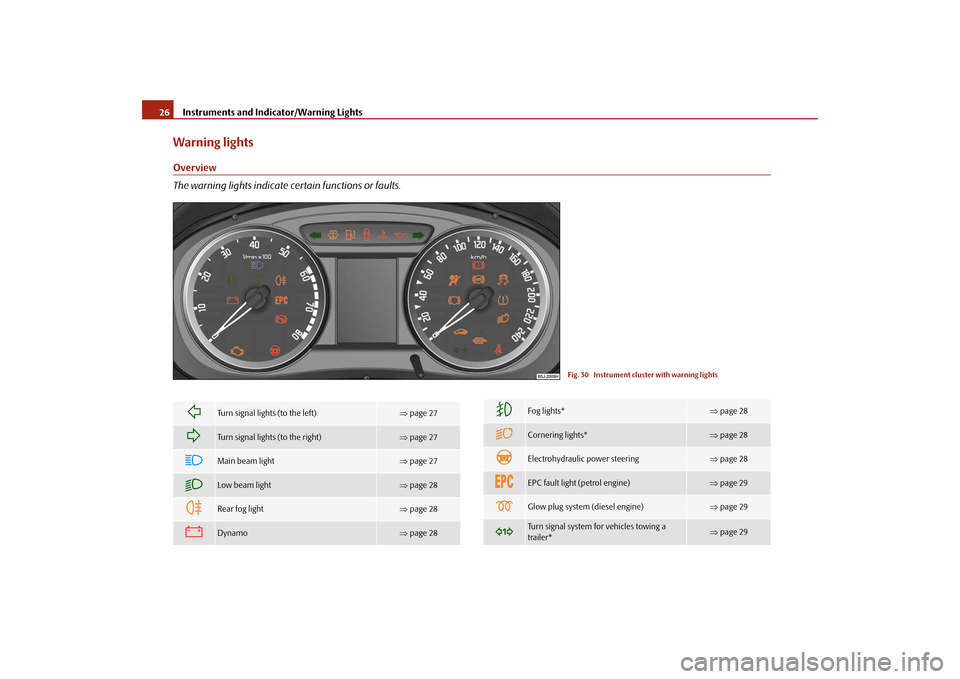
The warning lights indicate certain functions or faults.
Fig. 30 Instrument cluster with warning lights
Turn signal lights (to the left)
⇒page 27
Turn signal lights (to the right)
⇒page 27
Main beam light
⇒page 27
Low beam light
⇒page 28
Rear fog light
⇒page 28
Dynamo
⇒page 28
Fog lights*
⇒page 28
Cornering lights*
⇒page 28
Electrohydraulic power steering
⇒page 28
EPC fault light (petrol engine)
⇒page 29
Glow plug system (diesel engine)
⇒page 29
Turn signal system for vehicles towing a
trailer*
⇒page 29
s3f4.1.book Page 26 Thursday, June 18, 2009 11:07 AM
Page 28 of 259
Instruments and Indicator/Warning Lights27
Using the system
Safety
Driving Tips
General Maintenance
Breakdown assistance
Technical Data
WARNING
•
If you do not pay attention to the warning lights coming on and the corre-
sponding descriptions and warning notes, this may result in severe body
injuries or major vehicle damage.
•
The engine compartment of your car is a hazardous area. There is a risk
of injuries, scalding, accidents and fire when working in the engine
compartment, e.g. inspecting and replenishing oil and other fluids. It is also
essential to observe all warnings ⇒page 185.Note
•
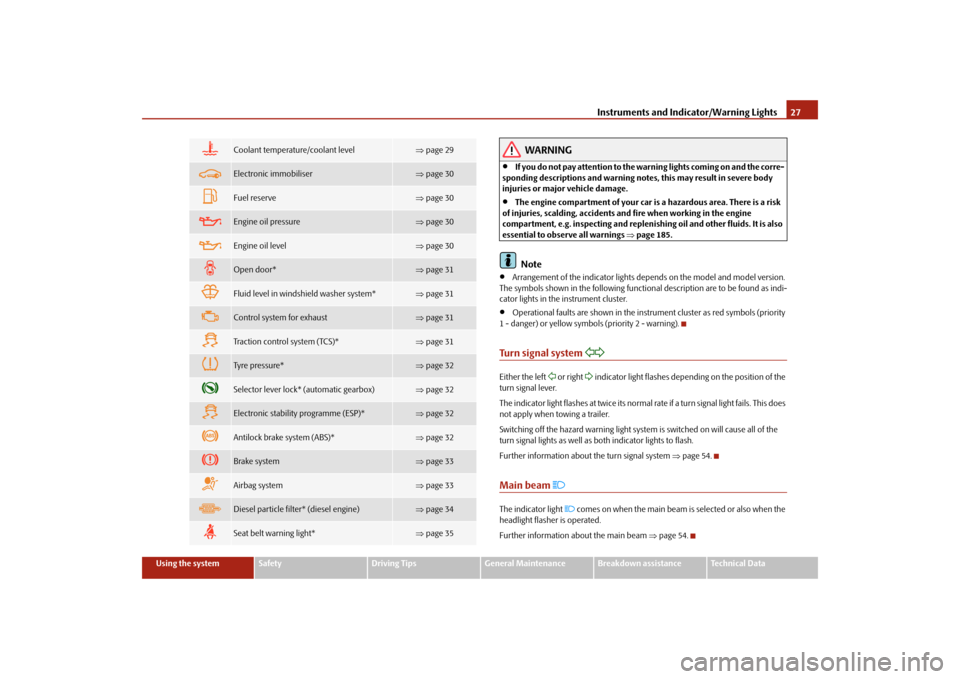
Arrangement of the indicator lights depends on the model and model version.
The symbols shown in the following functional description are to be found as indi-
cator lights in the instrument cluster.
•
Operational faults are shown in the instrument cluster as red symbols (priority
1 - danger) or yellow symbols (priority 2 - warning).
Turn signal system
Either the left
or right
indicator light flashes depending on the position of the
turn signal lever.
The indicator light flashes at twice its normal rate if a turn signal light fails. This does
not apply when towing a trailer.
Switching off the hazard warning light system is switched on will cause all of the
turn signal lights as well as both indicator lights to flash.
Further information about the turn signal system ⇒page 54.
Main beam
The indicator light
comes on when the main beam is selected or also when the
headlight flasher is operated.
Further information about the main beam ⇒page 54.
Coolant temperature/coolant level
⇒page 29
Electronic immobiliser
⇒page 30
Fuel reserve
⇒page 30
Engine oil pressure
⇒page 30
Engine oil level
⇒page 30
Open door*
⇒page 31
Fluid level in windshield washer system*
⇒page 31
Control system for exhaust
⇒page 31
Traction control system (TCS)*
⇒page 31
Tyre pressure*
⇒page 32
Selector lever lock* (automatic gearbox)
⇒page 32
Electronic stability programme (ESP)*
⇒page 32
Antilock brake system (ABS)*
⇒page 32
Brake system
⇒page 33
Airbag system
⇒page 33
Diesel particle filter* (diesel engine)
⇒page 34
Seat belt warning light*
⇒page 35
s3f4.1.book Page 27 Thursday, June 18, 2009 11:07 AM
Page 30 of 259
Instruments and Indicator/Warning Lights29
Using the system
Safety
Driving Tips
General Maintenance
Breakdown assistance
Technical Data
EPC fault light
(petrol engine)
The
(Electronic Power Control) warning light comes on for a few seconds when
the ignition is switched on.
There is a fault in the engine control system if the warning light
does not go out
or comes on or flashes while driving. The engine management system selects an
emergency programme which enables you to drive to the nearest specialist garage
by adopting a gentle style of driving.
The following text will be displayed in the information display*:
ENGINE FAULT WORKSHOP!
Glow plug system
(diesel engine)
The warning light
lights up for a cold engine when switching on the ignition
(pre-heat position) 2 ⇒page 100. Start the engine after the indicator light goes out.
The glow plug indicator light will come on for about 1 second if the engine is at a
normal operating temperature or if the outside temperature is above +5°C. This
means that you can start the engine right away.
There is a fault in the glow plug system if the warning light
does not come on or
lights up continuously, contact a specialist garage as soon as possible to obtain
assistance.
There is a system fault in the engine control system if the warning light
has
started to flash while driving. The engine management system selects an emer-
gency programme which enables you to drive to the nearest specialist garage by
adopting a gentle style of driving.
The following text will be displayed in the information display*:
ENGINE FAULT WORKSHOP!
Turn signal system for vehicles towing a trailer*
Only if a trailer is attached to the vehicle, the indicator light
flashes together with
the turn signals.The indicator light
does not flash if a turn signal light on the trailer or on the
vehicle is not operating.
Coolant temperature/coolant level
After the ignition is switched on the warning light lights up blue until the engine
reaches operating temperature
1). Avoid running at high engine speeds, at full
throttle and at severe engine loads. The blue warning light goes out once the oper-
ating temperature has been reached .
The coolant temperature is too high or the coolant level too low if the warning light
lights up red or flashes red while driving.
3 peeps sound as an additional warning signal.
In this case stop and switch the engine off and check the coolant level; top up the
coolant as necessary ⇒page 190, “Replenishing the coolant”.
Do not continue your journey if for some reason it is not possible under the
conditions prevailing to top up with coolant. Keep the engine switched off and
obtain professional assistance from a specialist garage, otherwise it could lead to
severe engine damage.
If the coolant is within the specified range, the increased temperature may be
caused by an operating problem at the coolant fan. Check the fuse for the coolant
fan, replace it if necessary ⇒page 221, “Fuse assignment at the battery (automatic
gearbox)”.
Do not continue driving if the warning light does not go off although the fluid is at
the correct level and also the fuse of the fan is in proper order. Contact a specialist
garage to obtain assistance.
Please also refer to the additional instructions ⇒page 189, “Cooling system”.
The following text will be displayed in the information display*:
STOP CHECK COOLANT OWNER'S MANUAL!1)Not valid for vehicles with information display.
s3f4.1.book Page 29 Thursday, June 18, 2009 11:07 AM
Page 54 of 259
Lights and Visibility53
Using the system
Safety
Driving Tips
General Maintenance
Breakdown assistance
Technical Data
Fog lights with the function “Corner”*
The fog lights with the function “Corner” improve the illumination of
areas close to the vehicle when turning, parking etc.The fog lights with the function “Corner” are regulated according to the steering
angle or after switching on the turn signal light
4) in the following circumstances:
•
the vehicle is stationary and the engine is running or it moves with a speed of
maximum 40 km/h;
•
the daylight driving lights are not switched on
•
low beam switched on;
•
no reverse gear engaged;
•
no hazard warning light system switched on.
A fault in the system of the fog lights with the function “Corner” is confirmed by the
warning light lighting up or flashing
.
Note
If the fog lights are switched on, the function of the lights “Corner” is not active.Rear fog light
Switching on the rear fog light
– First of all turn the light switch into position
or
⇒page 52,
fig. 50.
– Pull the light switch out to the second detent . The fog lights* light
up at the same time.
If the vehicle is not fitted with fog lights*, the rear fog light is switched on by turning
the light switch to the position
and is pulled out directly to the position . This
switch does not have two positions, but only one position.The rear fog light warning light
⇒page 26 lights up in the instrument cluster
when the fog light is switched off.
Only the rear fog light of the trailer lights up if the vehicle is fitted with a towing
device from Škoda original accessoriesand when you are towing a trailer which
is fitted with the rear fog light.
Caution
The rear fog light should only be switched on if visibility is particularly poor
(conform with any varying legal provisions) to avoid dazzling vehicles behind your
vehicle.Headlamp range adjustment
Once the low beam is switched on you can then adapt the range of
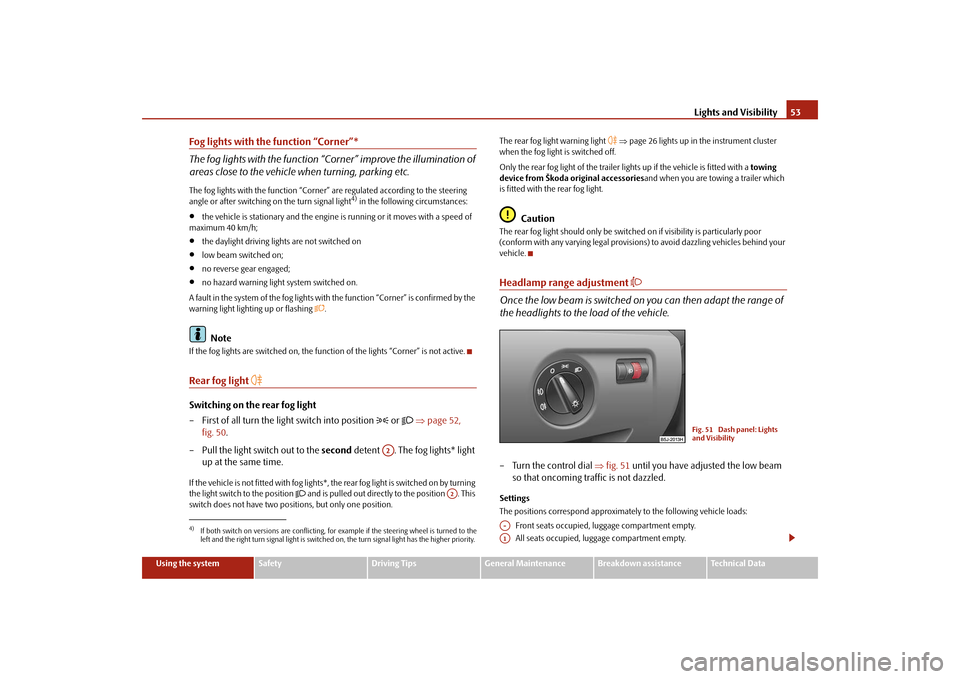
the headlights to the load of the vehicle.– Turn the control dial ⇒fig. 51 until you have adjusted the low beam
so that oncoming traffic is not dazzled.Settings
The positions correspond approximately to the following vehicle loads:
Front seats occupied, luggage compartment empty.
All seats occupied, luggage compartment empty.
4)If both switch on versions are conflicting, for example if the steering wheel is turned to the
left and the right turn signal light is switched on, the turn signal light has the higher priority.
A2
A2
Fig. 51 Dash panel: Lights
and Visibility
A-A1
s3f4.1.book Page 53 Thursday, June 18, 2009 11:07 AM
Page 105 of 259
Starting-off and Driving 104Parking aid*The parking aid provides a warning of obstacles behind the vehicle.The audible parking aid determines the distance between the rear bumper and an
obstacle located behind the vehicle with the aid of ultrasound sensors. The sensors
are integrated in the rear bumper.
Range of sensors
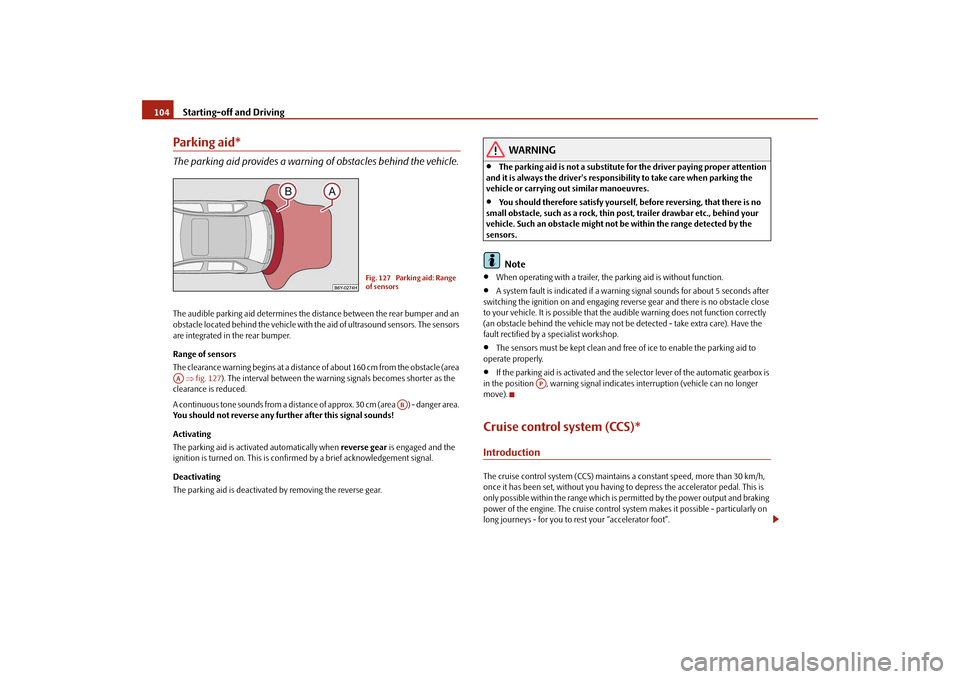
The clearance warning begins at a distance of about 160 cm from the obstacle (area
⇒fig. 127). The interval between the warning signals becomes shorter as the
clearance is reduced.
A continuous tone sounds from a distance of approx. 30 cm (area ) - danger area.
You should not reverse any further after this signal sounds!
Activating
The parking aid is activated automatically when reverse gear is engaged and the
ignition is turned on. This is confirmed by a brief acknowledgement signal.
Deactivating
The parking aid is deactivated by removing the reverse gear.
WARNING
•
The parking aid is not a substitute for the driver paying proper attention
and it is always the driver's responsibility to take care when parking the
vehicle or carrying out similar manoeuvres.
•
You should therefore satisfy yourself, before reversing, that there is no
small obstacle, such as a rock, thin post, trailer drawbar etc., behind your
vehicle. Such an obstacle might not be within the range detected by the
sensors.Note
•
When operating with a trailer, the parking aid is without function.
•
A system fault is indicated if a warning signal sounds for about 5 seconds after
switching the ignition on and engaging reverse gear and there is no obstacle close
to your vehicle. It is possible that the audible warning does not function correctly
(an obstacle behind the vehicle may not be detected - take extra care). Have the
fault rectified by a specialist workshop.
•
The sensors must be kept clean and free of ice to enable the parking aid to
operate properly.
•
If the parking aid is activated and the selector lever of the automatic gearbox is
in the position , warning signal indicates interruption (vehicle can no longer
move).
Cruise control system (CCS)*IntroductionThe cruise control system (CCS) maintains a constant speed, more than 30 km/h,
once it has been set, without you having to depress the accelerator pedal. This is
only possible within the range which is permitted by the power output and braking
power of the engine. The cruise control system makes it possible - particularly on
long journeys - for you to rest your “accelerator foot”.
Fig. 127 Parking aid: Range
of sensors
AA
AB
AP
s3f4.1.book Page 104 Thursday, June 18, 2009 11:07 AM
Page 110 of 259
Automatic gearbox109
Using the system
Safety
Driving Tips
General Maintenance
Breakdown assistance
Technical Data In certain circumstances (e.g. when driving in mountainous regions or when towing
a trailer) it may be beneficial to select the manual shift programme ⇒page 110 for
a short time in order to adapt the gearbox ratios manually to the driving situations.
S - Position for sporty style of driving
Shifting up later into a higher gear makes it possible to fully exploit the power
potential of the engine. The gearbox also then shifts down at higher engine speeds
as in the position D.
The gearbox does not shift into the 6th gear in the position S, because the
maximum speed is achieved with the 5th gear.
The Shiftlock on the selector lever grip must be pressed when moving the selector
lever out of the position D into the position S.
WARNING
•
Never move the selector lever into position R or P when driving - risk of
an accident!
•
When the engine is running and the vehicle is stationary, it is necessary
to hold the car with the brake pedal in all the positions of the selector lever
(except P and N) since the power transmission is never completely inter-
rupted, also not when the engine is idling - the vehicle creeps.
•
You must on no account unintentionally operate the throttle (e.g. by
hand from the engine compartment) if a drive position is engaged when the
car is stationary. The vehicle would otherwise immediately start off - also
when the handbrake is firmly applied - risk of an accident!
•
You must move the selector lever into position P and firmly apply the
handbrake first before you or any other person opens the bonnet and starts
working on the engine when it is running - risk of accident! It is also essential
to observe all warnings ⇒page 185, “Working in the engine
compartment”.
Selector lever lockAutomatic selector lever lock
With the ignition on, the selector lever is locked when it is in the positions P and N.
You must first of all depress the brake pedal in order to move the selector lever out
of this position. The warning light
⇒page 32 lights up in the instrument cluster
as a reminder for the driver when the selector lever is in position P and N.
A time delay element ensures that the selector lever is not blocked when rapidly
switching over the position N (e.g. from R to D). This does, for example, allow one
to seesaw out a stuck vehicle. The selector lever lock will click into place if the lever
is in the N position for more than 2 seconds without the brake pedal being pressed.
The selector lever lock is only active if the vehicle is stationary or moving at speed
of less than 5 km/hour. The lock is switched off automatically into position N when
the car is travelling at a higher speed.
Shiftlock button
The Shiftlock button in the handle of selector lever prevents certain selector lever
positions being engaged inadvertently. The selector lever lock is cancelled when
you press the Shiftlock button.
Keylock
5)- Ignition key withdrawal lock
You can only withdraw the ignition key after switching off the ignition if the selector
lever is in position P. If the ignition key is withdrawn, the selector lever is blocked in
position P.
Kickdown function
The kickdown function provides you with maximum acceleration
power.Fully depressing the accelerator pedal allows the kickdown function to be activated
in the desired driving program. This function has precedence over the driving
programme and serves for maximum acceleration of the vehicle when exploiting
the maximum power potential of the engine without taking into account the 5)This function is only valid for some countries.
s3f4.1.book Page 109 Thursday, June 18, 2009 11:07 AM
Page 162 of 259
Intelligent Technology161
Using the system
Safety
Driving Tips
General Maintenance
Breakdown assistance
Technical Data
•
the structure of the tyre is damaged,
•
the vehicle is loaded to one side or with a load on the roof,
•
the wheels of an axle are loaded heavily (e.g. when towing a trailer or when
driving uphill or downhill),
•
the vehicle is operated in unfavourable winter conditions or on an unfirm
ground,
•
Snow chains or emergency wheel* are mounted,
•
the driver has a sporty style of driving (with sharp acceleration and high speed
when cornering).
Basic setting of tyre inflation pressure-control system
After changing the tyre inflation pressures or after changing one or several wheels,
a basic setting of the system must be carried out as follows.
•
Inflate all tyres to the specified inflation pressure ⇒page 198.
•
Switch on the ignition.
•
Press button
⇒page 160, fig. 172 for more than 2 seconds. While
pressing the button, the warning light
lights up. At the same time the basic
values are stored, which is confirmed with an acoustic sound and then the warning
light
goes out.
•
If the warning light
does not go out after the basic setting, there is a fault in
the system. Have the vehicle inspected by your nearest specialist garage.
Function description
After the basic setting of the system the “adaptation” of the tyre inflation pressures
and then the tyre pressure control in the individual tyres are performed.
Warning light
lights up
If the tyre inflation pressure of at least one wheel is insufficiently inflated in compar-
ison to the stored basic value, the warning light
⇒ lights up. Inflate all tyres
to the specified inflation pressure ⇒page 198, “Tyre life” and then perform a basic
setting of the system.
Warning light
flashes
If the warning light flashes, there is a system fault. Have the vehicle inspected by
your nearest specialist garage.
WARNING
•
When the warning light
lights up, immediately reduce the speed and
avoid sudden steering and brake manoeuvres. Please stop the vehicle
without delay at the nearest possible stop and inspect the tyres and their
inflation pressures.
•
The driver is responsible for the correct tyre inflation pressures. For this
reason, the tyre inflation pressures must be checked regularly.
•
Under certain circumstances (e.g. sporty style of driving, wintry or
unpaved roads) the warning light
can be delayed or does not light up at
all.
•
The tyre inflation pressure-control system does not take away the
responsability from the driver for the correct tyre inflation pressure.Note
The tyre inflation pressure-control system:•
does not replace the regular tyre inflation pressure control, because the system
cannot detect an even pressure loss;
•
cannot warn in case of very rapid tyre inflation pressure loss, e.g. in case of
sudden tyre damage. In this case carefully bring the vehicle to a standstill without
sudden steering movements and without sharp braking.
s3f4.1.book Page 161 Thursday, June 18, 2009 11:07 AM
Page 164 of 259
Driving and the Environment163
Using the system
Safety
Driving Tips
General Maintenance
Breakdown assistance
Technical Data
Driving and the EnvironmentThe first 1 500 kilometres and then afterwardsA new engine
The engine has to be run in during the first 1 500 kilometres.Up to 1 000 kilometres
– Do not drive faster than 3/4 of the maximum speed of the gear in use,
that is 3/4 of the maximum permissible engine speed.
– Do not use full throttle.
– Avoid high engine revolutions.
– Do not tow a trailer.
From 1 000 up to 1 500 kilometres
– Increase the power output of the engine gradually up to the full
speed of the gear engaged, that is up to the maximum permissible
engine revolutions.During the first operating hours the engine has higher internal friction than later
until all of the moving parts have harmonized. The driving style which you adopt
during the first approx.1 500 kilometres plays a decisive part in the success of
running in your vehicle.
You should not drive at unnecessarily high engine revolutions even after the
running-in period is complete. The maximum permissible engine speed is marked
by the beginning of the red zone on the scale of the revolutions counter. Shift up
into the next higher gear on a vehicle fitted with manual gearbox before the red
zone is reached. During acceleration (depressing the accelerator) exceptionally
high engine speeds are automatically reduced, yet the engine is not protected
against too high engine speeds which are caused by incorrectly shifting down the
gears resulting in a sudden increase of the engine speeds above the permitted
maximum revolutions which can lead to engine damage.For a vehicle fitted with a manual gearbox the converse situation also applies: Do
not drive at engine revolutions which are too low. Shift down as soon as the engine
is no longer running smoothly.
Caution
All the speed and engine revolution figures apply only when the engine is at its
normal operating temperature. Never rev up an engine which is cold, neither when
the vehicle is stationary nor when driving in individual gears.
For the sake of the environment
Not driving at unnecessarily high engine revolutions and shifting to a higher gear as
early as possible are ways to minimise fuel consumption, operating noise levels as
well as protects the environment and contributes to a longer life and reliability of
the engine.New tyresNew tyres have to be “run in” since they do not offer optimal grip at first. You should
take account of this fact for the first 500 kilometres and drive particularly carefully.New brake padsAllow for the fact that new brake pads do not achieve their full braking efficiency
until approximately 200 kilometres. New brake pads must be first “run in” before
they develop their optimal friction force. You can, however, compensate for this
slightly reduced braking force by increasing the pressure on the brake pedal.
This guideline also applies to any new brake pads installed at a future date.
During the running-in period, you should avoid excessive stresses on the brakes.
This includes, for example, violent braking, particularly from very high speeds, and
also when crossing mountain passes.
s3f4.1.book Page 163 Thursday, June 18, 2009 11:07 AM
Page 166 of 259
Driving and the Environment165
Using the system
Safety
Driving Tips
General Maintenance
Breakdown assistance
Technical Data number of tips on how to protect the environment and at the same time save
money.
The fuel consumption can naturally also be influenced by factors which are beyond
the driver's control. It is, for example, normal for the fuel consumption to increase
in winter and under worsened conditions such as poor road conditions, towing a
trailer, etc.
The technical requirements for low fuel usage and economic efficiency of the
vehicle have already been built into the vehicle at the works. Special attention has
been given to minimising negative effects on the environment. It is necessary to
take note of the guidelines given in this chapter in order to make best use of these
characteristics and to maintain their effectiveness.
Looking ahead when driving
A vehicle's highest fuel consumption occurs it accelerates.Avoid accelerating and braking unnecessarily. If you drive with forsight you will not
need to brake so often and will also then not have to accelerate so much. Let your
vehicle coast to a stop, for example, if this is possible, when you see that the next
set of traffic lights is at red.Shifting gears and saving energy
Shifting up early saves on fuel.
Manual gearbox
– Drive no more than about one length of your vehicle in first gear.
Always shift up into the next higher gear at approx. 2 000 to 2 500 revs.
Automatic gearbox
– Depress the accelerator pedal slowly. Do not depress it beyond the
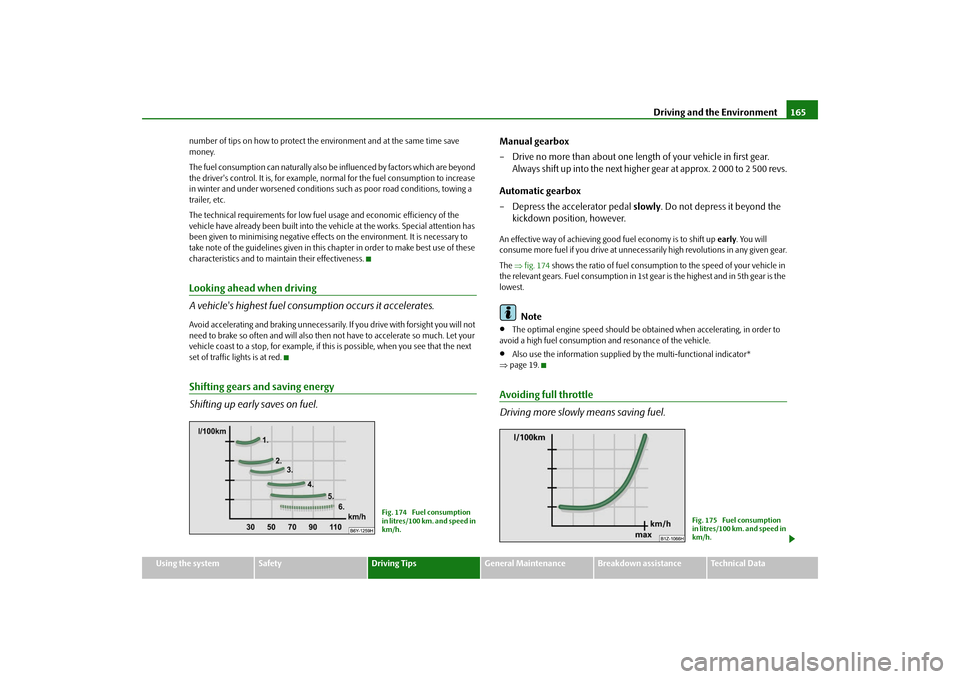
kickdown position, however.An effective way of achieving good fuel economy is to shift up early. You will
consume more fuel if you drive at unnecessarily high revolutions in any given gear.
The ⇒fig. 174 shows the ratio of fuel consumption to the speed of your vehicle in
the relevant gears. Fuel consumption in 1st gear is the highest and in 5th gear is the
lowest.
Note
•
The optimal engine speed should be obtained when accelerating, in order to
avoid a high fuel consumption and resonance of the vehicle.
•
Also use the information supplied by the multi-functional indicator*
⇒page 19.
Avoiding full throttle
Driving more slowly means saving fuel.
Fig. 174 Fuel consumption
in litres/100 km. and speed in
km/h.
Fig. 175 Fuel consumption
in litres/100 km. and speed in
km/h.
s3f4.1.book Page 165 Thursday, June 18, 2009 11:07 AM