gearbox SKODA FABIA 2013 2.G / 5J User Guide
[x] Cancel search | Manufacturer: SKODA, Model Year: 2013, Model line: FABIA, Model: SKODA FABIA 2013 2.G / 5JPages: 223, PDF Size: 12.77 MB
Page 103 of 223
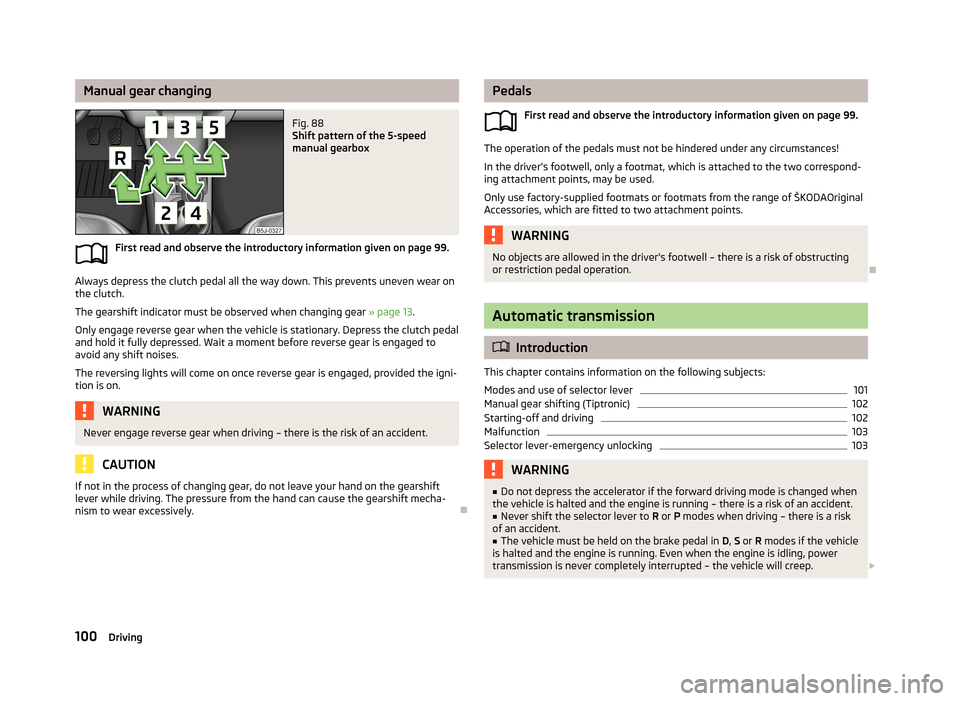
Manual gear changingFig. 88
Shift pattern of the 5-speed
manual gearbox
First read and observe the introductory information given on page 99.
Always depress the clutch pedal all the way down. This prevents uneven wear on the clutch.
The gearshift indicator must be observed when changing gear » page 13.
Only engage reverse gear when the vehicle is stationary. Depress the clutch pedal
and hold it fully depressed. Wait a moment before reverse gear is engaged to
avoid any shift noises.
The reversing lights will come on once reverse gear is engaged, provided the igni- tion is on.
WARNINGNever engage reverse gear when driving – there is the risk of an accident.
CAUTION
If not in the process of changing gear, do not leave your hand on the gearshiftlever while driving. The pressure from the hand can cause the gearshift mecha-
nism to wear excessively.
Pedals
First read and observe the introductory information given on page 99.
The operation of the pedals must not be hindered under any circumstances!
In the driver's footwell, only a footmat, which is attached to the two correspond- ing attachment points, may be used.
Only use factory-supplied footmats or footmats from the range of ŠKODAOriginal Accessories, which are fitted to two attachment points.
WARNINGNo objects are allowed in the driver's footwell – there is a risk of obstructing
or restriction pedal operation.
Automatic transmission
Introduction
This chapter contains information on the following subjects:
Modes and use of selector lever
101
Manual gear shifting (Tiptronic)
102
Starting-off and driving
102
Malfunction
103
Selector lever-emergency unlocking
103WARNING■ Do not depress the accelerator if the forward driving mode is changed when
the vehicle is halted and the engine is running – there is a risk of an accident.■
Never shift the selector lever to R or P modes when driving – there is a risk
of an accident.
■
The vehicle must be held on the brake pedal in D, S or R modes if the vehicle
is halted and the engine is running. Even when the engine is idling, power
transmission is never completely interrupted – the vehicle will creep.
100Driving
Page 104 of 223
CAUTION■If the selector lever is shifted to N while the vehicle is being driven you must lift
off the accelerator pedal and you will need to wait until the engine has reached
its idling speed before shifting the selector lever to a forward driving mode again.■
At temperatures below -10 °C, the engine can only be started in selector lever
position P.
■
Never try to hold the vehicle using the accelerator pedal when stopping on a hill
– this may lead to transmission damage.
Note
The ignition key can only be withdrawn once the ignition has been switched off if
the selector lever is in the P position 1)
.
Modes and use of selector lever
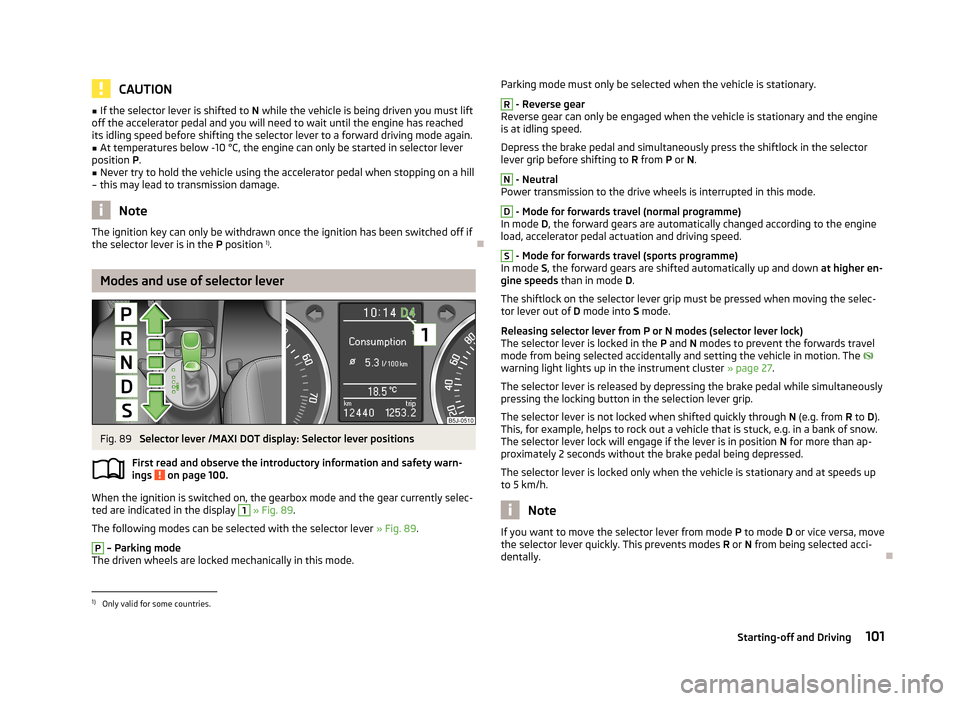
Fig. 89
Selector lever /MAXI DOT display: Selector lever positions
First read and observe the introductory information and safety warn-
ings
on page 100.
When the ignition is switched on, the gearbox mode and the gear currently selec-
ted are indicated in the display
1
» Fig. 89 .
The following modes can be selected with the selector lever » Fig. 89.
P
– Parking mode
The driven wheels are locked mechanically in this mode.
Parking mode must only be selected when the vehicle is stationary.R
- Reverse gear
Reverse gear can only be engaged when the vehicle is stationary and the engine
is at idling speed.
Depress the brake pedal and simultaneously press the shiftlock in the selector
lever grip before shifting to R from P or N.
N
- Neutral
Power transmission to the drive wheels is interrupted in this mode.
D
- Mode for forwards travel (normal programme)
In mode D, the forward gears are automatically changed according to the engine
load, accelerator pedal actuation and driving speed.
S
- Mode for forwards travel (sports programme)
In mode S, the forward gears are shifted automatically up and down at higher en-
gine speeds than in mode D.
The shiftlock on the selector lever grip must be pressed when moving the selec-
tor lever out of D mode into S mode.
Releasing selector lever from P or N modes (selector lever lock) The selector lever is locked in the P and N modes to prevent the forwards travel
mode from being selected accidentally and setting the vehicle in motion. The
warning light lights up in the instrument cluster » page 27.
The selector lever is released by depressing the brake pedal while simultaneously
pressing the locking button in the selection lever grip.
The selector lever is not locked when shifted quickly through N (e.g. from R to D).
This, for example, helps to rock out a vehicle that is stuck, e.g. in a bank of snow.
The selector lever lock will engage if the lever is in position N for more than ap-
proximately 2 seconds without the brake pedal being depressed.
The selector lever is locked only when the vehicle is stationary and at speeds up to 5 km/h.
Note
If you want to move the selector lever from mode P
to mode D or vice versa, move
the selector lever quickly. This prevents modes R or N from being selected acci-
dentally.1)
Only valid for some countries.
101Starting-off and Driving
Page 105 of 223
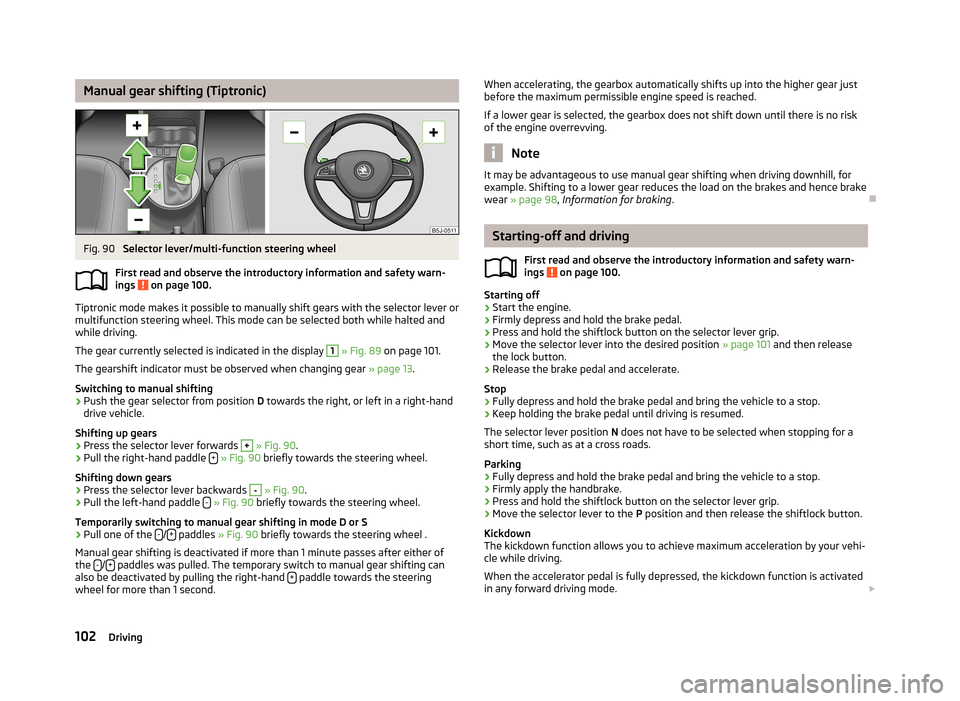
Manual gear shifting (Tiptronic)Fig. 90
Selector lever/multi-function steering wheel
First read and observe the introductory information and safety warn- ings
on page 100.
Tiptronic mode makes it possible to manually shift gears with the selector lever or
multifunction steering wheel. This mode can be selected both while halted and
while driving.
The gear currently selected is indicated in the display
1
» Fig. 89 on page 101.
The gearshift indicator must be observed when changing gear » page 13.
Switching to manual shifting
›
Push the gear selector from position D towards the right, or left in a right-hand
drive vehicle.
Shifting up gears
›
Press the selector lever forwards
+
» Fig. 90 .
›
Pull the right-hand paddle +
» Fig. 90 briefly towards the steering wheel.
Shifting down gears
›
Press the selector lever backwards
-
» Fig. 90 .
›
Pull the left-hand paddle -
» Fig. 90 briefly towards the steering wheel.
Temporarily switching to manual gear shifting in mode D or S
›
Pull one of the -/+ paddles
» Fig. 90 briefly towards the steering wheel .
Manual gear shifting is deactivated if more than 1 minute passes after either of
the -
/+ paddles was pulled. The temporary switch to manual gear shifting can
also be deactivated by pulling the right-hand + paddle towards the steering
wheel for more than 1 second.
When accelerating, the gearbox automatically shifts up into the higher gear just
before the maximum permissible engine speed is reached.
If a lower gear is selected, the gearbox does not shift down until there is no riskof the engine overrevving.
Note
It may be advantageous to use manual gear shifting when driving downhill, for
example. Shifting to a lower gear reduces the load on the brakes and hence brake wear » page 98 , Information for braking .
Starting-off and driving
First read and observe the introductory information and safety warn-
ings
on page 100.
Starting off
›
Start the engine.
›
Firmly depress and hold the brake pedal.
›
Press and hold the shiftlock button on the selector lever grip.
›
Move the selector lever into the desired position » page 101 and then release
the lock button.
›
Release the brake pedal and accelerate.
Stop
›
Fully depress and hold the brake pedal and bring the vehicle to a stop.
›
Keep holding the brake pedal until driving is resumed.
The selector lever position N does not have to be selected when stopping for a
short time, such as at a cross roads.
Parking
›
Fully depress and hold the brake pedal and bring the vehicle to a stop.
›
Firmly apply the handbrake.
›
Press and hold the shiftlock button on the selector lever grip.
›
Move the selector lever to the P position and then release the shiftlock button.
Kickdown
The kickdown function allows you to achieve maximum acceleration by your vehi-
cle while driving.
When the accelerator pedal is fully depressed, the kickdown function is activated
in any forward driving mode.
102Driving
Page 106 of 223
The gearbox shifts down one or more gears depending on the vehicle speed andengine speed, and the vehicle accelerates.
The gearbox does not shift up into the highest gear until the engine has reached
its maximum revolutions for this gear range.WARNINGRapid acceleration, particularly on slippery roads, can lead to loss of control of
the vehicle – there is a risk of an accident.
Malfunction
First read and observe the introductory information and safety warn-
ings
on page 100.
Emergency programme
The transmission switches to the emergency programme if there is a fault in the
automatic gearbox system.
Indications of an activated emergency programme include the following:
› Only certain gears are selected.
› Reverse gear
R cannot be used.
› Shifting gears in Tiptronic mode is not possible.
Gearbox overheating
The gearbox may, for example, become too hot due to frequent repeated starting
or stop-and-go traffic. Overheating is indicated by the warning light » page 19,
Clutches in the automatic gearbox are too hot .
Note
Visit a specialist workshop if the gearbox has switched to the emergency pro-
gramme.
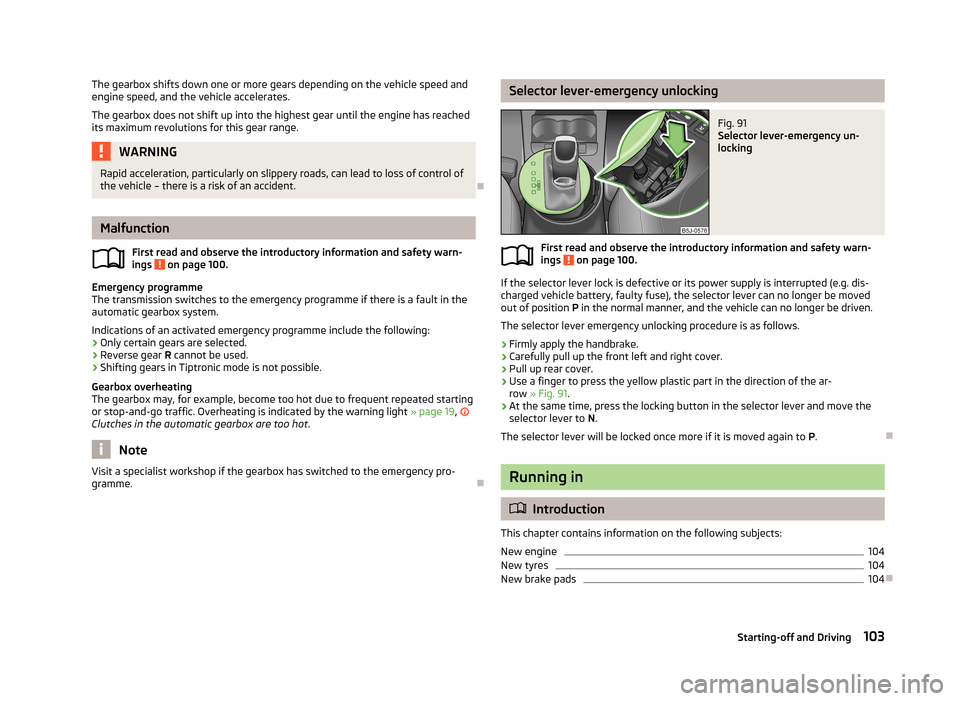
Selector lever-emergency unlockingFig. 91
Selector lever-emergency un-
locking
First read and observe the introductory information and safety warn-
ings on page 100.
If the selector lever lock is defective or its power supply is interrupted (e.g. dis-
charged vehicle battery, faulty fuse), the selector lever can no longer be moved
out of position P in the normal manner, and the vehicle can no longer be driven.
The selector lever emergency unlocking procedure is as follows.
›
Firmly apply the handbrake.
›
Carefully pull up the front left and right cover.
›
Pull up rear cover.
›
Use a finger to press the yellow plastic part in the direction of the ar- row » Fig. 91 .
›
At the same time, press the locking button in the selector lever and move the
selector lever to N.
The selector lever will be locked once more if it is moved again to P.
Running in
Introduction
This chapter contains information on the following subjects:
New engine
104
New tyres
104
New brake pads
104
103Starting-off and Driving
Page 107 of 223
New engineFirst read and observe the introductory information given on page 103.
The engine has to be run in during the first 1 500 kilometres.Up to 1 000 kilometres
›
Do not drive faster than 3/4 of the maximum speed of the gear in use, i.e. 3/4 of
the maximum permissible engine speed.
›
No full throttle.
›
Avoid high engine speeds.
›
Do not tow a trailer.
From 1 000 up to 1 500 kilometres
Gradually increase the power output of the engine up to the full speed of the
gear engaged, i.e. up to the maximum permissible engine speed.
The red scale on the rev counter indicates the range in which the system beginsto limit the engine speed.
During the first operating hours the engine has higher internal friction than later until all of the moving parts have harmonized. The driving style which you adopt
during the first approx.1 500 kilometres plays a decisive part in the success of
running in your car.
Never drive at unnecessarily high engine speeds even after the running-in period. On vehicles fitted with a manual gearbox, at the very latest shift up into the next
gear when the red area is reached. Observe the recommended gear » page 13,
Recommended gear . Very high engine speeds when accelerating (accelerator) are
automatically restricted »
.
In vehicles with manual transmission, do not drive at unnecessarily low engine
speeds. Shift down a gear when the engine is no longer running smoothly. Ob-
serve the recommended gear » page 13, Recommended gear .
CAUTION
■
The engine is not protected from excessive engine revs caused by shifting
down at the wrong time. This can result in a sudden increase in revs beyond the
permissible maximum rpm and hence engine damage.■
Never rev up a cold engine when the vehicle is stationary or when driving in in-
dividual gears.
For the sake of the environmentDo not drive at unnecessarily high engine speeds. Shifting up sooner helps save
fuel, reduces engine noise and protects the environment.
New tyres
First read and observe the introductory information given on page 103.
New tyres have to be “run in” since they do not offer optimal grip at first. Drive
especially carefully for the first 500 km or so.
New brake pads
First read and observe the introductory information given on page 103.
New brake pads initially do not provide optimal braking performance. They firstneed to be “run in”. Drive especially carefully for the first 200 km or so.
Economical driving and respect the environment
Introduction
This chapter contains information on the following subjects:
Driving with anticipation
105
Economical gear changing.
105
Avoiding full throttle
106
Reducing idling
106
Avoiding short distances
106
Checking tyre pressure
106
Avoiding unnecessary ballast
107
Regular maintenance
107
Saving electrical energy
107
Environmental compatibility
107
104Driving
Page 108 of 223
The technical requirements for low fuel usage and economic efficiency of the ve-
hicle have already been built into the vehicle at the works. ŠKODA places a partic-
ular emphasis on minimising negative effects on the environment.
It is necessary to take note of the guidelines given in this chapter in order tomake best use of these characteristics and to maintain their effectiveness.
Fuel consumption, environmental pollution and the wear to the engine, brakes
and tyres depend essentially on the following three factors.
› Your personal driving style
› Operating conditions
› Technical requirements
The fuel economy by can be improved by 10 -15 % by always looking ahead and
driving in an economical way.
Fuel consumption is also be influenced by external factors which are beyond the
driver's control. Consumption increases during the winter or under difficult condi-
tions, on poor roads, etc.
Fuel consumption can vary considerably from the manufacturer's data, as a result
of outside temperatures, the weather and driving style.
The optimal engine speed should be maintained when accelerating, to avoid a
high fuel consumption and resonance of the vehicle.
CAUTION
All the speed and engine revolution figures apply only when the engine is at its
normal operating temperature.
Driving with anticipation
First read and observe the introductory information and safety warn-
ings
on page 104.
A vehicle's highest fuel consumption occurs when accelerating, therefore unnec-
essary accelerating and braking should be avoided. If looking ahead when driving,
less braking and consequently less accelerating are required.
If possible, let your vehicle coast to a stop, or use the engine brake, if you can see that the next set of traffic lights is on red, for example.
Economical gear changing.Fig. 92
Principle sketch: Fuel consump-
tion in litres/100 km depending
on the selected gear
First read and observe the introductory information and safety warn- ings on page 104.
Shifting up early saves on fuel.
Manual gearbox › Drive no more than about one length of your vehicle in first gear.
› Shift up into the next gear at approximately 2000 rpm.
An effective way of achieving good fuel economy is to shift up early. Observe the
recommended gear » page 13, Recommended gear .
A suitably selected gear can have an effect on fuel consumption » Fig. 92.
Automatic gearbox › Depress the accelerator pedal
slowly. However, do not depress it as far as the
kickdown position » page 102.
› An economic driving programme is automatically selected if the accelerator ped-
al is only depressed slowly.
105Starting-off and Driving
Page 112 of 223
Driving through water on streetsFig. 95
Driving through water
First read and observe the introductory information given on page 108.
The following instructions must be observed if vehicle damage is to be avoided
when driving through water (e.g. flooded roads).
›
Determine the depth of the water before driving through it.
The water level must not reach above the web of the lower sill » Fig. 95.
›
Do not drive any faster than at a walking speed.
At a higher speed, a water wave can form in front of the vehicle, which can cause
water to penetrate into the engine's air intake system or other parts of the vehi- cle.
›
Never stop in the water, do not reverse and do not switch the engine off.
›
Deactivate the START-STOP system before driving through water » page 116,
START-STOP .
WARNING■
Driving through water, mud, sludge etc. can reduce the braking power and
extend the braking distance – there is the risk of an accident.■
Avoid abrupt and sudden braking immediately after water crossings.
■
After driving through bodies of water, the brakes must be cleaned and dried
as soon as possible by intermittent braking. Only apply the brakes for the pur-
pose of drying and cleaning the brake discs if the traffic conditions permit this.
Do not place any other road users in jeopardy.
CAUTION■ When driving through water, some parts of the vehicle such as the engine,
gearbox, chassis or electrics can be severely damaged.■
Oncoming vehicles can generate water waves which can exceed the permissible
water level for your vehicle.
■
Potholes, mud or rocks can be hidden under the water making it difficult or im-
possible to drive through the body of water.
■
Do not drive through salt water. The salt can lead to corrosion. Any vehicle parts
that have come into contact with salt water must be rinsed immediately with
fresh water.
Note
We recommend that the vehicle is checked by a specialist garage after it has been
driven through water.
Driving abroad
Introduction
This chapter contains information on the following subjects:
Unleaded petrol
109
Headlights
110
In certain countries, it may be possible that the ŠKODA service partner network is
limited or has not been established. This is the reason why procuring certain
spare parts may be somewhat complicated and specialist garages may only be
able to make limited repairs.
Unleaded petrol
First read and observe the introductory information given on page 109.
A vehicle fitted with a petrol engine must always be refuelled with unleaded pet-
rol » page 159 , Unleaded petrol . Information regarding the locations of filling
stations that offer unleaded petrol is, for example, provided by the automobile
associations.
109Starting-off and Driving
Page 117 of 223
Activation/deactivationFirst read and observe the introductory information and safety warn-
ings
on page 113.
The system is activated automatically by engaging reverse gear. This is confirmed
by a brief audible signal.
The system is deactivated by disengaging reverse gear.
Note
The system cannot be activated on vehicles with a factory-fitted towing device
when towing a trailer.
Cruise control system
Introduction
This chapter contains information on the following subjects:
Storing a speed
115
Changing a stored speed
115
Switching off temporarily
115
Switching off completely
115
The cruise control system (CCS) maintains a constant speed above 25 km/h, once
it has been set, without you having to depress the accelerator pedal.
This is only possible within the range which is permitted by the power output and
braking power of the engine.
The
warning light in the instrument cluster lights up when the cruise control
system is switched on.
WARNING■ For safety reasons, the cruise control system must not be used in dense
traffic or on unfavourable road surfaces (such as icy roads, slippery roads,
loose gravel) – there is a risk of an accident.■
The saved speed may only be resumed if it is not too high for the current
traffic conditions.
■
Always deactivate the cruise control system after use to prevent the system
being enabled unintentionally.
CAUTION
■ The cruise control system is not able to maintain a constant speed when driving
in areas with steeper gradients. The weight of the vehicle increases the speed at which it travels. Therefore, shift to a lower gear in good time or slow the vehicle
down by applying the foot brake.■
It is not possible to switch on the cruise control system on vehicles fitted with a
manual gearbox if first gear or reverse gear is engaged.
■
It is not possible on vehicles fitted with an automatic gearbox to switch on the
cruise control system if the selector lever is in the position P, N or R.
■
The cruise control system may automatically switch off when some brake assist
systems (e.g. ESC) intervene, when the speed exceeds maximum permissible en- gine speed, or a similar event takes place.
114Driving
Page 164 of 223
WARNINGPlease read the following advice before beginning work in the engine com-
partment.■
Turn off the engine and withdraw the ignition key.
■
Firmly apply the handbrake.
■
If the vehicle is fitted with a manual gearbox, move the gearshift lever into
Neutral, or if the vehicle is fitted with an automatic gearbox, move the selec-
tor lever into position P.
■
Allow the engine to cool.
■
Never open the bonnet if you can see steam or coolant flowing out of the
engine compartment – there is a risk of scalding. Wait until the steam or cool- ant has stopped escaping.
WARNINGPlease read the following advice for work in the engine compartment.■Keep children clear of the engine compartment.■
Never touch the radiator fan while the engine is still warm. The fan might
suddenly start running!
■
Do not touch any hot engine parts – there is a risk of burns.
■
The coolant additive and thus all of the coolant is harmful to your health.
■
Avoid contact with the coolant.
■
Coolant vapours are harmful to health.
■
Never open the end cover of the coolant expansion reservoir while the en-
gine is still warm. The cooling system is pressurized!
■
When opening the end cover of the coolant expansion reservoir, cover it
with a cloth to protect your face, hands and arms from hot steam or hot cool-
ant.
■
If any coolant splashes into your eyes, immediately rinse out your eyes with
clear water and contact a doctor as soon as possible.
■
Always safely store the coolant additive in its original container out of the
reach of children – there is a risk of poisoning.
■
Consult a doctor immediately if coolant is swallowed.
■
Do not leave any items (e.g. cleaning cloths or tools) in the engine compart-
ment.
■
Never spill fluids on the hot engine. Such fluids (e.g. the antifreeze con-
tained in the coolant) may ignite!
WARNINGThe following warning instructions must be observed at all times when work-
ing in the engine compartment while the engine is running.■
Pay particular attention to moving engine parts (e.g. V-ribbed belt, alterna-
tor, radiator fan) and the high-voltage ignition unit – there is a risk of death.
■
Never touch the electric wiring on the ignition system.
■
Avoid short circuits in the electrical system - particularly on the vehicle's
battery.
■
Always make sure that no jewellery, loose clothing or long hair can get
caught in rotating engine parts – there is a risk of death. Always remove any jewellery, tie back long hair and wear tight fitting clothing before completing
any work.
WARNINGThe following warning instructions must be observed if work has to be carried
out on the fuel or electrical systems.■
Always disconnect the vehicle battery from the electrical system.
■
Do not smoke.
■
Never work near open flames.
■
Always have a functioning fire extinguisher nearby.
WARNING■ Read the information and warning instructions on the fluid containers.■Keep fluids in their original containers and keep out of reach of children!■
If you wish to work under the vehicle, you must secure the vehicle against
rolling away and support it with suitable axle stands: the car jack is not suffi-
cient for this – there is a risk of injury.
■
Never cover the engine with additional insulation material (e.g. with a blan-
ket) – there is a risk of fire.
■
The bonnet must always be properly closed when driving. This is why after
closing the bonnet, the lock must always be checked to ensure it has engaged properly.
■
If you notice that the lock is not properly engaged while driving, stop the ve-
hicle immediately and close the bonnet – there is the risk of an accident.
161Inspecting and replenishing
Page 185 of 223
WARNINGObserve the following instructions for raising the vehicle.■If the wheel has to be changed on a slope, first of all block the opposite
wheel with a stone or similar object to prevent the vehicle from unexpectedly
rolling away.■
Secure the base plate of the lifting jack with suitable means to prevent pos-
sible moving. A soft and slippery ground under the base plate may move the
lifting jack, causing the vehicle to fall down. It is therefore always necessary to
place the lifting jack on a solid surface or use a wide and stable base. Use a
non-slip base (e.g. a rubber foot mat) if the surface is smooth, such as cobbled
stones, tiled floor, etc.
■
Only attach the lifting jack to the attachment points provided for this pur-
pose.
■
Always raise the vehicle with the doors closed.
■
Never position any body parts, such as arms or legs under the vehicle, while
the vehicle is raised with a lifting jack.
■
Never start the engine with the vehicle sitting on the raised jack – there is a
risk of injury.
CAUTION
■ The tightening torque specified for the wheel bolts for steel and light alloy
wheels is 120 Nm.■
If the wheel bolts are fastened too tightly, this can cause damage to the anti-
theft wheel bolt or the adapter.
Note
■ The anti-theft wheel bolt set and adapter can be purchased from a ŠKODA Part-
ner.■
The national legal requirements must be observed when changing a wheel.
Preparation
First read and observe the introductory information and safety warn-
ings
on page 181.
Always change a wheel on a level surface as far as possible.
The following steps must be carried out before actually changing the wheel:
› Have
all the occupants get out. The passengers should not stand on the road
(instead they should remain behind a crash barrier, for instance) while the wheel is being changed.›
Switch off the engine.
›
Move the gearshift lever into Neutral or move the selector lever for the auto-
matic gearbox into position P.
›
Apply the handbrake firmly.
›
Uncouple any trailer.
›
Remove the vehicle tool kit » page 181 and the spare wheel » page 177 , Spare
wheel from the boot.
Changing a wheel
First read and observe the introductory information and safety warn-
ings
on page 181.
›
Remove the full wheel trim » page 178 or caps » page 178 .
›
In the case of light alloy wheel rims remove the wheel trim cap » page 178.
›
First of all slacken the anti-theft wheel bolt and then the other wheel
bolts » page 183 .
›
Jack up the vehicle until the wheel that needs changing is clear of the
ground » page 184 .
›
Unscrew the wheel bolts and place them on a clean surface (cloth, paper, etc.).
›
Remove the wheel carefully.
›
Attach the spare wheel and slightly screw on the wheel bolts.
›
Lower the vehicle.
›
Tighten the opposite wheel bolts alternately (cross-wise) with the wheel
wrench. Tighten the anti-theft wheel bolt last » page 183.
›
Reinstall the wheel trim/wheel trim cap or the caps.
Note
■
All bolts must be clean and must turn easily.■Under no circumstances grease or oil the wheel bolts!■
When fitting unidirectional tyres, ensure that the direction of rotation is cor-
rect » page 176 , Unidirectional tyres .
182Do-it-yourself