checking oil SKODA FABIA 2014 2.G / 5J Owner's Manual
[x] Cancel search | Manufacturer: SKODA, Model Year: 2014, Model line: FABIA, Model: SKODA FABIA 2014 2.G / 5JPages: 197, PDF Size: 13.56 MB
Page 33 of 197
The display is updated regularly while you are driving.
Range
The estimated range is displayed in kilometres. It indicates the distance you can still drive with your vehicle based on the level of fuel in the tank and the
same style of driving.
The display is shown in steps of 10 km. The value is displayed in steps of 5 km
after the
warning light has come on.
The fuel consumption over the preceding 50 km is used to calculate the infor-
mation. The range will increase if you drive in a more economical manner.
If the memory is set to zero (after the battery has been disconnected), a fuel
consumption of 10 l/100 km is used initially, then the value is adapted accord-
ing to the style of driving.
Distance travelled
The distance travelled since the memory was last erased is displayed. Reset
the memory to zero if you want to measure the distance travelled from a par-
ticular moment » page 30, Operation .
The maximum distance indicated in both memories is 1999 km or 9999 km on
vehicles with a MAXI DOT display. The indicator is reset to zero when this val-
ue is exceeded.
Average speed
The average speed since the memory was last erased is displayed in km/hour .
Set the memory to zero at the start of measurement to determine the average
speed over a certain period » page 30, Operation .
No value will appear in the display until you have driven approximately 300 m after this information has been deleted.
The display is updated regularly while you are driving.
Current speed
The current speed, identical to the display on the speedometer 3
» Fig. 19 on
page 26 , is displayed.
Oil temperature 1)
The current engine oil temperature is displayed. If the oil temperature is lower
than 50 °C or if a fault in the system for checking the oil temperature is
present, only - -.- is displayed instead of the oil temperature.
Warning against speeding
The warning that the speed limit is being exceeded can be enabled/disabled in
the display » page 31.
Warning against speeding
Read and observe
on page 29 first.
Adjust the speed limit while the vehicle is stationary
›
Press button
A
» Fig. 22 on page 30 to select the Warning at (MAXI DOT
display) or
(segment display) menu item.
›
Press button
B
to activate the ability to set the speed limit 2)
(value flashes).
›
Use the button
A
to set the required speed limit, e.g. 50 km/h.
›
Confirm the speed limit that was set with button
B
, or wait approx. 5 sec-
onds until the setting is saved automatically (the value stops flashing).
This allows you to set the speed in 5 km/h intervals.
Adjusting the speed limit while the vehicle is moving
›
Press button
A
» Fig. 22 on page 30 to select the Warning at (MAXI DOT
display) or (segment display) menu item.
›
Drive at the desired speed, e.g. 50 km/h.
›
Press button
B
to accept the current speed as the speed limit (the value
flashes).
If you wish to adjust the set speed limit, you can do so in 5 km/h intervals (e.g. the accepted speed of 47 km/h increases to 50 km/h or decreases to 45 km/h).
›
Confirm the speed limit that was set by pressing button
B
again, or wait ap-
prox. 5 seconds until the setting is saved automatically (the value stops
flashing).
Change or delete speed limit
›
Press button
A
» Fig. 22 on page 30 to select the Warning at (MAXI DOT
display) or (segment display) menu item.
›
Pressing button
B
disables the speed limit.
›
Pressing the button
B
activates the ability to change the speed limit.
If the set speed limit is exceeded, an audible signal will sound as a warning.
The Warning at (MAXI DOT display) or
(segment display) menu item appears
in the display with the limit set.
1)
Applies for vehicles equipped with the MAXI DOT display.
2)
An initial value of 30 km/h is displayed automatically if no value has been specified.
31Instruments and Indicator Lights
Page 38 of 197
Brake systemRead and observe
on page 35 first.
The
indicator light comes on if the brake fluid level in the braking system is
too low or there is a fault in the ABS.
The following message is shown in the MAXI DOT display.
Brake fluid: Log book!
Stop the vehicle, switch off the engine, and check the level of the brake flu-
id » page 145 .
Further information » page 102, Brakes .
WARNING■
If you have to stop for technical reasons, then park the vehicle at a safe
distance from the traffic, switch off the engine and activate the hazard
warning light system » page 59.■
The following guidelines should be observed when opening the bonnet
and checking the brake fluid level » page 138, Engine compartment .
■
If the warning light
is displayed simultaneously with warning light
» page 38 ,
Antilock brake system (ABS) ,
do not continue your
journey! Seek help from a specialist garage.
■
A fault to the ABS system or the braking system can increase the vehi-
cle's braking distance – there is a risk of accident.
Seat belt warning light
Read and observe
on page 35 first.
The indicator light comes on after the ignition is switched on as a reminder
for the driver and front passenger to fasten their seat belt. The indicator light
only goes out once the driver and front passenger have fastened their seat
belt.
A steady warning signal sounds at vehicle speeds greater than 20 km/h and
the flashes if the driver and front passenger have not fastened their seat
belts.
The warning signal is switched off and the indicator light is permanently lit if
the driver and front passenger have not fastened their seat belts within the
next 90 seconds.
Further information » page 10.
Generator
Read and observe
on page 35 first.
If the warning light lights up
when the engine is running, the vehicle battery
is not being charged.
Seek help from a specialist garage. The electrical system requires checking.
WARNINGIf you have to stop for technical reasons, park the vehicle at a safe distance
from the traffic, switch off the engine and switch on the hazard warning
lights system » page 59.
CAUTION
Do not continue driving if the warning light (coolant system fault) lights
up in addition to the warning light while you are driving. Stop the engine -
there is a risk of engine damage.
OPen door
Read and observe
on page 35 first.
The warning light
comes on if one or several doors are opened or if the boot
lid is opened.
The warning light comes on even when the ignition is switched off. The warn-
ing light lights up for a maximum of 5 minutes.
WARNINGIf you have to stop for technical reasons, park the vehicle at a safe distance
from the traffic, switch off the engine and switch on the hazard warning
lights system » page 59.
Engine oil
Read and observe
on page 35 first.
The warning light lights up red (low oil pressure)
The following message is shown in the MAXI DOT display.
Oil pressure: Engine off! Log book!
36Using the system
Page 143 of 197
Clear water is not sufficient to intensively clean the windscreen and head-
lights. We recommend using clean washing water together with the screen
cleaner from the range of ŠKODA Original Accessories (in winter additionally
with antifreeze) which is capable of removing stubborn dirt.
The washing water should always be mixed with antifreeze in winter even if
the vehicle has heated windscreen washer nozzles.
Under exceptional circumstances, methylated spirits can also be used if no
screen cleaner with antifreeze is available. The concentration of methylated
spirits must not be more than 15 %. The freeze protection at this concentration
is sufficient only to -5 °C.
CAUTION
■ Under no circumstances must radiator antifreeze or other additives be added
to the windscreen washer fluid.■
If the vehicle is fitted with a headlight cleaning system, only cleaning prod-
ucts which do not attack the polycarbonate coating of the headlights must be
added to the windscreen washer fluid.
■
Do not remove the filter from the windscreen washer fluid reservoir when re-
plenishing it with liquid otherwise the liquid transportation system can be con-
taminated, which can cause the windscreen washer system to malfunction.
Engine oil
Introduction
This chapter contains information on the following subjects:
Specifications and capacity
141
Checking the oil level
142
Replenishing
143
Changing
143
The engine has been factory-filled with a high-grade oil that can be use
throughout the year - except in extreme climate zones.
Engine oils are the subject of continuous further development. Thus the infor-
mation stated in this Owner's Manual is only correct at the time of publication.
ŠKODA Service Partners are informed about the latest changes by the manu-
facturer. We therefore recommend that you have the oil changed by a ŠKODA
Service Partner.
The specifications (VW standards) stated in the following can be indicated sep-
arately or together with other specifications on the bottle.
The oil capacities include oil filter change. Check the oil level when filling; do
not over fill. The oil level must be between the markings » page 142.WARNING■
The engine compartment of your car is a hazardous area. While working in
the engine compartment, be sure to observe the following warn-
ings » page 138 .■
Do not continue your journey if for some reason it is not possible to top
up the engine oil under the current conditions. Switch off the engine and
seek assistance from a specialist garage.
■
Do not drive on if the oil level is above range
A
» Fig. 128 on page 142 .
Switch off the engine and seek assistance from a specialist garage.
CAUTION
Do not pour any additives into the engine oil – there is a risk of serious engine
damage.
Note
■ Before a long drive we recommend that you purchase and carry with you en-
gine oil which complies with the specification for your vehicle.■
We recommend that you use oils from ŠKODA Original Accessories.
■
You must wash yourself thoroughly if your skin has come into contact with
oil.
Specifications and capacity
Read and observe
and on page 141 first.
Specifications and capacity (in l) for vehicles with flexible service intervals
Petrol enginesSpecificationCapacity1.2 litres/44 kWVW 503 00, VW 504 002.81.2 l/51 kWVW 503 00, VW 504 002.81.4 l/63 kWVW 503 00, VW 504 003.21.4 l/132 kW TSIVW 504 003.61.2 l/63 kW TSIVW 504 003.91.2 l/77 kW TSIVW 504 003.9 141Inspecting and replenishing
Page 144 of 197
Diesel enginesa)SpecificationCapacity1.2 l/55 kW TDI CR DPFVW 507 004.31.6 l/55 kW TDI CR DPFVW 507 004.31.6 l/66 kW TDI CR DPFVW 507 004.31.6 l/77 kW TDI CR DPFVW 507 004.3a)
Engine oil VW 505 01 can optionally be used in diesel engines
without a DPF.
Specifications and capacity (in l) for vehicles with fixed service intervals
Petrol enginesSpecificationCapacity1.2 litres/44 kWVW 501 01, VW 502 002.81.2 l/51 kWVW 501 01, VW 502 002.81.4 l/63 kWVW 501 01, VW 502 003.21.6 l/77 kWVW 501 01, VW 502 003.61.4 l/132 kW TSIVW 502 003.61.2 l/63 kW TSIVW 502 003.91.2 l/77 kW TSIVW 502 003.9
If the oils specified above are not available, oils according to ACEA A2 or
ACEA A3 can be used once for refilling.
Diesel engines a)SpecificationCapacity1.2 l/55 kW TDI CR DPFVW 507 004.31.6 l/55 kW TDI CR DPFVW 507 004.31.6 l/66 kW TDI CR DPFVW 507 004.31.6 l/77 kW TDI CR DPFVW 507 004.3a)
Engine oil VW 505 01 can optionally be used in diesel engines
without DPF
If the oils specified above are not available, oils according to ACEA B3 or
ACEA B4 can be used once for refilling.
CAUTION
Only the above-mentioned oils can be used on vehicles with flexible service in-
tervals. We recommend always refilling with oil of the same specification since
this will maintain the properties of the oil. In exceptional cases, a maximum of
0.5 l of specification VW 502 00 (only for petrol engines) or specification
VW 505 01 (only for diesel engines) engine oil can be used to refill once. Other
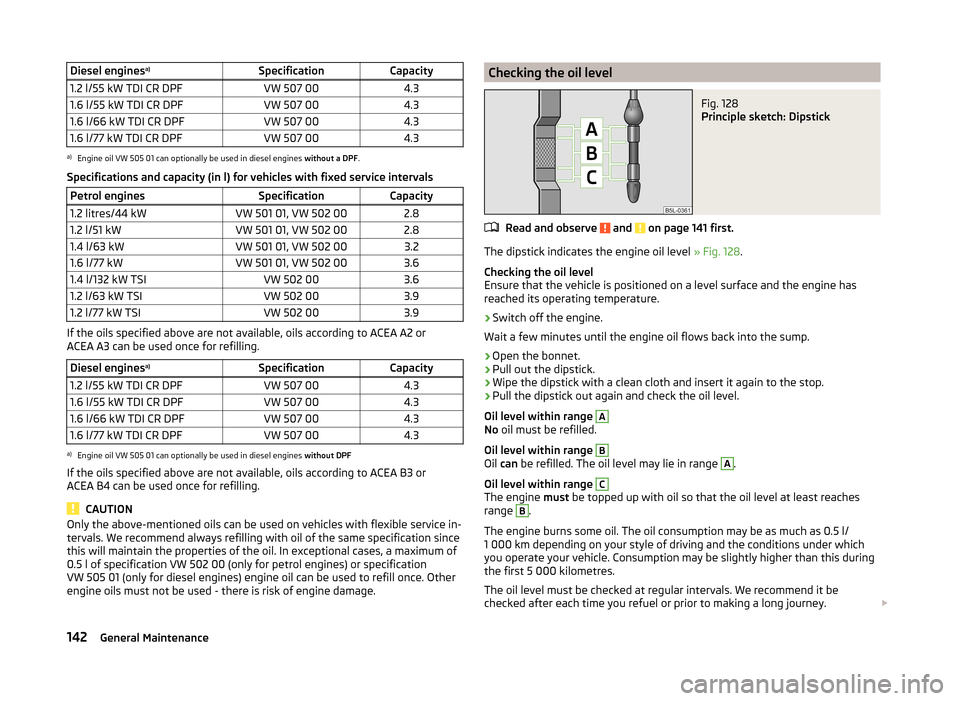
engine oils must not be used - there is risk of engine damage.Checking the oil levelFig. 128
Principle sketch: Dipstick
Read and observe and on page 141 first.
The dipstick indicates the engine oil level » Fig. 128.
Checking the oil level
Ensure that the vehicle is positioned on a level surface and the engine has
reached its operating temperature.
›
Switch off the engine.
Wait a few minutes until the engine oil flows back into the sump.
›
Open the bonnet.
›
Pull out the dipstick.
›
Wipe the dipstick with a clean cloth and insert it again to the stop.
›
Pull the dipstick out again and check the oil level.
Oil level within range
A
No oil must be refilled.
Oil level within range
B
Oil can be refilled. The oil level may lie in range
A
.
Oil level within range
C
The engine must be topped up with oil so that the oil level at least reaches
range
B
.
The engine burns some oil. The oil consumption may be as much as 0.5 l/
1 000 km depending on your style of driving and the conditions under which
you operate your vehicle. Consumption may be slightly higher than this during
the first 5 000 kilometres.
The oil level must be checked at regular intervals. We recommend it be
checked after each time you refuel or prior to making a long journey.
142General Maintenance
Page 145 of 197
We recommend maintaining the oil level within the range A, but not above , if
the engine has been operating at high loads, for example, during a lengthy
motorway trip during the summer months, towing a trailer or negotiating a
high mountain pass.
The warning light in the instrument cluster will indicate whether the oil level is
too low » page 36 ,
Engine oil . Check the oil level using the dipstick as
soon as possible. Add oil accordingly.
CAUTION
■ Always check the oil level on vehicles with the 1.2 l/44 kW engine when the
engine is cold. Otherwise the measuring result is incorrect und oil could be in-
correctly replenished - risk of engine damage!■
The oil level must never be above the
A
range » Fig. 128 – there is a risk of
damaging the exhaust system.
Replenishing
Read and observe
and on page 141 first.
›
Check the oil level » page 142.
›
Unscrew the cap of the engine oil filler opening » Fig. 126 on page 140 .
›
Replenish the oil in portions of 0.5 litres in accordance with the correct speci-
fications » page 141 .
›
Check the oil level » page 142.
›
Carefully screw on the oil filler opening cap and push the dipstick in fully.
Changing
Read and observe
and on page 141 first.
The engine oil must be changed according to prescribed service intervals or ac-cording to the » Service plan service interval display.
Coolant
Introduction
This chapter contains information on the following subjects:
Capacity
144
Checking the coolant level
144
Replenishing
144The coolant consists of water with a concentration of coolant additive. This mixture guarantees antifreeze protection, protects the cooling/heater system
against corrosion and prevents the formation of scale.
Vehicles exported to countries with a mild climate are already factory-filled
with a coolant which offers antifreeze protection down to about -25 ℃. In
these countries the concentration of coolant additive should be at least 40 %.
Vehicles exported to countries with a cold climate are already factory-filled
with a coolant which offers antifreeze protection down to about -35 °C. In
these countries the concentration of coolant additive should be at least 50 %.
If a higher concentration of antifreeze is required for climatic reasons, the
amount of coolant additive can only be increased up to a maximum of 60 %
(antifreeze protection down to approx. -40 °C).
When refilling, only use the same antifreeze identified on the coolant expan-
sion vessel » Fig. 129 on page 144 .WARNING■
The engine compartment of your car is a hazardous area. While working in
the engine compartment, be sure to observe the following warn-
ings » page 138 .■
Do not continue your journey if for some reason it is not possible to top
up the coolant under the current conditions. Switch off the engine and
seek assistance from a specialist garage.
CAUTION
■ The amount of coolant additive in the coolant must never be allowed to fall
below 40 %.■
Over 60 % coolant additive in the coolant reduces the antifreeze protection
and coolant effectiveness.
■
A coolant additive that does not comply with the correct specifications can
significantly reduce the corrosion protection.
■
Any faults resulting from corrosion may cause a loss of coolant and can con-
sequently result in major engine damage!
■
Do not fill the coolant above the mark
A
» Fig. 129 on page 144 .
■
We recommend that you visit a specialist garage if a fault causes the engine
to overheat, otherwise serious engine damage may occur.
■
Additional headlights and other attached components in front of the air inlet
impair the cooling efficiency of the coolant.
■
Never cover the radiator - there is a risk of the engine overheating.
143Inspecting and replenishing
Page 147 of 197
Do not use an alternative additive if the specified coolant is not available in an
emergency. In this case, use just water and have the correct mixing ratio of
water and coolant additive restored by a specialist garage as soon as possible.
Brake fluid
Introduction
This chapter contains information on the following subjects:
Level check
145
Changing
145WARNING■ The engine compartment of your car is a hazardous area. While working in
the engine compartment, be sure to observe the following warn-
ings » page 138 .■
Do not continue your journey if the fluid level has fallen below the MIN
marking » Fig. 130 on page 145 - there is a risk of an accident. Seek help
from a specialist garage.
■
Do not use used brake fluid - the function of the brake system may be im-
paired – there is the risk of an accident.
CAUTION
Brake fluid damages the paintwork of the vehicle.
Note
■ The brake fluid is changed as part of a prescribed inspection service.■We recommend using oils from the ŠKODA Original Accessories range.
Level check
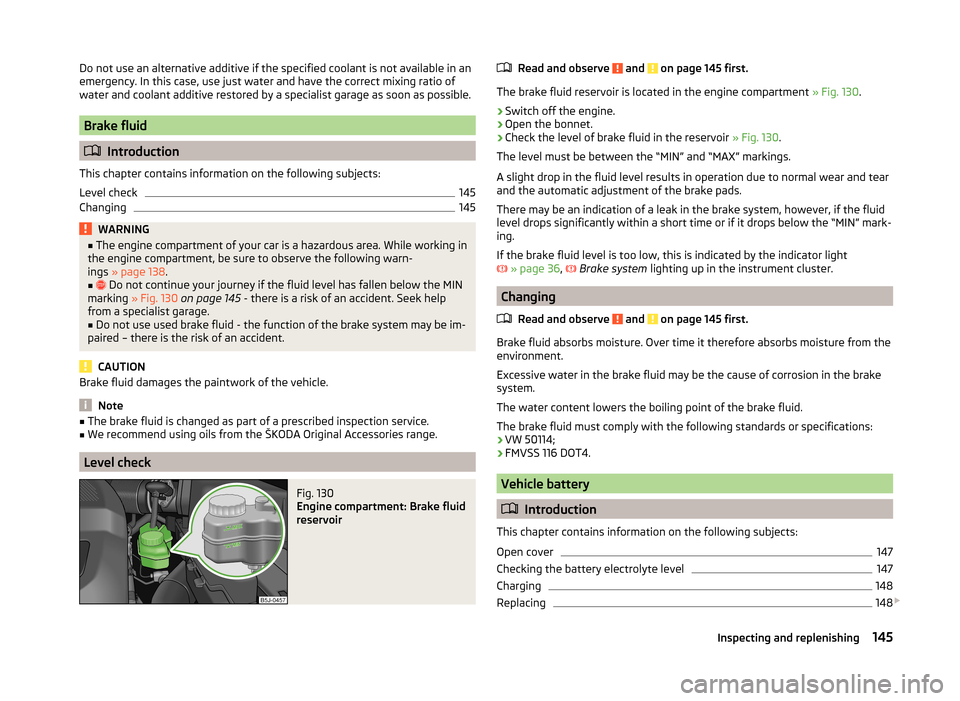
Fig. 130
Engine compartment: Brake fluid
reservoir
Read and observe and on page 145 first.
The brake fluid reservoir is located in the engine compartment » Fig. 130.
›
Switch off the engine.
›
Open the bonnet.
›
Check the level of brake fluid in the reservoir » Fig. 130.
The level must be between the “MIN” and “MAX” markings.
A slight drop in the fluid level results in operation due to normal wear and tear
and the automatic adjustment of the brake pads.
There may be an indication of a leak in the brake system, however, if the fluid level drops significantly within a short time or if it drops below the “MIN” mark-
ing.
If the brake fluid level is too low, this is indicated by the indicator light
» page 36 ,
Brake system
lighting up in the instrument cluster.
Changing
Read and observe
and on page 145 first.
Brake fluid absorbs moisture. Over time it therefore absorbs moisture from theenvironment.
Excessive water in the brake fluid may be the cause of corrosion in the brake
system.
The water content lowers the boiling point of the brake fluid.
The brake fluid must comply with the following standards or specifications: › VW 50114;
› FMVSS 116 DOT4.
Vehicle battery
Introduction
This chapter contains information on the following subjects:
Open cover
147
Checking the battery electrolyte level
147
Charging
148
Replacing
148
145Inspecting and replenishing
Page 187 of 197
Index
A
Abroad Driving abroad
113
Unleaded petrol113
ABS115
warning light38
Accessories126
Adjusting Belt height
13
Exterior mirrors64
Head restraints68
Steering wheel8
Adjusting the seats7
Adjustment Headlight beam
56
Seats65
Adjustments and technical changes Spoiler
127
Adjustments and technical modifications Airbags
127
Aerial129
See windows131
Airbag14
Adjustments and impairment of the airbag sys- tem
127
Deactivating18
Deployment14
Front airbag15
Head airbag17
Side airbag16
Switching off the front passenger airbag18
Airbag system14
Air conditioning Operation
88
Air conditioning system Air outlets85
Climatronic90
Manual air conditioning system87
Air outlets85
Alarm49
Anti-theft alarm system49
Operation49
Trailer125
Antilock Braking System115
Armrest83
Ashtray78
ASR115
warning light38
Assist systems ABS
38, 115
ASR38, 115
Cruise control system117
EDS and XDS115
ESC38, 114
Parking aid116
START-STOP118
Auto Check Control34
Automatic gearbox Selector lever-emergency unlocking
108
Starting-off and driving107
Tiptronic106
Automatic load deactivation149
Automatic transmission105
Kickdown107
Malfunction107
Selector lever lock106
Using the selector lever105
AUX99
Avoiding damage to the vehicle Driving through water
112
Avoiding damage to your vehicle112
B
Back-up wheel
155
Ball head Check fitting
122
Fitting122
Ready position121
Removing123
Belts10
Belt tensioners13
Bicycle carrier75
Bonnet Closing
139
Opening139
Boot Cover
70
Emergency unlocking51
Fastening elements69
Fixing nets70
Folding hooks70
see Boot lid50
Unlocking the boot lid51
Boot lid50
automatic locking51
Brake assist114
Brake booster103
Brake fluid145
Changing145
Checking145
Display messages36
Brakes Brake booster
103
Brake fluid145
Handbrake104
Indicator light36
Running in109
Braking Information for braking
103
Breakdown kit163
185Index
Page 188 of 197

BulbsChanging170
In the rear light174
Button in the driver's door Electrical power windows
51
C
Car care
126
Jack132
Washing128
Car computer see Multifunction display
29
Caring for paintwork130
Car park ticket holder80
Carrier76
Central locking button47
Central locking system45
lock47
unlock47
Changing Brake fluid
145
Bulbs170
Bulbs in the rear light174
Engine oil143
Foglight bulb (Scout, RS)173
Foglights and daytime running lights bulbs173
Front parking light bulb172
Front turn signal bulb172
Fuses168
Fuses in the dash panel168
Fuses in the engine compartment170
High beam bulb - halogen projector headlights 172
Licence plate light bulb
174
Low beam and high beam bulb - halogen head- lights
171
Low beam and high beam bulb - halogen pro- jector headlights
172
Wheels159
Changing a wheel Preparation160
Removing and fitting a wheel160
Subsequent steps160
Charging a vehicle battery148
Check Fit ball head properly
122
Checking Battery electrolyte level
147
Brake fluid145
Coolant level144
Engine oil142
Oil level142
Windscreen washer fluid140
Children and safety19
Child safety Side airbag
21
Child safety lock44
Child safety seat Use of child safety seats
21
Child seat Classification
21
ISOFIX22
on the front passenger seat20
TOP TETHER23
Use of ISOFIX child seats22
Chrome parts refer to Taking care of your vehicle
130
Cigarette lighter79
Cleaning126
Alcantara134
Covers on electrically heated seats134
Fabrics134
Headlight lenses131
Natural leather133
Plastic parts130
Synthetic leather134
Wheels132
Climatronic90
Automatic mode91
Control elements90
Controlling the blower91
Defrosting windscreen92
Recirculated air mode91
Setting the temperature91
Clock28
Clothes hook80
Cockpit 12-volt power outlet
79
Ashtray78
Cigarette lighter79
General view25
Lighting59
Storage compartments80
Compartments80
Computer see Multifunction display
29
Convenience turn signal57
Coolant143
Checking144
Display messages37
Replenishing144
Warning light37
Coolant temperature gauge display
27
Correct seated position7
Driver7
Front passenger8
Notes9
Rear seats9
Counter for distance driven28
Cruise control system117
Cupholders78
D
DAY LIGHT see Daylight running lights
56
Daylight running lights56
186Index
Page 189 of 197
De-icing rear window61
Deactivating airbags18
Decorative films131
Delayed locking of the boot lid see boot lid
51
Diesel refer to Fuel
137
Diesel fuel Operation in winter
137
Diesel particulate filter39
display messages39
Digital clock28
Dipstick142
Display Service interval
32
Distance driven28
Door Child safety lock
44
Closing44
Indicator light for an open door36
Opening44
Doors Emergency locking
45
driving emissions
177
fuel consumption177
Driving Abroad
113
Driving through water on streets112
Maximum speed179
Driving economically Economical gear changing
109
Driving through water112
E
Economical and environmentally friendly driv- ing
109
Economical driving Anticipation in driving109
Ballast111
Driving at full throttle110
Idling110
Regular maintenance111
Saving energy111
Short distances110
Tyre pressure110
EDS115
Electrical power windows Button in the driver's door
51, 52
Button in the rear door52
Central locking system53
Electric power windows Operational faults
53
Electric sliding/tilting roof53
Electronic Differential Lock115
Electronic immobilizer101
Emergency Changing a wheel
159
Hazard warning light system59
Jump-starting164, 165
locking of the doors45
Selector lever-unlocking108
Sliding/tilting roof55
Towing the vehicle166
Towing the vehicle using the tow hitch167
Tyre repair162
Unlocking the boot lid51
Emergency equipment Fire extinguisher
158
First aid kit158
Jack159
Vehicle tool kit159
Warning triangle158
Emissions177
Engine Running in
108
Starting and stopping the engine101
Starting the engine102
Switching off the engine102
Engine compartment138
Brake fluid145
Coolant144
Overview140
Vehicle battery145
Engine number176
Engine oil141
Capacity141
Changing143
Checking142
Replenishing143
Specifications141
Warning light36
Engine revolutions counter27
Environment109
Environmental compatibility111
Environmentally friendly driving109
ESC Function
114
warning light38
F
Films
131
Fire extinguisher158
First aid kit158
Flashers57
Fog lights58
Footmats104
see Footmats104
Front airbag15
Front seats65
Fuel135
Diesel137
Fuel gauge27
gauge27
refer to Fuel135
187Index