snow chains SKODA FABIA 2014 2.G / 5J Owner's Manual
[x] Cancel search | Manufacturer: SKODA, Model Year: 2014, Model line: FABIA, Model: SKODA FABIA 2014 2.G / 5JPages: 197, PDF Size: 13.56 MB
Page 117 of 197
Hill hold control (HHC)
HHC allows you to move your foot from the brake pedal to the accelerator ped-
al without having to use the handbrake when pulling away on a gradient.
The system holds the brake pressure produced by the activation of the brake
pedal for approx. 2 seconds after the brake pedal is released.
The brake pressure drops gradually the more you operate the accelerator ped-
al. If the vehicle does not start off within 2 seconds, it starts to roll back.
HHC is active on slopes of >5 % when the driver door is closed. HHC is always only active on slopes pulling away forwards or in reverse. When driving down-
hill, it is inactive.
Antilock Braking System (ABS)
Read and observe
and on page 114 first.
ABS prevents the wheels locking when braking. Thus helping the driver to
maintain control of the vehicle.
The intervention of the ABS is noticeable from the pulsating movements of
the brake pedal which is accompanied by noises.
When the ABS system is active, do not pump the brakes or lift off the brake
pedal.
Traction Control System (ASR)
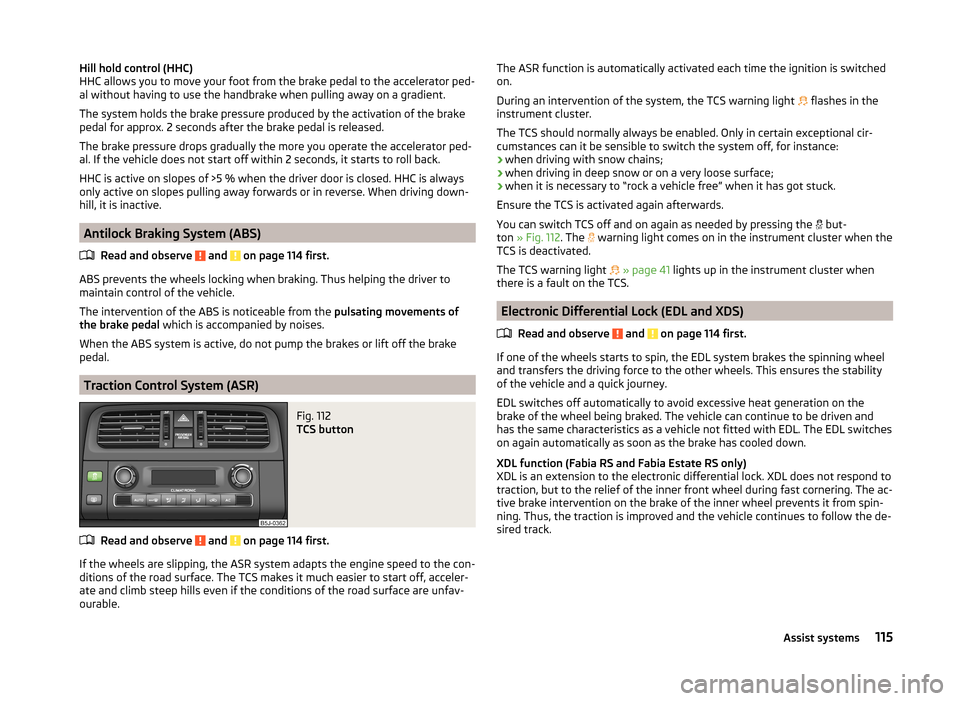
Fig. 112
TCS button
Read and observe and on page 114 first.
If the wheels are slipping, the ASR system adapts the engine speed to the con- ditions of the road surface. The TCS makes it much easier to start off, acceler-
ate and climb steep hills even if the conditions of the road surface are unfav-
ourable.
The ASR function is automatically activated each time the ignition is switched
on.
During an intervention of the system, the TCS warning light
flashes in the
instrument cluster.
The TCS should normally always be enabled. Only in certain exceptional cir-
cumstances can it be sensible to switch the system off, for instance:
› when driving with snow chains;
› when driving in deep snow or on a very loose surface;
› when it is necessary to “rock a vehicle free” when it has got stuck.
Ensure the TCS is activated again afterwards.
You can switch TCS off and on again as needed by pressing the but-
ton » Fig. 112 . The
warning light comes on in the instrument cluster when the
TCS is deactivated.
The TCS warning light
» page 41 lights up in the instrument cluster when
there is a fault on the TCS.
Electronic Differential Lock (EDL and XDS)
Read and observe
and on page 114 first.
If one of the wheels starts to spin, the EDL system brakes the spinning wheel
and transfers the driving force to the other wheels. This ensures the stability
of the vehicle and a quick journey.
EDL switches off automatically to avoid excessive heat generation on the
brake of the wheel being braked. The vehicle can continue to be driven and
has the same characteristics as a vehicle not fitted with EDL. The EDL switches
on again automatically as soon as the brake has cooled down.
XDL function (Fabia RS and Fabia Estate RS only)
XDL is an extension to the electronic differential lock. XDL does not respond to
traction, but to the relief of the inner front wheel during fast cornering. The ac-
tive brake intervention on the brake of the inner wheel prevents it from spin-
ning. Thus, the traction is improved and the vehicle continues to follow the de-
sired track.
115Assist systems
Page 152 of 197
WARNING (Continued)■Unusual vibrations or pulling of the vehicle to one side could be a sign of
tyre damage. If there is any doubt that a wheel is damaged, immediately re-
duce your speed and stop! If no external damage is evident, drive slowly
and carefully to the nearest specialist garage to have the vehicle checked.■
Only use those tyres or wheel rims which have been approved by ŠKODA
for your model of vehicle. Failure to observe this instruction will adversely
affect the road safety of your vehicle – there is the risk of an accident.
WARNINGInformation regarding tyre damage or wear■Never use tyres if you do not know anything about the condition and age.■
Never drive with damaged tyres – there is the risk of an accident.
■
Immediately replace damaged wheel rims or tyres.
■
You must have your tyres replaced with new ones at the latest when the
wear indicators have been worn down.
■
Worn tyres do not provide the necessary grip particularly at high speeds
on wet roads. “Aquaplaning” (uncontrolled movements of the vehicle –
“swimming” on a wet road surface) could be the result.
WARNINGInformation on tyre pressure■The tyre control display does not absolve the driver of the responsibility
to ensure the correct tyre inflation pressure. Check the tyre pressure at
regular intervals.■
Pressures that are too low or too high impair handling – there is the risk
of an accident.
■
If the pressure is too low, the tyre must overcome a greater rolling resist-
ance. This will heat the tyre up, especially at higher speeds. This can result
in tread separation and a tyre blowout.
WARNINGInformation on the wheel bolts■The wheel bolts must be clean and must turn easily. Never treat them
with grease or oil.■
The prescribed tightening torque of the wheel bolts for steel and light al-
loy wheels is 120 Nm.
WARNING (Continued)■ If the wheel bolts are tightened to a too low tightening torque, the rim
can come loose when the car is moving – risk of accident! A tightening tor-
que which is too high can damage the bolts and threads and this can result
in permanent deformation of the contact surfaces on the rim.■
In case of incorrect treatment of the wheel bolts, the wheel can loosen
when the car is moving – risk of accident!
WARNINGInformation on the spare wheel■Only use the spare wheel while absolutely necessary.■
Never drive with more than one spare wheel mounted.
■
The snow chains cannot be used on the spare wheel.
CAUTION
■ If a spare wheel is used that is not identical to the fitted tyres, the following
must be observed » page 155, Spare and back-up wheel .■
Protect the tyres from contact with oil, grease and fuel.
■
Replace lost dust caps.
■
If, in the event of a puncture, it is necessary to fit a spare wheel with a tyre
without a dedicated running direction or the opposite running direction, drive
carefully as the optimum characteristics of the tyre are no longer applicable in
this situation.
For the sake of the environment
Tyres which are insufficiently inflated increase your fuel consumption.
Note
■ We recommend that any work on the wheels or tyres is carried out by a spe-
cialist garage.■
We recommend that you use wheel rims, tyres, full wheel trims and snow
chains from ŠKODA Original Accessories.
150General Maintenance
Page 156 of 197
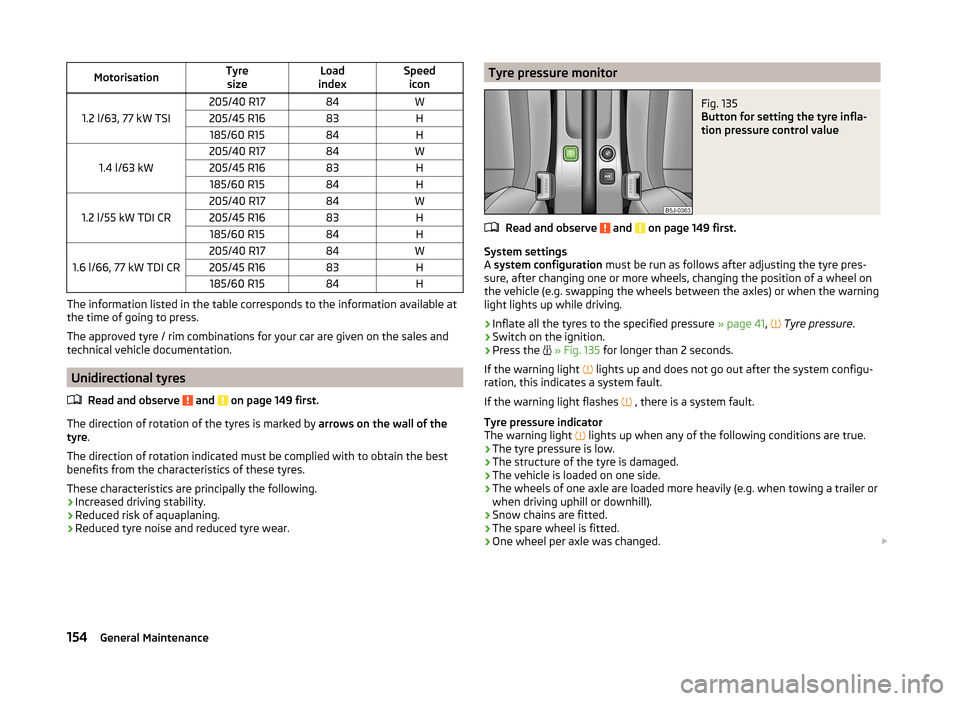
MotorisationTyresizeLoad
indexSpeed icon
1.2 l/63, 77 kW TSI
205/40 R1784W205/45 R1683H185/60 R1584H
1.4 l/63 kW
205/40 R1784W205/45 R1683H185/60 R1584H
1.2 l/55 kW TDI CR
205/40 R1784W205/45 R1683H185/60 R1584H
1.6 l/66, 77 kW TDI CR
205/40 R1784W205/45 R1683H185/60 R1584H
The information listed in the table corresponds to the information available at
the time of going to press.
The approved tyre / rim combinations for your car are given on the sales and
technical vehicle documentation.
Unidirectional tyres
Read and observe
and on page 149 first.
The direction of rotation of the tyres is marked by arrows on the wall of the
tyre .
The direction of rotation indicated must be complied with to obtain the best
benefits from the characteristics of these tyres.
These characteristics are principally the following.
› Increased driving stability.
› Reduced risk of aquaplaning.
› Reduced tyre noise and reduced tyre wear.
Tyre pressure monitorFig. 135
Button for setting the tyre infla-
tion pressure control value
Read and observe and on page 149 first.
System settings
A system configuration must be run as follows after adjusting the tyre pres-
sure, after changing one or more wheels, changing the position of a wheel on
the vehicle (e.g. swapping the wheels between the axles) or when the warning
light lights up while driving.
›
Inflate all the tyres to the specified pressure » page 41,
Tyre pressure
.
›
Switch on the ignition.
›
Press the
» Fig. 135 for longer than 2 seconds.
If the warning light lights up and does not go out after the system configu-
ration, this indicates a system fault.
If the warning light flashes , there is a system fault.
Tyre pressure indicator
The warning light lights up when any of the following conditions are true.
› The tyre pressure is low.
› The structure of the tyre is damaged.
› The vehicle is loaded on one side.
› The wheels of one axle are loaded more heavily (e.g. when towing a trailer or
when driving uphill or downhill).
› Snow chains are fitted.
› The spare wheel is fitted.
› One wheel per axle was changed.
154General Maintenance
Page 158 of 197
Full wheel trimRead and observe
and on page 149 first.
Pulling off
›
Hook the clamp found in the vehicle tool kit » page 159 into the reinforced
edge of the wheel trim.
›
Push the wheel wrench through the clamp, support on the tyre and pull off
the wheel trim.
Fitting
›
Press the wheel trim onto the wheel rim at the valve opening provided.
›
Then press the trim into the wheel rim until its entire circumference latches
correctly into position.
CAUTION
■ Use the pressure of your hand only, do not strike the full wheel trim. Avoid
striking the trim heavily when it is not yet inserted in the wheel rim. This could
cause damage to the guide and centring elements of the trim.■
When using the anti-theft wheel bolt, ensure that it is in the hole in the
valve area » page 162, Securing wheels against theft .
■
If wheel trims are retrofitted it must be ensured that an adequate flow of air
is assured to cool the brake system.
Wheel bolts
Fig. 137
Remove the cap
Read and observe and on page 149 first.
Pulling off
›
Push the extraction pliers » page 159 sufficiently far onto the cap until the
inner catches of the pliers are positioned at the collar of the cap.
›
Remove the cover in the direction of the arrow » Fig. 137.
Fitting›Push the cap onto the wheel bolt up to the stop.
The wheel bolt caps are housed in a plastic box in the spare wheel or in the
storage space for the spare wheel.
Wheel bolts
Read and observe
and on page 149 first.
Wheels and wheel bolts are matched to each other in terms of design. When-
ever you change the wheels fitted, e.g. light alloy wheels or wheels with win-
ter tyres, you must also use the matching wheel bolts of the correct length
and shape of bolt head. Correct fastening of the wheels depends on this.
Winter use
Introduction
This chapter contains information on the following subjects:
Winter tyres
156
Snow chains
157
Winter tyres
The handling of your vehicle will be significantly improved when driving on
wintry roads if you fit winter tyres. Summer tyres have less grip on ice, snow
and at temperatures below 7 °C. This is especially true of low-profile tyres or
high-speed tyres .
To achieve the best possible handling properties, winter tyres must be fitted
on all four wheels, the minimum tread depth must be 4 mm and tyres must be
no older than 4 years.
Winter tyres (marked with M+S and a peak/snowflake symbol) of a lower speed
category can be used provided that the permissible maximum speed of these
tyres is not exceeded even if the possible maximum speed of the vehicle is
higher.
The speed limit for winter tyres can be set in the MAXI DOT display in the Win-
ter tyres menu item » page 34.
156General Maintenance
Page 159 of 197
For the sake of the environmentRe-fit the summer tyres at an appropriate time as they provide better handling
properties, a shorter braking distance, less tyre noise, and reduced tyre wear
on roads which are free of snow and ice as well as at temperatures above 7 °C.
The fuel consumption is also lower.
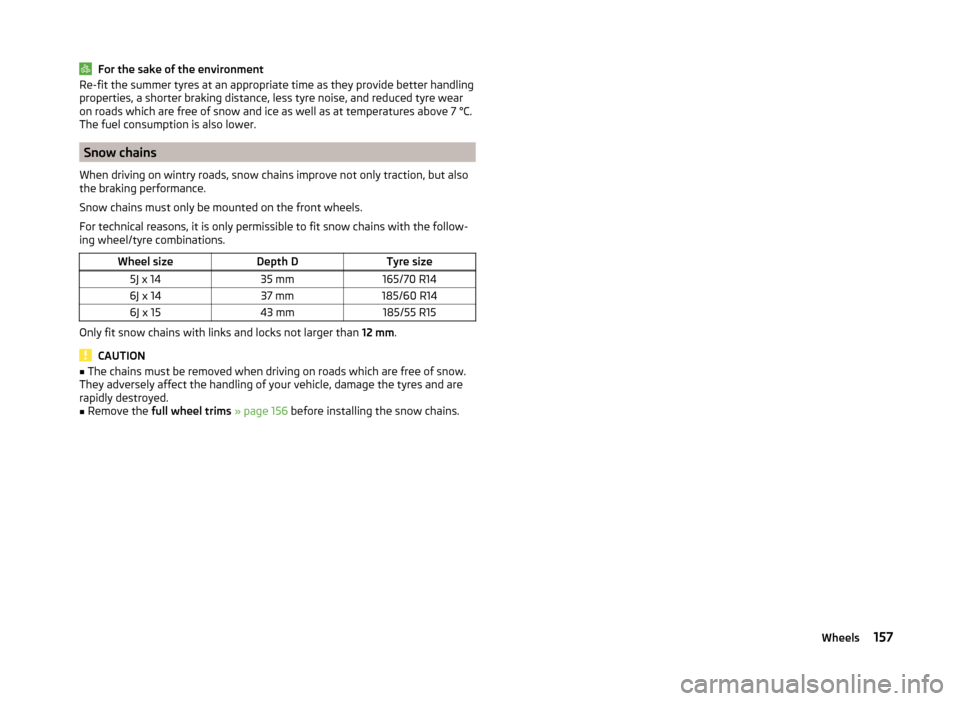
Snow chains
When driving on wintry roads, snow chains improve not only traction, but also
the braking performance.
Snow chains must only be mounted on the front wheels.
For technical reasons, it is only permissible to fit snow chains with the follow-
ing wheel/tyre combinations.
Wheel sizeDepth DTyre size5J x 1435 mm165/70 R146J x 1437 mm185/60 R146J x 1543 mm185/55 R15
Only fit snow chains with links and locks not larger than 12 mm.
CAUTION
■
The chains must be removed when driving on roads which are free of snow.
They adversely affect the handling of your vehicle, damage the tyres and are
rapidly destroyed.■
Remove the full wheel trims » page 156 before installing the snow chains.
157Wheels
Page 192 of 197

SeatAdjusting65
Seat belt warning light
36
Seat belts10
Belt tensioners13
Cleaning134
fastening and unfastening12
Height adjustment13
Seatbelts Inertia reels
13
Seat belts The physical principle of a frontal collision
11
Seats folding forward
66
Head restraints68
Heating66
Removing the seats67
Seats and storage65
see Automatic gearbox Manual gear shifting on the multifunction steering wheel
106
Selector lever see Using the selector lever
105
Service display32
Service intervals126
Setting Heating
87
Manual air conditioning system89
Manually dimmed rear-view mirror64
Setting the clock Clock
28
Shifting gears Driving and saving energy
109
Side airbag16
Sliding/tilting roof53
Comfort operation54
Emergency operation55
Opening and raising54
Operation54
Sliding/tilting sunroof Closing54
Snow chains157
Spare wheel155
Speedometer27
Speed symbol see Wheels
152
Spoiler127
Stalk Main beam
57
Turn signals57
START-STOP118
Operating conditions for the system118
operation119
system-related automatic start-up119
START-STOPP Manually deactivating/activating the system
119
Starting and stopping the engine101
Starting engine Jump-starting
164
Starting the engine102
Jump-starting165
START STOP Information messages
119
Jump-starting166
Steering wheel8
Storage80
Storage Compartment Lighting
60
Storage compartments80
Sun visors61
Switching lights on and off56
Switching off the engine102
Synthetic leather134
T
Tailgate
50
Taking care of the vehicle Natural leather133
Seat belts134
Taking care of your vehicle Automatic car wash system
129
Chrome parts130
Cleaning the wheels132
Door lock cylinders131
Headlight lenses131
High-pressure cleaner129
Plastic parts130
Washing by hand128
Wash system129
Technical data176
Telephone92
Tiptronic106
Tire Explanation of the labelling
152
see wheels152
Tire size152
see wheels152
Tools159
TOP TETHER23
Tourist lights58
Towing166
Towing a trailer120
Towing device Description
121
Drawbar load120
Use and care123
Towing eye Front
167
Rear167
Towing protection50
Traction Control System (ASR)115
Trailer120, 124
Loading124
Towing a trailer124
190Index
Page 193 of 197

TransportBoot68
Roof rack system76
Transporting children safely19
Turn signals57
Two-way radio systems92
Tyre load-bearing capacity see Wheels
152
Tyre pressure monitor Setting
154
Tyre repair Check pressure
164
Preparations163
Sealing and inflating the tyre164
Tyres149
Pressure151
Sizes151
Wear indicator151
U
Underbody protection
132
Underbody waxing132
Unleaded petrol113
unlock Central locking system
47
Unlocking Remote control
48
without central locking45
Unlocking and locking42
USB99
Useful equipment77
12-volt power outlet79
Ashtray78
Car park ticket holder80
Cigarette lighter79
Clothes hood80
Cupholders78
Using the selector lever105
V
Variable loading floor
72
Dividing the luggage compartment72
Removing and refitting72
Vehicle battery Automatic load deactivation
149
Charging148
Checking the battery electrolyte level147
Cover147
Disconnecting and reconnecting148
Operation in winter147
Replacing148
Safety instructions145
Vehicle care Alcantara
134
Care of the interior132
Decorative films131
Fabrics134
Polishing130
Rubber seals130
Seat covers134
Synthetic leather134
Underbody waxing132
Vehicle exterior care129
Waxing130
Vehicle data sticker176
Vehicle dimensions178
Vehicle Identification Number (VIN)176
Vehicle key42
Vehicle status see Auto Check Control
34
Vehicle tool kit159
Visors61
W
Warning lights
35
Warning symbols see warning lights
35
Warning triangle158
Washing126
Automatic car wash system129
by hand128
Chrome parts130
High-pressure cleaner129
Water Driving through
112
Waxing See Vehicle care
130
Wheel bolts Anti-theft wheel bolt
162
Caps156
Loosening and tightening161
Wheels Back-up wheel
155
Bolts156
Changing159
Full trim156
General information149
Load index152
Snow chains157
Spare wheel155
Speed symbol152
Storing wheels151
Swapping wheels around151
Tire size152
Tyre pressure151
Tyre service life151
Tyre wear indicator151
Unidirectional tyres154
Wheel sizes151
Winter tyres156
Window convenience operation53
Windows131
Deicing131
See Electrical power windows51
Window wipers Replacing the rear window wiper blade
63
Windscreen Deicing
131
191Index
Page 194 of 197
Windscreen washer fluidChecking140
Replenishing140
Warning light41
Winter140
Windscreen washer system140
Windscreen wash system Windscreen washer
62
Windscreen wiper Operate
62
Replacing the windscreen wiper blades63
Windscreen wipers Cleaning the windscreen wiper blades
63
Windscreen washer fluid140
Winter Deicing windows
131
Winter operation Snow chains
157
Winter tyres See Wheels
156
Winter use156
Winter tyres156
X
XDS
115
192Index