door lock SKODA FABIA 2014 2.G / 5J Owner's Manual
[x] Cancel search | Manufacturer: SKODA, Model Year: 2014, Model line: FABIA, Model: SKODA FABIA 2014 2.G / 5JPages: 197, PDF Size: 13.56 MB
Page 14 of 197
It is also important that rear passengers fasten their seat belts, as they could
otherwise be thrown through the vehicle in an uncontrolled manner in the
event of an accident.
A rear seat passenger who has not fastened the seat belt is a danger not only
to himself but also for those seated in the front » Fig. 4 -
.
Fastening and unfastening seat belts
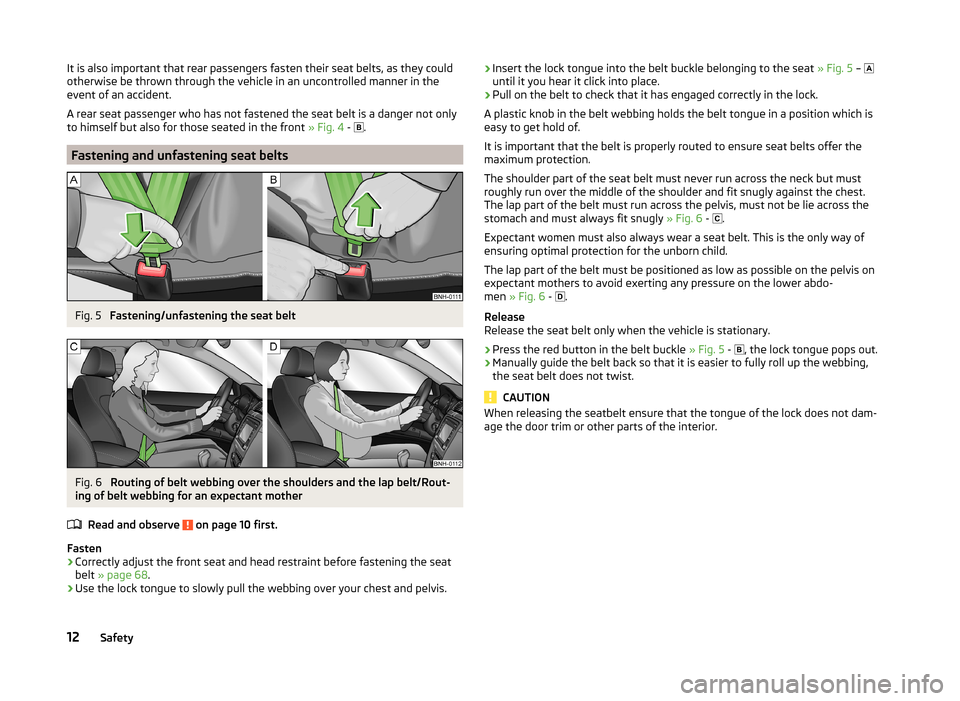
Fig. 5
Fastening/unfastening the seat belt
Fig. 6
Routing of belt webbing over the shoulders and the lap belt/Rout-
ing of belt webbing for an expectant mother
Read and observe
on page 10 first.
Fasten
›
Correctly adjust the front seat and head restraint before fastening the seat
belt » page 68 .
›
Use the lock tongue to slowly pull the webbing over your chest and pelvis.
›Insert the lock tongue into the belt buckle belonging to the seat
» Fig. 5 –
until it you hear it click into place.›
Pull on the belt to check that it has engaged correctly in the lock.
A plastic knob in the belt webbing holds the belt tongue in a position which is
easy to get hold of.
It is important that the belt is properly routed to ensure seat belts offer the
maximum protection.
The shoulder part of the seat belt must never run across the neck but must
roughly run over the middle of the shoulder and fit snugly against the chest.
The lap part of the belt must run across the pelvis, must not be lie across the
stomach and must always fit snugly » Fig. 6 -
.
Expectant women must also always wear a seat belt. This is the only way of ensuring optimal protection for the unborn child.
The lap part of the belt must be positioned as low as possible on the pelvis on expectant mothers to avoid exerting any pressure on the lower abdo-
men » Fig. 6 -
.
Release
Release the seat belt only when the vehicle is stationary.
›
Press the red button in the belt buckle » Fig. 5 -
, the lock tongue pops out.
›
Manually guide the belt back so that it is easier to fully roll up the webbing,
the seat belt does not twist.
CAUTION
When releasing the seatbelt ensure that the tongue of the lock does not dam-
age the door trim or other parts of the interior.12Safety
Page 17 of 197

Deployment factors
It is not possible to generally determine which deployment conditions apply to
the airbag system in every situation. An important role is played by factors
such as the type of object that the vehicle hits (hard/soft), the impact angle,
vehicle speed, etc.
A decisive factor for the deployment of the airbags is the deceleration which
occurs. The control unit analyses the nature of the collision and activates the
relevant restraint system.
If the vehicle deceleration which occurs and is measured during the collision
remains below the prescribed reference values specified in the control unit,
the airbags are not deployed although the vehicle may well suffer severe dam-
age to the bodywork as a consequence of the accident.
The following airbags will be deployed in the event of a severe frontal
collision.
› Driver’s front airbag.
› Front passenger airbag.
The following airbags will be deployed in the event of a severe side collision.
› Front side airbag on the side of the accident.
› Head airbags on the side of the accident.
In the event of an accident in which the airbags are deployed:
› the interior lighting comes on (if the switch for the interior light is in the door
contact position),
› the hazard warning light is switched on;
› all the doors are unlocked;
› the fuel supply to the engine is interrupted.
Airbag overview
Introduction
This chapter contains information on the following subjects:
Front airbags
15
Side airbags
16
Head airbags
17Front airbagsFig. 8
Driver airbag in the steering wheel/front passenger airbag in the
dashboard
Fig. 9
Safe distance to steering wheel/inflated airbags
In the event of a severe frontal collision, the front airbag system offers addi-
tional protection for the head and chest area of the driver and front passenger.
The front airbag for the driver is housed in the steering wheel » Fig. 8 -
.
The front airbag for the front seat passenger is located in the dash panel
above the glove compartment » Fig. 8 -
.
The airbags inflate in front of the driver and front passenger when they are
deployed » Fig. 9 -
. The forward movement of the driver and of the front
passenger is cushioned when they make contact with the fully inflated airbag
and the risk of injury to head and chest is thus reduced.
15Airbag system
Page 27 of 197
Using the system
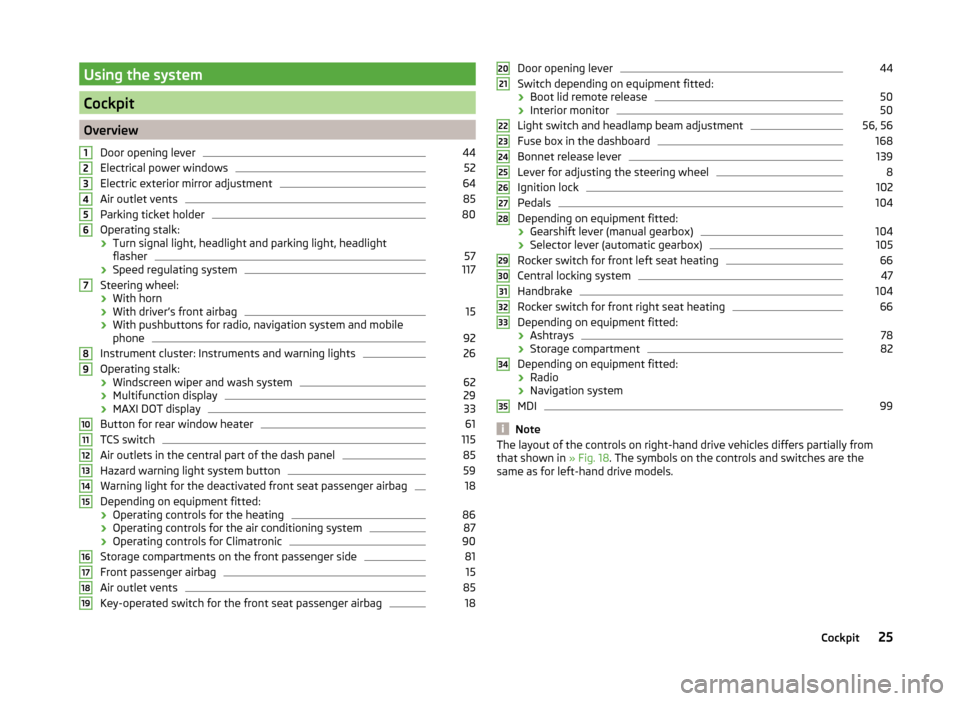
Cockpit
OverviewDoor opening lever
44
Electrical power windows
52
Electric exterior mirror adjustment
64
Air outlet vents
85
Parking ticket holder
80
Operating stalk:
› Turn signal light, headlight and parking light, headlight
flasher
57
› Speed regulating system
117
Steering wheel:
› With horn
› With driver’s front airbag
15
›With pushbuttons for radio, navigation system and mobile
phone
92
Instrument cluster: Instruments and warning lights
26
Operating stalk:
› Windscreen wiper and wash system
62
›Multifunction display
29
›MAXI DOT display
33
Button for rear window heater
61
TCS switch
115
Air outlets in the central part of the dash panel
85
Hazard warning light system button
59
Warning light for the deactivated front seat passenger airbag
18
Depending on equipment fitted:
› Operating controls for the heating
86
›Operating controls for the air conditioning system
87
›Operating controls for Climatronic
90
Storage compartments on the front passenger side
81
Front passenger airbag
15
Air outlet vents
85
Key-operated switch for the front seat passenger airbag
1812345678910111213141516171819Door opening lever44
Switch depending on equipment fitted:
› Boot lid remote release
50
›Interior monitor
50
Light switch and headlamp beam adjustment
56, 56
Fuse box in the dashboard
168
Bonnet release lever
139
Lever for adjusting the steering wheel
8
Ignition lock
102
Pedals
104
Depending on equipment fitted:
› Gearshift lever (manual gearbox)
104
›Selector lever (automatic gearbox)
105
Rocker switch for front left seat heating
66
Central locking system
47
Handbrake
104
Rocker switch for front right seat heating
66
Depending on equipment fitted:
› Ashtrays
78
›Storage compartment
82
Depending on equipment fitted:
› Radio
› Navigation system
MDI
99
Note
The layout of the controls on right-hand drive vehicles differs partially from
that shown in » Fig. 18. The symbols on the controls and switches are the
same as for left-hand drive models.2021222324252627282930313233343525Cockpit
Page 37 of 197
The following message is shown in the MAXI DOT display.Gearbox overheated. Stop. Log book!
Stop the vehicle, switch off the engine, and wait until the
icon goes out –
there is a risk of gearbox damage. You can continue your journey as soon as
the icon disappears.WARNINGIf you have to stop for technical reasons, park the vehicle at a safe distance
from the traffic, switch off the engine and activate the hazard warning light
system » page 59 .
Note
■
Warning messages shown in the MAXI DOT display must be confirmed with
button B » Fig. 24 on page 33 to call up the main menu.■
As long as the operational faults are not rectified, the symbols are always in-
dicated again. After they are displayed for the first time, the symbols continue
to be indicated without any extra messages for the driver.
Warning lights
Introduction
This chapter contains information on the following subjects:
Handbrake
35
Brake system
36
Seat belt warning light
36
Generator
36
OPen door
36
Engine oil
36
Coolant
37
Power steering
38
Electronic Stability Control (ESC)
38
Traction Control System (ASR)
38
Antilock brake system (ABS)
38
The rear fog light
39
Bulb failure
39
Exhaust inspection system
39
Glow plug system (diesel engine)
39 EPC fault light (petrol engine)39 Diesel particulate filter (diesel engine)39
Fuel reserve
40
Airbag system
40
Tyre pressure
41
Windscreen washer fluid level
41
Traction control (TCS) switched off
41
Turn signal system
41
Low beam
41
Fog lights
41
Cruise control system
41
Selector lever lock
42
Main beam
42
The warning lights show certain functions/faults and may be accompanied by
audible signals.
WARNING■ If illuminated warning lights and the corresponding descriptions and
warning notes are not observed, this may result in severe injuries or major
vehicle damage.■
The engine compartment of your car is a hazardous area. There is a risk of
injuries, scalding, accidents and fire when working in the engine compart-
ment, e.g. inspecting and replenishing oil and other fluids. It is essential to
observe safety notes » page 138, Engine compartment .
Handbrake
Read and observe
on page 35 first.
The warning light comes on if the handbrake is applied. An audible warning
is also given if you drive the vehicle for at least 3 seconds at a speed of more
than 6 km/h.
The following message is shown in the MAXI DOT display. Release parking brake!
35Instruments and Indicator Lights
Page 38 of 197
Brake systemRead and observe
on page 35 first.
The
indicator light comes on if the brake fluid level in the braking system is
too low or there is a fault in the ABS.
The following message is shown in the MAXI DOT display.
Brake fluid: Log book!
Stop the vehicle, switch off the engine, and check the level of the brake flu-
id » page 145 .
Further information » page 102, Brakes .
WARNING■
If you have to stop for technical reasons, then park the vehicle at a safe
distance from the traffic, switch off the engine and activate the hazard
warning light system » page 59.■
The following guidelines should be observed when opening the bonnet
and checking the brake fluid level » page 138, Engine compartment .
■
If the warning light
is displayed simultaneously with warning light
» page 38 ,
Antilock brake system (ABS) ,
do not continue your
journey! Seek help from a specialist garage.
■
A fault to the ABS system or the braking system can increase the vehi-
cle's braking distance – there is a risk of accident.
Seat belt warning light
Read and observe
on page 35 first.
The indicator light comes on after the ignition is switched on as a reminder
for the driver and front passenger to fasten their seat belt. The indicator light
only goes out once the driver and front passenger have fastened their seat
belt.
A steady warning signal sounds at vehicle speeds greater than 20 km/h and
the flashes if the driver and front passenger have not fastened their seat
belts.
The warning signal is switched off and the indicator light is permanently lit if
the driver and front passenger have not fastened their seat belts within the
next 90 seconds.
Further information » page 10.
Generator
Read and observe
on page 35 first.
If the warning light lights up
when the engine is running, the vehicle battery
is not being charged.
Seek help from a specialist garage. The electrical system requires checking.
WARNINGIf you have to stop for technical reasons, park the vehicle at a safe distance
from the traffic, switch off the engine and switch on the hazard warning
lights system » page 59.
CAUTION
Do not continue driving if the warning light (coolant system fault) lights
up in addition to the warning light while you are driving. Stop the engine -
there is a risk of engine damage.
OPen door
Read and observe
on page 35 first.
The warning light
comes on if one or several doors are opened or if the boot
lid is opened.
The warning light comes on even when the ignition is switched off. The warn-
ing light lights up for a maximum of 5 minutes.
WARNINGIf you have to stop for technical reasons, park the vehicle at a safe distance
from the traffic, switch off the engine and switch on the hazard warning
lights system » page 59.
Engine oil
Read and observe
on page 35 first.
The warning light lights up red (low oil pressure)
The following message is shown in the MAXI DOT display.
Oil pressure: Engine off! Log book!
36Using the system
Page 44 of 197
Selector lever lockRead and observe
on page 35 first.
If the warning light
lights up, operate the brake pedal. This is necessary to
be able to move the selector lever from position P or N » page 106 .
Main beam
Read and observe
on page 35 first.
The warning light
comes on when the main beam or headlight flasher are
selected » page 57 .
Unlocking and locking
Unlocking and locking
Introduction
This chapter contains information on the following subjects:
Vehicle key
42
Replacing the battery in the remote control key
43
Child safety lock
44
Opening/closing the door
44
Locking/unlocking the vehicle without central locking
45
Emergency locking of the doors
45
Vehicle key
Fig. 25
Key: without/with remote control
Two keys are provided with the vehicle. Depending on the equipment, your ve-
hicle can be equipped with keys without radio remote control » Fig. 25 -
or
with radio remote control » Fig. 25 -
.
42Using the system
Page 46 of 197
Note■The system has to be synchronised, if the vehicle cannot be unlocked or
locked with the remote control key after replacing the battery » page 49.■
Replacing the battery in the key a glued decorative cover requires the cover
to be destroyed. A replacement cover can be purchased from a ŠKODA Partner.
Child safety lock
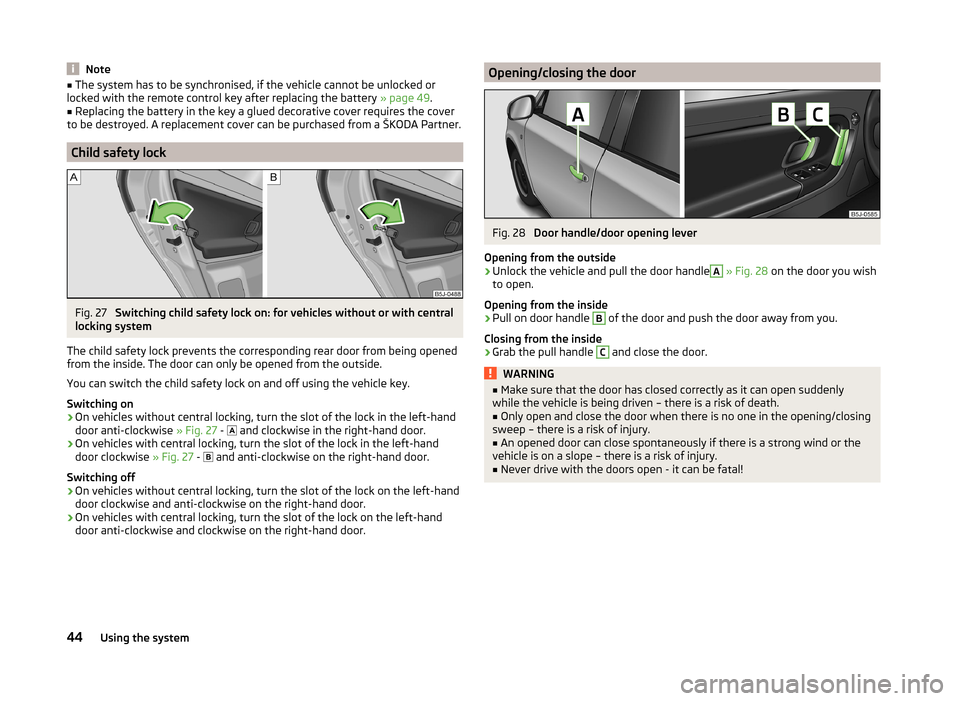
Fig. 27
Switching child safety lock on: for vehicles without or with central
locking system
The child safety lock prevents the corresponding rear door from being opened
from the inside. The door can only be opened from the outside.
You can switch the child safety lock on and off using the vehicle key.
Switching on
›
On vehicles without central locking, turn the slot of the lock in the left-hand
door anti-clockwise » Fig. 27 -
and clockwise in the right-hand door.
›
On vehicles with central locking, turn the slot of the lock in the left-hand
door clockwise » Fig. 27 -
and anti-clockwise on the right-hand door.
Switching off
›
On vehicles without central locking, turn the slot of the lock on the left-hand
door clockwise and anti-clockwise on the right-hand door.
›
On vehicles with central locking, turn the slot of the lock on the left-hand
door anti-clockwise and clockwise on the right-hand door.
Opening/closing the doorFig. 28
Door handle/door opening lever
Opening from the outside
›
Unlock the vehicle and pull the door handle
A
» Fig. 28 on the door you wish
to open.
Opening from the inside
›
Pull on door handle
B
of the door and push the door away from you.
Closing from the inside
›
Grab the pull handle
C
and close the door.
WARNING■ Make sure that the door has closed correctly as it can open suddenly
while the vehicle is being driven – there is a risk of death.■
Only open and close the door when there is no one in the opening/closing
sweep – there is a risk of injury.
■
An opened door can close spontaneously if there is a strong wind or the
vehicle is on a slope – there is a risk of injury.
■
Never drive with the doors open - it can be fatal!
44Using the system
Page 47 of 197
Locking/unlocking the vehicle without central lockingFig. 29
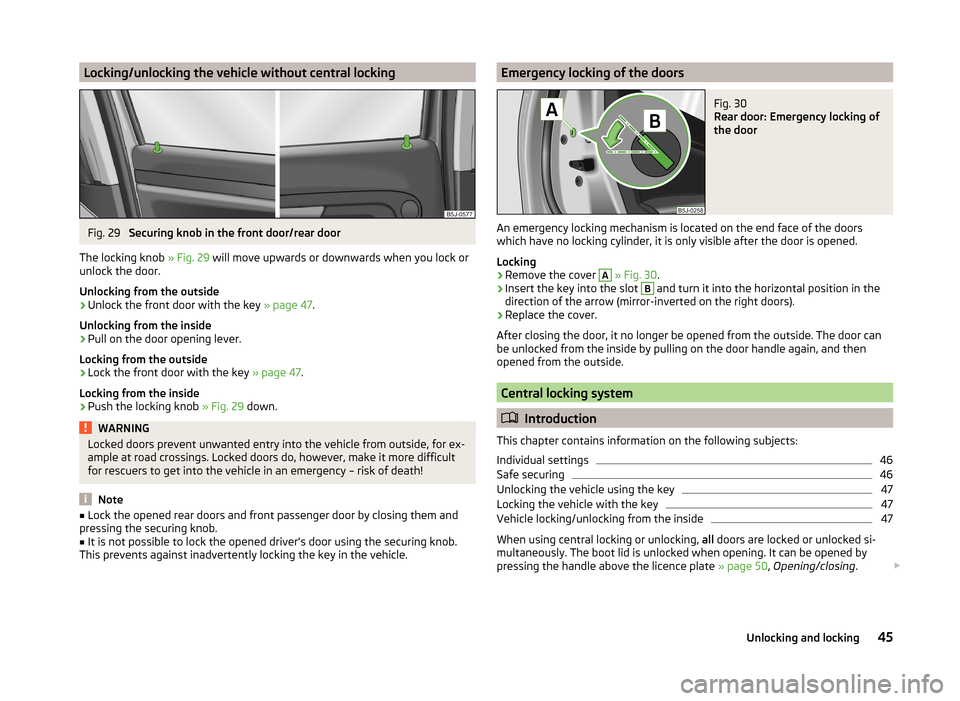
Securing knob in the front door/rear door
The locking knob » Fig. 29 will move upwards or downwards when you lock or
unlock the door.
Unlocking from the outside
›
Unlock the front door with the key » page 47.
Unlocking from the inside
›
Pull on the door opening lever.
Locking from the outside
›
Lock the front door with the key » page 47.
Locking from the inside
›
Push the locking knob » Fig. 29 down.
WARNINGLocked doors prevent unwanted entry into the vehicle from outside, for ex-
ample at road crossings. Locked doors do, however, make it more difficult
for rescuers to get into the vehicle in an emergency – risk of death!
Note
■ Lock the opened rear doors and front passenger door by closing them and
pressing the securing knob.■
It is not possible to lock the opened driver's door using the securing knob.
This prevents against inadvertently locking the key in the vehicle.
Emergency locking of the doorsFig. 30
Rear door: Emergency locking of
the door
An emergency locking mechanism is located on the end face of the doors
which have no locking cylinder, it is only visible after the door is opened.
Locking
›
Remove the cover
A
» Fig. 30 .
›
Insert the key into the slot
B
and turn it into the horizontal position in the
direction of the arrow (mirror-inverted on the right doors).
›
Replace the cover.
After closing the door, it no longer be opened from the outside. The door can
be unlocked from the inside by pulling on the door handle again, and then
opened from the outside.
Central locking system
Introduction
This chapter contains information on the following subjects:
Individual settings
46
Safe securing
46
Unlocking the vehicle using the key
47
Locking the vehicle with the key
47
Vehicle locking/unlocking from the inside
47
When using central locking or unlocking, all doors are locked or unlocked si-
multaneously. The boot lid is unlocked when opening. It can be opened by
pressing the handle above the licence plate » page 50, Opening/closing .
45Unlocking and locking
Page 48 of 197
Warning light in the driver's door
After locking the vehicle, the warning light flashes for around 2 seconds in
quick succession, afterwards it begins to flash evenly at longer intervals.
If the vehicle is locked and the safe securing system » page 46 is not operat-
ing, the warning light in the driver door flashes for about 2 seconds fast, goes
out and starts to flash evenly at longer intervals after about 30 seconds.
If the indicator light first flashes fast for about 2 seconds, then lights up for
about 30 seconds continuously and then flashes slowly, there is a fault in the
central locking system or in the interior monitor and in the towing protec-
tion » page 50 . Seek help from a specialist garage.
Convenience operation of windows
The windows can be opened and closed when unlocking and locking the vehi-
cle » page 53 .
CAUTION
If the safe securing system is activated » page 46, the door opening lever and
the central locking buttons do not operate.
Note
■ In the event of an accident in which the airbags are deployed, the locked
doors are automatically unlocked in order to enable rescuers to gain access to
the vehicle.■
Upon failure of the central locking system the key can only be used for lock-
ing and unlocking the driver's door. The other doors and the boot lid can be
manually locked or unlocked. ■ Emergency locking of the door » page 45.
■ Emergency unlocking of the boot lid » page 51.
Individual settings
Read and observe
on page 46 first.
Opening a single door
This selection function makes it possible to only unlock the driver's door. The other doors remain locked and are only unlocked when the command is repea-
ted.
Automatic locking and unlocking
All the doors and the boot lid are locked automatically once the car reaches a
speed of about 15 km/h.
If the ignition key is withdrawn, the car is then automatically unlocked again.
In addition, it is possible for the driver or front passenger to unlock the car by
pressing the central locking button
» page 47 .
The doors can be unlocked and opened from the inside by a single pull on the
opening lever of the respective door.
Note
Individual settings can be applied in a specialist workshop.
Safe securing
Read and observe
on page 46 first.
The central locking system is equipped with a safe securing system. The door
locks are blocked automatically if the vehicle is locked from the outside. It is
then not possible to open the doors with the door handle, either from the in-
side or from the outside.
You will be informed that the safe securing system is activated after the vehi-
cle is locked by the CHECK DEADLOCK message on the instrument cluster dis-
play. On vehicles equipped with the MAXI DOT display, the display shows
Check deadlock. Log book!
Switching off
Opening can take place in one of the following ways.
›
By locking twice within 2 seconds.
›
By disabling the interior monitoring » page 50, Interior monitor and towing
protection .
If the vehicle is locked and the safe securing system is switched off, the door can be opened separately from the inside by a single pull on the opening lever.
Switching on
The safelock switches on automatically the next time the vehicle is locked and
unlocked.
Switch-on display
The warning light flashes for around 2 seconds in quick succession, afterwards
it begins to flash evenly at longer intervals.
Switch-off display
The indicator light in the driver door flashes for about 2 seconds fast, goes out
and starts to flash regularly at longer intervals after about 30 seconds.
46Using the system
Page 49 of 197
WARNINGIf the car is locked from the outside and the safelock system is switched on,
no-one must be in the car, as it is then not possible to open either a door or
a window from the inside. The locked doors make it more difficult for rescu-
ers to get into the vehicle in an emergency – risk to life!
Note
This function is only enabled in certain countries.
Unlocking the vehicle using the key
Fig. 31
Turning the key for unlocking
and locking the vehicle
Read and observe on page 46 first.
›
Turn the key in the locking cylinder of the driver's door in the direction of
travel (unlocking position)
A
» Fig. 31 .
›
Pull the door handle and open the door.
› All the doors (only the driver's door on vehicles with anti-theft alarm system)
are unlocked.
› The boot lid is then unlocked.
› The switched on interior lights come on over the door contact.
› The safe securing system is deactivated.
› The windows open while the key
is held in the unlock position.
› The warning light in the driver door stops flashing if the car is not fitted with
an anti-theft alarm system » page 49.
Locking the vehicle with the key
Read and observe
on page 46 first.
›
Turn the key in the locking cylinder of the driver's door opposite to the direc-
tion of travel (locking position)
B
» Fig. 31 on page 47 .
›All the doors and the boot lid are locked.
› The switched on interior lights will switch off over the door contact.
› The windows and the electric sliding/tilting roof close while the key
is held in
the lock position.
› The safe securing system is immediately activated.
› The warning light in the driver door begins flashing.
Note
If the driver's door has been opened, the vehicle cannot be locked.
Vehicle locking/unlocking from the inside
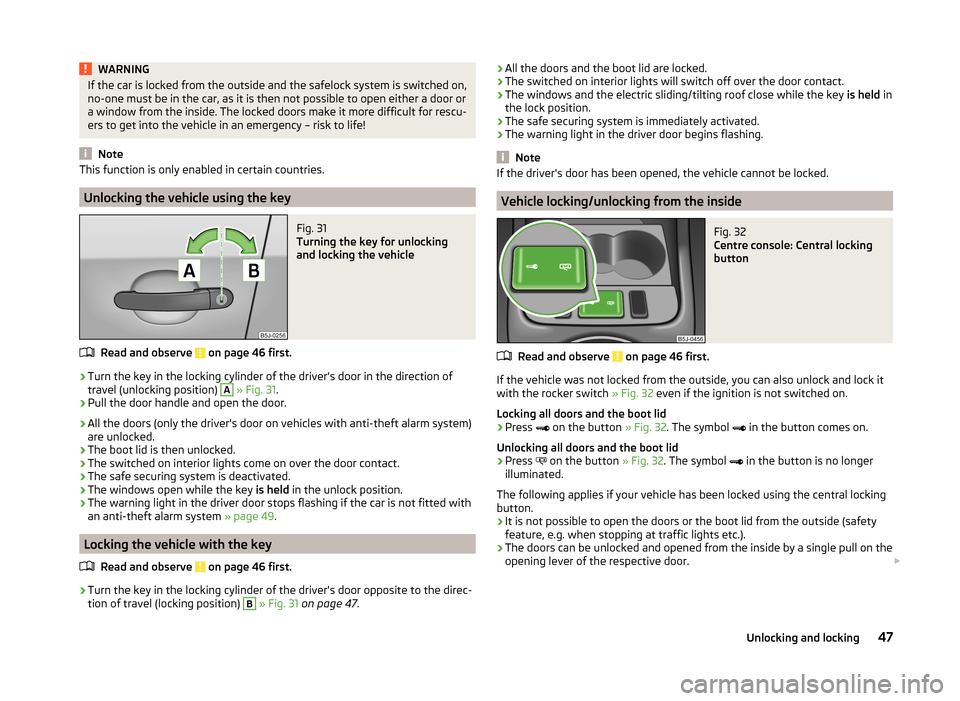
Fig. 32
Centre console: Central locking
button
Read and observe on page 46 first.
If the vehicle was not locked from the outside, you can also unlock and lock it
with the rocker switch » Fig. 32 even if the ignition is not switched on.
Locking all doors and the boot lid
›
Press
on the button » Fig. 32. The symbol
in the button comes on.
Unlocking all doors and the boot lid
›
Press
on the button » Fig. 32. The symbol
in the button is no longer
illuminated.
The following applies if your vehicle has been locked using the central locking button.
› It is not possible to open the doors or the boot lid from the outside (safety
feature, e.g. when stopping at traffic lights etc.).
› The doors can be unlocked and opened from the inside by a single pull on the
opening lever of the respective door.
47Unlocking and locking