driver seat adjustment SKODA FABIA 2014 2.G / 5J Owner's Manual
[x] Cancel search | Manufacturer: SKODA, Model Year: 2014, Model line: FABIA, Model: SKODA FABIA 2014 2.G / 5JPages: 197, PDF Size: 13.56 MB
Page 12 of 197

Seat belts
Wearing seat belts
Introduction
Fig. 3
Driver wearing seat belt
This chapter contains information on the following subjects:
The physical principle of a frontal collision
11
Fastening and unfastening seat belts
12
Belt height adjustment on the front seats
13
Seat belts that are fastened correctly offer good protection in the event of an
accident. They reduce the risk of an injury and increase the chance of survival
in the event of a major accident.
Correctly fastened seat belts hold occupants of the car in the correct seated
position » Fig. 3.
The seat belts reduce the kinetic energy (energy of motion) to a considerable
extent. They also prevent uncontrolled movements which, in turn, may well re-
sult in severe injuries.
The occupants of a vehicle who have fastened and correctly adjusted their
seat belt benefit greatly from the fact that the kinetic energy is absorbed by
the belts as much as possible.
The structure of the front end of the vehicle and other passive safety meas-
ures, such as the airbag system, also contribute to reducing the kinetic energy
in the best possible way. The energy produced is thus absorbed and there is
less risk of injury.
Particular safety aspects must be observed when transporting children in the
vehicle » page 19 , Transporting children safely .
WARNING■
Fasten your seat belt before each journey - even when driving in town!
This also applies to the people seated at the rear – there is a risk of injury.■
Expectant women must also always wear a seat belt. This is the only way
of ensuring optimal protection for the unborn child » page 12, Fastening
and unfastening seat belts .
■
The maximum protection which seat belts can offer is only achieved if you
are correctly seated » page 7, Correct and safe seated position .
■
The seat backrests of the front seats must not be tilted too far to the rear
otherwise the seatbelts can lose their effectiveness.
WARNINGInformation on the correct routing of the belt■Always ensure that the webbing of the seat belts is properly routed. Seat
belts which are not correctly adjusted can themselves cause injuries even
in minor accidents.■
Adjust the height of the belt in such a way that the shoulder part of the
belt is roughly positioned across the middle of your shoulder - on no ac-
count across your neck.
■
A seat belt which is hanging too loose can result in injuries as your body is
moved forward by the kinetic energy produced in an accident and is then
suddenly held firm by the belt.
■
The belt must not run across solid or fragile objects (e.g. spectacles, ball-
point pens, keys, etc.). Such objects can cause injury.
WARNINGInformation on dealing with the safety belts■The belt webbing must not be jammed in-between at any point or twis-
ted, or chafe against any sharp edges.■
Make sure you do not catch the seat belt in the door when closing it.
WARNINGInformation on the proper use of the safety belts■Never use a seatbelt to secure two persons (not even children). Nor may
the seat belt be placed over a child who is sitting on the lap of another pas-
senger. 10Safety
Page 15 of 197

Belt height adjustment on the front seatsFig. 7
Front seat: Seat belt height ad-
juster
Read and observe on page 10 first.
The seat belt height adjuster makes it possible to adjust the routing of the
front seat belts in the area of the shoulder to the body size.
›
Press the height adjuster and move up or down in the desired direc-
tion » Fig. 7 .
›
Then pull firmly on the belt to ensure that the seat belt height adjuster has
correctly locked in place.
Inertia reel and belt pretensioners
Introduction
This chapter contains information on the following subjects:
Inertia reel
13
Belt tensioners
13
Inertia reel
Each seat belt is equipped with an inertia reel.
The seat belt can move freely when it is pulled slowly. The seat belt is locked
by the inertia reel when it is pulled suddenly.
The belts also lock under full braking, under acceleration, when driving down-
hill and when cornering.
WARNINGIf the seat belt does not lock when it is pulled sharply, have it inspected im-
mediately by a specialist garage.Belt tensioners
Safety for the driver and front passenger wearing their seat belts is enhanced
by the belt tensioners fitted to the inertia reels of the front three-point seat
belts.
The three-point seat belts are automatically tensioned in the event of a frontal
collision of a certain severity. The belt tensioners can also be deployed if the
seat belts are not fastened.
The seat belts are automatically tensioned in the event of a collision of a cer-
tain severity.
Belt tensioners are not activated in the event of minor frontal collisions, side
and rear-end collisions, in the case of a rollover and also not in accidents in
which no major forces are produced from the front.WARNING■ Any work on the belt tensioner system including removal and installation
of system components because of other repair work, must only be carried
out by a specialist garage.■
The protective function of the system is only adequate for a single acci-
dent. If the belt tensioners have been deployed, it is then necessary to re-
place the entire system.
Note
■ Smoke is generated when the belt tensioners are deployed. This is not an in-
dication of a fire in the vehicle.■
When disposing of the vehicle or parts of the belt tensioner system, it is im-
portant to comply with national legal requirements. ŠKODA service partners
are familiar with these regulations and will be able to provide you with de-
tailed information.
13Seat belts
Page 27 of 197

Using the system
Cockpit
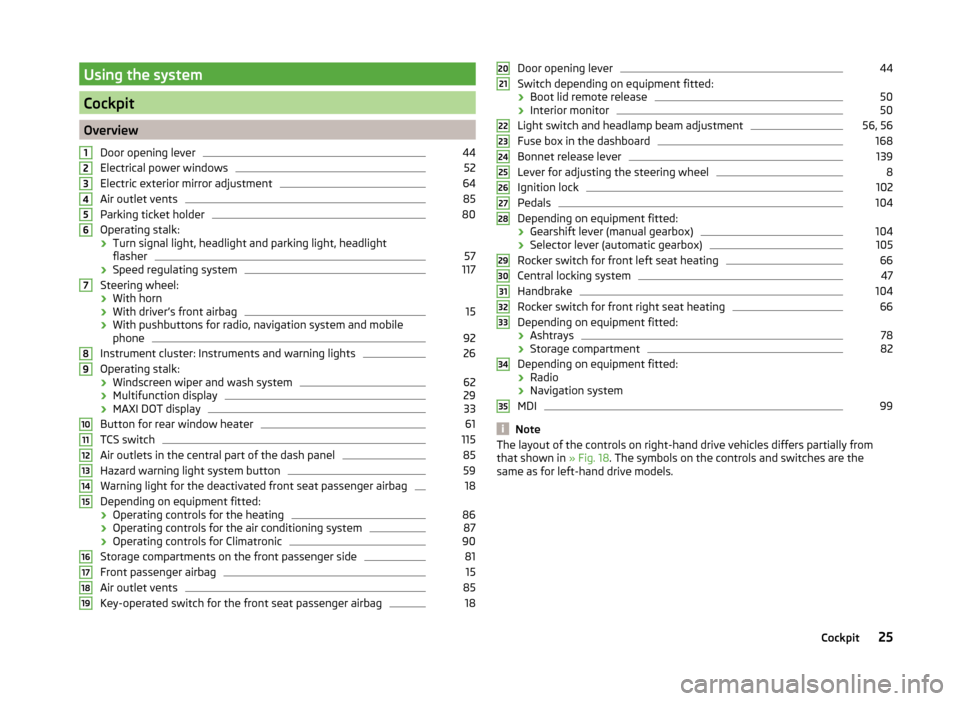
OverviewDoor opening lever
44
Electrical power windows
52
Electric exterior mirror adjustment
64
Air outlet vents
85
Parking ticket holder
80
Operating stalk:
› Turn signal light, headlight and parking light, headlight
flasher
57
› Speed regulating system
117
Steering wheel:
› With horn
› With driver’s front airbag
15
›With pushbuttons for radio, navigation system and mobile
phone
92
Instrument cluster: Instruments and warning lights
26
Operating stalk:
› Windscreen wiper and wash system
62
›Multifunction display
29
›MAXI DOT display
33
Button for rear window heater
61
TCS switch
115
Air outlets in the central part of the dash panel
85
Hazard warning light system button
59
Warning light for the deactivated front seat passenger airbag
18
Depending on equipment fitted:
› Operating controls for the heating
86
›Operating controls for the air conditioning system
87
›Operating controls for Climatronic
90
Storage compartments on the front passenger side
81
Front passenger airbag
15
Air outlet vents
85
Key-operated switch for the front seat passenger airbag
1812345678910111213141516171819Door opening lever44
Switch depending on equipment fitted:
› Boot lid remote release
50
›Interior monitor
50
Light switch and headlamp beam adjustment
56, 56
Fuse box in the dashboard
168
Bonnet release lever
139
Lever for adjusting the steering wheel
8
Ignition lock
102
Pedals
104
Depending on equipment fitted:
› Gearshift lever (manual gearbox)
104
›Selector lever (automatic gearbox)
105
Rocker switch for front left seat heating
66
Central locking system
47
Handbrake
104
Rocker switch for front right seat heating
66
Depending on equipment fitted:
› Ashtrays
78
›Storage compartment
82
Depending on equipment fitted:
› Radio
› Navigation system
MDI
99
Note
The layout of the controls on right-hand drive vehicles differs partially from
that shown in » Fig. 18. The symbols on the controls and switches are the
same as for left-hand drive models.2021222324252627282930313233343525Cockpit
Page 58 of 197

Parking and low beam lightsFig. 40
Dash panel: Light switch
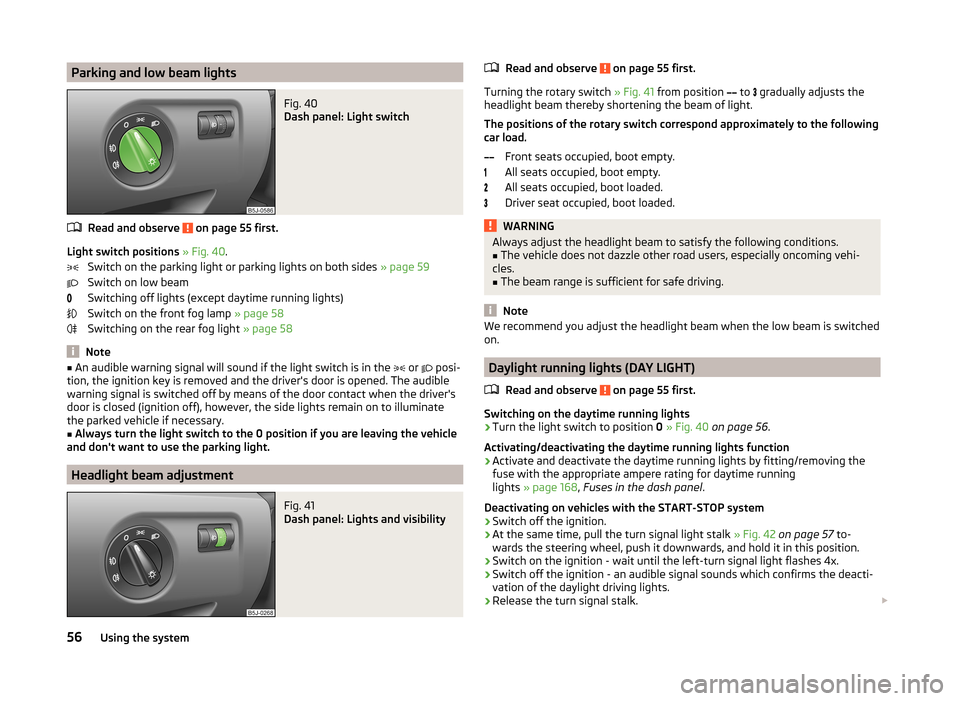
Read and observe on page 55 first.
Light switch positions » Fig. 40 .
Switch on the parking light or parking lights on both sides » page 59
Switch on low beam
Switching off lights (except daytime running lights)
Switch on the front fog lamp » page 58
Switching on the rear fog light » page 58
Note
■
An audible warning signal will sound if the light switch is in the or posi-
tion, the ignition key is removed and the driver's door is opened. The audible
warning signal is switched off by means of the door contact when the driver's
door is closed (ignition off), however, the side lights remain on to illuminate
the parked vehicle if necessary.■
Always turn the light switch to the 0 position if you are leaving the vehicle
and don't want to use the parking light.
Headlight beam adjustment
Fig. 41
Dash panel: Lights and visibility
Read and observe on page 55 first.
Turning the rotary switch » Fig. 41 from position
to
gradually adjusts the
headlight beam thereby shortening the beam of light.
The positions of the rotary switch correspond approximately to the following
car load.
Front seats occupied, boot empty.
All seats occupied, boot empty.
All seats occupied, boot loaded.
Driver seat occupied, boot loaded.
WARNINGAlways adjust the headlight beam to satisfy the following conditions.■The vehicle does not dazzle other road users, especially oncoming vehi-
cles.■
The beam range is sufficient for safe driving.
Note
We recommend you adjust the headlight beam when the low beam is switched
on.
Daylight running lights (DAY LIGHT)
Read and observe
on page 55 first.
Switching on the daytime running lights
›
Turn the light switch to position 0 » Fig. 40 on page 56 .
Activating/deactivating the daytime running lights function
›
Activate and deactivate the daytime running lights by fitting/removing the
fuse with the appropriate ampere rating for daytime running
lights » page 168 , Fuses in the dash panel .
Deactivating on vehicles with the START-STOP system
›
Switch off the ignition.
›
At the same time, pull the turn signal light stalk » Fig. 42 on page 57 to-
wards the steering wheel, push it downwards, and hold it in this position.
›
Switch on the ignition - wait until the left-turn signal light flashes 4x.
›
Switch off the ignition - an audible signal sounds which confirms the deacti-
vation of the daylight driving lights.
›
Release the turn signal stalk.
56Using the system
Page 67 of 197

Seats and storage
Front seats
Introduction
This chapter contains information on the following subjects:
Adjusting the front seats - Version 1
65
Adjusting the front seats - Variant 2
65
Front seat heating
66
The driver's seat should be adjusted in such a way that the pedals can be fully
pressed to the floor with slightly bent legs.
The seat backrest on the driver's seat should be adjusted in such a way that the upper point of the steering wheel can be easily reached with slightly bent
arms.
Correct adjustment of the seats is particularly important for the following rea-
sons.
› Reaching the controls safely and quickly.
› A relaxed and fatigue-free body position.
› Achieving the maximum protection offered by the seat belts and the airbag
system.
WARNING■ Only adjust the driver's seat when the vehicle is stationary – there is the
risk of an accident.■
Caution when adjusting the seat! You may suffer injuries or bruises as a
result of adjusting the seat without paying proper attention.
■
Never carry more people than the number of seats in the vehicle.
■
Do not transport any objects on the front passenger seat other than ob-
jects (e.g. child safety seat) intended for this purpose – there is the risk of
an accident.
Note
After a certain time, play can develop within the adjustment mechanism of the
backrest angle.Adjusting the front seats - Version 1Fig. 54
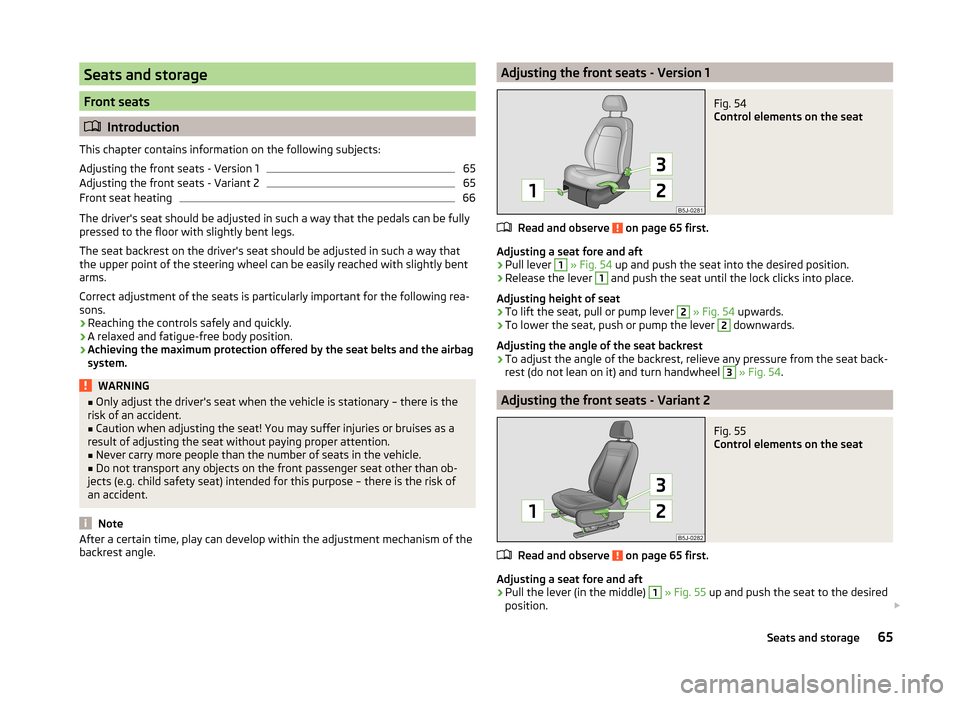
Control elements on the seat
Read and observe on page 65 first.
Adjusting a seat fore and aft
›
Pull lever
1
» Fig. 54 up and push the seat into the desired position.
›
Release the lever
1
and push the seat until the lock clicks into place.
Adjusting height of seat
›
To lift the seat, pull or pump lever
2
» Fig. 54 upwards.
›
To lower the seat, push or pump the lever
2
downwards.
Adjusting the angle of the seat backrest
›
To adjust the angle of the backrest, relieve any pressure from the seat back-
rest (do not lean on it) and turn handwheel
3
» Fig. 54 .
Adjusting the front seats - Variant 2
Fig. 55
Control elements on the seat
Read and observe on page 65 first.
Adjusting a seat fore and aft
›
Pull the lever (in the middle)
1
» Fig. 55 up and push the seat to the desired
position.
65Seats and storage