height SKODA FABIA 2014 2.G / 5J Owner's Manual
[x] Cancel search | Manufacturer: SKODA, Model Year: 2014, Model line: FABIA, Model: SKODA FABIA 2014 2.G / 5JPages: 197, PDF Size: 13.56 MB
Page 8 of 197
Safety
Passive Safety
General information
Introduction
This chapter contains information on the following subjects:
Before every journey
6
Driving safety
6
Safety equipment
6
In this section you will find important information, tips and notes on the sub-
ject of passive safety in your vehicle.
We have combined everything here which you should be familiar with, for ex-
ample, regarding seat belts, airbags, child seats and safety of children.
WARNING■ This chapter contains important information on how to use the vehicle for
the driver and his occupants.■
You will find further information on safety, which concerns you and those
travelling with you, in the following chapters of this Owner's Manual.
■
The complete on-board literature should always be in the vehicle. This
applies in particular, if you rent out or sell the vehicle.
Before every journey
Read and observe
on page 6 first.
For your own safety and the safety of the people travelling with you, please
pay attention to the following points before setting off.
Ensure that the lighting and the turn signal system are functioning proper-
ly.
Make sure that the function of the wiper and the condition of the wiper
blades are free of any defects.
Ensure that all of the windows offer good visibility to the outside.
Adjust the rear-view mirror so that vision to the rear is guaranteed.
Ensure that the mirrors are not covered.
Check the tyre inflation pressure.
Check the engine oil, brake fluid and coolant level.
Secure all items of luggage.
Do not exceed the permissible axle loads and permissible gross weight of
the vehicle – risk of accident.
Close all doors and the engine compartment and luggage compartment lid.
Ensure that no objects can obstruct the pedals.
Protect children in suitable child seats with correctly fastened seat
belts » page 19 , Transporting children safely .
Adopt the correct seated position » page 7, Correct and safe seated
position . Tell your passengers to assume the correct seated position.
Driving safety
Read and observe
on page 6 first.
The driver is fully responsible for himself and his occupants. If your driving
safety is effected, you place yourself and the oncoming traffic at risk.
The following guidelines must therefore be observed. Do not get distracted from concentrating on the traffic situation, e.g. by
your passengers or mobile phone calls.
Never drive when your driving ability is impaired, e.g. through medication,
alcohol or drugs.
Keep to the traffic regulations and the permissible speed limit.
Always adjust the driving speed to the road, traffic and weather condi-
tions.
Take regular breaks on long journeys – at least every two hours.
Safety equipment
Read and observe
on page 6 first.
The following list contains only part of the safety equipment in your vehicle.
› Three-point seat belts for all the seats.
› Belt force limiters for the front seats.
› Belt tensioners for the front seats.
› Seat belt height adjusters for the front seats.
› Front airbag for the driver and the front passenger.
› Side airbags.
6Safety
Page 9 of 197

›Head airbags.
› Anchoring points for child seats using the ISOFIX system.
› Anchoring points for child seats using the TOP TETHER system.
› Head restraints adjustable for height.
› Adjustable steering column.
The specified safety equipment works together, in order to optimally protect you and those travelling with you in accident situations.
The safety equipment does not protect you or the people travelling with you, if
you or your occupants adopt an incorrect seated position or the equipment is not correctly adjusted or used.
If the seat belt is not fastened properly, this may result in injuries during an
accident caused by the deployed airbag.
Correct and safe seated position
Introduction
This chapter contains information on the following subjects:
Correct seated position of the driver
7
Adjusting the steering wheel position
8
Correct seated position of the front passenger
8
Correct seated position of the rear seat passengers
9
Examples of incorrect seated positions
9WARNING■ The front seats and all head restraints must be adjusted to match the
body size at all times and the seat belt must always be fastened properly to
provide the most effective levels of protection to the passengers.■
Each occupant must correctly fasten the seat belt belonging to the seat.
Children must be fastened » page 19, Transporting children safely with a
suitable restraint system.
■
If the occupant adopts an incorrect seated position, he is exposed to life-
threatening injuries, in case he is hit by a deployed airbag.
■
If the occupants on the rear seats are not sitting upright, the risk of injury
is increased due to incorrect routing of the seat belt.
■
The seat backrests must not be tilted too far back when driving, as this
will impair the function of the seat belts and of the airbag system – risk of
injury!
Correct seated position of the driverFig. 1
The correct distance of the driver to the steering wheel/correctly
adjusted head restraint
Read and observe
on page 7 first.
For your own safety and to reduce the risk of injury in the event of an accident,we recommend the following settings.
Adjust the driver’s seat in the forward/back direction so that the pedals
can be fully depressed with slightly bent legs.
Adjust the seat backrest so that the highest point of the steering wheel
can be reached with your arms at a slight angle.
Adjust the steering wheel so that the distance
A
between the steering
wheel and your chest is at least 25 cm » Fig. 1. Adjusting the steering
wheel » page 8 , Adjusting the steering wheel position .
Adjust the head restraint such that the top edge of the head restraint is at
the same level as the upper part of your head
B
.
Correctly fasten the seat belt » page 10, Wearing seat belts .
Setting the seats and head restraints » page 65 .
7Passive Safety
Page 10 of 197
WARNING■Always assume the correct seated position before setting off and do not
change this position while driving. Also advise your passengers to adopt
the correct seated position and not to change this position while the car is
moving.■
Maintain a distance of at least 25 cm from the steering wheel, and a dis-
tance of at least 10 cm between the legs and the dash panel at the height
of the knee airbag. Not maintaining this minimum distance will mean that
the airbag system will not be able to properly protect you - hazard!
■
When driving, hold the steering wheel with both hands firmly on the out-
er edge in the “9 o'clock” and “3 o'clock” position. Never hold the steering
wheel in the “12 o'clock” position or in any other way (e.g. in the middle or
inner edge of the steering wheel). In such cases, you could severely injure
your arms, hands and head when the driver airbag is deployed.
■
Ensure that there are no objects in the driver's footwell, as these may get
caught in the pedal apparatus when driving or braking. You would then no
longer be able to operate the clutch, brake or acceleration pedals.
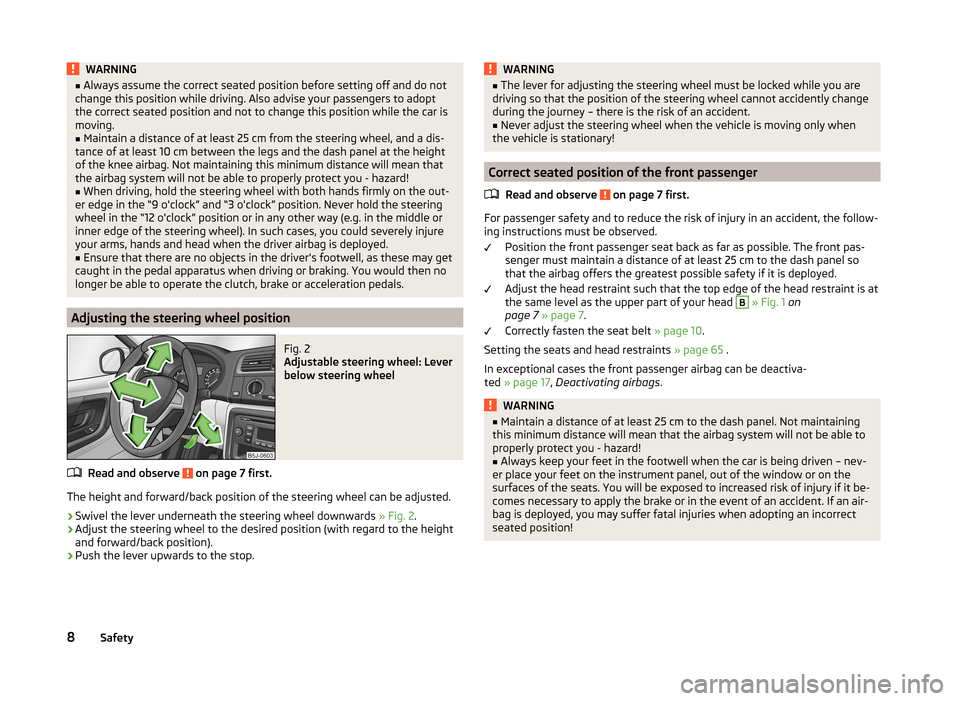
Adjusting the steering wheel position
Fig. 2
Adjustable steering wheel: Lever
below steering wheel
Read and observe on page 7 first.
The height and forward/back position of the steering wheel can be adjusted.
›
Swivel the lever underneath the steering wheel downwards » Fig. 2.
›
Adjust the steering wheel to the desired position (with regard to the height
and forward/back position).
›
Push the lever upwards to the stop.
WARNING■ The lever for adjusting the steering wheel must be locked while you are
driving so that the position of the steering wheel cannot accidently change
during the journey – there is the risk of an accident.■
Never adjust the steering wheel when the vehicle is moving only when
the vehicle is stationary!
Correct seated position of the front passenger
Read and observe
on page 7 first.
For passenger safety and to reduce the risk of injury in an accident, the follow-ing instructions must be observed.
Position the front passenger seat back as far as possible. The front pas-
senger must maintain a distance of at least 25 cm to the dash panel so
that the airbag offers the greatest possible safety if it is deployed.
Adjust the head restraint such that the top edge of the head restraint is at
the same level as the upper part of your head
B
» Fig. 1 on
page 7 » page 7 .
Correctly fasten the seat belt » page 10.
Setting the seats and head restraints » page 65 .
In exceptional cases the front passenger airbag can be deactiva-
ted » page 17 , Deactivating airbags .
WARNING■
Maintain a distance of at least 25 cm to the dash panel. Not maintaining
this minimum distance will mean that the airbag system will not be able to
properly protect you - hazard!■
Always keep your feet in the footwell when the car is being driven – nev-
er place your feet on the instrument panel, out of the window or on the
surfaces of the seats. You will be exposed to increased risk of injury if it be-
comes necessary to apply the brake or in the event of an accident. If an air-
bag is deployed, you may suffer fatal injuries when adopting an incorrect
seated position!
8Safety
Page 12 of 197

Seat belts
Wearing seat belts
Introduction
Fig. 3
Driver wearing seat belt
This chapter contains information on the following subjects:
The physical principle of a frontal collision
11
Fastening and unfastening seat belts
12
Belt height adjustment on the front seats
13
Seat belts that are fastened correctly offer good protection in the event of an
accident. They reduce the risk of an injury and increase the chance of survival
in the event of a major accident.
Correctly fastened seat belts hold occupants of the car in the correct seated
position » Fig. 3.
The seat belts reduce the kinetic energy (energy of motion) to a considerable
extent. They also prevent uncontrolled movements which, in turn, may well re-
sult in severe injuries.
The occupants of a vehicle who have fastened and correctly adjusted their
seat belt benefit greatly from the fact that the kinetic energy is absorbed by
the belts as much as possible.
The structure of the front end of the vehicle and other passive safety meas-
ures, such as the airbag system, also contribute to reducing the kinetic energy
in the best possible way. The energy produced is thus absorbed and there is
less risk of injury.
Particular safety aspects must be observed when transporting children in the
vehicle » page 19 , Transporting children safely .
WARNING■
Fasten your seat belt before each journey - even when driving in town!
This also applies to the people seated at the rear – there is a risk of injury.■
Expectant women must also always wear a seat belt. This is the only way
of ensuring optimal protection for the unborn child » page 12, Fastening
and unfastening seat belts .
■
The maximum protection which seat belts can offer is only achieved if you
are correctly seated » page 7, Correct and safe seated position .
■
The seat backrests of the front seats must not be tilted too far to the rear
otherwise the seatbelts can lose their effectiveness.
WARNINGInformation on the correct routing of the belt■Always ensure that the webbing of the seat belts is properly routed. Seat
belts which are not correctly adjusted can themselves cause injuries even
in minor accidents.■
Adjust the height of the belt in such a way that the shoulder part of the
belt is roughly positioned across the middle of your shoulder - on no ac-
count across your neck.
■
A seat belt which is hanging too loose can result in injuries as your body is
moved forward by the kinetic energy produced in an accident and is then
suddenly held firm by the belt.
■
The belt must not run across solid or fragile objects (e.g. spectacles, ball-
point pens, keys, etc.). Such objects can cause injury.
WARNINGInformation on dealing with the safety belts■The belt webbing must not be jammed in-between at any point or twis-
ted, or chafe against any sharp edges.■
Make sure you do not catch the seat belt in the door when closing it.
WARNINGInformation on the proper use of the safety belts■Never use a seatbelt to secure two persons (not even children). Nor may
the seat belt be placed over a child who is sitting on the lap of another pas-
senger. 10Safety
Page 15 of 197

Belt height adjustment on the front seatsFig. 7
Front seat: Seat belt height ad-
juster
Read and observe on page 10 first.
The seat belt height adjuster makes it possible to adjust the routing of the
front seat belts in the area of the shoulder to the body size.
›
Press the height adjuster and move up or down in the desired direc-
tion » Fig. 7 .
›
Then pull firmly on the belt to ensure that the seat belt height adjuster has
correctly locked in place.
Inertia reel and belt pretensioners
Introduction
This chapter contains information on the following subjects:
Inertia reel
13
Belt tensioners
13
Inertia reel
Each seat belt is equipped with an inertia reel.
The seat belt can move freely when it is pulled slowly. The seat belt is locked
by the inertia reel when it is pulled suddenly.
The belts also lock under full braking, under acceleration, when driving down-
hill and when cornering.
WARNINGIf the seat belt does not lock when it is pulled sharply, have it inspected im-
mediately by a specialist garage.Belt tensioners
Safety for the driver and front passenger wearing their seat belts is enhanced
by the belt tensioners fitted to the inertia reels of the front three-point seat
belts.
The three-point seat belts are automatically tensioned in the event of a frontal
collision of a certain severity. The belt tensioners can also be deployed if the
seat belts are not fastened.
The seat belts are automatically tensioned in the event of a collision of a cer-
tain severity.
Belt tensioners are not activated in the event of minor frontal collisions, side
and rear-end collisions, in the case of a rollover and also not in accidents in
which no major forces are produced from the front.WARNING■ Any work on the belt tensioner system including removal and installation
of system components because of other repair work, must only be carried
out by a specialist garage.■
The protective function of the system is only adequate for a single acci-
dent. If the belt tensioners have been deployed, it is then necessary to re-
place the entire system.
Note
■ Smoke is generated when the belt tensioners are deployed. This is not an in-
dication of a fire in the vehicle.■
When disposing of the vehicle or parts of the belt tensioner system, it is im-
portant to comply with national legal requirements. ŠKODA service partners
are familiar with these regulations and will be able to provide you with de-
tailed information.
13Seat belts
Page 22 of 197

WARNING (Continued)■Pay particular attention to the information provided by the manufacturer
of the child safety seat regarding the correct routing of the belt. Seat belts
which are not correctly adjusted can themselves cause injuries even in mi-
nor accidents.■
Safety belts must be checked to ensure that they are running properly.
One should also ensure that the belt is not damaged by sharp-edged fit-
tings.
■
It is essential to switch off the front passenger airbag if using a child seat
on the front passenger seat in which the child is carried with its back facing
the direction of travel. Further information » page 20, Use of a child seat
on the front passenger seat .
Note
We recommend that you use child seats from ŠKODA Original Accessories.
These child seats were developed and also tested for use in ŠKODA vehicles.
They meet the ECE-R 44 standard.
Use of a child seat on the front passenger seat
Never use a rearward-facing child restraint system on a seat which is protec-
ted by an active airbag installed in front of it. This could cause serious injury to
the child, even death.
Fig. 13
Sticker on the B column on the
front passenger side.
Fig. 14
Front passenger sun visor / label
Read and observe
on page 19 first.
For safety reasons, we recommend that you install child seats on the rear
seats whenever possible.
The following advice must be heeded when using a child seat in which the
child is carried on the front passenger seat.
› It is essential to switch off the front passenger airbag if using a child seat in
which the child is carried with its back facing the direction of travel »
.
› Adjust the front passenger seat back as vertically as possible so that there is
firm contact passenger seat back and the child seat back.
› Where possible, move the front passenger seat back so that there is no con-
tact between the front seat and the child seat behind.
› In the case of Group 2 or 3 child seats, make sure that the deflector pulley
mounted on the child seat headrest is in front of or level with the pulley on
the B-pillar on the passenger side.
› Set the height-adjustable front passenger seat as high up as possible.
› Set the front passenger seat belt as high up as possible.
› Place and fasten the child seat on the seat and the child in the child seat ac-
cording to the specifications in the manufacturer's user manual of the child
seat .
20Safety
Page 67 of 197
Seats and storage
Front seats
Introduction
This chapter contains information on the following subjects:
Adjusting the front seats - Version 1
65
Adjusting the front seats - Variant 2
65
Front seat heating
66
The driver's seat should be adjusted in such a way that the pedals can be fully
pressed to the floor with slightly bent legs.
The seat backrest on the driver's seat should be adjusted in such a way that the upper point of the steering wheel can be easily reached with slightly bent
arms.
Correct adjustment of the seats is particularly important for the following rea-
sons.
› Reaching the controls safely and quickly.
› A relaxed and fatigue-free body position.
› Achieving the maximum protection offered by the seat belts and the airbag
system.
WARNING■ Only adjust the driver's seat when the vehicle is stationary – there is the
risk of an accident.■
Caution when adjusting the seat! You may suffer injuries or bruises as a
result of adjusting the seat without paying proper attention.
■
Never carry more people than the number of seats in the vehicle.
■
Do not transport any objects on the front passenger seat other than ob-
jects (e.g. child safety seat) intended for this purpose – there is the risk of
an accident.
Note
After a certain time, play can develop within the adjustment mechanism of the
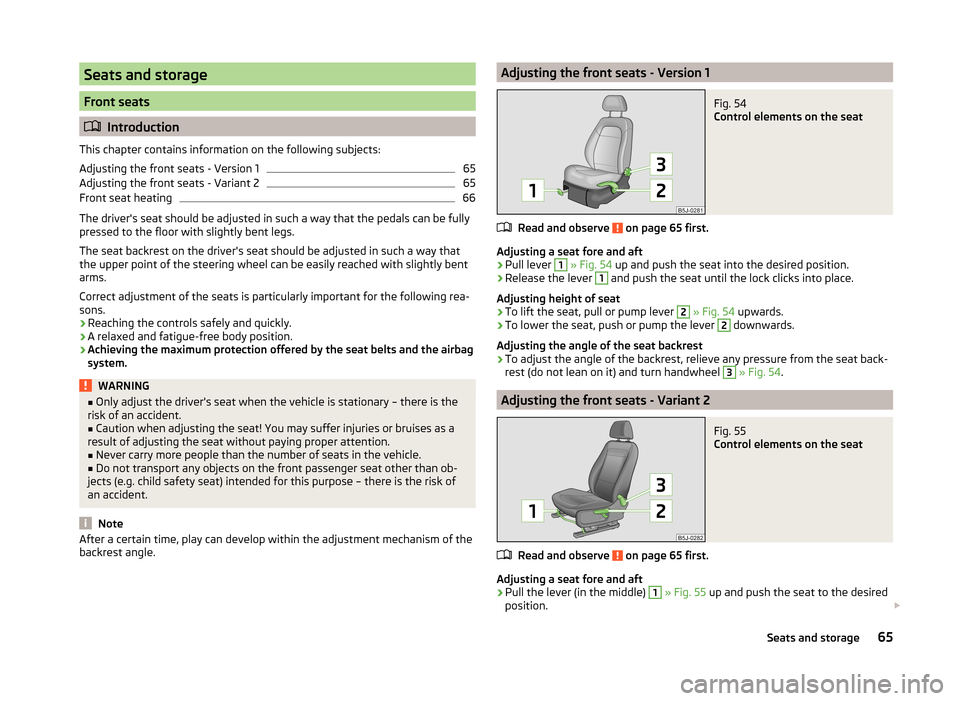
backrest angle.Adjusting the front seats - Version 1Fig. 54
Control elements on the seat
Read and observe on page 65 first.
Adjusting a seat fore and aft
›
Pull lever
1
» Fig. 54 up and push the seat into the desired position.
›
Release the lever
1
and push the seat until the lock clicks into place.
Adjusting height of seat
›
To lift the seat, pull or pump lever
2
» Fig. 54 upwards.
›
To lower the seat, push or pump the lever
2
downwards.
Adjusting the angle of the seat backrest
›
To adjust the angle of the backrest, relieve any pressure from the seat back-
rest (do not lean on it) and turn handwheel
3
» Fig. 54 .
Adjusting the front seats - Variant 2
Fig. 55
Control elements on the seat
Read and observe on page 65 first.
Adjusting a seat fore and aft
›
Pull the lever (in the middle)
1
» Fig. 55 up and push the seat to the desired
position.
65Seats and storage
Page 68 of 197
›Release the lever 1 and push the seat until the lock clicks into place.
Adjusting height of seat›
To lift the seat, pull or pump lever
2
» Fig. 55 upwards.
›
To lower the seat, push or pump the lever
2
downwards.
Adjusting the angle of the seat backrest
›
Relieve the load on the seat backrest (do not lean on it), pull the lever
3
» Fig. 55 towards the rear and set the desired angle of the seat backrest
with the back.
›
After releasing the lever
3
, the seat backrest will remain in the set position.
Front seat heating
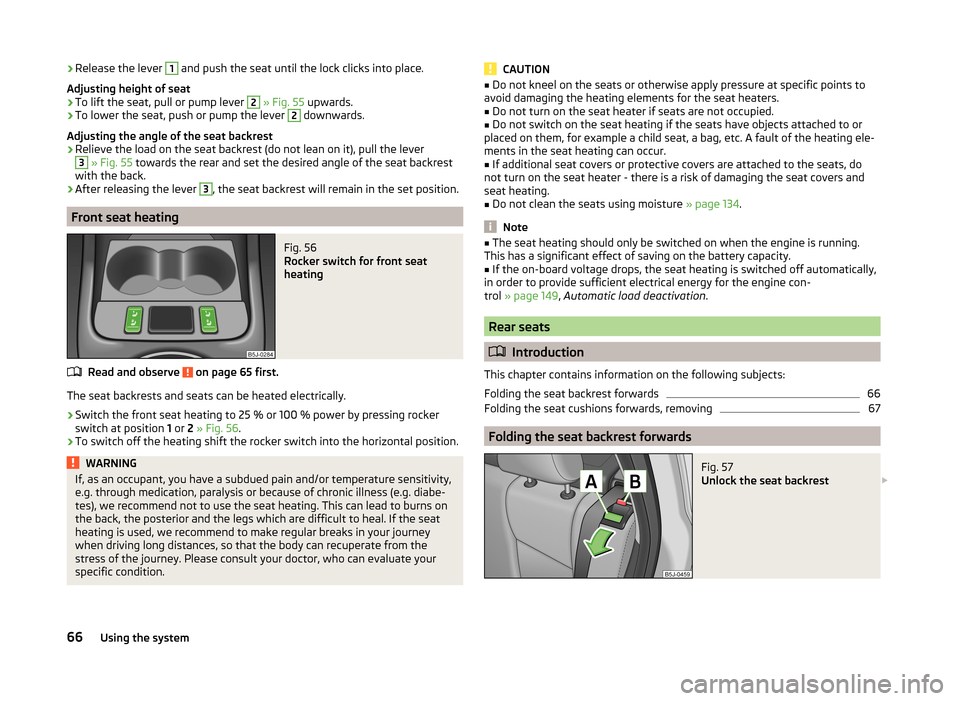
Fig. 56
Rocker switch for front seat
heating
Read and observe on page 65 first.
The seat backrests and seats can be heated electrically.
›
Switch the front seat heating to 25 % or 100 % power by pressing rocker
switch at position 1 or 2 » Fig. 56 .
›
To switch off the heating shift the rocker switch into the horizontal position.
WARNINGIf, as an occupant, you have a subdued pain and/or temperature sensitivity,
e.g. through medication, paralysis or because of chronic illness (e.g. diabe-
tes), we recommend not to use the seat heating. This can lead to burns on
the back, the posterior and the legs which are difficult to heal. If the seat
heating is used, we recommend to make regular breaks in your journey
when driving long distances, so that the body can recuperate from the
stress of the journey. Please consult your doctor, who can evaluate your
specific condition.CAUTION■ Do not kneel on the seats or otherwise apply pressure at specific points to
avoid damaging the heating elements for the seat heaters.■
Do not turn on the seat heater if seats are not occupied.
■
Do not switch on the seat heating if the seats have objects attached to or
placed on them, for example a child seat, a bag, etc. A fault of the heating ele-
ments in the seat heating can occur.
■
If additional seat covers or protective covers are attached to the seats, do
not turn on the seat heater - there is a risk of damaging the seat covers and
seat heating.
■
Do not clean the seats using moisture » page 134.
Note
■
The seat heating should only be switched on when the engine is running.
This has a significant effect of saving on the battery capacity.■
If the on-board voltage drops, the seat heating is switched off automatically,
in order to provide sufficient electrical energy for the engine con-
trol » page 149 , Automatic load deactivation .
Rear seats
Introduction
This chapter contains information on the following subjects:
Folding the seat backrest forwards
66
Folding the seat cushions forwards, removing
67
Folding the seat backrest forwards
Fig. 57
Unlock the seat backrest
66Using the system
Page 70 of 197
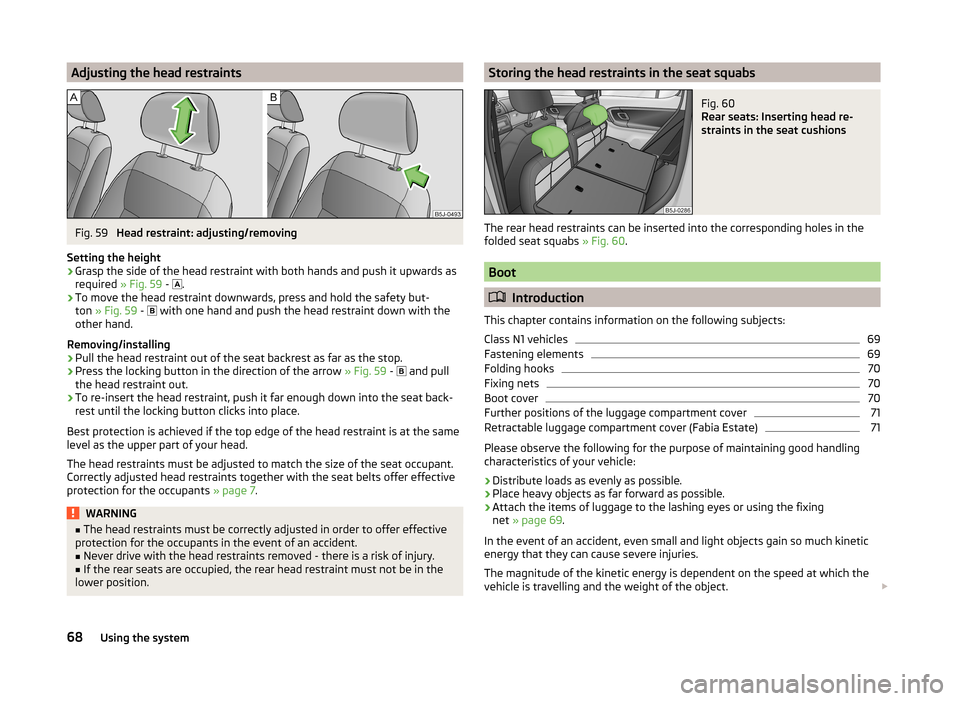
Adjusting the head restraintsFig. 59
Head restraint: adjusting/removing
Setting the height
›
Grasp the side of the head restraint with both hands and push it upwards as
required » Fig. 59 -
.
›
To move the head restraint downwards, press and hold the safety but-
ton » Fig. 59 -
with one hand and push the head restraint down with the
other hand.
Removing/installing
›
Pull the head restraint out of the seat backrest as far as the stop.
›
Press the locking button in the direction of the arrow » Fig. 59 -
and pull
the head restraint out.
›
To re-insert the head restraint, push it far enough down into the seat back-
rest until the locking button clicks into place.
Best protection is achieved if the top edge of the head restraint is at the same
level as the upper part of your head.
The head restraints must be adjusted to match the size of the seat occupant.
Correctly adjusted head restraints together with the seat belts offer effective
protection for the occupants » page 7.
WARNING■
The head restraints must be correctly adjusted in order to offer effective
protection for the occupants in the event of an accident.■
Never drive with the head restraints removed - there is a risk of injury.
■
If the rear seats are occupied, the rear head restraint must not be in the
lower position.
Storing the head restraints in the seat squabsFig. 60
Rear seats: Inserting head re-
straints in the seat cushions
The rear head restraints can be inserted into the corresponding holes in the folded seat squabs » Fig. 60.
Boot
Introduction
This chapter contains information on the following subjects:
Class N1 vehicles
69
Fastening elements
69
Folding hooks
70
Fixing nets
70
Boot cover
70
Further positions of the luggage compartment cover
71
Retractable luggage compartment cover (Fabia Estate)
71
Please observe the following for the purpose of maintaining good handling
characteristics of your vehicle:
›
Distribute loads as evenly as possible.
›
Place heavy objects as far forward as possible.
›
Attach the items of luggage to the lashing eyes or using the fixing
net » page 69 .
In the event of an accident, even small and light objects gain so much kinetic
energy that they can cause severe injuries.
The magnitude of the kinetic energy is dependent on the speed at which the
vehicle is travelling and the weight of the object.
68Using the system
Page 73 of 197
WARNINGNo objects should be placed on the boot cover, the vehicle occupants could
be endangered if there is sudden braking or the vehicle collides with some-
thing.
CAUTION
■ When closing the boot lid, jamming and damage to the luggage compartment
cover or the side trim panel can occur if handled in an unprofessional way. The
following guidelines must be observed. ■ The recesses in the cover 3
» Fig. 64 must lock in the holders in the side
trim panel
2
.
■ The items which are transported must not exceed the height of the lug-
gage compartment cover. ■ The cover must not be jammed in the seal of the boot lid when it is in the
opened position.
■ There must be no object in the gap between the opened cover and the rear
backrest.
Note
Opening the boot lid also lifts up the boot cover.
Further positions of the luggage compartment cover
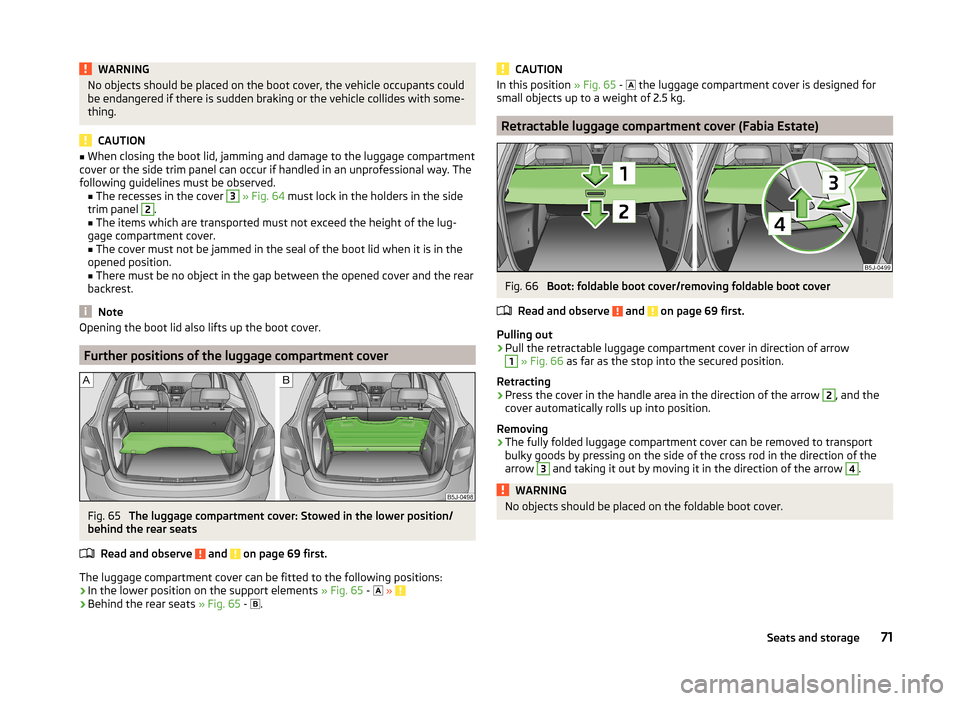
Fig. 65
The luggage compartment cover: Stowed in the lower position/
behind the rear seats
Read and observe
and on page 69 first.
The luggage compartment cover can be fitted to the following positions:› In the lower position on the support elements
» Fig. 65 -
»
› Behind the rear seats
» Fig. 65 -
.
CAUTIONIn this position
» Fig. 65 - the luggage compartment cover is designed for
small objects up to a weight of 2.5 kg.
Retractable luggage compartment cover (Fabia Estate)
Fig. 66
Boot: foldable boot cover/removing foldable boot cover
Read and observe
and on page 69 first.
Pulling out
›
Pull the retractable luggage compartment cover in direction of arrow
1
» Fig. 66 as far as the stop into the secured position.
Retracting
›
Press the cover in the handle area in the direction of the arrow
2
, and the
cover automatically rolls up into position.
Removing
›
The fully folded luggage compartment cover can be removed to transport
bulky goods by pressing on the side of the cross rod in the direction of the
arrow
3
and taking it out by moving it in the direction of the arrow
4
.
WARNINGNo objects should be placed on the foldable boot cover.71Seats and storage