manual radio set SKODA FABIA 2014 3.G / NJ Bolero Car Radio Manual
[x] Cancel search | Manufacturer: SKODA, Model Year: 2014, Model line: FABIA, Model: SKODA FABIA 2014 3.G / NJPages: 60, PDF Size: 5.78 MB
Page 7 of 60
Description of the deviceFig. 1
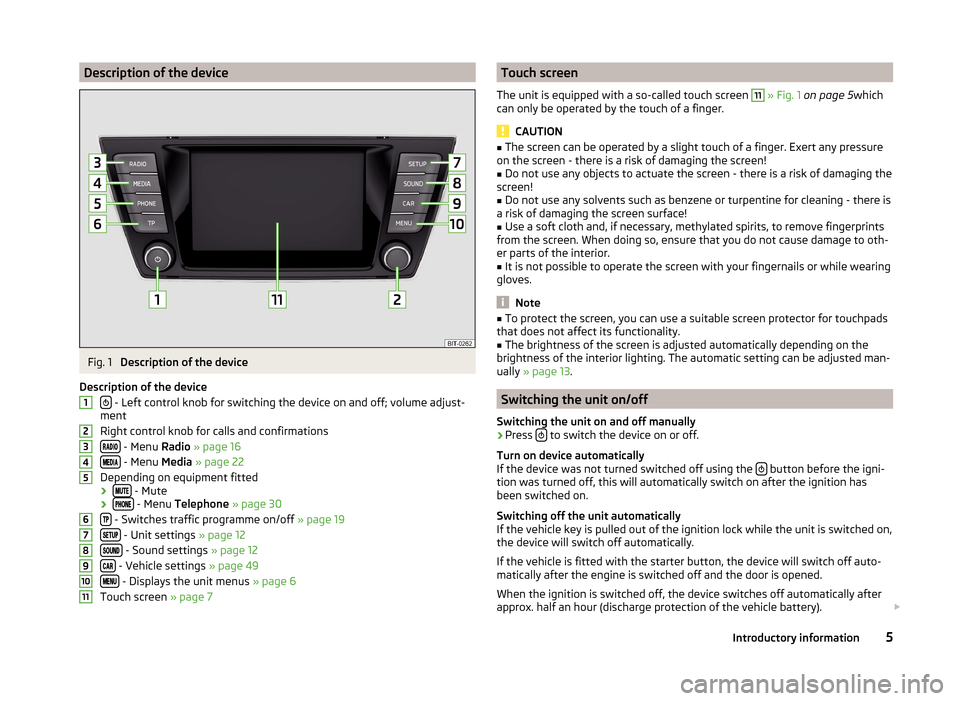
Description of the device
Description of the device
- Left control knob for switching the device on and off; volume adjust-
ment
Right control knob for calls and confirmations
- Menu Radio » page 16
- Menu Media » page 22
Depending on equipment fitted ›
- Mute
› - Menu
Telephone » page 30
- Switches traffic programme on/off » page 19
- Unit settings » page 12
- Sound settings » page 12
- Vehicle settings » page 49
- Displays the unit menus » page 6
Touch screen » page 7
1234567891011Touch screen
The unit is equipped with a so-called touch screen 11
» Fig. 1 on page 5 which
can only be operated by the touch of a finger.
CAUTION
■ The screen can be operated by a slight touch of a finger. Exert any pressure
on the screen - there is a risk of damaging the screen!■
Do not use any objects to actuate the screen - there is a risk of damaging the
screen!
■
Do not use any solvents such as benzene or turpentine for cleaning - there is
a risk of damaging the screen surface!
■
Use a soft cloth and, if necessary, methylated spirits, to remove fingerprints
from the screen. When doing so, ensure that you do not cause damage to oth-
er parts of the interior.
■
It is not possible to operate the screen with your fingernails or while wearing
gloves.
Note
■ To protect the screen, you can use a suitable screen protector for touchpads
that does not affect its functionality.■
The brightness of the screen is adjusted automatically depending on the
brightness of the interior lighting. The automatic setting can be adjusted man-
ually » page 13 .
Switching the unit on/off
Switching the unit on and off manually
›
Press to switch the device on or off.
Turn on device automatically
If the device was not turned switched off using the
button before the igni-
tion was turned off, this will automatically switch on after the ignition has
been switched on.
Switching off the unit automatically
If the vehicle key is pulled out of the ignition lock while the unit is switched on,
the device will switch off automatically.
If the vehicle is fitted with the starter button, the device will switch off auto-
matically after the engine is switched off and the door is opened.
When the ignition is switched off, the device switches off automatically after
approx. half an hour (discharge protection of the vehicle battery).
5Introductory information
Page 10 of 60
Alphanumeric with keyboardFig. 4
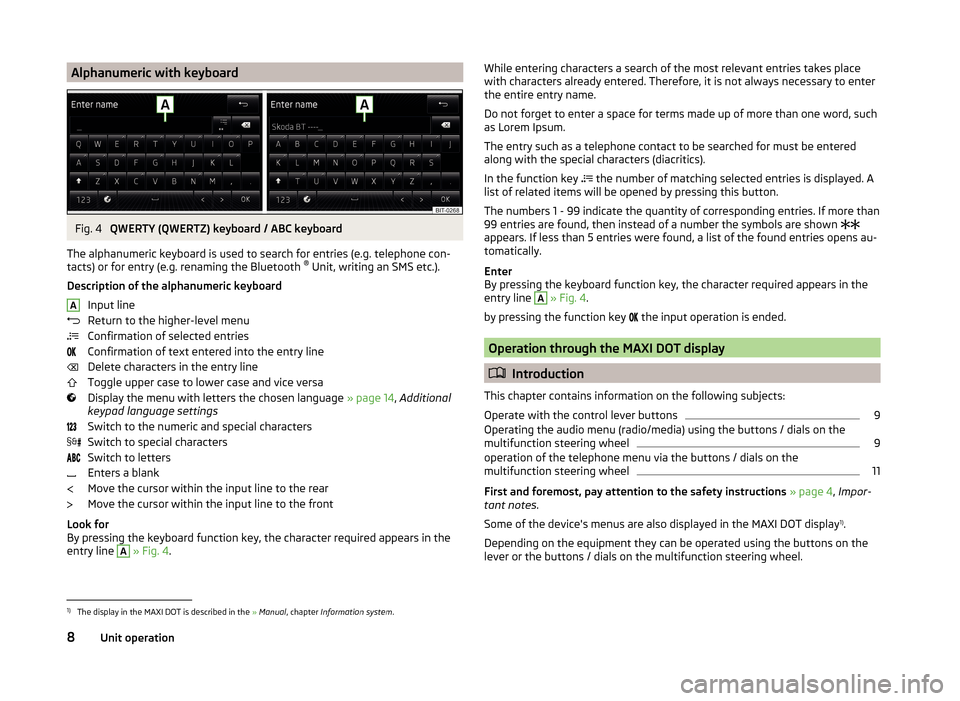
QWERTY (QWERTZ) keyboard / ABC keyboard
The alphanumeric keyboard is used to search for entries (e.g. telephone con-
tacts) or for entry (e.g. renaming the Bluetooth ®
Unit, writing an SMS etc.).
Description of the alphanumeric keyboard Input line
Return to the higher-level menu
Confirmation of selected entries
Confirmation of text entered into the entry line
Delete characters in the entry line
Toggle upper case to lower case and vice versa
Display the menu with letters the chosen language » page 14, Additional
keypad language settings
Switch to the numeric and special characters
Switch to special characters
Switch to letters
Enters a blank
Move the cursor within the input line to the rear
Move the cursor within the input line to the front
Look for
By pressing the keyboard function key, the character required appears in the
entry line
A
» Fig. 4 .
AWhile entering characters a search of the most relevant entries takes place
with characters already entered. Therefore, it is not always necessary to enter
the entire entry name.
Do not forget to enter a space for terms made up of more than one word, such
as Lorem Ipsum.
The entry such as a telephone contact to be searched for must be entered
along with the special characters (diacritics).
In the function key
the number of matching selected entries is displayed. A
list of related items will be opened by pressing this button.
The numbers 1 - 99 indicate the quantity of corresponding entries. If more than 99 entries are found, then instead of a number the symbols are shown
appears. If less than 5 entries were found, a list of the found entries opens au-
tomatically.
Enter
By pressing the keyboard function key, the character required appears in the
entry line A
» Fig. 4 .
by pressing the function key the input operation is ended.
Operation through the MAXI DOT display
Introduction
This chapter contains information on the following subjects:
Operate with the control lever buttons
9
Operating the audio menu (radio/media) using the buttons / dials on the
multifunction steering wheel
9
operation of the telephone menu via the buttons / dials on the
multifunction steering wheel
11
First and foremost, pay attention to the safety instructions » page 4 , Impor-
tant notes .
Some of the device's menus are also displayed in the MAXI DOT display 1)
.
Depending on the equipment they can be operated using the buttons on the
lever or the buttons / dials on the multifunction steering wheel.
1)
The display in the MAXI DOT is described in the » Manual , chapter Information system .
8Unit operation
Page 18 of 60
Radio
Operation
Introduction
This chapter contains information on the following subjects:
Main menu
16
Radio DAB text and images presentation
17
Select the frequency range
17
List of available stations
17
Search and select available stations
18
Save radio station
18
Station logos
19
TP Traffic programme
19
First and foremost, pay attention to the safety instructions » page 4 , Impor-
tant notes .
The device allows analogue radio reception of FM and AM frequency ranges as
well as DAB digital radio reception.
CAUTION
For vehicles with window antennas do not stick foil or metal coated stickers to
the window as this can lead to interference.
Note
■ Car parks, tunnels, tall buildings or mountains can interfere with the radio
signal even causing it to fail completely.■
In countries where the RDS function is not supported, we recommend turn-
ing off the AF and RDS function.
Main menuFig. 9
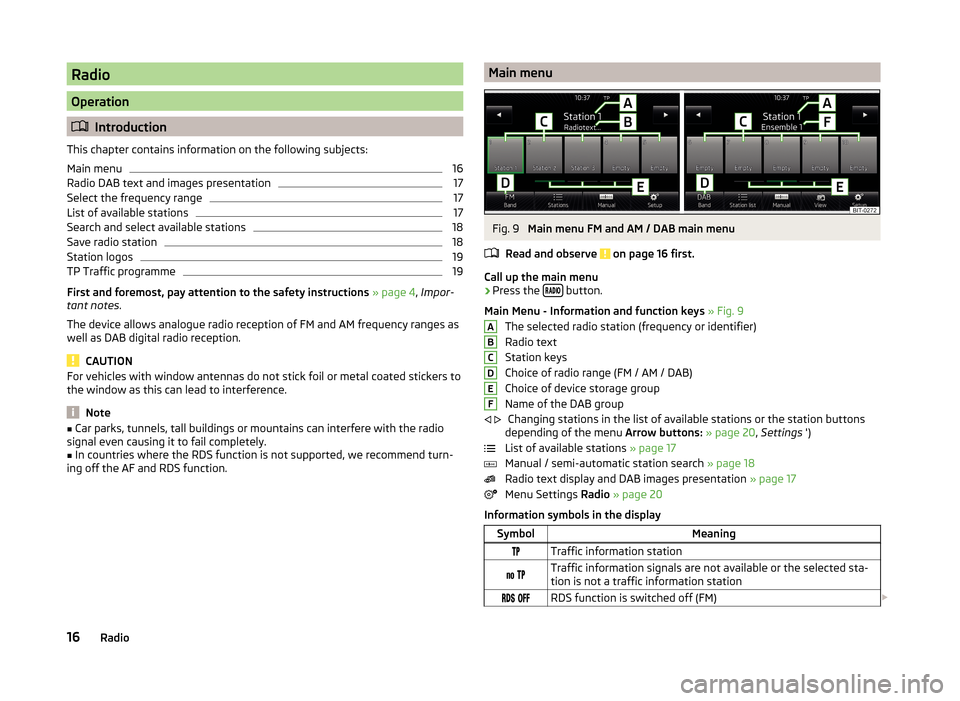
Main menu FM and AM / DAB main menu
Read and observe
on page 16 first.
Call up the main menu
›
Press the button.
Main Menu - Information and function keys » Fig. 9
The selected radio station (frequency or identifier)
Radio text
Station keys
Choice of radio range (FM / AM / DAB)
Choice of device storage group
Name of the DAB group Changing stations in the list of available stations or the station buttons
depending of the menu Arrow buttons: » page 20 , Settings ')
List of available stations » page 17
Manual / semi-automatic station search » page 18
Radio text display and DAB images presentation » page 17
Menu Settings Radio » page 20
Information symbols in the display
SymbolMeaningTraffic information station Traffic information signals are not available or the selected sta-
tion is not a traffic information station RDS function is switched off (FM) ABCDEF
16Radio
Page 20 of 60
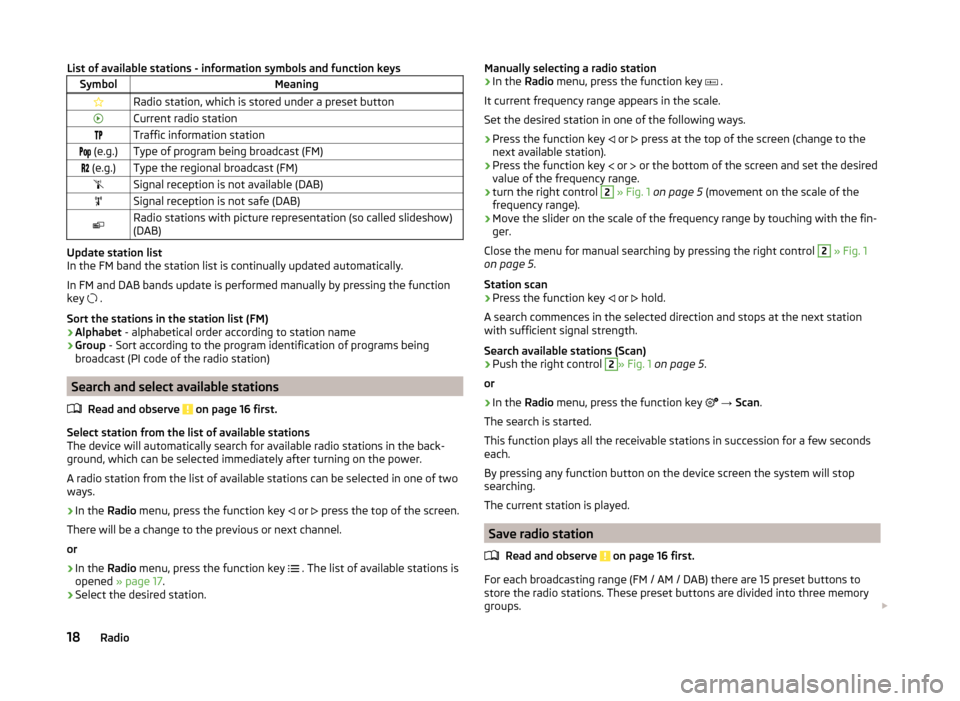
List of available stations - information symbols and function keysSymbolMeaningRadio station, which is stored under a preset buttonCurrent radio stationTraffic information station (e.g.)Type of program being broadcast (FM) (e.g.)Type the regional broadcast (FM)Signal reception is not available (DAB)Signal reception is not safe (DAB)Radio stations with picture representation (so called slideshow)
(DAB)
Update station list
In the FM band the station list is continually updated automatically.
In FM and DAB bands update is performed manually by pressing the function
key .
Sort the stations in the station list (FM) › Alphabet
- alphabetical order according to station name
› Group
- Sort according to the program identification of programs being
broadcast (PI code of the radio station)
Search and select available stations
Read and observe
on page 16 first.
Select station from the list of available stations
The device will automatically search for available radio stations in the back-
ground, which can be selected immediately after turning on the power.
A radio station from the list of available stations can be selected in one of two
ways.
›
In the Radio menu, press the function key
or
press the top of the screen.
There will be a change to the previous or next channel.
or
›
In the Radio menu, press the function key
. The list of available stations is
opened » page 17 .
›
Select the desired station.
Manually selecting a radio station›In the Radio menu, press the function key .
It current frequency range appears in the scale.
Set the desired station in one of the following ways.›
Press the function key
or
press at the top of the screen (change to the
next available station).
›
Press the function key
or
or the bottom of the screen and set the desired
value of the frequency range.
›
turn the right control
2
» Fig. 1 on page 5 (movement on the scale of the
frequency range).
›
Move the slider on the scale of the frequency range by touching with the fin-
ger.
Close the menu for manual searching by pressing the right control
2
» Fig. 1
on page 5 .
Station scan
›
Press the function key or
hold.
A search commences in the selected direction and stops at the next station with sufficient signal strength.
Search available stations (Scan)
›
Push the right control
2
» Fig. 1 on page 5 .
or
›
In the Radio menu, press the function key
→ Scan .
The search is started.
This function plays all the receivable stations in succession for a few seconds
each.
By pressing any function button on the device screen the system will stop
searching.
The current station is played.
Save radio station
Read and observe
on page 16 first.
For each broadcasting range (FM / AM / DAB) there are 15 preset buttons to
store the radio stations. These preset buttons are divided into three memory
groups.
18Radio
Page 21 of 60
A radio station can be stored in the device memory in one of the following
ways.
Save station from the menu Radio›
In the menu Radio press and hold the desired station button
C
» Fig. 9 on
page 16 until you hear an acoustic signal.
If a station was already stored in the desired position it is replaced with the
currently selected station.
Save station from the station list
›
In the list of available stations » page 17 press the function key of the desired
station longer.
A list of the station keys
C
is shown as well as a list of the functions keys for
the storage groups
E
» Fig. 9 on page 16 .
›
Select a storage group.
›
Press the station button.
The station is stored under the selected station button.
Station logos
Read and observe
on page 16 first.
With the present buttons
C
» Fig. 9 on page 16 logos (images) can be linked or
removed to/from the radio stations.
Store station logos automatically (FM / DAB)
›
Before you store the radio station to a station button function key press in
the Radio menu the function key
→ Advanced settings .
›
Activate the menu item Auto-save station logos » page 20 , Advanced Set-
tings (FM) and » page 20 , Advanced setup (DAB) .
When you save the station to a station button, the station is assigned a logo
from the device memory if the logo is available in the memory.
Assign channel logo manually
A logo can be assigned or removed manually from the previously stored sta-
tions.
›
Press the function key
→ Station logos .
A menu with preset buttons for radio stations is displayed.
›
Press the preset button for the station, which a logo is to be assigned to.
A menu of media (CD, SD card, USB) is displayed.
› In the relevant media select the image you want to have.
By selection of the image it is assigned to the relevant station button.
Remove channel logo manually›
Press the function key
→ Station logos .
A menu with preset buttons for radio stations is displayed.
›
Press the preset button for the station, which a logo is to be removed from.
The logo is removed from the station button.
Note
■ The following image formats are supported: jpg, gif, png, bmp.■We recommend a resolution of up to 500 x 500 pixels.■
The information about radio station updates can be found on the ŠKODA In-
ternet pages www.infotainment.skoda-auto.com .
TP Traffic programme
Read and observe
on page 16 first.
The function allows the reception of traffic information.
Switching the traffic information station on and off manually
›
Press the button.
or
›
In the Radio menu, press the function key
.
›
Enable or disable the menu item
Traffic program (TP).
Current traffic reports
During a traffic announcement, the following menu is displayed.
›
Cancel - interruption of the current traffic report. The TP function remains
activated.
›
Deactivate - Interrupt the current traffic report and turn off TP function.
Note
■
Should this radio station not transmit traffic reports or the signal is not avail-
able, then the device automatically searches in the background for another TP
station.■
During playback in menu Media or a radio station in the AM range, traffic
news is received from the previously selected FM radio station.
19Radio
Page 22 of 60
Settings
Introduction
This chapter contains information on the following subjects:
Settings
20
Advanced Settings (FM)
20
Advanced setup (DAB)
20
First and foremost, pay attention to the safety instructions » page 4 , Impor-
tant notes .
The basic setting of the Radio menu functions is the same for all broadcast
ranges.
The Advanced setup menu is different for FM and DAB. The AM broadcast area
does not have this menu.
Settings
›
In the Radio menu, press the function key
.
■ Sound - Sound settings » page 12, Sound settings
■ Scan - Auto-play all stations in the current frequency band, each station for
around five seconds.
■ Arrow buttons: - Set the station select function in the Radio menu
■ Preset list - Change between stations stored under the preset buttons
■ Station list - Change between all receivable radio stations of the selected
frequency band
■ Traffic program (TP) - Switches traffic programme on/off
■ Delete presets - Deletes the preset buttons
■ - Delete a particular radio station
■
Delete all - Delete all stored stations
■ Station logos - manual assignment /removal of station logos » page 19, Sta-
tion logos
■ Radio text - Switching the text display radio (FM and DAB) on and off
■ Advanced setup - another setting that is different depending on the selec-
ted broadcasting range(FM and DAB)
Advanced Settings (FM)
›
Select the FM band in the Radio menu, and press the function key
→ Ad-
vanced settings .
■
Alternative frequency (AF) - Switching on/off the search for alternative fre-
quencies of the station currently being heard, when you turn off AF off is dis-
played on the device screen
■ Radio Data System (RDS) - Switches on/off the RDS function
■ RDS Regional: - Switch on/off the automatic tracking of related regional sta-
tions ■ Fixed - Maintains the selected regional station continuously. When the sig-
nal is lost, another regional station must be set manually.
■ Automatic - Auto-selects the station with the best reception at the mo-
ment. If you lose reception the region, the unit will automatically set anoth-
er available region.
■ Auto-save station logos - Automatic storage of the station logos » page 19,
Station logos
Advanced setup (DAB)
›
Select the DAB band in the Radio menu, and press the function key
→
Advanced settings .
■ Auto-save station logos - Automatic association of the logo with station de-
tected » page 19
■ DAB traffic announcements - Switch on/off DAB announcements
■ Other DAB messages - Switch on/off other announcements (e.g., warnings,
regional weather, sports reports, financial news)
■ DAB - DAB station tracking - Switch on/off automatic DAB station tracking in
other station groups
■ Automatic DAB - FM switching - Switch on/off auto-switching from DAB to
the FM frequency band if the DAB signal is lost
■ L-Band - Switch on/off the automatic DAB station search in L-band
DAB station tracking
If a DAB station is a member of several sender groups, when the signal is poor,
the same station is searched in a different sender group.
Auto-change DAB -FM
With bad DAB reception the device tries to find an FM transmitter.
› The station name is followed by (
) while the station is being received on
the FM band. The ( ) marker disappears when the relevant DAB station can
be received again.
› If a DAB station is also not available in the FM band due to poor reception,
the device will be switched to mute.
20Radio
Page 33 of 60
WARNING (Continued)■Never leave a telephone in the deployment area of an airbag, on a seat,
on the dash panel or in another area, from which it can be thrown during a
sudden braking manoeuvre, an accident or a collision - there is a risk of in-
jury. There are storage compartments with lids and if necessary there is the
multimedia storage compartments to hold this » Vehicle owner's manual ,
chapter Transport and practical equipment .■
Before transport of the vehicle by air, the Bluetooth ®
function must be
switched off by a specialist company.
CAUTION
■ In areas with no signal and possibly in tunnels, garages and subways a tele-
phone conversation can be interrupted and no telephone connection can be
established - not even in an emergency!■
We recommend that mobile telephones and two-way radio systems be in-
stalled in the vehicle by a specialist workshop.
■
Most modern electronic equipment is shielded from RF signals. In exceptional
cases, electronic equipment may not be shielded against the RF signals and
telephone service may be disrupted.
Note
■ The range of the telephone connection to the device using the Bluetooth ®
profile is limited to the vehicle interior. The range is dependent on local condi-
tions, e.g. obstacles between the devices and mutual interferences with other
devices. If your telephone is in a jacket pocket, for example, this can lead to
difficulties when establishing a connection with the device or transferring da-
ta.■
The functionality of the telephone is dependent on the telephone service op-
erator and the telephone being used. Further information is available from the
telephone service operator or can be taken from the telephone manual.
■
In some countries the connection via the Bluetooth ®
function, may be limi-
ted. Further information can be obtained from local authorities.
Main menuFig. 19
Telephone: Main menu
Read and observe and on page 30 first.
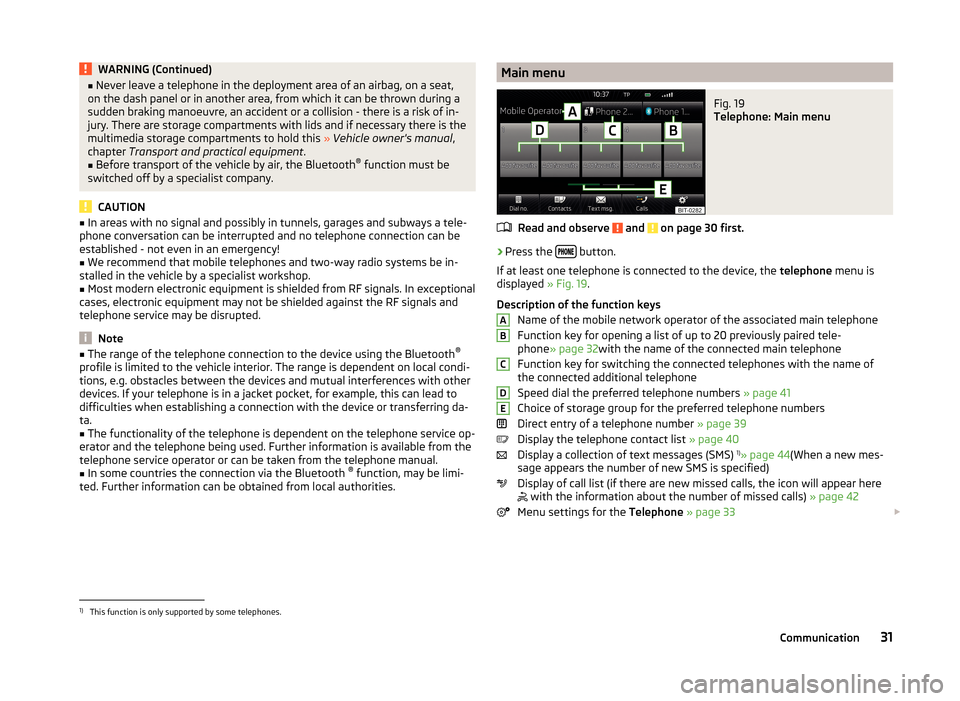
›
Press the button.
If at least one telephone is connected to the device, the telephone menu is
displayed » Fig. 19.
Description of the function keys Name of the mobile network operator of the associated main telephone
Function key for opening a list of up to 20 previously paired tele-
phone » page 32 with the name of the connected main telephone
Function key for switching the connected telephones with the name of
the connected additional telephone
Speed dial the preferred telephone numbers » page 41
Choice of storage group for the preferred telephone numbers
Direct entry of a telephone number » page 39
Display the telephone contact list » page 40
Display a collection of text messages (SMS) 1)
» page 44 (When a new mes-
sage appears the number of new SMS is specified)
Display of call list (if there are new missed calls, the icon will appear here
with the information about the number of missed calls)
» page 42
Menu settings for the Telephone » page 33
ABCDE1)
This function is only supported by some telephones.
31Communication
Page 51 of 60
Vehicle systems
Vehicle settings - CAR
Introduction
This chapter contains information on the following subjects:
Driving data
49
Vehicle status
49
ESC-and TCS systems
50
Tyres
50
Assistance systems
50
Parking and manoeuvring
50
Light
51
Windscreen wipers
51
Opening and closing
51
Instrument cluster (multifunction display)
51
Time, date and unit setting
51
Service
52
Restore factory settings
52
First and foremost, pay attention to the safety instructions » page 4 , Impor-
tant notes .
In the menu CAR travel data and information displayed on the vehicle condi-
tion and some vehicle systems can be set.
After pressing the button
the last displayed function is displayed on the
screen » page 49 , Driving data or » page 49 , Vehicle status .
Function keys » Fig. 28 on page 49
Travel data / vehicle status Operation of the radio / media playback » page 16, » page 22
Vehicle system settings
Note
■ Description of the individual systems » Vehicle Owner's Manual .■Settings relating to the vehicle systems can only be made when the ignition
is switched on. Driving dataFig. 28
Driving data
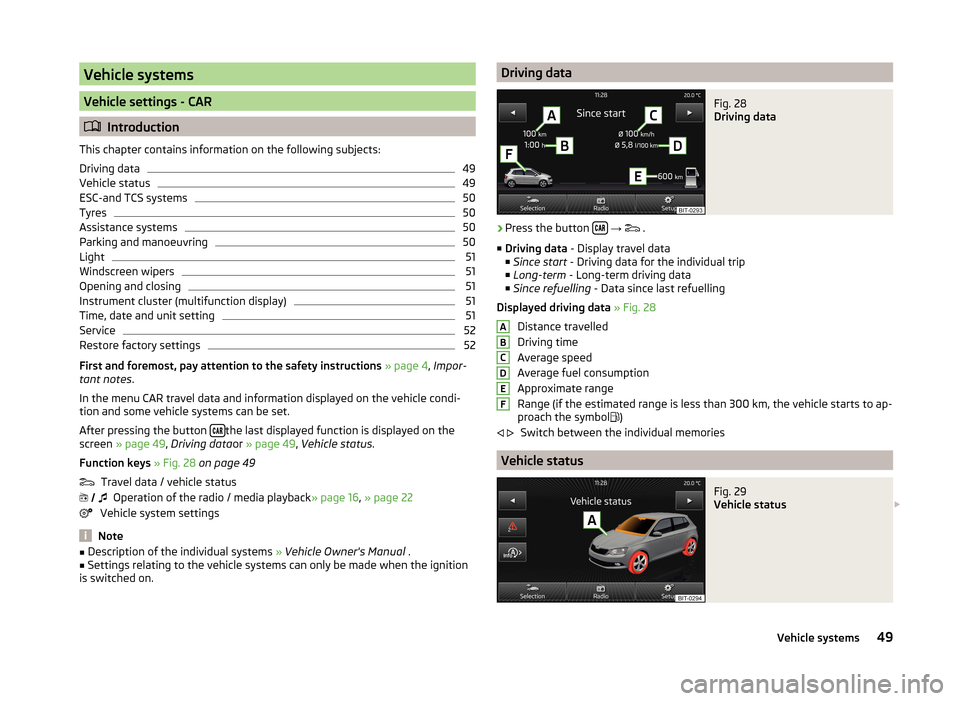
›
Press the button
→
.
■ Driving data - Display travel data
■ Since start - Driving data for the individual trip
■ Long-term - Long-term driving data
■ Since refuelling - Data since last refuelling
Displayed driving data » Fig. 28
Distance travelled
Driving time
Average speed
Average fuel consumption
Approximate range
Range (if the estimated range is less than 300 km, the vehicle starts to ap-
proach the symbol )
Switch between the individual memories
Vehicle status
Fig. 29
Vehicle status
ABCDEF
49Vehicle systems