door lock SKODA FABIA 2014 3.G / NJ Operating Instruction Manual
[x] Cancel search | Manufacturer: SKODA, Model Year: 2014, Model line: FABIA, Model: SKODA FABIA 2014 3.G / NJPages: 216, PDF Size: 30.9 MB
Page 58 of 216
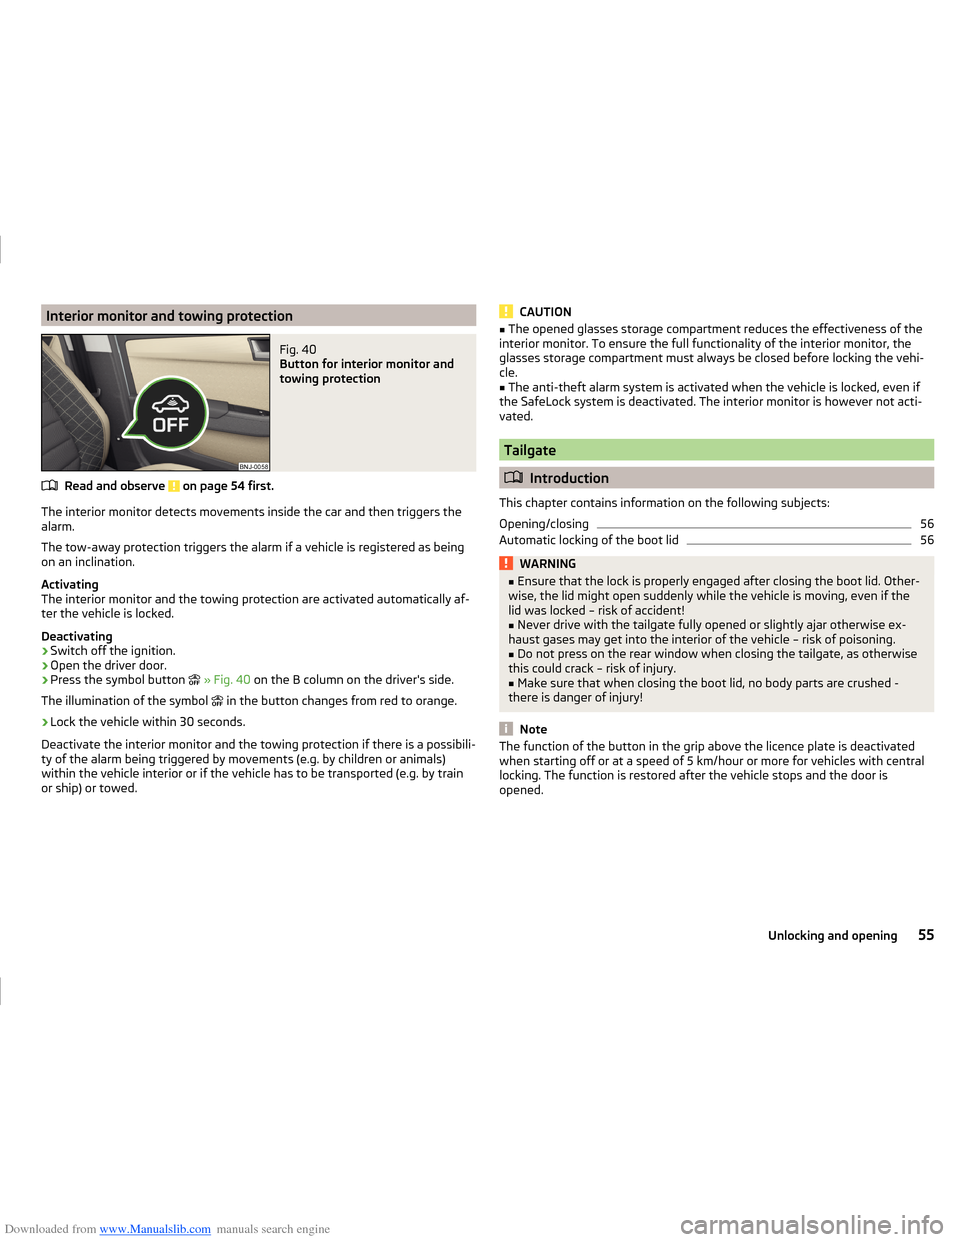
Downloaded from www.Manualslib.com manuals search engine Interior monitor and towing protectionFig. 40
Button for interior monitor and
towing protection
Read and observe on page 54 first.
The interior monitor detects movements inside the car and then triggers the
alarm.
The tow-away protection triggers the alarm if a vehicle is registered as being
on an inclination.
Activating
The interior monitor and the towing protection are activated automatically af-
ter the vehicle is locked.
Deactivating
›
Switch off the ignition.
›
Open the driver door.
›
Press the symbol button
» Fig. 40 on the B column on the driver's side.
The illumination of the symbol in the button changes from red to orange.
›
Lock the vehicle within 30 seconds.
Deactivate the interior monitor and the towing protection if there is a possibili-
ty of the alarm being triggered by movements (e.g. by children or animals)
within the vehicle interior or if the vehicle has to be transported (e.g. by train
or ship) or towed.
CAUTION■ The opened glasses storage compartment reduces the effectiveness of the
interior monitor. To ensure the full functionality of the interior monitor, the
glasses storage compartment must always be closed before locking the vehi-
cle.■
The anti-theft alarm system is activated when the vehicle is locked, even if
the SafeLock system is deactivated. The interior monitor is however not acti-
vated.
Tailgate
Introduction
This chapter contains information on the following subjects:
Opening/closing
56
Automatic locking of the boot lid
56WARNING■ Ensure that the lock is properly engaged after closing the boot lid. Other-
wise, the lid might open suddenly while the vehicle is moving, even if the
lid was locked – risk of accident!■
Never drive with the tailgate fully opened or slightly ajar otherwise ex-
haust gases may get into the interior of the vehicle – risk of poisoning.
■
Do not press on the rear window when closing the tailgate, as otherwise
this could crack – risk of injury.
■
Make sure that when closing the boot lid, no body parts are crushed -
there is danger of injury!
Note
The function of the button in the grip above the licence plate is deactivated
when starting off or at a speed of 5 km/hour or more for vehicles with central
locking. The function is restored after the vehicle stops and the door is
opened.55Unlocking and opening
Page 59 of 216
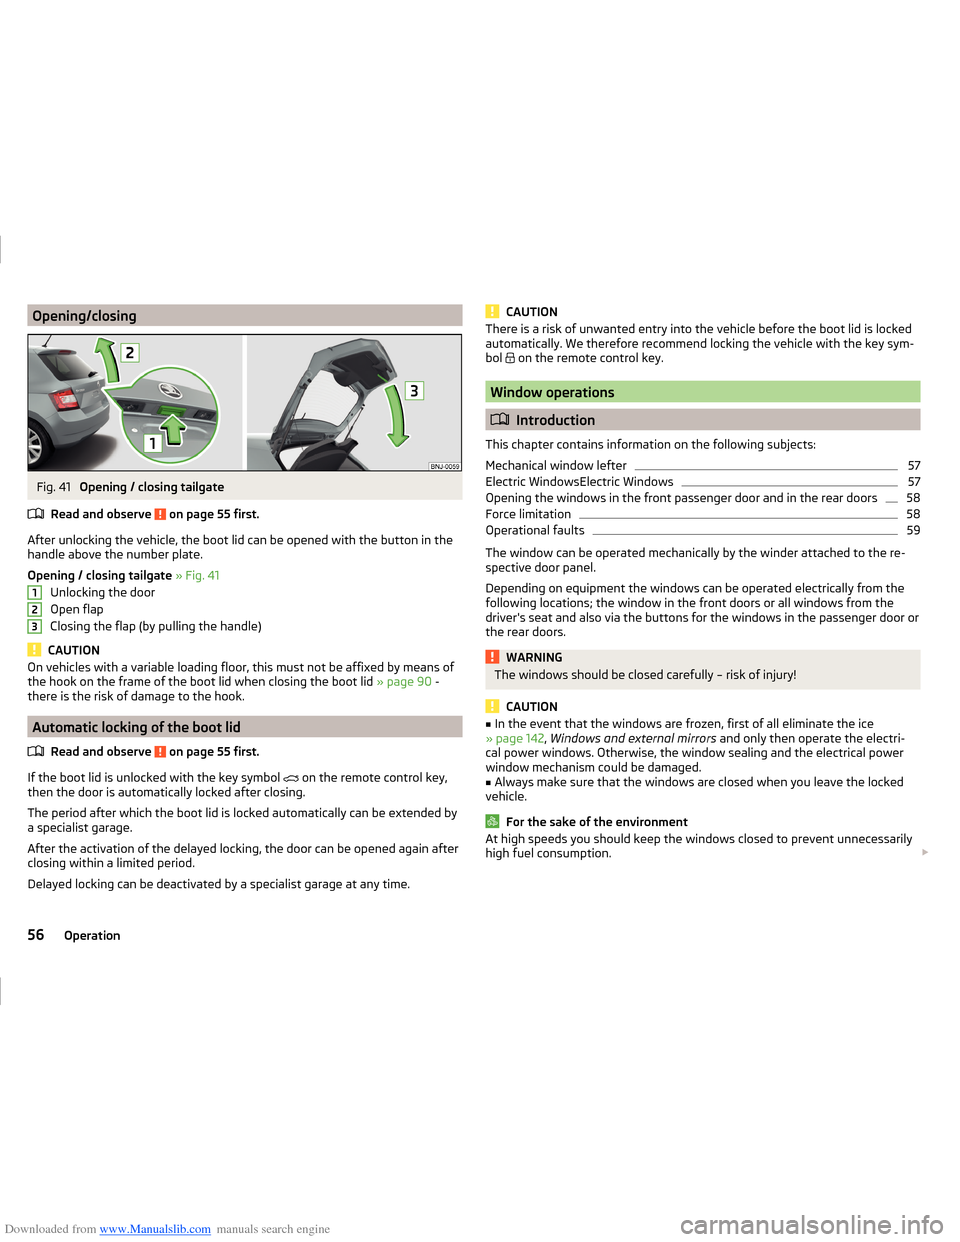
Downloaded from www.Manualslib.com manuals search engine Opening/closingFig. 41
Opening / closing tailgate
Read and observe
on page 55 first.
After unlocking the vehicle, the boot lid can be opened with the button in the
handle above the number plate.
Opening / closing tailgate » Fig. 41
Unlocking the door
Open flap
Closing the flap (by pulling the handle)
CAUTION
On vehicles with a variable loading floor, this must not be affixed by means of
the hook on the frame of the boot lid when closing the boot lid » page 90 -
there is the risk of damage to the hook.
Automatic locking of the boot lid
Read and observe
on page 55 first.
If the boot lid is unlocked with the key symbol
on the remote control key,
then the door is automatically locked after closing.
The period after which the boot lid is locked automatically can be extended by
a specialist garage.
After the activation of the delayed locking, the door can be opened again after
closing within a limited period.
Delayed locking can be deactivated by a specialist garage at any time.
123CAUTIONThere is a risk of unwanted entry into the vehicle before the boot lid is locked
automatically. We therefore recommend locking the vehicle with the key sym-
bol
on the remote control key.
Window operations
Introduction
This chapter contains information on the following subjects:
Mechanical window lefter
57
Electric WindowsElectric Windows
57
Opening the windows in the front passenger door and in the rear doors
58
Force limitation
58
Operational faults
59
The window can be operated mechanically by the winder attached to the re-
spective door panel.
Depending on equipment the windows can be operated electrically from the
following locations; the window in the front doors or all windows from the
driver's seat and also via the buttons for the windows in the passenger door or
the rear doors.
WARNINGThe windows should be closed carefully – risk of injury!
CAUTION
■ In the event that the windows are frozen, first of all eliminate the ice
» page 142 , Windows and external mirrors and only then operate the electri-
cal power windows. Otherwise, the window sealing and the electrical power
window mechanism could be damaged.■
Always make sure that the windows are closed when you leave the locked
vehicle.
For the sake of the environment
At high speeds you should keep the windows closed to prevent unnecessarily high fuel consumption. 56Operation
Page 60 of 216
Downloaded from www.Manualslib.com manuals search engine NoteWhen driving always use the existing heater, air conditioning and ventilation
system for ventilating the interior of the vehicle. If the windows are opened,
dust as well as other dirt can get into the vehicle and in addition the wind
noise is more at certain speeds.
Mechanical window lefter
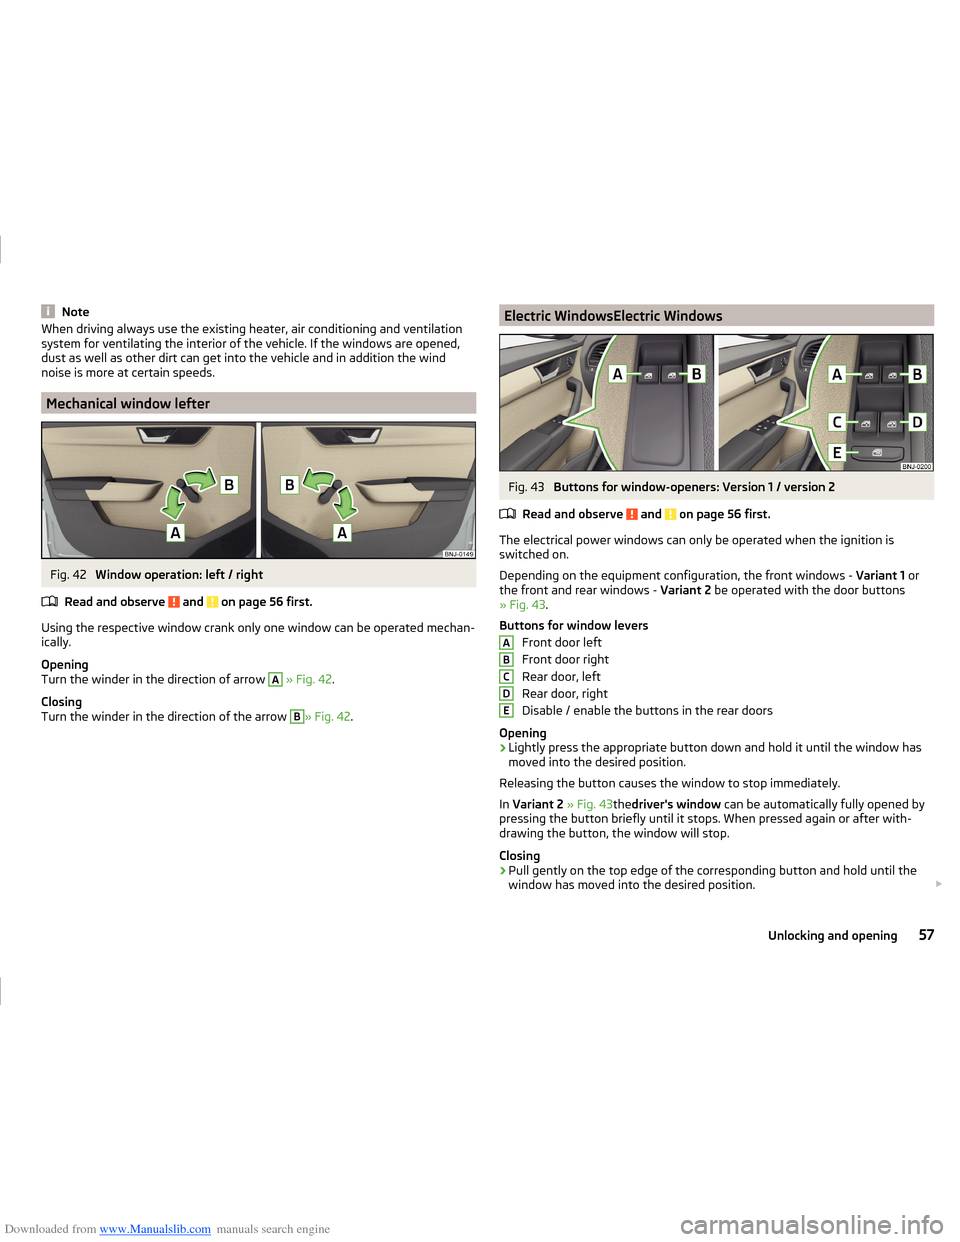
Fig. 42
Window operation: left / right
Read and observe
and on page 56 first.
Using the respective window crank only one window can be operated mechan-
ically.
Opening
Turn the winder in the direction of arrow
A
» Fig. 42 .
Closing
Turn the winder in the direction of the arrow
B
» Fig. 42 .
Electric WindowsElectric WindowsFig. 43
Buttons for window-openers: Version 1 / version 2
Read and observe
and on page 56 first.
The electrical power windows can only be operated when the ignition is
switched on.
Depending on the equipment configuration, the front windows - Variant 1 or
the front and rear windows - Variant 2 be operated with the door buttons
» Fig. 43 .
Buttons for window levers Front door left
Front door right
Rear door, left
Rear door, right
Disable / enable the buttons in the rear doors
Opening
›
Lightly press the appropriate button down and hold it until the window has
moved into the desired position.
Releasing the button causes the window to stop immediately.
In Variant 2 » Fig. 43thedriver's window can be automatically fully opened by
pressing the button briefly until it stops. When pressed again or after with-
drawing the button, the window will stop.
Closing
›
Pull gently on the top edge of the corresponding button and hold until the
window has moved into the desired position.
ABCDE57Unlocking and opening
Page 66 of 216
Downloaded from www.Manualslib.com manuals search engine NoteWhile driving with an accessory connected to the trailer socket (e.g. trailer,
bike carrier) only the equipment is illuminated by the fog light. The towing de-
vice must be installed at the factory or from the ŠKODA original accessories.
COMING HOME / LEAVING HOME
Read and observe
on page 59 first.
The function COMING HOME ensures that the vehicle's environment is illumi-
nated after switching off the ignition and opening the driver's door.
The function LEAVING HOME ensures that the vehicle's environment is illumi-
nated after unlocking the vehicle with the radio remote control unit.
The function switches the light on only if there is poorer visibility and the light
switch is in the position .
Enabling / disabling and setting functions
The functions and setting of the lighting duration can be activated or deactiva-
ted in the Infotainment system » Operating instructions Infotainment , chap-
ter CARVehicle settings .
CAUTION
■
Poorer visibility is detected by a sensor mounted below the windscreen in
the holder of the inside mirror or in the control panel. Do not attach any stick-
ers or similar objects in front of the sensor in order to avoid impairing the func-
tion or its reliability.■
If this option is always enabled, then the battery is heavily loaded.
Hazard warning light system
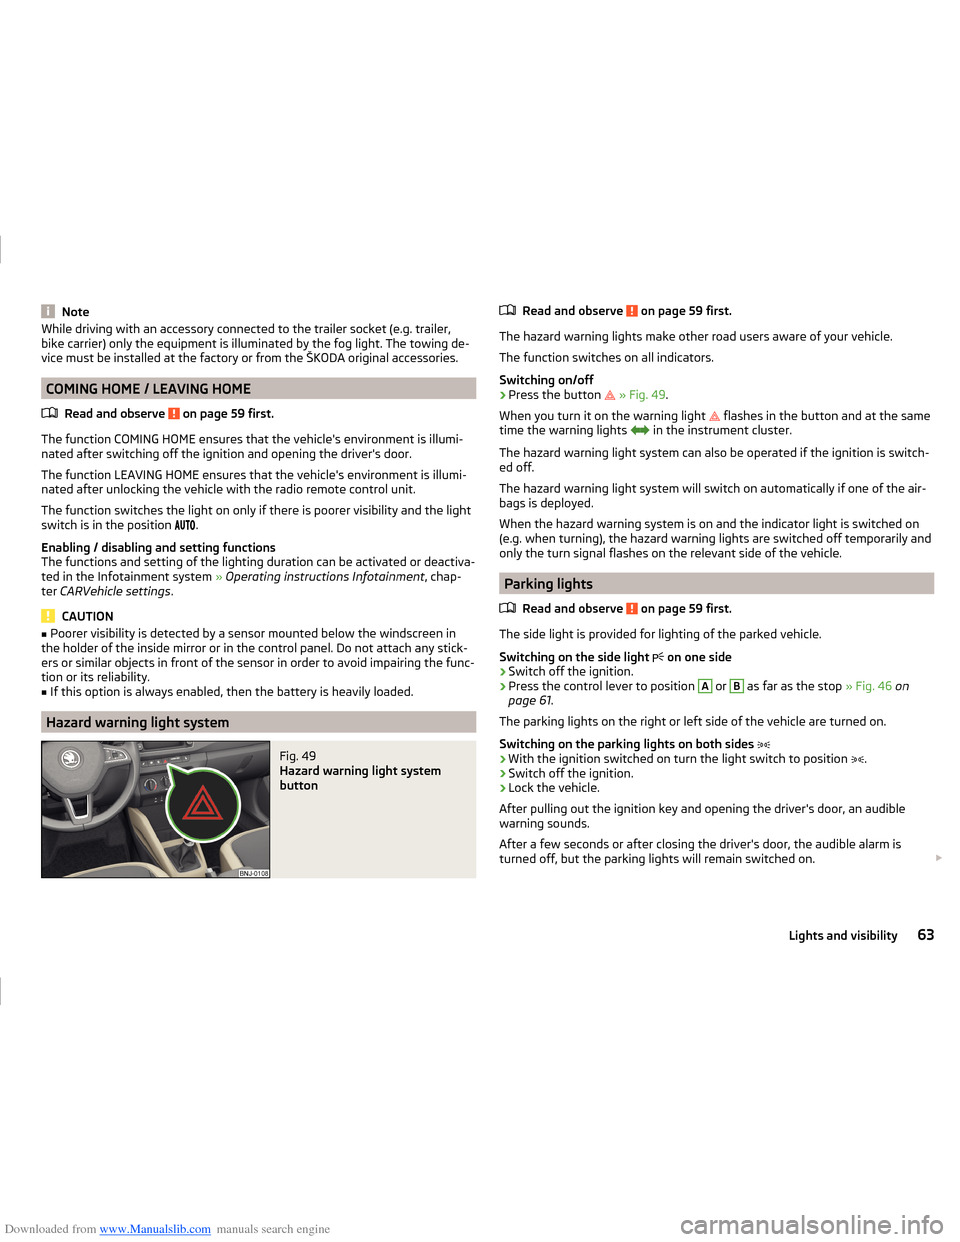
Fig. 49
Hazard warning light system
button
Read and observe on page 59 first.
The hazard warning lights make other road users aware of your vehicle.
The function switches on all indicators.
Switching on/off
›
Press the button
» Fig. 49 .
When you turn it on the warning light
flashes in the button and at the same
time the warning lights
in the instrument cluster.
The hazard warning light system can also be operated if the ignition is switch-
ed off.
The hazard warning light system will switch on automatically if one of the air-
bags is deployed.
When the hazard warning system is on and the indicator light is switched on
(e.g. when turning), the hazard warning lights are switched off temporarily and
only the turn signal flashes on the relevant side of the vehicle.
Parking lights
Read and observe
on page 59 first.
The side light is provided for lighting of the parked vehicle.
Switching on the side light on one side
›
Switch off the ignition.
›
Press the control lever to position
A
or
B
as far as the stop
» Fig. 46 on
page 61 .
The parking lights on the right or left side of the vehicle are turned on.
Switching on the parking lights on both sides
›
With the ignition switched on turn the light switch to position .
›
Switch off the ignition.
›
Lock the vehicle.
After pulling out the ignition key and opening the driver's door, an audible
warning sounds.
After a few seconds or after closing the driver's door, the audible alarm is
turned off, but the parking lights will remain switched on.
63Lights and visibility
Page 67 of 216
Downloaded from www.Manualslib.com manuals search engine CAUTION■Turning on the parking light means the battery is heavily loaded.■The parking light cannot be turned off automatic due to the low battery
charge level.■
If the two-sided parking lights are switched on when the ignition is off, then
there is no automatic switching off of the parking light.
Driving abroad
Read and observe
on page 59 first.
When driving in countries with opposing traffic system (traffic on the
left/right), your headlights may dazzle oncoming traffic. To prevent oncoming
traffic from being dazzled, the headlights must be adjusted by a specialist ga-
rage.
Interior lights
Introduction
This chapter contains information on the following subjects:
Front interior light
64
Rear interior light
65
The inner lighting also works if the ignition is switched off.
The light turns off automatically 10 minutes after switching off the ignition or
opening a door unless otherwise specified.
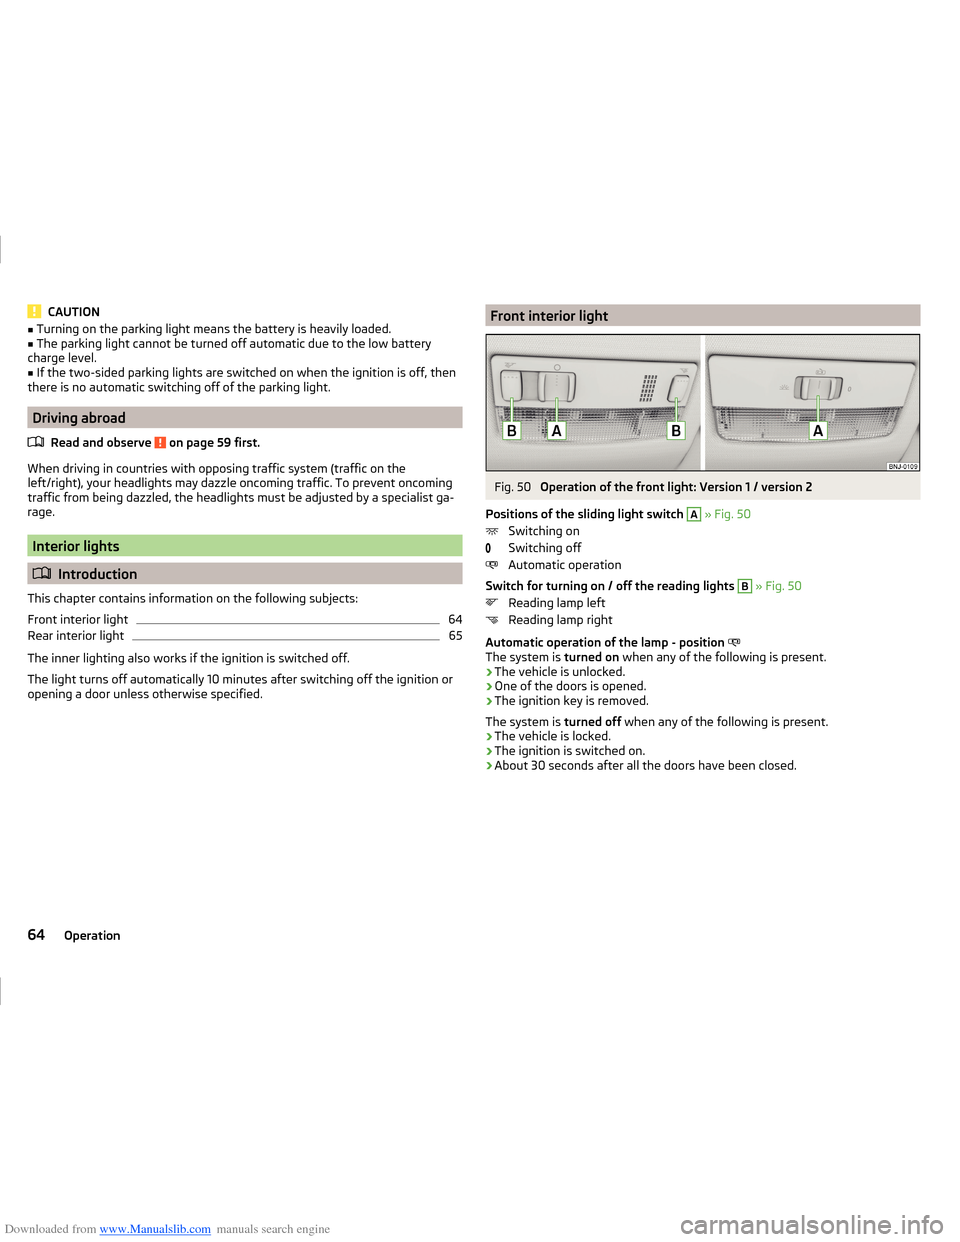
Front interior lightFig. 50
Operation of the front light: Version 1 / version 2
Positions of the sliding light switch
A
» Fig. 50
Switching on
Switching off
Automatic operation
Switch for turning on / off the reading lights
B
» Fig. 50
Reading lamp left
Reading lamp right
Automatic operation of the lamp - position
The system is turned on when any of the following is present.
› The vehicle is unlocked.
› One of the doors is opened.
› The ignition key is removed.
The system is turned off when any of the following is present.
› The vehicle is locked.
› The ignition is switched on.
› About 30 seconds after all the doors have been closed.
64Operation
Page 98 of 216
Downloaded from www.Manualslib.com manuals search engine WARNING (Continued)■Under certain circumstances, air at a temperature of about 5 °C can flow
out of the vents when the cooling system is switched on.■
To reduce health risks (e.g. common colds), the following instructions for
the use of the cooling system are to be observed. ■The difference between the indoor temperature and the outdoor air
temperature should not be greater than about 5 ° C.
■ The cooling system is to be turned off about 10 minutes before the end
of the journey.
■ Once a year, disinfection of the air conditioner or the Climatronic is to be
carried out by a specialist company.
CAUTION
■ The air inlet in front of the windscreen must be free (e.g. of ice, snow or
leaves) to ensure that the heating and cooling system operates properly.■
After switching on the cooling system condensation from the evaporator of
the air conditioning may drip down and form a puddle below the vehicle. This is
not a leak!
■
If the coolant temperature is too high, the cooling system is switched off to
ensure that the engine cools down.
Note
The used air flows out through the vents in the luggage compartment.
Air outlet vents
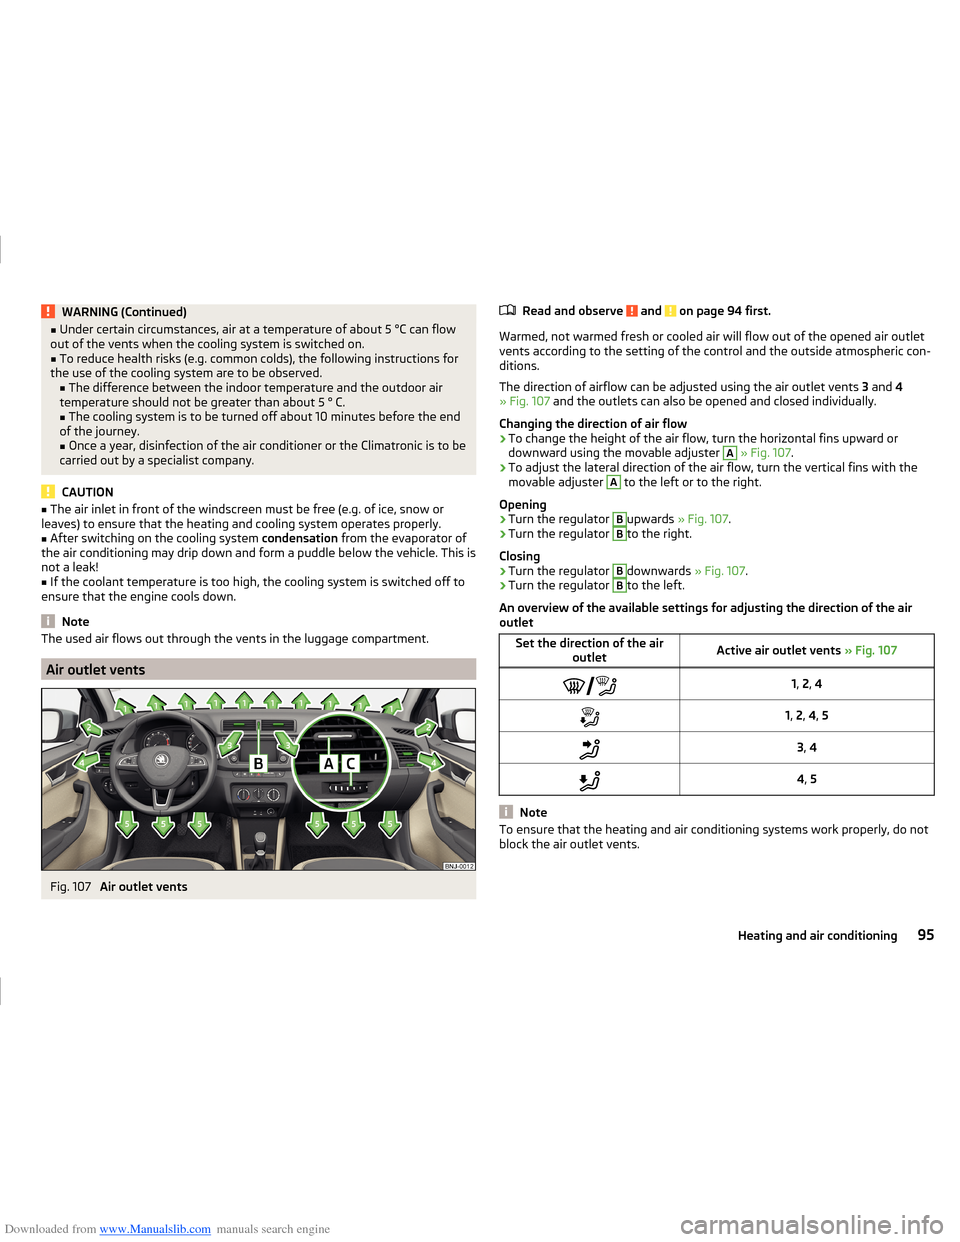
Fig. 107
Air outlet vents
Read and observe and on page 94 first.
Warmed, not warmed fresh or cooled air will flow out of the opened air outlet vents according to the setting of the control and the outside atmospheric con-
ditions.
The direction of airflow can be adjusted using the air outlet vents 3 and 4
» Fig. 107 and the outlets can also be opened and closed individually.
Changing the direction of air flow
›
To change the height of the air flow, turn the horizontal fins upward or
downward using the movable adjuster
A
» Fig. 107 .
›
To adjust the lateral direction of the air flow, turn the vertical fins with the
movable adjuster
A
to the left or to the right.
Opening
›
Turn the regulator
B
upwards » Fig. 107 .
›
Turn the regulator
B
to the right.
Closing
›
Turn the regulator
B
downwards » Fig. 107.
›
Turn the regulator
B
to the left.
An overview of the available settings for adjusting the direction of the air
outlet
Set the direction of the air outletActive air outlet vents » Fig. 1071, 2 , 41, 2 , 4 , 53 , 44 , 5
Note
To ensure that the heating and air conditioning systems work properly, do not
block the air outlet vents.95Heating and air conditioning
Page 105 of 216
Downloaded from www.Manualslib.com manuals search engine Starting and stopping the engine at the push of the button
Introduction
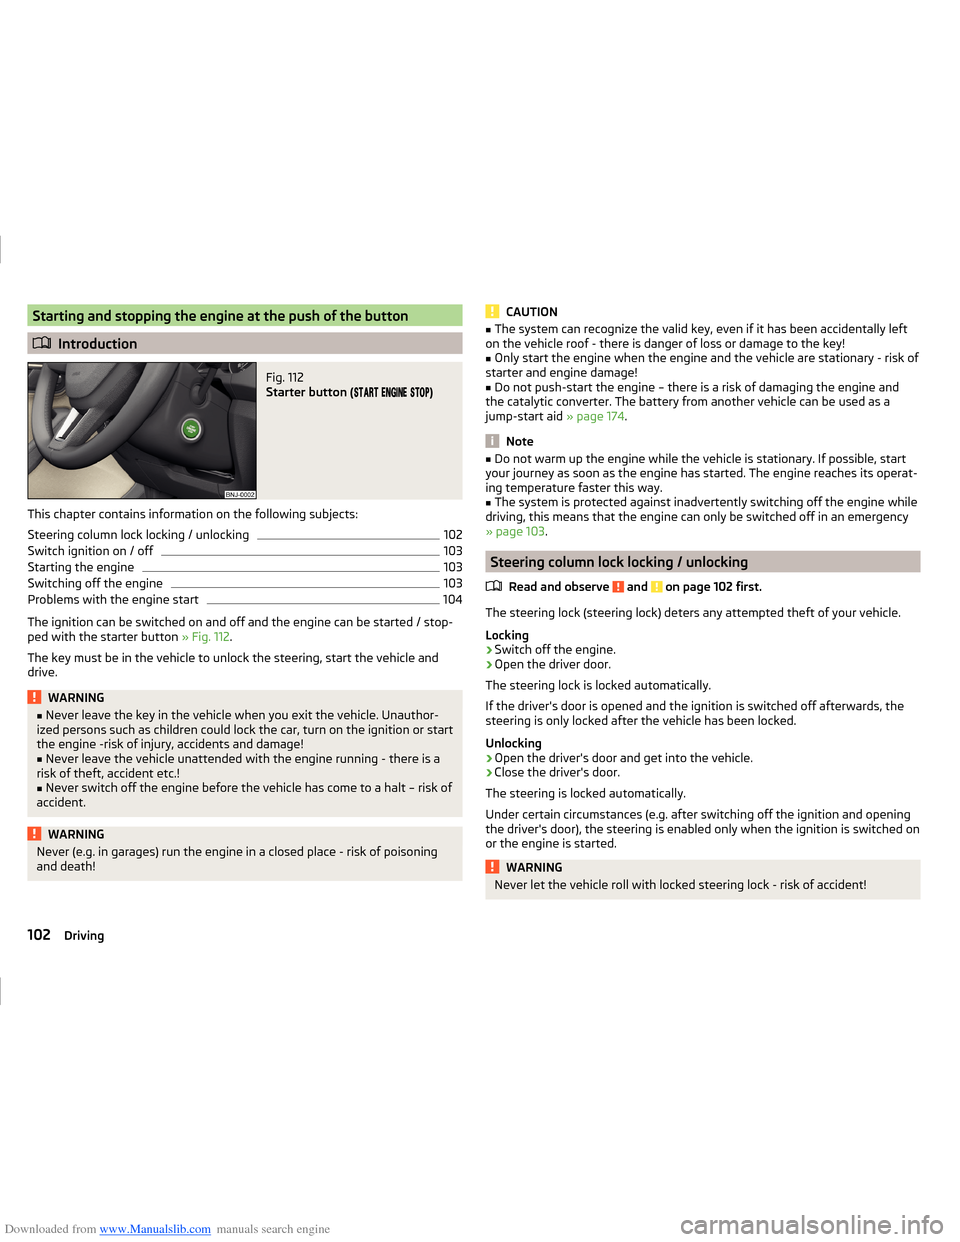
Fig. 112
Starter button (
)
This chapter contains information on the following subjects:
Steering column lock locking / unlocking
102
Switch ignition on / off
103
Starting the engine
103
Switching off the engine
103
Problems with the engine start
104
The ignition can be switched on and off and the engine can be started / stop-
ped with the starter button » Fig. 112.
The key must be in the vehicle to unlock the steering, start the vehicle and
drive.
WARNING■ Never leave the key in the vehicle when you exit the vehicle. Unauthor-
ized persons such as children could lock the car, turn on the ignition or start
the engine -risk of injury, accidents and damage!■
Never leave the vehicle unattended with the engine running - there is a
risk of theft, accident etc.!
■
Never switch off the engine before the vehicle has come to a halt – risk of
accident.
WARNINGNever (e.g. in garages) run the engine in a closed place - risk of poisoning
and death!CAUTION■ The system can recognize the valid key, even if it has been accidentally left
on the vehicle roof - there is danger of loss or damage to the key!■
Only start the engine when the engine and the vehicle are stationary - risk of
starter and engine damage!
■
Do not push-start the engine – there is a risk of damaging the engine and
the catalytic converter. The battery from another vehicle can be used as a
jump-start aid » page 174.
Note
■
Do not warm up the engine while the vehicle is stationary. If possible, start
your journey as soon as the engine has started. The engine reaches its operat-
ing temperature faster this way.■
The system is protected against inadvertently switching off the engine while
driving, this means that the engine can only be switched off in an emergency
» page 103 .
Steering column lock locking / unlocking
Read and observe
and on page 102 first.
The steering lock (steering lock) deters any attempted theft of your vehicle.
Locking
›
Switch off the engine.
›
Open the driver door.
The steering lock is locked automatically.
If the driver's door is opened and the ignition is switched off afterwards, the
steering is only locked after the vehicle has been locked.
Unlocking
›
Open the driver's door and get into the vehicle.
›
Close the driver's door.
The steering is locked automatically.
Under certain circumstances (e.g. after switching off the ignition and opening
the driver's door), the steering is enabled only when the ignition is switched on
or the engine is started.
WARNINGNever let the vehicle roll with locked steering lock - risk of accident!102Driving
Page 106 of 216
Downloaded from www.Manualslib.com manuals search engine Switch ignition on / offRead and observe
and on page 102 first.
›
Press the button » Fig. 112 on page 102 briefly.
The ignition is switched on or off.
On vehicles fitted with a manual transmission, the clutch pedal must not be
depressed while switching the ignition on or off, otherwise the system would
try to start.
On vehicles fitted with a automatic transmission, the brake pedal must not be
depressed while switching the ignition on or off, otherwise the system would
try to start.
If the driver's door is opened while the ignition is on, an audible signal sounds
and the following message appears in the instrument cluster display.
Ignition switched on.
IGNITION STILL ON
When leaving the vehicle always switch off the ignition.
Starting the engine
Read and observe
and on page 102 first.
Procedure for starting the engine
›
Firmly apply the handbrake.
›
For vehicles with manual transmission , shift gear lever to neutral, depress
the clutch pedal and hold it there until the engine starts.
›
On vehicles with automatic transmission , place the selector lever in position
P or N and depress the brake pedal until the engine starts.
›
Press the starter button » Fig. 112 on page 102 briefly – the engine starts au-
tomatically.
In vehicles with diesel engines the glow plug warning light
lights up after
pressing the button. The engine can be started after the indicator light goes
out.
Note
■ The engine running noises may at first be louder for a short time after start-
ing the cold engine. This is quite normal and is not an operating problem.■
You should not switch on any major electrical components during the heat-
ing period otherwise the vehicle battery will be drained unnecessarily.
Switching off the engine
Read and observe
and on page 102 first.
Switching off
›
Stop the vehicle » page 107, Parking .
›
Press the button » Fig. 112 on page 102 briefly.
The engine and the ignition are switched off simultaneously.
Emergency shutdown
If necessary and in exceptional cases, the engine may even be turned off while
driving.
›
Press the starter button » Fig. 112 on page 102 for longer than 1 second or
twice within 1 second.
After the emergency stop of the engine, the steering lock will remain un-
locked.
CAUTION
Do not switch the engine off immediately at the end of your journey after the
engine has been operated over a prolonged period at high loads but leave it to
run at an idling speed for about 1 minute. This prevents any possible accumula-
tion of heat when the engine is switched off.
Note
The radiator fan can intermittently continue to run for approximately 10 mi-
nutes after the ignition has been switched off.103Starting-off and driving
Page 112 of 216

Downloaded from www.Manualslib.com manuals search engine WARNING■Never accelerate when the mode for moving forward is set with the se-
lector lever - there is a risk of accident!■
Never shift the selector lever to R or P modes when driving – there is a
risk of an accident.
■
If the vehicle is in the mode selected D, S , R or Tiptronic and the engine
stops when at idle speed, then the brake pedal must be pressed. Even
when the engine is idling, power transmission is never completely interrup-
ted – the vehicle will creep.
■
When leaving the vehicle, the selector lever is always to be put in the P
mode. Otherwise the vehicle could then start to move and potentially cause
an accident.
CAUTION
■ If the selector lever is moved to mode N while driving, the accelerator pedal
must be released and you will need to wait until the engine has reached its
idling speed before moving the selector lever to a forward driving mode again.■
When the outdoor temperature is below -10 ° C, the selector lever, when
starting, must always be in P mode.
■
When stopping on a slope, never try to keep the vehicle in position by using
the accelerator pedal – this may lead to gear damage.
Note
After the ignition is switched off, the ignition key can only be withdrawn if the
selector lever is in the position P.
Modes and use of selector lever
Fig. 118
Selector lever/display
Read and observe and on page 109 first.
When the ignition is switched on, the gearbox mode and the currently selected
gear are indicated in the display » Fig. 118.
The following modes can be selected with the selector lever » Fig. 118.
P
– Parking mode
The driven wheels are locked mechanically in this mode.
Parking mode must only be selected when the vehicle is stationary.
R
- Reverse gear
Reverse gear can only be engaged when the vehicle is stationary and the en-
gine is at idling speed.
N
- Neutral
Power transmission to the drive wheels is interrupted in this mode.
D
/
S
- mode for driving forward (Normal program) / mode for driving
forward (Sport program)
The system switches from one mode to the other by moving the selector lever
into the spring-loaded position
» Fig. 118 .
In mode D or S, the forward gears are shifted automatically depending on the
engine load, the operation of the accelerator pedal, the vehicle speed, and the
selected driving mode .
In mode S, the forward gears are shifted automatically up and down at higher
engine speeds than in mode D.
109Starting-off and driving
Page 143 of 216
Downloaded from www.Manualslib.com manuals search engine Washing by handRead and observe
and on page 139 first.
Soften the dirt with plenty of water and rinse as much as you can of this off.
Clean the vehicle with a soft sponge, a washing glove or a washing brush.
Work from the top to the bottom - starting with the roof.
For stubborn dirt, agents specifically intended for this purpose are to be used.
Wash out the sponge or washing glove thoroughly at short intervals.
Clean wheels, door sills and similar parts last. Use a second sponge for such areas.
Give the vehicle a good rinse after washing it and dry it off using a chamois
leather.
WARNINGProtect your hands and arms from sharp-edged metal parts when cleaning
the underfloor or the inside of the wheel housings or the wheel trims – risk
of cuts!
CAUTION
■ Only apply slight pressure when cleaning the vehicle's paintwork.■Do not wash your vehicle in bright sunlight – there is a risk of paint damage.
Automatic car wash systems
Read and observe
and on page 139 first.
The usual precautionary measures must be taken before washing the vehicle
in an automatic car wash system (e.g. closing the windows including the slid-
ing/tilting roof, etc.).
If your vehicle is fitted with any particular attached parts, such as a spoiler,
roof rack system etc., it is best to consult the operator of the car wash system
beforehand.
The lips of the windscreen wiper rubbers must be cleaned and degreased with
cleaning agents especially formulated for the task after an automatic wash
with wax.
CAUTION■ Before driving through a car wash fold in the exterior mirrors - there is a risk
of damage.■
For vehicles with roof antenna the antenna rod should be unscrewed before
driving through a car wash - there is a risk of damage.
Washing with a high-pressure cleaner
Read and observe
and on page 139 first.
When washing the vehicle with a high-pressure cleaner, the instructions for
use of the equipment must be observed. This applies in particular to the pres-
sure used and to the spraying distance .
Maintain a sufficiently large distance to the parking aid sensors and soft mate-
rials such as rubber hoses or insulation material.
CAUTION
■ Do not aim the water jet directly at the lock cylinders or the door or opening
joints when washing the vehicle in the winter – there is a risk of freezing.■
The sensors of the parking aid can be sprayed only for a short time and there
must be a minimum distance of 10 cm - there is a risk of damage.
Note
See also Washing a vehicle with decorative film trim using a high-pressure
cleaner » page 142 .
Cleaning vehicle exterior
Introduction
This chapter contains information on the following subjects:
Vehicle paint work
141
Plastic parts
141
Rubber seals
141
Chrome and anodized parts
142
Decorative and protective foils
142
Windows and external mirrors
142
Headlight glasses
143
Door closing cylinder
143
Cavity protection
143
140General Maintenance