wheel SKODA FABIA 2014 3.G / NJ Operating Instruction Manual
[x] Cancel search | Manufacturer: SKODA, Model Year: 2014, Model line: FABIA, Model: SKODA FABIA 2014 3.G / NJPages: 216, PDF Size: 30.9 MB
Page 21 of 216
Downloaded from www.Manualslib.com manuals search engine Head airbagsFig. 10
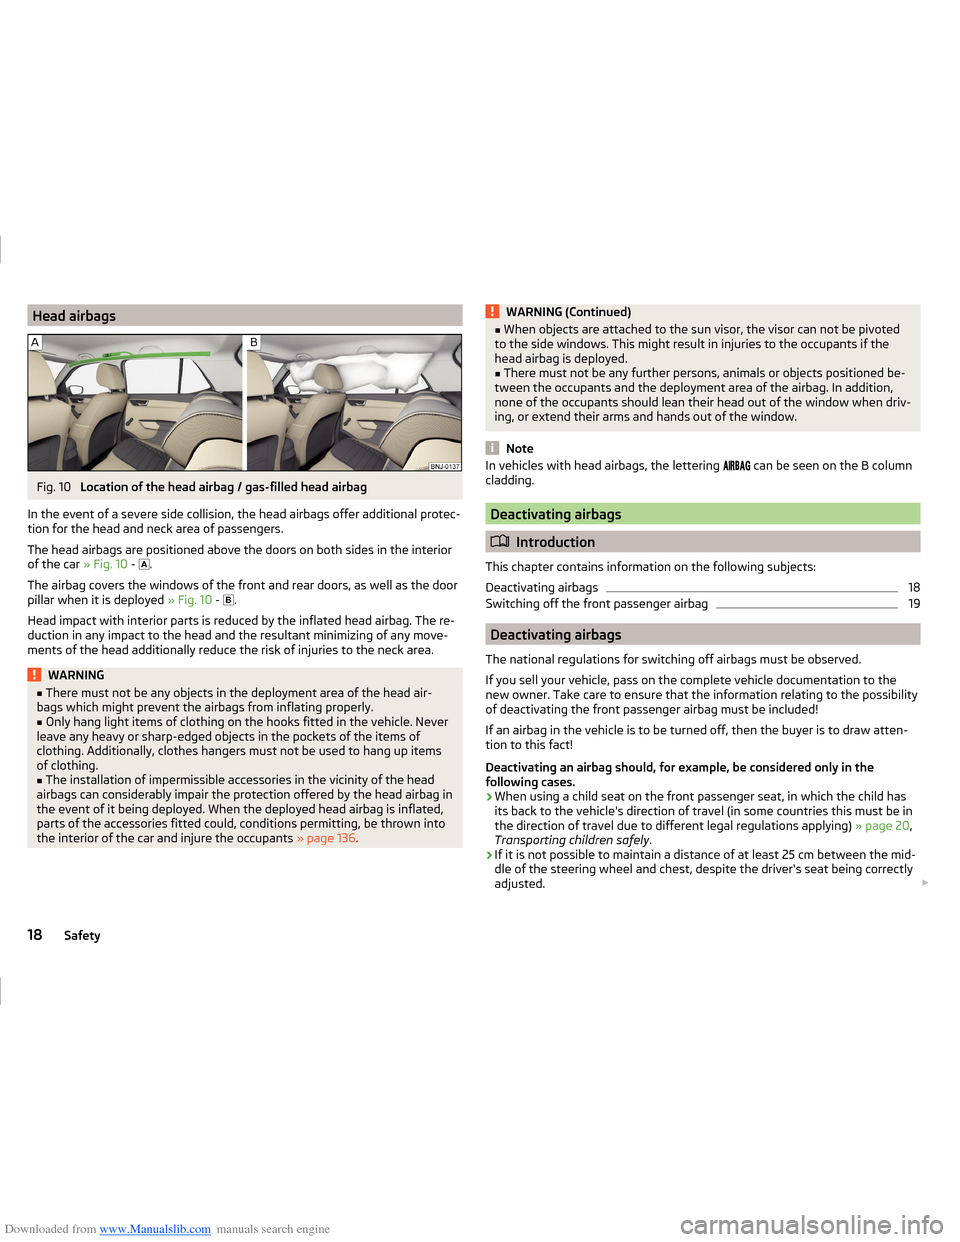
Location of the head airbag / gas-filled head airbag
In the event of a severe side collision, the head airbags offer additional protec-
tion for the head and neck area of passengers.
The head airbags are positioned above the doors on both sides in the interior
of the car » Fig. 10 -
.
The airbag covers the windows of the front and rear doors, as well as the door
pillar when it is deployed » Fig. 10 -
.
Head impact with interior parts is reduced by the inflated head airbag. The re-
duction in any impact to the head and the resultant minimizing of any move-
ments of the head additionally reduce the risk of injuries to the neck area.
WARNING■ There must not be any objects in the deployment area of the head air-
bags which might prevent the airbags from inflating properly.■
Only hang light items of clothing on the hooks fitted in the vehicle. Never
leave any heavy or sharp-edged objects in the pockets of the items of
clothing. Additionally, clothes hangers must not be used to hang up items
of clothing.
■
The installation of impermissible accessories in the vicinity of the head
airbags can considerably impair the protection offered by the head airbag in
the event of it being deployed. When the deployed head airbag is inflated,
parts of the accessories fitted could, conditions permitting, be thrown into
the interior of the car and injure the occupants » page 136.
WARNING (Continued)■
When objects are attached to the sun visor, the visor can not be pivoted
to the side windows. This might result in injuries to the occupants if the
head airbag is deployed.■
There must not be any further persons, animals or objects positioned be-
tween the occupants and the deployment area of the airbag. In addition,
none of the occupants should lean their head out of the window when driv-
ing, or extend their arms and hands out of the window.
Note
In vehicles with head airbags, the lettering can be seen on the B column
cladding.
Deactivating airbags
Introduction
This chapter contains information on the following subjects:
Deactivating airbags
18
Switching off the front passenger airbag
19
Deactivating airbags
The national regulations for switching off airbags must be observed.
If you sell your vehicle, pass on the complete vehicle documentation to the
new owner. Take care to ensure that the information relating to the possibility
of deactivating the front passenger airbag must be included!
If an airbag in the vehicle is to be turned off, then the buyer is to draw atten-
tion to this fact!
Deactivating an airbag should, for example, be considered only in the
following cases.
› When using a child seat on the front passenger seat, in which the child has
its back to the vehicle's direction of travel (in some countries this must be in
the direction of travel due to different legal regulations applying) » page 20,
Transporting children safely .
› If it is not possible to maintain a distance of at least 25 cm between the mid-
dle of the steering wheel and chest, despite the driver's seat being correctly
adjusted.
18Safety
Page 22 of 216
Downloaded from www.Manualslib.com manuals search engine ›If special attachments are required in the area of the steering wheel because
of a physical disability.
› If other seats have been installed (e.g. orthopaedic seats without side air-
bags).
The front passenger airbag can be switched off with the key-operated switch
» Fig. 11 on page 19 -
.
We recommend that you ask a ŠKODA Service Partner to switch off any other
airbags.
Deactivation indicator
Display of the airbag deactivation » page 34,
Airbag system .
Note
A ŠKODA Service Partner will be able to inform you which airbags in your vehi-
cle can/must be deactivated.
Switching off the front passenger airbag
Fig. 11
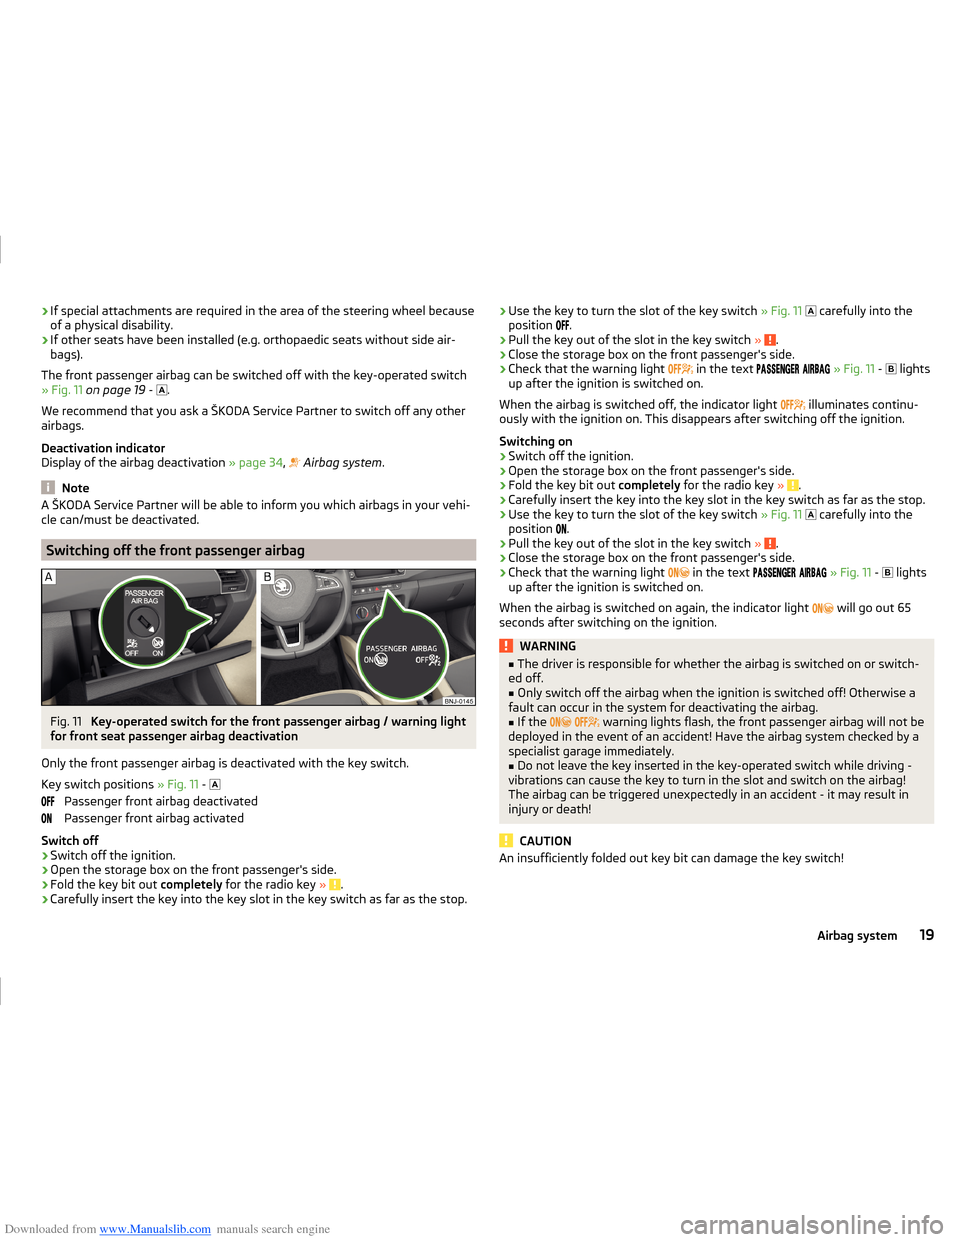
Key-operated switch for the front passenger airbag / warning light
for front seat passenger airbag deactivation
Only the front passenger airbag is deactivated with the key switch.
Key switch positions » Fig. 11 -
Passenger front airbag deactivated
Passenger front airbag activated
Switch off
›
Switch off the ignition.
›
Open the storage box on the front passenger's side.
›
Fold the key bit out completely for the radio key » .
›
Carefully insert the key into the key slot in the key switch as far as the stop.
›Use the key to turn the slot of the key switch
» Fig. 11 carefully into the
position .›
Pull the key out of the slot in the key switch » .
›
Close the storage box on the front passenger's side.
›
Check that the warning light
in the text
» Fig. 11 -
lights
up after the ignition is switched on.
When the airbag is switched off, the indicator light
illuminates continu-
ously with the ignition on. This disappears after switching off the ignition.
Switching on
›
Switch off the ignition.
›
Open the storage box on the front passenger's side.
›
Fold the key bit out completely for the radio key » .
›
Carefully insert the key into the key slot in the key switch as far as the stop.
›
Use the key to turn the slot of the key switch » Fig. 11
carefully into the
position .
›
Pull the key out of the slot in the key switch
» .
›
Close the storage box on the front passenger's side.
›
Check that the warning light
in the text
» Fig. 11 -
lights
up after the ignition is switched on.
When the airbag is switched on again, the indicator light will go out 65
seconds after switching on the ignition.
WARNING■ The driver is responsible for whether the airbag is switched on or switch-
ed off.■
Only switch off the airbag when the ignition is switched off! Otherwise a
fault can occur in the system for deactivating the airbag.
■
If the
warning lights flash, the front passenger airbag will not be
deployed in the event of an accident! Have the airbag system checked by a
specialist garage immediately.
■
Do not leave the key inserted in the key-operated switch while driving -
vibrations can cause the key to turn in the slot and switch on the airbag!
The airbag can be triggered unexpectedly in an accident - it may result in
injury or death!
CAUTION
An insufficiently folded out key bit can damage the key switch!19Airbag system
Page 29 of 216
Downloaded from www.Manualslib.com manuals search engine Operation
Cockpit
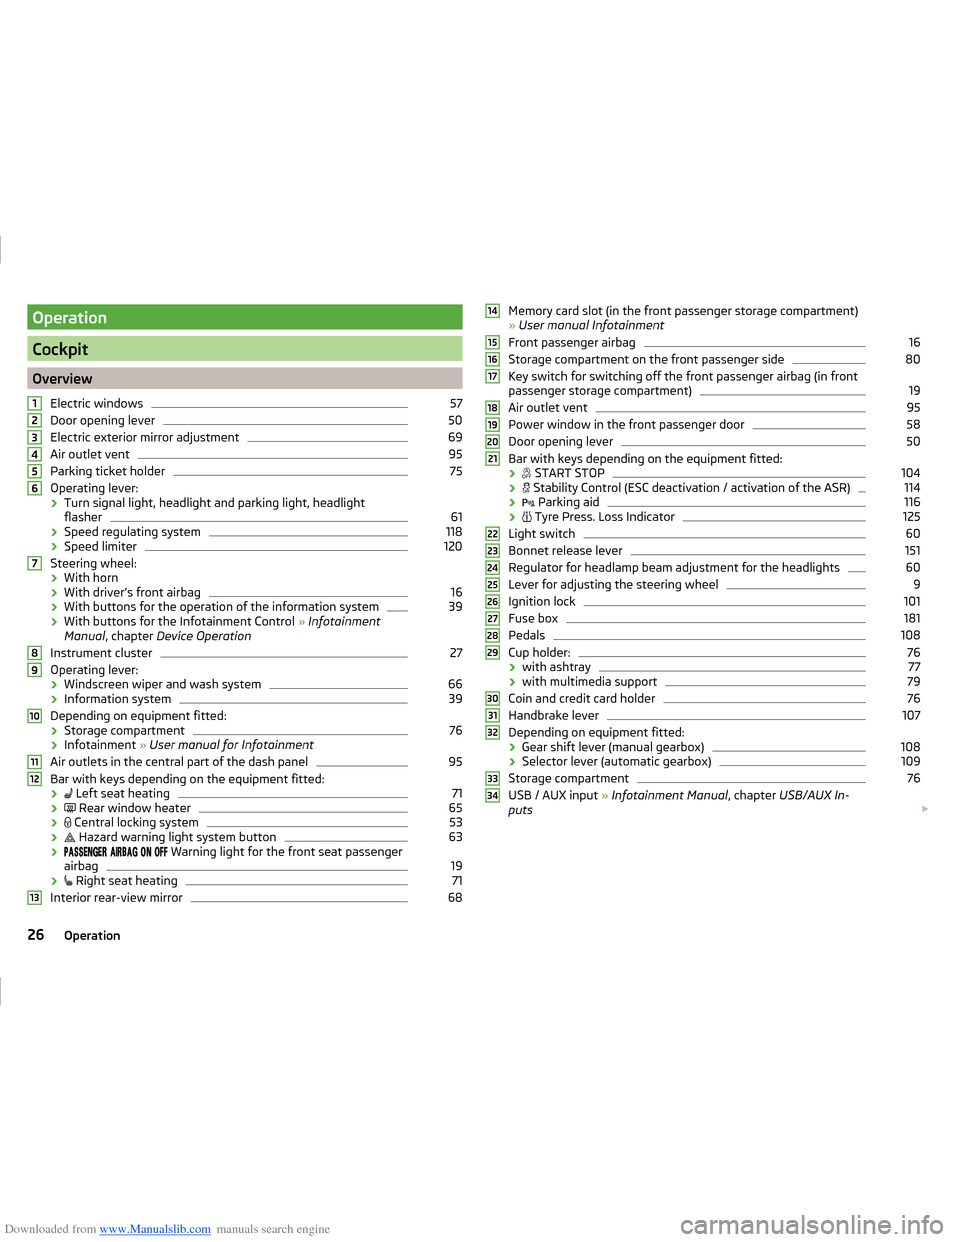
OverviewElectric windows
57
Door opening lever
50
Electric exterior mirror adjustment
69
Air outlet vent
95
Parking ticket holder
75
Operating lever:
› Turn signal light, headlight and parking light, headlight
flasher
61
› Speed regulating system
118
›Speed limiter
120
Steering wheel:
› With horn
› With driver’s front airbag
16
›With buttons for the operation of the information system
39
›With buttons for the Infotainment Control
» Infotainment
Manual , chapter Device Operation
Instrument cluster
27
Operating lever: › Windscreen wiper and wash system
66
›Information system
39
Depending on equipment fitted:
› Storage compartment
76
›Infotainment
» User manual for Infotainment
Air outlets in the central part of the dash panel
95
Bar with keys depending on the equipment fitted: ›
Left seat heating
71
›
Rear window heater
65
›
Central locking system
53
›
Hazard warning light system button
63
›
Warning light for the front seat passenger
airbag
19
›
Right seat heating
71
Interior rear-view mirror
6812345678910111213Memory card slot (in the front passenger storage compartment)
» User manual Infotainment
Front passenger airbag16
Storage compartment on the front passenger side
80
Key switch for switching off the front passenger airbag (in front
passenger storage compartment)
19
Air outlet vent
95
Power window in the front passenger door
58
Door opening lever
50
Bar with keys depending on the equipment fitted:
›
START STOP
104
›
Stability Control (ESC deactivation / activation of the ASR)
114
›
Parking aid
116
›
Tyre Press. Loss Indicator
125
Light switch
60
Bonnet release lever
151
Regulator for headlamp beam adjustment for the headlights
60
Lever for adjusting the steering wheel
9
Ignition lock
101
Fuse box
181
Pedals
108
Cup holder:
76
› with ashtray
77
›with multimedia support
79
Coin and credit card holder
76
Handbrake lever
107
Depending on equipment fitted:
› Gear shift lever (manual gearbox)
108
›Selector lever (automatic gearbox)
109
Storage compartment
76
USB / AUX input
» Infotainment Manual , chapter USB/AUX In-
puts
14151617181920212223242526272829303132333426Operation
Page 35 of 216
Downloaded from www.Manualslib.com manuals search engine WARNING■Ignoring illuminated indicator lights and related messages or instructions
in the instrument cluster display may lead to serious personal injury or
damage to the vehicle.■
If you have to stop for technical reasons, then park the vehicle at a safe
distance from the traffic, switch off the engine and activate the hazard
warning lights system » page 63. The warning triangle must be set up at
the prescribed distance - observe the national legal provisions when doing
so.
■
The engine compartment of your car is a hazardous area. While working in
the engine compartment, be sure to observe the following warnings
» page 149 , Engine compartment .
Handbrake
Read and observe
on page 32 first.
illuminates - the hand brake is applied.
An acoustic signal will sound if you drive the vehicle above 5 km/h while the
handbrake is still on.
Release the handbrake!
RELEASE HANDBRAKE
Brake system
Read and observe
on page 32 first.
illuminates - the brake fluid level in the braking system is too low.
Brake fluid: owner's manual!
BRAKE FLUID PLEASE CHECK
›
Stop the vehicle, switch off the engine, and check the level of the brake fluid.
WARNING■ If warning light illuminates simultaneously with warning light
» page 33 , Anti-lock braking system (ABS) , do not continue your
journey! Seek help from a specialist garage.■
A fault to the ABS system or the braking system can increase the vehi-
cle's braking distance – there is a risk of an accident occurring!
Seat belt warning light
Read and observe
on page 32 first.
illuminates - the driver or front passenger has not fastened the seat belt.
At a speed of more than approximately 30 km/h the warning light
flashes
and an audible warning sounds at a time.
If the seat belt is not fastened by the driver or front passenger during the next
approx. 2 seconds, the warning signal is deactivated and the warning light
lights up permanently.
Power Steering / steering lock (engine start push-button)
Read and observe
on page 32 first.
Fault in the power steering
illuminates - this indicates a complete failure of the power steering and the
steering assist has failed (significantly higher steering forces).
illuminates - this indicates a partial failure of the power steering and the
steering forces can be greater.
Seek help from a specialist garage.
Steering lock defective (engine start push-button)
An audible signal sounds as a warning.
flashes
Steering lock faulty. Stop!
STOP VEHICLE STEERING FAULTY
Park the vehicle, and
stop driving . After switching off the ignition, it is no
longer possible to lock the steering, to activate the electrical components (e.g.
Infotainment etc.), to switch on the ignition again and to start the engine. Seek
help from a specialist garage.
flashes
Steering lock: workshop!
STEERING WORKSHOP
Seek help from a specialist garage.
Steering lock not unlocked (engine start push-button)
flashes
Move the steering wheel!
MOVE STEERING WHEEL 32Operation
Page 36 of 216
Downloaded from www.Manualslib.com manuals search engine ›Move the steering wheel slightly back and forth, thereby facilitating unlock-
ing the steering lock.
If the steering does also not unlock then, the help of a specialist garage is re-
quired.
Disconnecting the vehicle battery
If the vehicle's battery has been disconnected and reconnected, the indicator
light
comes on after switching on the ignition.
The warning light should go out after driving a short distance.
If, after the motor is restarted and a short drive, the indicator light does not go
out, there is a system error.
Seek help from a specialist garage.
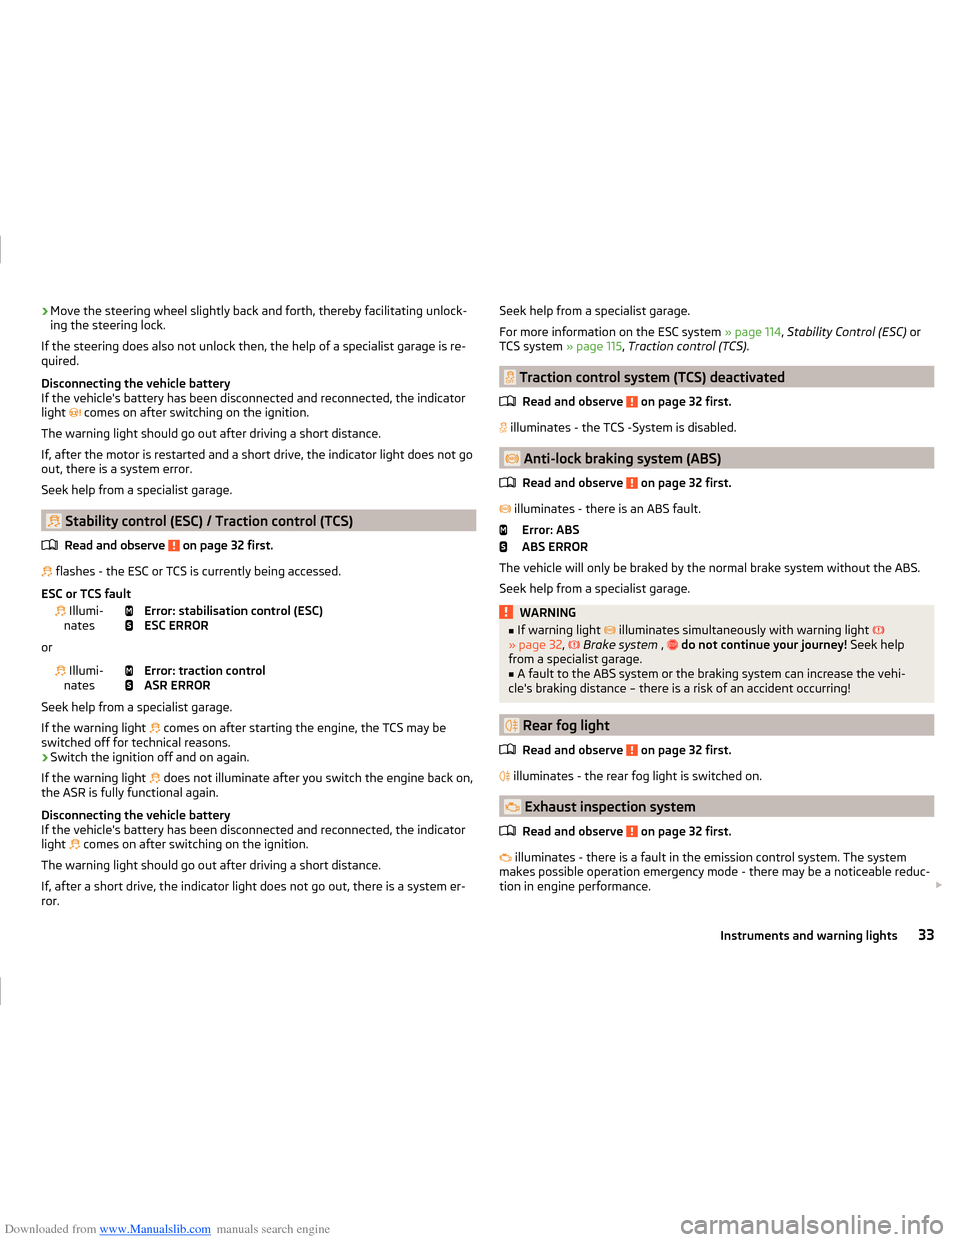
Stability control (ESC) / Traction control (TCS)
Read and observe
on page 32 first.
flashes - the ESC or TCS is currently being accessed.
ESC or TCS fault
Illumi-
nates
Error: stabilisation control (ESC)
ESC ERROR
or
Illumi-
nates
Error: traction control
ASR ERROR
Seek help from a specialist garage.
If the warning light comes on after starting the engine, the TCS may be
switched off for technical reasons.
› Switch the ignition off and on again.
If the warning light does not illuminate after you switch the engine back on,
the ASR is fully functional again.
Disconnecting the vehicle battery
If the vehicle's battery has been disconnected and reconnected, the indicator
light comes on after switching on the ignition.
The warning light should go out after driving a short distance.
If, after a short drive, the indicator light does not go out, there is a system er-
ror.
Seek help from a specialist garage.
For more information on the ESC system » page 114, Stability Control (ESC) or
TCS system » page 115, Traction control (TCS) .
Traction control system (TCS) deactivated
Read and observe
on page 32 first.
illuminates - the TCS -System is disabled.
Anti-lock braking system (ABS)
Read and observe
on page 32 first.
illuminates - there is an ABS fault.
Error: ABS
ABS ERROR
The vehicle will only be braked by the normal brake system without the ABS.
Seek help from a specialist garage.
WARNING■ If warning light illuminates simultaneously with warning light
» page 32 , Brake system , do not continue your journey! Seek help
from a specialist garage.■
A fault to the ABS system or the braking system can increase the vehi-
cle's braking distance – there is a risk of an accident occurring!
Rear fog light
Read and observe
on page 32 first.
illuminates - the rear fog light is switched on.
Exhaust inspection system
Read and observe
on page 32 first.
illuminates - there is a fault in the emission control system. The system
makes possible operation emergency mode - there may be a noticeable reduc-
tion in engine performance.
33Instruments and warning lights
Page 37 of 216
Downloaded from www.Manualslib.com manuals search engine Seek help from a specialist garage.
Glow plug system (diesel engine)Read and observe
on page 32 first.
flashes - there is a fault in the engine management system. The system
makes possible operation emergency mode - there may be a noticeable reduc-
tion in engine performance.
There is a fault in the glow plug system if the warning light
does not come
on or illuminates continuously.
Seek help from a specialist garage.
Engine performance check (petrol engine)
Read and observe
on page 32 first.
illuminates - there is a fault in the engine management system. The system
makes possible operation emergency mode - there may be a noticeable reduc-
tion in engine performance.
Seek help from a specialist garage.
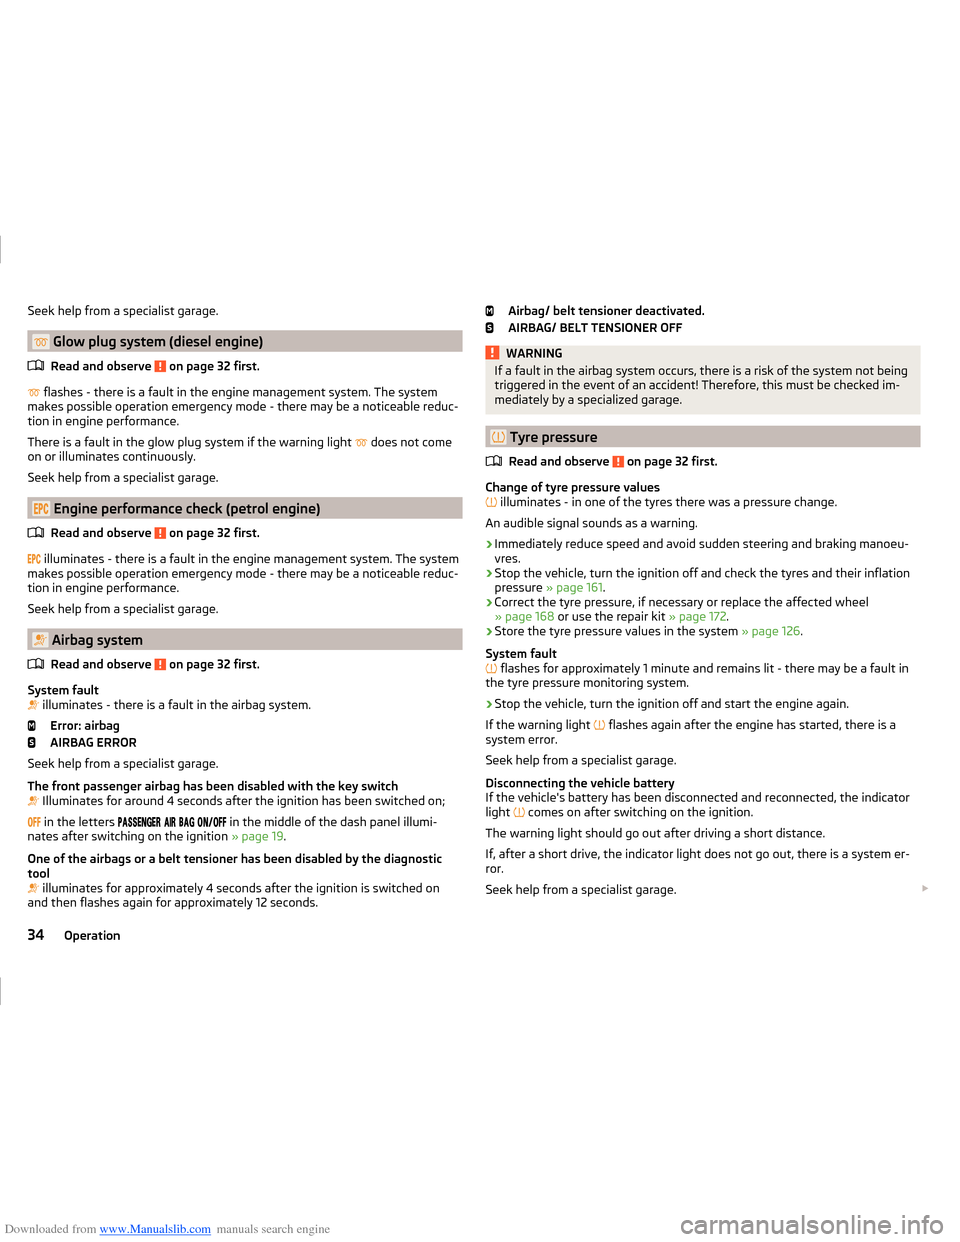
Airbag system
Read and observe
on page 32 first.
System fault
illuminates - there is a fault in the airbag system.
Error: airbag
AIRBAG ERROR
Seek help from a specialist garage.
The front passenger airbag has been disabled with the key switch
Illuminates for around 4 seconds after the ignition has been switched on;
in the letters
in the middle of the dash panel illumi-
nates after switching on the ignition » page 19.
One of the airbags or a belt tensioner has been disabled by the diagnostic
tool
illuminates for approximately 4 seconds after the ignition is switched on
and then flashes again for approximately 12 seconds.
Airbag/ belt tensioner deactivated.
AIRBAG/ BELT TENSIONER OFFWARNINGIf a fault in the airbag system occurs, there is a risk of the system not being
triggered in the event of an accident! Therefore, this must be checked im-
mediately by a specialized garage.
Tyre pressure
Read and observe
on page 32 first.
Change of tyre pressure values
illuminates - in one of the tyres there was a pressure change.
An audible signal sounds as a warning.
›
Immediately reduce speed and avoid sudden steering and braking manoeu-
vres.
›
Stop the vehicle, turn the ignition off and check the tyres and their inflation
pressure » page 161 .
›
Correct the tyre pressure, if necessary or replace the affected wheel
» page 168 or use the repair kit » page 172.
›
Store the tyre pressure values in the system » page 126.
System fault
flashes for approximately 1 minute and remains lit - there may be a fault in
the tyre pressure monitoring system.
›
Stop the vehicle, turn the ignition off and start the engine again.
If the warning light flashes again after the engine has started, there is a
system error.
Seek help from a specialist garage.
Disconnecting the vehicle battery
If the vehicle's battery has been disconnected and reconnected, the indicator
light comes on after switching on the ignition.
The warning light should go out after driving a short distance.
If, after a short drive, the indicator light does not go out, there is a system er-
ror.
Seek help from a specialist garage.
34Operation
Page 38 of 216
Downloaded from www.Manualslib.com manuals search engine Other incidents
The following reasons can also apply if the warning light is illuminated.
› The vehicle is loaded on one side. Distribute loads as evenly as possible.
› The wheels of one axle are loaded more heavily (e.g. when towing a trailer or
when driving uphill or downhill).
› Snow chains are fitted.
› A wheel has been changed.
CAUTION
Under certain circumstances (e.g. sporty style of driving, wintry or unpaved
roads) the warning light in the instrument cluster can be delayed or does
not light up at all.
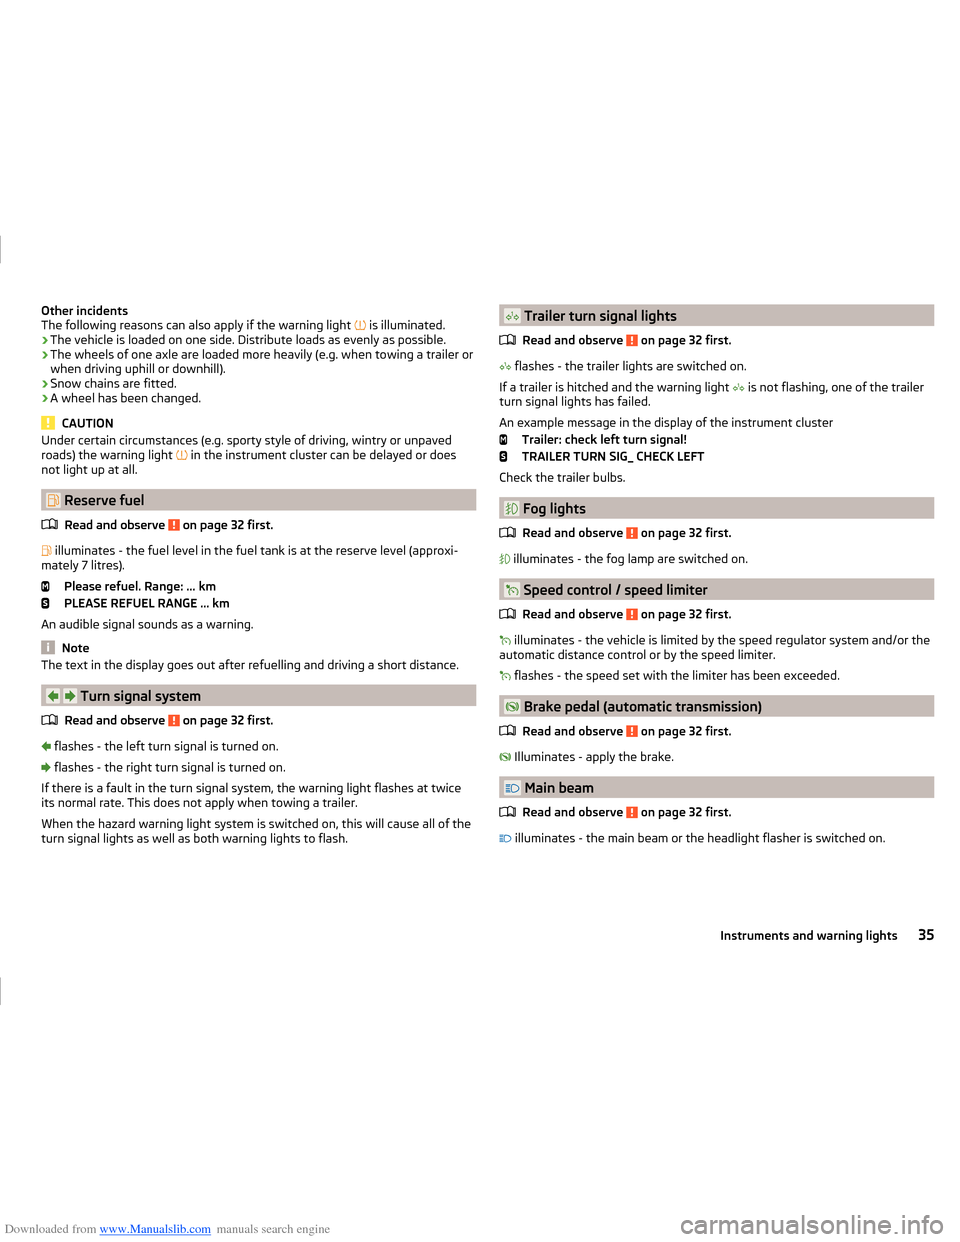
Reserve fuel
Read and observe
on page 32 first.
illuminates - the fuel level in the fuel tank is at the reserve level (approxi-
mately 7 litres).
Please refuel. Range: ... km
PLEASE REFUEL RANGE … km
An audible signal sounds as a warning.
Note
The text in the display goes out after refuelling and driving a short distance.
Turn signal system
Read and observe
on page 32 first.
flashes - the left turn signal is turned on.
flashes - the right turn signal is turned on.
If there is a fault in the turn signal system, the warning light flashes at twice
its normal rate. This does not apply when towing a trailer.
When the hazard warning light system is switched on, this will cause all of the
turn signal lights as well as both warning lights to flash.
Trailer turn signal lights
Read and observe
on page 32 first.
flashes - the trailer lights are switched on.
If a trailer is hitched and the warning light
is not flashing, one of the trailer
turn signal lights has failed.
An example message in the display of the instrument cluster Trailer: check left turn signal!
TRAILER TURN SIG_ CHECK LEFT
Check the trailer bulbs.
Fog lights
Read and observe
on page 32 first.
illuminates - the fog lamp are switched on.
Speed control / speed limiter
Read and observe
on page 32 first.
illuminates - the vehicle is limited by the speed regulator system and/or the
automatic distance control or by the speed limiter.
flashes - the speed set with the limiter has been exceeded.
Brake pedal (automatic transmission)
Read and observe
on page 32 first.
Illuminates - apply the brake.
Main beam
Read and observe
on page 32 first.
illuminates - the main beam or the headlight flasher is switched on.
35Instruments and warning lights
Page 43 of 216
Downloaded from www.Manualslib.com manuals search engine For instance, if appears in this display, this means it is recommended that
you shift from 3rd into 4th Switch gear.
For vehicles with automatic transmission the recommended gear will be
shown provided the mode for manual switching (Tiptronic) is selected.WARNINGThe driver is always responsible for selecting the correct gear in different
driving situations, such as overtaking.
Driving data (Multifunction display)
Introduction
This chapter contains information on the following subjects:
Operation
40
Information overview
40
Warning when exceeding the set speed
41
Memory
42
The driving data display is only possible with the ignition switched on.
After the ignition is switched on, the function that was last selected before
switching off the ignition is displayed.
The setting of the units, as well as the display of some information in the Info-
tainment can be hidden or shown » Operating instructions Infotainment , chap-
ter CAR - Vehicle settings .
WARNINGConcentrate fully at all times on your driving! As the driver you are fully re-
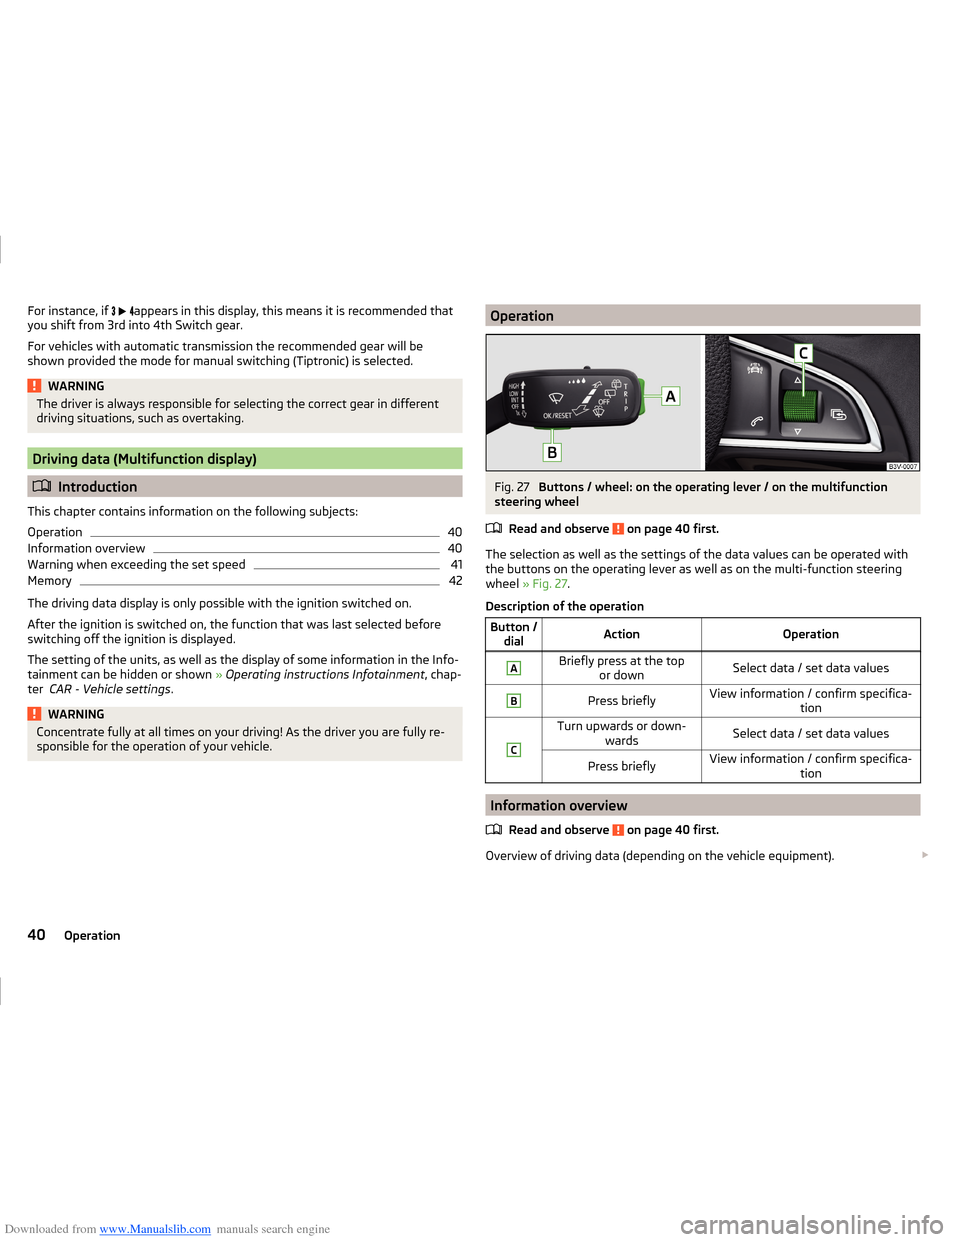
sponsible for the operation of your vehicle.OperationFig. 27
Buttons / wheel: on the operating lever / on the multifunction
steering wheel
Read and observe
on page 40 first.
The selection as well as the settings of the data values can be operated withthe buttons on the operating lever as well as on the multi-function steering
wheel » Fig. 27 .
Description of the operation
Button / dialActionOperationABriefly press at the top or downSelect data / set data valuesBPress brieflyView information / confirm specifica- tionCTurn upwards or down-wardsSelect data / set data valuesPress brieflyView information / confirm specifica- tion
Information overview
Read and observe
on page 40 first.
Overview of driving data (depending on the vehicle equipment).
40Operation
Page 45 of 216
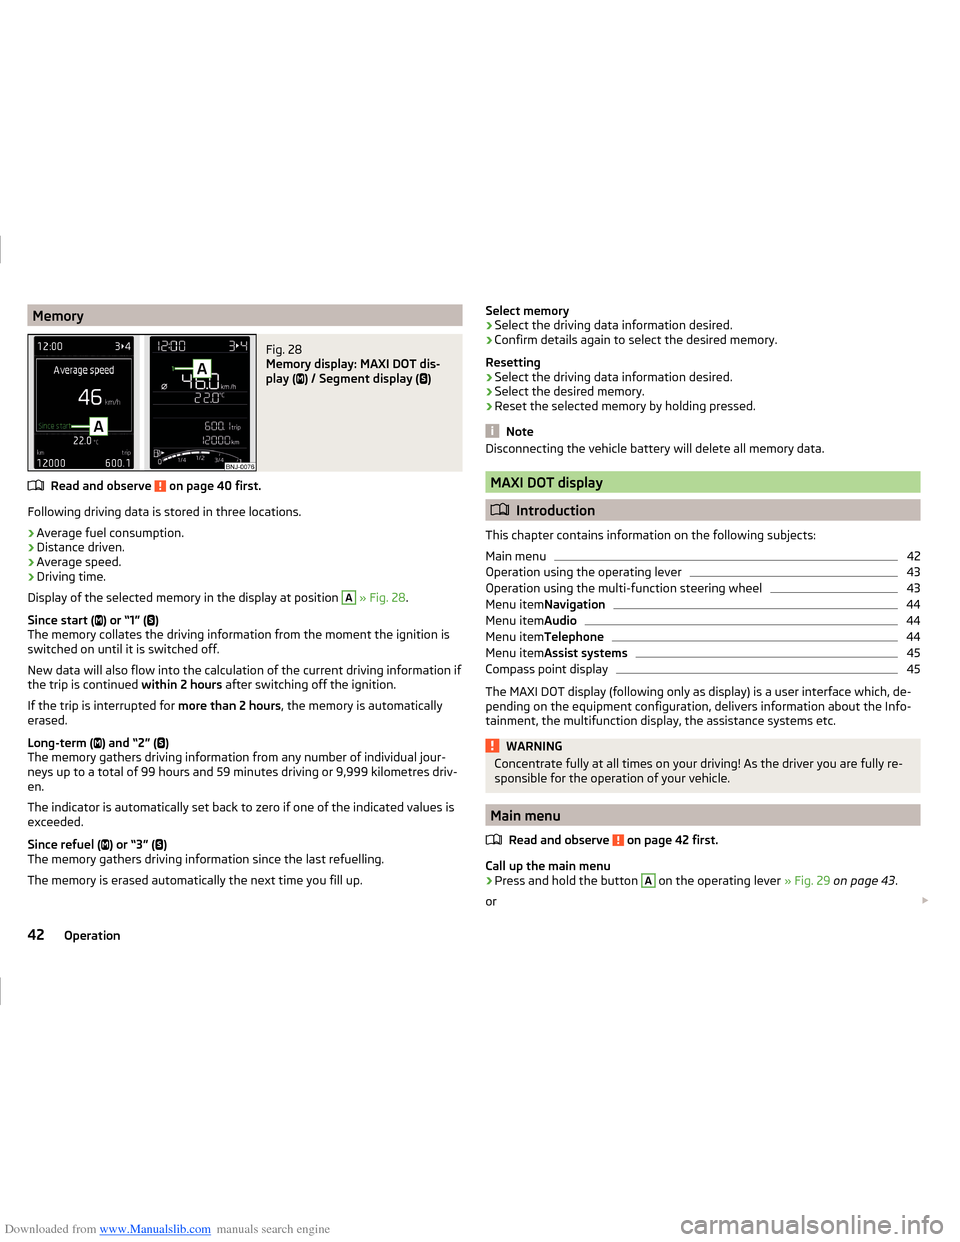
Downloaded from www.Manualslib.com manuals search engine MemoryFig. 28
Memory display: MAXI DOT dis-
play (
) / Segment display (
)
Read and observe on page 40 first.
Following driving data is stored in three locations.
› Average fuel consumption.
› Distance driven.
› Average speed.
› Driving time.
Display of the selected memory in the display at position
A
» Fig. 28 .
Since start ( ) or “1” (
)
The memory collates the driving information from the moment the ignition is
switched on until it is switched off.
New data will also flow into the calculation of the current driving information if
the trip is continued within 2 hours after switching off the ignition.
If the trip is interrupted for more than 2 hours, the memory is automatically
erased.
Long-term ( ) and “2” (
)
The memory gathers driving information from any number of individual jour-
neys up to a total of 99 hours and 59 minutes driving or 9,999 kilometres driv-
en.
The indicator is automatically set back to zero if one of the indicated values is
exceeded.
Since refuel ( ) or “3” (
)
The memory gathers driving information since the last refuelling.
The memory is erased automatically the next time you fill up.
Select memory
› Select the driving data information desired.
› Confirm details again to select the desired memory.
Resetting
› Select the driving data information desired.
› Select the desired memory.
› Reset the selected memory by holding pressed.
Note
Disconnecting the vehicle battery will delete all memory data.
MAXI DOT display
Introduction
This chapter contains information on the following subjects:
Main menu
42
Operation using the operating lever
43
Operation using the multi-function steering wheel
43
Menu item Navigation
44
Menu itemAudio
44
Menu itemTelephone
44
Menu itemAssist systems
45
Compass point display
45
The MAXI DOT display (following only as display) is a user interface which, de-
pending on the equipment configuration, delivers information about the Info-
tainment, the multifunction display, the assistance systems etc.
WARNINGConcentrate fully at all times on your driving! As the driver you are fully re-
sponsible for the operation of your vehicle.
Main menu
Read and observe
on page 42 first.
Call up the main menu
›
Press and hold the button
A
on the operating lever » Fig. 29 on page 43 .
or
42Operation
Page 46 of 216
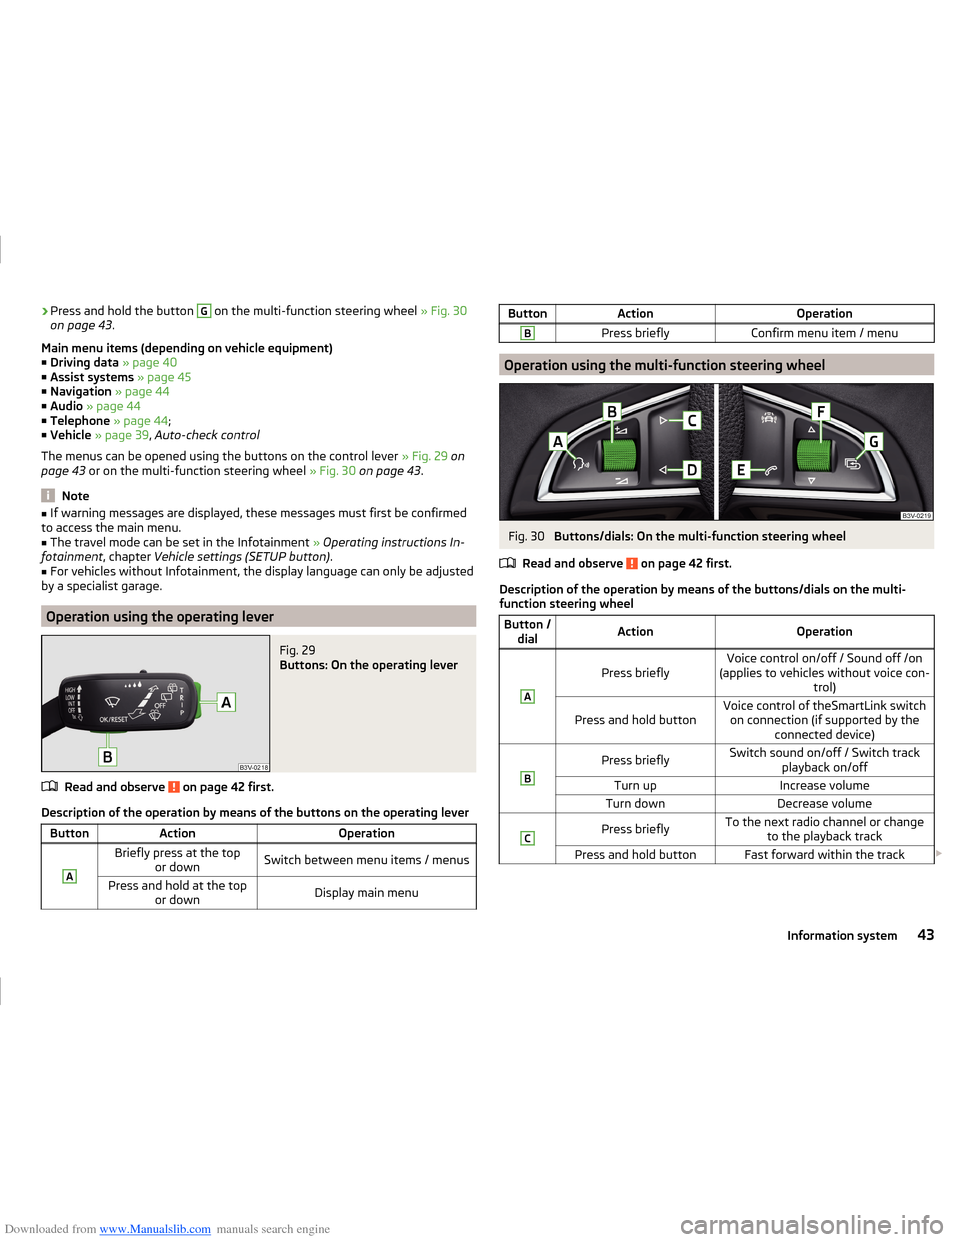
Downloaded from www.Manualslib.com manuals search engine ›Press and hold the button G on the multi-function steering wheel
» Fig. 30
on page 43 .
Main menu items (depending on vehicle equipment) ■ Driving data » page 40
■ Assist systems » page 45
■ Navigation » page 44
■ Audio » page 44
■ Telephone » page 44 ;
■ Vehicle » page 39 , Auto-check control
The menus can be opened using the buttons on the control lever » Fig. 29 on
page 43 or on the multi-function steering wheel » Fig. 30 on page 43 .
Note
■
If warning messages are displayed, these messages must first be confirmed
to access the main menu.■
The travel mode can be set in the Infotainment » Operating instructions In-
fotainment , chapter Vehicle settings (SETUP button) .
■
For vehicles without Infotainment, the display language can only be adjusted
by a specialist garage.
Operation using the operating lever
Fig. 29
Buttons: On the operating lever
Read and observe on page 42 first.
Description of the operation by means of the buttons on the operating lever
ButtonActionOperationABriefly press at the top or downSwitch between menu items / menusPress and hold at the top or downDisplay main menuButtonActionOperationBPress brieflyConfirm menu item / menu
Operation using the multi-function steering wheel
Fig. 30
Buttons/dials: On the multi-function steering wheel
Read and observe
on page 42 first.
Description of the operation by means of the buttons/dials on the multi-
function steering wheel
Button / dialActionOperationA
Press brieflyVoice control on/off / Sound off /on
(applies to vehicles without voice con- trol)Press and hold buttonVoice control of theSmartLink switchon connection (if supported by the connected device)BPress brieflySwitch sound on/off / Switch track playback on/offTurn upIncrease volumeTurn downDecrease volumeCPress brieflyTo the next radio channel or changeto the playback trackPress and hold buttonFast forward within the track 43Information system