fuel SKODA FABIA 2014 3.G / NJ Operating Instruction Manual
[x] Cancel search | Manufacturer: SKODA, Model Year: 2014, Model line: FABIA, Model: SKODA FABIA 2014 3.G / NJPages: 216, PDF Size: 30.9 MB
Page 114 of 216
Downloaded from www.Manualslib.com manuals search engine Starting-off and drivingRead and observe
and on page 109 first.
Starting off
›
Start the engine.
›
Firmly depress and hold the brake pedal.
›
Press the lock button in the direction of
1
» Fig. 119 on page 110 and hold.
›
Move the selector lever into the desired position » page 109and then release
the lock button.
›
Release the brake pedal and accelerate.
Stopping (while the car is moving)
›
Fully depress and hold the brake pedal and bring the vehicle to a stop.
›
Keep holding the brake pedal until driving is resumed.
The selector lever position N does not have to be selected when stopping for a
short time, such as at a cross roads.
Kickdown
The kickdown function allows you to achieve maximum acceleration by your vehicle while driving.
When the accelerator pedal is fully depressed, the kickdown function is activa-
ted in any forward driving mode.
The gearbox shifts down one or more gears depending on the vehicle speed
and engine speed, and the vehicle accelerates.
The gearbox does not shift up into the highest gear until the engine has
reached its maximum revolutions for this gear range.
WARNINGRapid acceleration, particularly on slippery roads, can lead to loss of control
of the vehicle – there is a risk of an accident.
Running-in and economical driving
Introduction
This chapter contains information on the following subjects:
Running-in
111
Tips for economical driving
111
DriveGreen function
112The fuel consumption, degree of pollution and vehicle wear depend on driving
style, road condition, weather conditions and the like.
Running-in
Driving in the engine
The engine has to be run in during the first 1 500 kilometres. During this peri-
od, the driving style decides on the quality of the driving-in process.
During the first 1,000 km ,we recommend not driving faster than 3/4 of the
maximum permissible engine speed, not to drive at full throttle and not to use
a trailer.
In the range of 1,000 to 1,500 kilometres, the engine load can be increased up
to the maximum permitted engine speed.
New tyres
New tyres have to be “run in” since they do not offer optimal grip at first.
Drive especially carefully for the first 500 km or so.
New brake pads
New brake pads have to first “grind in” because these do not initially have the
best possible braking effect.
Drive especially carefully for the first 200 km or so.
Tips for economical driving
To achieve the lowest possible fuel consumption, the following instructions
must be observed.
Looking ahead when driving
Avoid unnecessary acceleration and braking.
Change gear in an energy saving and timely manner
Observe the recommended gear » page 39.
Avoid full throttle and high speeds
Fuel consumption can be reduced by half if only three-quarters of the possible
top speed of your vehicle is used.
111Starting-off and driving
Page 115 of 216
Downloaded from www.Manualslib.com manuals search engine Reducing idling
If the vehicle is fitted with the START - STOP system there is an automatic re-
duction of the idling. If the engine is stopped on vehicles without START-STOP
system, such as when waiting in a traffic jam, the fuel economy is already
greater after 30 - 40 s than the fuel quantity which is required for engine re-
start.
Avoid short distances
When driving a short distance of less than about 4 km, the engine cannot
reach its operating temperature. As long as the engine has not reached oper-
ating temperature, the fuel consumption is significantly higher than with the
engine hot.
Pay attention to the correct tyre inflation pressure being maintained
Further information » page 161.
Avoid unnecessary ballast
Per 100 kg of weight, consumption increases by about 0.3 l/100 km. At a speed of 100 - 120 km/h, a vehicle fitted with a roof rack cross member without a load
will use about 10 % more fuel than normal due to the increased aerodynamic
drag.
Saving electricity
Electrical consumers (e.g. seat heating, air conditioning and the like) should
only be turned on for as long as necessary.
Use the cooling system economically
The air conditioning system compressor uses power from the engine when in
cooling mode, which will affect the fuel consumption.
It recommended to open the windows or the doors of a vehicle for which the
interior has been strongly heated through the effect of direct sunlight in order
to allow the heated air to escape.
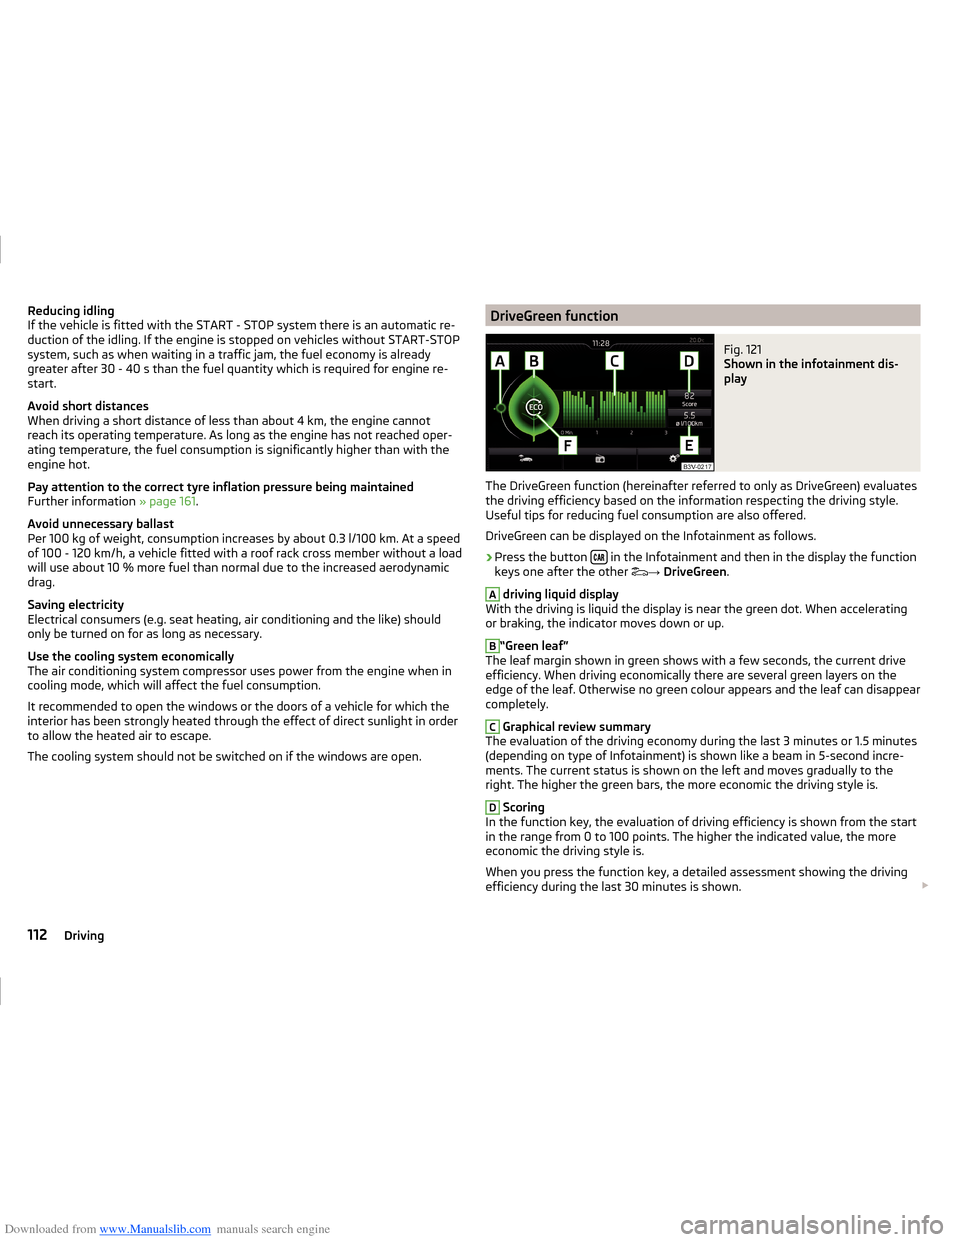
The cooling system should not be switched on if the windows are open.DriveGreen functionFig. 121
Shown in the infotainment dis-
play
The DriveGreen function (hereinafter referred to only as DriveGreen) evaluates
the driving efficiency based on the information respecting the driving style.
Useful tips for reducing fuel consumption are also offered.
DriveGreen can be displayed on the Infotainment as follows.
›
Press the button in the Infotainment and then in the display the function
keys one after the other →
DriveGreen .
A
driving liquid display
With the driving is liquid the display is near the green dot. When accelerating
or braking, the indicator moves down or up.
B
“Green leaf”
The leaf margin shown in green shows with a few seconds, the current drive
efficiency. When driving economically there are several green layers on the
edge of the leaf. Otherwise no green colour appears and the leaf can disappear
completely.
C
Graphical review summary
The evaluation of the driving economy during the last 3 minutes or 1.5 minutes
(depending on type of Infotainment) is shown like a beam in 5-second incre-
ments. The current status is shown on the left and moves gradually to the
right. The higher the green bars, the more economic the driving style is.
D
Scoring
In the function key, the evaluation of driving efficiency is shown from the start
in the range from 0 to 100 points. The higher the indicated value, the more
economic the driving style is.
When you press the function key, a detailed assessment showing the driving
efficiency during the last 30 minutes is shown.
112Driving
Page 116 of 216
Downloaded from www.Manualslib.com manuals search engine If the trip from the start, takes less than 30 minutes, then the assessment
takes in information from the previous trip (the bars are shown in dark green).E
Average fuel consumption
In the function key, the average fuel consumption from the start is displayed.
When you press the function key a detailed overview of the average fuel con-
sumption during the last 30 minutes is shown.
If the trip from the start, takes less than 30 minutes, then the average fuel
consumption takes in information from the previous trip (the bars are shown in
dark green).
F
Symbols in the display
The display may show the following four symbols, which give information on
the current driving style.
Ecological trip
The current speed has a negative effect on fuel consumption. The driving is not liquid, drive with anticipation.
Recommended gear.
Tips for reducing fuel consumption
When tapping the “Page” the display shows useful tips on how to reduce fuel consumption. These tips can to be helpful to drive more economically.
Note
■ Resetting the single-trip memory “from start” also resets the average con-
sumption E and the driving assessment D.■
With some Infotainment types changing the units for the fuel consumption
indicator causes the resetting of the average fuel consumption values
E
.
Avoiding damage to your vehicle
Introduction
This chapter contains information on the following subjects:
Driving Tips
113
Driving through water
113
This section of the manual contains important information on preventing dam-
age to the vehicle while driving.
Driving Tips
Only drive on such roads and in such terrain, which match the vehicle parame-
ters » page 192 , Technical data as well as your driving skills.
The driver is always responsible for deciding whether the vehicle can handle
travelling in the given terrain.WARNING■ Always adjust your driving to the current terrain and weather conditions.
Excessive speed or incorrect driving manoeuvres can cause damage to the
vehicle and lead to serious injuries.■
Combustible objects such as dry leaves or twigs caught under the base of
the vehicle could ignite on hot vehicle parts - risk of fire!
CAUTION
■ Pay attention to the ground clearance of the vehicle! When driving over ob-
jects which are larger than the ground clearance, the vehicle can get damaged.■
Any objects that get trapped under the vehicle floor must be removed as
soon as possible. These objects can damage the fuel lines, the brake system,
seals and other parts of the vehicle.
■
Drive slowly in unknown terrain and watch out for unexpected obstacles,
such as potholes, rocks, stumps, etc.
■
Check up on confusing sections of unpaved roads before travelling on them
and consider whether such travelling is possible without risk.
Driving through water
Fig. 122
Maximum permissible water lev-
el when driving through water
The following instructions must be observed if vehicle damage is to be avoided
when driving through water (e.g. flooded roads).
113Starting-off and driving
Page 117 of 216
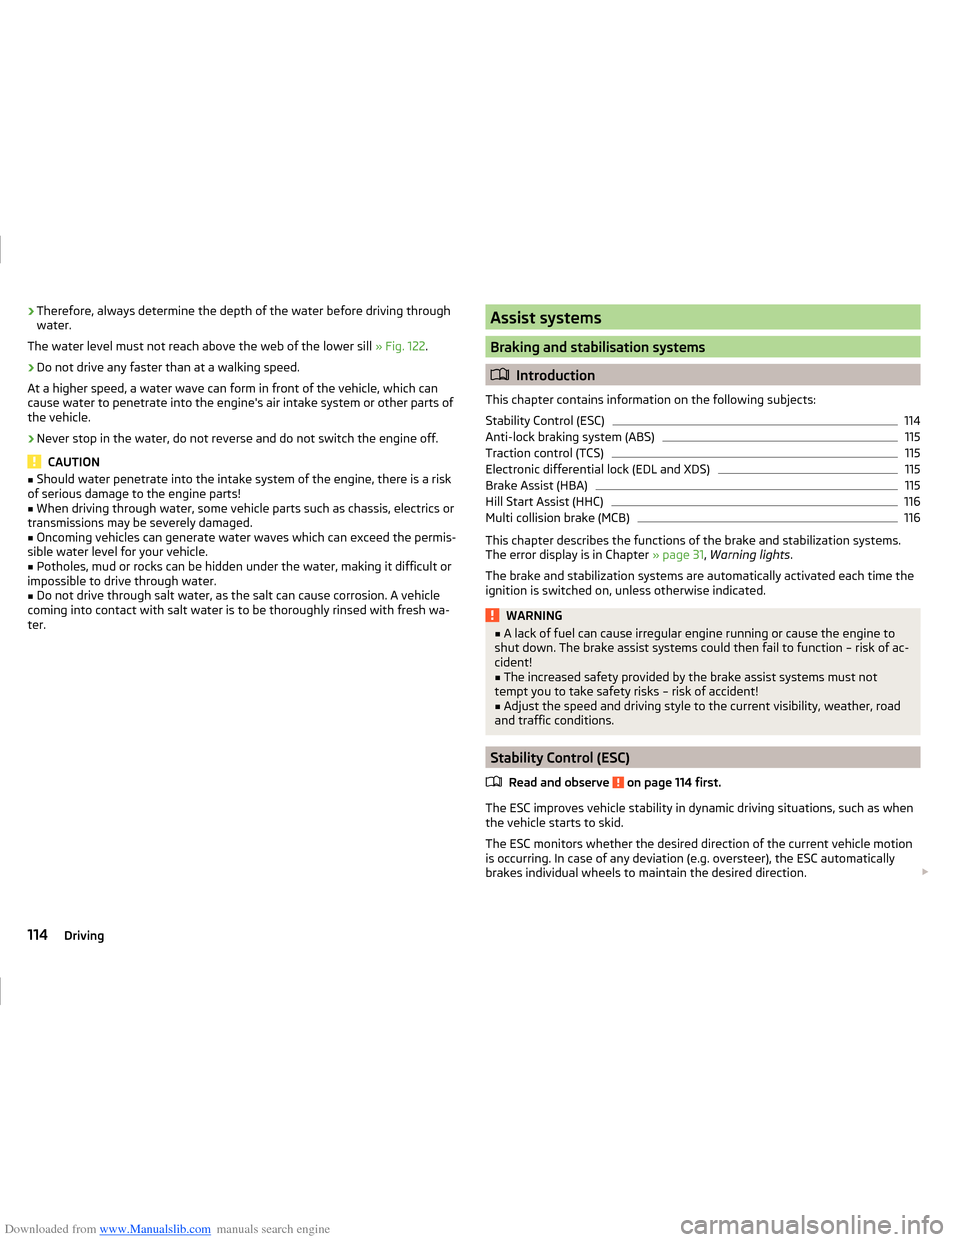
Downloaded from www.Manualslib.com manuals search engine ›Therefore, always determine the depth of the water before driving through
water.
The water level must not reach above the web of the lower sill » Fig. 122.›
Do not drive any faster than at a walking speed.
At a higher speed, a water wave can form in front of the vehicle, which can
cause water to penetrate into the engine's air intake system or other parts of
the vehicle.
›
Never stop in the water, do not reverse and do not switch the engine off.
CAUTION
■ Should water penetrate into the intake system of the engine, there is a risk
of serious damage to the engine parts!■
When driving through water, some vehicle parts such as chassis, electrics or
transmissions may be severely damaged.
■
Oncoming vehicles can generate water waves which can exceed the permis-
sible water level for your vehicle.
■
Potholes, mud or rocks can be hidden under the water, making it difficult or
impossible to drive through water.
■
Do not drive through salt water, as the salt can cause corrosion. A vehicle
coming into contact with salt water is to be thoroughly rinsed with fresh wa-
ter.
Assist systems
Braking and stabilisation systems
Introduction
This chapter contains information on the following subjects:
Stability Control (ESC)
114
Anti-lock braking system (ABS)
115
Traction control (TCS)
115
Electronic differential lock (EDL and XDS)
115
Brake Assist (HBA)
115
Hill Start Assist (HHC)
116
Multi collision brake (MCB)
116
This chapter describes the functions of the brake and stabilization systems.
The error display is in Chapter » page 31, Warning lights .
The brake and stabilization systems are automatically activated each time the
ignition is switched on, unless otherwise indicated.
WARNING■ A lack of fuel can cause irregular engine running or cause the engine to
shut down. The brake assist systems could then fail to function – risk of ac-
cident!■
The increased safety provided by the brake assist systems must not
tempt you to take safety risks – risk of accident!
■
Adjust the speed and driving style to the current visibility, weather, road
and traffic conditions.
Stability Control (ESC)
Read and observe
on page 114 first.
The ESC improves vehicle stability in dynamic driving situations, such as whenthe vehicle starts to skid.
The ESC monitors whether the desired direction of the current vehicle motion
is occurring. In case of any deviation (e.g. oversteer), the ESC automatically
brakes individual wheels to maintain the desired direction.
114Driving
Page 145 of 216
Downloaded from www.Manualslib.com manuals search engine CAUTION■Do not treat the door seals or window guides with any cleaning agent.■An additional treatment of the seals can attack their protective coating and
road noise may be generated.
Chrome and anodized parts
Read and observe
and on page 141 first.
First clean the chrome parts and anodized parts with a damp cloth and thenpolish them with a soft, dry cloth.
If this method does not completely clean the parts, use cleaning products spe-
cially designed for this purpose.
CAUTION
■ Do not polish the chrome parts and anodized parts in a dusty environment -
risk of surface scratches.■
Never use aggressive cleaning agents or chemical solvents for these parts -
there is risk of damage.
Decorative and protective foils
Read and observe
and on page 141 first.
Wash the films with a mild soap solution and clean, warm water.
The following instructions must be observed for the high-pressure washing
the vehicle.
› The minimum distance between the nozzle and the vehicle body should be
50 cm.
› Keep the jet perpendicular to the film surface.
› The maximum water temperature is 50 °C.
› The maximum water pressure is 80 bar.
CAUTION
■
Never use aggressive cleaning agents or chemical solvents for the glued sur-
faces with films - there is a danger of film damage.■
Never use dirty cloths or chemical solvents for the glued surfaces with films -
there is a danger of damaging the film.
■
No ice scrapers should be used in the winter months to remove ice and snow
from the areas to which films have been applied. Do not remove frozen snow
or ice using other objects - there is a risk of damage to the film.
Windows and external mirrorsFig. 154
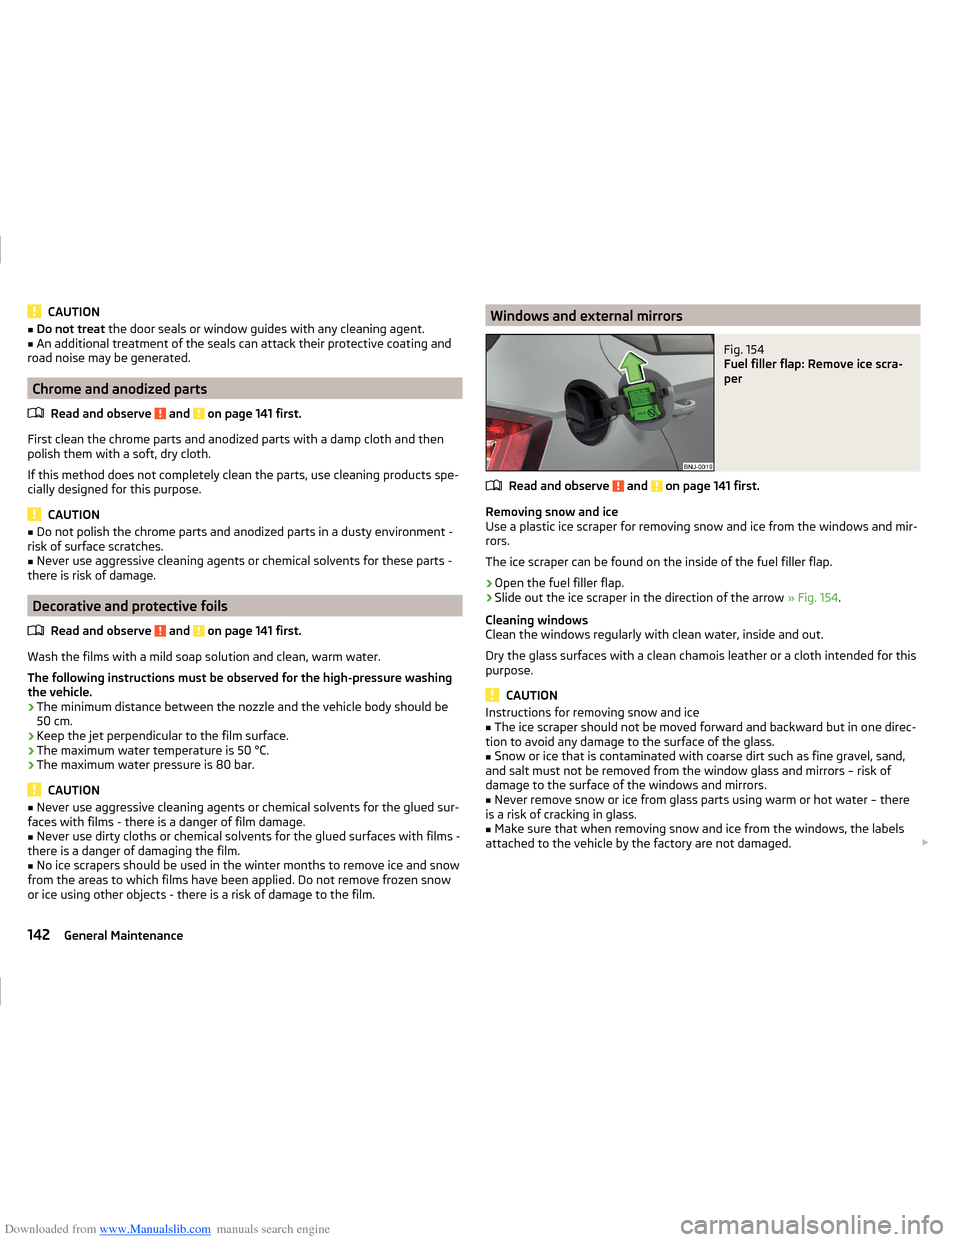
Fuel filler flap: Remove ice scra-
per
Read and observe and on page 141 first.
Removing snow and ice
Use a plastic ice scraper for removing snow and ice from the windows and mir-
rors.
The ice scraper can be found on the inside of the fuel filler flap.
›
Open the fuel filler flap.
›
Slide out the ice scraper in the direction of the arrow » Fig. 154.
Cleaning windows
Clean the windows regularly with clean water, inside and out.
Dry the glass surfaces with a clean chamois leather or a cloth intended for this
purpose.
CAUTION
Instructions for removing snow and ice■The ice scraper should not be moved forward and backward but in one direc-
tion to avoid any damage to the surface of the glass.■
Snow or ice that is contaminated with coarse dirt such as fine gravel, sand,
and salt must not be removed from the window glass and mirrors – risk of
damage to the surface of the windows and mirrors.
■
Never remove snow or ice from glass parts using warm or hot water – there
is a risk of cracking in glass.
■
Make sure that when removing snow and ice from the windows, the labels
attached to the vehicle by the factory are not damaged.
142General Maintenance
Page 150 of 216
Downloaded from www.Manualslib.com manuals search engine Inspecting and replenishing
Fuel
Introduction
This chapter contains information on the following subjects:
Refuelling
147
Lead-free petrol
148
Diesel fuel
149
The correct fuel grades for your vehicle are specified on the inside of the fuel
filler flap » Fig. 155 on page 147 .
CAUTION
■
Never drive until the fuel tank is completely empty! The irregular supply of
fuel can cause misfiring, which can result in damage to parts of the engine and
the exhaust system.■
Immediately remove any fuel that has spilled onto the vehicle's paintwork –
risk of paint damage.
■
If the vehicle was not purchased in the country in which it was intended to
be operated, you should check whether the fuel specified by the manufacturer
is offered in the country where the vehicle will be operated. You should also
perhaps check whether the manufacturer has recommended a different fuel
for operation of the vehicle in the country concerned. If no prescribed fuel is
available, then you must check whether it is permitted by the manufacturer to
operate the vehicle with another fuel type.
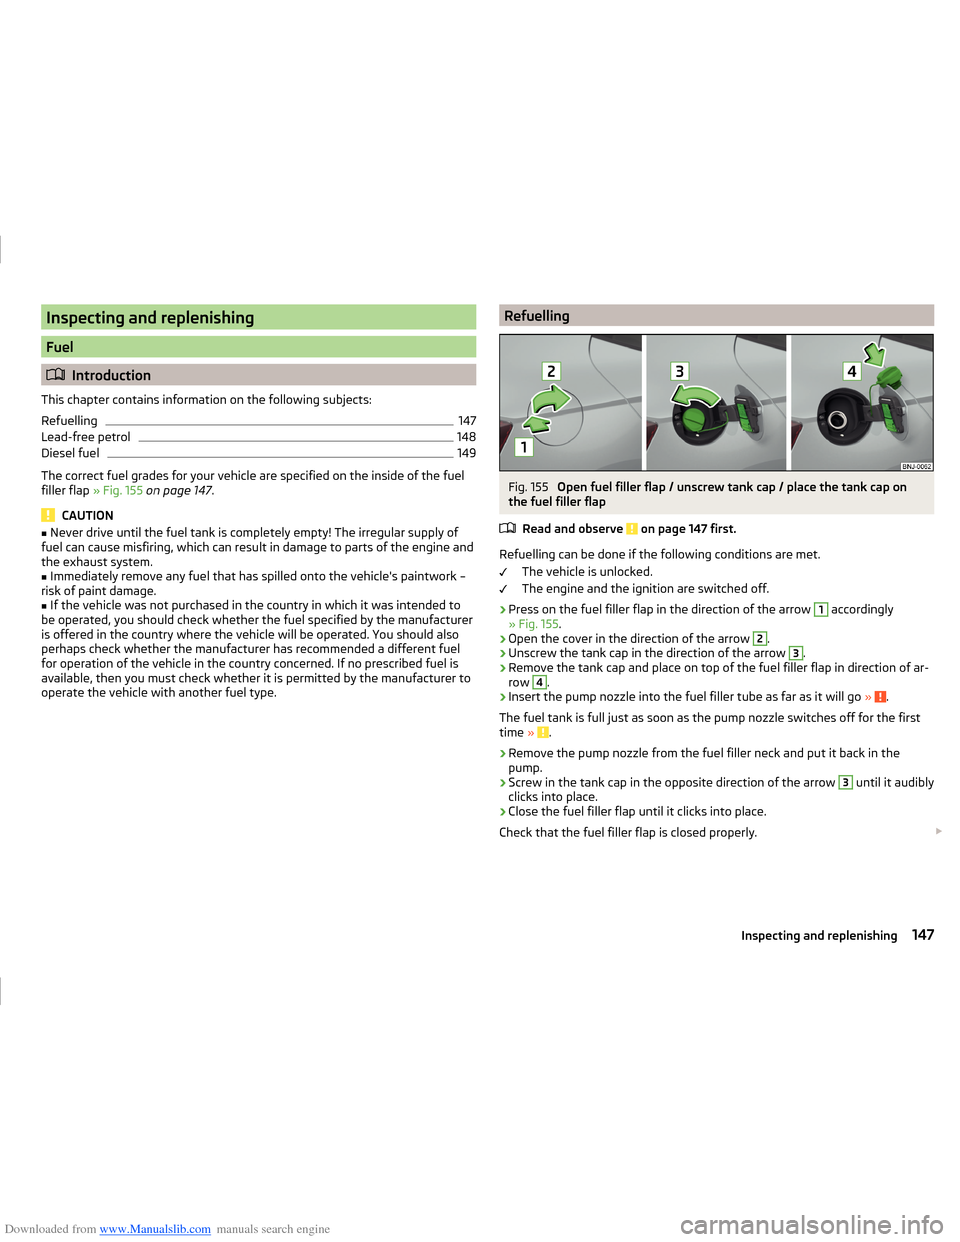
RefuellingFig. 155
Open fuel filler flap / unscrew tank cap / place the tank cap on
the fuel filler flap
Read and observe
on page 147 first.
Refuelling can be done if the following conditions are met. The vehicle is unlocked.
The engine and the ignition are switched off.
›
Press on the fuel filler flap in the direction of the arrow
1
accordingly
» Fig. 155 .
›
Open the cover in the direction of the arrow
2
.
›
Unscrew the tank cap in the direction of the arrow
3
.
›
Remove the tank cap and place on top of the fuel filler flap in direction of ar-
row
4
.
›
Insert the pump nozzle into the fuel filler tube as far as it will go » .
The fuel tank is full just as soon as the pump nozzle switches off for the first
time »
.
›
Remove the pump nozzle from the fuel filler neck and put it back in the
pump.
›
Screw in the tank cap in the opposite direction of the arrow
3
until it audibly
clicks into place.
›
Close the fuel filler flap until it clicks into place.
Check that the fuel filler flap is closed properly.
147Inspecting and replenishing
Page 151 of 216
Downloaded from www.Manualslib.com manuals search engine WARNING■Do not smoke when refuelling and do not use a mobile phone.■The fuel and fuel vapours are explosive - risk to life!■
Observe the local regulations regarding fuel handling.
WARNINGInstructions for filling the reserve canister■Never fill the reserve can inside the vehicle.■
Never place the reserve can on the vehicle.
■
Always place the reserve can on the floor.
■
The national legal requirements must be observed if carrying a spare can-
ister in the vehicle.
■
We do not recommend carrying any fuel canisters in your vehicle for safe-
ty reasons. In the event of an accident this could be damaged and fuel
could escape – there is a risk of fire.
CAUTION
■ The fuel tank is full just as soon as the pump nozzle switches off for the first
time, provided the nozzle has been operated properly. Do not continue refuel-
ling.■
Be careful when filling diesel fuel from the spare canister and then do this
slowly and cautiously – danger of contaminating the body.
Note
The fuel tank has a capacity of about 45 litres, including a reserve of approx.
7 litres .
Lead-free petrol
The correct fuel grades for your vehicle are specified on the inside of the fuel
filler flap.
Read and observe
on page 147 first.
The vehicle can only be operated with unleaded petrol in compliance with the
EN 228 1)
standard.
All petrol engines can be operated using petrol with a maximum of 10% bioe-
thanol (E10).
Unleaded petrol 95/91 or 92 or 93 RON/ROZ
We recommend using unleaded fuel with an octane rating of 95 RON. Unlea-
ded petrol with the octane ratings 91, 92 and/or 93 RON can also be used, but
may result in a slight loss in performance and slightly increased fuel consump-
tion and exhaust emissions.
Unleaded petrol min. 95 RON / ROZ
Use unleaded fuel with an octane rating of 95 RON or higher.
In an emergency petrol with the octane ratings 91, 92 and/or 93 RON can also
be used, but may result in a slight loss in performance and slightly increased
fuel consumption and exhaust emissions. Continue driving at medium engine
speeds and minimum engine load »
.
Refuel using petrol of the prescribed octane number as soon as possible.
Fuel additives
Unleaded petrol complying with EN 228 1)
meets all the conditions for a
smooth-running engine. We therefore recommend that no fuel additives are
used. This can result in considerable damage to parts of the engine or the ex-
haust system.
CAUTION
■ Even one filling of the tank with petrol that does not meet the standards can
lead to serious damage to parts of the exhaust system!■
If a fuel other than unleaded fuel which complies to the above mentioned
standards (e.g. leaded petrol) is put in the tank by mistake, do not start the en-
gine or switch on the ignition. Extensive damage to engine parts can occur.
CAUTION
■ If petrol with a lower octane number than the one prescribed is used do not
drive with a high engine speed. A high engine load can severely damage en-
gine components.■
Even in the event of an emergency, petrol of a lower octane number than 91
RON must not be used, otherwise the engine can be severely damaged.
CAUTION
In no case may fuel additives with metal components be used, especially not
with manganese and iron content. Risk of causing considerable damage to
parts of the engine or exhaust system. 1)
In Germany also DIN 51626-1 or E10 for unleaded petrol with octane rating 95 or 91 or DIN 51626-2 or E5
for unleaded petrol with octane rating 95.
148General Maintenance
Page 152 of 216
Downloaded from www.Manualslib.com manuals search engine CAUTIONDo not use fuels with metal components, such as LRP (lead replacement
petrol) may be used. Risk of causing considerable damage to parts of the en-
gine or exhaust system.
Note
■ Unleaded petrol that has a higher octane number than that required by the
engine can be used without limitations.■
The use of petrol with an octane rating higher than 95 RON in does not re-
sult in either a noticeable increase in power nor lower fuel consumption in ve-
hicles for which unleaded petrol 95/91, 92 or 93 RON is specified.
■
On vehicles using prescribed unleaded petrol of min. 95 RON, the use of pet-
rol with a higher octane number than 95 RON can increase the power and re-
duce fuel consumption.
Diesel fuel
The correct fuel grades for your vehicle are specified on the inside of the fuel
filler flap.
Read and observe
on page 147 first.
The vehicle can only be operated with diesel fuel that meets the EN 5901)
standard.
All diesel engines can be operated using diesel fuel with a maximum of 7% bi-
odiesel (B7)2)
.
On the Indian market, your vehicle will only be able to run on diesel fuel com-
pliant with standard IS 1460/Bharat IV. If diesel fuel which complies with this
standard is not available, you can refuel with diesel fuel according to standard
IS 1460/Bharat III in case of emergency.
Operation in winter - winter-grade diesel fuel
In the cold season, only use “winter-grade diesel fuel” which will still operate properly even at a temperature of -20 °C.
It is often the case in countries with different climatic conditions that diesel
fuels available have a different temperature characteristic. ŠKODA Partners
and filling stations in the relevant country will be able to provide you with in-
formation regarding the diesel fuels available.
Preheating fuel
The vehicle is fitted with a fuel filter preheating system. This secures opera- tion of a vehicle using diesel fuel down to an environmental temperature of
-24 °C.
Diesel fuel additives
The diesel fuel in accordance with the prescribed standards meets all the con-
ditions for a smooth running engine. We therefore recommend that no diesel
fuel additives are used. This can result in considerable damage to parts of the
engine or the exhaust system.
CAUTION
■ Just filling the tank once with diesel fuel that does not comply with the
standard, can cause severe damage to parts of the engine, the fuel and ex-
haust system.■
If a different fuel other than diesel fuel, which complies to the above men-
tioned standards (e.g. petrol) is used, do not start the engine or switch on the
ignition! Extensive damage to engine parts can occur.
■
Water which has collected in the fuel filter can cause engine faults.
CAUTION
■ The vehicle cannot be operated with biofuel RME, therefore this fuel must
not be filled in the tank and used for driving the vehicle. The use of biofuel
RME can cause considerable damage to parts of the engine or fuel system.■
Do not mix any fuel additives, so-called “flow improvers” (petrol and similar
agents), into the diesel. This can result in considerable damage to parts of the
engine or the exhaust system.
Engine compartment
Introduction
This chapter contains information on the following subjects:
Opening and closing the bonnet
151
Engine compartment overview
151
Radiator fan
152
Windscreen washer system
152
1)
In Germany also DIN 51628, in Austria ÖNORM C 1590, in Russia GOST R 52368-2005 / EN 590:2004.
2)
In Germany complying with standard DIN 52638, in Austria ÖNORM C 1590, in France EN 590.
149Inspecting and replenishing
Page 153 of 216
Downloaded from www.Manualslib.com manuals search engine WARNINGWhen working in the engine compartment, injuries, scalding, accident or
fire hazards may arise. For this reason, it is essential to comply with the
warning instructions stated below and with the generally applicable rules
of safety. The engine compartment of your car is a hazardous area.WARNINGInstructions before beginning work in the engine compartment■Turn off the engine and remove the ignition key.■
Firmly apply the handbrake.
■
For vehicles with manual transmission the lever into the neutral position.
■
On vehicles with automatic transmission, shift the selector lever into the
P position.
■
Allow the engine to cool.
■
Never open the bonnet if you can see steam or coolant flowing out of the
engine compartment – there is a risk of scalding. Wait until the steam or
coolant has stopped escaping.
WARNINGInformation for working in the engine room■Keep all people, especially children, away from the engine compartment.■
Never touch the radiator fan while the engine is still warm. The fan might
suddenly start running!
■
Do not touch any hot engine parts – there is a risk of burns.
WARNINGInformation for working in the engine compartment with the engine run-
ning■
Pay particular attention to moving engine parts, e.g. V-ribbed belt, gener-
ator, radiator fan - danger to life!
■
Never touch the electric wiring on the ignition system.
■
Avoid short circuits in the electrical system, particularly on the vehicle's
battery.
■
Always make sure that no jewellery, loose clothing or long hair can get
caught in rotating engine parts – there is a risk of death. Always remove
any jewellery, tie back long hair and wear tight fitting clothing before com-
pleting any work.
WARNINGInformation for working on the fuel system or the electrical system■Always disconnect the vehicle battery from the electrical system.■
Do not smoke.
■
Never work near open flames.
■
Always have a functioning fire extinguisher nearby.
WARNING■ Read the information and warning instructions on the fluid containers.■Keep the working fluids in sealed original containers and safe from peo-
ple who are not completely independent, e.g. children.■
Never spill operating fluids over the hot engine - risk of fire.
■
If you wish to work under the vehicle, you must secure the vehicle against
rolling away and support it with suitable axle stands: the car jack is not suf-
ficient for this – there is a risk of injury.
CAUTION
Always top up using the correct specification of fluids. This may result in major
operating problems and also vehicle damage!
For the sake of the environment
In view of the requirements for the environmentally friendly disposal of fluids and the special tools and knowledge required for such work, we recommend
that fluids be changed by a specialist garage.
Note
■ If there is anything you are not sure about concerning fluids, please consult a
specialist garage.■
Fluids with the proper specifications can be purchased from the ŠKODA Origi-
nal Accessories or from the ŠKODA Genuine Parts ranges.
150General Maintenance
Page 164 of 216
Downloaded from www.Manualslib.com manuals search engine Notes on using wheelsRead and observe
on page 160 first.
During the first 500 km, new tyres do not offer optimum grip and appropriate
care should therefore be taken when driving.
Always fit the tyres with the deeper tread depth to the front wheels.
Tyre storage
Mark the tyres as you remove them so that you are able to refit them to run in
the same direction.
Always store wheels or tyres in a cool, dry and, where possible, dark place.
Tyres which are not fixed to a wheel trim should be stored upright.
Tyre age
Tyres age losing their original characteristics, even if they are not used. The
service life of the tyres is 6 years. Therefore, we recommend not using tyres
older than 6 years.
Wheel bolts
Wheels and wheel bolts are matched to each other in terms of design. There-
fore we recommend that you use wheel rims and wheel bolts from ŠKODA
Original Accessories.
WARNINGNever use tyres if you do not know anything about the condition and age.
Tyre pressure
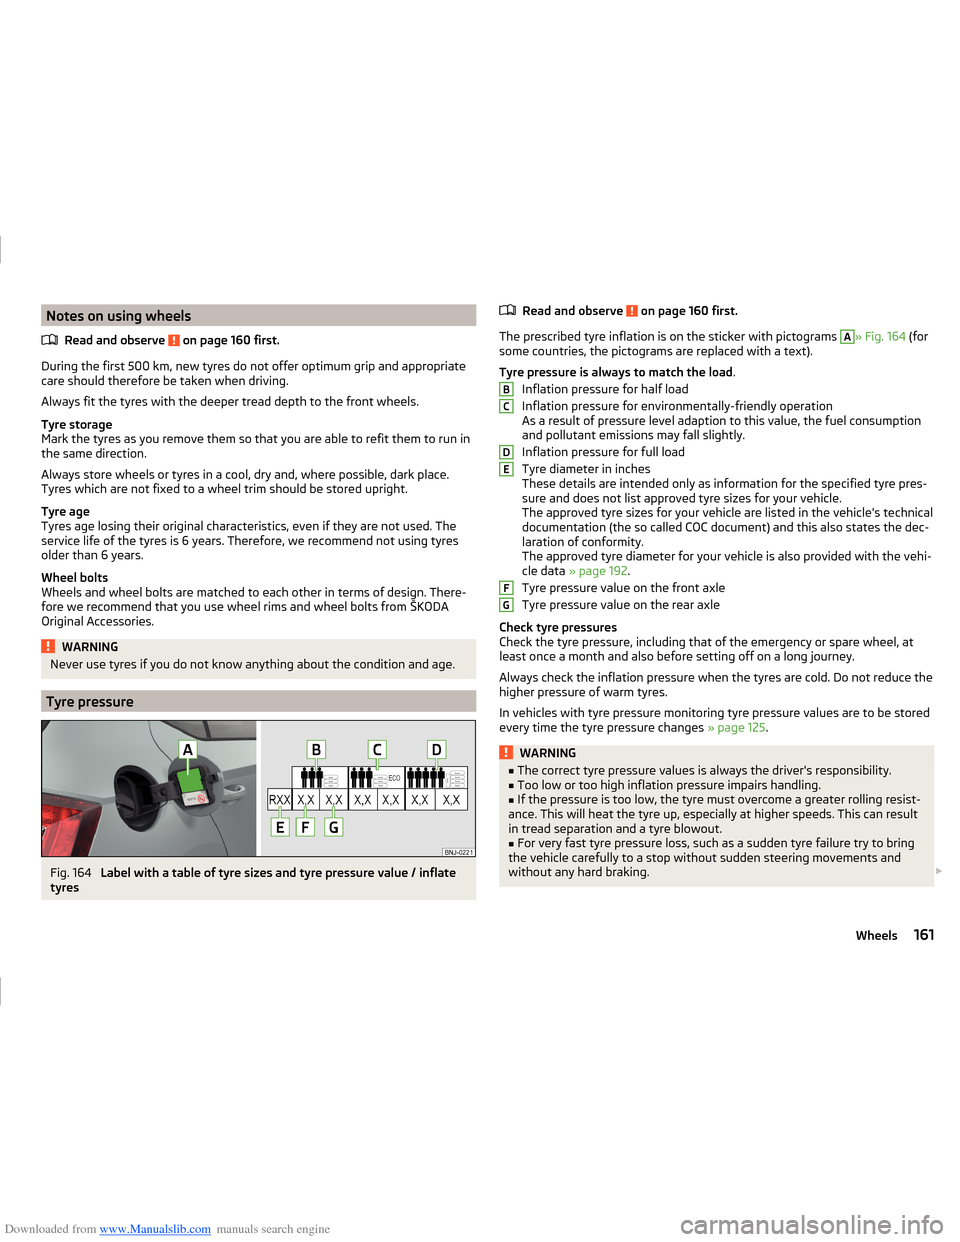
Fig. 164
Label with a table of tyre sizes and tyre pressure value / inflate
tyres
Read and observe on page 160 first.
The prescribed tyre inflation is on the sticker with pictograms
A
» Fig. 164 (for
some countries, the pictograms are replaced with a text).
Tyre pressure is always to match the load .
Inflation pressure for half load
Inflation pressure for environmentally-friendly operation
As a result of pressure level adaption to this value, the fuel consumption
and pollutant emissions may fall slightly.
Inflation pressure for full load
Tyre diameter in inches
These details are intended only as information for the specified tyre pres-
sure and does not list approved tyre sizes for your vehicle.
The approved tyre sizes for your vehicle are listed in the vehicle's technical
documentation (the so called COC document) and this also states the dec-
laration of conformity.
The approved tyre diameter for your vehicle is also provided with the vehi-
cle data » page 192 .
Tyre pressure value on the front axle
Tyre pressure value on the rear axle
Check tyre pressures
Check the tyre pressure, including that of the emergency or spare wheel, at
least once a month and also before setting off on a long journey.
Always check the inflation pressure when the tyres are cold. Do not reduce the
higher pressure of warm tyres.
In vehicles with tyre pressure monitoring tyre pressure values are to be stored
every time the tyre pressure changes » page 125.
WARNING■
The correct tyre pressure values is always the driver's responsibility.■Too low or too high inflation pressure impairs handling.■
If the pressure is too low, the tyre must overcome a greater rolling resist-
ance. This will heat the tyre up, especially at higher speeds. This can result
in tread separation and a tyre blowout.
■
For very fast tyre pressure loss, such as a sudden tyre failure try to bring
the vehicle carefully to a stop without sudden steering movements and
without any hard braking.
BCDEFG161Wheels