snow chains SKODA FABIA 2014 3.G / NJ Operating Instruction Manual
[x] Cancel search | Manufacturer: SKODA, Model Year: 2014, Model line: FABIA, Model: SKODA FABIA 2014 3.G / NJPages: 216, PDF Size: 30.9 MB
Page 38 of 216
Downloaded from www.Manualslib.com manuals search engine Other incidents
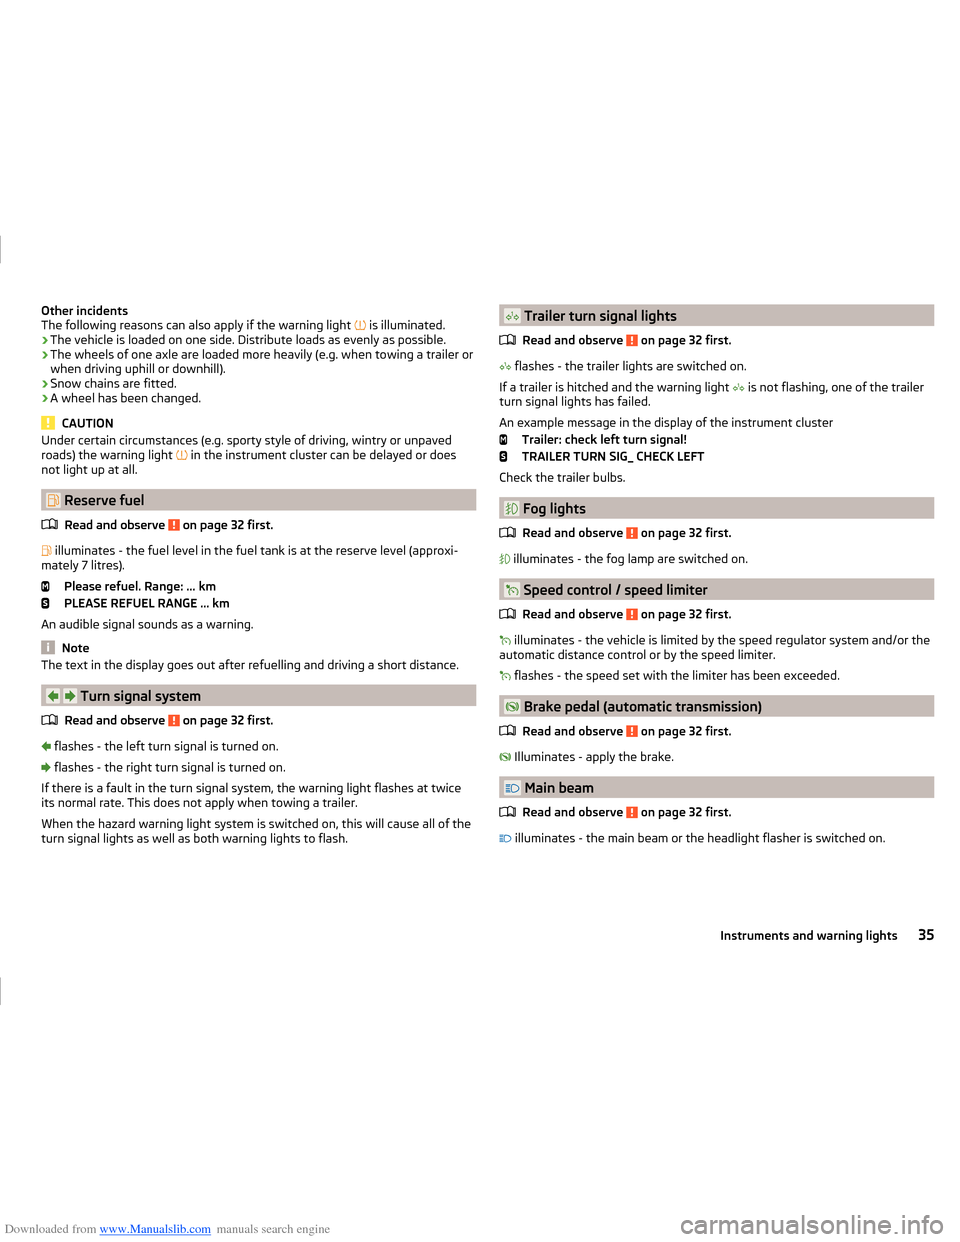
The following reasons can also apply if the warning light is illuminated.
› The vehicle is loaded on one side. Distribute loads as evenly as possible.
› The wheels of one axle are loaded more heavily (e.g. when towing a trailer or
when driving uphill or downhill).
› Snow chains are fitted.
› A wheel has been changed.
CAUTION
Under certain circumstances (e.g. sporty style of driving, wintry or unpaved
roads) the warning light in the instrument cluster can be delayed or does
not light up at all.
Reserve fuel
Read and observe
on page 32 first.
illuminates - the fuel level in the fuel tank is at the reserve level (approxi-
mately 7 litres).
Please refuel. Range: ... km
PLEASE REFUEL RANGE … km
An audible signal sounds as a warning.
Note
The text in the display goes out after refuelling and driving a short distance.
Turn signal system
Read and observe
on page 32 first.
flashes - the left turn signal is turned on.
flashes - the right turn signal is turned on.
If there is a fault in the turn signal system, the warning light flashes at twice
its normal rate. This does not apply when towing a trailer.
When the hazard warning light system is switched on, this will cause all of the
turn signal lights as well as both warning lights to flash.
Trailer turn signal lights
Read and observe
on page 32 first.
flashes - the trailer lights are switched on.
If a trailer is hitched and the warning light
is not flashing, one of the trailer
turn signal lights has failed.
An example message in the display of the instrument cluster Trailer: check left turn signal!
TRAILER TURN SIG_ CHECK LEFT
Check the trailer bulbs.
Fog lights
Read and observe
on page 32 first.
illuminates - the fog lamp are switched on.
Speed control / speed limiter
Read and observe
on page 32 first.
illuminates - the vehicle is limited by the speed regulator system and/or the
automatic distance control or by the speed limiter.
flashes - the speed set with the limiter has been exceeded.
Brake pedal (automatic transmission)
Read and observe
on page 32 first.
Illuminates - apply the brake.
Main beam
Read and observe
on page 32 first.
illuminates - the main beam or the headlight flasher is switched on.
35Instruments and warning lights
Page 118 of 216
Downloaded from www.Manualslib.com manuals search engine During an intervention of the system, the warning light flashes in the instru-
ment cluster.
Anti-lock braking system (ABS)
Read and observe
on page 114 first.
ABS prevents the wheels locking when braking. Thereby, it helps the driver to
maintain control of the vehicle.
The intervention of the ABS is noticeable from the pulsating movements of
the brake pedal which is accompanied by noises.
When the ABS system is active, do not pump the brakes or lift off the brake
pedal.
Traction control (TCS)
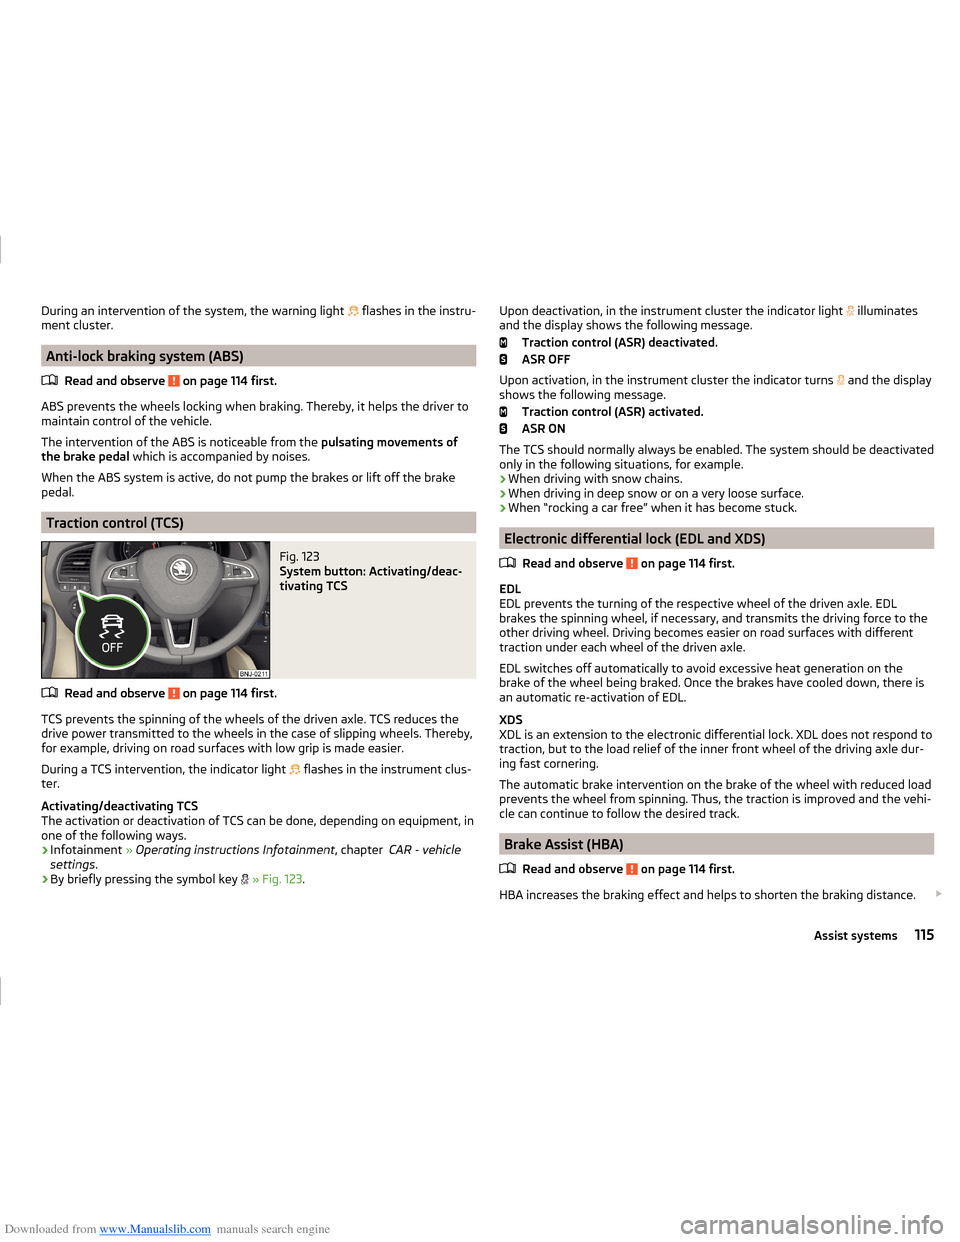
Fig. 123
System button: Activating/deac-
tivating TCS
Read and observe on page 114 first.
TCS prevents the spinning of the wheels of the driven axle. TCS reduces the drive power transmitted to the wheels in the case of slipping wheels. Thereby,
for example, driving on road surfaces with low grip is made easier.
During a TCS intervention, the indicator light flashes in the instrument clus-
ter.
Activating/deactivating TCS
The activation or deactivation of TCS can be done, depending on equipment, in
one of the following ways.
› Infotainment
» Operating instructions Infotainment , chapter CAR - vehicle
settings .
› By briefly pressing the symbol key
» Fig. 123 .
Upon deactivation, in the instrument cluster the indicator light illuminates
and the display shows the following message.
Traction control (ASR) deactivated.
ASR OFF
Upon activation, in the instrument cluster the indicator turns
and the display
shows the following message.
Traction control (ASR) activated.
ASR ON
The TCS should normally always be enabled. The system should be deactivated
only in the following situations, for example.
› When driving with snow chains.
› When driving in deep snow or on a very loose surface.
› When “rocking a car free” when it has become stuck.
Electronic differential lock (EDL and XDS)
Read and observe
on page 114 first.
EDL
EDL prevents the turning of the respective wheel of the driven axle. EDL
brakes the spinning wheel, if necessary, and transmits the driving force to the
other driving wheel. Driving becomes easier on road surfaces with different
traction under each wheel of the driven axle.
EDL switches off automatically to avoid excessive heat generation on the
brake of the wheel being braked. Once the brakes have cooled down, there is
an automatic re-activation of EDL.
XDS
XDL is an extension to the electronic differential lock. XDL does not respond to
traction, but to the load relief of the inner front wheel of the driving axle dur-
ing fast cornering.
The automatic brake intervention on the brake of the wheel with reduced load
prevents the wheel from spinning. Thus, the traction is improved and the vehi-
cle can continue to follow the desired track.
Brake Assist (HBA)
Read and observe
on page 114 first.
HBA increases the braking effect and helps to shorten the braking distance.
115Assist systems
Page 163 of 216
Downloaded from www.Manualslib.com manuals search engine CAUTION■Despite such intervention by the vehicle electric system management, the
vehicle battery may be drained. For example, when the ignition is switched on
a long time with the engine turned off or the side or parking lights are turned
on during longer parking.■
Consumers which are supplied via a 12 V socket can cause the vehicle battery
to discharge when the ignition is switched off.
Note
Driving comfort is not disrupted by any shutting off of consumers. Often the
driver is not aware of it having taken place.Wheels
Tyres and rims
Introduction
This chapter contains information on the following subjects:
Notes on using wheels
161
Tyre pressure
161
Tyre wear
162
Tyre wear indicator and wheels exchange
162
Tyre damage
163
Unidirectional tyres
163
Spare wheel
163
Spare wheel
163
Tyre label
164
Only use those tyres or wheel rims which have been approved by ŠKODA for
your model of vehicle.
WARNINGNational legal requirements must be observed for the use of tyres.WARNINGFor safety reasons, do no replace tyres individually.
For the sake of the environment
Old and unserviceable tyres are a polluting hazardous waste. These must be disposed of in accordance with national legislation.
Note
■ We recommend that any work on the wheels or tyres is carried out by a spe-
cialist garage.■
We recommend that you use wheel rims, tyres, full wheel trims and snow
chains from ŠKODA Original Accessories.
160General Maintenance
Page 166 of 216
Downloaded from www.Manualslib.com manuals search engine Tyre damageRead and observe
on page 160 first.
We recommend checking your tyres and wheel rims for damage (punctures,
cuts, splits and bulges, etc.) on a regular basis. Remove foreign bodies (e.g.
small stones) from the tyre profile immediately.
Drive over kerbs and other such obstacles slowly and at right angles wherever
possible in order to avoid damage to tyres and wheel trims.
Immediately replace damaged wheel rims or tyres.
WARNINGNever drive with damaged tyres – there is the risk of an accident.
CAUTION
The tyres must be protected from contact with substances such as oil, grease
and fuel, which could damage them. If the tyres with these substances come
into contact, then we recommend that you check this in a specialist workshop.
Unidirectional tyres
Read and observe
on page 160 first.
The direction of rotation of the tyres is marked by arrows on the wall of the
tyre .
The direction of rotation indicated must be complied with to obtain the best
benefits from the characteristics of these tyres.
These characteristics are principally the following.
› Increased driving stability.
› Reduced risk of aquaplaning.
› Reduced tyre noise and reduced tyre wear.
Spare wheel
Read and observe
on page 160 first.
The size of the spare wheel is identical to that of the vehicle factory installedwheels.
After changing the spare wheel, the tyre pressure should be adjusted.
In vehicles with tyre pressure monitoring, save tyre pressure values » page 125.WARNING■
If, you get a puncture and a spare tyre has to be mounted with opposite
direction of rotation, then drive carefully. In this situation the best proper-
ties of the tyre are no longer present.■
If the dimensions or design of the spare wheel differ from the tyres fitted
to the vehicle (e.g. winter tyres or low-profile tyres), it must only be used
briefly in the event of a puncture and if an appropriately cautious style of
driving is adopted.
■
Never use the temporary spare wheel if it is damaged.
Spare wheel
Read and observe
on page 160 first.
A yellow warning label is always displayed on the rim of the temporary spare
wheel.
Please note the following if you intend to use the temporary spare wheel. › The warning label must not be covered after installing the wheel.
› Be specially attentive when driving.
› The temporary spare wheel is inflated to the maximum inflation pressure for
the vehicle » page 161.
› Only use the temporary spare wheel to reach the nearest specialist garage
since it is not intended for permanent use.
If you need to use a spare wheel, make sure to fit a standard wheel of the ap-
propriate dimensions and design as soon as possible.
In vehicles with tyre pressure monitoring, save tyre pressure values » page 125.
WARNING■
Never drive with more than one spare wheel mounted!■Only use the spare wheel while absolutely necessary.■
Avoid accelerating at full throttle, sharp braking and fast cornering.
■
The snow chains cannot be used on the spare wheel.
■
If the dimensions or design of the temporary spare wheel differ from the
tyres fitted, never drive faster than 80 km/h (or 50 mph).
■
Never use the emergency spare wheel if it is damaged.
■
Observe the instructions on the warning sign of the temporary spare
wheel.
163Wheels
Page 167 of 216
Downloaded from www.Manualslib.com manuals search engine Tyre labelRead and observe
on page 160 first.
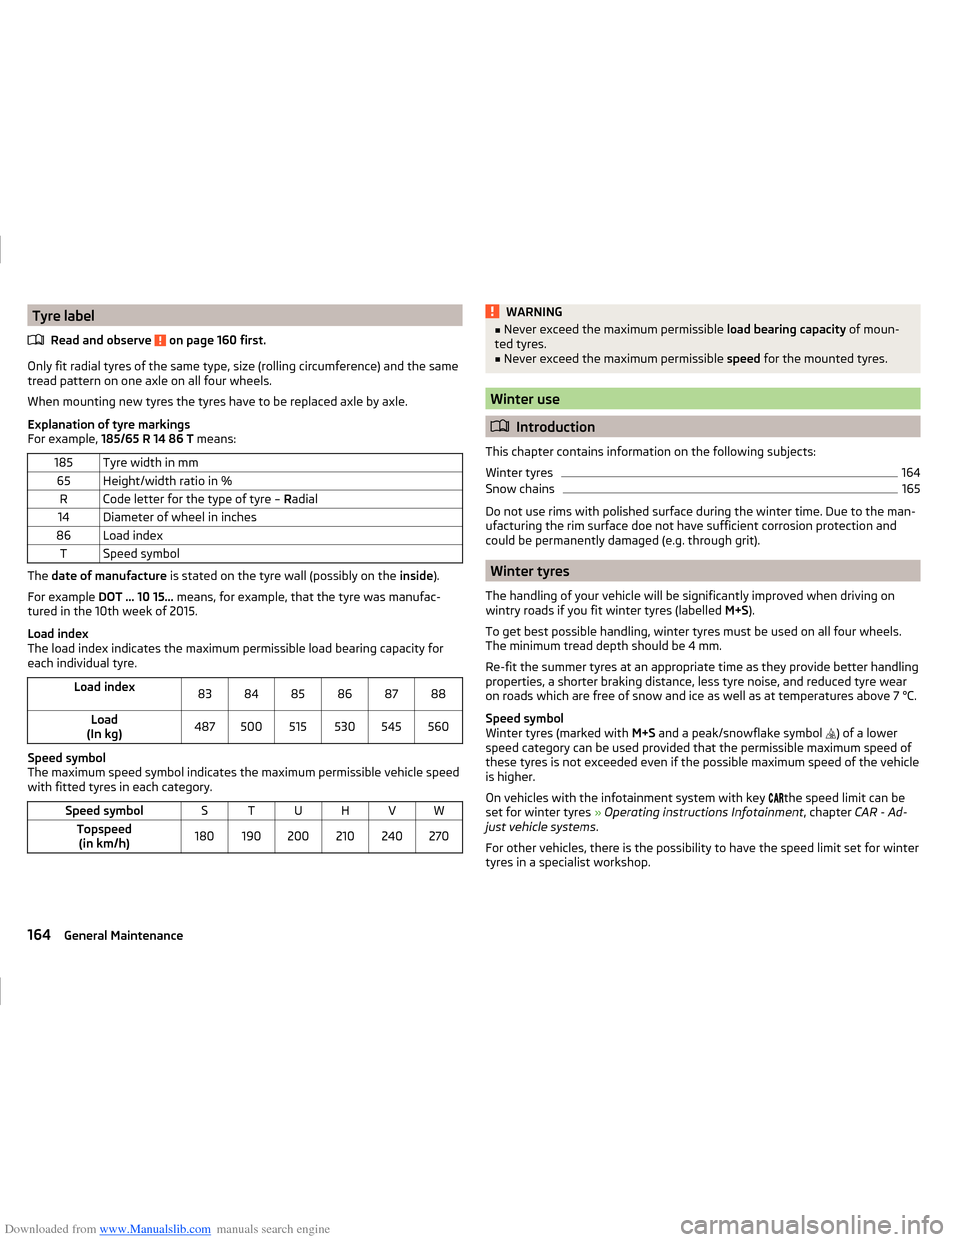
Only fit radial tyres of the same type, size (rolling circumference) and the same
tread pattern on one axle on all four wheels.
When mounting new tyres the tyres have to be replaced axle by axle.
Explanation of tyre markings
For example, 185/65 R 14 86 T means:
185Tyre width in mm65Height/width ratio in %RCode letter for the type of tyre – Radial14Diameter of wheel in inches86Load indexTSpeed symbol
The date of manufacture is stated on the tyre wall (possibly on the inside).
For example DOT ... 10 15... means, for example, that the tyre was manufac-
tured in the 10th week of 2015.
Load index
The load index indicates the maximum permissible load bearing capacity for
each individual tyre.
Load index838485868788Load
(In kg)487500515530545560
Speed symbol
The maximum speed symbol indicates the maximum permissible vehicle speed
with fitted tyres in each category.
Speed symbolSTUHVWTopspeed (in km/h)180190200210240270WARNING■ Never exceed the maximum permissible load bearing capacity of moun-
ted tyres.■
Never exceed the maximum permissible speed for the mounted tyres.
Winter use
Introduction
This chapter contains information on the following subjects:
Winter tyres
164
Snow chains
165
Do not use rims with polished surface during the winter time. Due to the man-
ufacturing the rim surface doe not have sufficient corrosion protection and
could be permanently damaged (e.g. through grit).
Winter tyres
The handling of your vehicle will be significantly improved when driving on
wintry roads if you fit winter tyres (labelled M+S).
To get best possible handling, winter tyres must be used on all four wheels.
The minimum tread depth should be 4 mm.
Re-fit the summer tyres at an appropriate time as they provide better handling
properties, a shorter braking distance, less tyre noise, and reduced tyre wear
on roads which are free of snow and ice as well as at temperatures above 7 °C.
Speed symbol
Winter tyres (marked with M+S and a peak/snowflake symbol
) of a lower
speed category can be used provided that the permissible maximum speed of
these tyres is not exceeded even if the possible maximum speed of the vehicle
is higher.
On vehicles with the infotainment system with key the speed limit can be
set for winter tyres » Operating instructions Infotainment , chapter CAR - Ad-
just vehicle systems .
For other vehicles, there is the possibility to have the speed limit set for winter
tyres in a specialist workshop.
164General Maintenance
Page 168 of 216
Downloaded from www.Manualslib.com manuals search engine Snow chains
When driving on wintry roads, snow chains improve not only traction, but also
the braking performance.
Snow chains must only be mounted on the front wheels.
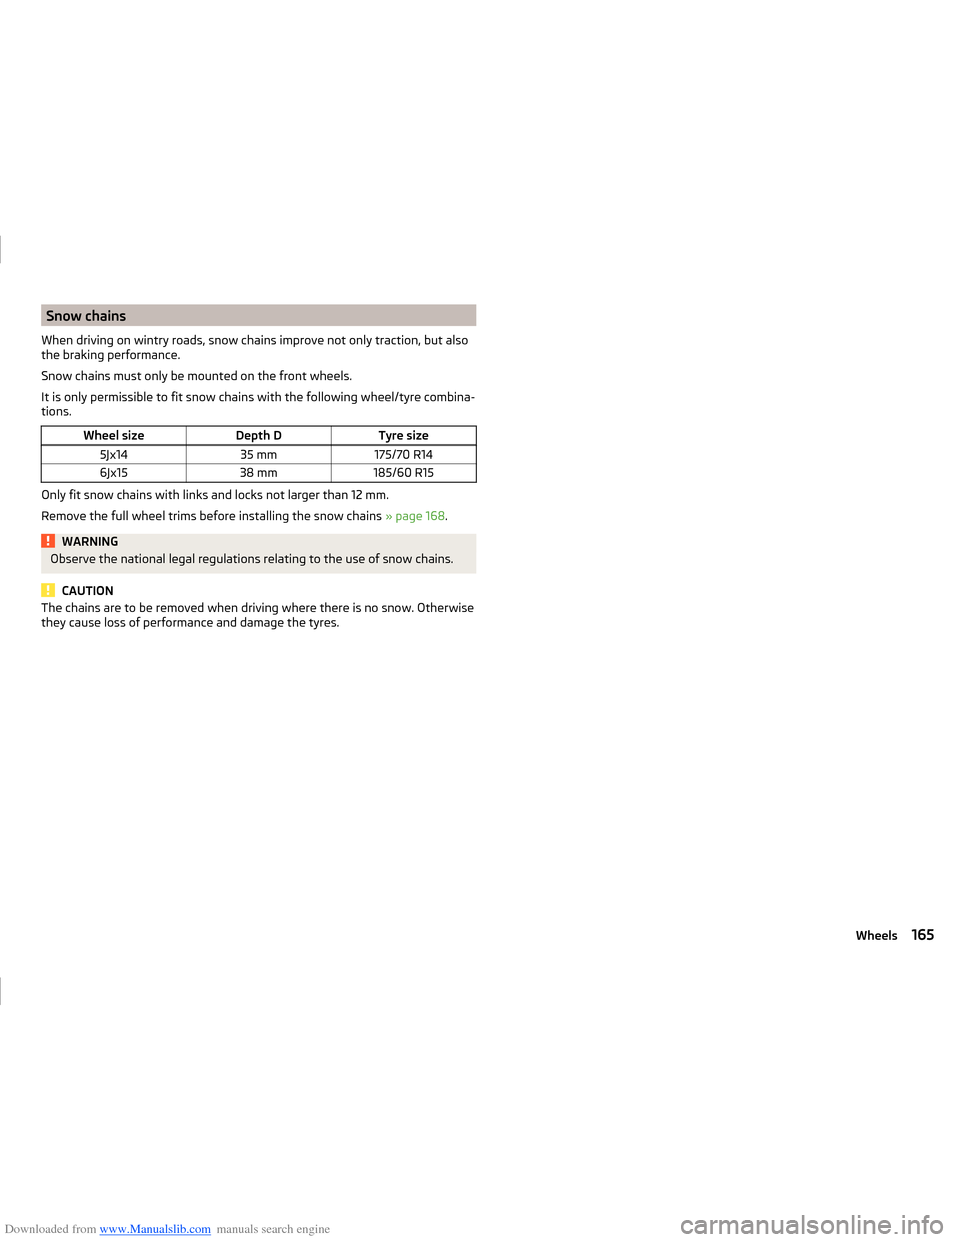
It is only permissible to fit snow chains with the following wheel/tyre combina-
tions.Wheel sizeDepth DTyre size5Jx1435 mm175/70 R146Jx1538 mm185/60 R15
Only fit snow chains with links and locks not larger than 12 mm.
Remove the full wheel trims before installing the snow chains » page 168.
WARNINGObserve the national legal regulations relating to the use of snow chains.
CAUTION
The chains are to be removed when driving where there is no snow. Otherwise
they cause loss of performance and damage the tyres.165Wheels
Page 210 of 216
Downloaded from www.Manualslib.com manuals search engine Rear seat73
Seat backrests72
Seats and headrest70
Secure variable loading floor
90
see Instrument cluster see Instrument cluster
27
Selector lever Refer to Selector lever
109
Selector lever lock Indicator light
35
Service137
Service interval display46
Warning light38
setting Lower position of the variable loading floor
89
Setting31
Seat belt height12
seats and headrests70
Upper position of the variable loading floor89
Settings Interior mirror
68
Setting the31
Side airbag17
SmartGate Connection via the search for a Wi-Fi network
47
Setting48
Wi-Fi direct48
SmartLink see Infotainment
4
Snow chains165
Sockets 12 V
78
Spare change
168
spare wheel change
168
Spare wheel163
Speed control system118
Speed limiter120
Indicator light35
Operation120
Operation description121
Speed symbol see Wheels
164
Spoiler138
Stabilisation system114
Stability Control (ESC)114
Staring engine Jump-starting
174
START-STOP104
Jump-starting174
Manually deactivating/activating the system105
operation104
Warning light38
START-STOP system104
Starter button Problems with the engine start
104
Steering column lock locking102
Steering column lock unlocking102
Switching off the engine103
Switch off the ignition103
Switch on the ignition103
Starting and stopping the engine at the push of the button
102
Starting and stopping the engine using the key 100
Starting engine Jump-starting
174
Starting the engine Starter button
103
START STOP Information messages
105
Start the engine Key
101
Steering column lock locking Starter button
102
Steering column lock unlocking Starter button
102
Steering lock lockingKey100
Steering lock unlocking Key
100
Steering lock (engine start push-button) Warning light
32
Steering wheel correct posture
9
setting9
Stop see Parking
107
Stopping the engine Key
101
Storage74
compartment beneath the front seat81
storage compartment Glasses compartment
80
Storage compartment in the doors
75
in the front arm rest79
in the front centre console76
in the rear centre console82
on the dash panel76
on the front passenger side80
on the side of the front seat75
Storage compartments74
Storage pockets on the front seats81
sun visors66
Sun visors66
Switching lights on and off60
Switching off the engine Starter button
103
Switch off the ignition Key
101
Starter button103
Switch on the ignition Key
101
Starter button103
207Index
Page 212 of 216
Downloaded from www.Manualslib.com manuals search engine Chrome parts142
Cleaning vehicle exterior140
Cleaning wheels143
Decorative and protective foils142
Door locking cylinder143
Headlight glasses143
Interior care144
Maintenance141
Materials145
Natural leather145
Plastic parts141
Polishing vehicle paint work141
Rubber seals141
Safety belt146
Seat covers146
Under-body protections144
washing139
Vehicle condition see Auto-check control
39
Vehicle data sticker192
Vehicle data sticker and nameplate Vehicle data sticker and nameplate
192
Vehicle dimensions194
Vehicle height194
Vehicle Identification Number (VIN)192
Vehicle length194
Vehicle tool kit167
Vehicle width194
Vest Placement of the reflective vest
166
VIN Vehicle Identification Number
192
Visibility65
Visors see front sun visors
66
W
Warning indicator of a low temperature Warning light
38
Warning lights31
Warning symbols see Warning lights
31
Warning triangle166
warning when speeding41
Washing Automatic car wash system
140
by hand140
High-pressure cleaner140
Washing vehicles139
Waste container78
Weather conditions136
Wheel bolts Anti-theft wheel bolts
169
Caps169
Loosening and tightening170
wheels spare wheel
168
Wheels Age of wheels
161
Changing168
Driving style162
Full trim168
General information160
Load index164
Snow chains165
Speed symbol164
Storage of wheels161
Tyre damage163
Tyre pressure161
Tyre size164
Tyre wear162
Tyre wear indicator162
Unidirectional tyres163
Wheel balance162
Wheels exchange162
Winter tyres164
Wi-Fi Password
47
Setting48
Wi-Fi direct48
Window wiper Replacing the rear window wiper blade
180
Windscreen washer fluid Checking
152
Replenishing152
Warning light38
Winter152
Windscreen washers Windscreen washers
67
Windscreen washer system152
Windscreen wipers operation
67
Replacing the windscreen wipers180
Windscreen washer fluid152
Windscreen wipers and washers66
Winter operation De-icing windows
142
Snow chains165
Winter tyres See Wheels
164
Winter use164
Winter tyres164
Wiper blades144
Service position of the windscreen wiper arms 180
Wiper interval
67
Wipers Maintaining wiper blades
144
X
XDS
115
209Index