window SKODA FABIA 2015 3.G / NJ Owner's Guide
[x] Cancel search | Manufacturer: SKODA, Model Year: 2015, Model line: FABIA, Model: SKODA FABIA 2015 3.G / NJPages: 220, PDF Size: 32.46 MB
Page 99 of 220
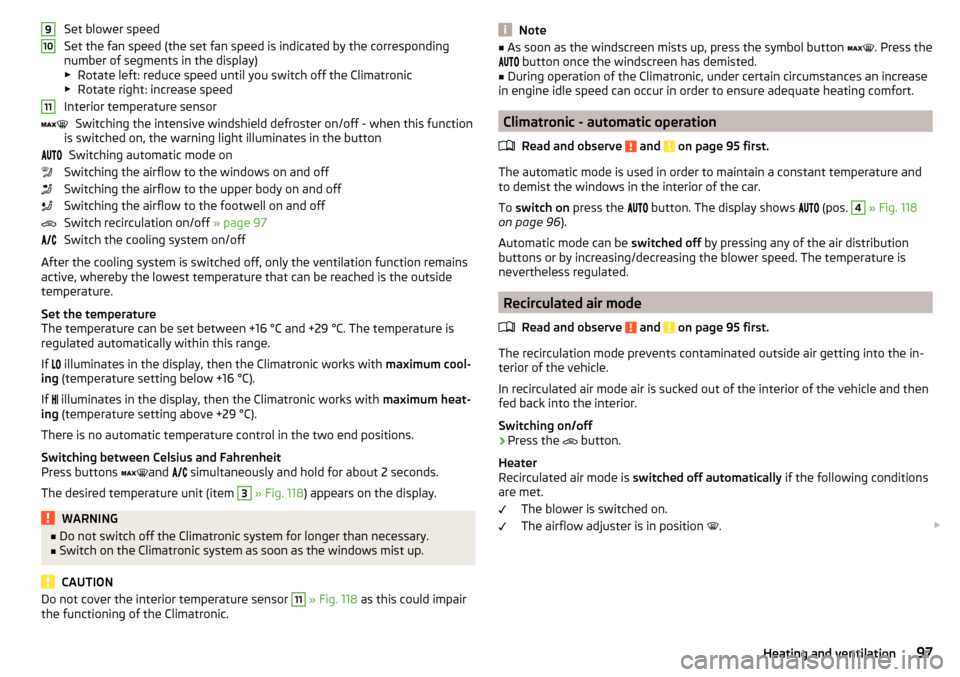
Set blower speed
Set the fan speed (the set fan speed is indicated by the corresponding
number of segments in the display)
▶ Rotate left: reduce speed until you switch off the Climatronic
▶ Rotate right: increase speed
Interior temperature sensor Switching the intensive windshield defroster on/off - when this function
is switched on, the warning light illuminates in the button
Switching automatic mode on
Switching the airflow to the windows on and off
Switching the airflow to the upper body on and off
Switching the airflow to the footwell on and off
Switch recirculation on/off » page 97
Switch the cooling system on/off
After the cooling system is switched off, only the ventilation function remains active, whereby the lowest temperature that can be reached is the outside
temperature.
Set the temperature
The temperature can be set between +16 °C and +29 °C. The temperature is
regulated automatically within this range.
If illuminates in the display, then the Climatronic works with
maximum cool-
ing (temperature setting below +16 °C).
If illuminates in the display, then the Climatronic works with
maximum heat-
ing (temperature setting above +29 °C).
There is no automatic temperature control in the two end positions.
Switching between Celsius and Fahrenheit
Press buttons and
simultaneously and hold for about 2 seconds.
The desired temperature unit (item 3
» Fig. 118 ) appears on the display.
WARNING■
Do not switch off the Climatronic system for longer than necessary.■Switch on the Climatronic system as soon as the windows mist up.
CAUTION
Do not cover the interior temperature sensor 11 » Fig. 118 as this could impair
the functioning of the Climatronic.91011Note■ As soon as the windscreen mists up, press the symbol button . Press the
button once the windscreen has demisted.■
During operation of the Climatronic, under certain circumstances an increase
in engine idle speed can occur in order to ensure adequate heating comfort.
Climatronic - automatic operation
Read and observe
and on page 95 first.
The automatic mode is used in order to maintain a constant temperature andto demist the windows in the interior of the car.
To switch on press the
button. The display shows
(pos.
4
» Fig. 118
on page 96 ).
Automatic mode can be switched off by pressing any of the air distribution
buttons or by increasing/decreasing the blower speed. The temperature is
nevertheless regulated.
Recirculated air mode
Read and observe
and on page 95 first.
The recirculation mode prevents contaminated outside air getting into the in-
terior of the vehicle.
In recirculated air mode air is sucked out of the interior of the vehicle and then
fed back into the interior.
Switching on/off
›
Press the button.
Heater
Recirculated air mode is switched off automatically if the following conditions
are met.
The blower is switched on.
The airflow adjuster is in position .
97Heating and ventilation
Page 100 of 220
Individually controlled air conditioning
Recirculated air mode is switched on automatically if the following conditions
are met.
The blower is switched on.
The airflow adjuster is outside position
.
The temperature controller is turned to the left.
Recirculated air mode is switched off automatically if the following conditions
are met.
The blower is switched on.
The airflow adjuster is in position
.
Climatronic
Depending on the moisture conditions in the vehicle interior, the air recircula-
tion may shut-down automatically .WARNINGThe recirculation system cannot be switched on for a longer period of time,
because there is no supply of fresh air from the outside. “Stale air” may re-
sult in fatigue in the driver and occupants, reduce attention levels and also
cause the windows to mist up. The risk of having an accident increases.
Switch off recirculated air mode as soon as the windows start to mist up.
CAUTION
We recommend not smoking in the vehicle when the recirculating air operation
is switched on. The smoke sucked from inside the vehicle is deposited on the
evaporator of the air conditioner. This produces a permanent odour when the
air conditioning system is operating which can only be eliminated through con-
siderable effort and expense (replacement of compressor).Air outlet ventsFig. 119
Air outlet vents
Read and observe
and on page 95 first.
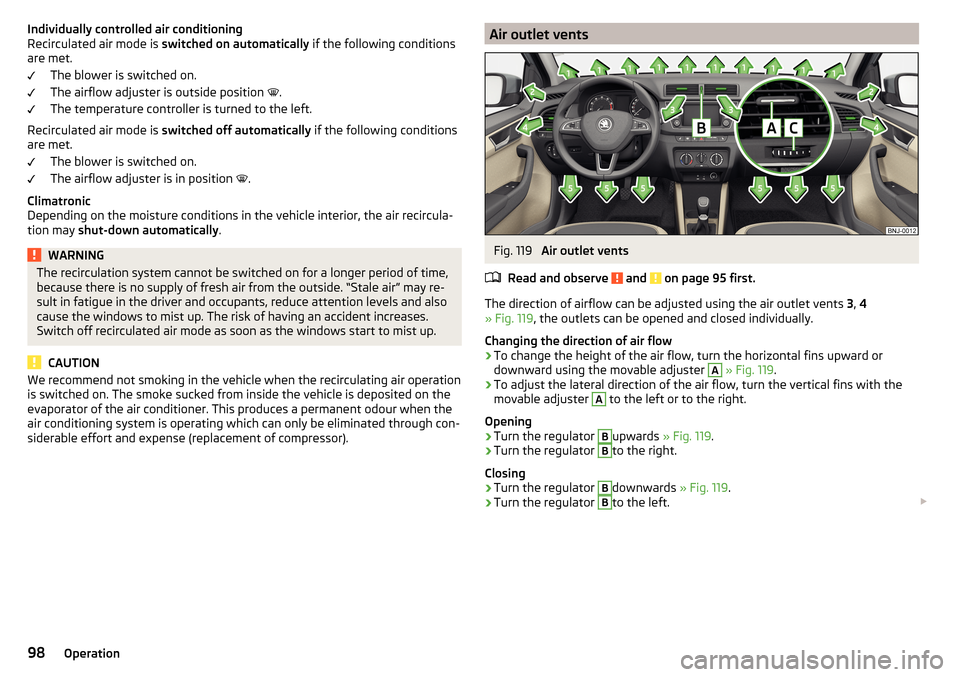
The direction of airflow can be adjusted using the air outlet vents 3, 4
» Fig. 119 , the outlets can be opened and closed individually.
Changing the direction of air flow
›
To change the height of the air flow, turn the horizontal fins upward or
downward using the movable adjuster
A
» Fig. 119 .
›
To adjust the lateral direction of the air flow, turn the vertical fins with the
movable adjuster
A
to the left or to the right.
Opening
›
Turn the regulator
B
upwards » Fig. 119.
›
Turn the regulator
B
to the right.
Closing
›
Turn the regulator
B
downwards » Fig. 119.
›
Turn the regulator
B
to the left.
98Operation
Page 114 of 220
Drive especially carefully for the first 500 km or so.
New brake pads
New brake pads have to first “grind in” because these do not initially have the
best possible braking effect.
Drive especially carefully for the first 200 km or so.
Tips for economical driving
To achieve the lowest possible fuel consumption, the following instructions
must be observed.
Looking ahead when driving
Avoid unnecessary acceleration and braking.
Change gear in an energy saving and timely manner
Observe the recommended gear » page 39.
Avoid full throttle and high speeds
Fuel consumption can be reduced by half if only three-quarters of the possible
top speed of your vehicle is used.
Reducing idling
If the vehicle is fitted with the START - STOP system there is an automatic re-
duction of the idling. If the engine is stopped on vehicles without START-STOP
system, such as when waiting in a traffic jam, the fuel economy is already
greater after 30 - 40 s than the fuel quantity which is required for engine re-
start.
Avoid short distances
When driving a short distance of less than about 4 km, the engine cannot
reach its operating temperature. As long as the engine has not reached oper-
ating temperature, the fuel consumption is significantly higher than with the
engine hot.
Pay attention to the correct tyre inflation pressure being maintained
Further information » page 161.
Avoid unnecessary ballast
Per 100 kg of weight, consumption increases by about 0.3 l/100 km. At a speed
of 100 - 120 km/h, a vehicle fitted with a roof rack cross member without a load
will use about 10 % more fuel than normal due to the increased aerodynamic
drag.
Saving electricity
Only turn on electrical consumers (e.g. seat, window and mirror heating, etc.)
for as long as necessary.
Use the cooling system economically
The air conditioning system compressor uses power from the engine when in
cooling mode, which will affect the fuel consumption.
It recommended to open the windows or the doors of a vehicle for which the
interior has been strongly heated through the effect of direct sunlight in order
to allow the heated air to escape.
The cooling system should not be switched on if the windows are open.
DriveGreen function
Fig. 130
Shown in the infotainment dis-
play
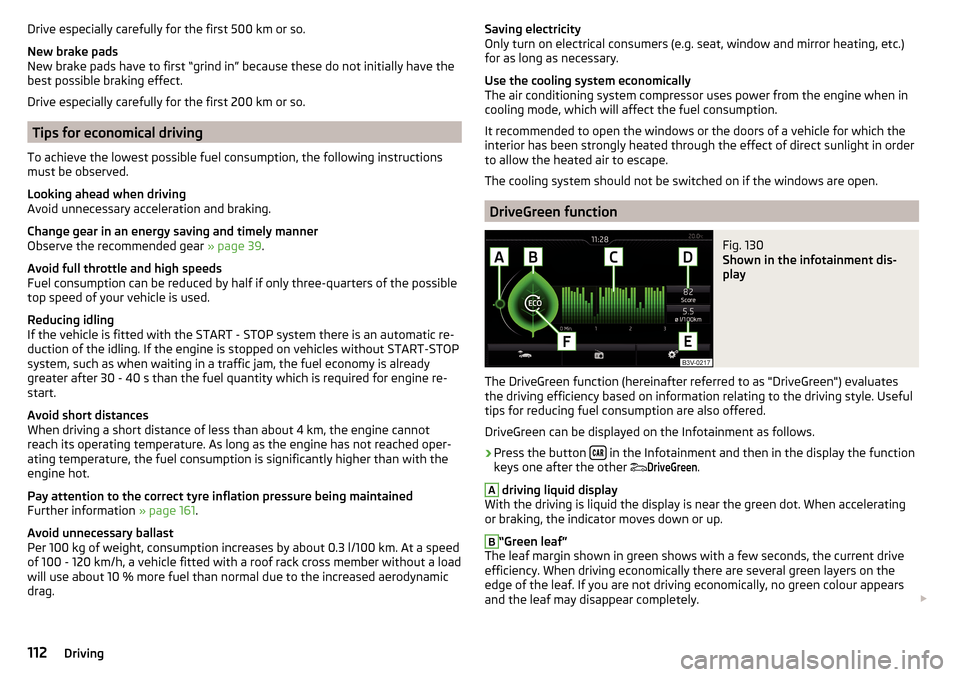
The DriveGreen function (hereinafter referred to as "DriveGreen") evaluates
the driving efficiency based on information relating to the driving style. Useful
tips for reducing fuel consumption are also offered.
DriveGreen can be displayed on the Infotainment as follows.
›
Press the button in the Infotainment and then in the display the function
keys one after the other
DriveGreen
.
A
driving liquid display
With the driving is liquid the display is near the green dot. When accelerating
or braking, the indicator moves down or up.
B
“Green leaf”
The leaf margin shown in green shows with a few seconds, the current drive
efficiency. When driving economically there are several green layers on the
edge of the leaf. If you are not driving economically, no green colour appears
and the leaf may disappear completely.
112Driving
Page 142 of 220
Clean wheels, door sills and similar parts last. Use a second sponge for such
areas.
Give the vehicle a good rinse after washing it and dry it off using a chamois
leather.WARNINGProtect your hands and arms from sharp-edged metal parts when cleaning
the underfloor or the inside of the wheel housings or the wheel trims – risk
of cuts!
CAUTION
■ Only apply slight pressure when cleaning the vehicle's paintwork.■Do not wash your vehicle in bright sunlight – there is a risk of paint damage.
Automatic car wash systems
Read and observe
and on page 139 first.
The usual precautionary measures must be taken before washing the vehicle
in an automatic car wash system (e.g. closing the windows including the slid-
ing/tilting roof, etc.).
If your vehicle is fitted with any particular attached parts, such as a spoiler,
roof rack system etc., it is best to consult the operator of the car wash system
beforehand.
The lips of the windscreen wiper rubbers must be cleaned and degreased with
cleaning agents especially formulated for the task after an automatic wash
with wax.
CAUTION
■ Before driving through a car wash fold in the exterior mirrors - there is a risk
of damage.■
For vehicles with roof antenna the antenna rod should be unscrewed before
driving through a car wash - there is a risk of damage.
Washing with a high-pressure cleaner
Read and observe
and on page 139 first.
When washing the vehicle with a high-pressure cleaner, the instructions for
use of the equipment must be observed. This applies in particular to the pres-
sure used and to the spraying distance .
Maintain a sufficiently large distance to the parking aid sensors and soft mate-
rials such as rubber hoses or insulation material.
CAUTION
■ The films may not be washed with any high-pressure cleaners - there is risk
of damage » page 141.■
Do not aim the water jet directly at the lock cylinders or the door or opening
joints when washing the vehicle in the winter – there is a risk of freezing.
■
The sensors of the parking aid can be sprayed only for a short time and there
must be a minimum distance of 10 cm - there is a risk of damage.
Cleaning vehicle exterior
Introduction
This chapter contains information on the following subjects:
Vehicle paint work
141
Foils
141
Plastic parts
142
Rubber seals
142
Chrome and anodized parts
142
Windows and external mirrors
142
Headlight glasses
143
Door closing cylinder
143
Cavity protection
143
Jack
143
Wheels
143
Towing device and mounting recess
144
Under-body protection
144
Wiper blades
144
We recommend using care products from ŠKODA Original Accessories that are
available from ŠKODA Partners. The instructions for use on the package must
be observed.
140General Maintenance
Page 143 of 220
WARNING■Care products may be harmful to your health if not used according to the
instructions.■
Always keep the automobile care products safe from people who are not
completely independent, e.g. children - there is a danger of poisoning!
■
Protect your hands and arms from sharp-edged metal parts when clean-
ing the underfloor, the inside of the wheel housings or the wheel trims –
risk of cuts!
CAUTION
■ Do not use any insect sponges, kitchen scrubbers or similar cleaning prod-
ucts – there is a risk of damaging the paintwork finish.■
Cleaners containing solvents can damage the material being cleaned.
Note
Because of the special tools and knowledge required, and to avoid any poten-
tial problems with the cleaning and care of the exterior of your vehicle, we rec-
ommend that cleaning and care of your vehicle be carried out by a ŠKODA
Service Partner.
Vehicle paint work
Read and observe
and on page 141 first.
Preserving the vehicle paintwork
Thorough wax treatment is an effective way of protecting the paintwork from
harmful environmental influences.
The vehicle must be treated with a high-quality hard wax polish at the latest,
when no more drops form on the clean paintwork.
A new layer of a high-quality hard wax polish can be applied to the clean body- work after it has dried thoroughly.
Even if you use a wax preserver regularly we still recommend that you treat
the paintwork of the vehicle at least twice a year with hard wax.
Polishing
Polishing is necessary if the vehicle's paintwork has become unattractive and
if it is no longer possible to achieve a gloss with wax preservatives.
If the polish does not contain any preserving elements, the paint must be trea- ted with a preservative afterwards.
CAUTION■ Paint damage is to be repaired immediately.■Never apply wax to the windows.■
Mat painted or plastic parts must not be treated with polishing products or
hard waxes.
■
Do not polish the paintwork in a dusty environment - there is a risk of
scratching the paintwork.
■
Do not apply polish to door seals or window guides.
■
If possible, do not apply any polish to body surfaces that come into contact
with door seals and window guides.
Foils
Read and observe
and on page 141 first.
Cleaning
Films (e.g. Roof, decorative, protective films, etc.) must be cleaned more care-
fully than the vehicle paint.
The films may not be washed with any high-pressure cleaners.
Only wash the films with a soft cloth, mild soap solution and clean, warm wa-
ter.
Service life
Environmental influences (e.g. sunlight, humidity, air pollution, rockfall) affect
the life of the films.
The sunlight may also affect the depth of the film colour.
The films age and become brittle, which is normal; this shall not be considered
a fault.
CAUTION
■ Never use aggressive cleaning agents or chemical solvents for the glued sur-
faces with films - there is a danger of film damage.■
Never use dirty cloths or chemical solvents for the glued surfaces with films -
there is a danger of damaging the film.
■
No ice scrapers should be used in the winter months to remove ice and snow
from the areas to which films have been applied. Do not remove frozen snow
or ice using other objects - there is a risk of damage to the film.
■
Do not polish the films - there is risk of damage!
■
When transporting a load on the roof rack (e.g. roof box, etc.), there is an in-
creased risk of film damage (e.g. due to rockfall from the secured load).
141Care and maintenance
Page 144 of 220
Plastic partsRead and observe
and on page 141 first.
Clean plastic parts with a damp cloth.
If this method does not clean plastic parts completely, use a specific plastic
care product.
CAUTION
Do not use polish on plastic parts.
Rubber seals
Read and observe
and on page 141 first.
All door seals and window guides are factory-treated with a colourless mattvarnish layer against a freezing to painted body parts and against road noise.
CAUTION
■ Do not treat the door seals or window guides with any cleaning agent.■An additional treatment of the seals can attack their protective coating and
road noise may be generated.
Chrome and anodized parts
Read and observe
and on page 141 first.
First clean the chrome parts and anodized parts with a damp cloth and thenpolish them with a soft, dry cloth.
If this method does not completely clean the parts, use cleaning products spe-
cially designed for this purpose.
CAUTION
■ Do not polish the chrome parts and anodized parts in a dusty environment -
risk of surface scratches.■
Never use aggressive cleaning agents or chemical solvents for these parts -
there is risk of damage.
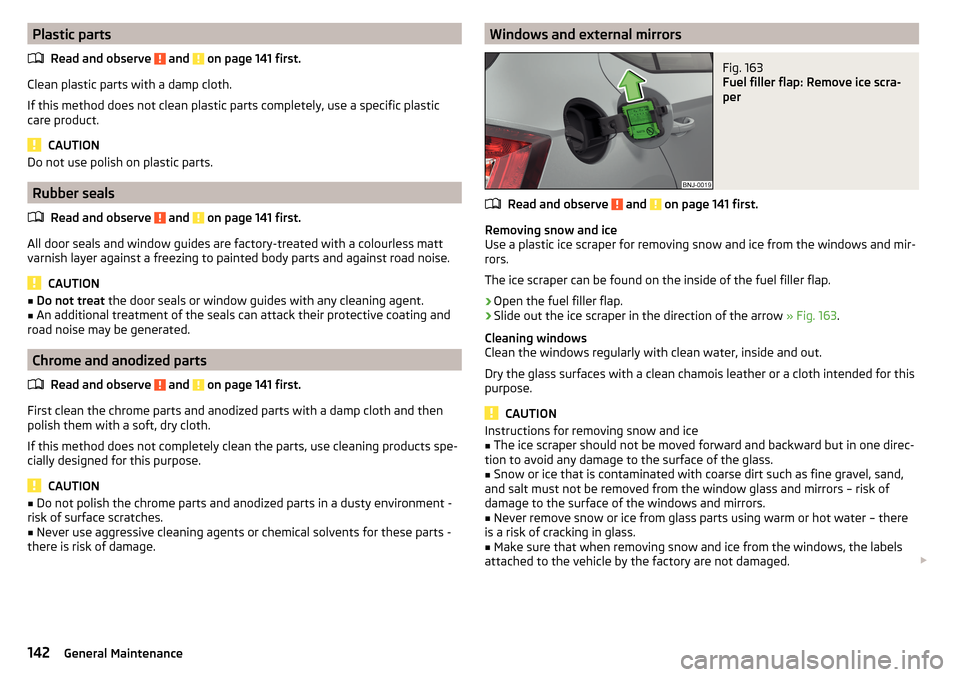
Windows and external mirrorsFig. 163
Fuel filler flap: Remove ice scra-
per
Read and observe and on page 141 first.
Removing snow and ice
Use a plastic ice scraper for removing snow and ice from the windows and mir-
rors.
The ice scraper can be found on the inside of the fuel filler flap.
›
Open the fuel filler flap.
›
Slide out the ice scraper in the direction of the arrow » Fig. 163.
Cleaning windows
Clean the windows regularly with clean water, inside and out.
Dry the glass surfaces with a clean chamois leather or a cloth intended for this
purpose.
CAUTION
Instructions for removing snow and ice■The ice scraper should not be moved forward and backward but in one direc-
tion to avoid any damage to the surface of the glass.■
Snow or ice that is contaminated with coarse dirt such as fine gravel, sand,
and salt must not be removed from the window glass and mirrors – risk of
damage to the surface of the windows and mirrors.
■
Never remove snow or ice from glass parts using warm or hot water – there
is a risk of cracking in glass.
■
Make sure that when removing snow and ice from the windows, the labels
attached to the vehicle by the factory are not damaged.
142General Maintenance
Page 145 of 220
CAUTIONInformation for cleaning windows■Do not clean the inside of the windows with sharp-edged objects or corro-
sive and acidic cleaning agents – there is a risk of damaging the heating ele-
ments or window aerial.■
When drying the windows after washing the vehicle, do not use window
leathers that have been used to polish the bodywork. Residues of preserva-
tives in the chamois leather can smear the windows and reduce visibility.
Headlight glasses
Read and observe
and on page 141 first.
Clean the plastic headlight lenses with clean, warm water and soap.
CAUTION
■The headlights are never to be wiped dry - there is a risk of damaging the
protective lacquer and the headlight glass subsequently developing cracks.■
Do not use sharp objects to clean the glasses - there is a risk of damaging
the protective lacquer and the headlight glasses subsequently developing
cracks.
■
Do not use any aggressive cleaning or chemical solvent products to clean the
headlights – risk of damaging the headlight lenses.
Door closing cylinder
Read and observe
and on page 141 first.
Specific products must be used for de-icing door lock cylinders.
CAUTION
Make sure that as little water as possible gets into the locking cylinder when
washing the vehicle - there is a risk of freezing the lock cylinder!
Cavity protection
Read and observe
and on page 141 first.
All the cavities of your vehicle which are at risk from corrosion are protectedfor life by a layer of protective wax applied in the factory.
Wax protection does not require to be inspected or re-treated.
If any small amount of wax flow out of the cavities at high temperatures, these
must be removed with a plastic scraper and the stains cleaned using a petrole-
um cleaner.WARNINGSafety regulations should be observed when using petroleum cleaner to re-
move wax – there is a risk of fire.
Jack
Read and observe
and on page 141 first.
The jack is maintenance-free.
If necessary, the moving parts of the jack should be lubricated with a suitable lubricant.
Wheels
Read and observe
and on page 141 first.
Wheel rims
Also thoroughly wash the wheel rims when washing the vehicle on a regular basis.
Regularly remove salt and brake dust otherwise the rim material will be at-
tacked.
Light alloy wheels
After washing thoroughly and treat the wheel rims with a protective product
for light alloy wheels.
For the treatment of wheel rims do not use products which may cause damage
to the paint on the rims.
CAUTION
■ Damage to the paint layer on the wheel rims must be touched up immediate-
ly.■
Severe layers of dirt on the wheels can also result in wheel imbalance. This
may show itself in the form of a wheel vibration which is transmitted to the
steering wheel which, in certain circumstances, can cause premature wear of
the steering. This means it is necessary to remove the dirt.
143Care and maintenance
Page 154 of 220
Radiator fanRead and observe
and on page 150 first.
The radiator fan is powered by an electric motor. Operation is controlled ac-
cording to the temperature of the coolant.
WARNINGThe fan can intermittently continue to run for approximately 10 minutes af-
ter the ignition is switched off.
Windscreen washer system
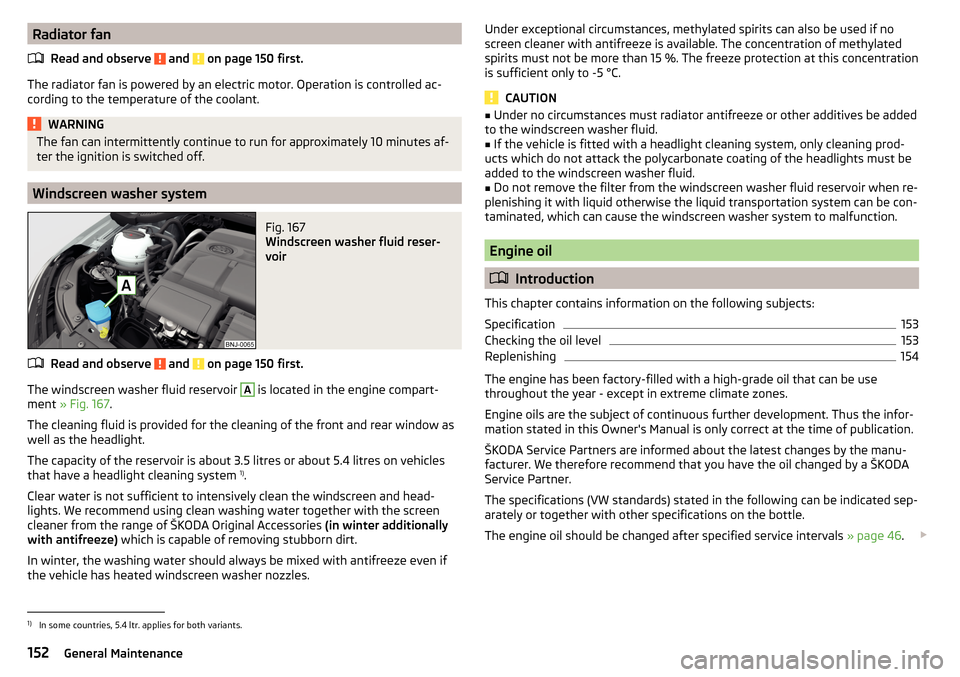
Fig. 167
Windscreen washer fluid reser-
voir
Read and observe and on page 150 first.
The windscreen washer fluid reservoir
A
is located in the engine compart-
ment » Fig. 167 .
The cleaning fluid is provided for the cleaning of the front and rear window as
well as the headlight.
The capacity of the reservoir is about 3.5 litres or about 5.4 litres on vehicles
that have a headlight cleaning system 1)
.
Clear water is not sufficient to intensively clean the windscreen and head-
lights. We recommend using clean washing water together with the screen
cleaner from the range of ŠKODA Original Accessories (in winter additionally
with antifreeze) which is capable of removing stubborn dirt.
In winter, the washing water should always be mixed with antifreeze even if
the vehicle has heated windscreen washer nozzles.
Under exceptional circumstances, methylated spirits can also be used if no
screen cleaner with antifreeze is available. The concentration of methylated
spirits must not be more than 15 %. The freeze protection at this concentration
is sufficient only to -5 °C.
CAUTION
■ Under no circumstances must radiator antifreeze or other additives be added
to the windscreen washer fluid.■
If the vehicle is fitted with a headlight cleaning system, only cleaning prod-
ucts which do not attack the polycarbonate coating of the headlights must be
added to the windscreen washer fluid.
■
Do not remove the filter from the windscreen washer fluid reservoir when re-
plenishing it with liquid otherwise the liquid transportation system can be con-
taminated, which can cause the windscreen washer system to malfunction.
Engine oil
Introduction
This chapter contains information on the following subjects:
Specification
153
Checking the oil level
153
Replenishing
154
The engine has been factory-filled with a high-grade oil that can be use
throughout the year - except in extreme climate zones.
Engine oils are the subject of continuous further development. Thus the infor-
mation stated in this Owner's Manual is only correct at the time of publication.
ŠKODA Service Partners are informed about the latest changes by the manu-
facturer. We therefore recommend that you have the oil changed by a ŠKODA
Service Partner.
The specifications (VW standards) stated in the following can be indicated sep-
arately or together with other specifications on the bottle.
The engine oil should be changed after specified service intervals » page 46.
1)
In some countries, 5.4 ltr. applies for both variants.
152General Maintenance
Page 161 of 220
WARNING■When you charge a battery, hydrogen is released, and a highly explosive
gas mixture is also produced. An explosion can be caused through sparkling
over during unclamping or loosening of the cable plug while the ignition is
on.■
Creating a bridge between the poles on the battery (e.g. with metal ob-
jects - cables) creates a short circuit - risk of damage to the battery, explo-
sion and burning of the battery, jets of acid spurting out.
■
Avoid creating sparks when working with cables and electrical devices.
Strong sparking represents a risk of injury.
■
Before carrying out any work on the electrical system, switch off the en-
gine, the ignition and all electrical consumers and disconnect the negative
terminal
.
■
“Quick-charging” the vehicle battery is dangerous and requires a special
charger and specialist knowledge.
■
We therefore recommend that vehicle batteries be “rapidly charged” by a
specialist garage.
CAUTION
On vehicles with the START/STOP system or additional heating (auxiliary heat-
ing), the pole terminal of the charger must not be connected directly to the
negative terminal of the vehicle battery, but only to the engine earth
» page 174 .
Replacing
Read and observe
and on page 157 first.
The new vehicle battery must have the same capacity, voltage, current and thesame size as the original battery. Suitable vehicle battery types can be pur-
chased from a specialist garage.
We recommend you have the battery replaced by a specialist garage.
Disconnecting or reconnecting
Read and observe
and on page 157 first.
Disconnecting
›
Switch off the ignition.
›
First, disconnect the negative terminal
first, then the positive
terminal
of the battery.
Connecting›First, connect the positive first, then the negative battery terminal.
After disconnecting and re-connecting the vehicle battery, the following func-
tions or devices are partially or completely inoperative.Function / deviceOperating measureElectric windows» page 59Time settings» page 31
CAUTION
■ Disconnect the vehicle battery only with the ignition turned off - there is a
risk of damaging the electrical system of the vehicle.■
Under no circumstances must the battery cables be connected incorrectly –
risk of a cable fire.
Note
■ After disconnecting and re-connecting the vehicle battery, we recommend
having the vehicle checked by a specialist to ensure that the full functionality
of all electrical systems is guaranteed.■
The data of the multi-function display will be reset.
Automatic load deactivation
Read and observe
and on page 157 first.
The vehicle voltage system automatically prevents the battery from discharg-ing when the battery is put under high levels of strain. This may be noticed
from the following.
▶ The idling speed is raised to allow the generator to deliver more electricity to
the electrical system.
▶ Where appropriate large convenience consumers, e.g. seat heaters, rear win-
dow heaters, have their power limited or shut off completely if necessary.
CAUTION
■ Despite such intervention by the vehicle electric system management, the
vehicle battery may be drained. For example, when the ignition is switched on
a long time with the engine turned off or the side or parking lights are turned
on during longer parking.■
Consumers which are supplied via a 12 V socket can cause the vehicle battery
to discharge when the ignition is switched off.
159Inspecting and replenishing
Page 181 of 220
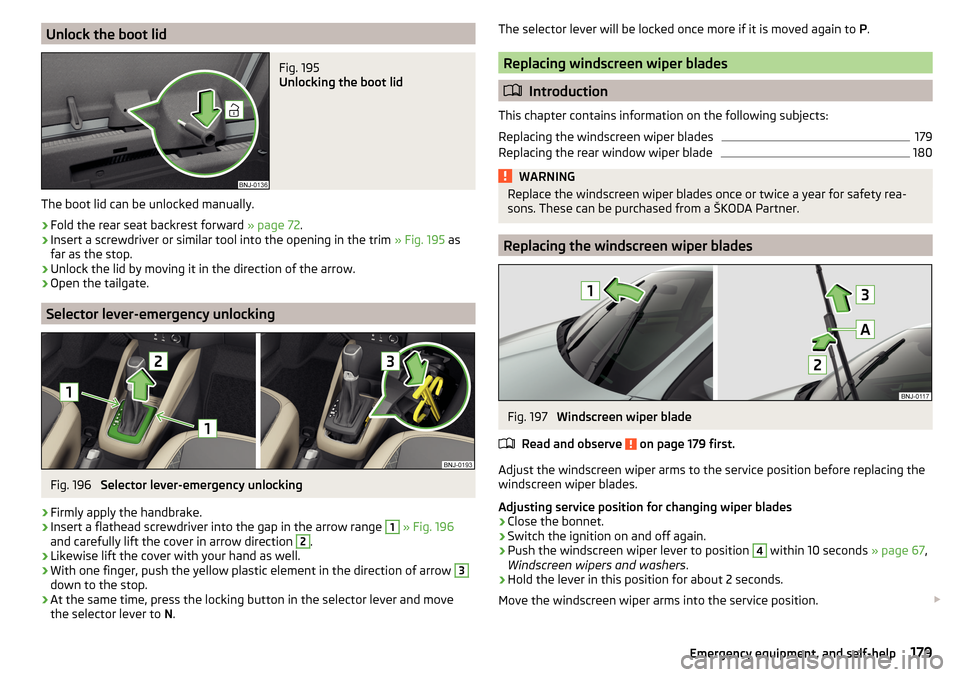
Unlock the boot lidFig. 195
Unlocking the boot lid
The boot lid can be unlocked manually.
›
Fold the rear seat backrest forward » page 72.
›
Insert a screwdriver or similar tool into the opening in the trim
» Fig. 195 as
far as the stop.
›
Unlock the lid by moving it in the direction of the arrow.
›
Open the tailgate.
Selector lever-emergency unlocking
Fig. 196
Selector lever-emergency unlocking
›
Firmly apply the handbrake.
›
Insert a flathead screwdriver into the gap in the arrow range
1
» Fig. 196
and carefully lift the cover in arrow direction
2
.
›
Likewise lift the cover with your hand as well.
›
With one finger, push the yellow plastic element in the direction of arrow
3
down to the stop.
›
At the same time, press the locking button in the selector lever and move
the selector lever to N.
The selector lever will be locked once more if it is moved again to P.
Replacing windscreen wiper blades
Introduction
This chapter contains information on the following subjects:
Replacing the windscreen wiper blades
179
Replacing the rear window wiper blade
180WARNINGReplace the windscreen wiper blades once or twice a year for safety rea-
sons. These can be purchased from a ŠKODA Partner.
Replacing the windscreen wiper blades
Fig. 197
Windscreen wiper blade
Read and observe
on page 179 first.
Adjust the windscreen wiper arms to the service position before replacing the windscreen wiper blades.
Adjusting service position for changing wiper blades
›
Close the bonnet.
›
Switch the ignition on and off again.
›
Push the windscreen wiper lever to position
4
within 10 seconds » page 67,
Windscreen wipers and washers .
›
Hold the lever in this position for about 2 seconds.
Move the windscreen wiper arms into the service position.
179Emergency equipment, and self-help