steering SKODA FABIA 2016 3.G / NJ Owner's Guide
[x] Cancel search | Manufacturer: SKODA, Model Year: 2016, Model line: FABIA, Model: SKODA FABIA 2016 3.G / NJPages: 196, PDF Size: 31.86 MB
Page 135 of 196
Protection of cavities
All the cavities of your vehicle which are at risk from corrosion are protected by
a layer of long-lasting protective wax applied in the factory.
If any small amount of wax flow out of the cavities at high temperatures, these
must be removed with a plastic scraper and the stains cleaned using a petrole-
um cleaner.
Underbody
The underside of your vehicle is already permanently protected by the factory
against chemical and mechanical influences.
We recommend having the protective coating — preferably before the begin-
ning of winter and at the end of winter.
Product life of the films
Environmental influences (e.g. sunlight, humidity, air pollution, rockfall) affect
the life of the films. The films age and become brittle, which is normal; this
shall not be considered a fault.
The sunlight may also affect the depth of the film colour.
When transporting a load on the roof rack (e.g. roof box, etc.), there is an in- creased risk of film damage (e.g. due to rockfall from the secured load).
CAUTION
■ Vehicle paint
■ Repair damaged areas as soon as possible.
■ Matt-painted parts should not be treated with polishes or hard waxes.
■ Do not polish in a dusty environment - risk of paint scratches.
■ Do not apply polish to door seals or window guides.■
Plastic parts
■ Do not use paint polish.
■
Chromed and anodised parts
■ Do not polish in a dusty environment - risk of surface scratches.
■
Films
The following instructions must be observed, otherwise there is a risk of film
damage.
■ Do not use dirty cloths or sponges for cleaning.
■ Do not use a scraper or other means to remove ice and snow.
■ Do not polish the films
■ Do not use a high pressure cleaner on the films.
■
Rubber seals
■ Do not treat the door seals and window guides deal with anything - the
protective varnish coating could be damaged.
■ Windows and door mirrors
■ Do not clean the insides of the windows/mirrors with sharp objects - risk of
damage to the filaments or the antenna. ■ Do not use a cloth which has been used to polish the body - this could dirty
the window and impair visibility.■
Head / tail lights
■ Do not wipe head/tail lamps dry, do not use any sharp objects - risk of dam-
age to the protective coating and cracks forming on the headlamp glass cov-
ers.
■
Reversing camera
The following instructions must be observed, otherwise there is a risk of
camera damage.
■ Do not remove snow / ice with warm / hot water.
■ To wash, never use a pressure washer or steam jet.
■ For cleaning, do not use abrasive cleaners.
■
Door lock cylinders
■ Make sure that as little water as possible gets into the locking cylinder
when washing the vehicle - there is a risk of freezing the lock cylinder!
■
Wheels
■ Heavy soiling of the wheels can affect the balance of the wheels - the re-
sult can be a vibration, which can cause premature wear of the steering.
Removing ice and snow from the windows
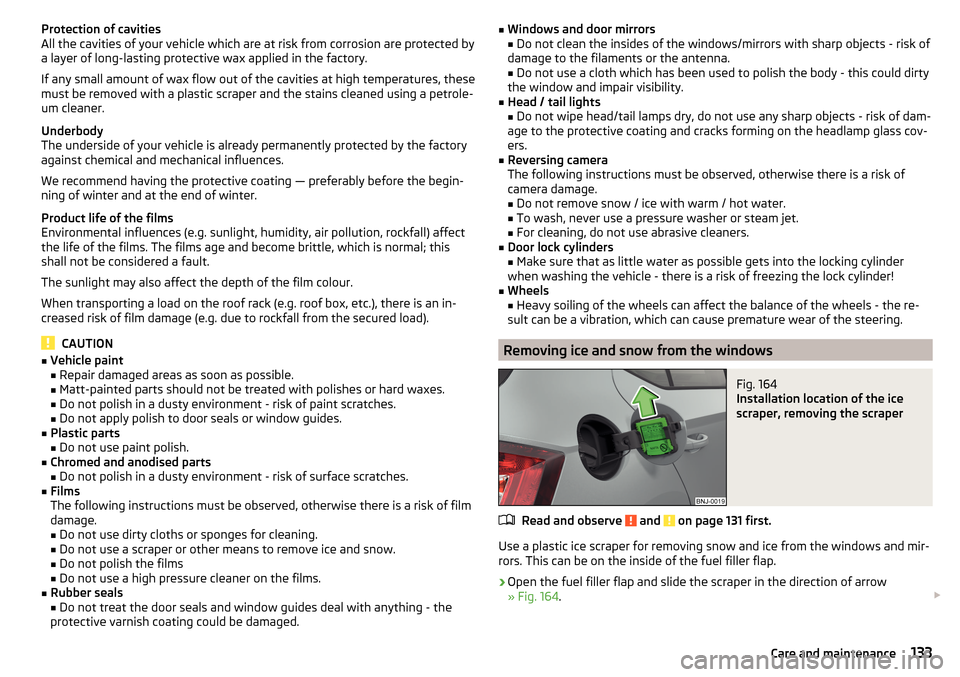
Fig. 164
Installation location of the ice
scraper, removing the scraper
Read and observe and on page 131 first.
Use a plastic ice scraper for removing snow and ice from the windows and mir-
rors. This can be on the inside of the fuel filler flap.
›
Open the fuel filler flap and slide the scraper in the direction of arrow
» Fig. 164 .
133Care and maintenance
Page 148 of 196

Tyre pressureFig. 174
Label with a table of tyre sizes and tyre pressure value / inflate
tyres
The prescribed tyre inflation is on the sticker with pictograms
A
» Fig. 174 (for
some countries, the pictograms are replaced with a text).
Tyre pressure is always to match the load .
Inflation pressure for half load
Inflation pressure for environmentally friendly operation (slightly lower
fuel consumption and emissions)
Inflation pressure for full load
Tyre diameter in inches
This information serves merely as information for the prescribed tyre pres-
sure. This is not a list of shared tyre sizes for your vehicle. These are in the
vehicle's technical documentation, in the declaration of conformity (in so-
called COC document) and listed on the vehicle data » page 173.
Tyre pressure value on the front axle
Tyre pressure value on the rear axle
Check tyre pressures
Check the tyre pressure (including that of the emergency or spare wheel) at
least once a month and also before setting off on a long journey.
Always check the inflation pressure when the tyres are cold. Do not reduce the
higher pressure of warm tyres.
In vehicles with tyre pressure monitoring, tyre pressure values must be saved
each time the pressures are changed » page 117.
BCDEFGWARNING■
Do not drive with incorrect tyre pressure - risk of accident.■In the event of very rapid pressure loss (e.g. in the event of tyre damage)
an attempt should be made to bring the vehicle carefully to a stop without
sudden steering movements and without any hard braking - risk of acci-
dent.
Note
The declaration of conformity (the COC document) can be obtained from a
ŠKODA partner 1)
.
Tyre wear and wheel change
Fig. 175
Tyre wear indicator / wheel change
Tyre wear increases in the following circumstances.
▶ Incorrect tyre pressures.
▶ Driving style (e.g. fast cornering, rapid acceleration / braking).
▶ Incorrect wheel balancing (you should have the wheels balanced after
changing/repair tyres or if the steering “is drifting”).
▶ Wheel alignment errors.
There are wear indicator markers in the tyre profiles, indicating whether the
minimum permissible tread depth has been reached » Fig. 175 -
. A tyre
should be regarded as worn out when this indicator is flush with the tread.
Markings on the walls of the tyres through the letters “TWI” and/or other sym- bols (e.g. ), identify the position of the wear indicators.
To ensure uniform wear on all tyres, we recommend that you change the
wheels every 10 000 km, in line with the schedule » Fig. 175 -
.
1)
Only valid for some countries and some models.
146General Maintenance
Page 160 of 196
The maximum towing speed is 50 km/h.
The vehicle must be transported on a special breakdown vehicle or trailer
if it is not possible to tow the vehicle in the way described or if the towing
distance is greater than 50 km.
Driver of the tow vehicle›
On vehicles with manual transmission , engage gear slowly when starting.
›
On vehicles with automatic transmission , accelerate with particular care.
›
Only then, approach correctly when the rope is taut.
Driver of the towed vehicle
›
If possible, the vehicle should be towed with the engine running. The brake
booster and power steering only operate if the engine is running, otherwise
much greater force has to be applied to the brake pedal and more power has
to be expended for steering.
›
If it is not possible to start the engine, switch on the ignition so that the
steering wheel does not lock and so that the turn signal lights, windscreen
wipers and windscreen washer system can be used.
›
Take the vehicle out of gear or move the selector lever into position N if the
vehicle is fitted with an automatic gearbox.
›
Keep the tow rope taut at all times during the towing procedure.
WARNING■ Spiral tow ropes must not be used for towing » Fig. 189- , the towing
eye may unscrew out of the vehicle - There is a risk of an accident.■
The tow rope should not be twisted - risk of accident.
CAUTION
■ Do not tow-start the engine – There is a risk of damaging the engine. The
battery from another vehicle can be used as a jump-start aid » page 156, Jump-
starting .■
For off-road towing manoeuvres, there is a risk to both vehicles that the fas-
teners may become overloaded and damaged.
Note
We recommend that you use a tow rope from ŠKODA Original Accessories.Front towing eyeFig. 190
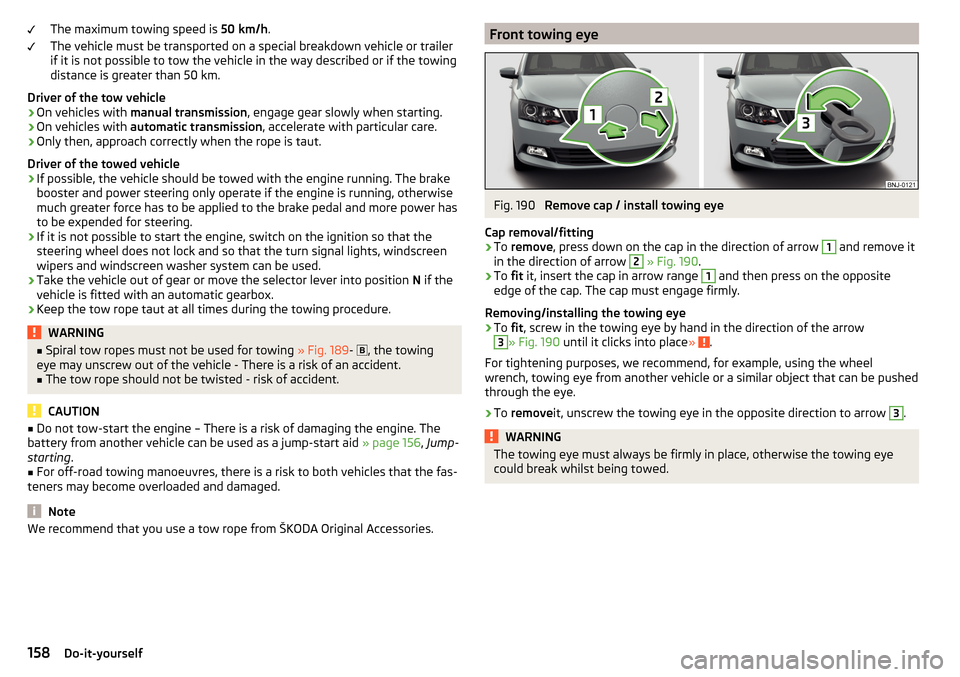
Remove cap / install towing eye
Cap removal/fitting
›
To remove , press down on the cap in the direction of arrow
1
and remove it
in the direction of arrow
2
» Fig. 190 .
›
To fit it, insert the cap in arrow range
1
and then press on the opposite
edge of the cap. The cap must engage firmly.
Removing/installing the towing eye
›
To fit, screw in the towing eye by hand in the direction of the arrow
3
» Fig. 190 until it clicks into place » .
For tightening purposes, we recommend, for example, using the wheel
wrench, towing eye from another vehicle or a similar object that can be pushed through the eye.
›
To remove it, unscrew the towing eye in the opposite direction to arrow
3
.
WARNINGThe towing eye must always be firmly in place, otherwise the towing eye
could break whilst being towed.158Do-it-yourself
Page 165 of 196
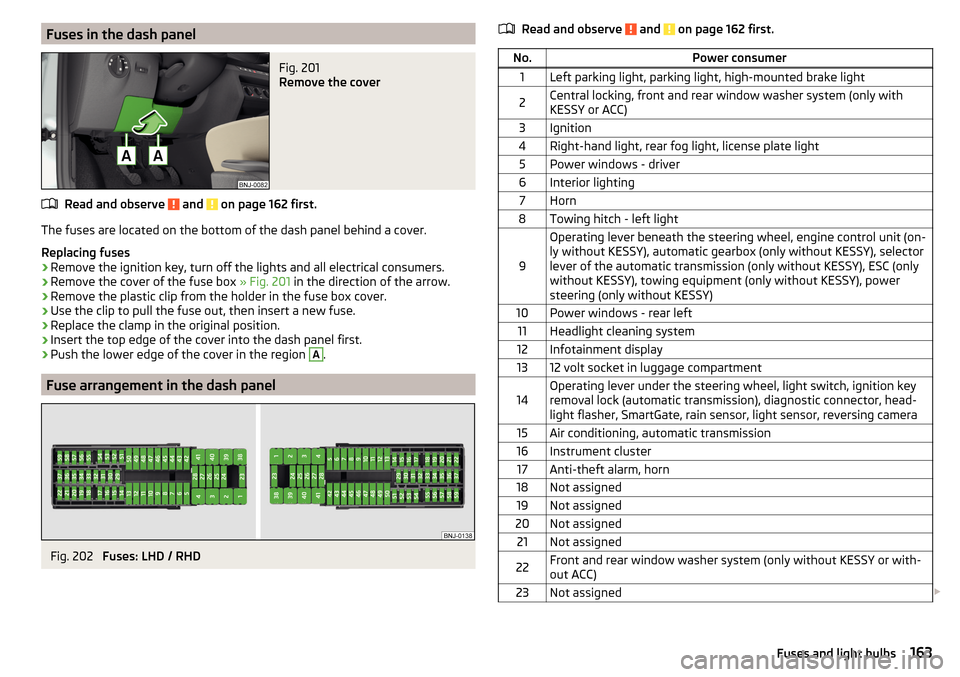
Fuses in the dash panelFig. 201
Remove the cover
Read and observe and on page 162 first.
The fuses are located on the bottom of the dash panel behind a cover.
Replacing fuses
›
Remove the ignition key, turn off the lights and all electrical consumers.
›
Remove the cover of the fuse box » Fig. 201 in the direction of the arrow.
›
Remove the plastic clip from the holder in the fuse box cover.
›
Use the clip to pull the fuse out, then insert a new fuse.
›
Replace the clamp in the original position.
›
Insert the top edge of the cover into the dash panel first.
›
Push the lower edge of the cover in the region
A
.
Fuse arrangement in the dash panel
Fig. 202
Fuses: LHD / RHD
Read and observe and on page 162 first.No.Power consumer1Left parking light, parking light, high-mounted brake light2Central locking, front and rear window washer system (only with
KESSY or ACC)3Ignition4Right-hand light, rear fog light, license plate light5Power windows - driver6Interior lighting7Horn8Towing hitch - left light
9
Operating lever beneath the steering wheel, engine control unit (on-
ly without KESSY), automatic gearbox (only without KESSY), selector
lever of the automatic transmission (only without KESSY), ESC (only
without KESSY), towing equipment (only without KESSY), power
steering (only without KESSY)10Power windows - rear left11Headlight cleaning system12Infotainment display1312 volt socket in luggage compartment14Operating lever under the steering wheel, light switch, ignition key
removal lock (automatic transmission), diagnostic connector, head-
light flasher, SmartGate, rain sensor, light sensor, reversing camera15Air conditioning, automatic transmission16Instrument cluster17Anti-theft alarm, horn18Not assigned19Not assigned20Not assigned21Not assigned22Front and rear window washer system (only without KESSY or with-
out ACC)23Not assigned 163Fuses and light bulbs
Page 166 of 196
No.Power consumer24Blower fan for the air conditioning system, heating, air conditioning,
heating25Not assigned26Heated front seats27Rear window wiper28Not assigned29airbag30Electric windows, light switches, reversing light switch, exterior mir-
rors, feed for the central toolbar, feed for the side toolbar, rear view
mirror, air-conditioning system, park assist31Fuel pump, radiator fan, cruise control, front and rear window wash-
er, engine start32Diagnostic connector, headlight range adjustment33Clutch pedal switch34Heated windscreen washer jets35Not assigned36Heated front seats37Radar38Not assigned39Electrical auxiliary heating system40Not assigned41Rear window heating42Power windows - front passenger43Trailer device - electrical outlet44Cigarette lighter, 12-volt power socket45Power windows - rear right46Front and rear window washer, operating lever under the steering
wheel47Trailer device - electrical outlet48Towing hitch - right light49Fuel pump50Infotainment51Heating of the external mirrorNo.Power consumer52KESSY53KESSY steering lock54Not assigned55Heated front seats56Not assigned57Not assigned58Not assigned59Not assigned
Fuses in the engine compartment
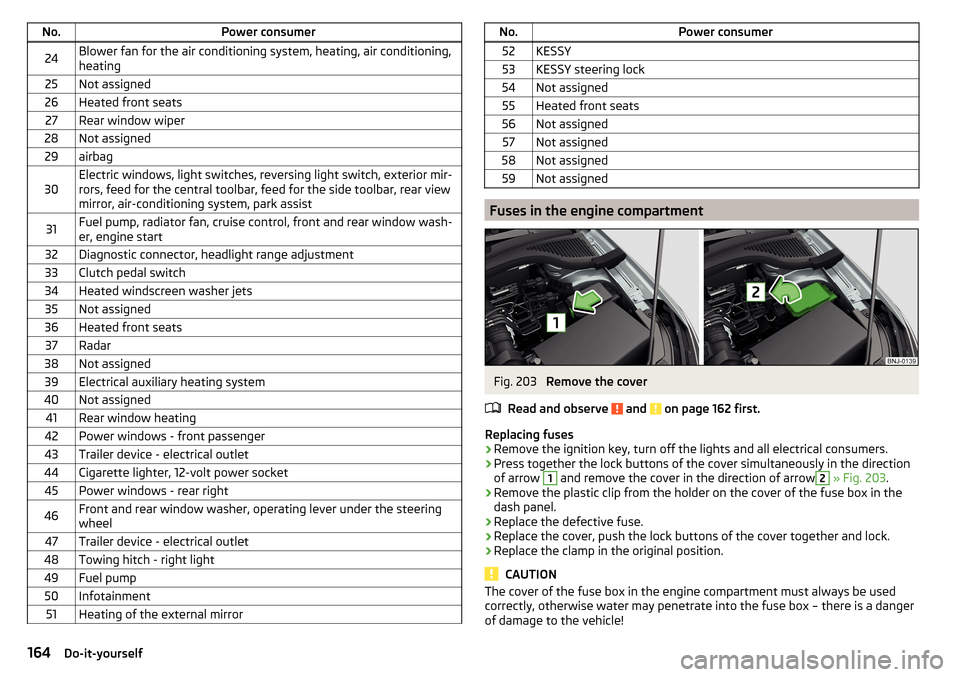
Fig. 203
Remove the cover
Read and observe
and on page 162 first.
Replacing fuses
›
Remove the ignition key, turn off the lights and all electrical consumers.
›
Press together the lock buttons of the cover simultaneously in the direction
of arrow
1
and remove the cover in the direction of arrow
2
» Fig. 203 .
›
Remove the plastic clip from the holder on the cover of the fuse box in the
dash panel.
›
Replace the defective fuse.
›
Replace the cover, push the lock buttons of the cover together and lock.
›
Replace the clamp in the original position.
CAUTION
The cover of the fuse box in the engine compartment must always be used
correctly, otherwise water may penetrate into the fuse box – there is a danger
of damage to the vehicle!164Do-it-yourself
Page 184 of 196

Index
A
ABS Operation
101
Warning light31
ACC
110
Acceptance and recycling of used vehicles129
Accessories127
Adaptive cruise control automatic stop-start
111
Operation110
Set/change the desired speed112
special driving conditions113
Start control112
Stop/resume control112
Warning light30, 36
Adaptive Cruise Control110
Malfunctions114
Operation overview111
Overtaking114
Radar sensor100
Set the clearance level113
Trailer towing114
Adjusting Steering wheel
11
Adjusting the seats
10
Advance warning / Emergency braking36
Advice on tyre/wheel usage145
Air-conditioning system Air outlet vents
88
air bag16
airbag warning light
31
Airbag Adjustments and impairments to the airbag system
128
Deactivation18
Deployment17
Airbag system16
Air conditioning85
Climatronic87
Manual air conditioning86
Recirculated air mode88
Air outlet vents88
Alarm49
Trailer126
All-year tyres148
Anti-lock braking system (ABS)101
Anti-theft alarm system49
Trailer126
Anti-theft wheel bolts 153
Armrest Front
63
Ashtray69
Assembling the bar ball, Step 1
120
bar ball, Step 2121
Assist systems100
Auto Check Control37
Automatic drive Selector lever
96
Automatic driving light control55
automatic gearbox Tiptronic
97
Automatic gearbox Kickdown
98
Malfunction33
Selector lever-emergency unlocking160
Selector lever lock97
Starting-off and driving98
Warning light33
Automatic shutdown of consumers142
Automatic transmission96
Selector lever lock97
AUX67
Avoiding damage to your vehicle99
B
ball bar ready position
120
Ball head Check fitting
121
Ready position120
Battery Change in key
159
Belts13
Belt tensioners15
bike carriers82
Bluetooth See Owner´s Manual -Infotainment
6
Bonnet Closing
138
Opening138
Boot Cargo element
80
Class N1 vehicles80
Hooks77
see boot lid50
Boot lid Automatic locking
50
Open/Close50
Brake Assist (HBA)102
Brake booster93
Brake fluid142
Check142
specification142
Brake pads new
93
Brake pedal (automatic gearbox) Warning light
33
Brakes Brake booster
93
Brake fluid142
Braking and stabilisation systems101
Handbrake94
182Index
Page 188 of 196
Operation of the information system38
Speed regulating system109
Windscreen wipers60
light Flash
54
Fog lights/rear fog light55
Light COMING HOME / LEAVING HOME
56
Replacing bulbs165
Turn signal/main beam54
Lighting Interior lighting
57
Luggage compartment75
Lights53
Abroad57
Automatic driving light control55
Cockpit57
Daylight running54
Dipped beam53
Fog lights with the CORNER function56
Hazard warning light system56
Headlight cleaning system60
Headlight range control53
Parking lights53, 56
Switching on and off53
Warning lights28
Load175
Lock Individual settings
47
Locking Central locking button
46
in case of emergency160
KESSY46
Key45
Remote control45
Lock steering lock90
Luggage compartment75
Cover78
Fastening elements76
Fixing nets76
Flexible storage compartment80
Lighting75
Net partition79
Storage compartments under the floor80
unlock manually160
Unlock the boot lid160
Variable loading floor81
Luggage compartment cover78
Other positions78
Roll-up cover79
Luggage Storage bike carriers
82
Roll-up cover79
Storage compartments77
M
Main beam
54
Warning light33
Manual air conditioning Controls
86
Recirculated air mode88
Manual gear changing see Gear changing
95
Materials defect liability4
MAXI DOT See MAXI DOT display
40
MAXI DOT display assist systems menu item
41
Audio menu item40
Main menu40
Navigation menu item40
Operation38
telephone menu item41
Maximum speed178
MCB103
Mechanical window lifter open/close
51
Mechanical windows50
Media AUX67
See Owner´s Manual -Infotainment6
USB67
Memory39
Mirror61
Vanity59
mobility warranty5
Modes of the automatic transmission96
Modifications and technical alterations127
MSR101
Multi collision brake (MCB)103
Multifunction display Data
39
Functions38
Memory39
Multifunction pocket77
Multifunction steering wheel38
Multimedia holder70
N
N1
80
Nameplate173
Navigation S Owner´s Manual -Infotainment
6
Net partition79
Nets76
O
oil see Engine oil
140
Oil Information messages
34
Oil changing Engine oil
139
Onboard computer see multifunction display
38
Operating weight174
186Index
Page 189 of 196
Original accessories128
overview cockpit
26
Overview Engine compartment
138
Fuses162
Warning lights28
P
Parking
94
Parking aid103
Reversing camera105
Parking aid103
Automatic system activation when moving for- ward
105
Function103
Parking assistance Activation / deactivation
105
Display in the Infotainment display104
Parking lights53
Parking the vehicle see Parking
94
ParkPilot103
Parts replacement127
Passive safety Before every journey
10
Driving safety10
Passive Safety10
Pedals95
Footmats95
Petrol135
Pockets73
Pockets in the luggage compartment77
Power steering30
Practical features Pockets
73
Storage compartment for umbrella72
storage compartment under the passenger seat72
Waste container68
Preheating unit31
R
Radio See Owner´s Manual - Infotainment
6
Raise vehicle153
Rear fog light55
Warning light31
Rear seats63
Rear View Camera Function keys
106
Operation106
Orientation Lines106
Rear view mirror61
Rear window - heater58
Recirculated air mode88
Refilling Coolant
141
Engine oil140
Windscreen washer fluid139
Reflective vest149
Refuelling135
Fuel135
Regulation Headlight beam
53
remote Synchronization process
48
Remote Change battery
159
Remote control Unlocking/locking the vehicle
45
Removing the bar ball, Step 1
122
bar ball, Step 2122
Repairs and technical alterations127
Replacing Bulbs165
Fuses162
Windscreen wiper blades161
Rev counter27
Reversing camera105
Rims145
Roller blind Luggage compartment cover
79
Roof Load
84
Roof rack84
Running in Brake pads
93
Engine98
Tyres145
S
SafeLock
47
safety air bag
16
Safety10
Child safety20
Child safety seats20
Correct seated position10
Headrests64
ISOFIX23
TOP TETHER24
SAFE, SAFELOCK See SafeLock
47
Saving electrical energy98
Saving fuel98
SD card See Owner´s Manual -Infotainment
6
Seat belt height adjustment
14
Warning light33
187Index
Page 190 of 196
Seat belts13
Belt tensioners15
fastening and unfastening14
Seatbelts Inertia reels
15
Seat belts Warning light
29
Seats Adjusting the front seats
62
front62
Front armrest63
Headrests64
Heating65
Rear63
Rear seat64
Rear seat backrests63
Setting62
Seats and headrest62
see Instrument cluster see Instrument cluster
27
Selector lever96
Selector lever control96
Selector lever lock Warning light
33
service127
Service Service interval display
41
Warning light36
Service intervals129, 130
Service Plan131
Setting Headrests
64
Mirror61
Seat belt height14
Seats62
Setting the Clock
37
Set to lower position of the variable loading floor
81
upper position of the variable loading floor81
shifting Tiptronic97
SmartGate connection using Wi-Fi direct
43
Connection via Wi-Fi42
introductory information42
Password/PIN code change43
Setting43
SmartLink See Owner´s Manual -Infotainment
6
Snow chains148
sockets 12-volt power socket in the luggage compart-ment
70
12-volt socket in the interior70
Sound See Owner´s Manual -Infotainment
6
Spare wheel147
Removing / stowing152
Speed limiter108
Warning light33
Speed regulating system Warning light
33
Speed symbol147
Spoiler128
Stabilisation system101
Stability Control (ESC)101
START-STOP92
Jump-starting157
Manually deactivating/activating the system93
operation92
Warning light35
START-STOP system92
Start engine Immobilizer
90
Starter button Lock / unlock the steering lock
90
Problems with the engine start92
Starting / stopping the engine91
Switch on/off ignition91
Starting engine Jump-starting156
Starting the engine Jump-starting
157
Key91
Starter button91
Steering lock (KESSY system) Warning light
30
steering wheel Correct posture
11
Steering wheel Buttons
38
setting11
Stopping see Parking
94
Stopping the engine Key
91
Starter button91
Storage66
storage compartment Glasses compartment
71
under the passenger seat72
Storage compartment in the doors
67
in the front arm rest71
in the front centre console67
in the rear centre console73
on the dash panel68
on the front passenger side71
on the side of the front seat72
Storage compartments66
sun visor59
Sun visors59
Switch Car battery
144
Switching the lights on and off53
Switch off Alarm
49
Switch off ignition91
Key91
188Index
Page 191 of 196
Switch on ignition91
Key91
T
Tablet holder
73
Tailgate50
TCS Deactivate/activate
102
Function102
Warning light30, 31
TCS - off Warning light
31
Technical data173
Telephone See Owner´s Manual -Infotainment
6
Ticket holder66
Time37
Tiptronic97
Tools150
TOP TETHER24
Towing159
Towing a trailer125
Towing away157
Towing device Accessories
123
Description119
Vertical load119
Towing eye158
Towing protection49
Towing the vehicle157
Traction control (TCS)30, 102
Trailer Connect and disconnect
123
Load124
Loading124
Towing a trailer125
Trailer towing119
Transport Luggage compartment75
Roof rack84
Towing device and trailer119
Transporting children20
Triangle149
Turn signal54
Turn signal system Warning light
32, 33
Tyre load capacity147
Tyre pressure146
Warning light32
Tyre pressure monitor refer to the tyre pressure monitoring
117
Tyre pressure monitoring117
Warning light32
Tyre repair154
Tyres145
damage145
Explanation of the label147
new145
Tyre pressure146
Wear indicator146
Tyre size147
U
Umbrella Tray
72
Unlock Individual settings
47
Unlocking Central locking button
46
In case of emergency159
KESSY46
Key45
Remote control45
Unlocking and locking44
Unlock steering lock90
USB67
Used vehicles Acceptance and recycling129
Useful equipment Clothes hook
72
Cup holders68
Glasses compartment71
Multimedia holder70
Useful features Storage compartment
66
Useful Features 12-volt power socket in the luggage compart-ment
70
12-volt socket in the interior70
Ashtray69
Cigarette lighter69
Coin and card holders67
Pockets73
Reflective vest149
Ticket holder66
V
Variable loading floor
81
Vehicle battery Automatic shutdown of consumers
142
Charging144
Safety instructions142
Warning light34
Vehicle Condition see Auto Check Control
37
Vehicle data sticker173
Vehicle data sticker and nameplate Vehicle data sticker and nameplate
173
Vehicle dimensions176
Vehicle height176
Vehicle Identification Number (VIN)173
Vehicle length176
Vehicle tool kit150
Vehicle width176
Vest149
189Index