start stop button SKODA KODIAQ 2016 1.G Owner's Guide
[x] Cancel search | Manufacturer: SKODA, Model Year: 2016, Model line: KODIAQ, Model: SKODA KODIAQ 2016 1.GPages: 344, PDF Size: 58.96 MB
Page 238 of 344
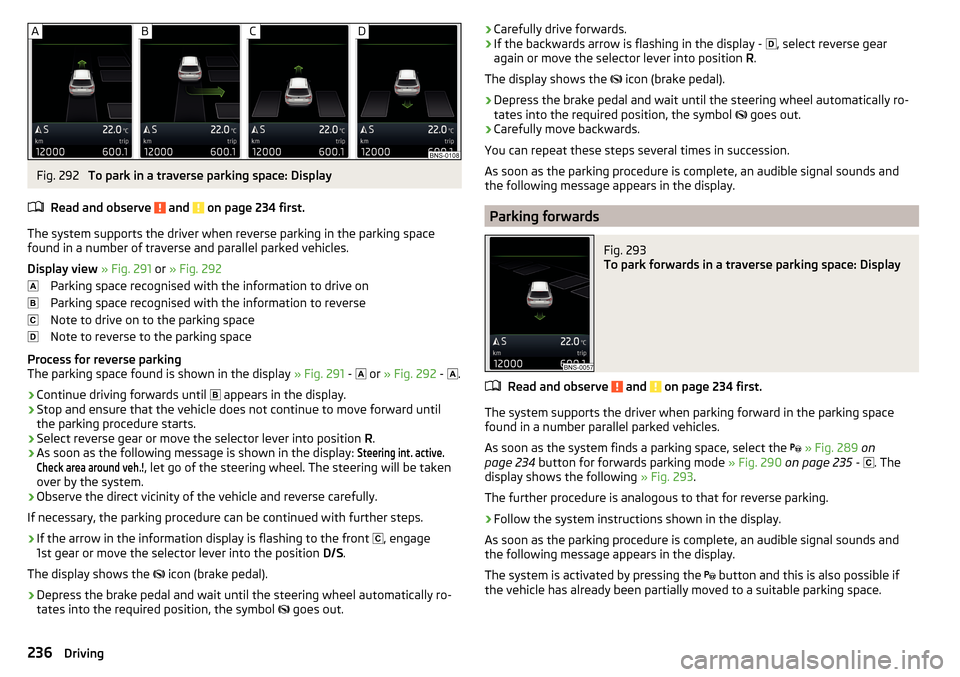
Fig. 292
To park in a traverse parking space: Display
Read and observe
and on page 234 first.
The system supports the driver when reverse parking in the parking space
found in a number of traverse and parallel parked vehicles.
Display view » Fig. 291 or » Fig. 292
Parking space recognised with the information to drive on
Parking space recognised with the information to reverse
Note to drive on to the parking space
Note to reverse to the parking space
Process for reverse parking
The parking space found is shown in the display » Fig. 291 -
or
» Fig. 292 -
.
›
Continue driving forwards until
appears in the display.
›
Stop and ensure that the vehicle does not continue to move forward until
the parking procedure starts.
›
Select reverse gear or move the selector lever into position R.
›
As soon as the following message is shown in the display:
Steering int. active.Check area around veh.!
, let go of the steering wheel. The steering will be taken
over by the system.
›
Observe the direct vicinity of the vehicle and reverse carefully.
If necessary, the parking procedure can be continued with further steps.
›
If the arrow in the information display is flashing to the front , engage
1st gear or move the selector lever into the position D/S.
The display shows the icon (brake pedal).
›
Depress the brake pedal and wait until the steering wheel automatically ro-
tates into the required position, the symbol goes out.
›Carefully drive forwards.›If the backwards arrow is flashing in the display -
, select reverse gear
again or move the selector lever into position R.
The display shows the
icon (brake pedal).›
Depress the brake pedal and wait until the steering wheel automatically ro-
tates into the required position, the symbol
goes out.
›
Carefully move backwards.
You can repeat these steps several times in succession.
As soon as the parking procedure is complete, an audible signal sounds and the following message appears in the display.
Parking forwards
Fig. 293
To park forwards in a traverse parking space: Display
Read and observe and on page 234 first.
The system supports the driver when parking forward in the parking space
found in a number parallel parked vehicles.
As soon as the system finds a parking space, select the
» Fig. 289 on
page 234 button for forwards parking mode » Fig. 290 on page 235 -
. The
display shows the following » Fig. 293.
The further procedure is analogous to that for reverse parking.
›
Follow the system instructions shown in the display.
As soon as the parking procedure is complete, an audible signal sounds and
the following message appears in the display.
The system is activated by pressing the button and this is also possible if
the vehicle has already been partially moved to a suitable parking space.
236Driving
Page 248 of 344
Start controlRead and observe
on page 243 first.
Basic requirements for start of control The ACC is activated.
On vehicles with manual transmission , the second gear or a higher gear is
selected and the current speed is greater than 25 km/h.
On vehicles with automatic transmission , the selector lever is in the D/S
position or in the Tiptronic position.
Start control
›
Press the button
» Fig. 306 on page 245 the button.
›
or: Set the lever to the sprung position
» Fig. 306 on page 245 .
The ACC takes the current driving speed and performs the control, the warning
light illuminates in the instrument cluster.
If the control is started by moving the lever to the position and should
the speed be stored already, the ACC adopts this speed and carries out the
control.
Note
If control is started at a speed of less than 30 km/h on vehicles with an auto-
matic transmission, the speed of 30 km/h is stored. The speed increases auto-
matically to 30 km/h or is regulated with respect to the speed of the vehicle
ahead.
Stop/resume control
Read and observe
on page 243 first.
Stop control
›
Set the lever into the sprung position
» Fig. 306 on page 245 .
›
or: apply the brake pedal.
Control stops, the speed remains stored.
Resume control
›
Start control » page 246, Start control .
Note
Control is also stopped when the clutch pedal is held down for longer than 30
s or the TCS is deactivated.Set/change desired speed
Read and observe
on page 243 first.
The desired speed can be set or changed using the control lever » Fig. 306 on
page 245 .
Setting/changing the speed by increments of 10 km/h at a time (
) - re-
quirements
The ACC is activated.
Increasing/reducing the speed by increments of 1 km/h at a time (
/
-
requirements
The ACC is activated.
Vehicle control takes place.
Changing the speed by adopting the current speed ( ) - requirements
The ACC is activated.
The vehicle is moving at a speed other than that which is stored.
Note
■
If during control the speed is increased by pressing the accelerator, control is
temporarily stopped. Upon releasing the accelerator, control is automatically
resumed.■
If during control the speed is reduced by applying the brake, control is stop-
ped. Control needs to be restarted in order to resume » page 246.
■
If the vehicle is controlled by a lower speed than the stored speed, then
the current speed is stored by pressing the button again
and the speed is
reduced in increments of 1 km/h.
Set the clearance level
Read and observe
on page 243 first.
The proximity to the vehicle ahead can be set with the lever » Fig. 306 on
page 245 or in Infotainment » page 244, Settings in Infotainment .
Setting by means of the lever
›
Set the switch to the spring-tensioned position
or
» Fig. 306 on
page 245 .
The display of the instrument cluster shows line
2
» Fig. 304 on page 244 ,
which indicates the proximity.
246Driving
Page 250 of 344
MalfunctionsRead and observe
on page 243 first.
If, for some unknown reason, ACC is not available, the warning light
appears
in the display of the instrument cluster and an appropriate message is shown.
Sensor covered / dirty
If the sensor cover or the sensor is dirty or covered, a message appears on the
instrument cluster display stating there is no sensor view. Clean the sensor
cover or remove the obstacles » Fig. 264 on page 215 .
If there is no sensor view in the winter, the snow on the sensor under the cov-
er could be the reason. The ACC is functional again after the snow melts away
from the sensor.
ACC not available
If the ACC is currently unavailable, a message concerning the unavailability ap-
pears. Stop the vehicle, switch off the engine and then start it again. If ACC
continues to be unavailable, seek the assistance of a specialist garage.
ACC fault
With an ACC fault, an error message appears. Seek help from a specialist ga-
rage.
Front Assist
Introduction
This chapter contains information on the following subjects:
Settings in Infotainment
248
Operation
248
Distance warning
249
Warning and automatic braking
249
Pedestrian recognition
250
Deactivation/activation
250
Malfunctions
251
The Front Assist (hereinafter referred to as the system) warns you of the dan-
ger of a collision with a vehicle or another obstacle in front of the vehicle, and
tries to avoid a collision or mitigate its consequences by automatically applying
the brakes where necessary.
The area in front of the vehicle is monitored by a radar sensor » page 215.WARNING■
Please take note of the general points relating to the use of assistance
systems » page 215, in section Introduction .■
The system does not respond vehicles that are crossing or oncoming.
CAUTION
In case of failure of more than one brake light on the vehicle or on the electri-
cally connected trailer, the system becomes unavailable.
Settings in Infotainment
Read and observe
and on page 248 first.
›
Press the button, then tap on the function surface
→
Driver assistance
.
■ Front Assist (ambient traffic monitor. sys.) - Set the assistant for distance
monitoring to the vehicles ahead ■
Active
- Activate/deactivate the assistant
■
Advance warning
(Version 1) - Activate/deactivate advance warning
■
Advance warning
(Version 2) - Activating/deactivating and setting the distance
level at which a warning occurs
■
Display distance warning
- Activate/deactivate distance warnings
Operation
Read and observe
and on page 248 first.
The system support is provided in the following manner.▶ Alerts you about a dangerous proximity to the vehicle ahead.
▶ Warns you of an impending collision.
▶ Assists with a brake action triggered by the driver.
▶ If the driver fails to respond to a detected danger, an automatic braking ac-
tion is performed.
The system can work only if the following basic conditions are met. The system is activated.
TCS is activated » page 217.
The vehicle is travelling forwards at a speed of more than approx. 5 km/h.
248Driving
Page 326 of 344
Destination managementDestination details192
Favourite192
Storage192
Destination on the map Destinationentered in map
183
Diesel276
Diesel fuel276
Diesel particle filter (DPF)41
Digital Clock44
Digital Service Plan270
Dipped beam66
Dipstick281
Disclaimer applications
120
external devices120
Mobile phones120
Display Coolant temperature
32
Fuel level33
Gear changes44
In the instrument cluster43
MAXI DOT48
Rear centre console33
Display of a low temperature42
Disposal Acceptance and recycling of used vehicles
268
Distance warning249
Diverting calls134
Door Child safety lock
56
Door edge protection55
Emergency locking303
Emergency locking of the driver's door302
Opening/ Closing55
Door alarm43
Door edge protection55
Drive Driving through water
214
DriveGreen213
Driver information system43
Driving Emissions
315
Fuel consumption315
Maximum speed318
through water214
Driving mode251
Adaptive Chassis Control (DCC)251
Comfort252
Eco251
Individual252
Individual mode settings253
Mode selection and Infotainment display252
Normal252
Snow252
Sports252
Driving Mode Selection251
DSR217
DVD147
DVD-Video main menu
153
menu153
Select video source153
DVD video Compatible sources
154
Supported file formats154
Dynamic Road Sign Display Additional display
259
Operation258
Dynamic route200
E
Easy Entry
81
Economical driving212
Economy mode Warning light
42
Edit route194
EDS217
Electrical boot lid set the top position of the lid60
Electrical power windows63
Electric boot lid Force limiter
59
Manual operation59
Open/close60
Electric parking brake206
Electric power windows61
Malfunctions63
Electric tailgate Malfunctions
61
Electric windows Buttons on the driver door
62
Electronic Differential Lock (EDL, XDS)217
Electronic immobiliser202
Elevation178
emergency Jump-starting
298
Starting the engine / stopping at the push of a button
204
Emergency Changing a wheel
291
Hazard warning light system70
Jump-starting297
selector lever release303
Starting the engine / stopping the push of a button
203
Towing the using the tow hitch300
Towing the vehicle298
Tyre repair295
Unlocking/locking the door302
Unlocking / locking the door303
emergency call14, 118
see emergency14
see emergency call14
Emergency call164
Emergency equipment Fire extinguisher
290
First aid kit290
324Index
Page 335 of 344
SmartLink172
Android Auto173
Apple CarPlay174
Application ŠKODA One App176
Introduction to the subject172
Main menu173
MirrorLink®175
Set to136, 141
SMS168
Snow chains289
Sockets 12-volt socket in the interior
97
12 volt socket in luggage compartment97
230 V97
Software Update129, 133
Software updates139
SOS button see emergency call
14
sound130
Sound138
sound system130
Spare wheel287
Removing / stowing292
Removing / stowing (sound system)293
speech enhancement126
Speed limitations193
Speed limiter38 , 241
Speed regulating system Warning light
38
Speed symbol288
Spoiler267
Spurhalteassistent254
SSID132
Stabilisation system215
Stability Control (ESC)36, 216
standby125
START-STOP204
Jump-starting298
manually activate/ deactivate system205
operation204
Warning light41
START-STOP system204
Start engine203
Immobiliser202
Jump-starting298
starter button Ignition on / off
203
Starting engine / Stopping203
Starter button Lock / unlock the steering lock
202
Problems with the engine start204
Starting the engine Jump-starting
297
Start the route guidance192
status line Navigation
138
Status line124, 180
Telephone158, 159
Steering lock (KESSY system)35
Steering wheel Buttons
45
Heating86
Proper posture13
Setting13
Stop engine203
Stopping see Parking
208
Storage compartment Glasses compartment
92
In the front centre console89
in the rear centre console95
on the driver's side88
on the front passenger side93
under the front arm rest92
under the passenger seat93
Storage compartments87
Storage net92
Stored destinations Final destinations184
target memory185
Store destination192
Storing seats
79
Stowage compartments in the doors
89
Sunblind for the tilt / slide sunroof65
Sun visor73
Supported sources media
150
surround130
swing infotainment Description
122
Switch Car battery
285
Switching the lights on and off66
Switch off Alarm
57
Switch off the ignition203
switch on / offTraffic dynamic route
200
Switch on ignition203
system information129
System information133, 139
T
Tablet holder
99
Tailgate58
target memory185
Technical data313
Telefon Bluetooth-Profile
160
telephone conditions for pairing
160
Telephone Additional telephone
157
Breakdown call164
333Index