charging SKODA KODIAQ 2016 1.G Owner's Manual
[x] Cancel search | Manufacturer: SKODA, Model Year: 2016, Model line: KODIAQ, Model: SKODA KODIAQ 2016 1.GPages: 344, PDF Size: 58.96 MB
Page 13 of 344
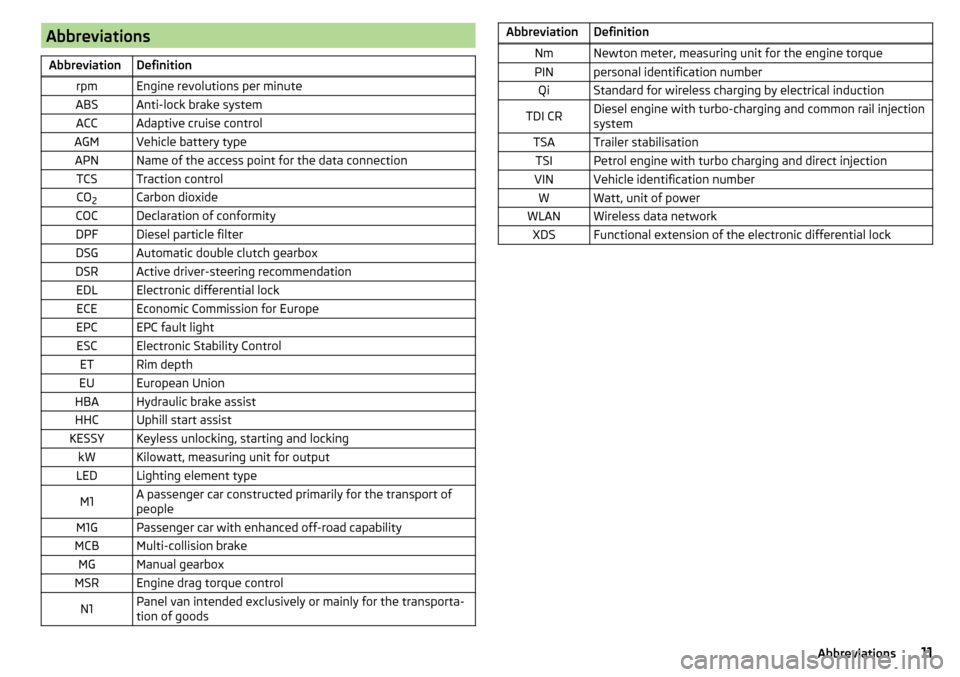
AbbreviationsAbbreviationDefinitionrpmEngine revolutions per minuteABSAnti-lock brake systemACCAdaptive cruise controlAGMVehicle battery typeAPNName of the access point for the data connectionTCSTraction controlCO2Carbon dioxideCOCDeclaration of conformityDPFDiesel particle filterDSGAutomatic double clutch gearboxDSRActive driver-steering recommendationEDLElectronic differential lockECEEconomic Commission for EuropeEPCEPC fault lightESCElectronic Stability ControlETRim depthEUEuropean UnionHBAHydraulic brake assistHHCUphill start assistKESSYKeyless unlocking, starting and lockingkWKilowatt, measuring unit for outputLEDLighting element typeM1A passenger car constructed primarily for the transport of
peopleM1GPassenger car with enhanced off-road capabilityMCBMulti-collision brakeMGManual gearboxMSREngine drag torque controlN1Panel van intended exclusively or mainly for the transporta-
tion of goodsAbbreviationDefinitionNmNewton meter, measuring unit for the engine torquePINpersonal identification numberQiStandard for wireless charging by electrical inductionTDI CRDiesel engine with turbo-charging and common rail injection
systemTSATrailer stabilisationTSIPetrol engine with turbo charging and direct injectionVINVehicle identification numberWWatt, unit of powerWLANWireless data networkXDSFunctional extension of the electronic differential lock11Abbreviations
Page 91 of 344
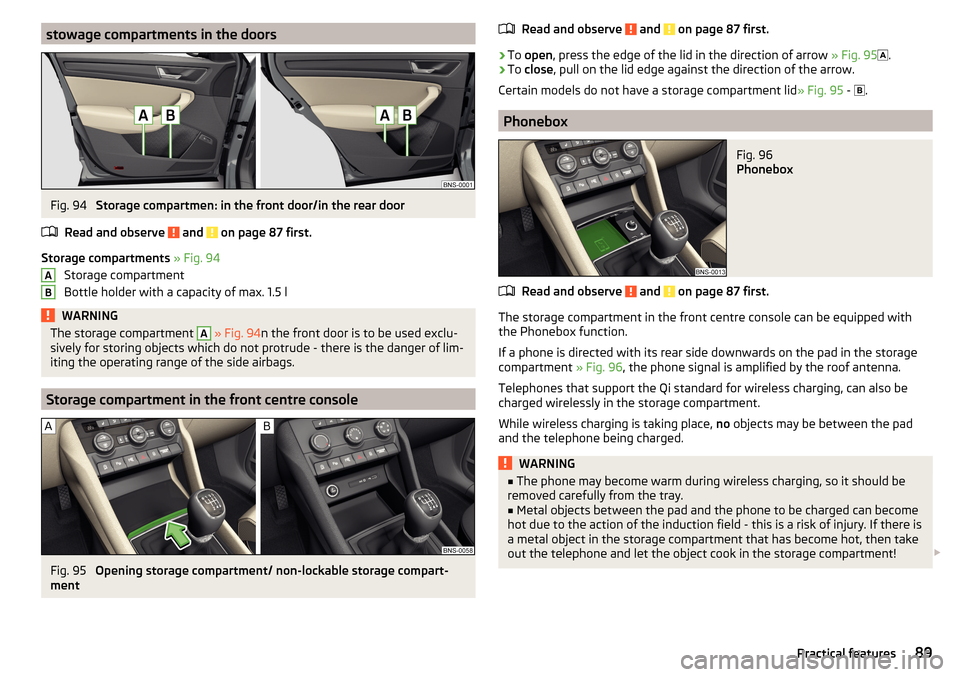
stowage compartments in the doorsFig. 94
Storage compartmen: in the front door/in the rear door
Read and observe
and on page 87 first.
Storage compartments » Fig. 94
Storage compartment
Bottle holder with a capacity of max. 1.5 l
WARNINGThe storage compartment A » Fig. 94 n the front door is to be used exclu-
sively for storing objects which do not protrude - there is the danger of lim-
iting the operating range of the side airbags.
Storage compartment in the front centre console
Fig. 95
Opening storage compartment/ non-lockable storage compart-
ment
ABRead and observe and on page 87 first.›
To open , press the edge of the lid in the direction of arrow » Fig. 95
.
›
To close , pull on the lid edge against the direction of the arrow.
Certain models do not have a storage compartment lid » Fig. 95 -
.
Phonebox
Fig. 96
Phonebox
Read and observe and on page 87 first.
The storage compartment in the front centre console can be equipped with
the Phonebox function.
If a phone is directed with its rear side downwards on the pad in the storage
compartment » Fig. 96, the phone signal is amplified by the roof antenna.
Telephones that support the Qi standard for wireless charging, can also be
charged wirelessly in the storage compartment.
While wireless charging is taking place, no objects may be between the pad
and the telephone being charged.
WARNING■ The phone may become warm during wireless charging, so it should be
removed carefully from the tray.■
Metal objects between the pad and the phone to be charged can become
hot due to the action of the induction field - this is a risk of injury. If there is
a metal object in the storage compartment that has become hot, then take
out the telephone and let the object cook in the storage compartment!
89Practical features
Page 92 of 344
CAUTION■Metal objects between the pad and the phone to be charged can become hot
due to the action of the induction field - this is a risk of damage to the tele-
phone.■
With some phones, the charging process can be interrupted or the phone can
switch off due to heating up.
■
Do not insert any electronic or magnetic storage media (e.g. SD cards, USB
sticks, cards with magnetic strips or chips) between the pad and the phone to
be charged- there is a risk of data loss and damage to these data carriers.
■
If a message appears in the Infotainment screen that the phone cannot be
charged, then proceed as follows. ■Check that there is no object between the support and the phone to be
charged. If this is the case, then take out the object and the phone. Place the
phone centrally on the phone symbol on the pad again.
■ Check if the position of the phone to be charged has not changed during
the journey. If this is the case, then take out the phone and put it back cen-
trally on the phone symbol on the pad.
Note
■ At the start of the wireless charging, the appropriate message appears on
the Infotainment screen.■
For the optimum phone signal strength and uninterrupted wireless charging,
we recommend position the phone in the storage compartment without the
protective sleeve, if possible.
■
Place a max. 160x80 mm phone in the storage compartment.
USB and AUX inputs
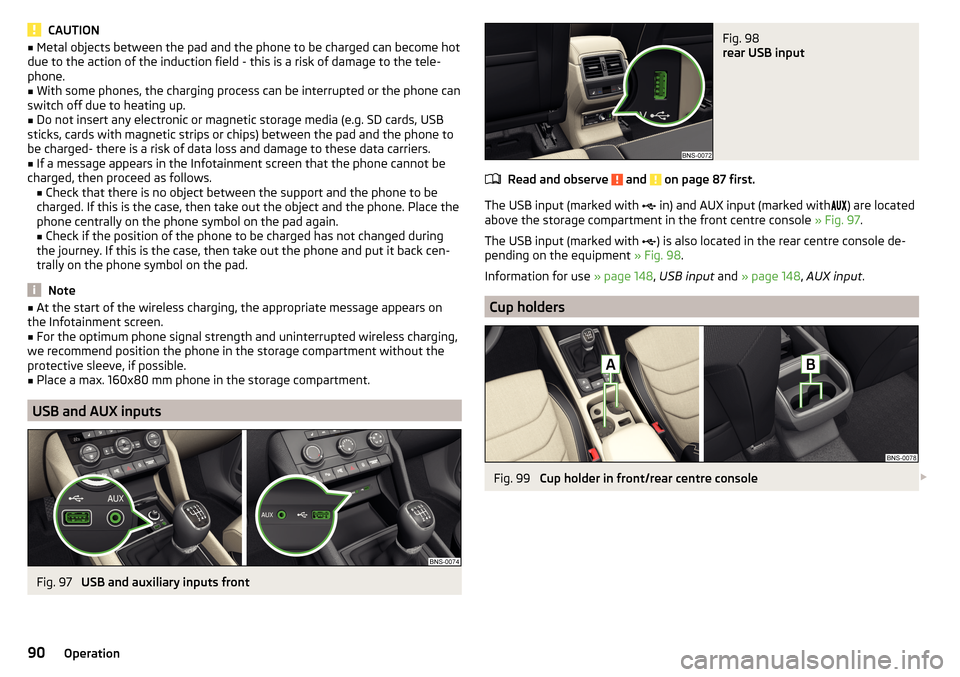
Fig. 97
USB and auxiliary inputs front
Fig. 98
rear USB input
Read and observe and on page 87 first.
The USB input (marked with in) and AUX input (marked with
) are located
above the storage compartment in the front centre console » Fig. 97.
The USB input (marked with ) is also located in the rear centre console de-
pending on the equipment » Fig. 98.
Information for use » page 148, USB input and » page 148 , AUX input .
Cup holders
Fig. 99
Cup holder in front/rear centre console
90Operation
Page 150 of 344
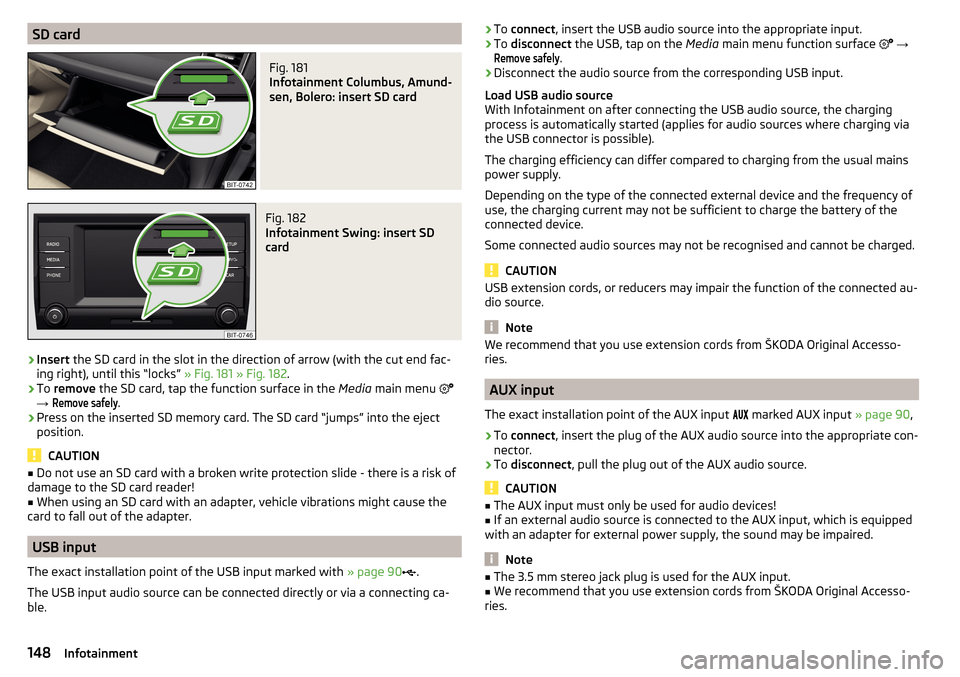
SD cardFig. 181
Infotainment Columbus, Amund-
sen, Bolero: insert SD card
Fig. 182
Infotainment Swing: insert SD
card
›
Insert the SD card in the slot in the direction of arrow (with the cut end fac-
ing right), until this “locks” » Fig. 181 » Fig. 182 .
›
To remove the SD card, tap the function surface in the Media main menu
→
Remove safely
.
›
Press on the inserted SD memory card. The SD card “jumps” into the eject
position.
CAUTION
■ Do not use an SD card with a broken write protection slide - there is a risk of
damage to the SD card reader!■
When using an SD card with an adapter, vehicle vibrations might cause the
card to fall out of the adapter.
USB input
The exact installation point of the USB input marked with » page 90
.
The USB input audio source can be connected directly or via a connecting ca-
ble.
› To
connect , insert the USB audio source into the appropriate input.›To disconnect the USB, tap on the Media main menu function surface →
Remove safely
.
›
Disconnect the audio source from the corresponding USB input.
Load USB audio source
With Infotainment on after connecting the USB audio source, the charging
process is automatically started (applies for audio sources where charging via
the USB connector is possible).
The charging efficiency can differ compared to charging from the usual mains
power supply.
Depending on the type of the connected external device and the frequency of
use, the charging current may not be sufficient to charge the battery of the
connected device.
Some connected audio sources may not be recognised and cannot be charged.
CAUTION
USB extension cords, or reducers may impair the function of the connected au-
dio source.
Note
We recommend that you use extension cords from ŠKODA Original Accesso-
ries.
AUX input
The exact installation point of the AUX input
marked AUX input » page 90,
›
To connect , insert the plug of the AUX audio source into the appropriate con-
nector.
›
To disconnect , pull the plug out of the AUX audio source.
CAUTION
■
The AUX input must only be used for audio devices!■If an external audio source is connected to the AUX input, which is equipped
with an adapter for external power supply, the sound may be impaired.
Note
■ The 3.5 mm stereo jack plug is used for the AUX input.■We recommend that you use extension cords from ŠKODA Original Accesso-
ries.148Infotainment
Page 285 of 344
Specification - the brake fluid must comply with VW 501 14 standard (this
standard meets the requirements of FMVSS 116 DOT4).WARNING■ The following warning instructions must be followed at all times when
working in the engine compartment » page 278.■
There may be an indication of a leak in the brake system, however, if the
fluid level drops significantly within a short time or if it drops below the
“MIN” » Fig. 334 marking.
Stop driving - There is a risk of an accident!
Seek help from a specialist garage.
Note
■ The brake fluid is changed as part of a compulsory inspection service.■A low brake fluid level which is too low is indicated by the warning light
being shown on the display of the instrument cluster as well as the corre-
sponding message » page 35. We therefore recommend that you check the
coolant level directly at the reservoir from time to time.
Vehicle battery
Introduction
This chapter contains information on the following subjects:
Check condition
284
Charging
284
Disconnect/reconnect and change
285
The vehicle battery represents a power source for the motor to start and for the supply of electrical consumers in the car.
Automatic consumer shutdown - Discharge protection of the vehicle battery
The on-board power supply tries as follows to avoid draining the vehicle bat-
tery when it is heavily loaded.
▶ By increasing the engine idle speed.
▶ By limiting the power of certain consumers.
▶ By turning off some consumers (heated seats, heated rear window) for as
long as necessary.
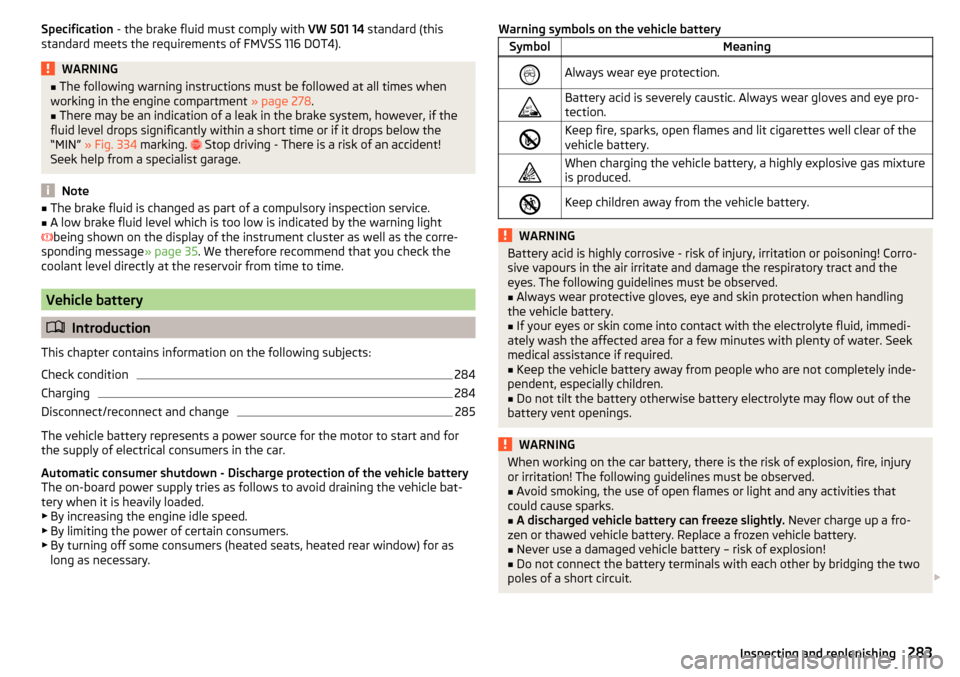
Warning symbols on the vehicle batterySymbolMeaningAlways wear eye protection.Battery acid is severely caustic. Always wear gloves and eye pro-
tection.Keep fire, sparks, open flames and lit cigarettes well clear of the
vehicle battery.When charging the vehicle battery, a highly explosive gas mixture
is produced.Keep children away from the vehicle battery.WARNINGBattery acid is highly corrosive - risk of injury, irritation or poisoning! Corro-
sive vapours in the air irritate and damage the respiratory tract and the
eyes. The following guidelines must be observed.■
Always wear protective gloves, eye and skin protection when handling
the vehicle battery.
■
If your eyes or skin come into contact with the electrolyte fluid, immedi-
ately wash the affected area for a few minutes with plenty of water. Seek
medical assistance if required.
■
Keep the vehicle battery away from people who are not completely inde-
pendent, especially children.
■
Do not tilt the battery otherwise battery electrolyte may flow out of the
battery vent openings.
WARNINGWhen working on the car battery, there is the risk of explosion, fire, injury
or irritation! The following guidelines must be observed.■
Avoid smoking, the use of open flames or light and any activities that
could cause sparks.
■
A discharged vehicle battery can freeze slightly. Never charge up a fro-
zen or thawed vehicle battery. Replace a frozen vehicle battery.
■
Never use a damaged vehicle battery – risk of explosion!
■
Do not connect the battery terminals with each other by bridging the two
poles of a short circuit.
283Inspecting and replenishing
Page 286 of 344
CAUTIONEnsure that battery acid does not come into contact with the bodywork – risk
of damage to the paintwork.
Note
■ We recommend having all work on the vehicle battery carried out by a spe-
cialist garage.■
You should replace batteries older than 5 years.
Check condition
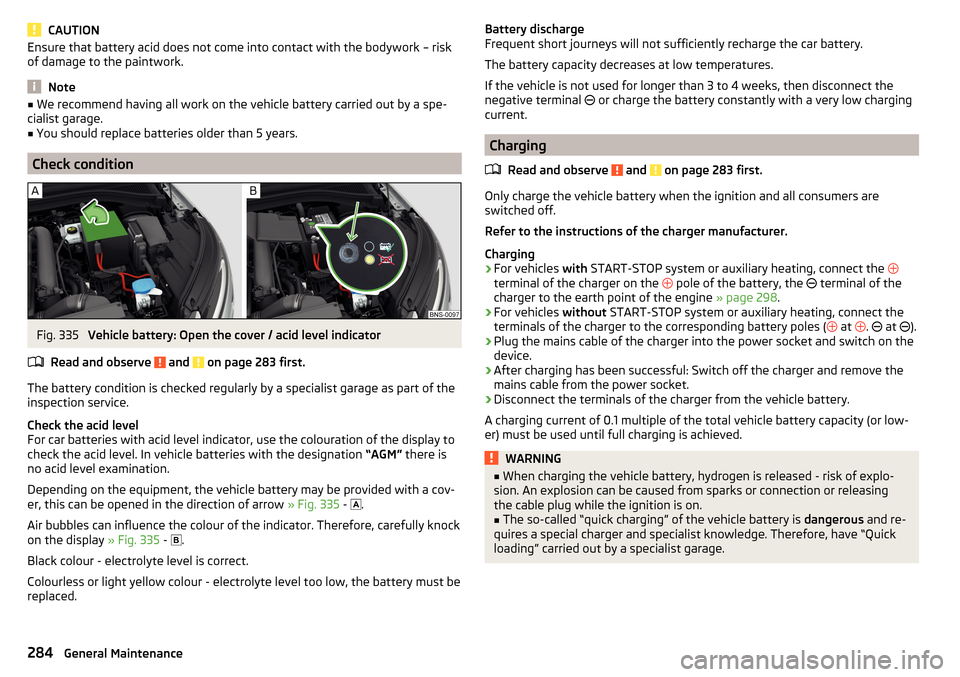
Fig. 335
Vehicle battery: Open the cover / acid level indicator
Read and observe
and on page 283 first.
The battery condition is checked regularly by a specialist garage as part of the
inspection service.
Check the acid level
For car batteries with acid level indicator, use the colouration of the display to
check the acid level. In vehicle batteries with the designation “AGM” there is
no acid level examination.
Depending on the equipment, the vehicle battery may be provided with a cov-
er, this can be opened in the direction of arrow » Fig. 335 -
.
Air bubbles can influence the colour of the indicator. Therefore, carefully knock
on the display » Fig. 335 -
.
Black colour - electrolyte level is correct.
Colourless or light yellow colour - electrolyte level too low, the battery must be
replaced.
Battery discharge
Frequent short journeys will not sufficiently recharge the car battery.
The battery capacity decreases at low temperatures.
If the vehicle is not used for longer than 3 to 4 weeks, then disconnect the
negative terminal
or charge the battery constantly with a very low charging
current.
Charging
Read and observe
and on page 283 first.
Only charge the vehicle battery when the ignition and all consumers are
switched off.
Refer to the instructions of the charger manufacturer.
Charging
›
For vehicles with START-STOP system or auxiliary heating, connect the
terminal of the charger on the pole of the battery, the
terminal of the
charger to the earth point of the engine » page 298.
›
For vehicles without START-STOP system or auxiliary heating, connect the
terminals of the charger to the corresponding battery poles ( at
.
at
).
›
Plug the mains cable of the charger into the power socket and switch on the
device.
›
After charging has been successful: Switch off the charger and remove the
mains cable from the power socket.
›
Disconnect the terminals of the charger from the vehicle battery.
A charging current of 0.1 multiple of the total vehicle battery capacity (or low-
er) must be used until full charging is achieved.
WARNING■ When charging the vehicle battery, hydrogen is released - risk of explo-
sion. An explosion can be caused from sparks or connection or releasing
the cable plug while the ignition is on.■
The so-called “quick charging” of the vehicle battery is dangerous and re-
quires a special charger and specialist knowledge. Therefore, have “Quick
loading” carried out by a specialist garage.
284General Maintenance
Page 325 of 344
ChangingBatteries for the removable light302
Battery300, 301
Wheels291
Windscreen wiper blades304
Changing a wheel291
Changing gear Selector lever
210
Tiptronic211
Charging a vehicle battery284
Check Brake fluid
282
Engine oil281
Oil level281
Checking Battery status
284
Coolant282
Checks Statutory checks
266
Children and safety23
Child safety lock56
Child seat23
Classification26
I-Size28
Installation location26, 27, 28
ISOFIX27
on the front passenger seat24, 25
TOP TETHER28
Cigarette lighter99
Cleaning the vehicle Interior
273
Outside271
Washing270
Climatronic109
air distribution control113
Automatic operation112
Operate in Infotainment112
Operating elements110
Clock change display
125
Clothes hook94
Cockpit31
Lighting71
Columbus external module
123
infotainment Description121
Comfort flashing67
COMING HOME69
Compartments87
Compatible sources DVD video
154
Pictures152
Component protection267
Computer see multifunction display
46
Conditions for pairing160
Conference call167
Configuration wizard126
Connection with the infotainment Hotspot170
Connect to the hotspot of the external device170
Coolant281
Checking282
Refilling282
Temperature display32
Warning light39
CORNER See Fog lights with CORNER function
69
Correct routing of seat belt
16
Correct seated position12
Correct seating position14
Crew Protect Assist253
Cruise control240
Cruise Control System239
Cup holders90
D
DAB
141, 142
additional information141
Radio Text and images presentation141
set to134, 140
DAB Slideshow141
Data Connection Carstick
171
connection171
Internet171
rSAP171
SIM card171
WIRELESS INTERNET ACCESS171
Data roaming132
Data transfer of external devices127
Date131, 138
DAY LIGHT See Daytime running lights
66
Daytime running lights66
Dazzle73
DCC42, 251
De-icing the windscreen and rear window72
Deactivation Airbag
22
default settings201
Delayed locking of the boot lid See boot lid
59
Delete destination192
Demo mode138, 193
Descent Control System42
Destination Enter destination using the address
183
Favourite192
final destinations184
Home address185
Image with GPS189
Memory192
Destination details192
323Index
Page 337 of 344
Tyre Pressure MonitoringStoring the tyre pressure values and Infotain- ment display
260
Tyre repair295
Tyres285
damage285
Explanation of the label288
new285
Tyre pressure286
Tyre size288
U
Umbrella Tray
94
Units131, 139
Unlatch KESSY
53
Unlock Individual settings
54
Unlocking Central locking button
54
In case of emergency302
Remote control52
Unlocking and locking52
Unlock steering lock202
Update navigation data179
Update the navigation data137
USB90, 148
Safe removal139
Used vehicles Acceptance and recycling
268
Useful equipment Clothes hook
94
Cup holders90
Glasses compartment92
Removable through-loading bag95
User account Configuration wizard
126
User profile134, 140
V
Variable loading floor
106
vCard185, 187
Vehicle - Settings201
Vehicle battery charging
284
Safety instructions283
Warning light39
Vehicle care270
Outside271
Vehicle cleaning270
Vehicle condition Auto Check Control
45
Vehicle data carrier269
Vehicle data sticker313
Vehicle data sticker and type plate Vehicle data sticker and type plate
313
Vehicle dimensions316
Vehicle height316
Vehicle identification number (VIN)313
Vehicle length316
vehicle systems201
Vehicle tool kit291
Vehicle width316
Ventilation Seats
85
Verwaltung gekoppelter Geräte160
Vest290
Video DVD Playback
153
Set to134
video player153
VIN Vehicle identification number
313
Virtual pedal61
Visibility72
Visors73
Voice control127
Commands128
Correction of a voice command input128
Help128
Not recognising a voice command128
on / off128
Operation principle128
Settings132
Stop / restore command128
Voicemail164
Volume125
Volume setting125
W
Waiter Voice control
128
Warning lights33
Warning symbols see Warning lights
33
Warning triangle290
Warning when speeding47
Warranty5
Washing the vehicle270
Waste container91
Water in the fuel filter42
Waypoint mode196
Main menu197
Record waypoints197
Set waypoint manually197
Waypoint tour memory198
Waypoint tour memory198
Weather conditions266
Weights313, 314
Wheel bolts Anti-theft wheel bolts
294
Caps294
Loosening and tightening294
335Index