headrest SKODA KODIAQ 2016 1.G Owner's Manual
[x] Cancel search | Manufacturer: SKODA, Model Year: 2016, Model line: KODIAQ, Model: SKODA KODIAQ 2016 1.GPages: 344, PDF Size: 58.96 MB
Page 4 of 344
Table of Contents
Liability for defects and ŠKODA warranty for
new cars5
Printed Owner's Manual
7
Online Owner's Manual
8
Notes
9
Structure of the Owner´s Manual and further
information
10
Abbreviations
Safety
Passive Safety
12
General information
12
Correct and safe seated position
12
emergency call
14
Seat belts
15
Using seat belts
15
Inertia reel and belt tensioners
18
Airbag system
19
Description of the airbag system
19
Airbag deactivation
22
Transporting children safely
23
Child seat
23
Fastening systems
27
Operation
Cockpit
31
Overview
30
Instruments and warning lights
32
Instrument cluster
32
Warning lights
33Information system43Driver information system43
Operation of the information system
45
Driving data (Multifunction display)
46
MAXI DOT display
48
Service interval display
49
Personalization
50
Unlocking and opening
52
Unlocking and locking
52
Anti-theft alarm system
57
Manually operated tailgate
58
Electric boot lid
59
Window operation
61
Panoramic tilt / slide sunroof
63
Lights and visibility
65
Light
65
Interior lighting
71
Viisibility
72
Windscreen wipers and washers
73
Rear view mirror
75
Seats and head restraints
78
Front seats
78
Rear seats
80
Headrests
83
Seat heating and ventilation
85
Heated steering wheel
86
Practical features
87
Interior equipment
87
Electrical sockets
96
Ashtray and cigarette lighter
98
Tablet holder
99Transport of cargo100Luggage compartment100
Variable loading floor in the luggage
compartment (Estate)
106
Transportation on the roof rack
108
Heating and ventilation
109
Heating, manual air conditioning system,
Climatronic
109
Auxiliary heating (auxiliary heating and
ventilation)
114
Online services ŠKODA Connect
117
Introductory information
117
Care Connect-Services
118
infotainment online-Services
118
Infotainment
Introductory information
120
Important information
120
Infotainment Overview
121
Infotainment operation
124
Infotainment operation
124
Voice control
127
Updating the Infotainment software
129
Infotainment settings - Columbus, Amundsen,
Bolero
130
Infotainment system settings
130
Radio menu settings
133
Media menu settings
134
Image menu settings
134
Video DVD menu settings
134
Settings
134
SmartLink menu settings
136
Navigation menu settings
1362Table of Contents
Page 15 of 344
WARNING■The front seats and all head restraints must be adjusted to match the
body size at all times and the seat belt must always be fastened properly to
provide the most effective levels of protection to the passengers.■
Each occupant must correctly fasten the seat belt belonging to the seat.
Children must be fastened » page 23, Transporting children safely with a
suitable restraint system.
■
The seat backrests must not be tilted too far back when driving, as this
will impair the function of the seat belts and of the airbag system – risk of
injury!
WARNINGBy sitting incorrectly, the occupant is risking life-threatening injuries.
Driver’s correct seated position
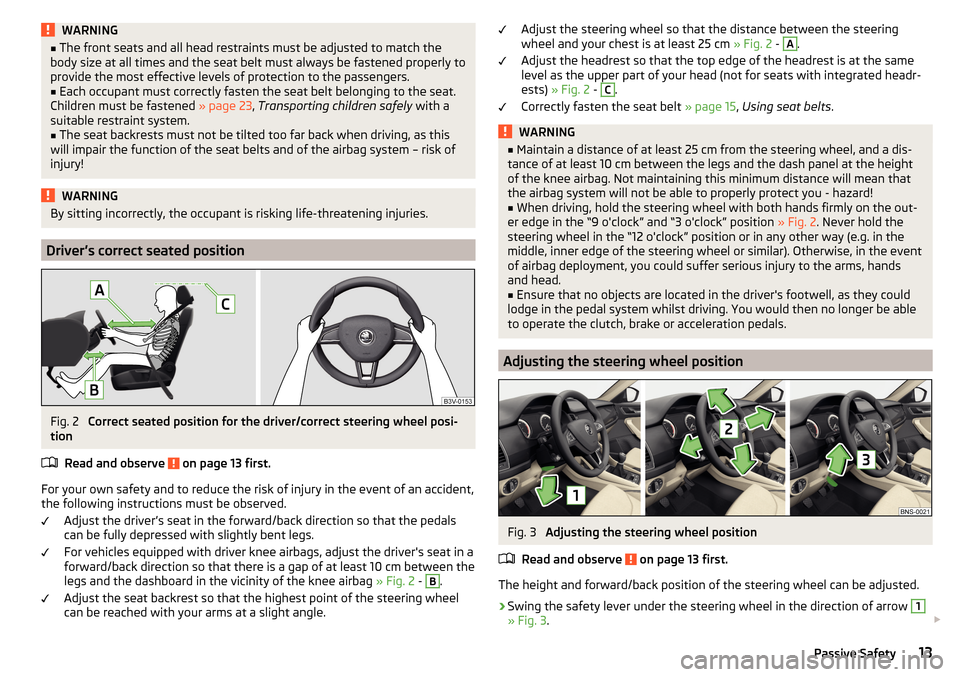
Fig. 2
Correct seated position for the driver/correct steering wheel posi-
tion
Read and observe
on page 13 first.
For your own safety and to reduce the risk of injury in the event of an accident,
the following instructions must be observed.
Adjust the driver’s seat in the forward/back direction so that the pedals
can be fully depressed with slightly bent legs.
For vehicles equipped with driver knee airbags, adjust the driver's seat in a
forward/back direction so that there is a gap of at least 10 cm between the
legs and the dashboard in the vicinity of the knee airbag » Fig. 2 -
B
.
Adjust the seat backrest so that the highest point of the steering wheel
can be reached with your arms at a slight angle.
Adjust the steering wheel so that the distance between the steering
wheel and your chest is at least 25 cm » Fig. 2 - A.
Adjust the headrest so that the top edge of the headrest is at the same
level as the upper part of your head (not for seats with integrated headr-
ests) » Fig. 2 - C
.
Correctly fasten the seat belt » page 15, Using seat belts .
WARNING■
Maintain a distance of at least 25 cm from the steering wheel, and a dis-
tance of at least 10 cm between the legs and the dash panel at the height
of the knee airbag. Not maintaining this minimum distance will mean that
the airbag system will not be able to properly protect you - hazard!■
When driving, hold the steering wheel with both hands firmly on the out-
er edge in the “9 o'clock” and “3 o'clock” position » Fig. 2. Never hold the
steering wheel in the “12 o'clock” position or in any other way (e.g. in the
middle, inner edge of the steering wheel or similar). Otherwise, in the event
of airbag deployment, you could suffer serious injury to the arms, hands
and head.
■
Ensure that no objects are located in the driver's footwell, as they could
lodge in the pedal system whilst driving. You would then no longer be able
to operate the clutch, brake or acceleration pedals.
Adjusting the steering wheel position
Fig. 3
Adjusting the steering wheel position
Read and observe
on page 13 first.
The height and forward/back position of the steering wheel can be adjusted.
›
Swing the safety lever under the steering wheel in the direction of arrow
1
» Fig. 3 .
13Passive Safety
Page 16 of 344
›Adjust the steering wheel to the desired position. The steering wheel can be
adjusted in direction of arrow 2.›
Pull the holder in arrow direction
3
until the stop.
WARNING■ Never adjust the steering wheel when the vehicle is moving only when
the vehicle is stationary!■
The safety lever must always be locked after adjusting so that the steer-
ing wheel cannot accidentally change position – risk of accident!
Passenger’s correct seating position
Read and observe
on page 13 first.
For passenger safety and to reduce the risk of injury in an accident, the follow-
ing instructions must be observed.
Position the front passenger seat back as far as possible. The front pas-
senger must maintain a distance of at least 25 cm to the dash panel so
that the airbag offers the greatest possible safety if it is deployed.
Adjust the headrests so that the top edge of the headrest is at the same
level as the upper part of your head » Fig. 2 on page 13 -
C
(not for seats
with integrated headrests).
Correctly fasten the seat belt » page 15, Using seat belts .
WARNING■
Ensure a distance of at least 25 cm to the dashboard, otherwise the air-
bag system will not be able to protect you properly - risk of death!■
Always keep your feet in the footwell when the car is being driven – nev-
er place your feet on the instrument panel, out of the window or on the
surface of the seats! You will be exposed to increased risk of injury if it be-
comes necessary to apply the brake or in the event of an accident. If an air-
bag is deployed, you could suffer fatal injuries by adopting an incorrect
seated position!
Passengers’ correct seating position on the rear seats
Read and observe
on page 13 first.
For passenger safety on the rear seats and to reduce the risk of injury in the
event of an accident, the following information must be observed.
Adjust the headrests so that the top edge of the headrest is at the same
level as the upper part of the head » Fig. 2 on page 13 -
C
.
Correctly fasten the seat belt » page 15, Using seat belts .
emergency call
Only valid for some countries.
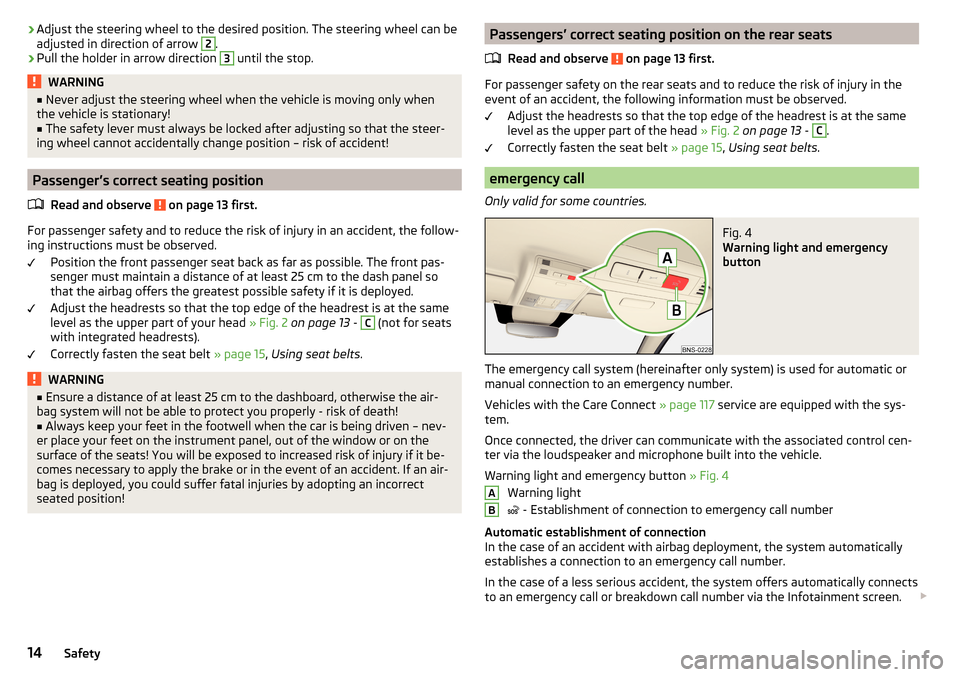
Fig. 4
Warning light and emergency
button
The emergency call system (hereinafter only system) is used for automatic or manual connection to an emergency number.
Vehicles with the Care Connect » page 117 service are equipped with the sys-
tem.
Once connected, the driver can communicate with the associated control cen-
ter via the loudspeaker and microphone built into the vehicle.
Warning light and emergency button » Fig. 4
Warning light
- Establishment of connection to emergency call number
Automatic establishment of connection
In the case of an accident with airbag deployment, the system automatically
establishes a connection to an emergency call number.
In the case of a less serious accident, the system offers automatically connects to an emergency call or breakdown call number via the Infotainment screen.
AB14Safety
Page 19 of 344
Seat belt height adjusters for front seats›Push the seat belt guide loop upwards in the direction of arrow » Fig. 6 - .›
Or : push together the mechanism in the direction of arrows
1
and push the
return pulley downwards in the direction of arrow
2
» Fig. 6 -
.
›
Then pull firmly on the belt to ensure that the seat belt height adjuster has
correctly locked in place.
WARNING■ Always ensure that the webbing of the seat belts is properly routed. Seat
belts which are not correctly adjusted can themselves cause injuries even
in minor accidents.■
A seat belt which is hanging too loose can result in injuries as your body is
moved forward by the kinetic energy produced in an accident and is then
suddenly held firm by the belt.
■
The belt webbing must not run across solid or fragile objects (e.g. specta-
cles, ball-point pens, keys, etc.). Such objects can cause injury.
Fastening and unfastening seat belts
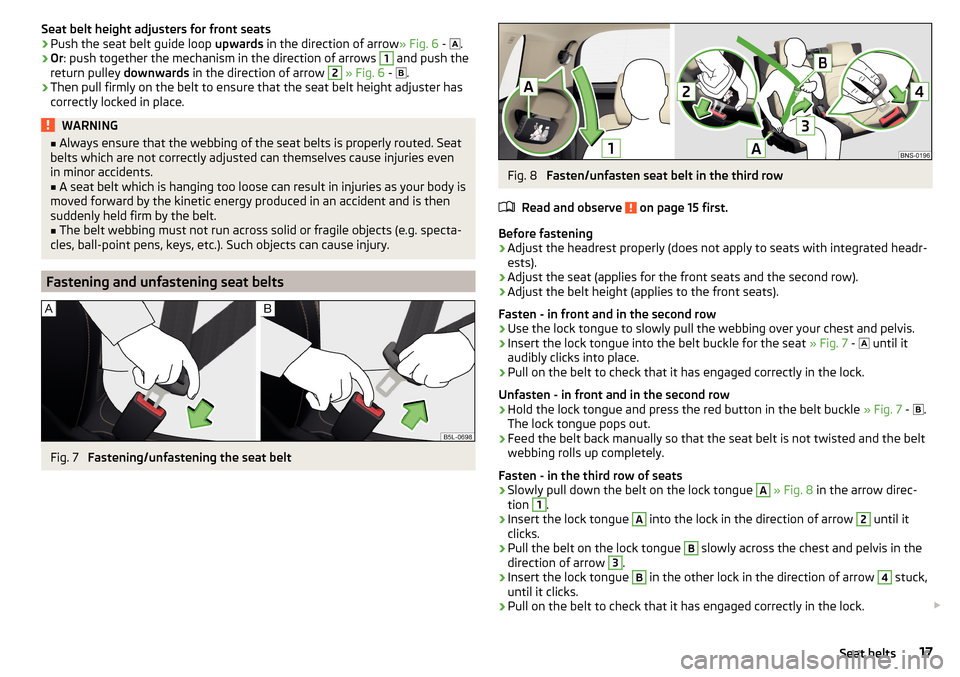
Fig. 7
Fastening/unfastening the seat belt
Fig. 8
Fasten/unfasten seat belt in the third row
Read and observe
on page 15 first.
Before fastening
›
Adjust the headrest properly (does not apply to seats with integrated headr-
ests).
›
Adjust the seat (applies for the front seats and the second row).
›
Adjust the belt height (applies to the front seats).
Fasten - in front and in the second row
›
Use the lock tongue to slowly pull the webbing over your chest and pelvis.
›
Insert the lock tongue into the belt buckle for the seat » Fig. 7 -
until it
audibly clicks into place.
›
Pull on the belt to check that it has engaged correctly in the lock.
Unfasten - in front and in the second row
›
Hold the lock tongue and press the red button in the belt buckle » Fig. 7 -
.
The lock tongue pops out.
›
Feed the belt back manually so that the seat belt is not twisted and the belt
webbing rolls up completely.
Fasten - in the third row of seats
›
Slowly pull down the belt on the lock tongue
A
» Fig. 8 in the arrow direc-
tion
1
.
›
Insert the lock tongue
A
into the lock in the direction of arrow
2
until it
clicks.
›
Pull the belt on the lock tongue
B
slowly across the chest and pelvis in the
direction of arrow
3
.
›
Insert the lock tongue
B
in the other lock in the direction of arrow
4
stuck,
until it clicks.
›
Pull on the belt to check that it has engaged correctly in the lock.
17Seat belts
Page 26 of 344
WARNING (Continued)■Children are exposed to an increased risk of injury in the event of an acci-
dent if they lean forward or adopt an incorrect seated position when the
vehicle is moving. This particularly applies to children who are transported
on the front passenger seat as they can suffer severe, or even fatal injuries
if the airbag system is deployed!■
Pay particular attention to the information provided by the manufacturer
of the child safety seat regarding the correct routing of the belt. Seat belts
which are not correctly adjusted can themselves cause injuries even in mi-
nor accidents.
■
Safety belts must be checked to ensure that they are running properly.
One should also ensure that the belt is not damaged by sharp-edged fit-
tings.
■
When installing the child seat on a seat in the second or third row of
seats, the corresponding front seat must be adjusted so that there is no
contact between the front seat and the child seat or the child being trans-
ported in a child seat.
■
When installing a child seat in which the child faces forward, adjust the
head restraints so that they are as high as possible.
■
If the head restraints still prevent the child seat from being installed,
even in the lowest position, you will need to remove them » page 83. Af-
ter removing the child seat, refit the head restraints.
■
When using a separate child seat cushion, set the headrest so that the
child's head is flush to the height of the headrest upper edge, but does not
protrude above this » Fig. 2 on page 13
C
.
Note
We recommend that you use child seats from ŠKODA Original Accessories.
These child seats were developed and also tested for use in ŠKODA vehicles.
They meet the ECE-R 44 standard.Use of a child seat on the front passenger seat (variant 1)
Does not apply to TaiwanFig. 13
Warning labels
Read and observe
on page 23 first.
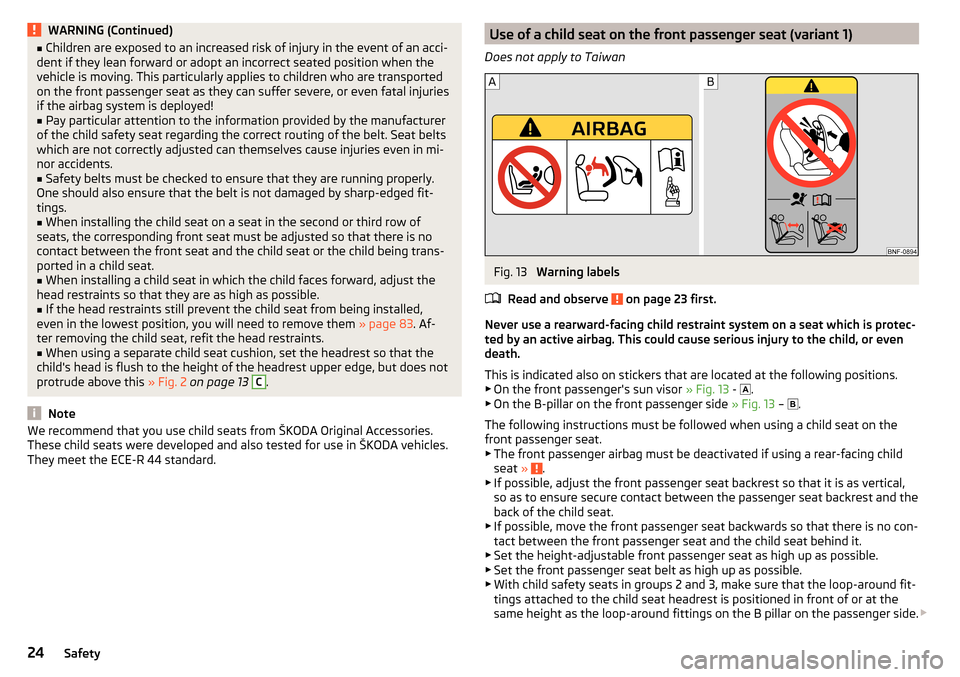
Never use a rearward-facing child restraint system on a seat which is protec-
ted by an active airbag. This could cause serious injury to the child, or even
death.
This is indicated also on stickers that are located at the following positions. ▶ On the front passenger's sun visor » Fig. 13 -
.
▶ On the B-pillar on the front passenger side » Fig. 13 –
.
The following instructions must be followed when using a child seat on the front passenger seat.
▶ The front passenger airbag must be deactivated if using a rear-facing child
seat »
.
▶ If possible, adjust the front passenger seat backrest so that it is as vertical,
so as to ensure secure contact between the passenger seat backrest and the
back of the child seat.
▶ If possible, move the front passenger seat backwards so that there is no con-
tact between the front passenger seat and the child seat behind it.
▶ Set the height-adjustable front passenger seat as high up as possible.
▶ Set the front passenger seat belt as high up as possible.
▶ With child safety seats in groups 2 and 3, make sure that the loop-around fit-
tings attached to the child seat headrest is positioned in front of or at the
same height as the loop-around fittings on the B pillar on the passenger side.
24Safety
Page 84 of 344
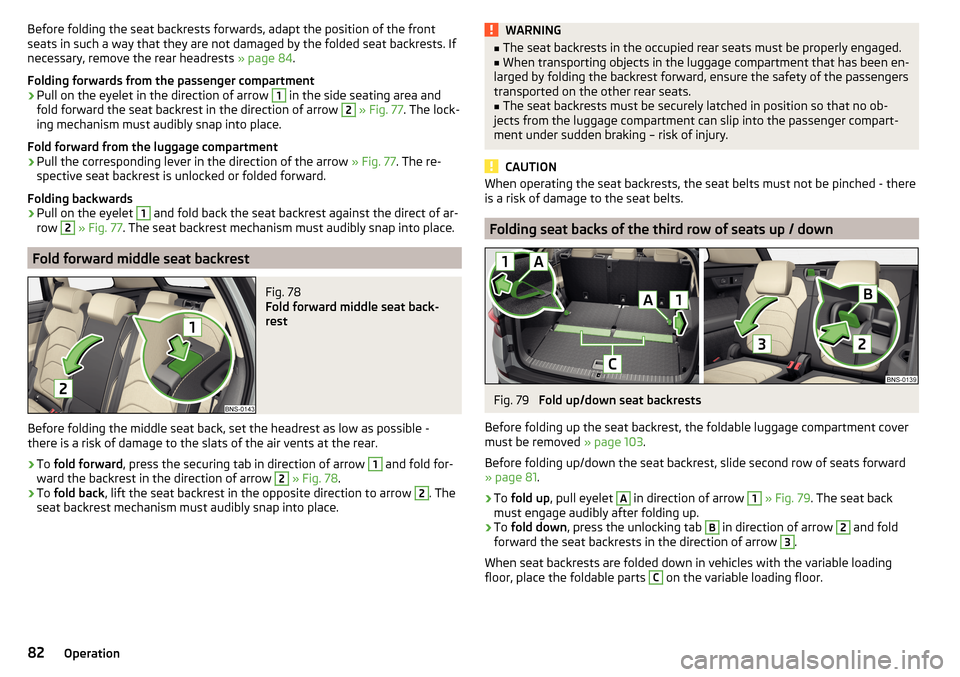
Before folding the seat backrests forwards, adapt the position of the front
seats in such a way that they are not damaged by the folded seat backrests. If
necessary, remove the rear headrests » page 84.
Folding forwards from the passenger compartment›
Pull on the eyelet in the direction of arrow
1
in the side seating area and
fold forward the seat backrest in the direction of arrow
2
» Fig. 77 . The lock-
ing mechanism must audibly snap into place.
Fold forward from the luggage compartment
›
Pull the corresponding lever in the direction of the arrow » Fig. 77. The re-
spective seat backrest is unlocked or folded forward.
Folding backwards
›
Pull on the eyelet
1
and fold back the seat backrest against the direct of ar-
row
2
» Fig. 77 . The seat backrest mechanism must audibly snap into place.
Fold forward middle seat backrest
Fig. 78
Fold forward middle seat back-
rest
Before folding the middle seat back, set the headrest as low as possible -
there is a risk of damage to the slats of the air vents at the rear.
›
To fold forward , press the securing tab in direction of arrow
1
and fold for-
ward the backrest in the direction of arrow
2
» Fig. 78 .
›
To fold back , lift the seat backrest in the opposite direction to arrow
2
. The
seat backrest mechanism must audibly snap into place.
WARNING■ The seat backrests in the occupied rear seats must be properly engaged.■When transporting objects in the luggage compartment that has been en-
larged by folding the backrest forward, ensure the safety of the passengers
transported on the other rear seats.■
The seat backrests must be securely latched in position so that no ob-
jects from the luggage compartment can slip into the passenger compart-
ment under sudden braking – risk of injury.
CAUTION
When operating the seat backrests, the seat belts must not be pinched - there
is a risk of damage to the seat belts.
Folding seat backs of the third row of seats up / down
Fig. 79
Fold up/down seat backrests
Before folding up the seat backrest, the foldable luggage compartment cover
must be removed » page 103.
Before folding up/down the seat backrest, slide second row of seats forward
» page 81 .
›
To fold up , pull eyelet
A
in direction of arrow
1
» Fig. 79 . The seat back
must engage audibly after folding up.
›
To fold down , press the unlocking tab
B
in direction of arrow
2
and fold
forward the seat backrests in the direction of arrow
3
.
When seat backrests are folded down in vehicles with the variable loading
floor, place the foldable parts
C
on the variable loading floor.
82Operation
Page 85 of 344
Third-row seats fold up / fold downFig. 80
Fold seats up/down
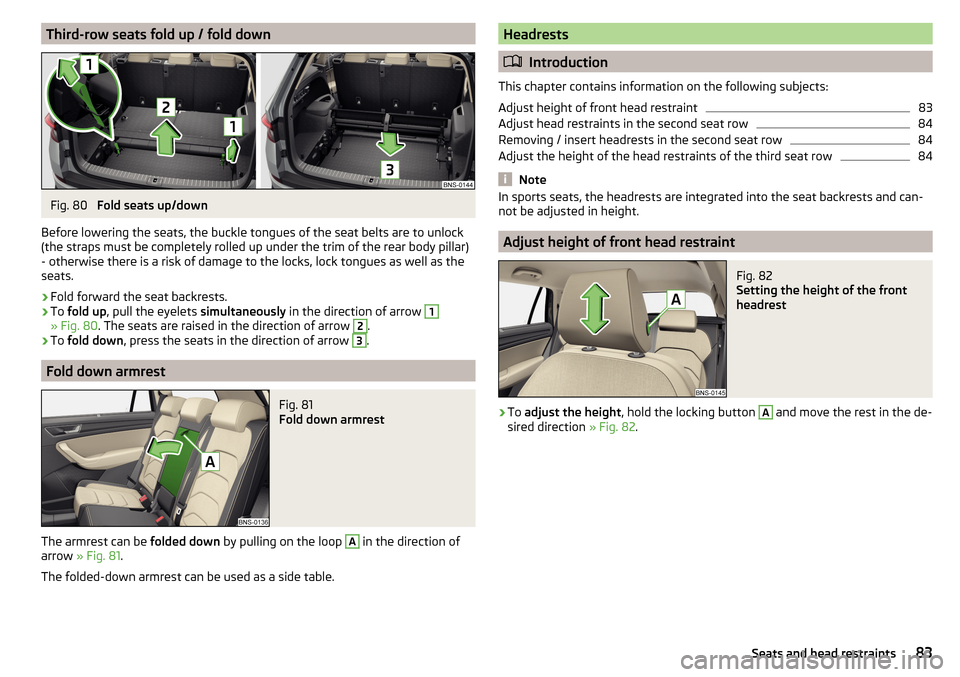
Before lowering the seats, the buckle tongues of the seat belts are to unlock
(the straps must be completely rolled up under the trim of the rear body pillar)
- otherwise there is a risk of damage to the locks, lock tongues as well as the
seats.
›
Fold forward the seat backrests.
›
To fold up , pull the eyelets simultaneously in the direction of arrow
1
» Fig. 80. The seats are raised in the direction of arrow
2
.
›
To fold down , press the seats in the direction of arrow
3
.
Fold down armrest
Fig. 81
Fold down armrest
The armrest can be folded down by pulling on the loop
A
in the direction of
arrow » Fig. 81 .
The folded-down armrest can be used as a side table.
Headrests
Introduction
This chapter contains information on the following subjects:
Adjust height of front head restraint
83
Adjust head restraints in the second seat row
84
Removing / insert headrests in the second seat row
84
Adjust the height of the head restraints of the third seat row
84
Note
In sports seats, the headrests are integrated into the seat backrests and can-
not be adjusted in height.
Adjust height of front head restraint
Fig. 82
Setting the height of the front
headrest
›
To adjust the height , hold the locking button
A
and move the rest in the de-
sired direction » Fig. 82.
83Seats and head restraints
Page 86 of 344
Adjust head restraints in the second seat rowFig. 83
Adjust the height of the headrest in the second seat row
Fig. 84
Fold down side bolsters of the
headrest
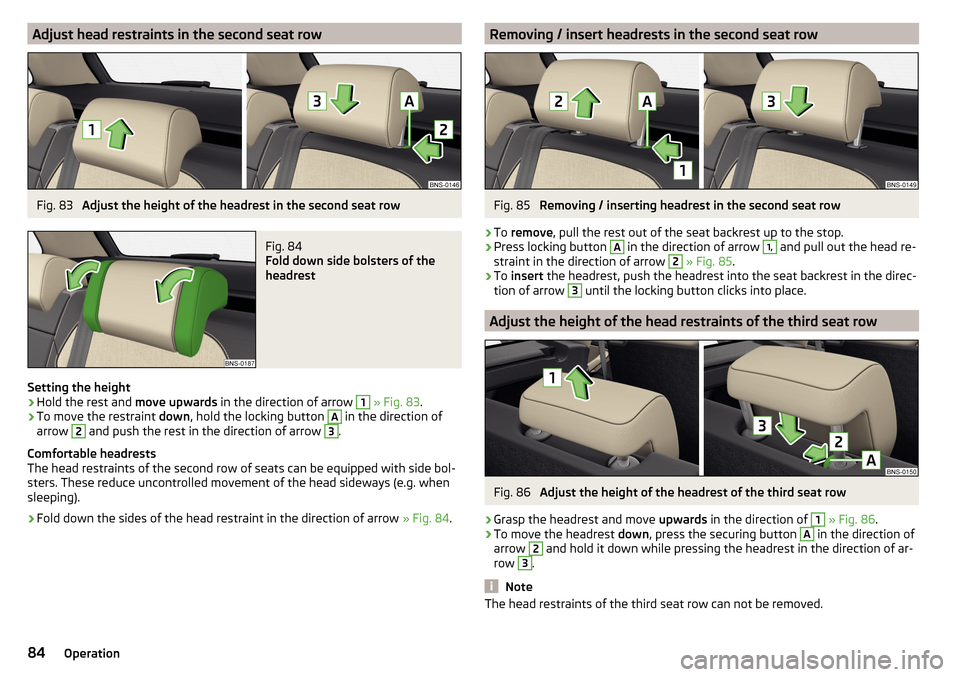
Setting the height
›
Hold the rest and move upwards in the direction of arrow
1
» Fig. 83 .
›
To move the restraint down, hold the locking button
A
in the direction of
arrow
2
and push the rest in the direction of arrow
3
.
Comfortable headrests
The head restraints of the second row of seats can be equipped with side bol-
sters. These reduce uncontrolled movement of the head sideways (e.g. when
sleeping).
›
Fold down the sides of the head restraint in the direction of arrow » Fig. 84.
Removing / insert headrests in the second seat rowFig. 85
Removing / inserting headrest in the second seat row
›
To remove , pull the rest out of the seat backrest up to the stop.
›
Press locking button
A
in the direction of arrow
1,
and pull out the head re-
straint in the direction of arrow
2
» Fig. 85 .
›
To insert the headrest, push the headrest into the seat backrest in the direc-
tion of arrow
3
until the locking button clicks into place.
Adjust the height of the head restraints of the third seat row
Fig. 86
Adjust the height of the headrest of the third seat row
›
Grasp the headrest and move upwards in the direction of
1
» Fig. 86 .
›
To move the headrest down, press the securing button
A
in the direction of
arrow
2
and hold it down while pressing the headrest in the direction of ar-
row
3
.
Note
The head restraints of the third seat row can not be removed.84Operation
Page 98 of 344
›Place the empty through-loading bag in the opening in such a way that the
end of the bag with the zip is in the luggage compartment.
Securing through-loading bag and skis›
Tighten the strap
A
around the skis in front of the bindings » Fig. 114. The
strap must hold the skis tight.
›
Insert the lock tongue
B
into the belt buckle of the middle seat.
›
The carabiners on the two sides latch into the lashing eyes
C
. To better ac-
cess the eyelets, fold forward the seat backrests of the second seat row
» page 81 .
›
Pull the belt
D
taut.
WARNING■
The total weight of the skis which are transported must not exceed 10 kg.■Always stow and secure the skis and the bag securely - otherwise there is
a risk of injury or accident!
CAUTION
Never fold and stow the through-loading bag when it is wet - risk of damaging
the through-loading bag.
Blanket
Read and observe
and on page 87 first.
To increase comfort for the occupants, the vehicle may be equipped with a
blanket.
The blanket is in a bag that can be attached to one of the following locations.
▶ On the guide rods of the front headrests.
▶ On operating lever for adjusting the second seat row in the longitudinal di-
rection.
▶ In the storage pockets on the backs of the front seats.
Electrical sockets
Introduction
This chapter contains information on the following subjects:
12-volt socket in the front centre console
97
12 volt socket in the rear centre console
9712 volt socket in luggage compartment97230-volt socket in the rear centre console97WARNING■ Do not place anything on the dashboard. These objects might slide or fall
down when driving and may distract you from concentrating on the traffic –
risk of accident!■
Make sure that while driving no objects can enter the driver's footwell -
cause an accident!
■
Safely stow all devices during the journey to prevent them from being
thrown around the interior in the event of a sudden braking manoeuvre or
an accident – risk of death!
■
The devices may warm up during operation – risk of injury or fire!
■
Improper use of the power sockets and the electrical accessories can
cause fires, burns and other serious injuries.
■
The 12-Volt sockets also work if the ignition is switched off. When leaving
the vehicle, never leave persons who are not completely independent, such
as children, unattended in the vehicle.
CAUTION
When using the 12 volt power outlets the following notes are to be observed.■The sockets can only be used for the connection of approved electrical ac-
cessories with a total power consumption of up to 120 watts, otherwise the
electrical system of the vehicle may be damaged.■
Connecting appliances when the engine is not running will drain the battery
of the vehicle!
■
Before switching the ignition on / off or before starting the engine, switch
off the devices which are connected to the sockets - there is a risk of damage
to the equipment due to voltage fluctuations.
96Operation
Page 101 of 344
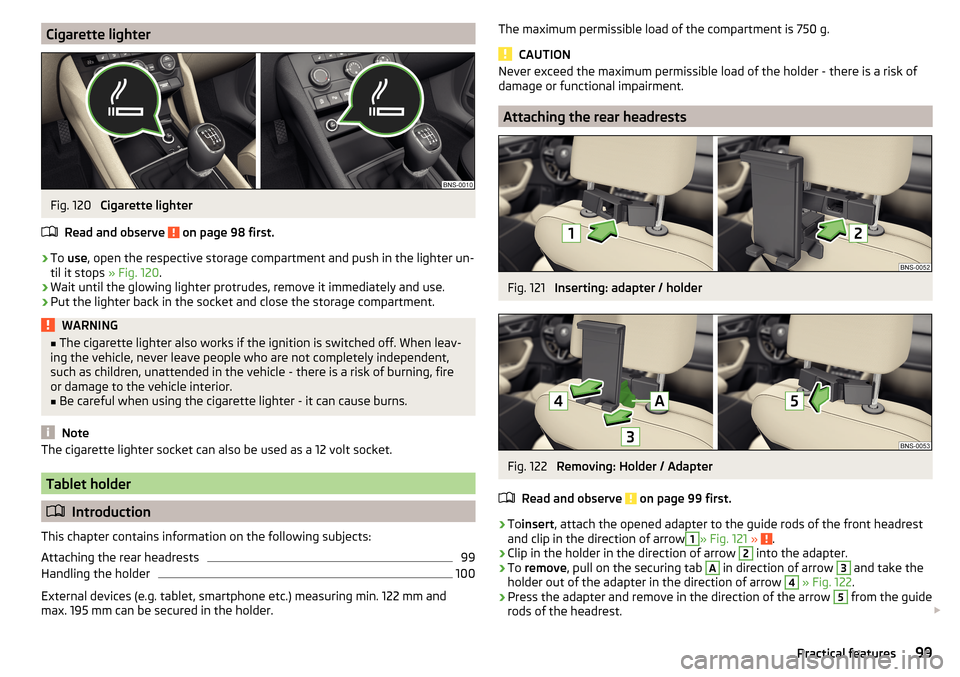
Cigarette lighterFig. 120
Cigarette lighter
Read and observe
on page 98 first.
›
To use , open the respective storage compartment and push in the lighter un-
til it stops » Fig. 120.
›
Wait until the glowing lighter protrudes, remove it immediately and use.
›
Put the lighter back in the socket and close the storage compartment.
WARNING■
The cigarette lighter also works if the ignition is switched off. When leav-
ing the vehicle, never leave people who are not completely independent,
such as children, unattended in the vehicle - there is a risk of burning, fire
or damage to the vehicle interior.■
Be careful when using the cigarette lighter - it can cause burns.
Note
The cigarette lighter socket can also be used as a 12 volt socket.
Tablet holder
Introduction
This chapter contains information on the following subjects:
Attaching the rear headrests
99
Handling the holder
100
External devices (e.g. tablet, smartphone etc.) measuring min. 122 mm and
max. 195 mm can be secured in the holder.
The maximum permissible load of the compartment is 750 g.
CAUTION
Never exceed the maximum permissible load of the holder - there is a risk of
damage or functional impairment.
Attaching the rear headrests
Fig. 121
Inserting: adapter / holder
Fig. 122
Removing: Holder / Adapter
Read and observe
on page 99 first.
›
To insert , attach the opened adapter to the guide rods of the front headrest
and clip in the direction of arrow
1
» Fig. 121 » .
›
Clip in the holder in the direction of arrow
2
into the adapter.
›
To remove , pull on the securing tab
A
in direction of arrow
3
and take the
holder out of the adapter in the direction of arrow
4
» Fig. 122 .
›
Press the adapter and remove in the direction of the arrow
5
from the guide
rods of the headrest.
99Practical features