technical data SKODA OCTAVIA 2005 1.G / (1U) Owner's Manual
[x] Cancel search | Manufacturer: SKODA, Model Year: 2005, Model line: OCTAVIA, Model: SKODA OCTAVIA 2005 1.G / (1U)Pages: 315, PDF Size: 11.8 MB
Page 264 of 315
Wheels and Tyres263
Using the systemSafetyDriving TipsGeneral MaintenanceBreakdown assistanceTechnical Data
Wheels and Tyres
Wheels
General comments
•New tyres do not offer optimal grip at first and should therefore be run
in for about 500 km at a moderate speed and an appropriately cautious
style of driving. You will also profit from longer tyre life.
•The tread depth of new tyres may differ because of design features
and the configuration of the tread (depending on the type of tyre and the
manufacturer).
•Drive over curbs on the side of the road and other such obstacles
slowly and, where possible, at a right angles in order to avoid damage to
tyres and wheel trims.
•Inspect your tyres from time to time for damage (punctures, cuts, splits
and bulges). Remove foreign bodies from the tyre profile.
•Damage to tyres and wheels is frequently not visible. Unusual vibra-
tions or pulling of the vehicle to one side could be a sign of tyre damage.
Please reduce your speed immediately and stop if you suspect that
a wheel is damaged. Inspect the tyres for signs of damage (bulges,
splits, etc.) If no visible damage is present, please drive at an appropri-
ately slow speed and carefully to the nearest specialist garage in order to
have your vehicle inspected.
•Also protect your tyres from contact with oil, grease and fuel.
•Immediately replace any dust caps of the valves which have got lost.
•Mark wheels before removing them so that their previous direction of
running can be maintained when mounted them again.
•Always store wheels or tyres which been removed in a cool, dry and,
where possible, dark place. Tyres which are not fixed to a wheel trim
should be stored upright. Unidirectional tyres*
The direction of rotation of the tyres is marked by arrows on the wall of the
tyre. This indicates the direction of rotation of the tyre, and it is essential
that the tyres are fitted on to run in this direction. Only then are the tyres
able to provide the optimal properties in terms of grip, low noise, wear-
and-tear and aquaplaning.
Further information concerning the use of unidirectional tyres
⇒page 268.
WARNING
•New tyres during the first 500 km do not offer optimal grip and
should therefore be run approp riately - risk of accident!
•Never drive with damaged tyres - risk of accident!
Note
Please observe the various differing legal requirements regarding tyres.
s24s.book Page 263 Thursday, November 24, 2005 12:27 PM
Page 266 of 315
Wheels and Tyres265
Using the systemSafetyDriving TipsGeneral MaintenanceBreakdown assistanceTechnical Data
Wear indicators
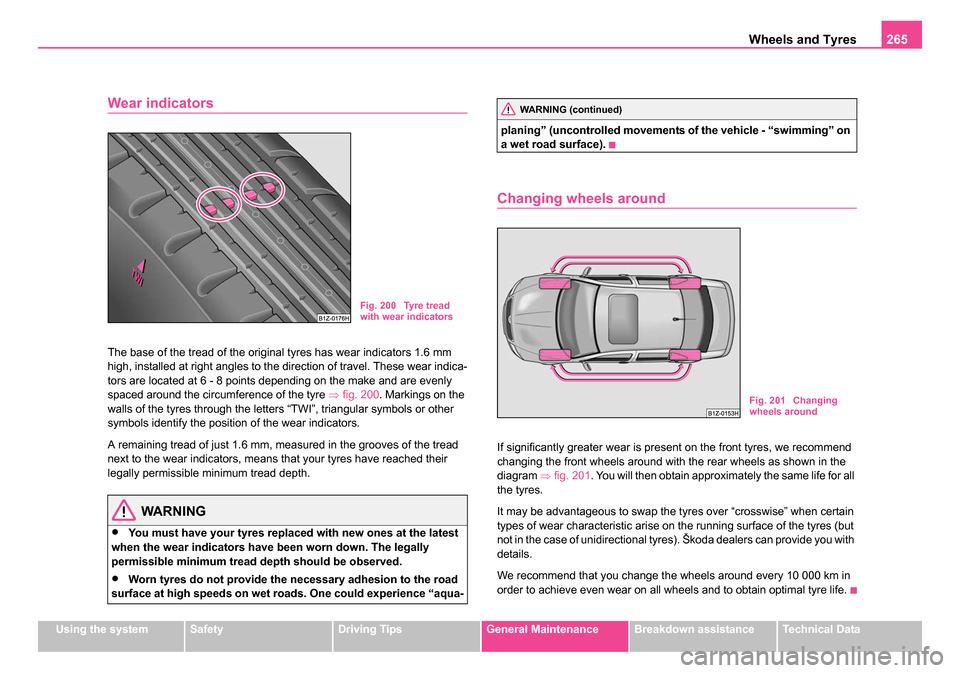
The base of the tread of the original tyres has wear indicators 1.6 mm
high, installed at right angles to the direction of travel. These wear indica-
tors are located at 6 - 8 points depending on the make and are evenly
spaced around the circumference of the tyre ⇒fig. 200 . Markings on the
walls of the tyres through the letters “TWI”, triangular symbols or other
symbols identify the position of the wear indicators.
A remaining tread of just 1.6 mm, measured in the grooves of the tread
next to the wear indicators, means that your tyres have reached their
legally permissible minimum tread depth.
WARNING
•You must have your tyres replaced with new ones at the latest
when the wear indicators have been worn down. The legally
permissible minimum tread depth should be observed.
•Worn tyres do not provide the necessary adhesion to the road
surface at high speeds on wet roads. One could experience “aqua- planing” (uncontrolled movements of the vehicle - “swimming” on
a wet road surface).
Changing wheels around
If significantly greater wear is present on the front tyres, we recommend
changing the front wheels around with the rear wheels as shown in the
diagram
⇒fig. 201 . You will then obtain approximately the same life for all
the tyres.
It may be advantageous to swap the tyres over “crosswise” when certain
types of wear characteristic arise on the running surface of the tyres (but
not in the case of unidirectional tyres). Škoda dealers can provide you with
details.
We recommend that you change the wheels around every 10 000 km in
order to achieve even wear on all wheels and to obtain optimal tyre life.
Fig. 200 Tyre tread
with wear indicators
WARNING (continued)
Fig. 201 Changing
wheels around
s24s.book Page 265 Thursday, November 24, 2005 12:27 PM
Page 268 of 315
Wheels and Tyres267
Using the systemSafetyDriving TipsGeneral MaintenanceBreakdown assistanceTechnical Data
risk of accident! Approval and li
cencing of your vehicle on public
roads may also become void as a result.
•You must on no account drive at a higher speed than is permis-
sible for your tyres - risk of an accident resulting from tyre damage
and loss of control over your vehicle.
•Tyres which are 6 years old or more should only be fitted in
exceptional cases and when adopting an appropriately cautious
style of driving.
•Never fit tyres which have already been used without having
adequate knowledge of their previous history. Tyres age even if
they have not been used at all or only very little. A spare tyre must
only be used in exceptional cases and only then when adopting an
appropriately cautious style of driving.
•Do not, where possible, replace individual tyres but at least
replace them on both wheels of a given axle at the same time.
Always fit the tyres with the deeper tread depth to the front wheels.
For the sake of the environment
Old tyres must be disposed of in conformity with the appropriate regula-
tions.
Note
It is not normally possible to fit wheels from other models of cars for tech-
nical reasons. This may also apply in certain circumstances to the wheels
of the same type of vehicle.
Wheel bolts
Wheels and wheel bolts are matched to each other in terms of design.
Each time you fit other wheels - e.g. light alloy wheels or wheels with
winter tyres - you must therefore also use the matching wheel bolts of the
correct length and shape of spherical cap. This is essential to ensure that
the wheels are tightly fitted and that the brake system operates properly.
If you retrofit wheel trims (or have this done), please also ensure that an
adequate flow of air remains assured for cooling the brake system.
Škoda dealers are instructed in the technical possibilities which exist
regarding converting or retrofitting wheels, tyres and wheel trim.
WARNING
•In case of incorrect treatment of the wheel bolts, the wheel can
loosen when the car is moving - risk of accident!
•The wheel bolts must be clean and must turn easily. However,
they must never be treated with grease or oil.
•If the wheel bolts are tightened to a too low tightening torque,
the rim can lossen when the car is moving - risk of accident! A tight-
ening torque which is too high can damage the bolts and threads
and this can result in perman ent deformation of the contact
surfaces on the rims.
Caution
The prescribed tightening torque of the wheel bolts for steel and light alloy
wheels is 120 Nm.
WARNING (continued)
s24s.book Page 267 Thursday, November 24, 2005 12:27 PM
Page 270 of 315
Wheels and Tyres269
Using the systemSafetyDriving TipsGeneral MaintenanceBreakdown assistanceTechnical Data
important on wet roads. Please refer to the notes
⇒page 275, “Spare
wheel”.
You should have the defective tyre replaced as soon as possible and
restore the correct direction of rotation on all tyres
Snow chains
Snow chains must only be mounted on the front wheels.
When driving on wintry roads, snow chains improve not only traction, but
also the braking performance.
For technical reasons, it is only permissible to fit snow chains with the
following wheel/tyre combinations:
Only use fine-link snow chains . They must not project more than 15 mm
- including the chain lock.
Remove the full wheel trims if you wish to fit snow chains to the wheels.
Observe the national legal requirements relating to the maximum vehicle
speed with snow chains.
WARNING
Please pay attention to the information in the supplied fitting
instructions of the snow chain manufacturer.
Caution
You must take the chains off as soon as you drive on roads which are free
of snow. They adversely affect the handling of your vehicle, damage the
tyres and are rapidly destroyed.
Note
We recommend that you use snow chains from the Škoda genuine
accessories.
Wheel sizeDepth (D)Tyre size
6J x 1547 mm195/65
6.5J x 1550 mm195/65
6J x 1650 mm205/55
s24s.book Page 269 Thursday, November 24, 2005 12:27 PM
Page 272 of 315
Accessories, changes and replacement of parts271
Using the systemSafetyDriving TipsGeneral MaintenanceBreakdown assistanceTechnical Data
WARNING
Work or modifications on your vehicle, which have been carried out
unprofessionally, can cause operation al faults - risk of accident!
s24s.book Page 271 Thursday, November 24, 2005 12:27 PM
Page 274 of 315
Breakdown assistance273
Using the systemSafetyDriving TipsGeneral MaintenanceBreakdown assistanceTechnical Data
Breakdown assistance
Breakdown assistance
First-aid box* and warning triangle*
(Octavia)
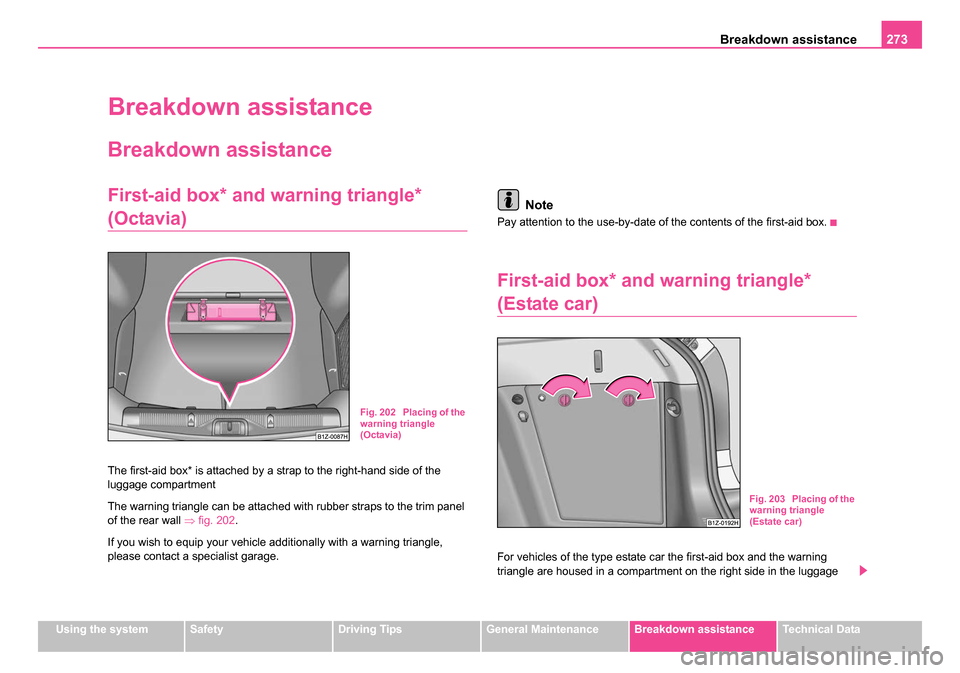
The first-aid box* is attached by a strap to the right-hand side of the
luggage compartment
The warning triangle can be attached with rubber straps to the trim panel
of the rear wall ⇒fig. 202.
If you wish to equip your vehicle additionally with a warning triangle,
please contact a specialist garage.
Note
Pay attention to the use-by-date of the contents of the first-aid box.
First-aid box* and warning triangle*
(Estate car)
For vehicles of the type estate car the first-aid box and the warning
triangle are housed in a compartment on the right side in the luggage
Fig. 202 Placing of the
warning triangle
(Octavia)
Fig. 203 Placing of the
warning triangle
(Estate car)
s24s.book Page 273 Thursday, November 24, 2005 12:27 PM
Page 276 of 315
Breakdown assistance275
Using the systemSafetyDriving TipsGeneral MaintenanceBreakdown assistanceTechnical Data
•Adapter for the wheel bolts lock,
After using the lifting jack, screw in the arm of the lifting jack fully before
placing it back in its stowage area.
WARNING
•The factory-supplied lifting jack is only intended for your model
of vehicle. On no account attempt to lift a heavier vehicle or other
loads - risk of injury!
•Ensure that the vehicle tool kit is safely attached in the luggage
compartment.
Note
Ensure that the box is always secured with the strap.
Tyre repair kit*
The tyre repair kit is intended for the repair of minor tyre defects. The tyre
repair kit contains a compressor, inflation bottle, operating instructions
and accessories.
The repair with the tyre repair kit is not at all intended to replace a
permanent repair on the tyre, this repair only serves to reach the next
specialist garage. The repair can be undertaken on the vehicle immedi-
ately. Please read the attached instructions carefully before the
repair.
The tyre repair kit is located in a well under the floor covering in the
luggage compartment.
Spare wheel
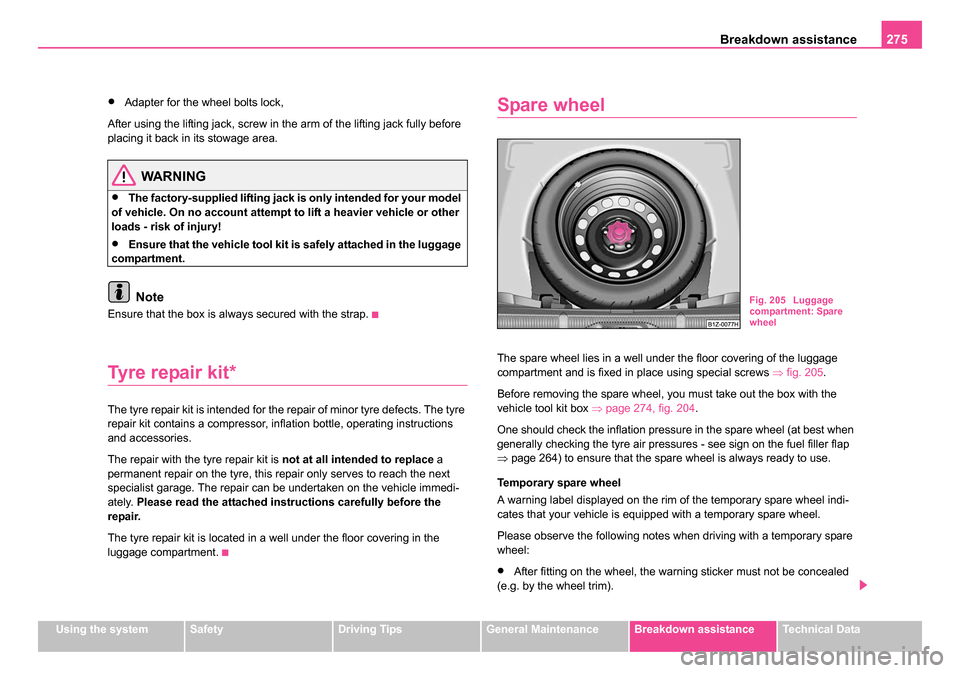
The spare wheel lies in a well under the floor covering of the luggage
compartment and is fixed in place using special screws ⇒fig. 205 .
Before removing the spare wheel, you must take out the box with the
vehicle tool kit box ⇒page 274, fig. 204 .
One should check the inflation pressure in the spare wheel (at best when
generally checking the tyre air pressures - see sign on the fuel filler flap
⇒ page 264) to ensure that the spare wheel is always ready to use.
Temporary spare wheel
A warning label displayed on the rim of the temporary spare wheel indi-
cates that your vehicle is equipped with a temporary spare wheel.
Please observe the following notes when driving with a temporary spare
wheel:
•After fitting on the wheel, the warning sticker must not be concealed
(e.g. by the wheel trim).
Fig. 205 Luggage
compartment: Spare
wheel
s24s.book Page 275 Thursday, November 24, 2005 12:27 PM
Page 278 of 315
Breakdown assistance277
Using the systemSafetyDriving TipsGeneral MaintenanceBreakdown assistanceTechnical Data
– Slacken the wheel bolts ⇒page 279.
– Jack up the vehicle until the wheel to be changed is clear of the ground ⇒page 280.
– Unscrew the wheel bolts and place them on a clean surface (cloth, paper etc.).
– Take off the wheel.
– Fit on the spare wheel and tighten the wheel bolts slightly.
– Lower the car.
– Tighten the wheel bolts firmly, alternately and diagonally using the wheel wrench ⇒page 279.
– Mount the full wheel trim/wheel trim cap or the caps.
Note
•All bolts must be clean and must turn easily.
•You must never grease or oil the wheel bolts!
•When fitting on unidirectional tyres, ensure that the tyres rotate in the
correct direction ⇒page 263.
Subsequent steps
After changing the wheel, you must perform the following steps.
– Stow and attach the replaced wheel in the spare wheel well.
– Stow the vehicle tool kit in the space provided. –
Check the tyre pressure on the spare wheel just mounted as
soon as possible.
– Have the tightening torque of the wheel bolts checked with
a torque wrench as soon as possible. Steel and light alloy
wheels must be tightened to a tightening torque of 120 Nm.
– Have the defective tyre repaired as soon as possible.
WARNING
It is necessary to observe the guidelines given on ⇒page 266, “New
tyres and wheels” if the vehicle is subsequently fitted with tyres
which are different to those it was fitted with at the works.
Note
•If you find, when changing the wheel, that the wheel bolts are corroded
and difficult to turn, the bolts must be replaced before checking the tight-
ening torque.
•Drive cautiously and only at a moderate speed to a workshop where
the tightening torque can be checked.
s24s.book Page 277 Thursday, November 24, 2005 12:27 PM
Page 280 of 315
Breakdown assistance279
Using the systemSafetyDriving TipsGeneral MaintenanceBreakdown assistanceTechnical Data
Installing
– Push the caps fully onto the wheel bolts.
The caps are located in the well of the luggage compartment.
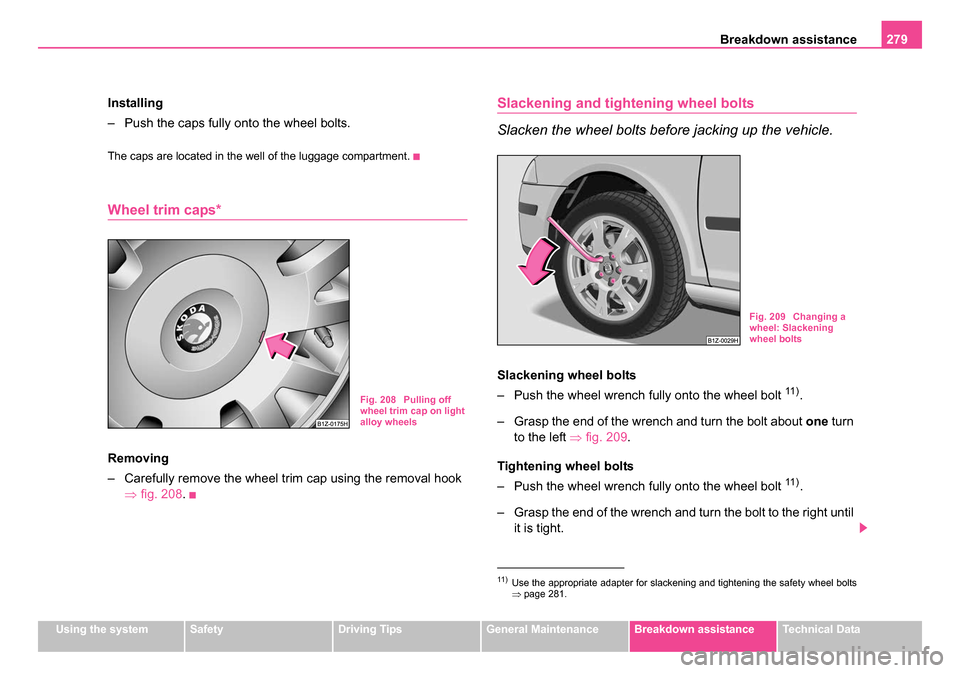
Wheel trim caps*
Removing
– Carefully remove the wheel trim cap using the removal hook
⇒fig. 208 .
Slackening and tightening wheel bolts
Slacken the wheel bolts before jacking up the vehicle.
Slackening wheel bolts
– Push the wheel wrench fully onto the wheel bolt
11 ).
– Grasp the end of the wrench and turn the bolt about one turn
to the left ⇒fig. 209.
Tightening wheel bolts
– Push the wheel wrench fully onto the wheel bolt
11 ).
– Grasp the end of the wrench and turn the bolt to the right until it is tight.
Fig. 208 Pulling off
wheel trim cap on light
alloy wheels
11 )Use the appropriate adapter for slackening and tightening the safety wheel bolts
⇒page 281.
Fig. 209 Changing a
wheel: Slackening
wheel bolts
s24s.book Page 279 Thursday, November 24, 2005 12:27 PM
Page 282 of 315
Breakdown assistance281
Using the systemSafetyDriving TipsGeneral MaintenanceBreakdown assistanceTechnical Data
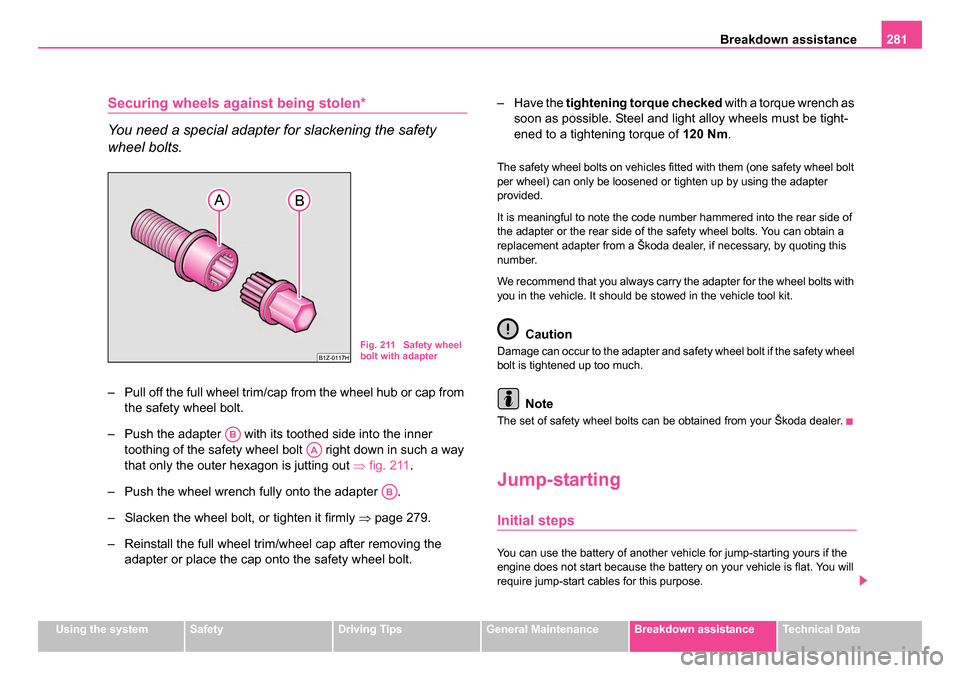
Securing wheels against being stolen*
You need a special adapter for slackening the safety
wheel bolts.
– Pull off the full wheel trim/cap from the wheel hub or cap from
the safety wheel bolt.
– Push the adapter with its toothed side into the inner toothing of the safety wheel bolt right down in such a way
that only the outer hexagon is jutting out ⇒fig. 211.
– Push the wheel wrench fully onto the adapter .
– Slacken the wheel bolt, or tighten it firmly ⇒page 279.
– Reinstall the full wheel trim/wheel cap after removing the adapter or place the cap onto the safety wheel bolt. – Have the
tightening torque checked with a torque wrench as
soon as possible. Steel and light alloy wheels must be tight-
ened to a tightening torque of 120 Nm.
The safety wheel bolts on vehicles fitted with them (one safety wheel bolt
per wheel) can only be loosened or tighten up by using the adapter
provided.
It is meaningful to note the code number hammered into the rear side of
the adapter or the rear side of the safety wheel bolts. You can obtain a
replacement adapter from a Škoda dealer, if necessary, by quoting this
number.
We recommend that you always carry the adapter for the wheel bolts with
you in the vehicle. It should be stowed in the vehicle tool kit.
Caution
Damage can occur to the adapter and safety wheel bolt if the safety wheel
bolt is tightened up too much.
Note
The set of safety wheel bolts can be obtained from your Škoda dealer.
Jump-starting
Initial steps
You can use the battery of another vehicle for jump-starting yours if the
engine does not start because the battery on your vehicle is flat. You will
require jump-start cables for this purpose.
Fig. 211 Safety wheel
bolt with adapter
AB
AA
AB
s24s.book Page 281 Thursday, November 24, 2005 12:27 PM