technical data SKODA OCTAVIA 2005 1.G / (1U) Owner's Manual
[x] Cancel search | Manufacturer: SKODA, Model Year: 2005, Model line: OCTAVIA, Model: SKODA OCTAVIA 2005 1.G / (1U)Pages: 315, PDF Size: 11.8 MB
Page 284 of 315
Breakdown assistance283
Using the systemSafetyDriving TipsGeneral MaintenanceBreakdown assistanceTechnical Data
– Attach the other end to a solid metal part which is
connected firmly to the engine block, or to the engine block
itself.
Starting engine
– Start the engine of the vehicle providing current and run the engine at idling speed.
– Now start the engine of the vehicle with the discharged battery.
– Interrupt the attempt at starting an engine after 10 seconds if it does not start right away and wait for about 30 seconds
before repeating the attempt.
– Disconnect the cables on the engine in exactly the reverse
order they were connected up.
WARNING
•The non-insulated parts of the terminal clamps must never
make contact with each other. Furthermore, the cable connected to
the positive terminal of the battery must not come into contact with
electrically conducting parts of the vehicle - risk of a short circuit!
•Do not affix the jump starting cables to the negative terminal of
the discharged battery. There is the risk of detonating gas seeping
out the battery being ignited by the strong spark which results from
the engine being started.
•Run the jump-start cables so that they cannot be caught by any
rotating parts in the engine compartment.
•Do not bend over the batteries - risk of caustic burns!
•The vent screws of the battery cells must be tightened firmly.
•Keep any sources of ignition (naked flame, smouldering ciga-
rettes etc.) away from the battery - risk of an explosion!
Tow-starting and towing vehicle
General
Please pay attention to the following instructions if you are going
to use a tow rope:
Driver of the towing vehicle
– Do not drive off until the tow rope is taught.
– Release the clutch particularly gently when starting off or depress the accelerator particularly gently if your vehicle is
fitted with an automatic gearbox.
Driver of the towed vehicle
– Switch the ignition on so that the steering wheel is not blocked and you can also operate the turn signal lights, the headlight
flasher, the windscreen wipers and windscreen washer
system.
– Take the vehicle out of gear or move the selector lever into position N if your vehicle is fitted with an automatic gearbox.
A4WARNING (continued)
s24s.book Page 283 Thursday, November 24, 2005 12:27 PM
Page 286 of 315
Breakdown assistance285
Using the systemSafetyDriving TipsGeneral MaintenanceBreakdown assistanceTechnical Data
Front towing eye
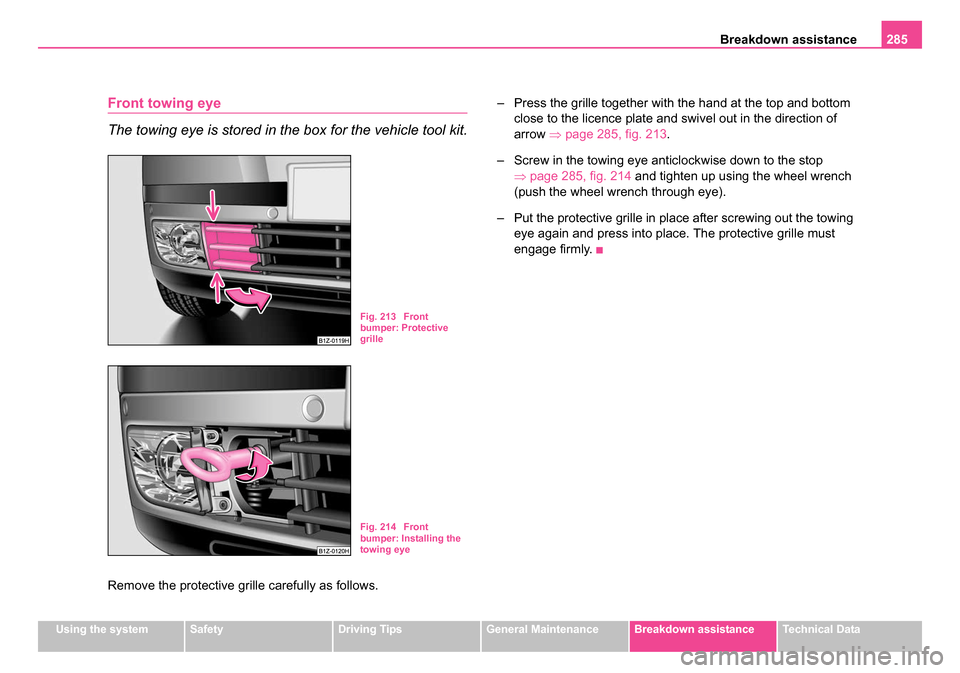
The towing eye is stored in the box for the vehicle tool kit.
Remove the protective grille carefully as follows. – Press the grille together with the hand at the top and bottom
close to the licence plate and swivel out in the direction of
arrow ⇒ page 285, fig. 213 .
– Screw in the towing eye anticlockwise down to the stop ⇒page 285, fig. 214 and tighten up using the wheel wrench
(push the wheel wrench through eye).
– Put the protective grille in place after screwing out the towing eye again and press into place. The protective grille must
engage firmly.
Fig. 213 Front
bumper: Protective
grille
Fig. 214 Front
bumper: Installing the
towing eye
s24s.book Page 285 Thursday, November 24, 2005 12:27 PM
Page 288 of 315
Breakdown assistance287
Using the systemSafetyDriving TipsGeneral MaintenanceBreakdown assistanceTechnical Data
WARNING
There is high risk of having an accident when tow-starting a
vehicle, when for example the towed vehicle runs into the towing
vehicle.
Caution
Vehicles which are fitted with a catalytic converter should not be tow-
started over a distance of more than 50 metres. Unburnt fuel may get into
the catalytic converter and damage it.
Towing in a vehicle fitted with a manual gearbox
Please refer to the notes ⇒page 283.
The car can be towed in with a tow bar or a tow rope or with the front or
rear wheels raised. The maximum towing speed is 50 km/h.
Towing of a vehicle with an automatic gearbox
Please refer to the notes ⇒page 283.
The car can be towed in with a tow bar or a tow rope. Refer at the same
time to the following guidelines:
•Move selector lever into N .
•The maximum towing speed is 50 km/h.
•The maximum permissible towing distance is 50 km. The gear oil
pump does not operate when the engine is not running and the gear would
not be adequately lubricated at higher speeds and over longer towing
distance.
Caution
If the vehicle is towed in by a recovery vehicle, it should only be towed in
with the front wheels raised. If the vehicle is raised at rear, the automatic
gearbox is damaged! (Does not apply to the automatic gearbox DSG).
Note
The vehicle must be transported on a special vehicle or trailer if it is not
possible to tow in the vehicle in the way described or if the towing distance
is greater than 50 km.
s24s.book Page 287 Thursday, November 24, 2005 12:27 PM
Page 290 of 315
Fuses and light bulbs289
Using the systemSafetyDriving TipsGeneral MaintenanceBreakdown assistanceTechnical Data
Caution
•Never attempt to “repair” fuses and also do not replace them with a
fuse of a higher amperage - risk of fire! This may also cause damage at
another part of the electrical system.
•Have the electrical system checked as quickly as possible by a
specialist garage if a newly inserted fuse blows again after a short time.
Fuse cover in engine compartment
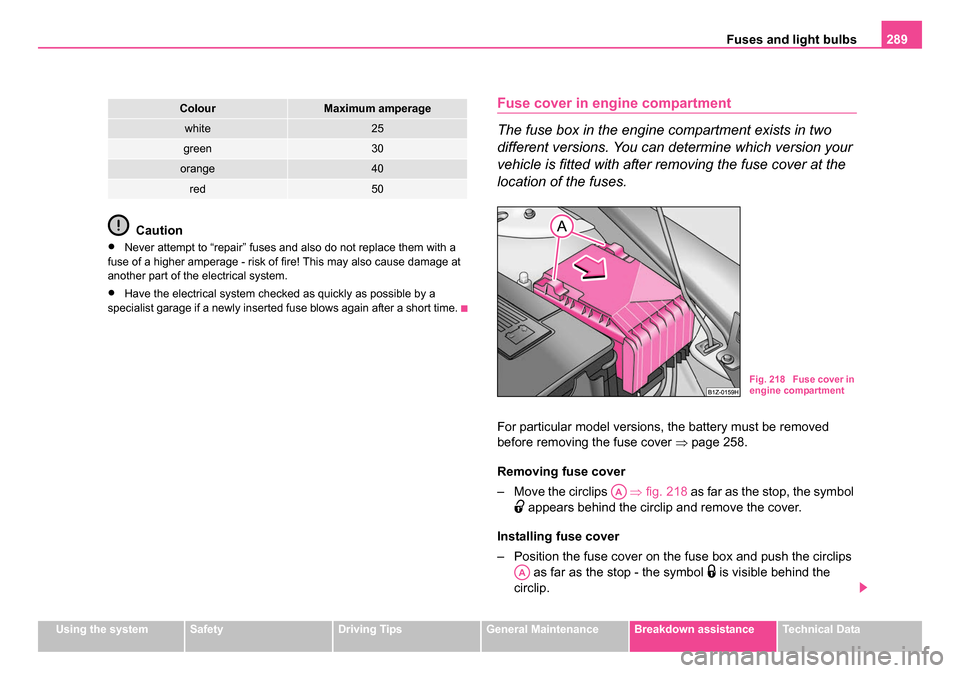
The fuse box in the engine compartment exists in two
different versions. You can determine which version your
vehicle is fitted with after removing the fuse cover at the
location of the fuses.
For particular model versions, the battery must be removed
before removing the fuse cover ⇒page 258.
Removing fuse cover
– Move the circlips ⇒fig. 218 as far as the stop, the symbol
appears behind the circlip and remove the cover.
Installing fuse cover
– Position the fuse cover on the fuse box and push the circlips as far as the stop - the symbol
is visible behind the
circlip.
white25
green30
orange40
red50
ColourMaximum amperage
Fig. 218 Fuse cover in
engine compartment
AA
AA
s24s.book Page 289 Thursday, November 24, 2005 12:27 PM
Page 292 of 315
Fuses and light bulbs291
Using the systemSafetyDriving TipsGeneral MaintenanceBreakdown assistanceTechnical Data
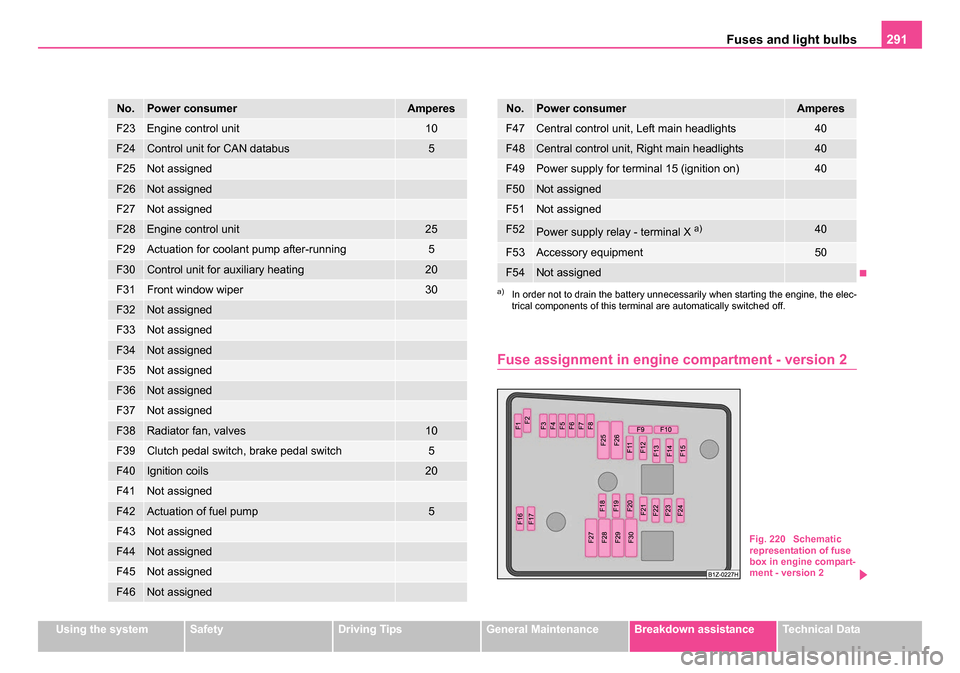
Fuse assignment in engine compartment - version 2
F23Engine control unit10
F24Control unit for CAN databus5
F25Not assigned
F26Not assigned
F27Not assigned
F28Engine control unit25
F29Actuation for coolant pump after-running5
F30Control unit for auxiliary heating20
F31Front window wiper30
F32Not assigned
F33Not assigned
F34Not assigned
F35Not assigned
F36Not assigned
F37Not assigned
F38Radiator fan, valves10
F39Clutch pedal switch, brake pedal switch5
F40Ignition coils20
F41Not assigned
F42Actuation of fuel pump5
F43Not assigned
F44Not assigned
F45Not assigned
F46Not assigned
No.Power consumerAmperes
F47Central control unit, Left main headlights40
F48Central control unit, Right main headlights40
F49Power supply for terminal 15 (ignition on)40
F50Not assigned
F51Not assigned
F52Power supply relay - terminal X a)40
F53Accessory equipment50
F54Not assigned
a)In order not to drain the battery unnecessarily when starting the engine, the elec-
trical components of this terminal are automatically switched off.
No.Power consumerAmperes
Fig. 220 Schematic
representation of fuse
box in engine compart-
ment - version 2
s24s.book Page 291 Thursday, November 24, 2005 12:27 PM
Page 294 of 315
Fuses and light bulbs293
Using the systemSafetyDriving TipsGeneral MaintenanceBreakdown assistanceTechnical Data
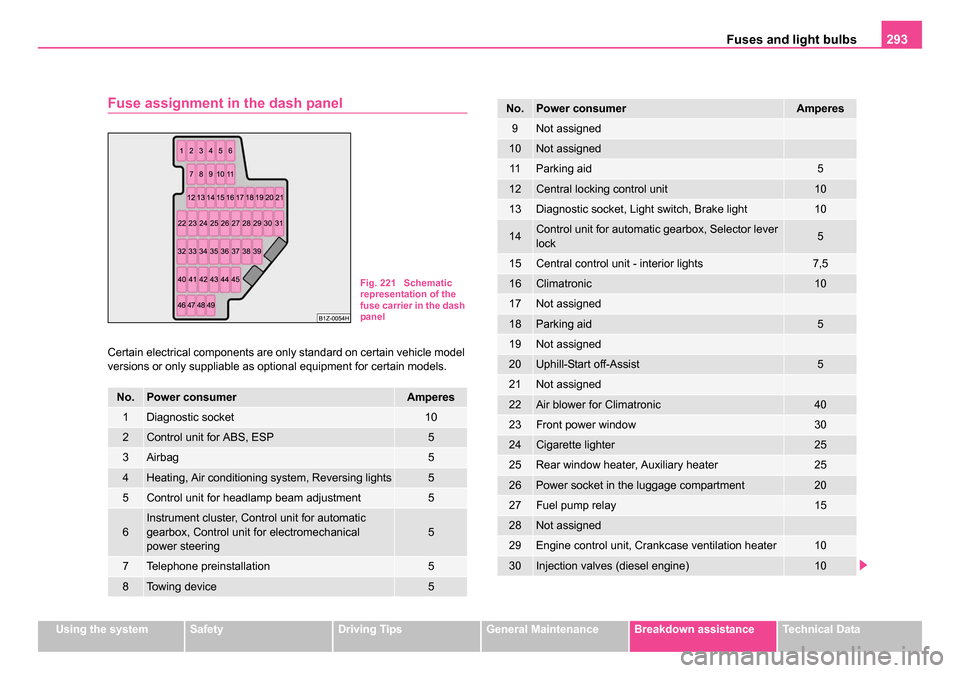
Fuse assignment in the dash panel
Certain electrical components are only standard on certain vehicle model
versions or only suppliable as optional equipment for certain models.
No.Power consumerAmperes
1Diagnostic socket10
2Control unit for ABS, ESP5
3Airbag5
4Heating, Air conditioning system, Reversing lights5
5Control unit for headlamp beam adjustment 5
6Instrument cluster, Control unit for automatic
gearbox, Control unit for electromechanical
power steering 5
7Telephone preinstallation 5
8Towing device5
Fig. 221 Schematic
representation of the
fuse carrier in the dash
panel
9Not assigned
10Not assigned
11Parking aid5
12Central locking control unit10
13Diagnostic socket, Light switch, Brake light10
14Control unit for automatic gearbox, Selector lever
lock 5
15Central control unit - interior lights7,5
16Climatronic10
17Not assigned
18Parking aid5
19Not assigned
20Uphill-Start off-Assist5
21Not assigned
22Air blower for Climatronic40
23Front power window30
24Cigarette lighter25
25Rear window heater, Auxiliary heater25
26Power socket in the luggage compartment20
27Fuel pump relay15
28Not assigned
29Engine control unit, Crankcase ventilation heater10
30Injection valves (diesel engine)10
No.Power consumerAmperes
s24s.book Page 293 Thursday, November 24, 2005 12:27 PM
Page 296 of 315
Fuses and light bulbs295
Using the systemSafetyDriving TipsGeneral MaintenanceBreakdown assistanceTechnical Data
WARNING
•Bulbs H7 and H1 are pressurised and may burst when changing
the bulb - risk of injury!
•It is recommended to wear gloves and eye protection when
changing a light bulb.
•Gas discharge bulbs* (xenon bulbs) operate with a high voltage,
professional knowledge is required - danger to life!
Caution
Do not take hold of the glass bulb with naked fingers (even the smallest
amount of dirt reduces the working life of the light bulb). Use a clean cloth,
serviette or something similar.
Note
This Owner's Manual only describes the replacement of bulbs where it is
assumed that no major complications will arise. Other light bulbs should
be changed by your specialist garage.
Front headlightHalogen headlightXenon headlight
Low beamH7D1S
Main beamH1
Parking lightsW5W
Turn signalsPY21W
Fog lightsH8
Light unit (Octavia)Bulb
Reversing lightP21W
Turn signalsPY21W
Twin filament light bulb for the brake lights and
tail lightsP21/4W
Twin filament light bulb for the rear fog lights
and tail lightsP21/4W
Parking lightsW3W
Rear light unit (estate car)Bulb
Reversing light, brake lights, tail lights and rear
fog lightP21W
Turn signalsPY21W
Parking lightsW3W
OthersBulb
Side turn signal lightsLED
Licence plate lightC5W
3. Brake lightLED
Entry lightW5W
front interior lightingC10W
Reading lightsW5W
Rear interior lightingC10W
Luggage compartment lightW5W
Door warning lightC5W
Storage compartment light - front passenger
sideC3W
OthersBulb
s24s.book Page 295 Thursday, November 24, 2005 12:27 PM
Page 298 of 315
Fuses and light bulbs297
Using the systemSafetyDriving TipsGeneral MaintenanceBreakdown assistanceTechnical Data
Parking light at the front
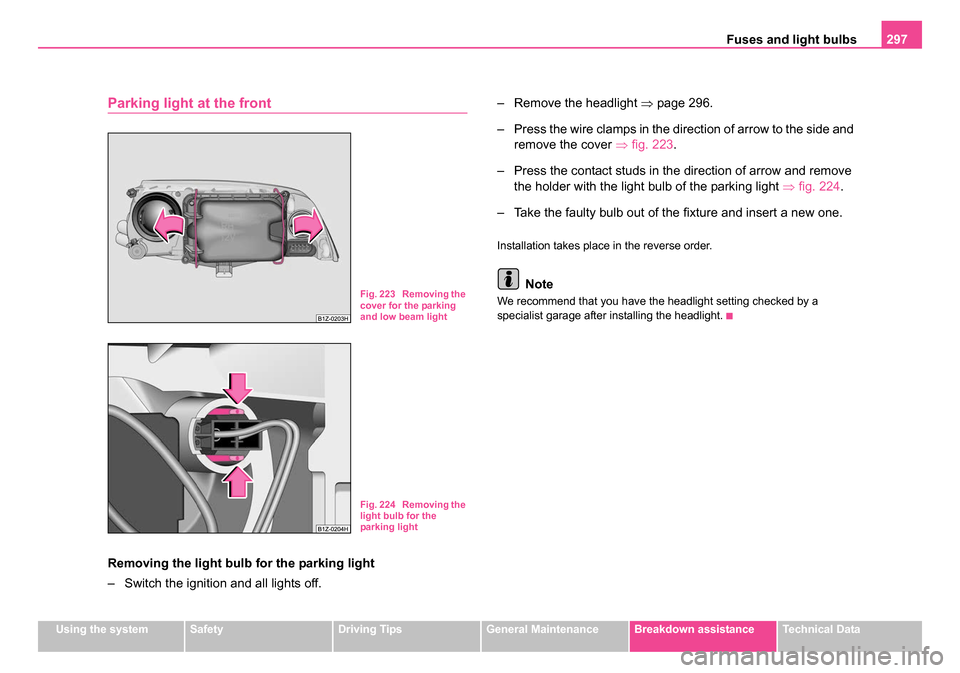
Removing the light bulb for the parking light
– Switch the ignition and all lights off. – Remove the headlight
⇒page 296.
– Press the wire clamps in the direction of arrow to the side and remove the cover ⇒fig. 223 .
– Press the contact studs in the direction of arrow and remove the holder with the light bulb of the parking light ⇒fig. 224.
– Take the faulty bulb out of the fixture and insert a new one.
Installation takes place in the reverse order.
Note
We recommend that you have the headlight setting checked by a
specialist garage after installing the headlight.Fig. 223 Removing the
cover for the parking
and low beam light
Fig. 224 Removing the
light bulb for the
parking light
s24s.book Page 297 Thursday, November 24, 2005 12:27 PM
Page 300 of 315
Fuses and light bulbs299
Using the systemSafetyDriving TipsGeneral MaintenanceBreakdown assistanceTechnical Data
Main beam
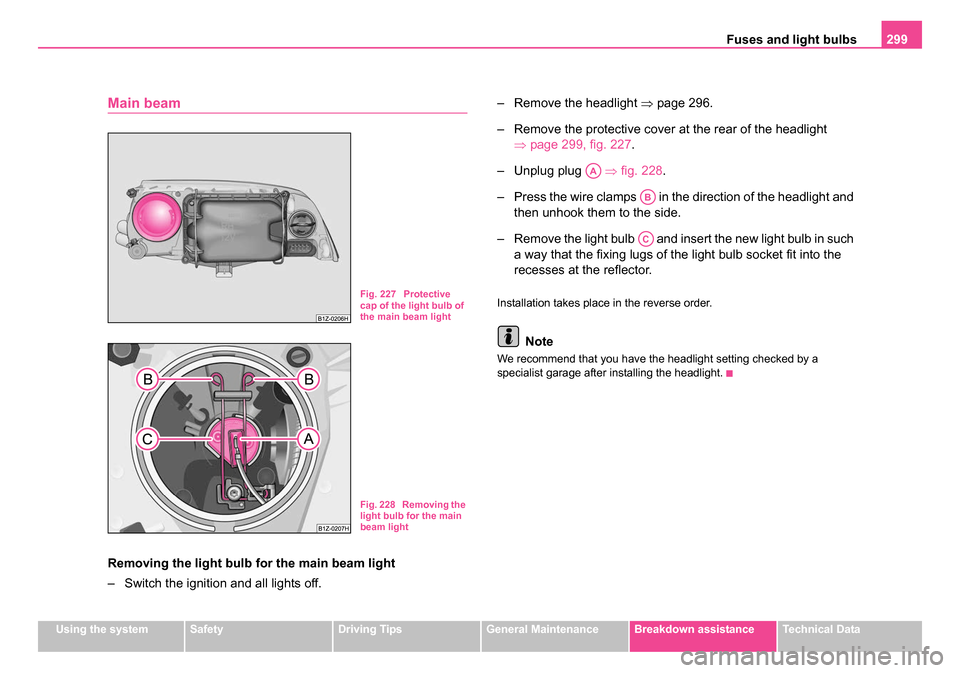
Removing the light bulb for the main beam light
– Switch the ignition and all lights off. – Remove the headlight
⇒page 296.
– Remove the protective cover at the rear of the headlight ⇒page 299, fig. 227.
– Unplug plug ⇒fig. 228 .
– Press the wire clamps in the direction of the headlight and then unhook them to the side.
– Remove the light bulb and insert the new light bulb in such a way that the fixing lugs of the light bulb socket fit into the
recesses at the reflector.
Installation takes place in the reverse order.
Note
We recommend that you have the headlight setting checked by a
specialist garage after installing the headlight.
Fig. 227 Protective
cap of the light bulb of
the main beam light
Fig. 228 Removing the
light bulb for the main
beam light
AA
AB
AC
s24s.book Page 299 Thursday, November 24, 2005 12:27 PM
Page 302 of 315
Fuses and light bulbs301
Using the systemSafetyDriving TipsGeneral MaintenanceBreakdown assistanceTechnical Data
Light unit (Octavia)
Changing light bulbs in the lamp holder
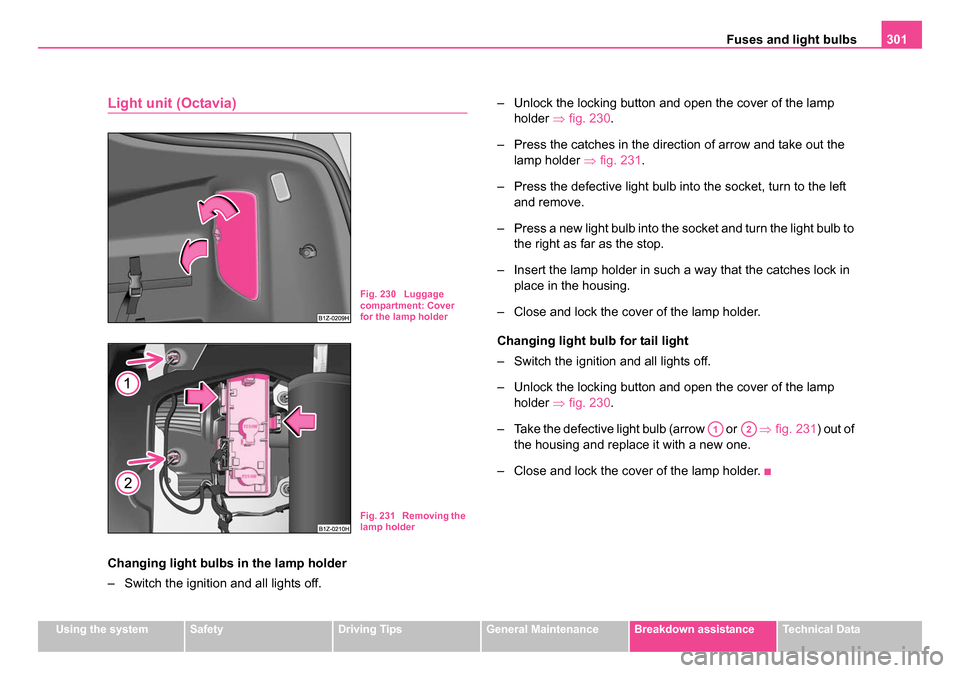
– Switch the ignition and all lights off. – Unlock the locking button and open the cover of the lamp
holder ⇒fig. 230.
– Press the catches in the direction of arrow and take out the lamp holder ⇒fig. 231 .
– Press the defective light bulb into the socket, turn to the left and remove.
– Press a new light bulb into the socket and turn the light bulb to the right as far as the stop.
– Insert the lamp holder in such a way that the catches lock in place in the housing.
– Close and lock the cover of the lamp holder.
Changing light bulb for tail light
– Switch the ignition and all lights off.
– Unlock the locking button and open the cover of the lamp holder ⇒fig. 230.
– Take the defective light bulb (arrow or ⇒ fig. 231) out of
the housing and replace it with a new one.
– Close and lock the cover of the lamp holder.
Fig. 230 Luggage
compartment: Cover
for the lamp holder
Fig. 231 Removing the
lamp holder
A1A2
s24s.book Page 301 Thursday, November 24, 2005 12:27 PM