key SKODA OCTAVIA 2005 1.G / (1U) Owner's Guide
[x] Cancel search | Manufacturer: SKODA, Model Year: 2005, Model line: OCTAVIA, Model: SKODA OCTAVIA 2005 1.G / (1U)Pages: 315, PDF Size: 11.8 MB
Page 70 of 315
Lights and Visibility69
Using the systemSafetyDriving TipsGeneral MaintenanceBreakdown assistanceTechnical Data
The turn signal and main beam lever perform the following func-
tions:
Right
and left turn signal light
– Push the lever upwards or downwards ⇒page 68, fig. 47 .
– If you only wish to flash three times* (the so-called conven- ience turn signal), push the lever briefly up to the upper or
lower pressure point and release it.
– Turn signal for changing lanes, in order to only flash briefly - move the lever up or down to the pressure point and hold it in
this position.
Main beam
– Switch on the low beam.
– Push the lever forwards.
– Pull the lever back into the initial position in order to switch the main beam off again.
Headlight flasher
– Pull on the lever of the steering wheel (sprung position) - the main beam and warning light in the instrument cluster come
on.
Parking light
– Switch off the ignition.
– Push the lever up or down - the right-hand or left-hand parking light is switched on.
Information concerning the function of the lights.
•The turn signal system only operates when the ignition is switched
on. The corresponding indicator light or in the instrument cluster also
flashes.
•The turn signal is automatically cancelled after negotiating a curve.
•The indicator light flashes at twice its normal rate if a bulb of the turn
signal light fails.
•The side light and rear light on the appropriate side of the vehicle are
switched on when the parking light is selected. The parking light function
only operates if the ignition is switched off.
•An acoustic warning signal will sound when the driver's door is opened
if the lever is not in the middle position after removing the ignition key. The
acoustic warning signal will stop just as soon as the driver's door is closed.
Caution
Use main beam or the headlight flasher only if this does not risk dazzling
other road users.
Note
•Use only in accordance with the legal requirements the described
lighting and signal systems.
s24s.book Page 69 Thursday, November 24, 2005 12:27 PM
Page 71 of 315
Lights and Visibility
70
Interior lighting
Front interior lighting and lighting of storage
compartment on front passenger side
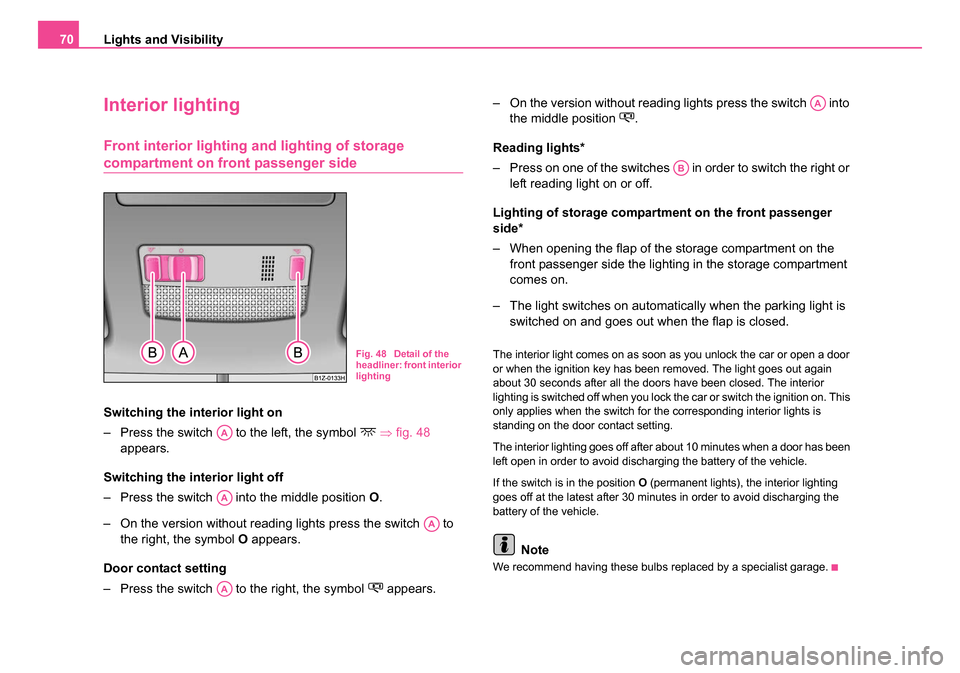
Switching the interior light on
– Press the switch to the left, the symbol
⇒ fig. 48
appears.
Switching the interior light off
– Press the switch into the middle position O.
– On the version without reading lights press the switch to the right, the symbol O appears.
Door contact setting
– Press the switch to the right, the symbol
appears. – On the version without reading lights press the switch into
the middle position
.
Reading lights*
– Press on one of the switches in order to switch the right or left reading light on or off.
Lighting of storage compartm ent on the front passenger
side*
– When opening the flap of the storage compartment on the front passenger side the lighting in the storage compartment
comes on.
– The light switches on automatically when the parking light is switched on and goes out when the flap is closed.
The interior light comes on as soon as you unlock the car or open a door
or when the ignition key has been removed. The light goes out again
about 30 seconds after all the doors have been closed. The interior
lighting is switched off when you lock the car or switch the ignition on. This
only applies when the switch for the corresponding interior lights is
standing on the door contact setting.
The interior lighting goes off after about 10 minutes when a door has been
left open in order to avoid discharging the battery of the vehicle.
If the switch is in the position O (permanent lights), the interior lighting
goes off at the latest after 30 minutes in order to avoid discharging the
battery of the vehicle.
Note
We recommend having these bulbs replaced by a specialist garage.
Fig. 48 Detail of the
headliner: front interior
lighting
AA
AA
AA
AA
AA
AB
s24s.book Page 70 Thursday, November 24, 2005 12:27 PM
Page 85 of 315
Seats and Stowage
84
Adjusting front seats electrically*
Adjusting seats
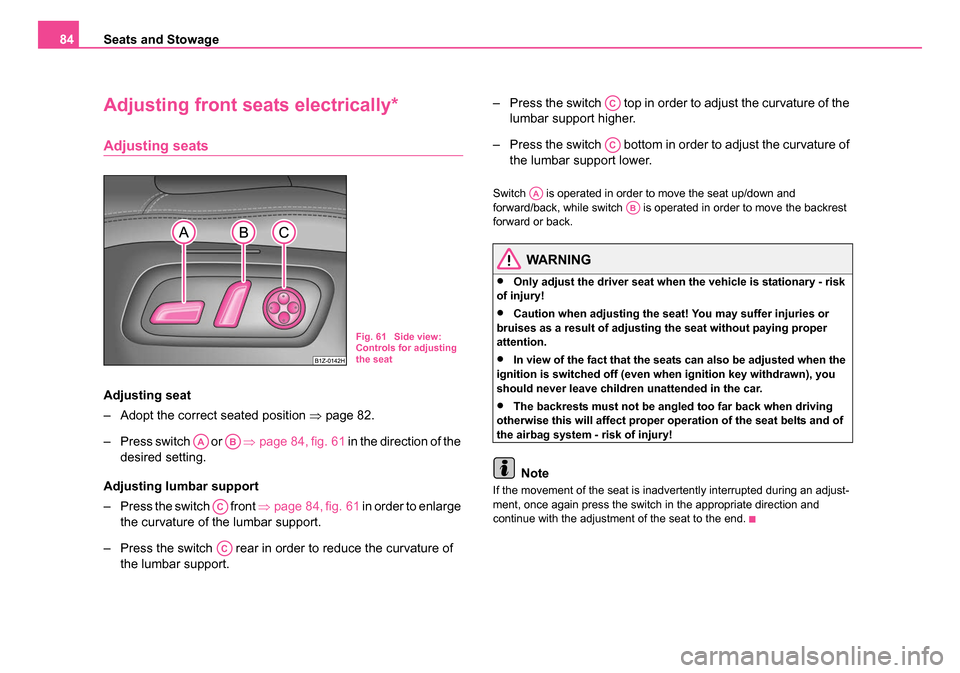
Adjusting seat
– Adopt the correct seated position ⇒page 82.
– Press switch or ⇒page 84, fig. 61 in the direction of the
desired setting.
Adjusting lumbar support
– Press the switch front ⇒page 84, fig. 61 in order to enlarge
the curvature of the lumbar support.
– Press the switch rear in order to reduce the curvature of the lumbar support. – Press the switch top in order to adjust the curvature of the
lumbar support higher.
– Press the switch bottom in order to adjust the curvature of the lumbar support lower.
Switch is operated in order to move the seat up/down and
forward/back, while switch is operated in order to move the backrest
forward or back.
WARNING
•Only adjust the driver seat when the vehicle is stationary - risk
of injury!
•Caution when adjusting the seat! You may suffer injuries or
bruises as a result of adjusting the seat without paying proper
attention.
•In view of the fact that the seats can also be adjusted when the
ignition is switched off (even when ignition key withdrawn), you
should never leave children unattended in the car.
•The backrests must not be angled too far back when driving
otherwise this will affect proper operation of the seat belts and of
the airbag system - risk of injury!
Note
If the movement of the seat is inadvertently interrupted during an adjust-
ment, once again press the switch in the appropriate direction and
continue with the adjustment of the seat to the end.
Fig. 61 Side view:
Controls for adjusting
the seat
AAAB
AC
AC
AC
AC
AAAB
s24s.book Page 84 Thursday, November 24, 2005 12:27 PM
Page 87 of 315
Seats and Stowage
86
Assigning remote control to the memory buttons
After storing the settings of the seat and exterior mirrors, you
have 10 seconds in order to assign the remote control to the
appropriate memory button.
– Withdraw the ignition key.
– Press the button for unlocking the vehicle ⇒page 52. The
setting is stored with the memory button which you have
selected.
If you wish to be able to retrieve the settings which are stored in the
memory by also using the remote control, you have to assign the remote
control to a memory button in each case.
If you wish, you can obtain an additional key with radio remote control
from a Škoda dealer and then assign the radio remote control to another
memory button.
Note
•If the remote control had previously been assigned to another memory
button, this setting is then erased by the new assignment.
•If you assign the remote control to a memory button which has already
been assigned to a remote control, the old assignment is also replaced by
a new assignment in this case.
•The assignment of the remote control to a memory button is retained,
however, after reassigning the seats and exterior mirrors.
Retrieving settings of the seat and mirrors
You can retrieve the stored settings either with the
memory buttons or with the remote control*.
Retrieving settings with memory buttons
– In order to retrieve the stored setting, you have two possibili- ties:
– One-touch automatic memory: Briefly press the desired
memory button ⇒ page 85, fig. 62. The seat and exterior
mirror are moved automatically into the stored positions (this
applies only if the ignition is switched on and the speed is less
than 5 km/h).
– Memory keying : Press and hold the desired memory button
pressed long enough until the seat and the exterior mirror
are moved into the stored positions.
Retrieving settings with remote control
– If the driver door is closed and the ignition is switched off, briefly press the unlock button of the remote control ⇒page 52
and then open the driver door.
– The seat and exterior mirrors now move automatically into the stored positions.
Retrieving setting of ext erior mirror for reversing*
– Turn the rotary knob for the exterior mirror setting into the position
⇒ page 80 before engaging the reverse gear.
AB
AB
s24s.book Page 86 Thursday, November 24, 2005 12:27 PM
Page 108 of 315
Seats and Stowage107
Using the systemSafetyDriving TipsGeneral MaintenanceBreakdown assistanceTechnical Data
Using the cigarette lighter
– Press in the button of the cigarette lighter ⇒page 106, fig. 96 .
– Wait until the button jumps forward.
– Remove the cigarette lighter immediately and use it.
– Insert the cigarette lighter again into the socket.
Using the power socket
– Take out the cigarette lighter.
– Insert the plug of the electrical appliance into the socket of the cigarette lighter.
The 12 volt power socket can also be used to supply power to electrical
accessories with a power uptake up to 180 watts.
WARNING
•Take care when using the cigarette lighter! Not paying proper
attention or incorrect use the cigarette lighter in an uncontrolled
manner may result in burns.
•The cigarette lighter and the power socket also operates when
the ignition is switched off or the ignition key withdrawn. You
should therefore never leave children unattended in the vehicle.
Caution
Always use matching plugs to avoid damaging the power sockets.
Note
•Connecting electrical components when the engine is not
running will drain the battery of the vehicle - risk of battery draining!
•Further information ⇒page 270, “Accessories, changes and replace-
ment of parts”.
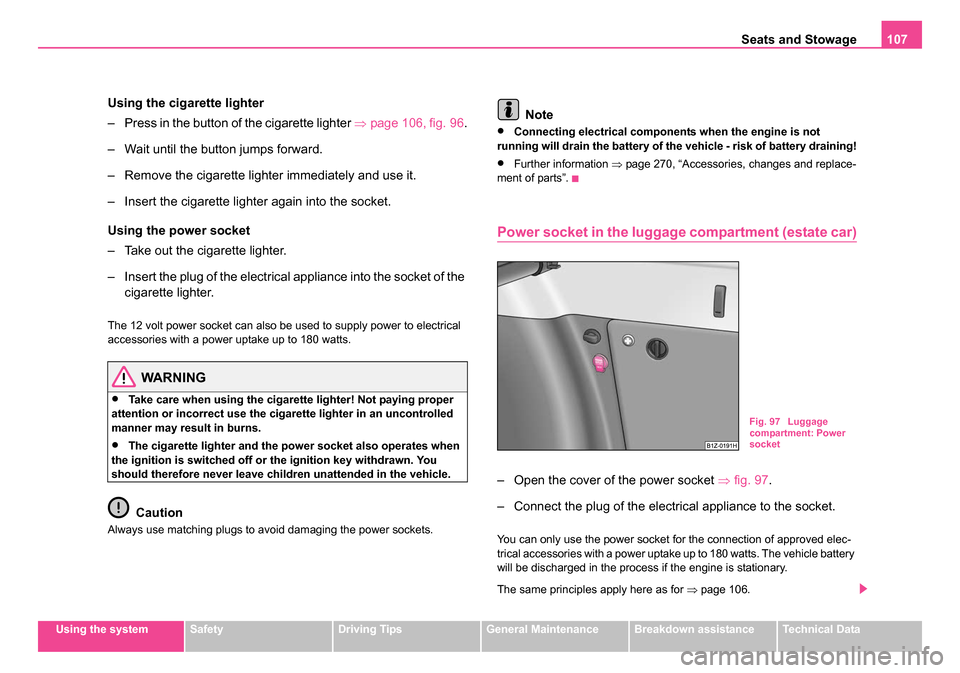
Power socket in the luggag e compartment (estate car)
– Open the cover of the power socket ⇒fig. 97.
– Connect the plug of the electrical appliance to the socket.
You can only use the power socket for the connection of approved elec-
trical accessories with a power uptake up to 180 watts. The vehicle battery
will be discharged in the process if the engine is stationary.
The same principles apply here as for ⇒page 106.
Fig. 97 Luggage
compartment: Power
socket
s24s.book Page 107 Thursday, November 24, 2005 12:27 PM
Page 140 of 315
Starting-off and Driving139
Using the systemSafetyDriving TipsGeneral MaintenanceBreakdown assistanceTechnical Data
way (e.g. in the middle of the steering wheel or at the inner steering
wheel edge). In such cases, injuries to the arms, the hands and the
head can occur when the driver airbag is deployed.
Ignition lock
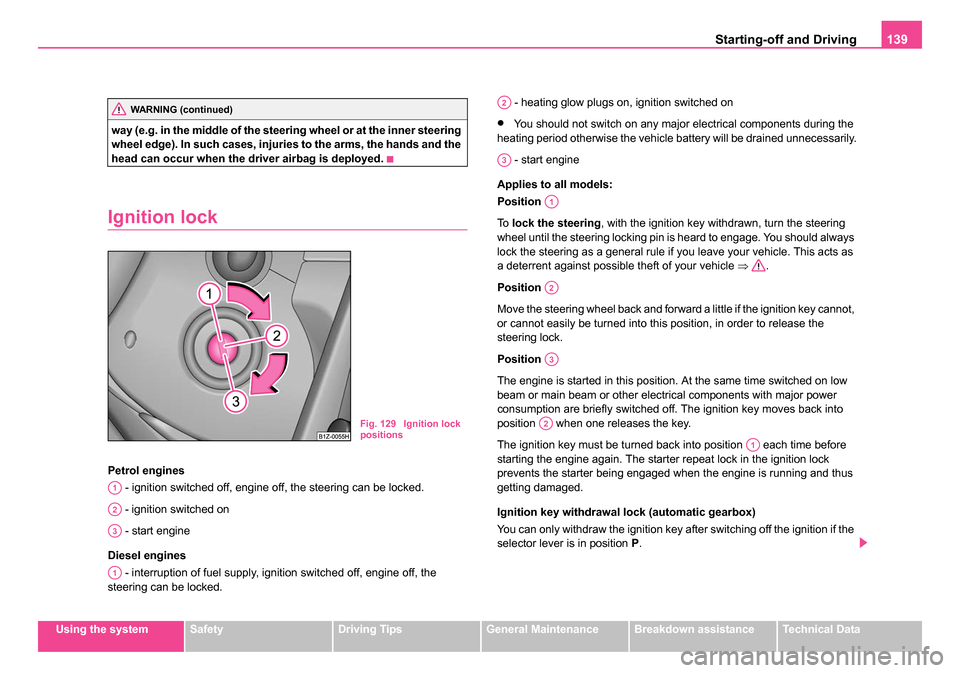
Petrol engines
- ignition switched off, engine off, the steering can be locked.
- ignition switched on
- start engine
Diesel engines - interruption of fuel supply, ignition switched off, engine off, the
steering can be locked. - heating glow plugs on, ignition switched on
•You should not switch on any major electrical components during the
heating period otherwise the vehicle battery will be drained unnecessarily.
- start engine
Applies to all models:
Position
To lock the steering , with the ignition key withdrawn, turn the steering
wheel until the steering locking pin is heard to engage. You should always
lock the steering as a general rule if you leave your vehicle. This acts as
a deterrent against possible theft of your vehicle ⇒.
Position
Move the steering wheel back and forward a little if the ignition key cannot,
or cannot easily be turned into this position, in order to release the
steering lock.
Position
The engine is started in this position. At the same time switched on low
beam or main beam or other electrical components with major power
consumption are briefly switched off. The ignition key moves back into
position when one releases the key.
The ignition key must be turned back into position each time before
starting the engine again. The starter repeat lock in the ignition lock
prevents the starter being engaged when the engine is running and thus
getting damaged.
Ignition key withdrawal lock (automatic gearbox)
You can only withdraw the ignition key after switching off the ignition if the
selector lever is in position P.
WARNING (continued)
Fig. 129 Ignition lock
positions
A1
A2
A3
A1
A2
A3
A1
A2
A3
A2
A1
s24s.book Page 139 Thursday, November 24, 2005 12:27 PM
Page 141 of 315
Starting-off and Driving
140
WARNING
•When driving, the ignition key mu st always be in the ignition
lock in the position (ignition switched on) without the engine
running. This position is indicate d by the warning lights coming on.
If this is not the case, it could result in unexpected locking of the
steering wheel - risk of accident!
•Only remove the ignition key from the ignition lock when the
vehicle has come to a standstill (put on the handbrake or select the
selector lever position P). The steering lock might otherwise
engage unintentionally - risk of accident!
•Always withdraw the ignition key if you are going to leave the
vehicle, even for a short time. This is particularly important if chil-
dren are left in the vehicle. The children might otherwise start the
engine or switch on electrical equipment (e.g. power windows) -
risk of accident or injury!
Starting engine
General
You can only start the engine only using an original ignition
key.
•Place the gearshift lever into neutral (or place the selector lever to the
position P or N in the case of an automatic gearbox) and put on the hand-
brake firmly before starting the engine.
•The clutch pedal should be fully depressed when starting the engine
which means that the starter only has to crank the engine.
•Let go of the key as soon as the engine starts otherwise there may be
damage to the starter. The engine running noises may at first be louder for a short time after
starting the cold engine until oil pressure can be built up in the hydraulic
valve clearance compensation. This is quite normal and is not an oper-
ating problem.
If the engine does not start ...
You can use the battery of another vehicle as a jump-start aid
⇒page 281.
It is only possible to tow-start vehicles fitted with a manual gearbox. The
tow-starting distance must not be more than 50 metres ⇒page 286.
WARNING
•Never run the engine in non ventilated or enclosed areas. The
exhaust gases of the engine contain besides the odorless and
colourless carbon monoxide a poisonous gas - hazard! Carbon
monoxide can cause unconsciousness and death.
•Never leave your vehicle unattended with the engine running.
Caution
•The starter may only be operated (ignition key position ), if the
engine is not running. If the starter is immediately operated after switching
off the engine, the starter or the engine can be damaged.
•Avoid high engine revolutions, full throttle and high engine loads as
long as the engine has not yet reached its normal operating temperature
- risk of damaging the engine!
•Vehicles which are fitted with an exhaust gas catalytic converter
should not be tow-started over a distance of more than 50 metres.
For the sake of the environment
Never warm up the engine when the vehicle is standing. Drive off right
away. Through this the engine reaches its operating temperature more
rapidly and the pollutant emissions are lower.
A2
A3
s24s.book Page 140 Thursday, November 24, 2005 12:27 PM
Page 142 of 315
Starting-off and Driving141
Using the systemSafetyDriving TipsGeneral MaintenanceBreakdown assistanceTechnical Data
Petrol engines
These engines are fitted with a starter system which selects the correct
fuel/air mixture for every external air temperature.
•Do not operate accelerator before and when starting engine.
•Interrupt the attempt at starting after 10 seconds if the engine does not
start right awayand wait for about 30 seconds before repeating the
attempt.
•It is possible that the fuse on the electrical fuel pump is defect if the
engine still does not start. Check the fuse and replace it if necessary
⇒ page 288.
•Contact the nearest specialist garage to obtain professional assist-
ance.
It may be necessary, if the engine is very hot, to slightly depress the
accelerator after the engine has started.
Diesel engines
Glow plug system
Diesel engines are equipped with a glow plug system, the preglow period
being controlled automatically in line with the coolant temperature and
outside temperature.
The preglow indicator light
comes on after the ignition has been
switched on.
You should not switch on any major electrical components during
the heating period otherwise the ve hicle battery will be drained
unnecessarily.
•You should start the engine immediately after the glow plug warning
light has gone out.
•The glow plug warning light will come on for about one second if the
engine is at a normal operating temperature or if the outside temperature
is above +5°C. This means that you can start the engine right away.
•Interrupt the attempt at starting after 10 seconds if the engine does not
start right awayand wait for about 30 seconds before repeating the
attempt.
•It is possible that the fuse on the diesel preglow system is defect if the
engine still does not start. Check the fuse and replace it if necessary
⇒ page 288.
•Contact the nearest specialist garage to obtain professional assist-
ance.
Starting the engine after the fuel tank has run dry
It may take longer than normal to start the engine after refuelling if the fuel
tank has run completely dry - up to one minute. This is because the fuel
system must first of all be filled while the attempting to start the engine.
Switching the engine off
– The engine can be switched off by turning the ignition key from position ⇒page 139, fig. 129 into position .
WARNING
•Never switch off the engine before the vehicle is stationary - risk
of accident!
•The brake booster only operates when the engine is running.
Greater physical effort for braking is required when engine is
switched off. Because if you do not stop as normal, this can cause
an accident and severe injuries.
A1
s24s.book Page 141 Thursday, November 24, 2005 12:27 PM
Page 153 of 315
Automatic gearbox
152
in the instrument cluster as a reminder for the driver when the selector
lever is in position P and N
In addition, the symbol
for the automatic selector lever lock in the shift
gate lights up.
A time delay element ensures that the selector lever is not blocked when
rapidly switching over the position N (e.g. from R to D). This does, for
example, allow one to seesaw out a stuck vehicle. The selector lever lock
will click into place if the lever is in the N position for more than 2 seconds
without the brake pedal being pressed.
The selector lever lock is only active if the vehicle is stationary or moving
at speed of less than 5 km/hour. The lock is switched off automatically into
position N when the car is travelling at a higher speed.
Shiftlock button
The Shiftlock button in the handle of selector lever prevents certain
selector lever positions being engaged inadvertently. The selector lever
lock is cancelled when you press the Shiftlock button.
Keylock - Ignition key withdrawal lock
You can only withdraw the ignition key after switching off the ignition if the
selector lever is in position P. If the ignition key is withdrawn, the selector
lever is blocked in postion P.
Kickdown function
The kickdown function provides you with maximum accel-
eration power.
Depressing the accelerator pedal allows the kickdown function to be acti-
vated in the desired driving program. This function has precedence over
the driving programme and serves for maximum acceleration of the
vehicle when exploiting the maximum power potential of the engine without taking into account the current selector lever position (
D, S or
Tiptronic ). The gearbox shifts down to one or several gears in line with
the driving state and the vehicle accelerates. The gearbox does not shift
up into the highest gear until the engine has reached its maximum revolu-
tions for this gear range.
WARNING
Please note that using the kickdown function can result in the
driven wheels spinning on a smooth or slippery road surface - risk
of skidding!
Dynamic shift programme
The automatic gearbox of your vehicle is controlled electronically. Shifting
up and down through the gears is performed automatically on the basis of
pre-defined driving programmes.
Adopting a moderate style of driving will cause the gearbox to select the
most economical driving programme. Shifting up into a higher gear as
soon as possible and shifting down as late as possible will have a favour-
able effect on your fuel consumption.
Adopting a sporty style of driving with rapid movements of the acceler-
ator pedal combined with sharp acceleration and frequent changes in
speed, exploiting the top speed of the car or depressing the accelerator
pedal (kickdown function), will cause the gearbox to switch over to this
style of driving and shift down earlier with frequent changes in gears in
comparison to the moderate style of driving.
Selecting the most appropriate driving programme for the particular style
of driving is a continuous process. Irrespective of this it is, however,
possible to switch or shift down into a dynamic shift programme by
depressing the accelerator rapidly. The gearbox shifts down into a lower
s24s.book Page 152 Thursday, November 24, 2005 12:27 PM
Page 155 of 315
Automatic gearbox
154
When you accelerate, the gearbox shifts up automatically in gears 1, 2, 3,
4 and 5 into the next higher gear just before the maximum permissible
engine speed is reached.
If you select a lower gear, the automatic gearbox does not shift down until
there is no risk of the engine overrevving (does not apply to shifting from
2nd to the 1st gear).
If you operate the kickdown function, the gearbox shifts into a lower gear
in line with the vehicle speed and engine speed.
Emergency programme
An emergency programme exists in the event of a fault in
the system.
The gearbox operates in a corresponding emergency programme if there
are functional faults in the gearbox electronics. This is indicated by all of
the segments in the display lighting up or going out.
It is possible to continue to move the selector lever into all the positions.
In the positions D and S the gearbox remains engaged in the 3rd gear. It
is also possible to continue to engage reverse gear in the position R.
The manual shift programme (Tiptronic) is switched off in the emergency
mode.
If the gearbox has switched over to emergency mode, drive to the
nearest specialist garage in order to have the fault rectified.
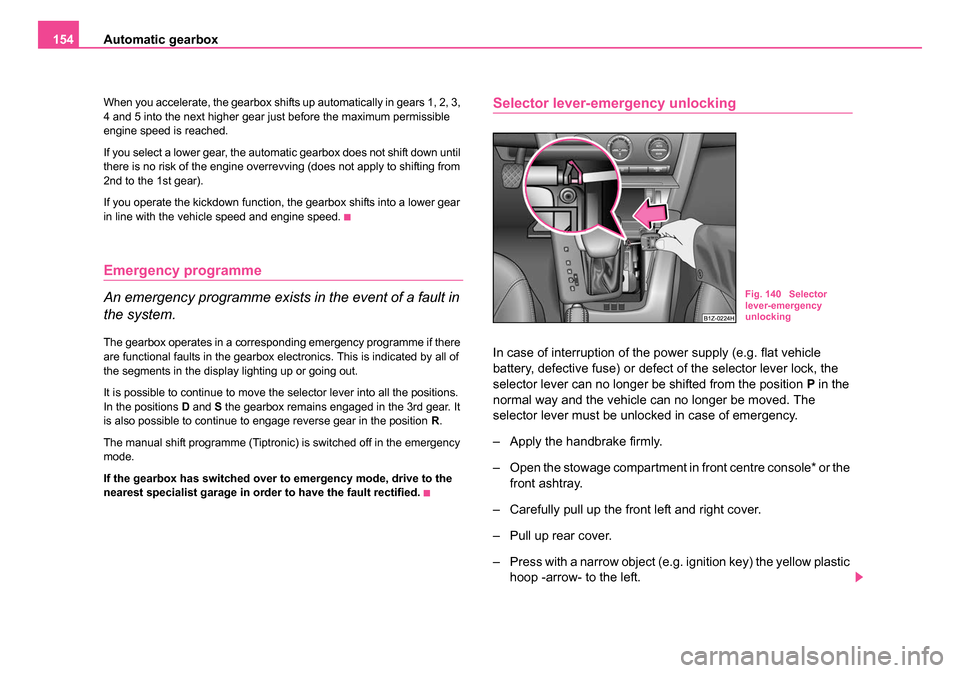
Selector lever-emergency unlocking
In case of interruption of the power supply (e.g. flat vehicle
battery, defective fuse) or defect of the selector lever lock, the
selector lever can no longer be shifted from the position P in the
normal way and the vehicle can no longer be moved. The
selector lever must be unlocked in case of emergency.
– Apply the handbrake firmly.
– Open the stowage compartment in front centre console* or the front ashtray.
– Carefully pull up the front left and right cover.
– Pull up rear cover.
– Press with a narrow object (e.g. ignition key) the yellow plastic hoop -arrow- to the left.
Fig. 140 Selector
lever-emergency
unlocking
s24s.book Page 154 Thursday, November 24, 2005 12:27 PM