all wheel drive SKODA OCTAVIA 2006 Owner´s Manual
[x] Cancel search | Manufacturer: SKODA, Model Year: 2006, Model line: OCTAVIA, Model: SKODA OCTAVIA 2006Pages: 218, PDF Size: 5.48 MB
Page 98 of 218
›
Electronic Differential Lock (EDL and XDS);
› Active driver-steering recommendation (DSR),
› Brake assist,
› Uphill start assist.
Active driver-steering recommendation (DSR)
This function indicates to the driver in critical situations a steering recommenda-
tion in order to stabilise the vehicle. The active driver-steering recommendation is
activated, for example, on the right and left vehicle side when braking sharply on
different road surfaces.
Hydraulic brake assist
The brake assist system is activated by the very quick operation of the brake ped-
al (e.g. in the event of danger). It increases the braking effect and helps to short-
en the braking distance. To achieve the shortest possible braking distance, the
brake pedal must be applied firmly and held in this position until the vehicle has
come to a complete standstill.
The ABS is activated faster and more effectively with the intervention of the
brake assist system.
The brake assist function is automatically switched off when the brake pedal is
released.
Uphill start assist
The uphill start assist makes it easier to start off on steep hills. The system holds
the brake pressure produced by the activation of the brake pedal for approx.
2 seconds after the brake pedal is released. The driver can therefore move his
foot from the brake pedal to the accelerator pedal and start off on the slope,
without having to actuate the handbrake. The brake pressure drops gradually the
more you operate the accelerator pedal. If the vehicle does not start off within 2
seconds, it starts to roll back.
The uphill start assist is active as of a 5 % slope, if the driver door is closed. It is
always active on slopes when in forward or reverse start off. When driving down-
hill, it is inactive. ÐAntilock brake system (ABS)
First read and observe the introductory information and safety warn-
ings on page 93.
ABS prevents the wheels locking when braking. Thus helping the driver to main-
tain control of the vehicle.
ä The intervention of the ABS is noticeable from the
pulsating movements of the
brake pedal which is accompanied by noises.
Do not reduce the pressure on the brake pedal during the intervention of the
ABS. The ABS deactivates if the brake pedal is released. Never interrupt the appli-
cation of the brakes during the intervention of the ABS! Ð Traction control system (TCS)
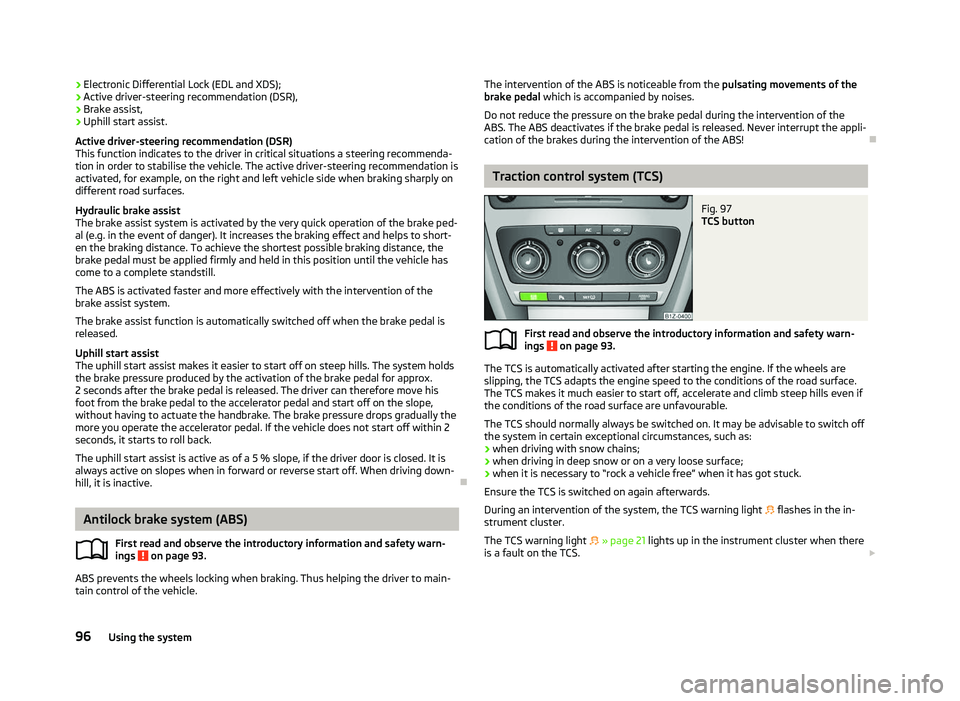
Fig. 97
TCS button
First read and observe the introductory information and safety warn-
ings on page 93.
The TCS is automatically activated after starting the engine. If the wheels are
slipping, the TCS adapts the engine speed to the conditions of the road surface.
The TCS makes it much easier to start off, accelerate and climb steep hills even if
the conditions of the road surface are unfavourable.
The TCS should normally always be switched on. It may be advisable to switch off
the system in certain exceptional circumstances, such as:
› when driving with snow chains;
› when driving in deep snow or on a very loose surface;
› when it is necessary to
“rock a vehicle free” when it has got stuck.
Ensure the TCS is switched on again afterwards.
During an intervention of the system, the TCS warning light flashes in the in-
strument cluster.
The TCS warning light » page 21 lights up in the instrument cluster when there
is a fault on the TCS. £
ä
96 Using the system
Page 99 of 218
If necessary, the TCS can be switched off and on again by pressing the button
» Fig. 97, or on vehicles with ESP, by pressing the button
» Fig. 96
on
page 95
. The TCS warning light lights up in the instrument cluster when the
TCS is switched off. ÐElectronic Differential Lock (EDS and XDS)
First read and observe the introductory information and safety warn-
ings on page 93.
If one of the wheels starts to spin, the EDL system brakes the spinning wheel and
transfers the driving force to the other wheels. This ensures the stability of the
vehicle and a quick journey.
The EDL switches off automatically if unusually severe stresses exist in order to
avoid excessive heat generation in the disc brake on the wheel which is being
braked. The vehicle can continue to be driven and has the same characteristics as
a vehicle not fitted with EDL. The EDL switches on again automatically as soon as
the brake has cooled down.
XDL (only for Octavia RS)
XDL is an extension to the electronic differential lock. XDL does not respond to
traction, but to the relief of the inner front wheel during fast cornering. The active
brake intervention on the brake of the inner wheel prevents it from spinning.
Thus, the traction is improved and the vehicle continues to follow the desired
track. ÐShifting (manual gearbox)
Fig. 98
The shift pattern: 5-speed or 6-
speed manual gearbox
ä
Always depress the clutch pedal fully when changing gear, to prevent excessive
wear of the clutch.
The gearshift indicator must be observed when changing gear
» page 11, Recom-
mended gear .
Only engage reverse gear when the vehicle is stationary. Depress the clutch pedal
and hold it fully depressed. Wait a moment before reverse gear is engaged to
avoid any shift noises.
The reversing lights will come on once reverse gear is engaged, provided the igni-
tion is on. WARNING
Never engage reverse gear when driving - risk of accident! Note
If not in the process of changing gear, do not leave your hand on the gearshift
lever while driving. The pressure from the hand can cause the gearshift mecha-
nism to wear excessively. Ð pedals
The operation of the pedals must not be hindered under any circumstances!
In the driver's footwell, only a footmat, which is attached to the two correspond-
ing attachment points, may be used.
Only use footmats from the range of
ŠKODA Original Accessories, which are fitted
to two attachment points. WARNING
No objects are allowed in the driver's footwell – risk of obstruction or limita-
tion in operating the pedal! Ð
97
Starting-off and Driving
Page 103 of 218
Conditions for the automatic engine shut down (stop phase):
›
The gearshift lever is in Neutral.
› The clutch pedal is not depressed.
› The driver has fastened the seat belt.
› The driver's door is closed.
› The bonnet is closed.
› The vehicle is at a standstill.
› The factory-fitted towing device is not electrically connected to a trailer.
› The engine is at operating temperature.
› The charge state of the vehicle battery is sufficient.
› The stationary vehicle is not on a steep slope or a steep downhill section.
› The engine speed is less than 1
200 rpm.
› The temperature inside the vehicle battery is not too low or too high.
› There is sufficient pressure in the braking system.
› The difference between the outdoor- and the set temperature in the interior is
not too great.
› The vehicle speed since the last time the engine was switched off was greater
than 3 km/h.
› No cleaning of the diesel particle filter takes place
» page 23.
› The front wheels are not turned excessively (the steering angle is less than 3/4
of a steering wheel revolution).
Conditions for an automatic restart (start phase):
› The clutch pedal is depressed.
› The max./min. temperature is set.
› The defrost function for the windscreen is switched on.
› A high blower stage has been selected.
› The START STOP button is pressed.
Conditions for an automatic restart without driver intervention: › The vehicle moves at a speed of more than 3 km/h.
› The difference between the outdoor- and the set temperature in the interior is
too great.
› The charge state of the vehicle battery is not sufficient.
› There is insufficient pressure in the braking system.
If the driver's seat belt is removed for more than 30 seconds or the driver's door is
opened during stop mode, the engine must be started manually with the key. The
following messages in the instrument cluster display must be observed. Messages in the instrument cluster display (valid for vehicles without
Information display)
ERROR START STOP Error in the START-STOP system
START STOP NOT POSSIBLE Automatic engine shut down is not
possible.
START STOP ACTIVE Automatic engine shut down (stop
phase)
SWITCH OFF IGNITION Switch off the ignition.
START MANUALLY Start the engine manually. WARNING
■ The brake servo unit and power steering only operate if the engine is run-
ning.
■ Never let the vehicle roll with the engine switched off. CAUTION
Deactivate the START-STOP system before driving through water on the
street » page 144. Note
■ Changes to the outdoor temperature can have an effect on the internal temper-
ature of the vehicle battery even after several hours. If the vehicle remains out-
doors for a long time in minus temperatures or in direct sunlight, it can take sev-
eral hours until the internal temperature of the vehicle battery reaches a suitable
temperature for proper operation of the
START STOP system.
■ If the Climatronic is running in automatic mode, under certain conditions, the
engine may not switch off automatically. Ð 101
Starting-off and Driving
Page 104 of 218
Automatic gearbox
Automatic gearbox
ä
Introduction
This chapter contains information on the following subjects:
Introductory information 102
Starting-off and driving 103
Selector lever positions 103
Manual shifting of gears (Tiptronic) 104
Selector lever lock 105
Kickdown function 105
Dynamic shift programme 105
Emergency programme 106
Selector lever-emergency unlocking 106
WARNING
■ Do not depress the accelerator if changing the position of the selector lever
when the vehicle is stationary and the engine is running - risk of accident!
■ Never move the selector lever into position R or P when driving - risk of an
accident!
■ When the engine is running and the vehicle is stationary, it is necessary to
hold the car with the brake pedal in all the positions of the selector lever (ex-
cept P and N) since the power transmission is never completely interrupted,
also not when the engine is idling - the vehicle creeps.
■ The selector lever must be placed into position P and the handbrake firmly
applied before the bonnet can be opened and work on the running engine can
be completed - risk of accident! The safety guidelines must always be ob-
served » page 158 , Engine compartment . WARNING (Continued)
■ If stopping on a hill (downhill gradient), never try to maintain the vehicle sta-
tionary with the gear engaged by means of the
“accelerator pedal”, i.e. by let-
ting the clutch slip. This can lead to overheating of the clutch. If there is a risk
of overheating of the clutch due to overload, the clutch is opened automati-
cally and the vehicle rolls backward - risk of accident!
■ If you have to stop on a slope, depress and hold the brake pedal to prevent
the vehicle from rolling back.
■ On a smooth or slippery road surface using the kickdown function can cause
the driven wheels to spin - risk of skidding! CAUTION
■ The double clutch on the automatic gearbox DSG is equipped with an overload
protection. If the uphill function is used when the vehicle is stationary or driving
slowly uphill, the thermal stress on the clutches is increased. ■ If the clutch system overheats, the symbol is shown in the information dis-
play along with the message Gearbox overheated. Stop! Owner's man.! appears.
An audible signal sounds as a warning signal. Stop the vehicle, switch off the en-
gine, and wait until the symbol disappears - risk of gearbox damage! You can
continue your journey as soon as the symbol disappears. Ð Introductory information
First read and observe the introductory information and safety warn-
ings on page 102.
Shifting up and down through the gears is performed automatically. The gearbox
can also be switched to
Tiptronic mode. This mode makes it possible for you to
also shift gears manually » page 104.
The engine can only be started when the selector lever is in position P or N . If
the selector lever is not in the P or N positions when locking the steering, switch-
ing the ignition on or off or when leaving the engine on, the following message
will appear in the Information display Move selector lever to position P/N! or, in
the instrument cluster display: P/N
.
At temperatures below -10 °C the engine can only be started in the selector lever
position P 1)
. £
ä
1)
Applies to DSG.
102 Using the system
Page 105 of 218
When parking on a level road surface, it suffices to engage selector lever position
P. When parking on a slope, the handbrake should be applied firmly before the
park position is selected. This ensures that there is no excessive pressure on the
lock mechanism and that it is subsequently easier to move the selector lever out
of position P.
If the selector lever position N is accidentally selected while driving, it is first nec-
essary to release pressure on the accelerator pedal and wait for the idling speed
of the engine to be reached before the selector lever can be engaged in the drive
position. ÐStarting-off and driving
First read and observe the introductory information and safety warn-
ings on page 102.
Starting off
›
Firmly depress and hold the brake pedal.
› Press the Shiftlock button (button in the selector lever handle), move the selec-
tor lever into the desired position » page 103 and then release the Shiftlock
button.
› Wait a moment until the gearbox has shifted (a slight engagement nudge can
be felt) 1)
.
› Release the brake pedal and accelerate.
Stop
› The selector lever position
N does not have to be selected when stopping for a
short time, such as at a cross roads. It is sufficient to hold the vehicle stationary
using the foot brake. The engine can, however, be allowed just to idle.
Parking
› Depress the brake pedal.
› Firmly apply the handbrake.
› Press and Shiftlock button in the selector lever, move the selector lever to
P
and then release the Shiftlock button. Ð
ä Selector lever positions
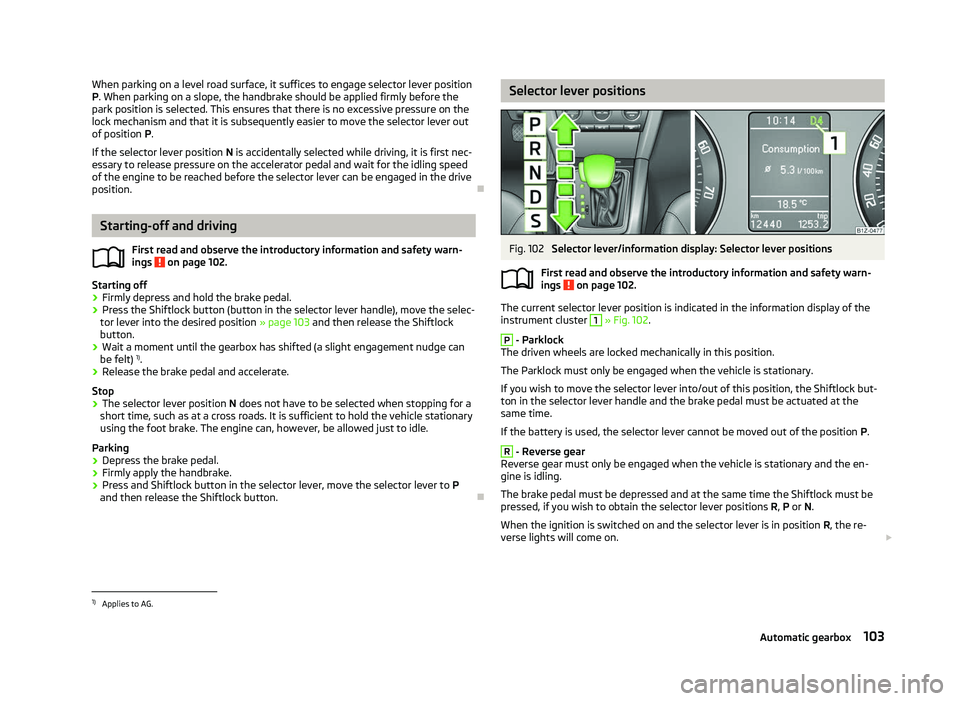
Fig. 102
Selector lever/information display: Selector lever positions
First read and observe the introductory information and safety warn-
ings on page 102.
The current selector lever position is indicated in the information display of the
instrument cluster
1
» Fig. 102.
P
- Parklock
The driven wheels are locked mechanically in this position.
The Parklock must only be engaged when the vehicle is stationary.
If you wish to move the selector lever into/out of this position, the Shiftlock but-
ton in the selector lever handle and the brake pedal must be actuated at the
same time.
If the battery is used, the selector lever cannot be moved out of the position P. R
- Reverse gear
Reverse gear must only be engaged when the vehicle is stationary and the en-
gine is idling.
The brake pedal must be depressed and at the same time the Shiftlock must be
pressed, if you wish to obtain the selector lever positions R, P or N.
When the ignition is switched on and the selector lever is in position R, the re-
verse lights will come on. £
ä
1)
Applies to AG.
103
Automatic gearbox
Page 110 of 218
Operating the phone on the multifunction steering wheel
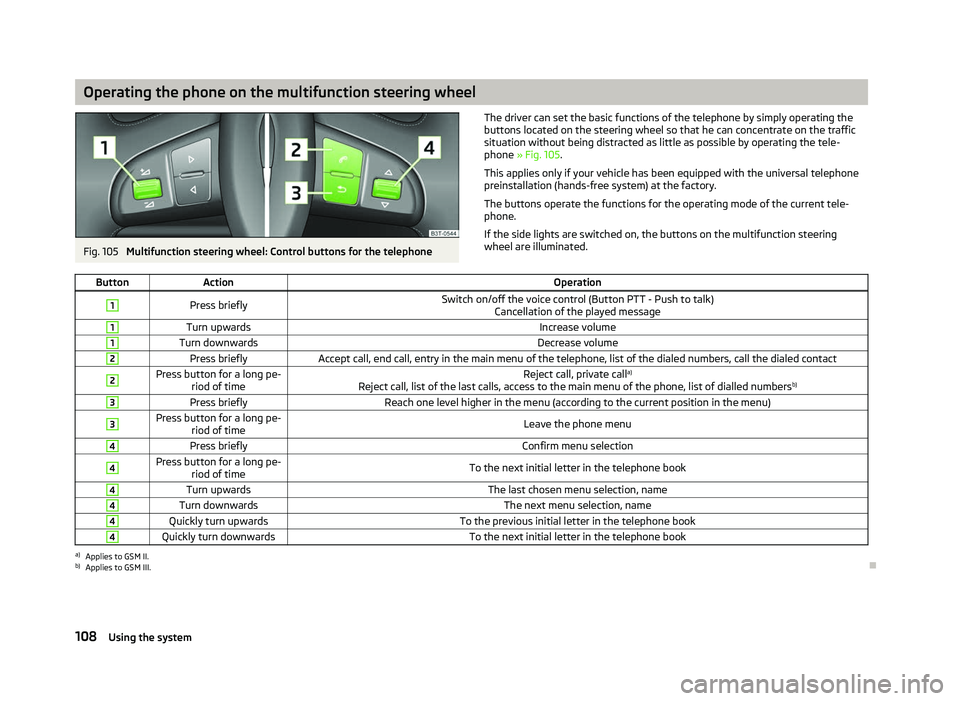
Fig. 105
Multifunction steering wheel: Control buttons for the telephone The driver can set the basic functions of the telephone by simply operating the
buttons located on the steering wheel so that he can concentrate on the traffic
situation without being distracted as little as possible by operating the tele-
phone
» Fig. 105 .
This applies only if your vehicle has been equipped with the universal telephone
preinstallation (hands-free system) at the factory.
The buttons operate the functions for the operating mode of the current tele-
phone.
If the side lights are switched on, the buttons on the multifunction steering
wheel are illuminated.
Button Action Operation1
Press briefly
Switch on/off the voice control (Button PTT - Push to talk)
Cancellation of the played message 1
Turn upwards
Increase volume1
Turn downwards
Decrease volume2
Press briefly
Accept call, end call, entry in the main menu of the telephone, list of the dialed numbers, call the dialed contact2 Press button for a long pe-
riod of time Reject call, private call
a)
Reject call, list of the last calls, access to the main menu of the phone, list of dialled numbers b)3
Press briefly
Reach one level higher in the menu (according to the current position in the menu)3 Press button for a long pe-
riod of time Leave the phone menu4
Press briefly
Confirm menu selection4 Press button for a long pe-
riod of time To the next initial letter in the telephone book4
Turn upwards
The last chosen menu selection, name4
Turn downwards
The next menu selection, name4
Quickly turn upwards
To the previous initial letter in the telephone book4
Quickly turn downwards
To the next initial letter in the telephone booka)
Applies to GSM II.
b) Applies to GSM III. Ð
108 Using the system
Page 118 of 218
›
Use the device that is to be connected to search for available Bluetooth ®
devi-
ces.
› Select the hands-free system (as standard “SKODA_BT”) from the list of found
devices.
› Enter the password on the device being connected and follow any instructions
given on this device or in the information display.
› Enter the desired Internet address in the Internet browser. The operating sys-
tem requests the entry of the telephone number for the internet access (de-
pending on the operator, usually
“*99#”). ÐVoice control
Dialogue
The period of time during which the system is ready to receive voice commands
and to carry them out is called a dialogue. The system gives audible feedback and
guides you if necessary through the relevant functions.
Optimum understanding of the voice commands depends on several factors.
› Speak with a normal tone of voice without intonation and excessive pauses.
› Avoid a bad pronunciation.
› Close the doors, windows and sliding roof, to reduce or stop disturbing exterior
noise.
› It is recommended to speak louder at higher speeds, so that the tone of your
voice is louder than the increased surrounding noise.
› During the dialogue, limit additional noise in the vehicle, e.g. passengers talking
at the same time.
› Do not speak, if the system makes an announcement.
The microphone for voice control is inserted in the moulded headliner and direc-
ted to the driver and front passenger. Therefore the driver and the front passen-
ger can operate the equipment.
Entering a phone number
The telephone number can be entered as a continuous series of individually spo-
ken digits (the whole number at once) or in the form of digital blocks (separated
by short pauses). After each order of digits (separation through brief voice pause)
all of the digits detected up to now are repeated by the system. The digits 0 - 9
, symbols +, , # are permitted. The system detects no continuous
digit combinations such as twenty-three, but only individually spoken digits (two,
three).
Activating voice control - GSM
II
› by briefly pressing the button
» Fig. 107
on page 111 on the adapter 1)
;
› by briefly pressing the button 1
on the multi-function steering
wheel » page 108 , Operating the phone on the multifunction steering wheel .
Deactivating voice control - GSM
II
If the system is currently playing a message, the message that is currently being
played will have to be stopped:
› by briefly pressing the button
on the adapter
1)
,
› by briefly pressing the button 1
on the multifunction steering wheel.
If the system expects a voice command, you can end the dialogue yourself:
› with the
CANCEL voice command;
› by pressing the button
on the adapter
1)
;
› by briefly pressing the button 1
on the multifunction steering wheel.
Activating voice control - GSM
III
The dialogue can be started at any time by pressing the button 1
on the multi-
function steering wheel 1)
.
Deactivating voice control - GSM
III
If the system is currently playing a message, you will need to end the message
currently being played by pressing the 1
button on the multifunction steering
wheel.
If the system expects a voice command, you can end the dialogue yourself:
› with the
CANCEL voice command;
› by briefly pressing the button 1
on the multifunction steering wheel.
Note
■ The dialogue of an incoming call is immediately interrupted.
■ The voice control is only possible in vehicles fitted with a multifunction steering
wheel with telephone control or a phone mount and adapter.
■ On vehicles which are factory-fitted with the Columbus navigation system, it is
only possible to operate the voice control for the telephone via this device; refer
to the operating instructions for the Columbus navigation system. Ð1)
Not valid for vehicles with the Columbus navigation system.
116 Using the system
Page 124 of 218
What influences the driving safety?
First read and observe the introductory information and safety warn-
ings on page 121.
The driver is fully responsible for himself and his occupants. If your driving safety
is effected, you place yourself and the oncoming traffic at risk.
The following guidelines must therefore be observed. › Do not get distracted from concentrating on the traffic situation, e.g. by your
passengers or mobile phone calls.
› Never drive when your driving ability is impaired, e.g. through medication, alco-
hol, drugs.
› Keep to the traffic regulations and the permissible speed limit.
› Always adjust the driving speed to the road, traffic and weather conditions.
› Take regular breaks on long journeys – at least every two hours. ÐCorrect seated position
ä
Introduction
This chapter contains information on the following subjects:
Correct seated position for the driver 123
Correct seated position for the front passenger 123
Correct seated position for the occupants on the rear seats 123
Examples of an incorrect seated position 124
WARNING
■ The front seats and the head restraints must always be adjusted to match
the body size of the seat occupant as well as the seat belts must always be
correctly fastened in order to provide an optimal protection for you and your
occupants.
■ Always assume the correct seated position before setting off and do not
change this position while driving. Also advise your passengers to adopt the
correct seated position and not to change this position while the car is mov-
ing.
ä WARNING (Continued)
■ If the occupant adopts an incorrect seated position, he is exposed to life-
threatening injuries, in case he is hit by a deployed airbag.
■ If the occupants on the rear seats are not sitting upright, the risk of injury is
increased due to incorrect routing of the seat belt.
■ The driver must maintain a distance of at least 25 cm to the steering wheel.
The front passenger must maintain a distance of at least 25 cm to the dash
panel. Not maintaining this minimum distance will mean that the airbag sys-
tem will not be able to properly protect you - hazard!
■ When driving, hold the steering wheel with both hands firmly on the outer
edge in the 9
o'clock and 3 o'clock position. Never hold the steering wheel in
the 12 o'clock position or in any other way (e.g. in the middle or inner edge of
the steering wheel). In such cases, you could severely injure the arms, hands
and head when the driver airbag is deployed.
■ The seat backrests must not be angled too far back when driving otherwise
this will affect proper operation of the seat belts and of the airbag system -
risk of injury!
■ Ensure that there are no objects in the driver's footwell as they may get
caught behind the pedals when driving or applying the braking. You would
then no longer be able to operate the clutch, brake or accelerate.
■ Always keep your feet in the footwell when the car is being driven - never
place your feet on the instrument panel, out of the window or on the surfaces
of the seats. You will be exposed to increased risk of injury if it becomes nec-
essary to apply the brake or in the event of an accident. If an airbag is de-
ployed, you may suffer fatal injuries when adopting an incorrect seated posi-
tion! Ð
122 Safety
Page 125 of 218
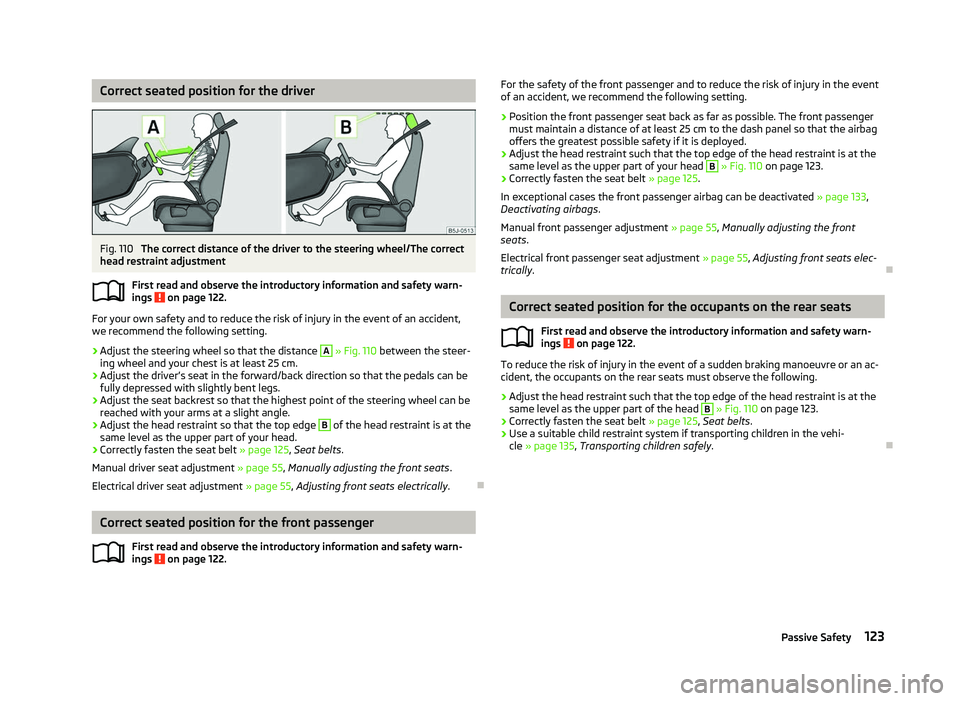
Correct seated position for the driver
Fig. 110
The correct distance of the driver to the steering wheel/The correct
head restraint adjustment
First read and observe the introductory information and safety warn-
ings on page 122.
For your own safety and to reduce the risk of injury in the event of an accident,
we recommend the following setting.
› Adjust the steering wheel so that the distance A
» Fig. 110 between the steer-
ing wheel and your chest is at least 25 cm.
› Adjust the driver’s seat in the forward/back direction so that the pedals can be
fully depressed with slightly bent legs.
› Adjust the seat backrest so that the highest point of the steering wheel can be
reached with your arms at a slight angle.
› Adjust the head restraint so that the top edge B
of the head restraint is at the
same level as the upper part of your head.
› Correctly fasten the seat belt
» page 125, Seat belts.
Manual driver seat adjustment » page 55, Manually adjusting the front seats .
Electrical driver seat adjustment » page 55, Adjusting front seats electrically .Ð Correct seated position for the front passenger
First read and observe the introductory information and safety warn-
ings on page 122.ä
ä For the safety of the front passenger and to reduce the risk of injury in the event
of an accident, we recommend the following setting.
› Position the front passenger seat back as far as possible. The front passenger
must maintain a distance of at least 25
cm to the dash panel so that the airbag
offers the greatest possible safety if it is deployed.
› Adjust the head restraint such that the top edge of the head restraint is at the
same level as the upper part of your head B
» Fig. 110
on page
123.
› Correctly fasten the seat belt
» page 125.
In exceptional cases the front passenger airbag can be deactivated » page 133,
Deactivating airbags .
Manual front passenger adjustment » page 55, Manually adjusting the front
seats .
Electrical front passenger seat adjustment » page 55, Adjusting front seats elec-
trically. Ð Correct seated position for the occupants on the rear seats
First read and observe the introductory information and safety warn-
ings on page 122.
To reduce the risk of injury in the event of a sudden braking manoeuvre or an ac-
cident, the occupants on the rear seats must observe the following.
› Adjust the head restraint such that the top edge of the head restraint is at the
same level as the upper part of the head B
» Fig. 110 on page 123.
› Correctly fasten the seat belt
» page 125, Seat belts.
› Use a suitable child restraint system if transporting children in the vehi-
cle » page 135, Transporting children safely . Ð
ä
123
Passive Safety
Page 128 of 218
WARNING (Continued)
■ The seat belts for the rear seats can only fulfil their function reliably when
the seat backrests are correctly locked into position » page 59, Rear seats.
■ The belt webbing must always be kept clean. Soiled belt webbing may im-
pair proper operation of the inertia reel » page 154, Seat belts.
■ The seat belts must not be removed or changed in any way. Do not attempt
to repair the seat belts yourself.
■ Check the condition of all the seat belts on a regular basis. If any damage to
the seat belts, seat belt connections, inertia reel or the lock is detected, the
relevant seat belt must be replaced by a
ŠKODA specialist garage.
■ Damaged seat belts which have been subjected to stress in an accident and
were therefore stretched, must be replaced - this is best done by a
ŠKODA
specialist garage. The anchorage points for the belts should also be checked. Note
The national legal requirements must be observed when using seat belts. ÐThe physical principle of a frontal collision
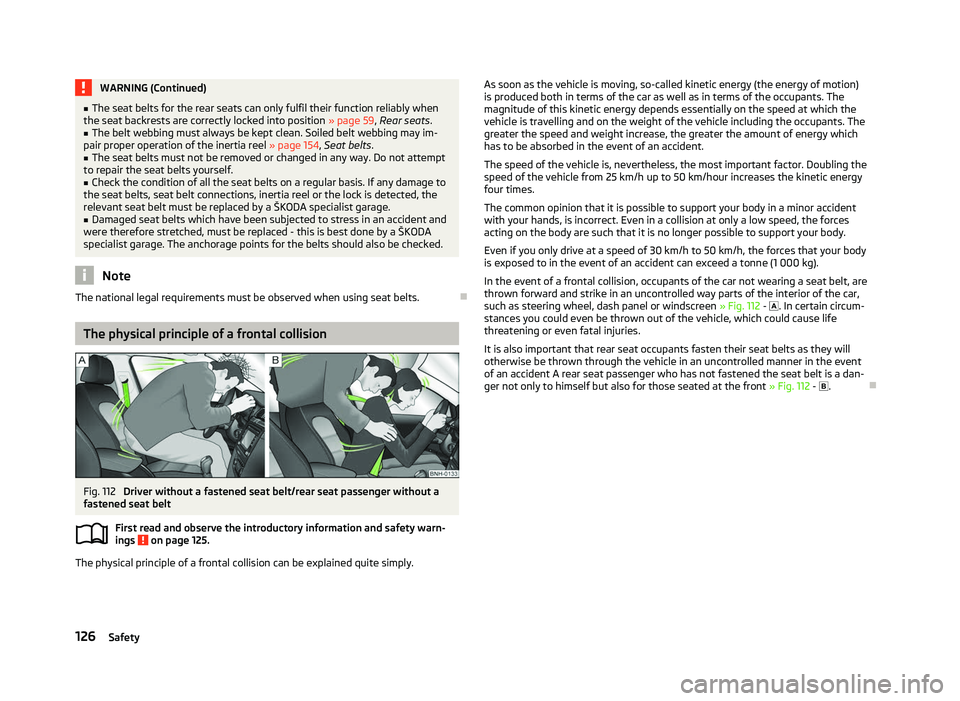
Fig. 112
Driver without a fastened seat belt/rear seat passenger without a
fastened seat belt
First read and observe the introductory information and safety warn-
ings on page 125.
The physical principle of a frontal collision can be explained quite simply.
ä As soon as the vehicle is moving, so-called kinetic energy (the energy of motion)
is produced both in terms of the car as well as in terms of the occupants. The
magnitude of this kinetic energy depends essentially on the speed at which the
vehicle is travelling and on the weight of the vehicle including the occupants. The
greater the speed and weight increase, the greater the amount of energy which
has to be absorbed in the event of an accident.
The speed of the vehicle is, nevertheless, the most important factor. Doubling the
speed of the vehicle from 25 km/h up to 50 km/hour increases the kinetic energy
four times.
The common opinion that it is possible to support your body in a minor accident
with your hands, is incorrect. Even in a collision at only a low speed, the forces
acting on the body are such that it is no longer possible to support your body.
Even if you only drive at a speed of 30
km/h to 50 km/h, the forces that your body
is exposed to in the event of an accident can exceed a tonne (1 000 kg).
In the event of a frontal collision, occupants of the car not wearing a seat belt, are
thrown forward and strike in an uncontrolled way parts of the interior of the car,
such as steering wheel, dash panel or windscreen » Fig. 112 - . In certain circum-
stances you could even be thrown out of the vehicle, which could cause life
threatening or even fatal injuries.
It is also important that rear seat occupants fasten their seat belts as they will
otherwise be thrown through the vehicle in an uncontrolled manner in the event
of an accident A rear seat passenger who has not fastened the seat belt is a dan-
ger not only to himself but also for those seated at the front » Fig. 112 - . Ð
126 Safety