118 SKODA OCTAVIA 2006 Owner´s Manual
[x] Cancel search | Manufacturer: SKODA, Model Year: 2006, Model line: OCTAVIA, Model: SKODA OCTAVIA 2006Pages: 218, PDF Size: 5.48 MB
Page 5 of 218
Table of Contents
Abbreviations
Using the system
Cockpit 7
Overview 6
Instruments and warning lights 8
Instrument cluster 8
Multifunction display (onboard computer) 12
MAXI DOT (information display) 15
Warning lights 18
Unlocking and locking 26
Vehicle key 26
Child safety lock 27
Central locking system 27
Remote control 30
Anti-theft alarm system 31
Boot lid 33
Electric power windows 34
Electric sliding/tilting roof 37
Lights and visibility 39
Lights 39
Interior light 45
Visibility 47
Windscreen wipers and washers 48
Rear window 51
Seats and Stowage 54
Front seats 54
Seat heaters 57
Head restraints 58
Rear seats 59
Boot 60Variable loading floor in the boot 64
Net partition (Combi) 65
Roof rack system 66
Cup holder 68
Ashtray 68
Cigarette lighter, 12-volt power socket 69
Storage compartments 70
Clothes hooks 77
Parking ticket holder 77
Heating and air conditioning system 79
Heating and air conditioning system 79
Air outlet vents 80
Heating 80
Air conditioning system (manual air conditioning
system) 82
Climatronic (automatic air conditioning
system) 85
Auxiliary heating (auxiliary heating and
ventilation) 87
Starting-off and Driving 91
Starting and stopping the engine 91
Brakes and brake assist systems 93
Shifting (manual gearbox) 97
pedals 97
Parking aid 98
Cruise control system (CCS) 99
START/STOP 100
Automatic gearbox 102
Automatic gearbox 102
Communication 107
Mobile phones and two-way radio systems 107
Operating the phone on the multifunction
steering wheel 108
Symbols in the information display 109
Phone Phonebook 109
Universal telephone preinstallation GSM II 109
Universal telephone preinstallation GSM IIl 112Voice control 116
Multimedia 118
Safety
Passive Safety 121
General information 121
Correct seated position 122
Seat belts 125
Seat belts 125
Airbag system 129
Description of the airbag system 129
Front airbags 130
Side airbags 131
Head airbags 132
Deactivating airbags 133
Transporting children safely 135
Child seat 135
Driving Tips
Driving and the Environment 139
The first 1 500 km 139
Catalytic converter 139
Economical and environmentally friendly
driving 140
Environmental compatibility 142
Driving abroad 143
Avoiding damage to your vehicle 143
Driving through water on the street 144
Towing a trailer 145
Towing a trailer 145
General Maintenance
Taking care of and cleaning the vehicle 148
Taking care of your vehicle 148
3
Table of Contents
Page 9 of 218
Using the system
Cockpit
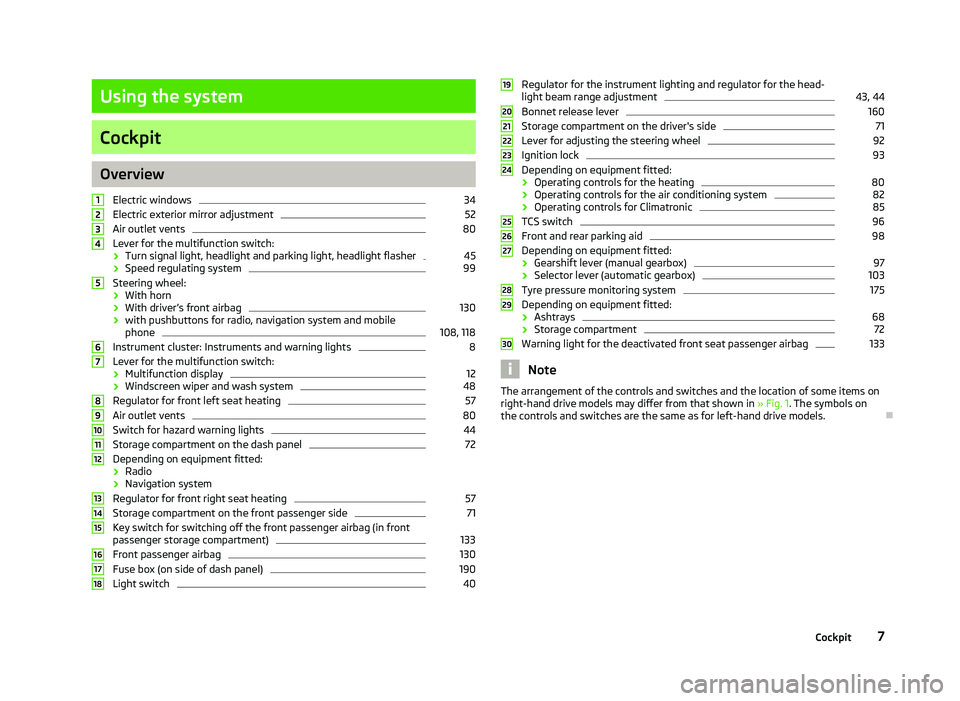
Overview
Electric windows 34
Electric exterior mirror adjustment 52
Air outlet vents 80
Lever for the multifunction switch:
› Turn signal light, headlight and parking light, headlight flasher 45
› Speed regulating system 99
Steering wheel:
› With horn
› With driver’s front airbag 130
› with pushbuttons for radio, navigation system and mobile
phone 108, 118
Instrument cluster: Instruments and warning lights 8
Lever for the multifunction switch:
› Multifunction display 12
› Windscreen wiper and wash system 48
Regulator for front left seat heating 57
Air outlet vents 80
Switch for hazard warning lights 44
Storage compartment on the dash panel 72
Depending on equipment fitted:
› Radio
› Navigation system
Regulator for front right seat heating 57
Storage compartment on the front passenger side 71
Key switch for switching off the front passenger airbag (in front
passenger storage compartment) 133
Front passenger airbag 130
Fuse box (on side of dash panel) 190
Light switch 401
2
3
4
5
6
7
8
9
10
11
12
13
14
15
16
17
18 Regulator for the instrument lighting and regulator for the head-
light beam range adjustment 43, 44
Bonnet release lever 160
Storage compartment on the driver's side 71
Lever for adjusting the steering wheel 92
Ignition lock 93
Depending on equipment fitted:
› Operating controls for the heating 80
› Operating controls for the air conditioning system 82
› Operating controls for Climatronic 85
TCS switch 96
Front and rear parking aid 98
Depending on equipment fitted:
› Gearshift lever (manual gearbox) 97
› Selector lever (automatic gearbox) 103
Tyre pressure monitoring system 175
Depending on equipment fitted:
› Ashtrays 68
› Storage compartment 72
Warning light for the deactivated front seat passenger airbag 133
Note
The arrangement of the controls and switches and the location of some items on
right-hand drive models may differ from that shown in »
Fig. 1. The symbols on
the controls and switches are the same as for left-hand drive models. Ð 19
20
21
22
23
24
25
26
27
28
29
30
7
Cockpit
Page 112 of 218
›
Managing telephone calls via the adapter
» page 111.
› Operation of the telephone via the information display
» page 112.
› Voice control of the telephone
» page 116.
› Music playback from the telephone or other multimedia units
» page 118.
All communication between a mobile phone and your vehicle's hands-free system
is established with the help of Bluetooth ®
technology. The adapter serves only
for charging the telephone and for transmitting the signal to the vehicle's exter-
nal aerial. Note
The following guidelines must be observed » page 107, Mobile phones and two-
way radio systems. ÐConnecting the mobile phone to the hands-free system
To connect a mobile phone with the hands-free system, the two devices must be
paired. Detailed information on this is provided in the operating instructions for
your mobile phone. The following steps must be carried out for the connection.
› Activate Bluetooth ®
and the visibility of your mobile phone on your telephone.
› Switch on the ignition.
› Select the menu
Phone - New user in the information display and wait until the
control unit has completed the search.
› Select your mobile phone from the menu of the units found.
› Confirm the PIN 1)
.
› If the hands-free system announces (as standard
SKODA_BT) on the display of
the mobile phone, enter the PIN 1)
within 30 seconds and wait, until the connec-
tion is established 2
).
› After terminating the connection, confirm the creation of a new user profile in
the information display.
If there is no free space available to create a new user profile, delete an existing
user profile.
During the connecting procedure, no other mobile phone may be connected with
the hands-free system. Up to four mobile phones can be paired with the hands-free system, whereby on-
ly one mobile phone can communicate with the hands-free system.
The visibility of the hands-free system is automatically switched off 3
minutes af-
ter the ignition is switched on and is also deactivated when the mobile phone has
connected to the hands-free system.
Restoring the visibility of the hands-free system
If you have not managed to connect your mobile phone with the hands-free sys-
tem within 3 minutes of switching on the ignition, the visibility of the hands-free
system can be reestablished for 3 minutes in the following ways.
› By turning the ignition off and on.
› By turning voice control off and on.
› Via the information display in the menu item Bluetooth
- Visibility.
Creating a connection with an already paired mobile phone
After switching on the ignition, the connection is automatically established for
the already paired mobile phone 2)
. Check on your mobile phone if the automatic
connection has been established.
Disconnecting the connection
› By withdrawing the ignition key.
› By disconnecting the hands-free system in the mobile phone.
› By disconnecting the user in the information display in the menu
Bluetooth -
User .
Solving connection problems
If the system announces No paired phone found, check the operating state of the
mobile phone.
› Is the mobile phone switched on?
› Is the PIN code entered?
› Is Bluetooth ®
active?
› Is the visibility of the mobile phone active?
› Has the mobile phone already been paired with the hands-free system?
£1)
Depending on the Bluetooth ®
version on the mobile phone, an automatically generated 6-digit PIN is
either displayed or the PIN 1234 has to be entered manually.
2) Some mobile phones have a menu, in which the authorisation for establishing a Bluetooth ®
connec-
tion is completed by inputting a code. If the authorisation input is required, it must always be per-
formed when re-establishing the Bluetooth connection.
110 Using the system
Page 114 of 218
Operate the telephone via the information display
The following menu points can be selected in the menu Phone.
■ Phone book
■ Dial number 1)
■ Call register
■ Voice mailbox
■ Bluetooth 1
)
■ Settings 2)
■ Back
Phone book
In the menu point Phone book is the list of the loaded contacts from the tele-
phone memory and the SIM card of the mobile phone.
Dial number
Any telephone number can be entered in the menu point Dial number. The re-
quired numbers must be selected one after the other using adjustment wheel
and confirmed by pressing the adjustment wheel. Numbers 0 - 9, symbols , , #
and the functions Cancel, Call, Delete can be selected.
Call register
The following menu items can be selected in the menu item Call register.
■ Missed calls
■ Dialled numbers
■ Received calls
Voice mailbox
In the menu Voice mailbox , it is possible to set the number of the voice mailbox 1 )
and then dial the number.
Bluetooth
The following menu items can be selected in the menu Bluetooth.
■ User - the overview of the stored users
■ New user - Search for new mobile phones that are in the reception range
■ Visibility - Switching on the visibility of the telephone unit for other devices ■
Media player
■ Active device
■ Paired devices
■ Search
■ Phone name - the possibility to change the name of the telephone unit (pre-set
SKODA UHV)
Settings
The following menu items can be selected in the menu Settings.
■ Phone book
■ Update 1
)
■ List
■ Surname
■ First name
■ Ring tone
Back
Return in the Start menu of the telephone. Ð Universal telephone preinstallation GSM IIl
Introductory information
The universal telephone preinstallation GSM
II (“hands-free system”) includes a
convenience mode for the mobile phone via voice control, the multifunction
steering wheel, the radio or navigation system.
The universal telephone preinstallation GSM III comprises the following functions.
› Phone Phonebook » page 109
.
› Convenience operation via the multifunction steering wheel
» page 108.
› Operation of the telephone via the information display
» page 114.
› Voice control of the telephone
» page 116.
› Music playback from the telephone or other multimedia units
» page 118.
› Internet connection
» page 115.
› Display of SMS messages » page 114.
£1)
On vehicles fitted with the Amundsen+ navigation system, this function can be accessed via the navi-
gation system menu; refer to the operating instructions for the Amundsen+ navigation system.
2) This function is not available in vehicles fitted with the Amundsen+ navigation system.
112 Using the system
Page 120 of 218
Multimedia
Music playback via Bluetooth
®
The universal telephone preinstallation makes it possible to play back music via
Bluetooth ®
from devices such as MP3 players, mobile phones or notebooks.
To ensure the music can be played back via Bluetooth ®
, it is necessary to connect
the terminal device with the hands-free system in the menu Phone - Bluetooth -
Media player. The music playback process is performed on the connected device.
The universal telephone preinstallation GSM II ensures that the music played back
via the hands-free system can be controlled with the remote control » page 117,
Voice commands - GSM II . Note
The device being connected must support the Bluetooth ®
A2DP profile; refer to
the operating instructions for the relevant device being connected. ÐOperating the radio and navigation system on the multifunction steering wheel
Fig. 108
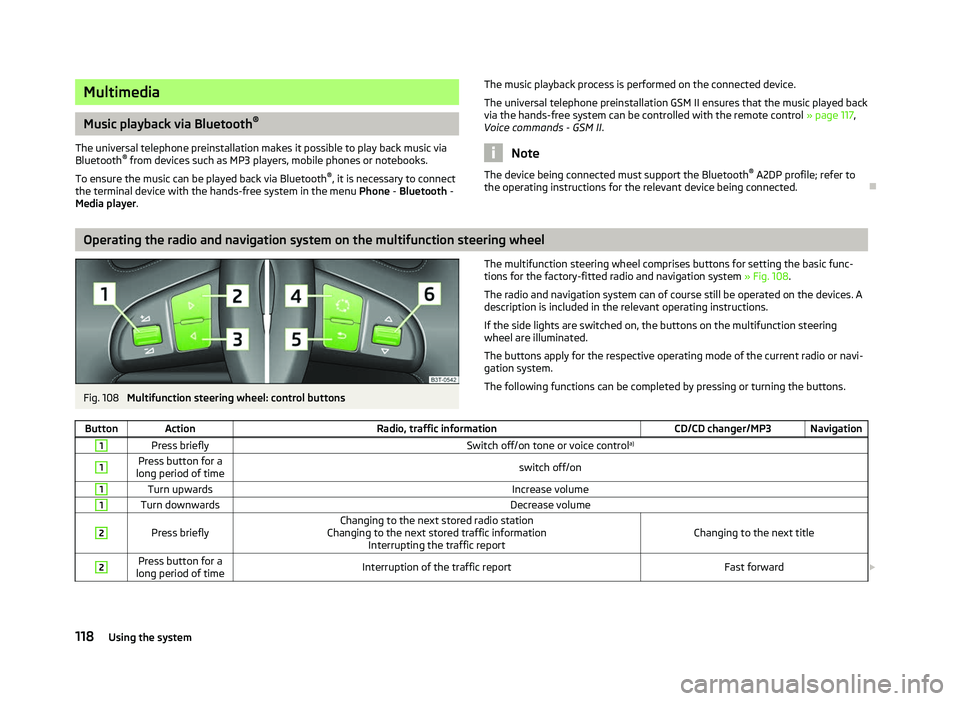
Multifunction steering wheel: control buttons The multifunction steering wheel comprises buttons for setting the basic func-
tions for the factory-fitted radio and navigation system » Fig. 108.
The radio and navigation system can of course still be operated on the devices. A
description is included in the relevant operating instructions.
If the side lights are switched on, the buttons on the multifunction steering
wheel are illuminated.
The buttons apply for the respective operating mode of the current radio or navi-
gation system.
The following functions can be completed by pressing or turning the buttons.
Button Action Radio, traffic information CD/CD changer/MP3 Navigation1
Press briefly
Switch off/on tone or voice controla)1 Press button for a
long period of time switch off/on1
Turn upwards
Increase volume1
Turn downwards
Decrease volume2
Press briefly
Changing to the next stored radio station
Changing to the next stored traffic information Interrupting the traffic report Changing to the next title2 Press button for a
long period of time Interruption of the traffic report
Fast forward£118
Using the system
Page 133 of 218
The airbag allows the gas to flow out of the inflated airbag in a controlled manner
(depending on the load of the particular car occupant) in order to cushion head
and chest areas. The airbag then deflates subsequently to such an extent, after
an accident, to again provide a clear view forward.
WARNING
■ For the driver and front passenger, it is important to maintain a distance of
at least 25 cm to the steering wheel or dashboard A
» Fig. 117
. Not maintain-
ing this minimum distance will mean that the airbag system will not be able to
properly protect you - hazard! The front seats and the head restraints must
always also be correctly adjusted to match the body size of the occupant.
■ The airbag develops enormous forces when triggered, which can lead to in-
juries if the sitting position or seated position is not correct.
■ There must not by any further persons, animals or objects positioned be-
tween the front seated occupants and the deployment area of the airbag. ■ Never transport children on the front seat of a vehicle without using a prop-
er restraint system. If airbags are deployed in the event of an accident, the
child might suffer severe or even fatal injuries!
■ It is essential to always switch off the front passenger airbag when attach-
ing a child safety seat to the front passenger seat where the child is seated
with its back facing in direction of travel » page 133, Deactivating airbags. If
this is not done, there is a risk of the child suffering severe or even fatal inju-
ries if the front passenger airbag is deployed. When transporting a child on
the front passenger seat, pay attention to any relevant national regulations
regarding the use of child safety seats.
■ The steering wheel and the surface of the airbag module in the dash panel
on the passenger side must not have stickers attached, be covered or modi-
fied in any other way. These parts should only be cleaned with a cloth that is
dry or has been moistened with water. No objects such as cup holders, mobile
phone mounts, etc. must be attached to the covers of the airbag modules or
be located within their immediate vicinity.
■ Never place objects on the surface of the front passenger airbag module in
the dash panel. Ð Side airbags
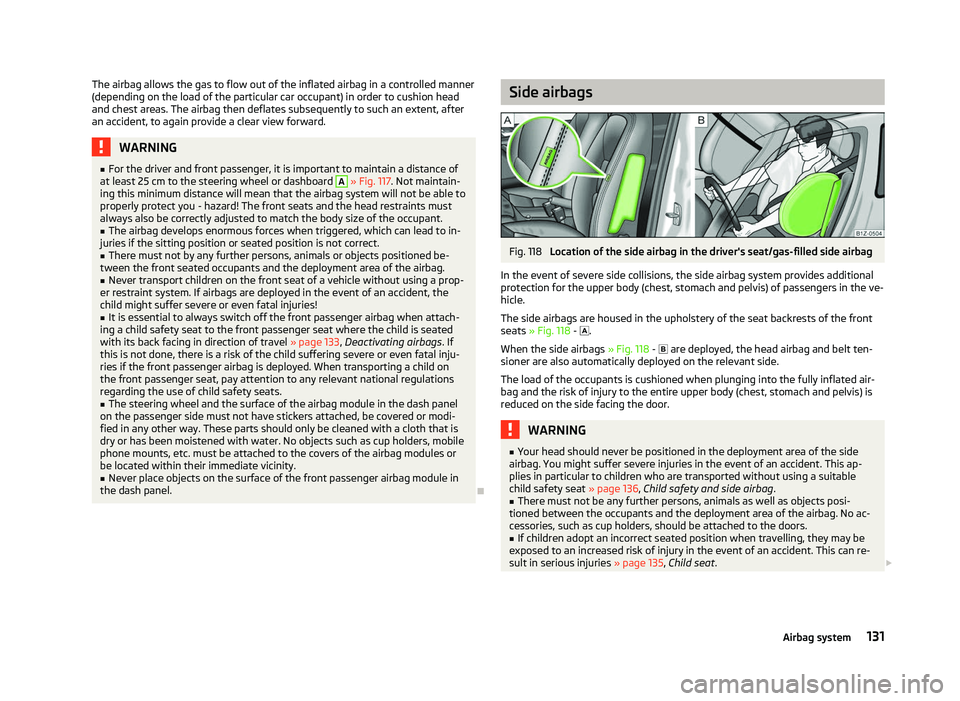
Fig. 118
Location of the side airbag in the driver's seat/gas-filled side airbag
In the event of severe side collisions, the side airbag system provides additional
protection for the upper body (chest, stomach and pelvis) of passengers in the ve-
hicle.
The side airbags are housed in the upholstery of the seat backrests of the front
seats » Fig. 118 - .
When the side airbags » Fig. 118 - are deployed, the head airbag and belt ten-
sioner are also automatically deployed on the relevant side.
The load of the occupants is cushioned when plunging into the fully inflated air-
bag and the risk of injury to the entire upper body (chest, stomach and pelvis) is
reduced on the side facing the door. WARNING
■ Your head should never be positioned in the deployment area of the side
airbag. You might suffer severe injuries in the event of an accident. This ap-
plies in particular to children who are transported without using a suitable
child safety seat » page 136, Child safety and side airbag.
■ There must not be any further persons, animals as well as objects posi-
tioned between the occupants and the deployment area of the airbag. No ac-
cessories, such as cup holders, should be attached to the doors. ■ If children adopt an incorrect seated position when travelling, they may be
exposed to an increased risk of injury in the event of an accident. This can re-
sult in serious injuries » page 135, Child seat. £
131
Airbag system
Page 162 of 218
Opening and closing the bonnet
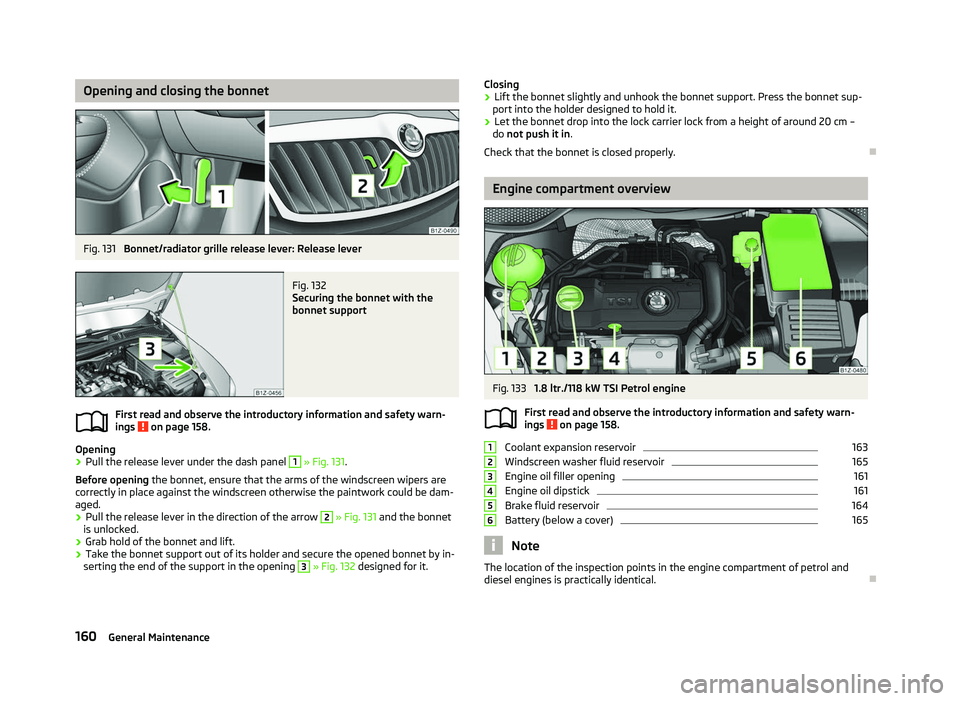
Fig. 131
Bonnet/radiator grille release lever: Release lever Fig. 132
Securing the bonnet with the
bonnet support
First read and observe the introductory information and safety warn-
ings on page 158.
Opening
›
Pull the release lever under the dash panel 1
» Fig. 131.
Before opening the bonnet, ensure that the arms of the windscreen wipers are
correctly in place against the windscreen otherwise the paintwork could be dam-
aged.
› Pull the release lever in the direction of the arrow 2
» Fig. 131 and the bonnet
is unlocked.
› Grab hold of the bonnet and lift.
› Take the bonnet support out of its holder and secure the opened bonnet by in-
serting the end of the support in the opening 3
» Fig. 132
designed for it.
ä Closing
› Lift the bonnet slightly and unhook the bonnet support. Press the bonnet sup-
port into the holder designed to hold it.
› Let the bonnet drop into the lock carrier lock from a height of around 20 cm –
do not push it in .
Check that the bonnet is closed properly. Ð Engine compartment overview
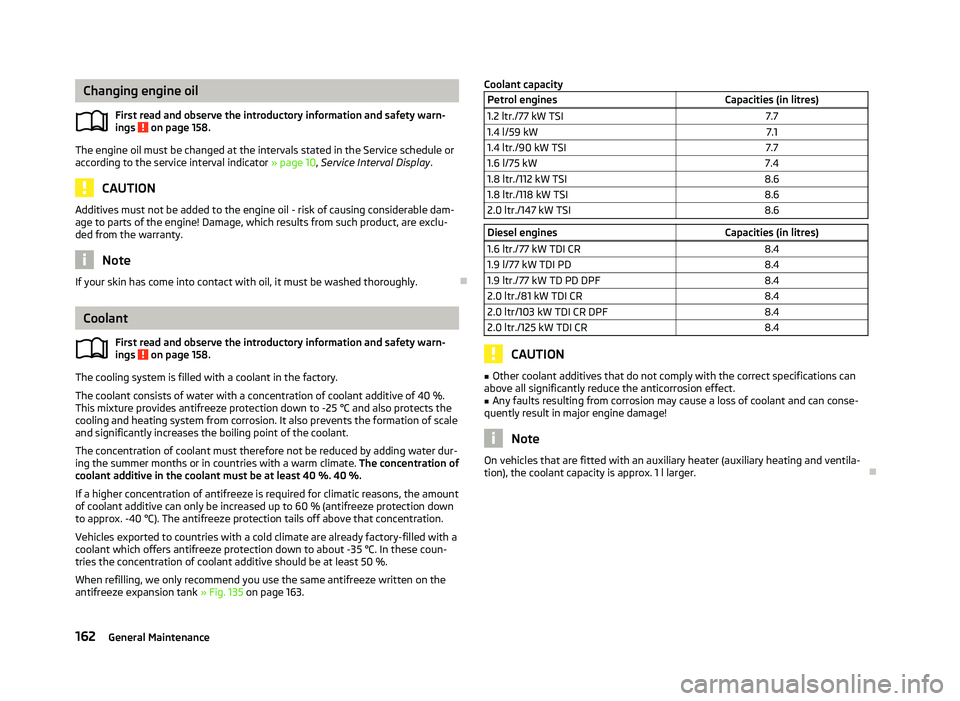
Fig. 133
1.8 ltr./118 kW TSI Petrol engine
First read and observe the introductory information and safety warn-
ings on page 158.
Coolant expansion reservoir 163
Windscreen washer fluid reservoir 165
Engine oil filler opening 161
Engine oil dipstick 161
Brake fluid reservoir 164
Battery (below a cover) 165
Note
The location of the inspection points in the engine compartment of petrol and
diesel engines is practically identical. Ð
ä 1
2
3
4
5
6
160
General Maintenance
Page 164 of 218
Changing engine oil
First read and observe the introductory information and safety warn-
ings on page 158.
The engine oil must be changed at the intervals stated in the Service schedule or
according to the service interval indicator
» page 10, Service Interval Display.CAUTION
Additives must not be added to the engine oil - risk of causing considerable dam-
age to parts of the engine! Damage, which results from such product, are exclu-
ded from the warranty. Note
If your skin has come into contact with oil, it must be washed thoroughly. ÐCoolant
First read and observe the introductory information and safety warn-
ings on page 158.
The cooling system is filled with a coolant in the factory.
The coolant consists of water with a concentration of coolant additive of 40 %.
This mixture provides antifreeze protection down to -25
°C and also protects the
cooling and heating system from corrosion. It also prevents the formation of scale
and significantly increases the boiling point of the coolant.
The concentration of coolant must therefore not be reduced by adding water dur-
ing the summer months or in countries with a warm climate. The concentration of
coolant additive in the coolant must be at least 40 %. 40 %.
If a higher concentration of antifreeze is required for climatic reasons, the amount
of coolant additive can only be increased up to 60 % (antifreeze protection down
to approx. -40 °C). The antifreeze protection tails off above that concentration.
Vehicles exported to countries with a cold climate are already factory-filled with a
coolant which offers antifreeze protection down to about -35 °C. In these coun-
tries the concentration of coolant additive should be at least 50 %.
When refilling, we only recommend you use the same antifreeze written on the
antifreeze expansion tank » Fig. 135 on page 163.
ä
ä
Coolant capacity
Petrol engines Capacities (in litres)
1.2 ltr./77 kW TSI 7.7
1.4 l/59 kW 7.1
1.4 ltr./90 kW TSI 7.7
1.6 l/75 kW 7.4
1.8 ltr./112 kW TSI 8.6
1.8 ltr./118 kW TSI 8.6
2.0 ltr./147 kW TSI 8.6 Diesel engines
Capacities (in litres)
1.6 ltr./77 kW TDI CR 8.4
1.9 l/77 kW TDI PD 8.4
1.9 ltr./77 kW TD PD DPF 8.4
2.0 ltr./81 kW TDI CR 8.4
2.0 ltr/103 kW TDI CR DPF 8.4
2.0 ltr./125 kW TDI CR 8.4 CAUTION
■ Other coolant additives that do not comply with the correct specifications can
above all significantly reduce the anticorrosion effect.
■ Any faults resulting from corrosion may cause a loss of coolant and can conse-
quently result in major engine damage! Note
On vehicles that are fitted with an auxiliary heater (auxiliary heating and ventila-
tion), the coolant capacity is approx. 1 l larger. Ð
162 General Maintenance
Page 202 of 218
Specifications and engine oil capacity
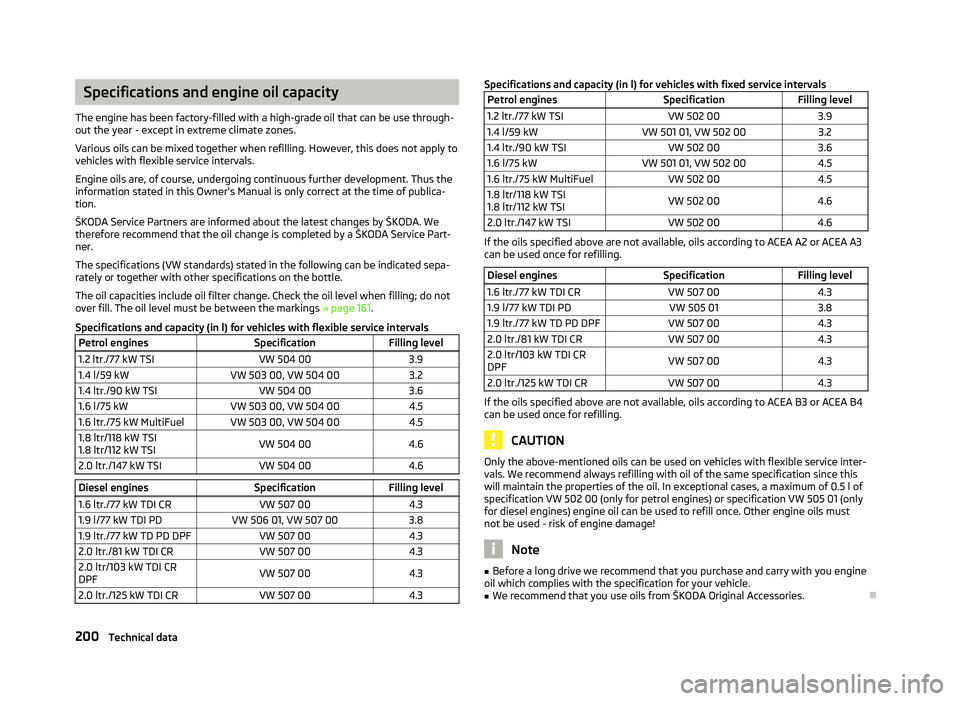
The engine has been factory-filled with a high-grade oil that can be use through-
out the year - except in extreme climate zones.
Various oils can be mixed together when refilling. However, this does not apply to
vehicles with flexible service intervals.
Engine oils are, of course, undergoing continuous further development. Thus the
information stated in this Owner's Manual is only correct at the time of publica-
tion.
ŠKODA Service Partners are informed about the latest changes by
ŠKODA. We
therefore recommend that the oil change is completed by a ŠKODA Service Part-
ner.
The specifications (VW standards) stated in the following can be indicated sepa-
rately or together with other specifications on the bottle.
The oil capacities include oil filter change. Check the oil level when filling; do not
over fill. The oil level must be between the markings » page 161.
Specifications and capacity (in l) for vehicles with flexible service intervals Petrol engines SpecificationFilling level
1.2 ltr./77 kW TSI VW 504 003.9
1.4 l/59 kW VW 503 00, VW 504 00 3.2
1.4 ltr./90 kW TSI VW 504 003.6
1.6 l/75 kW VW 503 00, VW 504 00 4.5
1.6 ltr./75 kW MultiFuel VW 503 00, VW 504 00 4.5
1.8 ltr/118 kW TSI
1.8 ltr/112 kW TSI VW 504 00
4.6
2.0 ltr./147 kW TSI VW 504 004.6Diesel engines
SpecificationFilling level
1.6 ltr./77 kW TDI CR VW 507 004.3
1.9 l/77 kW TDI PD VW 506 01, VW 507 00 3.8
1.9 ltr./77 kW TD PD DPF VW 507 004.3
2.0 ltr./81 kW TDI CR VW 507 004.3
2.0 ltr/103 kW TDI CR
DPF VW 507 00
4.3
2.0 ltr./125 kW TDI CR VW 507 004.3 Specifications and capacity (in l) for vehicles with fixed service intervals
Petrol engines SpecificationFilling level
1.2 ltr./77 kW TSI VW 502 003.9
1.4 l/59 kW VW 501 01, VW 502 00 3.2
1.4 ltr./90 kW TSI VW 502 003.6
1.6 l/75 kW VW 501 01, VW 502 00 4.5
1.6 ltr./75 kW MultiFuel VW 502 004.5
1.8 ltr/118 kW TSI
1.8 ltr/112 kW TSI VW 502 00
4.6
2.0 ltr./147 kW TSI VW 502 004.6 If the oils specified above are not available, oils according to ACEA
A2 or ACEA A3
can be used once for refilling.
Diesel engines SpecificationFilling level
1.6 ltr./77 kW TDI CR VW 507 004.3
1.9 l/77 kW TDI PD VW 505 013.8
1.9 ltr./77 kW TD PD DPF VW 507 004.3
2.0 ltr./81 kW TDI CR VW 507 004.3
2.0 ltr/103 kW TDI CR
DPF VW 507 00
4.3
2.0 ltr./125 kW TDI CR VW 507 004.3 If the oils specified above are not available, oils according to ACEA
B3 or ACEA B4
can be used once for refilling. CAUTION
Only the above-mentioned oils can be used on vehicles with flexible service inter-
vals. We recommend always refilling with oil of the same specification since this
will maintain the properties of the oil. In exceptional cases, a maximum of 0.5
l of
specification VW 502 00 (only for petrol engines) or specification VW 505 01 (only
for diesel engines) engine oil can be used to refill once. Other engine oils must
not be used - risk of engine damage! Note
■ Before a long drive we recommend that you purchase and carry with you engine
oil which complies with the specification for your vehicle. ■ We recommend that you use oils from ŠKODA Original Accessories. Ð200
Technical data
Page 205 of 218
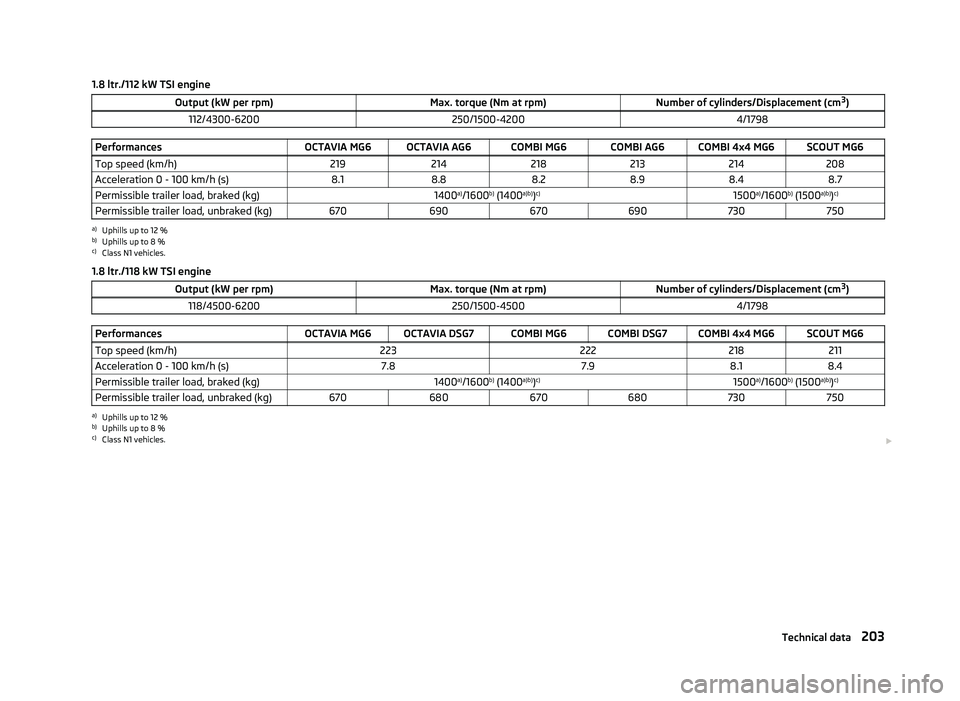
1.8 ltr./112 kW TSI engine
Output (kW per rpm) Max. torque (Nm at rpm)Number of cylinders/Displacement (cm3
)
112/4300-6200 250/1500-4200 4/1798Performances
OCTAVIA MG6 OCTAVIA AG6 COMBI MG6 COMBI AG6 COMBI 4x4 MG6 SCOUT MG6
Top speed (km/h) 219214218213214208
Acceleration 0 - 100 km/h (s) 8.18.8 8.28.9 8.4 8.7
Permissible trailer load, braked (kg) 1400a)
/1600 b)
(1400 a) b)
)c)
1500a)
/1600 b)
(1500a)b)
)c)
Permissible trailer load, unbraked (kg) 670690670690 730750a)
Uphills up to 12 %
b) Uphills up to 8 %
c) Class N1 vehicles.
1.8 ltr./118 kW
TSI engineOutput (kW per rpm) Max. torque (Nm at rpm)Number of cylinders/Displacement (cm3
)
118/4500-6200 250/1500-4500 4/1798Performances
OCTAVIA MG6 OCTAVIA DSG7 COMBI MG6 COMBI DSG7 COMBI 4x4 MG6 SCOUT MG6
Top speed (km/h) 223222218211
Acceleration 0 - 100 km/h (s) 7.87.98.18.4
Permissible trailer load, braked (kg) 1400a)
/1600 b)
(1400 a)
b)
)c)
1500a)
/1600 b)
(1500 a) b)
)c)
Permissible trailer load, unbraked (kg) 670680 670680 730750a)
Uphills up to 12 %
b) Uphills up to 8 %
c) Class N1 vehicles. £ 203
Technical data