stop start SKODA OCTAVIA 2006 Owner´s Manual
[x] Cancel search | Manufacturer: SKODA, Model Year: 2006, Model line: OCTAVIA, Model: SKODA OCTAVIA 2006Pages: 218, PDF Size: 5.48 MB
Page 5 of 218
Table of Contents
Abbreviations
Using the system
Cockpit 7
Overview 6
Instruments and warning lights 8
Instrument cluster 8
Multifunction display (onboard computer) 12
MAXI DOT (information display) 15
Warning lights 18
Unlocking and locking 26
Vehicle key 26
Child safety lock 27
Central locking system 27
Remote control 30
Anti-theft alarm system 31
Boot lid 33
Electric power windows 34
Electric sliding/tilting roof 37
Lights and visibility 39
Lights 39
Interior light 45
Visibility 47
Windscreen wipers and washers 48
Rear window 51
Seats and Stowage 54
Front seats 54
Seat heaters 57
Head restraints 58
Rear seats 59
Boot 60Variable loading floor in the boot 64
Net partition (Combi) 65
Roof rack system 66
Cup holder 68
Ashtray 68
Cigarette lighter, 12-volt power socket 69
Storage compartments 70
Clothes hooks 77
Parking ticket holder 77
Heating and air conditioning system 79
Heating and air conditioning system 79
Air outlet vents 80
Heating 80
Air conditioning system (manual air conditioning
system) 82
Climatronic (automatic air conditioning
system) 85
Auxiliary heating (auxiliary heating and
ventilation) 87
Starting-off and Driving 91
Starting and stopping the engine 91
Brakes and brake assist systems 93
Shifting (manual gearbox) 97
pedals 97
Parking aid 98
Cruise control system (CCS) 99
START/STOP 100
Automatic gearbox 102
Automatic gearbox 102
Communication 107
Mobile phones and two-way radio systems 107
Operating the phone on the multifunction
steering wheel 108
Symbols in the information display 109
Phone Phonebook 109
Universal telephone preinstallation GSM II 109
Universal telephone preinstallation GSM IIl 112Voice control 116
Multimedia 118
Safety
Passive Safety 121
General information 121
Correct seated position 122
Seat belts 125
Seat belts 125
Airbag system 129
Description of the airbag system 129
Front airbags 130
Side airbags 131
Head airbags 132
Deactivating airbags 133
Transporting children safely 135
Child seat 135
Driving Tips
Driving and the Environment 139
The first 1 500 km 139
Catalytic converter 139
Economical and environmentally friendly
driving 140
Environmental compatibility 142
Driving abroad 143
Avoiding damage to your vehicle 143
Driving through water on the street 144
Towing a trailer 145
Towing a trailer 145
General Maintenance
Taking care of and cleaning the vehicle 148
Taking care of your vehicle 148
3
Table of Contents
Page 16 of 218
The display appears in litres/hour if the vehicle is stationary or driving at a low
speed
1)
.
Average fuel consumption
The average fuel consumption since the memory was last erased is shown in the
display in litres/100
km2)
» page 12.
If you wish to determine the average fuel consumption over a certain period of
time, you must set the memory at the start of the new measurement to zero us-
ing the button B
» Fig. 6 on page 13
. After erasing the memory, no value appears
in the display until you have driven 300 m.
The display is updated regularly while you are driving.
Range
The estimated range in kilometres is shown on the display. It indicates the dis-
tance you can still drive with your vehicle based on the level of fuel in the tank
and the same style of driving.
The display is shown in steps of 10 km. After lighting up of the warning light for
the fuel reserve the display is shown in steps of 5 km.
The fuel consumption over the last 50 km is used to calculate the range. The
range will increase if you drive in a more economical manner.
If the memory is set to zero (after disconnecting the battery), the fuel consump-
tion of 10 ltr./100 km is calculated for the range; afterwards the value is adapted
accordingly to the style of driving.
Distance travelled
The distance driven since the memory was last erased appears in the dis-
play » page 12.
If you wish to measure the distance travelled from a particular point in time, you
need to set the memory to zero at this point in time by pressing the button B
» Fig. 6 on page 13 or D
.
The maximum distance indicated in both memories is 1
999 km or 9 999 km on
vehicles with an information display. The indicator is set back to zero if this period
is exceeded. Average speed
The average speed since the memory was last erased is shown in the display in
km/hour
» page 12 . If you wish to determine the average speed over a certain pe-
riod of time, you need to set the memory to zero at the start of the measurement
using the button B
» Fig. 6 on page 13 or D
.
After erasing the memory, no value appears in the display until you have driven
approx. 300 m.
The display is updated regularly while you are driving.
Current speed
The current speed which is identical to the display of the speedometer 2
»
Fig. 2
on page 8 is indicated on the display.
Oil temperature
If the oil temperature is lower than 50 °C or if a fault in the system for checking
the oil temperature is present, - -.- is displayed instead of the oil temperature. Ð Warning against excessive speeds
First read and observe the introductory information and safety warn-
ings on page 12.
Adjust the speed limit while the vehicle is stationary
›
With the button A
» Fig. 6
on page
13 or, if applicable, the adjustment wheel D
, select the menu item
Warning against excessive speeds .
› Press the button B
or D
to activate the ability to set the speed limit (value
flashes).
› Set the desired speed limit, e.g. 50 km/h, with the button A
or, if applicable,
the adjustment wheel D
.
› Press the button B
or D
to confirm the set speed limit, or wait approx. 5 sec-
onds and the setting is saved automatically (the value stops flashing).
This allows you to set the speed in 5 km/h intervals.
Adjusting the speed limit while the vehicle is moving
› With the button A
» Fig. 6
on page
13 or, if applicable, the adjustment wheel D
, select the menu item
Warning against excessive speeds .
› Drive at the desired speed, e.g. 50 km/h.
£
ä
1)
On some models in certain countries, the display appears in --,- kilometres/litres if the vehicle is sta-
tionary.
2) On some models in certain countries, the display appears in kilometres/litre.
14 Using the system
Page 23 of 218
WARNING
If you have to stop for technical reasons, then park the vehicle at a safe dis-
tance from the traffic, switch off the engine and activate the hazard warning
light system » page 44. ÐBoot lid
The warning light comes on when the ignition is switched on if the luggage
compartment door is open. If the boot lid opens while driving , the warning
light lights up and an audible signal sounds.
The warning light comes on even when the ignition is switched off. The warning
light lights up for a maximum of 5 minutes. ÐEngine oil
The warning light lights up red (low oil pressure)
The following is displayed in the information display:
Oil Pressure: Engine off! Owner's manual!
Stop the vehicle, switch off the engine, and check the level of the engine
oil » page 161 , Checking the engine oil level .
Even if the oil level is correct, do not drive any further if the warning light is
flashing . Also do not leave the engine running at an idling speed.
Seek help from a ŠKODA
specialist garage.
The warning light lights up yellow (oil quantity too low)
The following is displayed in the information display:
Check oil level!
Stop the vehicle, switch off the engine, and check the level of the engine
oil » page 161 .
The warning light will go out if the bonnet is left open for more than 30 seconds.
If no engine oil has been replenished, the warning light will come on again after
driving about 100 km.
The warning light flashes yellow (engine oil level sensor faulty)
The following is displayed in the information display:
Oil sensor: Workshop! If the engine oil level sensor is faulty, the warning light flashes
several times
and an audible signal sounds when the ignition is turned on.
Seek help from a
ŠKODA specialist garage. WARNING
If you have to stop for technical reasons, then park the vehicle at a safe dis-
tance from the traffic, switch off the engine and activate the hazard warning
light system » page 44. Ð Electromechanical power steering
If the warning light lights up, this indicates a partial failure of the power steer-
ing and the steering forces can be greater. Seek help from a
ŠKODA specialist ga-
rage.
If the warning light lights up, this indicates a complete failure of the power
steering and the steering assist has failed (significantly higher steering forces).
Seek help from a ŠKODA specialist garage.
Further information » page 92. WARNING
If you have to stop for technical reasons, then park the vehicle at a safe dis-
tance from the traffic, switch off the engine and activate the hazard warning
light system » page 44. Note
If the vehicle battery has been disconnected and reconnected, the yellow warning
light comes on after switching on the ignition. The warning light should go out
after driving a short distance. If the yellow warning light does not go out after
starting the engine again and a short drive, it is necessary to visit a
ŠKODA spe-
cialist garage. Ð Traction control system (TCS)
The warning light flashes to show that the ASR is currently operating. £
21
Instruments and warning lights
Page 24 of 218
If the warning light
comes on immediately after starting the engine, the ASR
can be switched off for technical reasons. Switch the ignition off and on again. If
the warning light does not light up after you switch the engine back on, the ASR
is fully functional again.
If the warning light lights up, there is a fault in the ASR.
The following is displayed in the information display: Error: traction control (ASR)
Seek help from a
ŠKODA specialist garage.
Further information » page 96, Traction control system (TCS) .Note
If the vehicle's battery has been disconnected and reconnected, the warning light comes on after switching on the ignition. The warning light should go out after
driving a short distance. ÐElectronic Stability Control (ESC)
The warning light flashes to show that the ESC is currently operating.
If the warning light comes on immediately after you start the engine, the ESC
might be switched off due to technical reasons. Switch the ignition off and on
again. If the warning light does not light up after you switch the engine back on,
the ESR is fully functional again.
If the warning light lights up, there is a fault in the ESC.
The following is displayed in the information display: Error: Electronic Stability Control (ESC)
Seek help from a ŠKODA specialist garage.
Further information » page 95, Stabilisation Control (ESC) .Note
If the vehicle's battery has been disconnected and reconnected, the warning light comes on after switching on the ignition. The warning light must go out after
driving a short distance. Ð Antilock brake system (ABS)
If the warning light lights up, there is a fault in the ABS.
The following is displayed in the information display: Error: ABS
The vehicle will only be braked by the normal brake system without the ABS.
Seek help from a
ŠKODA specialist garage.
Further information » page 96, Antilock brake system (ABS) . WARNING
■ If you have to stop for technical reasons, then park the vehicle at a safe dis-
tance from the traffic, switch off the engine and activate the hazard warning
light system » page 44.
■ If the warning light is displayed simultaneously with warning light ,
do not continue your journey!
Seek help from a ŠKODA specialist garage.
■ A fault to the ABS system or the braking system can increase the vehicle's
braking distance - risk of accident! Ð The rear fog light
The warning light comes on when the rear fog lights are operating » page 43.Ð Bulb failure
The warning light comes on if a bulb is faulty:
› within 2 seconds of the ignition being switched on;
› when switching on the defective light bulb.
The following is displayed in the information display: Check front-right dipped beam! Ð Exhaust inspection system
If the warning light lights up, there is a fault in the exhaust inspection system.
The engine control unit allows the vehicle to run in emergency mode. £
22 Using the system
Page 28 of 218
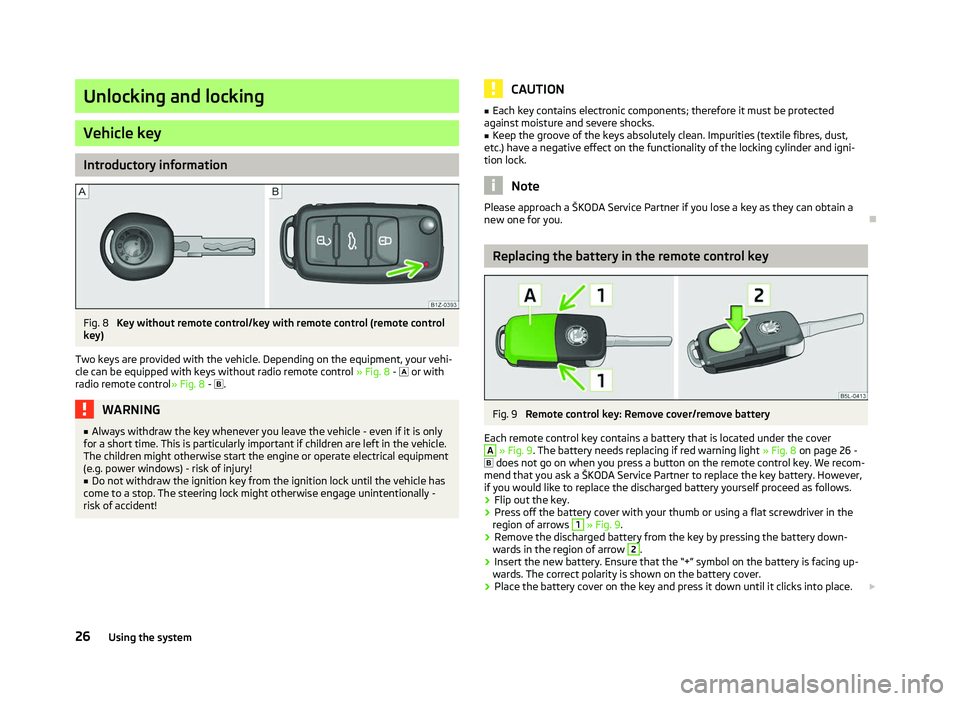
Unlocking and locking
Vehicle key
Introductory information
Fig. 8
Key without remote control/key with remote control (remote control
key)
Two keys are provided with the vehicle. Depending on the equipment, your vehi-
cle can be equipped with keys without radio remote control » Fig. 8 - or with
radio remote control»
Fig. 8 - . WARNING
■ Always withdraw the key whenever you leave the vehicle - even if it is only
for a short time. This is particularly important if children are left in the vehicle.
The children might otherwise start the engine or operate electrical equipment
(e.g. power windows) - risk of injury!
■ Do not withdraw the ignition key from the ignition lock until the vehicle has
come to a stop. The steering lock might otherwise engage unintentionally -
risk of accident! CAUTION
■ Each key contains electronic components; therefore it must be protected
against moisture and severe shocks.
■ Keep the groove of the keys absolutely clean. Impurities (textile fibres, dust,
etc.) have a negative effect on the functionality of the locking cylinder and igni-
tion lock. Note
Please approach a ŠKODA Service Partner if you lose a key as they can obtain a
new one for you. Ð Replacing the battery in the remote control key
Fig. 9
Remote control key: Remove cover/remove battery
Each remote control key contains a battery that is located under the cover A
» Fig. 9. The battery needs replacing if red warning light
» Fig. 8 on page 26 -
does not go on when you press a button on the remote control key. We recom-
mend that you ask a ŠKODA
Service Partner to replace the key battery. However,
if you would like to replace the discharged battery yourself proceed as follows.
› Flip out the key.
› Press off the battery cover with your thumb or using a flat screwdriver in the
region of arrows 1
» Fig. 9.
› Remove the discharged battery from the key by pressing the battery down-
wards in the region of arrow 2
.
› Insert the new battery. Ensure that the “+” symbol on the battery is facing up-
wards. The correct polarity is shown on the battery cover.
› Place the battery cover on the key and press it down until it clicks into place.
£
26 Using the system
Page 35 of 218

Boot lid
ä
Introduction
This chapter contains information on the following subjects:
Open/close 33
Automatic locking 33
Emergency unlocking 34
WARNING
■ Ensure that the lock is properly engaged after closing the boot lid. Other-
wise, the boot lid might open suddenly when driving even if the boot lid lock
was closed - risk of accident!
■ Never drive with the boot lid fully opened or slightly ajar otherwise exhaust
gases may get into the interior of the vehicle - risk of poisoning!
■ Do not press on the rear window when closing the boot lid, it could crack -
risk of injury! Note
■ After closing the boot lid, it is automatically locked within 1 second and the
anti-theft alarm system is activated. This applies only if the vehicle was locked
before closing the boot lid. ■ The function of the handle above the licence plate is deactivated when starting
off or at a speed of 5
km/hour or more for vehicles with central locking. The func-
tion of the handle is activated again when the vehicle has stopped and a door is
opened. Ð Open/close
Fig. 16
Handle of boot lid
First read and observe the introductory information and safety warn-
ings on page 33.
After unlocking the vehicle, you can open the lid by pushing the handle located
above the licence plate.
Opening
›
Push the handle and lift the boot lid in the direction of the arrow
» Fig. 16.
Closing
› Pull down the boot lid and close it with a slight swing.
A handle which makes the closing easier is located on the inner panelling of the
boot lid. Ð Automatic locking
First read and observe the introductory information and safety warn-
ings on page 33.
If the vehicle was locked with the button
on the remote control key before the
boot lid was closed, the lid is automatically locked as soon as it is closed.
The delayed automatic locking function of the boot lid can be activated on your
vehicle. The following applies following activation of this function: If the boot lid
was locked with the button on the remote control key 2
» page 30, then it is
possible to open the lid within a limited period of it being closed.
If you wish, a
ŠKODA Service Partner can activate or deactivate the delayed auto-
matic locking of the boot lid. The Service Partner will also provide any further in-
formation that is required. £
ä
ä
33
Unlocking and locking
Page 51 of 218
CAUTION
■ In cold temperatures and during the winter, check before the journey or before
switching on the ignition that the wiper blades are not frozen to the windscreen.
If the windscreen wipers are switched on when the blades are frozen to the
windscreen, this may damage both the blades and windscreen wiper motor!
■ If the ignition is switched off while the windscreen wipers are switched on, the
windscreen wipers will continue wiping in the same mode after the ignition is
turned back on. The windscreen wipers could freeze up in cold temperatures be-
tween the time the ignition was turned off and when it was turned back on again.
■ Carefully detach frozen wiper blades from the front or rear window.
■ Remove snow and ice from the windscreen wipers before driving.
■ If the windscreen wipers are handled carelessly, there is a risk of damage to the
windscreen.
■ Replace the windscreen wiper blades once or twice a year for safety reasons.
These can be purchased from a ŠKODA Service Partner.
■ The ignition must not be switched on if the front windscreen wiper arms are fol-
ded out. The wiper blades would move back into their rest position and while do-
ing so damage the paintwork of the bonnet. Note
■ If the slower 2
» Fig. 35 on page 49 or the faster 3
wiper setting is switched
on and the vehicle speed decreases to below 4 km/h, the lower wiper step is
switched on automatically. At a speed increase of more than 8 km/h the previous
wiper setting is established again.
■ If there is an obstacle on the windscreen, the wiper will try to push away the
obstacle. If the obstacle continues to block the wiper, the wiper stops automati-
cally after 5 attempts to eliminate the obstacle, in order to avoid a damage to the
wiper. Remove the the obstacle and switch the wiper on again. ■ The windscreen washer nozzles for the windscreen are heated when the en-
gine is running and the outside temperature is less than approx. +10
°C.
■ The content of the windscreen washer fluid reservoir is 3 litres. On vehicles fit-
ted with the headlight cleaning system, the volume is 5.5
litres. On vehicles fitted
with auxiliary heating, the content of the windscreen wiper reservoir is 4.5 litres.
■ The wiper blades should be cleaned on a regular basis with a windscreen clean-
er to avoid any smears. The wiper blades should be cleaned with a sponge or
cloth if they are heavily soiled by insect residues, for example. Ð Activating the windscreen wipers and washers
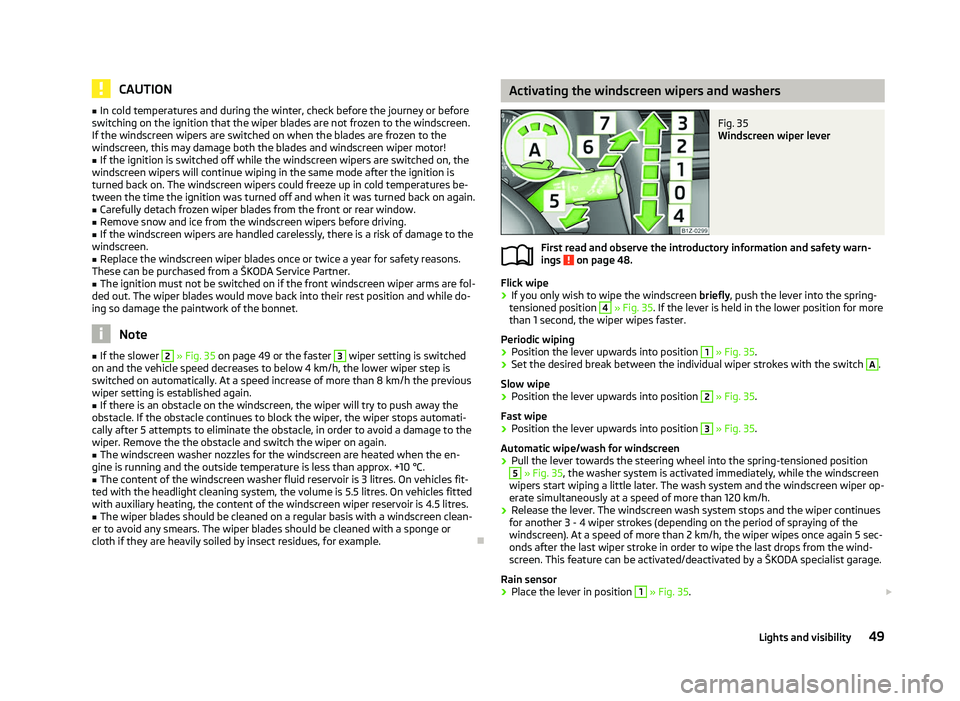
Fig. 35
Windscreen wiper lever
First read and observe the introductory information and safety warn-
ings on page 48.
Flick wipe
›
If you only wish to wipe the windscreen
briefly, push the lever into the spring-
tensioned position 4
» Fig. 35. If the lever is held in the lower position for more
than 1 second, the wiper wipes faster.
Periodic wiping
› Position the lever upwards into position 1
» Fig. 35.
› Set the desired break between the individual wiper strokes with the switch A
.
Slow wipe
› Position the lever upwards into position 2
» Fig. 35.
Fast wipe
› Position the lever upwards into position 3
» Fig. 35.
Automatic wipe/wash for windscreen
› Pull the lever towards the steering wheel into the spring-tensioned position 5
» Fig. 35, the washer system is activated immediately, while the windscreen
wipers start wiping a little later. The wash system and the windscreen wiper op-
erate simultaneously at a speed of more than 120
km/h.
› Release the lever. The windscreen wash system stops and the wiper continues
for another 3 - 4 wiper strokes (depending on the period of spraying of the
windscreen). At a speed of more than 2 km/h, the wiper wipes once again 5 sec-
onds after the last wiper stroke in order to wipe the last drops from the wind-
screen. This feature can be activated/deactivated by a
ŠKODA specialist garage.
Rain sensor
› Place the lever in position 1
» Fig. 35.
£
ä
49
Lights and visibility
Page 52 of 218
›
The sensitivity of the sensor can be set individually with the switch A
.
Wiping the rear window pane
› Push the lever away from the steering wheel into position 6
» Fig. 35 and the
windscreen wiper will operate every 6
seconds.
Automatic wipe/wash for the rear window
› Press the lever completely away from the steering wheel into the spring-ten-
sioned position 7
» Fig. 35, the washer system is activated immediately, while
the windscreen wiper starts wiping a little later. The wiper and washer system
will operate as long as the lever is held in this position.
› Release the lever. The washer system stops and the wiper continues for anoth-
er 2 to 3
wiper strokes (depending on the duration of the spraying process). The
lever will stay in position after releasing it 6
.
Switching windscreen wipers off
› Move the lever back into the home position 0
» Fig. 35.
Winter position
If the windscreen wipers are in rest position, they cannot be folded out from the
windscreen. For this reason we recommend adjusting the windscreen wipers in
winter so that they can be folded out from the windscreen easily.
This rest position is set as follows:
› Switch on the windscreen wipers.
› Switch off the ignition. The windscreen wipers remain in the position in which
they were when switching off the ignition.
The service position can also be used as a winter position » page 51.ÐAutomatic rear window wiper (Combi)
First read and observe the introductory information and safety warn-
ings on page 48.
If the windscreen wiper is in position 2
» Fig. 35 on page 49 or 3
the rear win-
dow is wiped every 30 or 10 seconds if the vehicle's speed exceeds 5
km/h.
When the rain sensor is active (the lever is in the position 1
) the function is only
active if the windscreen wipers operate in continuous mode (no break between
each wiping process). ä Activation/deactivation
The function of the automatic rear window wiper is activated/deactivated in the
information display in the menu:
■ Settings
■ Lights & Vision
■ Rear wiper Ð Headlight cleaning system
First read and observe the introductory information and safety warn-
ings on page 48.
The headlights are being cleaned after the windscreen has been sprayed for the
first time and fifth time, the low beam or main beam are switched on and the
windscreen wiper lever was held in the position 5
» Fig. 35 on page 49 for about
1 second.
The headlight washer nozzles are moved forward out of the bumper by the water
pressure for cleaning the headlights.
You should remove stubborn dirt (such as insect residues) from the headlight len-
ses at regular intervals, for example when refuelling. The following guidelines
must be observed » page 151, Headlight lenses.
To ensure the proper operation of the cleaning system during the winter, any
snow should be removed from the washer nozzle fixtures and ice should be
cleared with a de-icing spray. CAUTION
Never remove the nozzles from the headlight cleaning system by hand - risk of
damage! Ð
ä
50 Using the system
Page 86 of 218
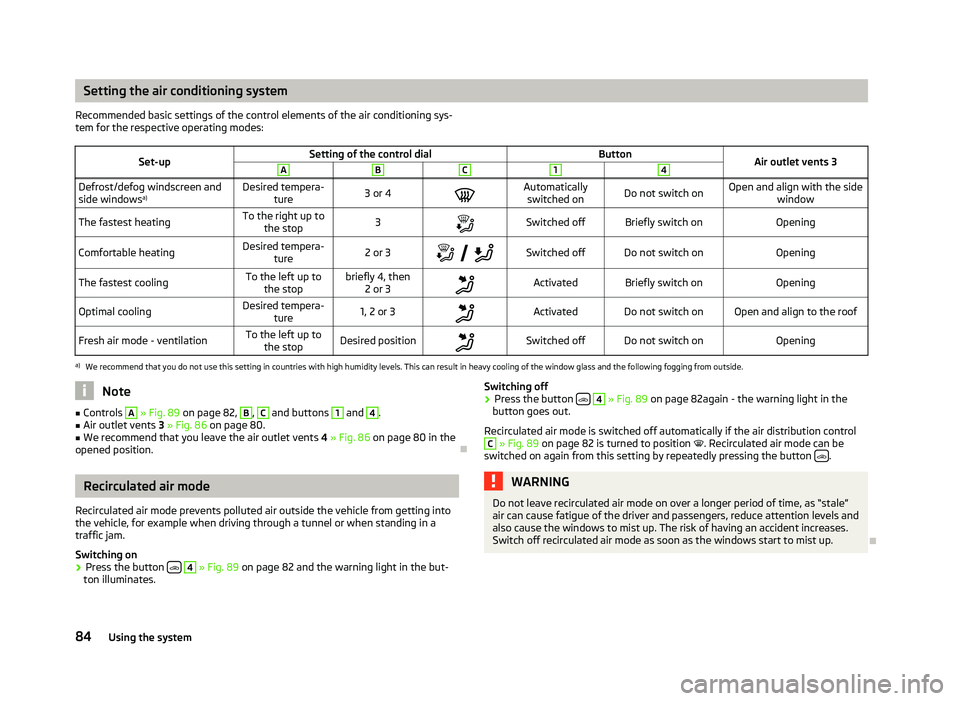
Setting the air conditioning system
Recommended basic settings of the control elements of the air conditioning sys-
tem for the respective operating modes:
Set-up Setting of the control dial
Button
Air outlet vents 3 A B C 1 4
Defrost/defog windscreen and
side windows
a) Desired tempera-
ture 3 or 4
Automatically
switched on Do not switch on Open and align with the side
window
The fastest heating To the right up to
the stop 3
Switched off Briefly switch on
Opening
Comfortable heating Desired tempera-
ture 2 or 3
Switched off Do not switch on
Opening
The fastest cooling To the left up to
the stop briefly 4, then
2 or 3 Activated Briefly switch on
Opening
Optimal cooling Desired tempera-
ture 1, 2 or 3
Activated Do not switch on Open and align to the roof
Fresh air mode - ventilation To the left up to
the stop Desired position
Switched off Do not switch on
Openinga)
We recommend that you do not use this setting in countries with high humidity levels. This can result in heavy cooling of the window glass and the following fogging from outside. Note
■ Controls A
» Fig. 89
on page 82, B
, C
and buttons 1
and 4
.
■ Air outlet vents 3 » Fig. 86 on page 80.
■ We recommend that you leave the air outlet vents 4 » Fig. 86 on page 80 in the
opened position. ÐRecirculated air mode
Recirculated air mode prevents polluted air outside the vehicle from getting into
the vehicle, for example when driving through a tunnel or when standing in a
traffic jam.
Switching on
› Press the button
4
» Fig. 89
on page 82 and the warning light in the but-
ton illuminates. Switching off
› Press the button
4
» Fig. 89
on page 82again - the warning light in the
button goes out.
Recirculated air mode is switched off automatically if the air distribution control C
» Fig. 89
on page 82 is turned to position . Recirculated air mode can be
switched on again from this setting by repeatedly pressing the button .
WARNING
Do not leave recirculated air mode on over a longer period of time, as “stale”
air can cause fatigue of the driver and passengers, reduce attention levels and
also cause the windows to mist up. The risk of having an accident increases.
Switch off recirculated air mode as soon as the windows start to mist up. Ð
84 Using the system
Page 93 of 218
Starting-off and Driving
Starting and stopping the engine
ä
Introduction
This chapter contains information on the following subjects:
Adjusting the steering wheel position 92
Electromechanical power steering 92
Electronic immobiliser 92
Ignition lock 93
Starting engine 93
Switching the engine off 93
WARNING
■ Never adjust the steering wheel when the vehicle is moving only when the
vehicle is stationary!
■ Maintain a distance of 25 cm 1
to the steering wheel
» Fig. 93 on page 92
- . Not maintaining this minimum distance will mean that the airbag system
will not be able to properly protect you - hazard!
■ The lever for adjusting the steering wheel must be locked whilst driving so
that the position of the steering wheel cannot accidently change during the
journey - risk of accident!
■ If the steering wheel is adjusted further towards the head, the protection
provided by the driver airbag in the event of an accident is reduced. Check
that the steering wheel is aligned to the chest. ■ When driving, hold the steering wheel with both hands firmly on the outer
edge in the 9 o'clock and 3 o'clock position. Never hold the steering wheel in
the 12 o'clock position or in any other way (e.g. in the middle or inner edge of
the steering wheel). In such cases, you could injure the arms, hands and head
when the driver airbag is deployed.
■ When driving, the ignition key must always be in the position 2
» Fig. 94 on
page 93 (ignition switched on) without the engine running. This position is
indicated by the warning lights coming on. If this is not the case, it could result
in unexpected locking of the steering wheel - risk of accident! WARNING (Continued)
■ Only pull the ignition key from the ignition lock when the vehicle has come
to a complete stop (by applying the handbrake). Otherwise the steering wheel
could block - risk of accident!
■ When leaving the vehicle, the ignition must always be removed. This is par-
ticularly important if children are left in the vehicle. Otherwise the children
could, for example, start the engine - risk of accident or injury!
■ Never leave the engine running in unventilated or closed rooms. The ex-
haust gases of the engine contain besides the odorless and colourless carbon
monoxide a poisonous gas - hazard! Carbon monoxide can cause unconscious-
ness and death. ■ Never leave the vehicle unattended with the engine running.
■ Never switch off the engine before the vehicle is stationary - risk of acci-
dent! CAUTION
■ The starter may only be operated (ignition key position 3
» Fig. 94 on
page 93), if the engine is not running. The starter or engine can be damaged if
the starter is activated when the engine is running. ■ Let go of the ignition key as soon as the engine starts otherwise the starter
could be damaged. ■ Avoid high engine revolutions, full throttle and high engine loads as long as the
engine has not yet reached its operating temperature - risk of damaging the en-
gine!
■ Do not tow start the engine - danger of damaging the engine! On vehicles with
a catalytic converter, unburnt fuel may get into the catalytic converter where it
may ignite. This in turn may damage the catalytic converter. The battery from an-
other vehicle can be used as a jump-start aid » page 185, Jump-starting.
■ Do not switch the engine off immediately at the end of your journey after the
engine has been operated over a prolonged period at high loads but leave it to
run at an idling speed for about 1
minute. This prevents any possible accumulation
of heat when the engine is switched off. For the sake of the environment
Do not warm up the engine while the vehicle is stationary. If possible, start your
journey as soon as the engine has started. Through this the engine reaches its
operating temperature more rapidly and the pollutant emissions are lower. £
91
Starting-off and Driving