buttons SKODA OCTAVIA 2008 2.G / (1Z) User Guide
[x] Cancel search | Manufacturer: SKODA, Model Year: 2008, Model line: OCTAVIA, Model: SKODA OCTAVIA 2008 2.G / (1Z)Pages: 304, PDF Size: 17.69 MB
Page 117 of 304
Heating and air conditioning system
116
WARNING
•For your own safety and that of other road users, ensure that all the
windows are free of ice, snow and mistin g. Please familiarize yourself about
how to correctly operate th e heating and ventilation systems, how to demist
and defrost the windows, as well as with the cooling mode.
•You should not leave recirculated air mode on over a longer period of
time, as “stale” air may result in fatigue in the driver and occupants, divert
your attention and also cause the windows to mist up. The risk of having an
accident increases. Switch recirculated air mode off as soon as the windows
begin misting up.
Note
•If the cooling system has not been switched on for a lengthy period, odours may
be produced at the evaporator because of deposits. Switch the cooling system on
at least once a month for approximately 5 mi nutes at the highest blower stage - also
during the cold season of the year - in order to remove such odours. Also open a
window for a short time.
•We recommend that you do not smoke in the vehicle when the recirculating air
mode is operating since the smoke which is drawn at the evaporator from the inte-
rior of the vehicle forms deposits in the evaporator of the air conditioning system.
This produces a permanent odour when the air conditioning system is operating
which can only be eliminated through co nsiderable effort and expense (replace-
ment of compressor).
•The used air streams out through the air removal openings in the luggage
compartment.
•On vehicles equipped with a factory-fitted radio* or navigation*, the informa-
tion of the Climatronic is also shown on the display. You can switch off this function
for the Radio* - see operating instructions for radio. This function cannot be
switched off during Navigation*.
•Using the cooling economically ⇒page 114.
•Operational problems ⇒page 115.
Overview of the control elements
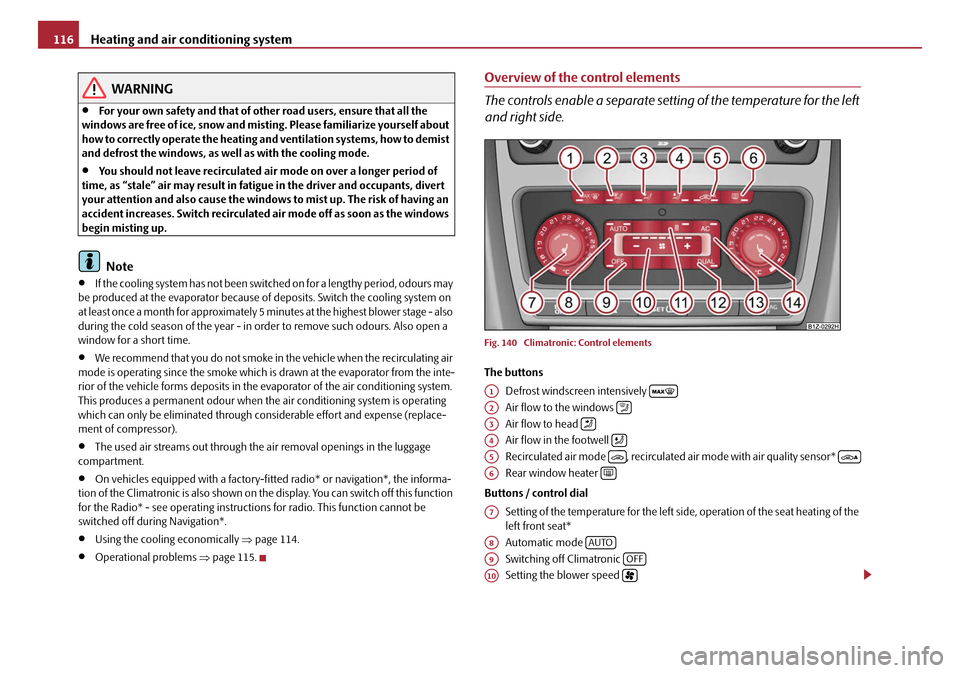
The controls enable a separate setting of the temperature for the left
and right side.
Fig. 140 Climatronic: Control elements
The buttons
Defrost windscreen intensively
Air flow to the windows
Air flow to head
Air flow in the footwell
Recirculated air mode , recirculated air mode with air quality sensor*
Rear window heater
Buttons / control dial Setting of the temperature for the left side, operation of the seat heating of the
left front seat*
Automatic mode
Switching off Climatronic
Setting the blower speed
A1
A2
A3
A4
A5
A6
A7
A8AUTO
A9OFF
A10
20A5Facelift.book Page 116 Saturday, September 6, 2008 2:13 PM
Page 118 of 304
Heating and air conditioning system117
Using the systemSafetyDriving TipsGeneral MaintenanceBreakdown assistanceTechnical Data
Button for direct switching on/off of au
xiliary heating (auxiliary heating)*
⇒ page 119
Switching on/off of the temperature setting in dual mode
Switching cooling on and off
Setting of the temperature for the right side, operation of the seat heating of
the right front seat*
Note
Below the top row of buttons is located the interior temperature sensor. Do not
glue or cover over the sensor, otherwise it could have an unfavourable effect on the
Climatronic.
Automatic mode
The automatic mode is used in order to maintain a constant temper-
ature and to demist the windows in the interior of the car.
Switching automatic mode on
– Set a temperature between +18 °C and +26 °C.
– Move the air outlet vents 3 and 4 ⇒ page 108, fig. 136 so that the air
flow is directed slightly upwards.
– Press the button . In the right or left top corner a warning light lights up, depending on which unit was last selected.
If the warning light in the top right corner of the button lights up, the
Climatronic operates in “HIGH” mode. The “HIGH” mode is the standard setting of
the Climatronic.
When pressing again the button , the Climatronic changes into the “LOW”
mode and the warning light in the top left corner lights up. The Climatronic uses
only in this mode the lower blower speed. However taking into account the noise
level, this is more comfortable, yet be aw are that the effectiveness of the air condi-
tioning system is reduced particularly if the vehicle is fully occupied.
By pressing again the button , yo u change into the “HIGH” mode. The automatic mode is switched off by pr
essing the button for the air distribution
or increasing or decreasing the blower speed. The temperature is nevertheless
regulated.
switching cooling on and off
switching cooling on and off
– Press the button ⇒ page 116, fig. 140. The warning light lights up
in the button.
– When you again press the switch , the cooling system is switched off. The warning light in the button goes out. Only the function of the
ventilation remains active when no lower temperature than the
outside temperature can be reached.
Setting temperature
You can separate the interior temperature for the left and right side sepa-
rately.
– You can set the temperature for both sides after switching on the igni- tion with the control dial .
– If you wish to set the temperature for the right side, turn the control dial . The warning light in the bu tton lights up, this indicates
that differing temperatures for the left and right side can be set.
If the warning light in the button lights up, the temperature for both sides
cannot be set with the control dial . You can reinitiate this function by pressing
the button . The warning light in the button which indicates the possibility to
set differing temperatures for the left and right side, goes out.
You can set the interior temperature be tween +18°C and +26°C. The interior
temperature is regulated automatically within this range. If you chose a tempera-
ture lower than +18°C, a blue symbol lights up at the start of the numerical scale. If
you chose a temperature higher than +26°C, a red symbol lights up at the end of
A11
A12DUAL
A13AC
A14
AUTO
AUTO
AUTO
AUTO
AC
AC
A7
A14DUAL
DUALA7DUAL
20A5Facelift.book Page 117 Saturday, September 6, 2008 2:13 PM
Page 142 of 304
Communication141
Using the systemSafetyDriving TipsGeneral MaintenanceBreakdown assistanceTechnical Data
Communication
Multifunction steering wheel*
Operate radio und navigation on the multifunction steering wheel
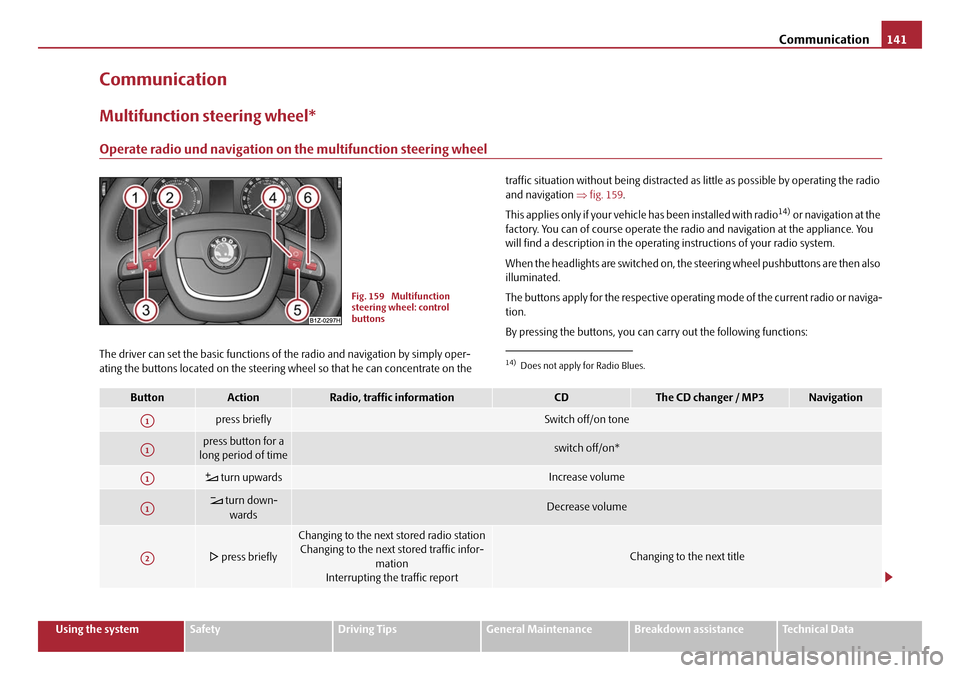
The driver can set the basic functions of the radio and navigation by simply oper-
ating the buttons located on the steering wheel so that he can concentrate on the traffic situation without being distracted as little as possible by operating the radio
and navigation
⇒fig. 159 .
This applies only if your vehicle has been installed with radio
14) or navigation at the
factory. You can of course operate the ra dio and navigation at the appliance. You
will find a description in the operating instructions of your radio system.
When the headlights are switched on, the steering wheel pushbuttons are then also
illuminated.
The buttons apply for the respective operating mode of the current radio or naviga-
tion.
By pressing the buttons, you can carry out the following functions:
Fig. 159 Multifunction
steering wheel: control
buttons
14)Does not apply for Radio Blues.
ButtonActionRadio, traffic informationCDThe CD changer / MP3Navigation
press brieflySwitch off/on tone
press button for a
long period of timeswitch off/on*
turn upwardsIncrease volume
turn down-
wardsDecrease volume
press briefly
Changing to the next stored radio stationChanging to the next stored traffic infor-
mation
Interrupting the traffic report
Changing to the next title
A1
A1
A1
A1
A2
20A5Facelift.book Page 141 Saturday, September 6, 2008 2:13 PM
Page 144 of 304
Communication143
Using the systemSafetyDriving TipsGeneral MaintenanceBreakdown assistanceTechnical Data
Universal telephone preinstallation GSM II*
Introduction
This enables you to make full use of the advantages of a normal carphone (“hands-
free system - Hands Free” using a micropho ne integrated in the vehicle, optimal
transmission of signals using an external aerial
15) etc.). The equipment includes
also the voice control. The telephone is connected by means of the Bluetooth®
technology ⇒page 144, “Bluetooth®”. On vehicles fitted with a telephone
mount*, it is also possible to establish the connection via the interface of the
adapter
16) ⇒ page 145, “Operating telephone calls with the aid of the adapter*.”.
A phone phonebook is part of the mobile ph one preinstallation with voice control.
In the phone phonebook there are 1500 free memory locations available. This
phone phonebook is independent of the appliance used for the mobile phone.
Furthermore the volume can be changed individually during the call at any time
with the button for setting the radio* or on vehicles fitted with multifunction
steering wheel* with function buttons on the steering wheel.
If the system answers with the voice response “ Telephone is not ready”, please
check the operating state of the telephone as follows:
•Is the telephone switched on?
•Is the PIN code entered?
Dialogue
The period, in which the telephone system is ready to receive voice commands and
carry out the voice commands, is called DIALOGUE. The system gives audible feed-
back and guides you if necessary through the relevant functions. You can start or
end the dialogue at any time by pres sing the PTT button on the adapter*
⇒ page 145 or on the multifunction steering wheel* ⇒page 146.
The dialogue is always automatically ended after carrying out an operation, e.g.
after erasing the name from the phonebook. When receiving an incoming call, the dialogue is immediately interrupted and you
can accept the call by pressing the button
on the multifunction steering wheel*
⇒ page 146 or by pressing the button for receiving a call directly on your tele-
phone.
If a voice command is not detected, the system answers with “ Sorry?” and a new
entry can be performed. After the 2nd error the system repeats the aid. After the 3rd
error the answer “ Cancel” is given and the dialogue is ended.
Optimum understanding of the voice commands depends on the following
factors:
•Speak with a normal tone of voice without intonation and excessive voice
pauses.
•Avoid insufficient articulation.
•Close the doors, windows and sliding roof, in order to reduce or stop disturbing
exterior noise.
•It is recommended to speak louder at higher speeds, so that the tone of your
voice is louder than the increased surrounding noise.
•During the dialogue avoid additional noise in the vehicle, e.g. simultaneously
talking occupants.
•Do not speak, if the system makes an announcement.
•The microphone for voice control is direct ed to the driver and front passenger.
Therefore the driver and the front passenger can operate the equipment.
WARNING
Pay attention primarily to the traffic situation! As the driver you are fully
responsible for road safety. Use the tele phone system only to such an extent,
so that you are in full contro l of your vehicle at any time.
Caution
Taking the mobile phone out of the adapter during the call can lead to interruption
of the connection. When taking out the mobile phone, the connection to the
factory-fitted antenna is interrupted, this reduces the quality of the transmitting
and receiving signal. This might result a dditionally in harmful radiation from the
15)Valid for telephone used with adapter* in the telephone mount.16)Not valid for adapter “Bluetooth only” ⇒page 146.
20A5Facelift.book Page 143 Saturday, September 6, 2008 2:13 PM
Page 147 of 304
Communication
146
telephone is connected to the handsfree-system via Bluetooth®, this connection is
interrupted.
Adapter “Bluetooth only”
For the adapters which are marked with the “Bluetooth only” logo, the complete
communication between the telephone and the handsfree-system of your vehicle
is carried out only with the help of the Bluetooth
® technology. If an adapter marked
in such a way is inserted in the telephon e mount, it only serves for recharging the battery of the telephone and for transmit
ting the signal onto the outer vehicle
aerial.
Aside from the button PTT, the button SOS can be found on certain adapters
⇒ page 145, fig. 162 . This button is without function.Note
The adapters illustrated are only prime examples.
Operation of the telephone on the multifunction steering wheel*
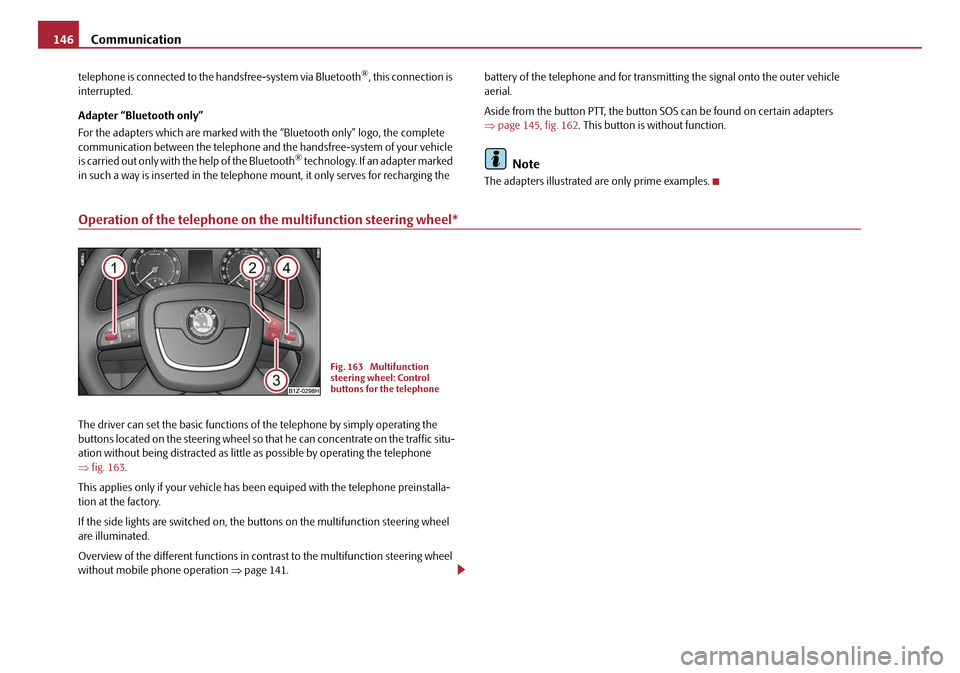
The driver can set the basic functions of the telephone by simply operating the
buttons located on the steering wheel so th at he can concentrate on the traffic situ-
ation without being distracted as little as possible by operating the telephone
⇒ fig. 163 .
This applies only if your vehicle has been equiped with the telephone preinstalla-
tion at the factory.
If the side lights are switched on, the buttons on the multifunction steering wheel
are illuminated.
Overview of the different functions in cont rast to the multifunction steering wheel
without mobile phone operation ⇒page 141.
Fig. 163 Multifunction
steering wheel: Control
buttons for the telephone
20A5Facelift.book Page 146 Saturday, September 6, 2008 2:13 PM
Page 148 of 304

Communication147
Using the systemSafetyDriving TipsGeneral MaintenanceBreakdown assistanceTechnical Data
The buttons operate the functions for
the operating mode of the current
telephone.
Operate telephone in the information display*
If you select the menu point Te l e p h o n e on the information display with the aid of
the handwheel , you can change to the following menus:
�„Phone book
�„Last calls
�„Received calls
�„Missed calls Phone book
In the menu point
Phone book is the list of the loaded contacts from the telephone
memory and the SIM card of the mobile phone. In the phone phonebook there are
1500 free memory locations available.
ButtonActionOperation
press brieflyActivation and deactivation of the voice control (Button PTT - Push to talk)
turn upwardsIncrease volume
turn downwardsDecrease volume
press brieflyAccept call, terminate call, entry in the main me nu of the telephone, list of selected numbers
press button for a long
timeReject call, entry in the main menu of the telephone, list of selected numbers
press brieflyReach one level higher in the menu (according to the current position in the menu)
press button for a long
timeReturn in the main menu of the information display
press brieflyConfirm menu selection
press button for a long period of timeConfirming the selected menu point, the following initial letters in the telephone book
turn upwardsThe last chosen menu selection, name
turn downwardsThe next menu selection, name
A1
A1
A1
A2
A2
A3
A3
A4
A4
A4
A4
A4
20A5Facelift.book Page 147 Saturday, September 6, 2008 2:13 PM
Page 153 of 304
Communication
152
Example for erasing individual names out of the phone phonebook
As long as the phonebook is read out, ot her entries can be erased by pressing the
PTT button.
You can end the dialogue at an y time with the voice command CANCEL.
Listening-in to the phonebook
– Press the PTT button.
– Give the command LISTEN TO/PLAY PHONEBOOK after the signal
tone.
After giving this command th e phone voice phone book is read out by the system.
By pressing the PTT button when announcin g the desired name, the corresponding
telephone number is being dialed; the system answers: “ The number is being
dialed ”.
Universal telephone preinstallation GSM III*
Introduction
This enables you to make full use of the advantages of a normal carphone (“hands-
free system” using a microphone integrated in the vehicle, optimal transmission of
signals using an external aerial etc.). The equipment includes also the voice control.
The telephone is connected using the rSAP profile - Remote SIM access profile
(telecommunication of the SIM data) by means of Bluetooth
® technology, if your
telephone supports this profile. The equi pment includes the following functions:
•Display of the SMS text in the information display.
•Free talking in the vehicle interior.
•MUTE signal to the radio.
•Voice control (with the set-up possibility for “short and long dialogue”,
depending on the user's knowledge of the operating structure).
•Convenience mode with the multifunction steering wheel and the display in the
information display.
•Handsfree-system.
The voice control of the telephone is activated by pressing the button PTT on the
multifunction steering wheel ⇒page 155, fig. 164 .
A phone phonebook is part of the univers al telephone preinstallation GSM III with
voice control. In the phone phonebook there are 1000 free memory locations avail-
able. This phone phonebook is independen t of the appliance used for the mobile
phone.
Furthermore the volume can be changed individually at any time with the button
for setting the radio* or on vehicles fitte d with multifunction steering wheel* with
function buttons on the steering wheel.
Dialogue
The period, in which the telephone system is ready to receive voice commands and
carry out the voice commands, is called DIALOGUE. The system gives audible feed-
back and guides you if necessary through the relevant functions. You can start or
end the dialogue at any time by pressing the PTT button.
Voice commandAnnouncement
DELETE PHONEBOOK“ Do you want to delete the whole
phonebook? ”
If no entry is put in, the following a nnouncement is made after about 5 seconds.
“Possible commands are: yes, no,
repeat ”.
NOThe phonebook is read out.
When announcing the entry to be
erased, press the PTT button.“Do you want to delete (name)? ”
If no entry is put in, the following a nnouncement is made after about 5 seconds.
“Possible commands are: yes, no ”.
YES“The name is deleted ”.
Continue reading out the phone book.
20A5Facelift.book Page 152 Saturday, September 6, 2008 2:13 PM
Page 156 of 304
Communication155
Using the systemSafetyDriving TipsGeneral MaintenanceBreakdown assistanceTechnical Data
Operation of the telephone on the multifunction steering wheel*
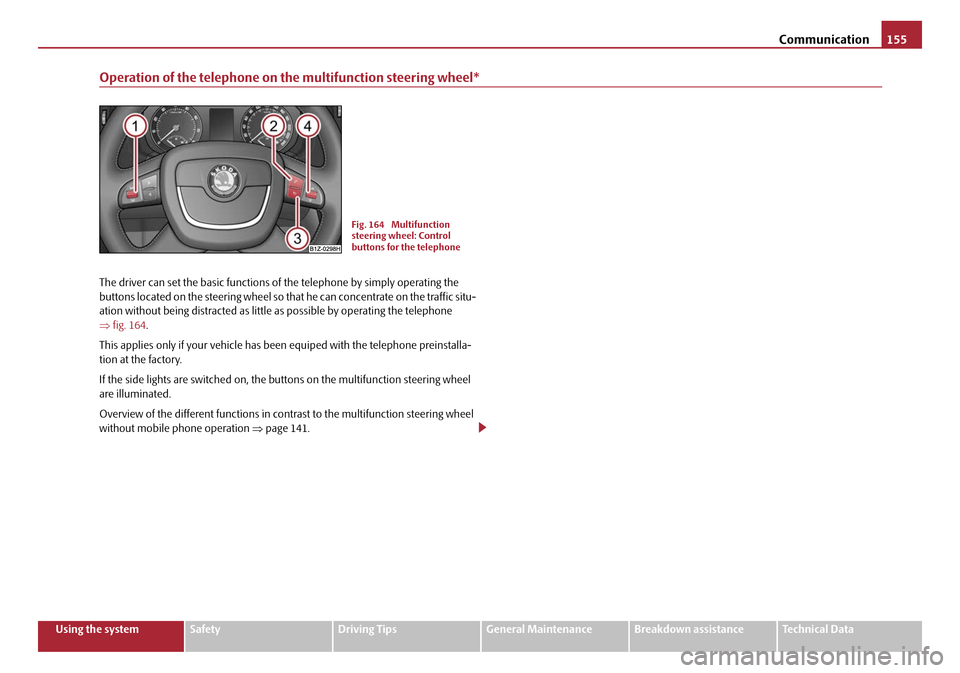
The driver can set the basic functions of the telephone by simply operating the
buttons located on the steering wheel so that he can concentrate on the traffic situ-
ation without being distracted as little as possible by operating the telephone
⇒ fig. 164 .
This applies only if your vehicle has b een equiped with the telephone preinstalla-
tion at the factory.
If the side lights are switched on, the buttons on the multifunction steering wheel
are illuminated.
Overview of the different functions in cont rast to the multifunction steering wheel
without mobile phone operation ⇒page 141.
Fig. 164 Multifunction
steering wheel: Control
buttons for the telephone
20A5Facelift.book Page 155 Saturday, September 6, 2008 2:13 PM
Page 157 of 304

Communication
156
The buttons operate the functions for the operating mode of the current
telephone.
ButtonActionOperation
press brieflyActivation and deactivation of the voice control°
(Button PTT - Push to talk)
press button for a long
period of time
turn upwardsIncrease volume
turn downwardsDecrease volume
press brieflyAccept call, terminate call, entry in the main menu of the telephone, list of selected numbers
press button for a long
timeReject call, list of the last calls, entry in the main menu of the telephone, list of selected numbers
press brieflyReach one level higher in the menu (accordi ng to the current position in the menu)
press button for a long
timeReturn in the main menu of the information display
press briefly
Confirm menu selection press button for a long period of time
turn upwardsThe last chosen menu selection, name
turn downwardsThe next menu selection, name
quickly turn upwardsTo the previous initial letter in the telephone book
quickly turn downwardsTo the next initial letter in the telephone book
A1
A1
A1
A1
A2
A2
A3
A3
A4
A4
A4
A4
A4
A4
20A5Facelift.book Page 156 Saturday, September 6, 2008 2:13 PM
Page 163 of 304

Communication
162
Note
The loudspeakers in the vehicle are matched to a power output of 30 W.
CD changer*
The CD changer for the radio and navigation system is located in the right
side compartment of the luggage compartment.
Loading a CD
– Touch the button and guide the CD (compact disc) into the CD-case . The CD is automatically loaded onto the next free position in
the CD-changer. The LED in the corresponding button stops
flashing.
Loading all CDs
– Hold the button pressed and guide all CDs one after the other (maximum 6 CDs) into the CD case . The LEDs in the buttons
are no longer flashing. Loading a CD to one definite position
– Touch button . The LEDs in the buttons light up at the memory
spaces, which are already assigned and flash in the case of free
memory spaces.
– Touch the desired button and guide the CD into the CD-case .
Ejecting a CD
– Touch the button , in order to eject a CD. For assigned memory spaces, now the LEDs light up in the buttons .
– Touch the corresponding button . The CD is ejected.
Ejecting all CDs
– Hold the button pressed for more th an 2 seconds, in order to eject
the CDs. All CDs in the CD-changer are ejected consecutively.
Note•Always guide the CD into the CD-cas e with the printed side pointing
upwards.
•Never push the CD with force into the CD-case as the insertion is performed
automatically.
•After loading a CD into the CD-changer, you must wait until the LED of the
corresponding button lights up. Then th e CD-case is free to load the next
CD.
•If you have selected a position, on which a CD is already located, this CD will be
ejected. Take out the ejected CD and load the desired CD.
Fig. 167 The CD changer
AC
AB
AD
AC
ABAD
ACAD
ADAB
AA
AD
AD
AA
AB
ADAB
20A5Facelift.book Page 162 Saturday, September 6, 2008 2:13 PM