steering SKODA OCTAVIA 2008 2.G / (1Z) Owner's Guide
[x] Cancel search | Manufacturer: SKODA, Model Year: 2008, Model line: OCTAVIA, Model: SKODA OCTAVIA 2008 2.G / (1Z)Pages: 304, PDF Size: 17.69 MB
Page 66 of 304
Lights and Visibility65
Using the systemSafetyDriving TipsGeneral MaintenanceBreakdown assistanceTechnical Data
Note
Switch on the hazard warning light system if, for example:
•you encounter traffic congestion,
•your vehicle breaks down or an emergency situation occurs.
The turn signal and main beam lever
The parking lights and headlight flas her are also switched on and off
using the turn signal and main beam lever.
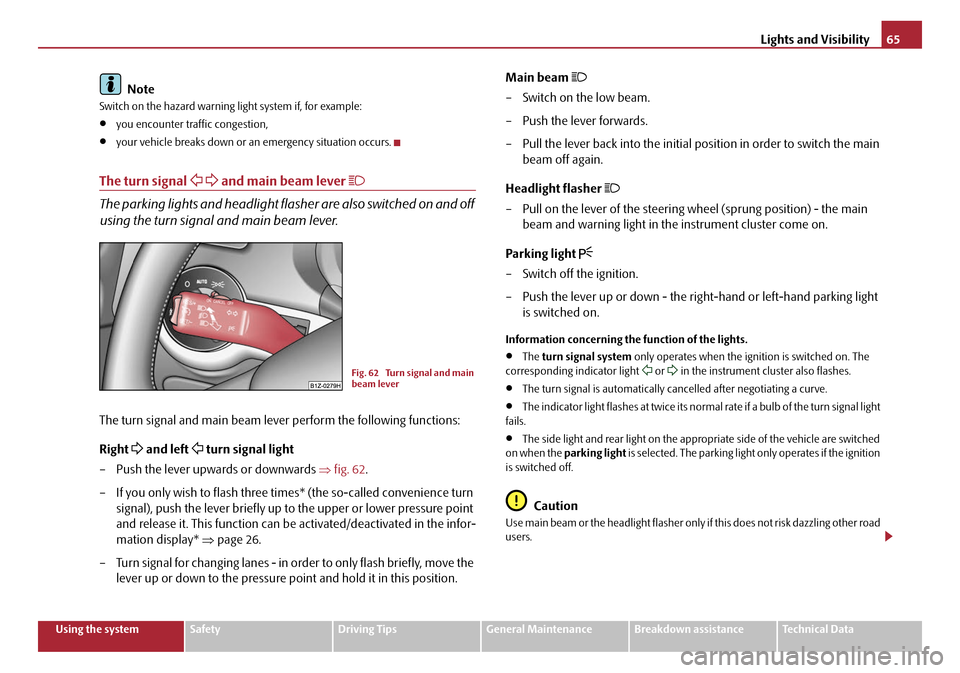
The turn signal and main beam lever perform the following functions:
Right
and left turn signal light
– Push the lever upwards or downwards ⇒fig. 62 .
– If you only wish to flash three times* (the so-called convenience turn signal), push the lever briefly up to the upper or lower pressure point
and release it. This function can be activated/deactivated in the infor-
mation display* ⇒page 26.
– Turn signal for changing lanes - in or der to only flash briefly, move the
lever up or down to the pressure po int and hold it in this position. Main beam
– Switch on the low beam.
– Push the lever forwards.
– Pull the lever back into the initial position in order to switch the main
beam off again.
Headlight flasher
– Pull on the lever of the steering wheel (sprung position) - the main beam and warning light in the instrument cluster come on.
Parking light
– Switch off the ignition.
– Push the lever up or down - the right-hand or left-hand parking light is switched on.
Information concerning the function of the lights.
•The turn signal system only operates when the ignition is switched on. The
corresponding indicator light or in the instrument cluster also flashes.
•The turn signal is automatically cancelled after negotiating a curve.
•The indicator light flashes at twice its normal rate if a bulb of the turn signal light
fails.
•The side light and rear light on the appropriate side of the vehicle are switched
on when the parking light is selected. The parking light only operates if the ignition
is switched off.
Caution
Use main beam or the headlight flasher only if this does not risk dazzling other road
users.
Fig. 62 Turn signal and main
beam lever
20A5Facelift.book Page 65 Saturday, September 6, 2008 2:13 PM
Page 71 of 304
Lights and Visibility
70
Fast wipe
– Position the lever up into position .
Automatic wipe/wash for windscreen
– Pull the lever towards the steering wheel into sprung position , the wash system sprays immediately, the windscreen wiper starts wiping
a little later. The wash system and the windscreen wiper operate
simultaneously at a speed of more than 120 km/h.
– Release the lever. The windscreen wash system stops and the wiper continues for another 3 - 4 wiper stro kes (depending on the period of
spraying of the windscreen). At a speed of more than 2 km/h, the wiper
wipes once again* 5 seconds after the last wiper stroke in order to
wipe the last drops from the windsc reen. This function can be acti-
vated/deactivated by a specialist garage.
Rain sensor*
– Move the lever into position .
– You can set the sensitivity of the sensor individually with switch .
Wiping the rear window pane*
– Push the lever away from the steering wheel into position - the widescreen wiper will operate every 6 seconds.
Automatic wipe/wash for the rear window pane*
– Press the lever from the steering wheel forward into the sprung posi- tion , the wash system sprays immediately, the windscreen wiper
starts wiping a little later. As long as you hold the lever in this position,
the wiper operates as well as the wash system.
– Letting go of the lever will cause the windscreen wash system to stop and the wiper to continue for anot her 2 - 3 wiper strokes (depending
on the period of spraying of the windscreen). The lever will stay in
position after releasing it . Switching windscreen wipers off
– Move the lever back into its home position .
After the windscreen wiper switches off each
time or the ignition switches off for
the third time, the position of the windscreen wiper changes, this counteracts an
early fatigue of the wiper rubbers.
The windscreen wipers and the wash system only operate if the ignition is switched
on and the bonnet is closed
10).
If the intermittent wipe is switched on, the intervals are also controlled depending
on speed.
The rain sensor* automatically regulates the break between the individual wiper
strokes depending on the intensity of the rain.
The rear window will be wiped again if the front window wipers are on when
reverse gear is selected.
The windscreen washer nozzles are heated* when the ignition is switched on.
Top up with wash liquid ⇒page 235.
Winter position
If the windscreen wipers are in rest posi tion, they cannot be folded out from the
windscreen. For this reason we recommend adjusting the windscreen wipers in
winter so that they can be folded out fr om the windscreen easily. You can set this
rest position as follows:
•Switch on the windscreen wipers.
•Switch off the ignition. The windscreen wipers remain in the position in which
they were when switching off the ignition.
You can also use the service position ⇒page 71 as a winter position.
A3
A5
A1
AA
A6
A7
A6
10)On vehicles which do not have a contact swit ch for the bonnet, the windshield wiper and
wash system operates also when the bonnet is opened.
A0
20A5Facelift.book Page 70 Saturday, September 6, 2008 2:13 PM
Page 77 of 304
Seats and Stowage
76
Seats and Stowage
Front seats
Basic information
The front seats have a wide range of different settings and can thus be matched to
the physical characteristics of the driver and front passenger. Correct adjustment of
the seats is particularly important for
•safely and quickly reaching the controls,
•a relaxed, fatigue-free body position,
•achieving the maximum protection offere d by the seat belts and the airbag
system.
WARNING
•Never transport more occupants than the maximum seating in the
vehicle.
•Each occupant must correctly fasten the seat belt belonging to the seat.
Children must be fastened ⇒page 184, “Transporting children safely” with
a suitable restraint system.
•The front seats and the head restraints must always be adjusted to match
the body size of the seat occupant as well as the seat belts must always be
correctly fastened in order to provide an optimal protection for you and your
occupants.
•Always keep your feet in the footwell when the car is being driven - never
place your feet on the instrument panel, out of the window or on the
surfaces of the seats. This is particularly important for the front seat
passenger. You will be exposed to increased risk of injury if it becomes
necessary to apply the brake or in the event of an accident. If an airbag is
deployed, you may suffer fatal injuries when adopting an incorrect seated
position!
•It is important for the driver and front passenger to maintain a distance
of at least 25 cm from the steering wheel or dash panel. Not maintaining this minimum distance will mean
that the airbag system will not be able to prop-
erly protect you - hazard! The front seats and the head restraints must
always also be correctly adjusted to match the body size of the occupant.
•Ensure that there are no objects in the footwell as any objects may get
behind the pedals during a driving or braking manoeuvre. You would then
no longer be able to operate the clutch, to brake or accelerate.
Adjusting the front seats
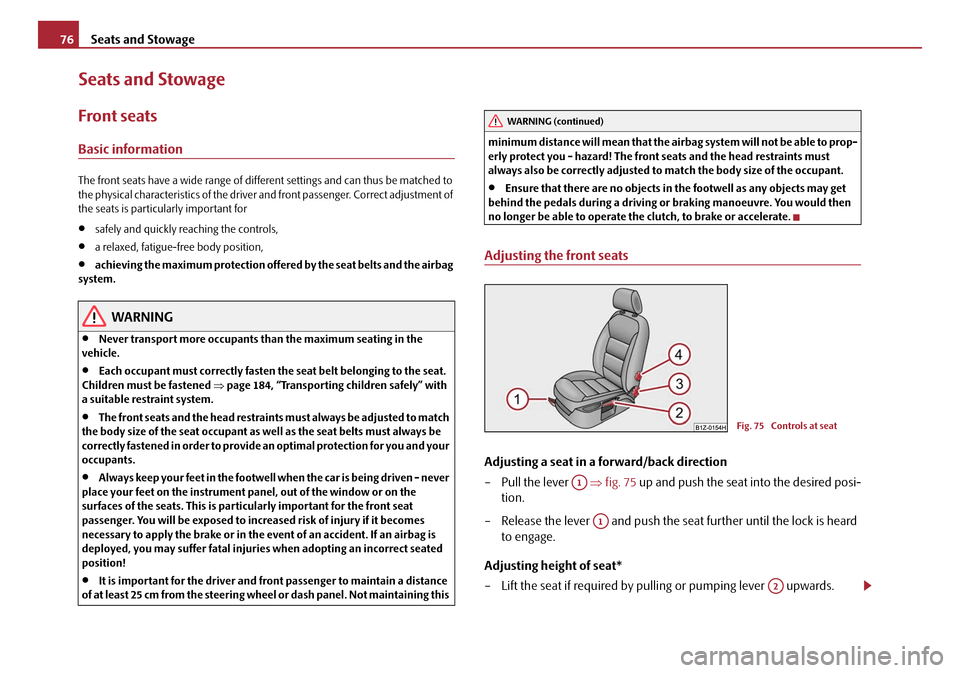
Adjusting a seat in a forward/back direction
– Pull the lever ⇒fig. 75 up and push the seat into the desired posi-
tion.
– Release the lever and push the seat further until the lock is heard to engage.
Adjusting height of seat*
– Lift the seat if required by pulling or pumping lever upwards.
WARNING (continued)
Fig. 75 Controls at seat
A1
A1
A2
20A5Facelift.book Page 76 Saturday, September 6, 2008 2:13 PM
Page 78 of 304
Seats and Stowage77
Using the systemSafetyDriving TipsGeneral MaintenanceBreakdown assistanceTechnical Data
– Lower the seat if required by pushing or pumping lever down-
wards.
Adjust the angle of the seat backrest
– Relieve any pressure on the backrest (do not lean on it) and turn the handwheel ⇒page 76, fig. 75 to adjust the desired angle of the
backrest.
Adjusting lumbar support*
– Turn the handwheel until you have set the most comfortable
curvature of the seat upholstery in the area of your spine.
The driver's seat should be adjusted in such a way that the pedals can be pressed
to the floor with slightly bent legs.
The backrest on the driver's seat should be adjusted in such a way that the upper
point of the steering wheel can be easi ly reached with slightly bent arms.
WARNING
•Only adjust the driver seat when the ve hicle is stationary - risk of injury!
•Take care when adjusting the seat! Adjusting the seat without care can
lead to bruises or injuries.
•The backrests must not be angled too far back when driving otherwise
this will affect proper operation of the seat belts and of the airbag system -
risk of injury!
Adjusting front seats electrically*
Adjusting seats
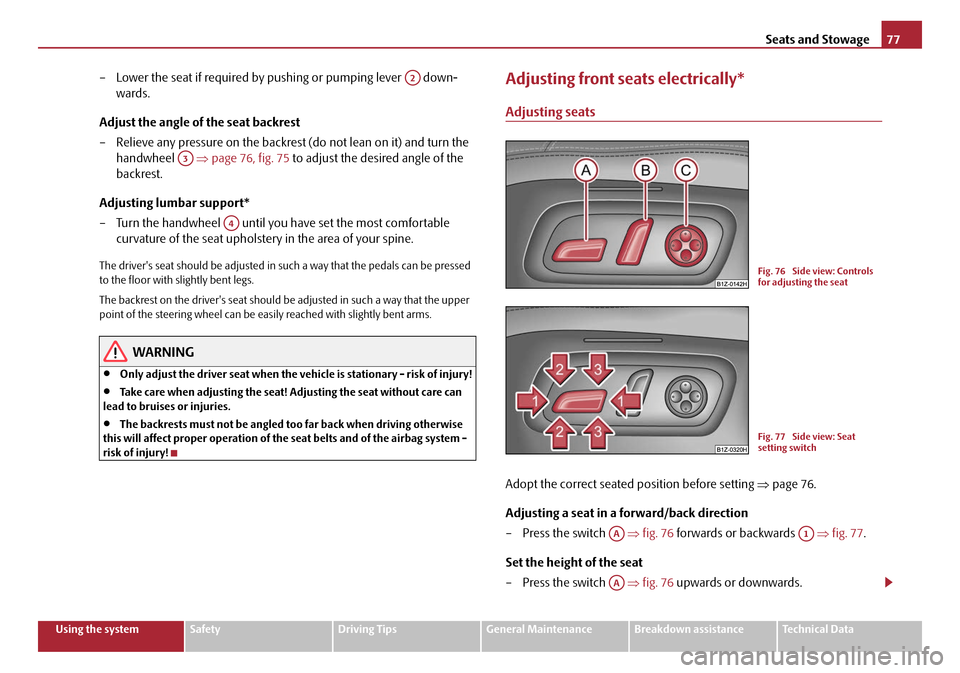
Adopt the correct seated position before setting ⇒page 76.
Adjusting a seat in a forward/back direction
– Press the switch ⇒fig. 76 forwards or backwards ⇒fig. 77 .
Set the height of the seat
– Press the switch ⇒fig. 76 upwards or downwards.
A2
A3
A4
Fig. 76 Side view: Controls
for adjusting the seat
Fig. 77 Side view: Seat
setting switch
AAA1
AA
20A5Facelift.book Page 77 Saturday, September 6, 2008 2:13 PM
Page 125 of 304
Starting-off and Driving
124
Starting-off and Driving
Setting steering wheel position
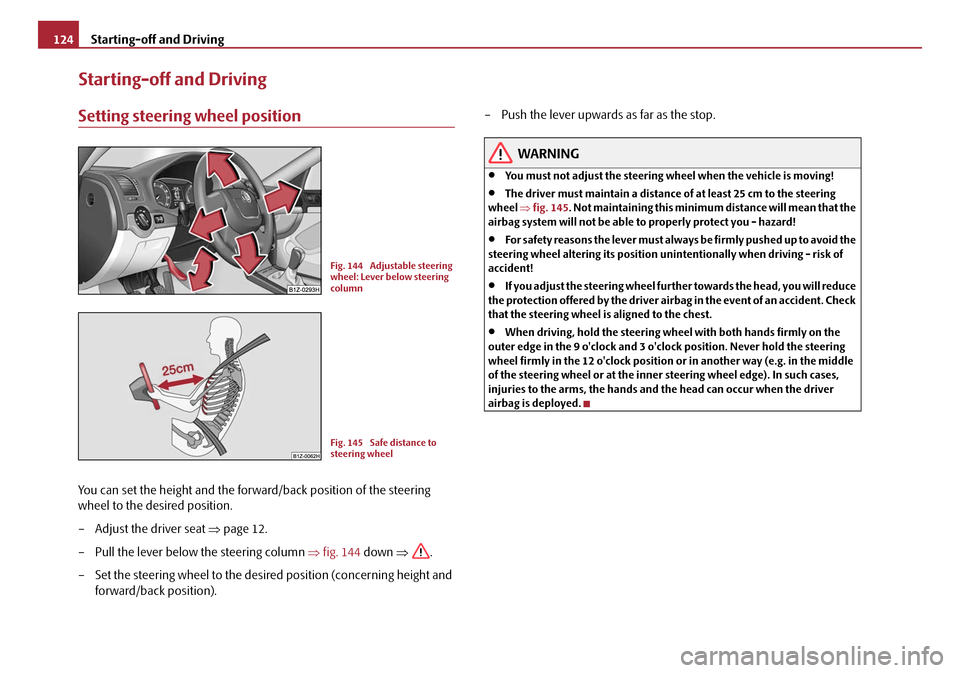
You can set the height and the forward/back position of the steering
wheel to the desired position.
– Adjust the driver seat ⇒page 12.
– Pull the lever below the steering column ⇒fig. 144 down ⇒.
– Set the steering wheel to the desired position (concerning height and forward/back position). – Push the lever upwards as far as the stop.
WARNING
•You must not adjust the steering wh
eel when the vehicle is moving!
•The driver must maintain a distance of at least 25 cm to the steering
wheel ⇒fig. 145 . Not maintaining this minimum distance will mean that the
airbag system will not be able to properly protect you - hazard!
•For s afe ty re a so ns t he le ve r m ust al wa y s b e fi rm ly pus he d up to a voi d the
steering wheel alteri ng its position unintentionally when driving - risk of
accident!
•If you adjust the steering wheel furthe r towards the head, you will reduce
the protection offered by the driver airb ag in the event of an accident. Check
that the steering wheel is aligned to the chest.
•When driving, hold the steering wheel with both hands firmly on the
outer edge in the 9 o'clock and 3 o'clock position. Never hold the steering
wheel firmly in the 12 o'clock position or in another way (e.g. in the middle
of the steering wheel or at the inner steering wheel edge). In such cases,
injuries to the arms, the hands and the head can occur when the driver
airbag is deployed.
Fig. 144 Adjustable steering
wheel: Lever below steering
column
Fig. 145 Safe distance to
steering wheel
20A5Facelift.book Page 124 Saturday, September 6, 2008 2:13 PM
Page 126 of 304
Starting-off and Driving125
Using the systemSafetyDriving TipsGeneral MaintenanceBreakdown assistanceTechnical Data
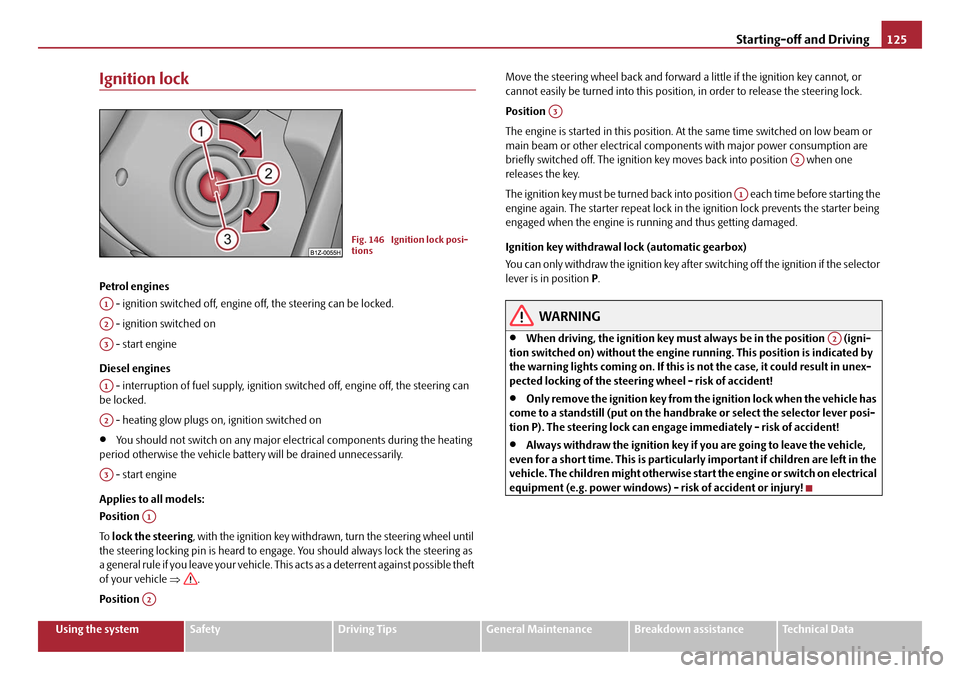
Ignition lock
Petrol engines
- ignition switched off, engine off, the steering can be locked.
- ignition switched on
- start engine
Diesel engines - interruption of fuel supply, ignition switched off, engine off, the steering can
be locked.
- heating glow plugs on, ignition switched on
•You should not switch on any major elec trical components during the heating
period otherwise the vehicle batter y will be drained unnecessarily.
- start engine
Applies to all models:
Position
To lock the steering , with the ignition key withdrawn, turn the steering wheel until
the steering locking pin is heard to engage. You should always lock the steering as
a general rule if you leave your vehicle. This acts as a deterrent against possible theft
of your vehicle ⇒.
Position Move the steering wheel back and forward
a little if the ignition key cannot, or
cannot easily be turned into this position, in order to release the steering lock.
Position
The engine is started in this position. At the same time switched on low beam or
main beam or other electrical compon ents with major power consumption are
briefly switched off. The ignition key moves back into position when one
releases the key.
The ignition key must be turned back into position each time before starting the
engine again. The starter repeat lock in th e ignition lock prevents the starter being
engaged when the engine is ru nning and thus getting damaged.
Ignition key withdrawal lock (automatic gearbox)
You can only withdraw the ignition key after switching off the ignition if the selector
lever is in position P .
WARNING
•When driving, the ignition key must always be in the position (igni-
tion switched on) without the engine running. This position is indicated by
the warning lights coming on. If this is not the case, it could result in unex-
pected locking of the steering wheel - risk of accident!
•Only remove the ignition key from the ignition lock when the vehicle has
come to a standstill (put on the handbrake or select the selector lever posi-
tion P). The steering lock can enga ge immediately - risk of accident!
•Always withdraw the ignition key if you are going to leave the vehicle,
even for a short time. This is particularly important if children are left in the
vehicle. The children might otherwise star t the engine or switch on electrical
equipment (e.g. power windows) - risk of accident or injury!
Fig. 146 Ignition lock posi-
tions
A1
A2
A3
A1
A2
A3
A1
A2
A3
A2
A1
A2
20A5Facelift.book Page 125 Saturday, September 6, 2008 2:13 PM
Page 140 of 304
Automatic gearbox139
Using the systemSafetyDriving TipsGeneral MaintenanceBreakdown assistanceTechnical Data
Shifting up gears
– One-touch forward of the selector lever (in the Tiptronic position)
⇒page 138, fig. 155 .
Shifting down gears
– One-touch back of the selector lever (in the Tiptronic position) .
It is possible to switch over to manual both when the car is stationary and also when
driving.
When you accelerate, the gearbox shifts up automatically into the higher gear just
before the maximum permissible engine speed is reached.
If you select a lower gear, the automatic ge arbox does not shift down until there is
no risk of the engine overrevving.
If you operate the kickdown function, the ge arbox shifts into a lower gear in line
with the vehicle speed and engine speed.
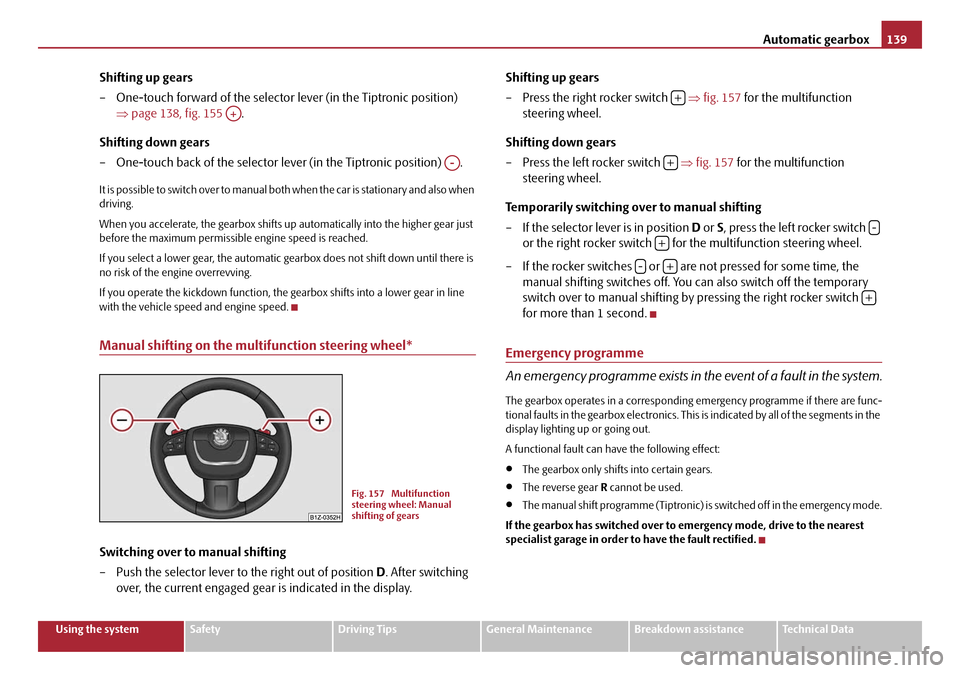
Manual shifting on the multifunction steering wheel*
Switching over to manual shifting
– Push the selector lever to the right out of position D. After switching
over, the current engaged gear is indicated in the display. Shifting up gears
– Press the right rocker switch
⇒fig. 157 for the multifunction
steering wheel.
Shifting down gears
– Press the left rocker switch ⇒fig. 157 for the multifunction
steering wheel.
Temporarily switching over to manual shifting
– If the selector lever is in position D or S, press the left rocker switch
or the right rocker switch fo r the multifunction steering wheel.
– If the rocker switches or are not pressed for some time, the manual shifting switches off. You can also switch off the temporary
switch over to manual shifting by pressing the right rocker switch
for more than 1 second.
Emergency programme
An emergency programme exists in th e event of a fault in the system.
The gearbox operates in a corresponding emergency programme if there are func-
tional faults in the gearbox electronics. This is indicated by all of the segments in the
display lighting up or going out.
A functional fault can have the following effect:
•The gearbox only shifts into certain gears.
•The reverse gear R cannot be used.
•The manual shift programme (Tiptronic) is switched off in the emergency mode.
If the gearbox has switched over to emergency mode, drive to the nearest
specialist garage in order to have the fault rectified.
A+
A-
Fig. 157 Multifunction
steering wheel: Manual
shifting of gears
+
+
-
+
-+
+
20A5Facelift.book Page 139 Saturday, September 6, 2008 2:13 PM
Page 142 of 304
Communication141
Using the systemSafetyDriving TipsGeneral MaintenanceBreakdown assistanceTechnical Data
Communication
Multifunction steering wheel*
Operate radio und navigation on the multifunction steering wheel
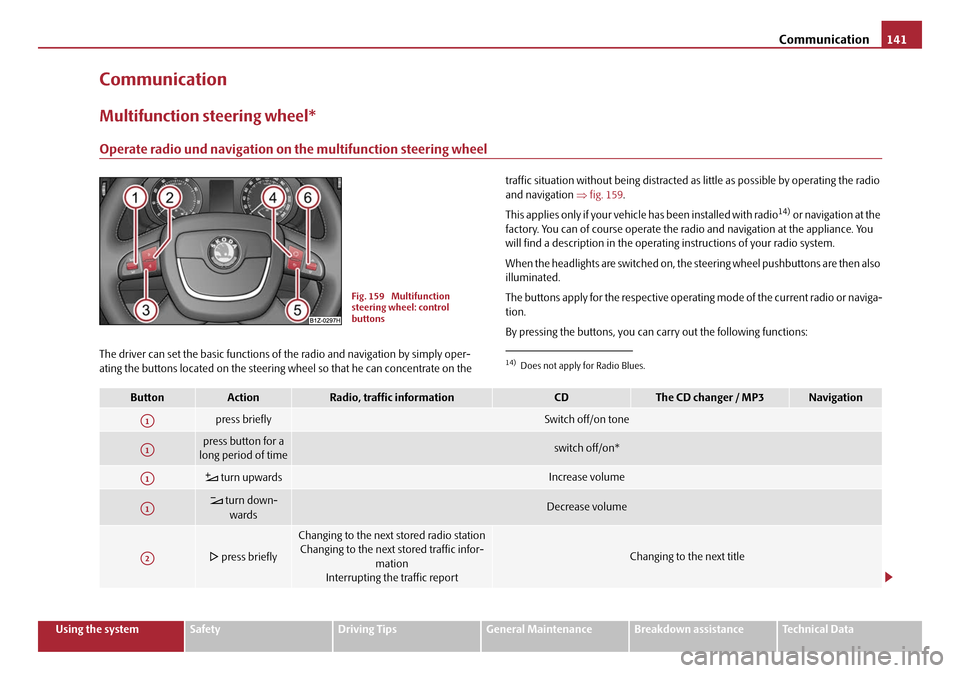
The driver can set the basic functions of the radio and navigation by simply oper-
ating the buttons located on the steering wheel so that he can concentrate on the traffic situation without being distracted as little as possible by operating the radio
and navigation
⇒fig. 159 .
This applies only if your vehicle has been installed with radio
14) or navigation at the
factory. You can of course operate the ra dio and navigation at the appliance. You
will find a description in the operating instructions of your radio system.
When the headlights are switched on, the steering wheel pushbuttons are then also
illuminated.
The buttons apply for the respective operating mode of the current radio or naviga-
tion.
By pressing the buttons, you can carry out the following functions:
Fig. 159 Multifunction
steering wheel: control
buttons
14)Does not apply for Radio Blues.
ButtonActionRadio, traffic informationCDThe CD changer / MP3Navigation
press brieflySwitch off/on tone
press button for a
long period of timeswitch off/on*
turn upwardsIncrease volume
turn down-
wardsDecrease volume
press briefly
Changing to the next stored radio stationChanging to the next stored traffic infor-
mation
Interrupting the traffic report
Changing to the next title
A1
A1
A1
A1
A2
20A5Facelift.book Page 141 Saturday, September 6, 2008 2:13 PM
Page 144 of 304
Communication143
Using the systemSafetyDriving TipsGeneral MaintenanceBreakdown assistanceTechnical Data
Universal telephone preinstallation GSM II*
Introduction
This enables you to make full use of the advantages of a normal carphone (“hands-
free system - Hands Free” using a micropho ne integrated in the vehicle, optimal
transmission of signals using an external aerial
15) etc.). The equipment includes
also the voice control. The telephone is connected by means of the Bluetooth®
technology ⇒page 144, “Bluetooth®”. On vehicles fitted with a telephone
mount*, it is also possible to establish the connection via the interface of the
adapter
16) ⇒ page 145, “Operating telephone calls with the aid of the adapter*.”.
A phone phonebook is part of the mobile ph one preinstallation with voice control.
In the phone phonebook there are 1500 free memory locations available. This
phone phonebook is independent of the appliance used for the mobile phone.
Furthermore the volume can be changed individually during the call at any time
with the button for setting the radio* or on vehicles fitted with multifunction
steering wheel* with function buttons on the steering wheel.
If the system answers with the voice response “ Telephone is not ready”, please
check the operating state of the telephone as follows:
•Is the telephone switched on?
•Is the PIN code entered?
Dialogue
The period, in which the telephone system is ready to receive voice commands and
carry out the voice commands, is called DIALOGUE. The system gives audible feed-
back and guides you if necessary through the relevant functions. You can start or
end the dialogue at any time by pres sing the PTT button on the adapter*
⇒ page 145 or on the multifunction steering wheel* ⇒page 146.
The dialogue is always automatically ended after carrying out an operation, e.g.
after erasing the name from the phonebook. When receiving an incoming call, the dialogue is immediately interrupted and you
can accept the call by pressing the button
on the multifunction steering wheel*
⇒ page 146 or by pressing the button for receiving a call directly on your tele-
phone.
If a voice command is not detected, the system answers with “ Sorry?” and a new
entry can be performed. After the 2nd error the system repeats the aid. After the 3rd
error the answer “ Cancel” is given and the dialogue is ended.
Optimum understanding of the voice commands depends on the following
factors:
•Speak with a normal tone of voice without intonation and excessive voice
pauses.
•Avoid insufficient articulation.
•Close the doors, windows and sliding roof, in order to reduce or stop disturbing
exterior noise.
•It is recommended to speak louder at higher speeds, so that the tone of your
voice is louder than the increased surrounding noise.
•During the dialogue avoid additional noise in the vehicle, e.g. simultaneously
talking occupants.
•Do not speak, if the system makes an announcement.
•The microphone for voice control is direct ed to the driver and front passenger.
Therefore the driver and the front passenger can operate the equipment.
WARNING
Pay attention primarily to the traffic situation! As the driver you are fully
responsible for road safety. Use the tele phone system only to such an extent,
so that you are in full contro l of your vehicle at any time.
Caution
Taking the mobile phone out of the adapter during the call can lead to interruption
of the connection. When taking out the mobile phone, the connection to the
factory-fitted antenna is interrupted, this reduces the quality of the transmitting
and receiving signal. This might result a dditionally in harmful radiation from the
15)Valid for telephone used with adapter* in the telephone mount.16)Not valid for adapter “Bluetooth only” ⇒page 146.
20A5Facelift.book Page 143 Saturday, September 6, 2008 2:13 PM
Page 147 of 304
Communication
146
telephone is connected to the handsfree-system via Bluetooth®, this connection is
interrupted.
Adapter “Bluetooth only”
For the adapters which are marked with the “Bluetooth only” logo, the complete
communication between the telephone and the handsfree-system of your vehicle
is carried out only with the help of the Bluetooth
® technology. If an adapter marked
in such a way is inserted in the telephon e mount, it only serves for recharging the battery of the telephone and for transmit
ting the signal onto the outer vehicle
aerial.
Aside from the button PTT, the button SOS can be found on certain adapters
⇒ page 145, fig. 162 . This button is without function.Note
The adapters illustrated are only prime examples.
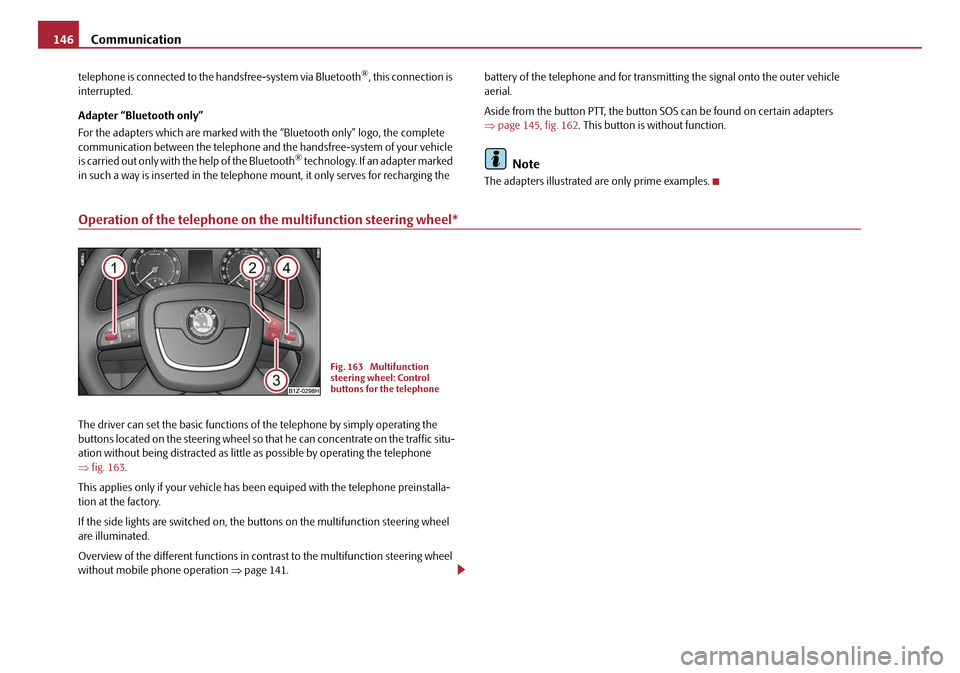
Operation of the telephone on the multifunction steering wheel*
The driver can set the basic functions of the telephone by simply operating the
buttons located on the steering wheel so th at he can concentrate on the traffic situ-
ation without being distracted as little as possible by operating the telephone
⇒ fig. 163 .
This applies only if your vehicle has been equiped with the telephone preinstalla-
tion at the factory.
If the side lights are switched on, the buttons on the multifunction steering wheel
are illuminated.
Overview of the different functions in cont rast to the multifunction steering wheel
without mobile phone operation ⇒page 141.
Fig. 163 Multifunction
steering wheel: Control
buttons for the telephone
20A5Facelift.book Page 146 Saturday, September 6, 2008 2:13 PM