ECU SKODA OCTAVIA 2008 2.G / (1Z) Owner's Manual
[x] Cancel search | Manufacturer: SKODA, Model Year: 2008, Model line: OCTAVIA, Model: SKODA OCTAVIA 2008 2.G / (1Z)Pages: 304, PDF Size: 17.69 MB
Page 17 of 304
The brief instruction
16
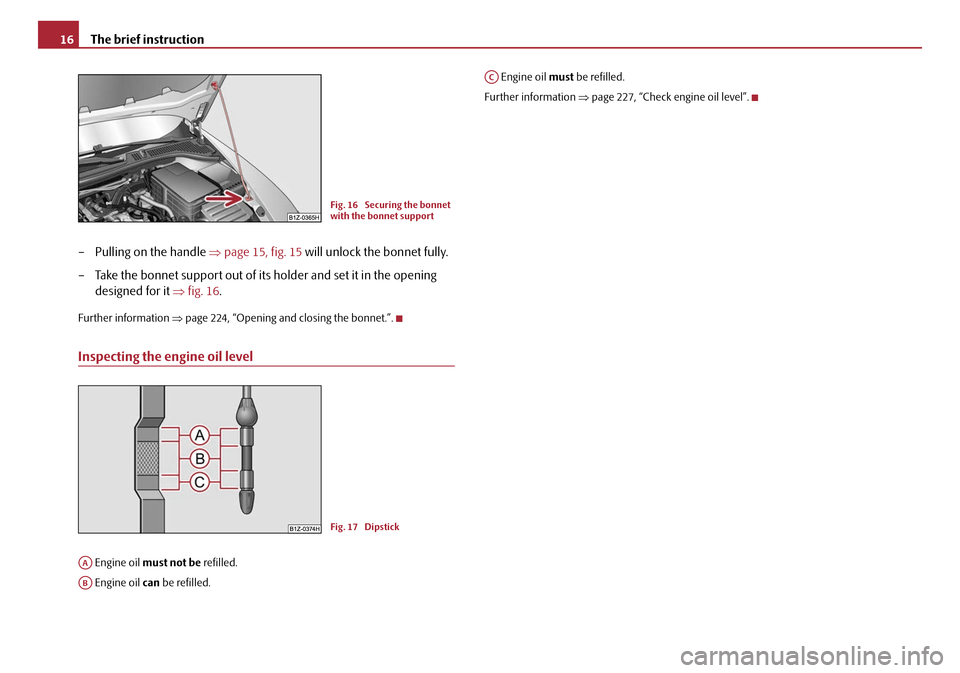
– Pulling on the handle ⇒page 15, fig. 15 will unlock the bonnet fully.
– Take the bonnet support out of its holder and set it in the opening designed for it ⇒fig. 16 .
Further information ⇒page 224, “Opening and closing the bonnet.”.
Inspecting the engine oil level
Engine oil must not be refilled.
Engine oil can be refilled. Engine oil
must be refilled.
Further information ⇒page 227, “Check engine oil level”.
Fig. 16 Securing the bonnet
with the bonnet support
Fig. 17 Dipstick
AA
AB
AC
20A5Facelift.book Page 16 Saturday, September 6, 2008 2:13 PM
Page 46 of 304
Unlocking and locking45
Using the systemSafetyDriving TipsGeneral MaintenanceBreakdown assistanceTechnical Data
Central locking system
Description
Unlocking or locking causes all the doors and the fuel filler flap* to be unlocked or
locked at the same time by the central lockin g system (as long as it is not set differ-
ently in the menu Setup (settings) - Convenience information display*). The boot
lid is unlocked when opening. It can be op ened by pressing the hand grip above the
licence plate ⇒page 48.
Operation of the central locking system is possible:
•from the outside using the vehicle key ⇒page 46,
•using the button for the central locking system ⇒page 47,
•by using the remote control ⇒page 50.
Indicator light in the driver's door on vehicles without anti-theft alarm system
After the car is locked, the indicator light flashes after 2 seconds.
After the car is locked with the deactivate d safe securing system, the indicator light
flashes only after 30 seconds.
Indicator light in the driver's door on vehicles with anti-theft alarm system
After locking the vehicle the indicator light flashes for 2 seconds fast, then more
slowly.
If the vehicle is locked and the safe securing system ⇒page 46 is not operating, the
indicator light in the driver door flashes for about 2 seconds fast, goes out and starts
to flash slowly after about 30 seconds.
If the indicator light first of all flashes fast for about 2 seconds, afterwards lights up
for about 30 seconds and then flashes slowly, there is a fault in the system of the
central locking or the interior monitor* ⇒page 52. Contact a specialist garage to
obtain assistance.
Convenience operation of windows
One can open and close the electrically powered windows when unlocking and
locking the vehicle ⇒page 55. Opening a single door*
This function allows one to just unlock
the driver's door. The other doors and the
fuel filler flap* remain locked and are only unlocked after repetitive unlocking.
If you wish, you can have your Škoda Dealer activate the function of the single door
opening mode.
Automatic locking*
All the doors and the boot lid are locked automatically once the car reaches a speed
of about 15 km/h.
If the ignition key is withdrawn, the car is then automatically unlocked again. In
addition, it is possible for the driver to unlock the car by pressing the central locking
button
or by pulling the door opening lever.
If you wish, your Škoda Deal er can activate the function of the automatic locking
mode.
WARNING
Locking the doors prevents involuntary opening in an exceptional situation
(an accident). Locked doors prevent unwanted entry into the vehicle from
outside, for example at road crossings. Locked doors do, however, make it
more difficult for rescuers to get into the vehicle in an emergency - danger to
life!
Note
•In the event of an accident in which the airbags are deployed, the locked doors
are automatically unlocked in order to enable rescuers to gain access to the vehicle.
•Only the front doors can be unlocked and locked using the key if the central
locking system fails. You can lock or unlock manually the other doors and the boot
lid.
−Emergency locking of the door ⇒page 48.
− Emergency unlocking of the boot lid ⇒page 49.
20A5Facelift.book Page 45 Saturday, September 6, 2008 2:13 PM
Page 47 of 304
Unlocking and locking
46
Safe securing
The central locking system is equipped with a safe securing system. Locking the
vehicle from the outside causes the door lock s to be automatically blocked. It is not
possible to open the doors with the door handle either from the inside or from the
outside. This acts as an effective deterrent for attempts to break into your vehicle.
You can deactivate the safe securing sy stem by locking twice within 2seconds.
If the safe securing system is not operating, the warning light in the driver door
flashes for about 2 seconds fast, goes out and starts to flash slowly again after about
30 seconds.
The safe securing system is again activate d the next time the vehicle is unlocked and
locked again.
The doors can be opened from the inside if the vehicle is locked and the safe
securing system is deactivated:
•The door is unlocked by actuating the door-opening lever.
•The door opens upon actuating the door-opening lever again.
WARNING
If the vehicle is locked from the outside and the safe securing system is acti-
vated, there must not be any person and animals in the vehicle as it is then
not possible to open either a door or a window from the inside. The locked
doors make it more difficult for rescuers to get into the vehicle in an emer-
gency - hazard!
Note
The anti-theft alarm system* is also activated with the deactivated safe securing
system when locking the vehicle. The inte rior monitor* is however not activated.
Unlocking the vehicle using the key
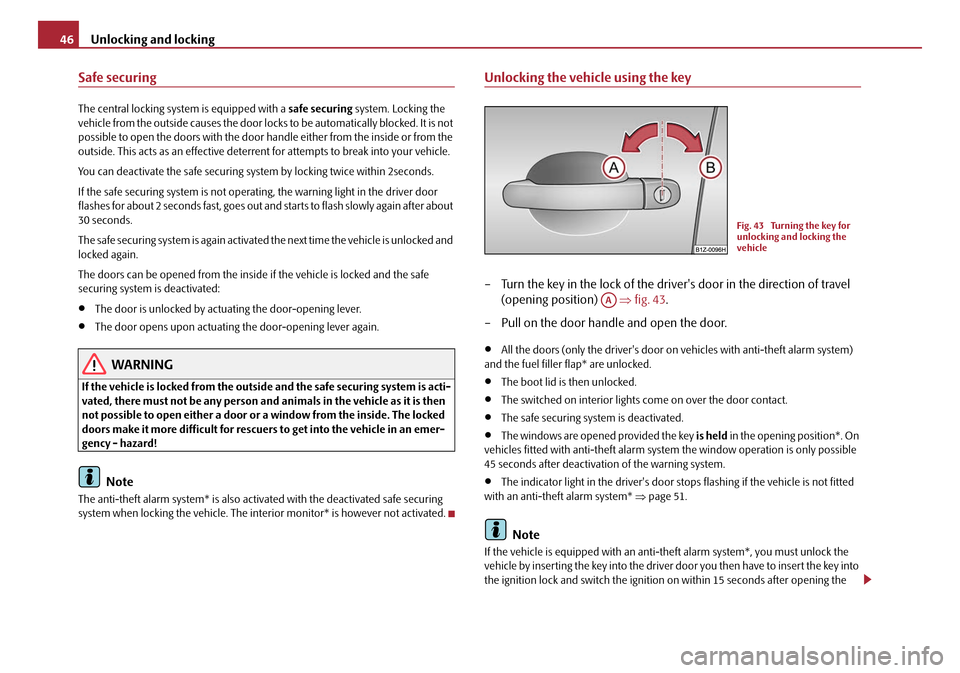
– Turn the key in the lock of the driver's door in the direction of travel
(opening position) ⇒fig. 43 .
– Pull on the door handle and open the door.
•All the doors (only the driver's door on vehicles with anti-theft alarm system)
and the fuel filler flap* are unlocked.
•The boot lid is then unlocked.
•The switched on interior lights come on over the door contact.
•The safe securing system is deactivated.
•The windows are opened provided the key is held in the opening position*. On
vehicles fitted with anti-theft alarm syst em the window operation is only possible
45 seconds after deactivation of the warning system.
•The indicator light in the driver's door stops flashing if the vehicle is not fitted
with an anti-theft alarm system* ⇒page 51.
Note
If the vehicle is equipped with an anti-theft alarm system*, you must unlock the
vehicle by inserting the key into the driver door you then have to insert the key into
the ignition lock and switch the ignition on within 15 seconds after opening the
Fig. 43 Turning the key for
unlocking and locking the
vehicle
AA
20A5Facelift.book Page 46 Saturday, September 6, 2008 2:13 PM
Page 48 of 304
Unlocking and locking47
Using the systemSafetyDriving TipsGeneral MaintenanceBreakdown assistanceTechnical Data
door. The
alarm will be triggered if you do not switch on the ignition within 15
seconds.
Closing the vehicle with the key
– Turn the key in the lock of the driver's door in the opposite direction of travel (closing position) ⇒page 46, fig. 43 .
•The doors, the boot lid and the fuel filler flap* are locked.
•The switched on interior lights wi ll switch off over the door contact.
•The windows and the electric sliding/tilting roof* are closed provided the key is
held in the locking position.
•The safe securing system is activated immediately.
•The indicator light in the driver door begins flashing.
Note
The opened driver door cannot be locked. It must be locked separately after closing
it.
Buttons for the central locking system
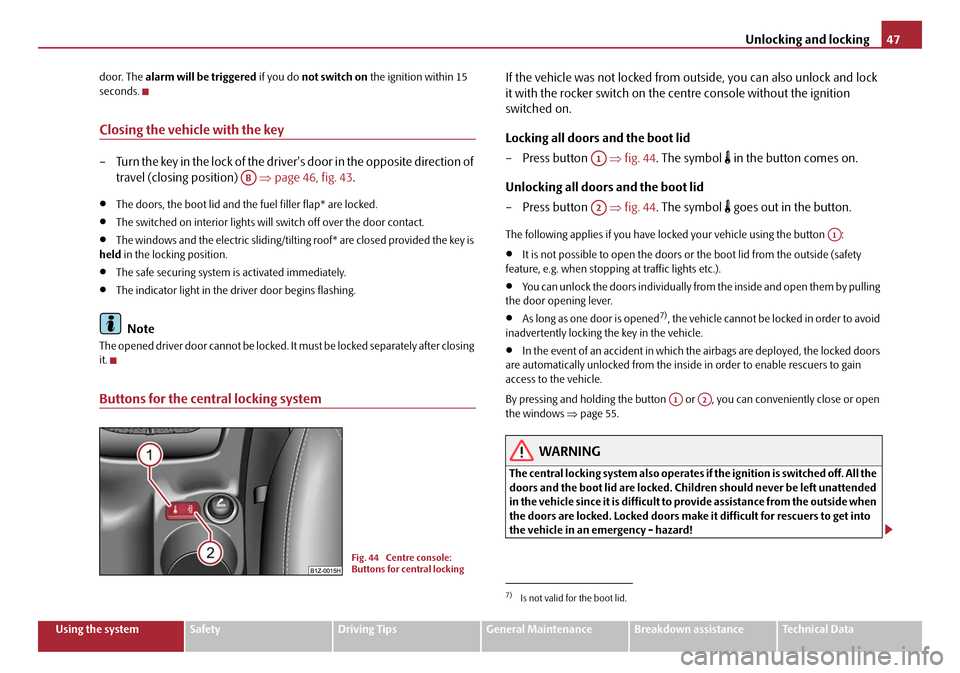
If the vehicle was not locked from ou tside, you can also unlock and lock
it with the rocker switch on the centre console without the ignition
switched on.
Locking all doors and the boot lid
–Press button ⇒fig. 44 . The symbol
in the button comes on.
Unlocking all doors and the boot lid
–Press button ⇒fig. 44 . The symbol
goes out in the button.
The following applies if you have lo cked your vehicle using the button :
•It is not possible to open the doors or the boot lid from the outside (safety
feature, e.g. when stopping at traffic lights etc.).
•You can unlock the doors individually from the inside and open them by pulling
the door opening lever.
•As long as one door is opened7), the vehicle cannot be locked in order to avoid
inadvertently locking the key in the vehicle.
•In the event of an accident in which the airbags are deployed, the locked doors
are automatically unlocked from the inside in order to enable rescuers to gain
access to the vehicle.
By pressing and holding the button or , you can conveniently close or open
the windows ⇒page 55.
WARNING
The central locking system also operates if the ignition is switched off. All the
doors and the boot lid are locked. Children should never be left unattended
in the vehicle since it is difficult to provide assistance from the outside when
the doors are locked. Locked doors make it difficult for rescuers to get into
the vehicle in an emergency - hazard!
AB
Fig. 44 Centre console:
Buttons for central locking
7)Is not valid for the boot lid.
A1
A2
A1
A1A2
20A5Facelift.book Page 47 Saturday, September 6, 2008 2:13 PM
Page 49 of 304
Unlocking and locking
48
Note
The door opening lever and the buttons for the central locking system do not
operate if the safe securing system is activated.
Emergency locking of the doors
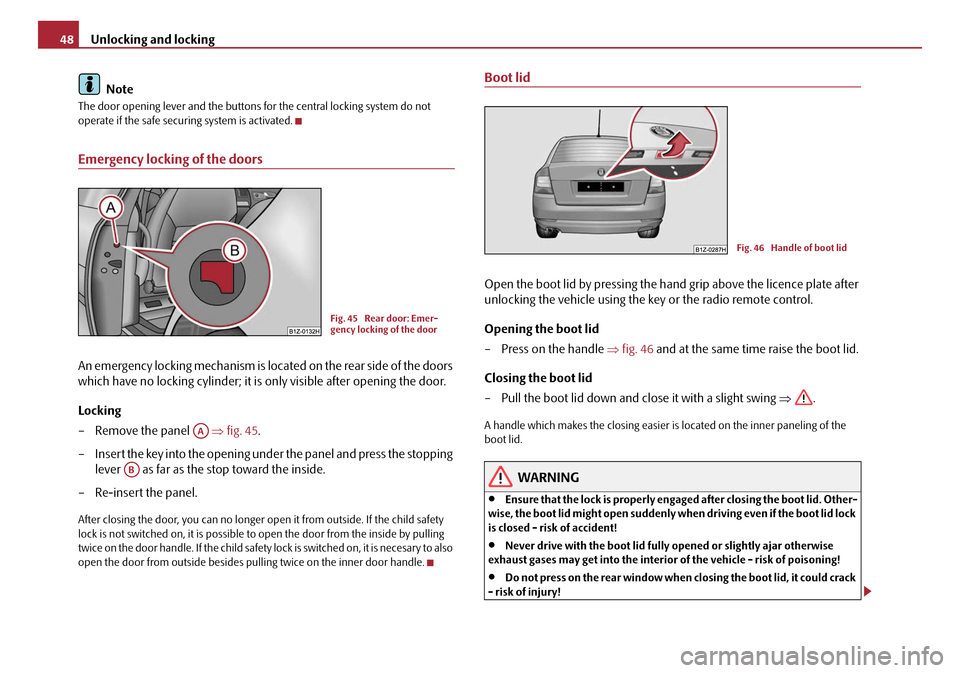
An emergency locking mechanism is loca ted on the rear side of the doors
which have no locking cyli nder; it is only visible after opening the door.
Locking
– Remove the panel ⇒fig. 45 .
– Insert the key into the opening under the panel and press the stopping lever as far as the stop toward the inside.
– Re-insert the panel.
After closing the door, you can no longer op en it from outside. If the child safety
lock is not switched on, it is possible to open the door from the inside by pulling
twice on the door handle. If the child safety lock is switched on, it is necesary to also
open the door from outside besides pu lling twice on the inner door handle.
Boot lid
Open the boot lid by pressing the hand grip above the licence plate after
unlocking the vehicle using the key or the radio remote control.
Opening the boot lid
– Press on the handle ⇒fig. 46 and at the same time raise the boot lid.
Closing the boot lid
– Pull the boot lid down and close it with a slight swing ⇒.
A handle which makes the closing easier is located on the inner paneling of the
boot lid.
WARNING
•Ensure that the lock is properly enga ged after closing the boot lid. Other-
wise, the boot lid might open suddenly wh en driving even if the boot lid lock
is closed - risk of accident!
•Never drive with the boot lid fully opened or slightly ajar otherwise
exhaust gases may get into the interior of the vehicle - risk of poisoning!
•Do not press on the rear window when closing the boot lid, it could crack
- risk of injury!
Fig. 45 Rear door: Emer-
gency locking of the door
AA
AB
Fig. 46 Handle of boot lid
20A5Facelift.book Page 48 Saturday, September 6, 2008 2:13 PM
Page 51 of 304
Unlocking and locking
50
The transmitter with the battery is housed in the handle of the master key. The
receiver is located in the interior of th e car. The operating range of the remote
control is approx. 10 m. But this range of the remote control can be reduced if the
batteries are weak.
The master key has a fold-open key bit whic h can be used for unlocking and locking
the car manually and also for starting the engine.
If a lost key is replaced or if the rece iver unit has been repaired or a new unit
installed, it is then necessary for a Škoda Dealer to initialise the system. Only after
this is it possible to again use the remote control.
Note
•The remote control is automatically deac tivated when the ignition is switched
on.
•The operation of the remote control may temporarily be affected by interfer-
ence from transmitters close to the car and which operate in the same frequency
range (e.g. mobile phone, TV transmitter).
•The battery must be replaced, ideally by a Škoda Service Partner, if the central
locking or anti-theft alarm system does re act to the remote control at less than 3
metres away.
•If the driver door is opened, the vehicle cannot be locked using the remote
control.
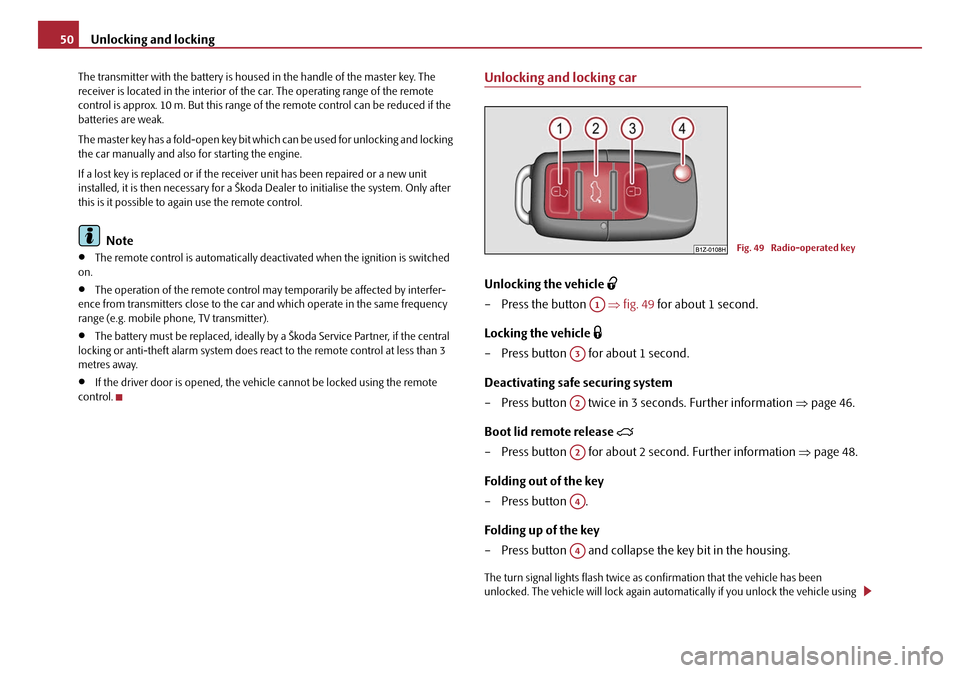
Unlocking and locking car
Unlocking the vehicle
– Press the button ⇒fig. 49 for about 1 second.
Locking the vehicle
– Press button for about 1 second.
Deactivating safe securing system
– Press button twice in 3 seconds. Further information ⇒page 46.
Boot lid remote release
– Press button for about 2 second. Further information ⇒page 48.
Folding out of the key
– Press button .
Folding up of the key
– Press button and collapse the key bit in the housing.
The turn signal lights flash twice as confirmation that the vehicle has been
unlocked. The vehicle will lock again auto matically if you unlock the vehicle using
Fig. 49 Radio-operated key
A1
A3
A2
A2
A4
A4
20A5Facelift.book Page 50 Saturday, September 6, 2008 2:13 PM
Page 52 of 304
Unlocking and locking51
Using the systemSafetyDriving TipsGeneral MaintenanceBreakdown assistanceTechnical Data
button but do not open a door or the boot
lid within the next 30 seconds. This
function is intended to prevent th e car being unlocked unintentionally.
In addition, when the car is unlocked, the power seats and exterior mirrors* move
into the position assigned to this key. The stored setting of driver seat and exterior
mirrors is retrieved.
Display of the locking
The turn signal lights flash once to co nfirm that the vehicle has been correctly
locked.
If the vehicle is locked by pressing the button and some doors or the boot lid are
not closed, the turn signal lights flash only after closing.
WARNING
If the vehicle is locked from the outside and the safe securing system is acti-
vated, there must not be any person in the vehicle as it is then not possible
to open either a door or a window from the inside. The locked doors make it
more difficult for rescuers to get into the vehicle in an emergency - hazard!
Note
•Operate the radio remote control only when the doors and boot lid are closed
and you have visual contact with the vehicle.
•Once in the car, you must not press the lock button of the radio remote
control before inserting the key into the igni tion lock in order to avoid the car being
inadvertently locked and, in addition, the anti-theft alarm system* being switched
on. Should this happen, press the unlock button
of the radio remote control.
Synchonisation of the remote control
If the vehicle cannot be unlocked by actuatin g the remote control system then it is
possible that the code in the key and the control unit in the vehicle are no longer
synchronised. This can occur when the butt ons on the radio-operated key are actu-
ated a number of times outside of the operative range of the equipment or the
battery on the remote control was replaced. This means it is necessary to synchronise the code as follows:
•Press any button on the remote control.
•pressing of the button means that the door will unlock with the key within 1
minute.
Anti-theft alarm system*
Description
The anti-theft alarm system increases the level of protection against people seeking
to break into the vehicle. The system triggers audible and visual warning signals if
an attempt is made to break into the vehicle.
How is the alarm system activated?
The anti-theft alarm system is activated automatically when the vehicle is locked
with the key on the closed driver's door or by using the radio remote control. It is
activated 30 seconds after closing the door.
How is the alarm system deactivated?
The anti-theft alarm system is deactivated if the vehicle is unlocked by only using
the radio remote control. The vehicle is automatically locked again if the vehicle is
not opened within 30 seconds after reactivating the anti-theft alarm system.
Once you unlock the vehicle by inserting the key into the driver door you then have
to insert the key into the ignition lock and switch the ignition on within 15 seconds
after opening the door in order to deactivate the anti-theft alarm system. The
alarm will be triggered if you do not switch on the ignition within 15 seconds.
When is the alarm triggered?
The following security areas of the locked vehicle are monitored:
•Bonnet,
•Boot lid,
•Doors,
•Ignition lock,
A1
A3
20A5Facelift.book Page 51 Saturday, September 6, 2008 2:13 PM
Page 83 of 304

Seats and Stowage
82
To enlarge the luggage compartment, the rear seats can be folded
forwards, if necessary remove the rear seats. The rear seats can be folded
forward individually on vehicles with divided rear seats*.
Folding the rear seats forwards
– Before folding the rear seats forwar d adjust the front seats in such a
way that they are not damaged when folding forward the rear seats.
– Pull up the rear seats in the direction of arrow and fold forwards in direction of arrow ⇒page 81, fig. 82 .
– Press the unlocking knob and fold the rear seat backrest forwards ⇒fig. 83 .
If the front seats are too far back, we recommend that you have the rear head
restraints removed before the seat backrests are folded forward. Store the removed
head restraints in such a way that they cannot be damaged or soiled. Please refer to
the guidelines ⇒page 85.
Folding the seats back into position
Folding the seats back into position
– Install the head restraint in the slightly lifted rear seat backrest.
– Place the rear lateral seat belt behind the edge of the side trim
panel ⇒fig. 84 .
– Then push the seat backrest back into the upright position until the securing knob clicks into place - check by pulling on the rear seat
backrest.
– Make sure that the red pin is covered ⇒fig. 83 .
– Fold the rear seat back into its original position.
WARNING
•The belts and the belt locks must be in their original position after folding
back the rear seats and seat backrests - they must be ready to use.
•The seat backrests must be securely interlocked in position so that no
objects in the luggage compartment can slide into the passenger compart-
ment if there is sudden braking - risk of injury!
Fig. 83 Unlock the seat back-
rest
A1
A2
AA
Fig. 84 Lock the backrest
AC
AB
20A5Facelift.book Page 82 Saturday, September 6, 2008 2:13 PM
Page 84 of 304
Seats and Stowage83
Using the systemSafetyDriving TipsGeneral MaintenanceBreakdown assistanceTechnical Data
•Pay attention that the rear seat backresst are correctly interlocked. It is
only then that the three-point seat belt for the middle seat can reliably fulfil
its function.
•Before folding the seat backrest back into the secure position, place the
rear lateral seat belt behind the edge of the side trim panel. Take suitable
measures to prevent that the seat belt is jammed between the seat backrest
and the side trim panel is thus damaged.
Remove the rear seat
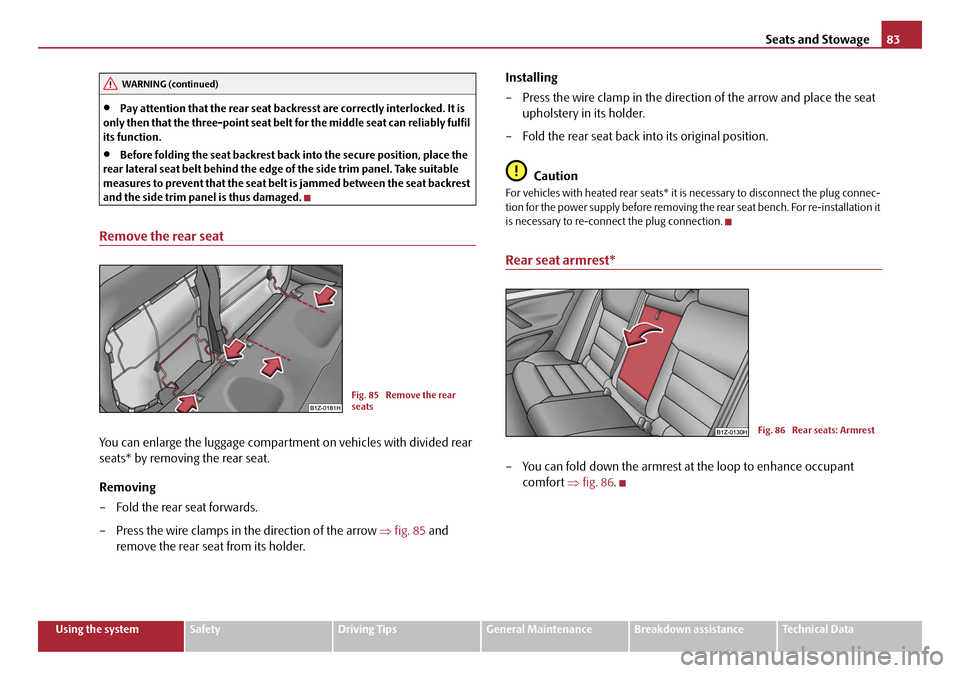
You can enlarge the luggage compartment on vehicles with divided rear
seats* by removing the rear seat.
Removing
– Fold the rear seat forwards.
– Press the wire clamps in the direction of the arrow ⇒fig. 85 and
remove the rear seat from its holder. Installing
– Press the wire clamp in the direction of the arrow and place the seat
upholstery in its holder.
– Fold the rear seat back into its original position.
Caution
For vehicles with heated rear seats* it is necessary to disconnect the plug connec-
tion for the power supply before removing the rear seat bench. For re-installation it
is necessary to re-connect the plug connection.
Rear seat armrest*
– You can fold down the armrest at the loop to enhance occupant comfort ⇒fig. 86 .
WARNING (continued)
Fig. 85 Remove the rear
seats
Fig. 86 Rear seats: Armrest
20A5Facelift.book Page 83 Saturday, September 6, 2008 2:13 PM
Page 85 of 304
Seats and Stowage
84
Seat heaters*
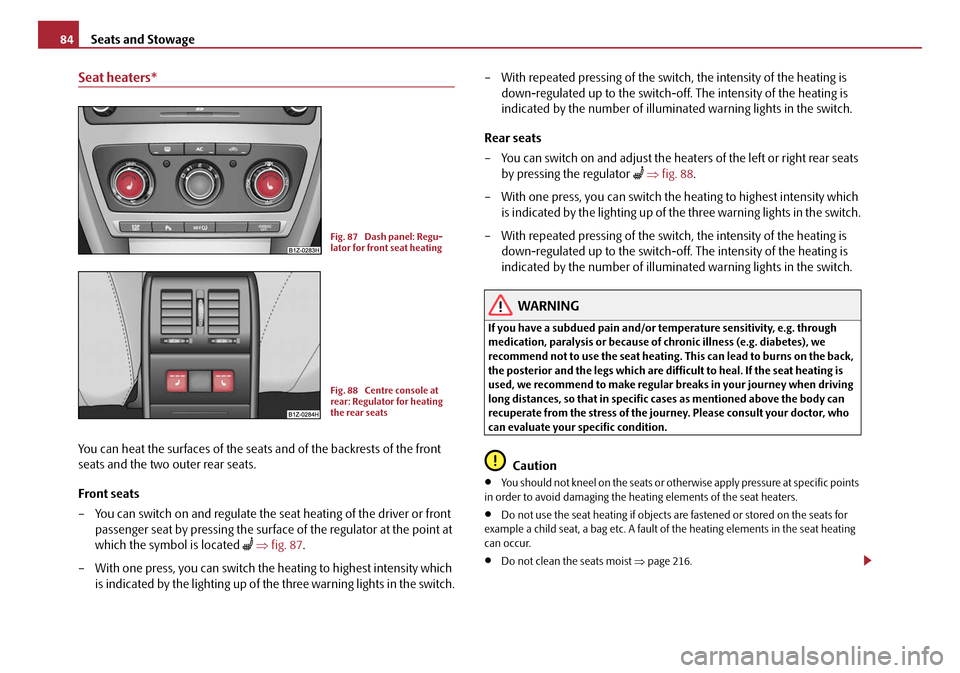
You can heat the surfaces of the seats and of the backrests of the front
seats and the two outer rear seats.
Front seats
– You can switch on and regulate the seat heating of the driver or front
passenger seat by pressing the surface of the regulator at the point at
which the symbol is located
⇒ fig. 87 .
– With one press, you can switch the heating to highest intensity which is indicated by the lighting up of th e three warning lights in the switch. – With repeated pressing of the switch, the intensity of the heating is
down-regulated up to the switch-off . The intensity of the heating is
indicated by the number of illuminated warning lights in the switch.
Rear seats
– You can switch on and adjust the heat ers of the left or right rear seats
by pressing the regulator
⇒ fig. 88 .
– With one press, you can switch the heating to highest intensity which is indicated by the lighting up of the three warning lights in the switch.
– With repeated pressing of the switch, the intensity of the heating is down-regulated up to the switch-off . The intensity of the heating is
indicated by the number of illuminated warning lights in the switch.
WARNING
If you have a subdued pain and/or temperature sensitivity, e.g. through
medication, paralysis or because of ch ronic illness (e.g. diabetes), we
recommend not to use the seat heating. This can lead to burns on the back,
the posterior and the legs which are difficult to heal. If the seat heating is
used, we recommend to make regular br eaks in your journey when driving
long distances, so that in specific cases as mentioned above the body can
recuperate from the stress of the journey. Please consult your doctor, who
can evaluate your specific condition.
Caution
•You should not kneel on the seats or otherwise apply pressure at specific points
in order to avoid damaging the heating elements of the seat heaters.
•Do not use the seat heating if objects ar e fastened or stored on the seats for
example a child seat, a bag etc. A fault of the heating elements in the seat heating
can occur.
•Do not clean the seats moist ⇒page 216.
Fig. 87 Dash panel: Regu-
lator for front seat heating
Fig. 88 Centre console at
rear: Regulator for heating
the rear seats
20A5Facelift.book Page 84 Saturday, September 6, 2008 2:13 PM