Wheel trim SKODA OCTAVIA 2008 2.G / (1Z) Owner's Manual
[x] Cancel search | Manufacturer: SKODA, Model Year: 2008, Model line: OCTAVIA, Model: SKODA OCTAVIA 2008 2.G / (1Z)Pages: 304, PDF Size: 17.69 MB
Page 213 of 304
Taking care of your vehicle and cleaning the vehicle
212
Automatic vehicle wash systems
The paintwork of the vehicle is sufficiently resistant that the vehicle can be washed
normally in automatic vehicle wash plants without any problem. The actual stress
to which the paintwork is subjected, however, depends greatly on the design of the
vehicle wash system, the filtering of the water and the type of washing and care
products used. If the paintwork of your vehicle appears mat after being washed or
even has scratches, point this out to the operator of the vehicle wash plant. Use a
different vehicle wash plant, if necessary.
There are no particular points to note be fore washing your vehicle in such a plant
other than the usual precautionary measur es (closing windows and sliding/tilting
roof, moving any factory-fitted aerials down flat against the bodywork, etc.).
If you have any particular atta ch e d p a r t s f i t te d t o y o u r c a r - s u ch a s s p o i l e r, ro o f ra ck
system, two-way radio aerial - it is best to first of all consult the operator of the car
wash plant.
It is important to degrease the lips of the windscreen wiper rubbers after passing
through the automatic vehicle wash system.
Caution
Do not screw the swivelling down roof aeri al tight before washing the vehicle in an
automatic vehicle wash sy stem - risk of damage!
Washing vehicle by hand
It is important to first soften the dirt with plenty of water and rinse it off as thor-
oughly as possible before wa shing your vehicle by hand.
One should then clean the vehicle using a soft washing sponge, washing glove or
a washing brush and only slight pressure. Work from the top to the bottom -
beginning with the roof. Only place slight pressure on the vehicle paintwork during
cleaning Only use a car shampoo for stubborn dirt.
Wash out the sponge or washing glove thoroughly at short intervals.
Clean wheels, door sills and similar parts last. Use a second sponge for such areas. Rinse off the vehicle well after giving it a wash and dry it off using a chamois leather.
WARNING
•The ignition should always be switched off when you wash your vehicle -
risk of accident!
•Protect your hands and arms from sharp-edged metal parts when you
are cleaning the underfloor, the inside of the wheel housings or the wheel
trims - risk of cuts.
Caution
•Do not wash your vehicle in bright sunlight - risk of paint damage.
•Ensure that the jet of water is not aimed directly at the locks or at the door and
panel joints if you spray your vehicle in winter down with a hose - risk of freezing.
•Do not use any insect sponges, rough ki tchen sponges or similar cleaning prod-
ucts - risk of damage to the surface of paintwork.
For the sake of the environment
Only wash your vehicle at washing bays specifically reserved for this purpose. This
ensures that no water which may be cont aminated by oil flows into the sewage
system. It is not even permitted to wash your vehicle in certain areas except at such
specific washing bays.
Washing with a high-pressure cleaner
When you wash your vehicle with a high-pressure cleaner, it is essential to comply
with the instructions for use of the cleaning equipment. This applies in particular to
the pressure used and to the spraying distance . Maintain a sufficiently large
distance to soft materials such as rubber hoses or insulation material.
On no account use circular spray nozzles or so-called dirt cutters!
20A5Facelift.book Page 212 Saturday, September 6, 2008 2:13 PM
Page 216 of 304
Taking care of your vehicle and cleaning the vehicle215
Using the systemSafetyDriving TipsGeneral MaintenanceBreakdown assistanceTechnical Data
Wheels
Steel wheels
You should also thoroughly wash the wheels and wheel trims when giving your
vehicle its regular wash. This prevents any brake dust, dirt and road salt from
sticking to the wheel hubs. You can remove stubborn brake abrasion adhering to
t h e w h e e l s w i t h a n i n d u s tr i a l c l e a n e r. To u c h u p a n y d a m a g e to t h e p a i n tw o r k o n th e
wheels before rust is able to form.
Light alloy wheels
Regular care of light alloy wheels is necessary in order to retain their decorative
appearance over long periods. It is part icularly important to remove regularly any
road salt and brake abrasion from light alloy wheels, otherwise the light metal will
suffer. Wash thoroughly and then treat the wheels with a protective product for light
alloy wheels which does not contain an y acidic components. We recommend to
apply a hard wax layer onto the wheel hub s every three months. You must not use
any products which cause abrasion when treating the wheel hubs. Any damage to
the paint layer on the wheel hubs must be touched up immediately.
We recommend using a preservative from Škoda genuine accessories offered by
your Škoda dealer.
WARNING
One should remember when cleaning th e wheels that moisture, ice and road
salt may adversely affect braking ef ficiency - risk of an accident!
Note
Severe layers of dirt on the wheels can also result in wheel imbalance. This may
show itself in the form of a wheel vibration which is transmitted to the steering
wheel which, in certain circumstances, ca n cause premature wear of the steering.
This means it is necessary to remove the dirt.
Underbody protection
The underside of your vehicl e is protected for life against chemical and mechanical
influences.
One cannot, however, completely rule out damage to the protective layer when
driving so we recommend that you inspect the protective layer on the underside of
your vehicle and on the chassis at certain in tervals - this is best done at the begin-
ning and end of the winter - and to touch up any damaged areas.
Škoda Service Partners have suitable spray products available as well as the neces-
sary equipment and are familiar with the instructions for use. It is therefore best to
have such touch-up work or additional corrosion protection measures carried out
by a Škoda Service Partner.
WARNING
Never use additional underbody protection or corrosion-protection agents
for the exhaust pipes, catalytic converte rs, diesel particle filter or heat
shields. When the engine reaches its operating temperature, these
substances might ignite - risk of fire!
Protection of hollow spaces
All the cavities of your vehicle which are at risk from corrosion are protected for life
by a layer of protective wax applied in the factory.
This wax protection does not require to be inspected or re-treated. Please remove
any small amount of wax which flows out of the cavities at high temperatures with
a plastic scraper and clean the spot using petroleum cleaner.
WARNING
Safety and environmental protection regulations should observed when
using petroleum cleaner to re move wax - a risk of fire!
20A5Facelift.book Page 215 Saturday, September 6, 2008 2:13 PM
Page 238 of 304
Wheels and Tyres237
Using the systemSafetyDriving TipsGeneral MaintenanceBreakdown assistanceTechnical Data
Wheels and Tyres
Wheels
General information
•New tyres do not offer optimal grip at first and should therefore be run in for
about 500 km at a moderate speed and an appropriately cautious style of driving.
You will also profit from longer tyre life.
•The tread depth of new tyres may differ because of design features and the
configuration of the tread (depending on the type of tyre and the manufacturer).
•Drive over curbs on the side of the road and other such obstacles slowly and,
where possible, at a right angles in order to avoid damage to tyres and wheel trims.
•Inspect your tyres from time to time for damage (punctures, cuts, splits and
bulges). Remove foreign bodies from the tyre profile.
•Damage to tyres and wheels is frequent ly not visible. Unusual vibrations or
pulling of the vehicle to one side could be a sign of tyre damage. Please reduce
your speed immediately and stop if you suspect that a wheel is damaged.
Inspect the tyres for signs of damage (bulges, splits, etc.). If no visible damage is
present, please drive at an appropriatel y slow speed and carefully to the nearest
specialist garage in order to have your vehicle inspected.
•Also protect your tyres from contact with oil, grease and fuel.
•Immediately replace any dust caps of the valves which have got lost.
•Mark wheels before removing them so th at their previous direction of running
can be maintained when mounted them again.
•Always store wheels or tyres which been removed in a cool, dry and, where
possible, dark place. Tyres which are not fixed to a wheel trim should be stored
upright.
Unidirectional tyres*
The direction of rotation of the tyres is marked by arrows on the wall of the tyre. This
indicates the direction of rotation of the tyre, and it is essential that the tyres are
fitted on to run in this direction. Only then are the tyres able to provide the optimal
properties in terms of grip, low noise, wear-and-tear and aquaplaning. Further information concerning
the use of unidirectional tyres ⇒page 241.
WARNING
•New tyres during the first 500 km do not offer optimal grip and should
therefore be run appropriately - risk of accident!
•Never drive with damaged tyres - risk of accident!
Note
Please observe the various differing legal requirements regarding tyres.
Tyre life
The life of your tyres very much depends on the following points:
Tyre pressure
The working life of tyres will be shortened considerably if the tyres are insufficiently
or over-inflated and this will have an adverse effect on the handling of your vehicle.
Correctly inflated tyres are of partic ular importance when travelling at high speeds.
It is therefore good to check the pressure at least once a month and also before
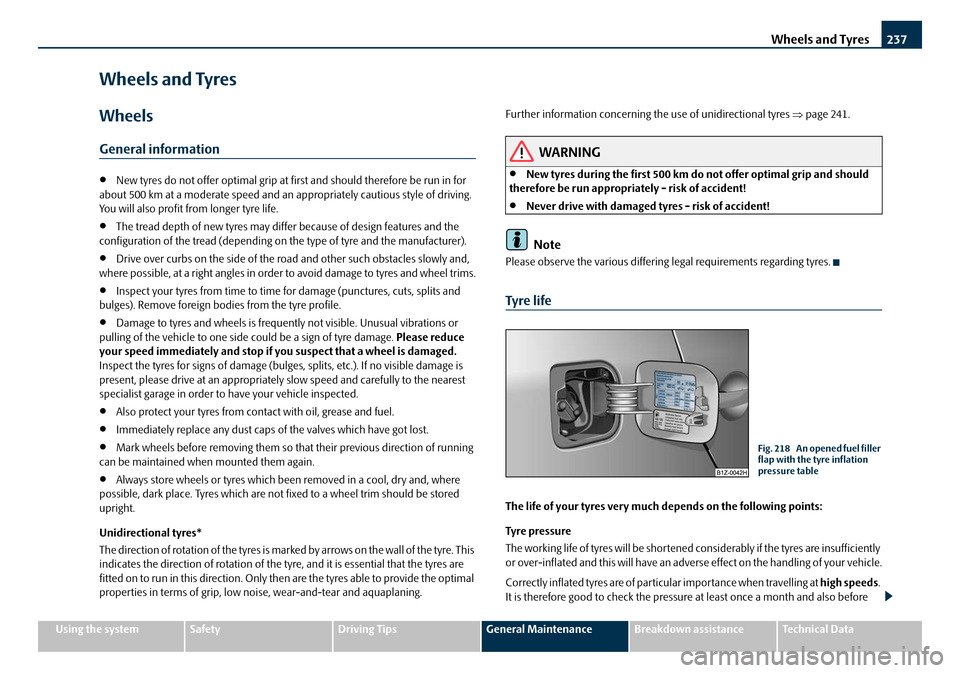
Fig. 218 An opened fuel filler
flap with the tyre inflation
pressure table
20A5Facelift.book Page 237 Saturday, September 6, 2008 2:13 PM
Page 241 of 304
Wheels and Tyres
240
The date of manufacture is a lso s tated on the tyre wal l (poss ibly o nl y on the inside
of wheel):
DOT ... 20 08...
means, for example, that the tyre was manufactured in the 20th week of the year
2008.
Any spare wheel which differs from the tyres fitted to the vehicle (e.g. winter tyres
or low-profile tyres) should only be used only for a short time in the event of a
puncture and when adopting an appropriately cautious style of driving. It should be
replaced as quickly as po ssible by a normal wheel.
WARNING
•Only use those tyres or wheel rims which have been approved for your
model of Škoda Auto a.s. vehicle. Failure to observe this instruction will
adversely affect the road safety of your vehicle - risk of accident! Approval
and licencing of your vehicle on public roads may also become void as a
result.
•You must on no account drive at a higher speed than is permissible for
y our t yre s - ris k of a n ac cid e n t re su lti ng fro m ty re d a m ag e a nd lo ss o f c ont rol
over your vehicle.
•Tyres which are 6 years old or more should only be fitted in exceptional
cases and when adopting an appropriately cautious style of driving.
•Never fit tyres which have already been used without having adequate
knowledge of their previous history. Ty res age even if they have not been used at all or only very little. A spare tyre must only be used in exceptional
cases and only then when adopting an appropriately cautious style of
driving.
•Do not, where possible, replace indivi
dual tyres but at least replace them
on both wheels of a given axle at the same time. Always fit the tyres with the
deeper tread depth to the front wheels.
For the sake of the environment
Old tyres must be disposed of in conf ormity with the appropriate regulations.
Note
It is not normally possible to fit wheels from other models of cars for technical
reasons. This may also apply in certain circumstances to the wheels of the same
type of vehicle.
Wheel bolts
Wheels and wheel bolts are matched to each other in terms of design. Each time
you fit other wheels - e.g. light alloy wheels or wheels with winter tyres - you must
therefore also use the matching wheel bolts of the correct length and shape of
spherical cap. This is essent ial to ensure that the wheels are tightly fitted and that
the brake system operates properly.
If you retrofit wheel trims (or have this done), please also ensure that an adequate
flow of air remains assured for cooling the brake system.
The Škoda Service Partners are instructed in the technical possibilities which exist
regarding converting or retrofitti ng wheels, tyres and wheel trim.
WARNING
•In case of incorrect treatment of th e wheel bolts, the wheel can loosen
when the car is moving - risk of accident!
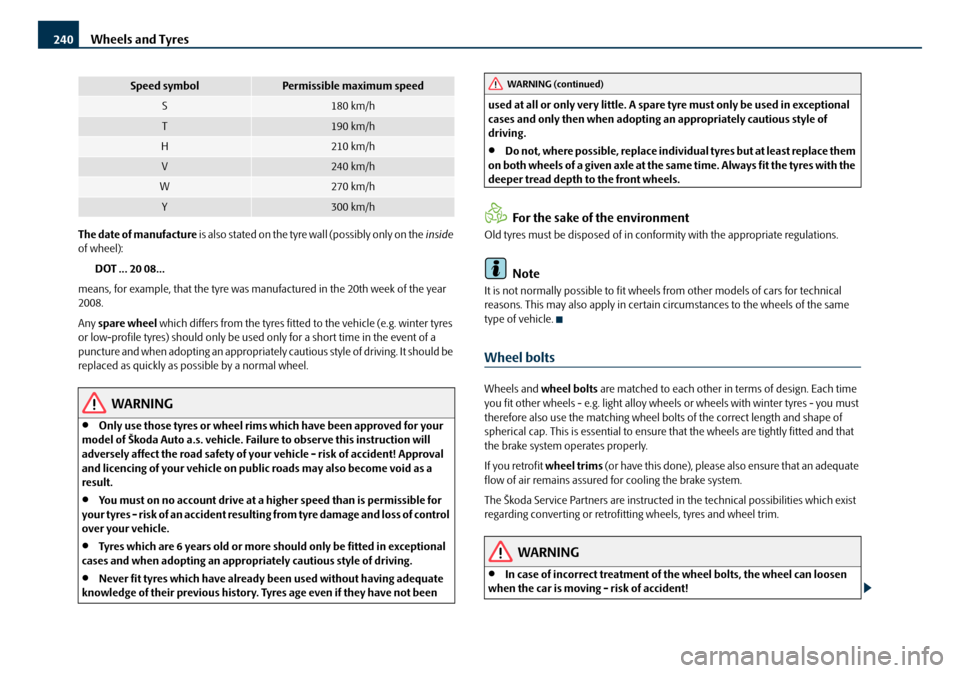
Speed symbolPermissible maximum speed
S180 km/h
T190 km/h
H210 km/h
V240 km/h
W270 km/h
Y300 km/h
WARNING (continued)
20A5Facelift.book Page 240 Saturday, September 6, 2008 2:13 PM
Page 243 of 304
Wheels and Tyres
242
cautious style of driving as the tyre is no longer able to provide optimal grip and
handling in such a situation. This particul arly important on wet roads. Please refer
to the notes ⇒page 247, “Spare wheel*”.
You should have the defective tyre replac ed as soon as possible and restore the
correct direction of rotation on all tyres
Snow chains
Snow chains must only be mounted on the front wheels.
When driving on wintry roads, snow chains improve not only traction, but also the
braking performance.
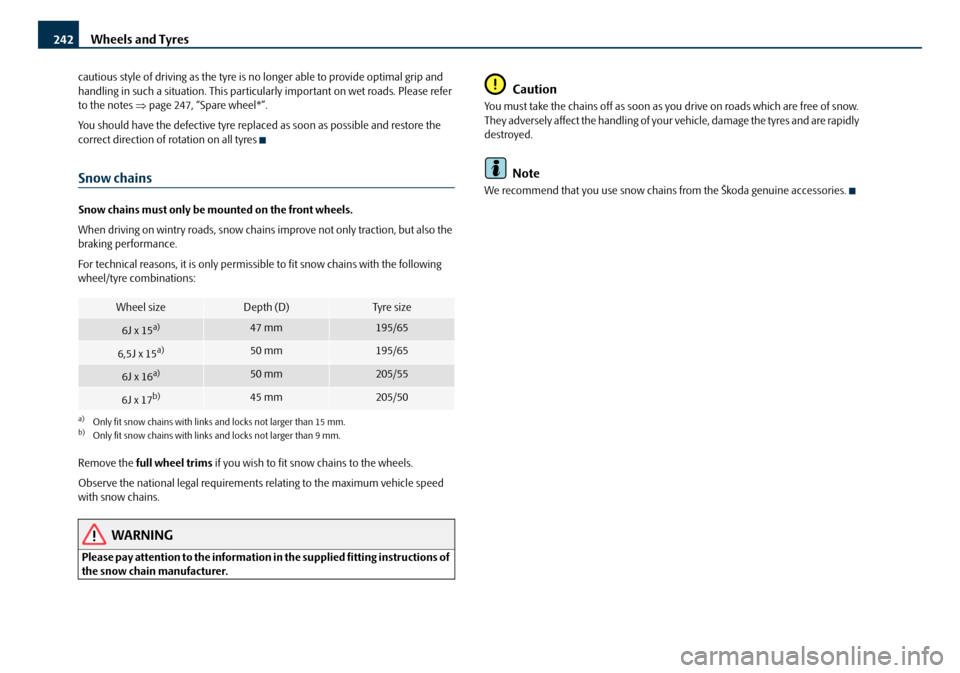
For technical reasons, it is only permissible to fit snow chains with the following
wheel/tyre combinations:
Remove the full wheel trims if you wish to fit snow chains to the wheels.
Observe the national legal requirements relating to the maximum vehicle speed
with snow chains.
WARNING
Please pay attention to the information in the supplied fitting instructions of
the snow chain manufacturer.
Caution
You must take the chains off as soon as you drive on roads which are free of snow.
They adversely affect the handling of your vehicle, damage the tyres and are rapidly
destroyed.
Note
We recommend that you use snow chains from the Škoda genuine accessories.
Wheel sizeDepth (D)Tyre si z e
6J x 15a)
a)Only fit snow chains with links and locks not larger than 15 mm.
47 mm195/65
6,5J x 15a)50 mm195/65
6J x 16a)50 mm205/55
6J x 17b)
b)Only fit snow chains with links and locks not larger than 9 mm.
45 mm205/50
20A5Facelift.book Page 242 Saturday, September 6, 2008 2:13 PM
Page 247 of 304
Breakdown assistance
246
The fire extinguisher must be checked by an authorised person or company annu-
ally (please observe the differing legal requirements).
WARNING
If the fire extinguisher is not correc tly attached, in case of sudden manoeu-
vres or an accident it can be “thrown” through the interior compartment and
cause injuries.
Note
•The fire extinguisher must comply with the relevant and valid legal require-
ments.
•Pay attention to the expiration date of the fire extinguisher. If the fire extin-
guisher is used after the expiration date, its proper function is no longer assured.
•The fire extinguisher is only supplied in certain countries within the scope of
delivery.
Vehicle tool kit
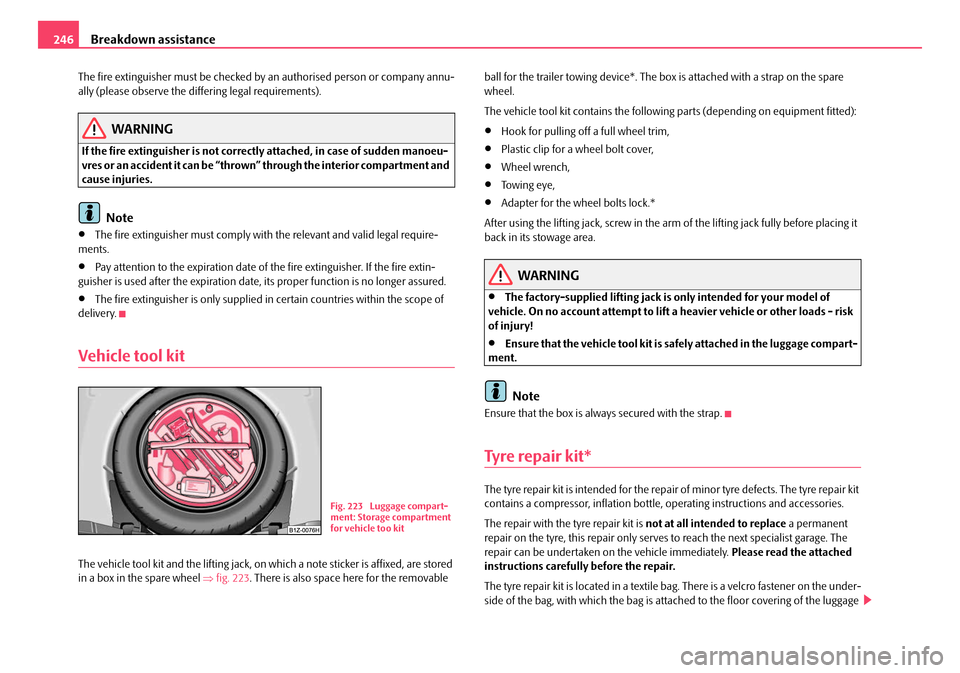
The vehicle tool kit and the lifting jack, on which a note sticker is affixed, are stored
in a box in the spare wheel ⇒fig. 223 . There is also space here for the removable ball for the trailer towing device*. The bo
x is attached with a strap on the spare
wheel.
The vehicle tool kit contains the following parts (depending on equipment fitted):
•Hook for pulling off a full wheel trim,
•Plastic clip for a wheel bolt cover,
•Wheel wrench,
•To w i n g e y e ,
•Adapter for the wheel bolts lock.*
After using the lifting jack, screw in the arm of the lifting jack fully before placing it
back in its stowage area.
WARNING
•The factory-supplied lifting jack is only intended for your model of
vehicle. On no account attempt to lift a heavier vehicle or other loads - risk
of injury!
•Ensure that the vehicle tool kit is safely attached in the luggage compart-
ment.
Note
Ensure that the box is alwa ys secured with the strap.
Tyre repair kit*
The tyre repair kit is intended for the repair of minor tyre defects. The tyre repair kit
contains a compressor, inflation bottle, operating instructions and accessories.
The repair with the tyre repair kit is not at all intended to replace a permanent
repair on the tyre, this repair only serves to reach the next specialist garage. The
repair can be undertaken on the vehicle immediately. Please read the attached
instructions carefully before the repair.
The tyre repair kit is located in a textile bag. There is a velcro fastener on the under-
side of the bag, with which the bag is atta ched to the floor covering of the luggage
Fig. 223 Luggage compart-
ment: Storage compartment
for vehicle too kit
20A5Facelift.book Page 246 Saturday, September 6, 2008 2:13 PM
Page 248 of 304

Breakdown assistance247
Using the systemSafetyDriving TipsGeneral MaintenanceBreakdown assistanceTechnical Data
compartment in such a way that the side of the bag rests on the right side of the
luggage compartment and on the seat backrest.
Spare wheel*
The spare wheel lies in a well under the floor covering of the luggage compartment
and is fixed in place using special screws
⇒fig. 224 .
Before removing the spare wheel, you must take out the box with the vehicle tool
kit box ⇒page 246, fig. 223 .
One should check the inflation pressure in the spare wheel (at best when generally
checking the tyre air pressures - see sign on the fuel filler flap ⇒ page 237) to
ensure that the spare wheel is always ready to use.
Temporary spare wheel
A warning label displayed on the rim of the temporary spare wheel indicates that
your vehicle is equipped with a temporary spare wheel.
Please observe the following notes when driving with a temporary spare wheel:
•After fitting on the wheel, the warning stic ker must not be concealed (e.g. by the
wheel trim).
•Do not drive with this spare wheel at more than 80 km/h - risk of accident. Avoid
accelerating at full throttle, sharp braking and fast cornering.
•The inflation pressure for this spare wheel is identical to the inflation pressure
of the standard tyres. The temporary spar e wheel R 18 must have an inflation pres-
sure of 420 kPa (4.2 bar)!
•Use this spare wheel only to reach the nearest specialist garage as it is not
intended for continuous use.
•No other summer or winter tyres must be mounted on the rim of the spare
wheel R 18.
Changing a wheel
Preliminary work
The following steps should be carried out before actually changing the
wheel.
– If it is necessary to change a wheel, park the vehicle as far away as possible from the traffic flow. The place you choose should be level.
–Have all the occupants get out. While changing a wheel, the occu-
pants of the vehicle should not stan d on the road (e.g. behind a crash
barrier).
– Apply the handbrake firmly.
–Engage 1st gear or if your vehicle is fitted with an automatic gearbox,
position the selector lever into position P .
– If a trailer is coupled, uncouple it.
– Take the vehicle tool kit ⇒ page 246 and the spare wheel*
⇒ page 247 out of the luggage compartment.
WARNING
•If you find yourself in flowing traffic switch on the hazard warning lights
system and place the warning triangle on the side of the road at the
prescribed distance from your vehicle while observing all national legal
Fig. 224 Luggage compart-
ment: Spare wheel
20A5Facelift.book Page 247 Saturday, September 6, 2008 2:13 PM
Page 249 of 304
Breakdown assistance
248
provisions. In this way you are protecting not only yourself but also other
road users.
•Never start the engine with the vehicle sitting on the raised jack - danger
of suffering injury.
Caution
If you have to change a wheel on a slope first block the opposite wheel with a stone
or similar object in order to secure th e vehicle from unexpectedly rolling away.
Note
Comply with the national legal regulations.
Changing a wheel
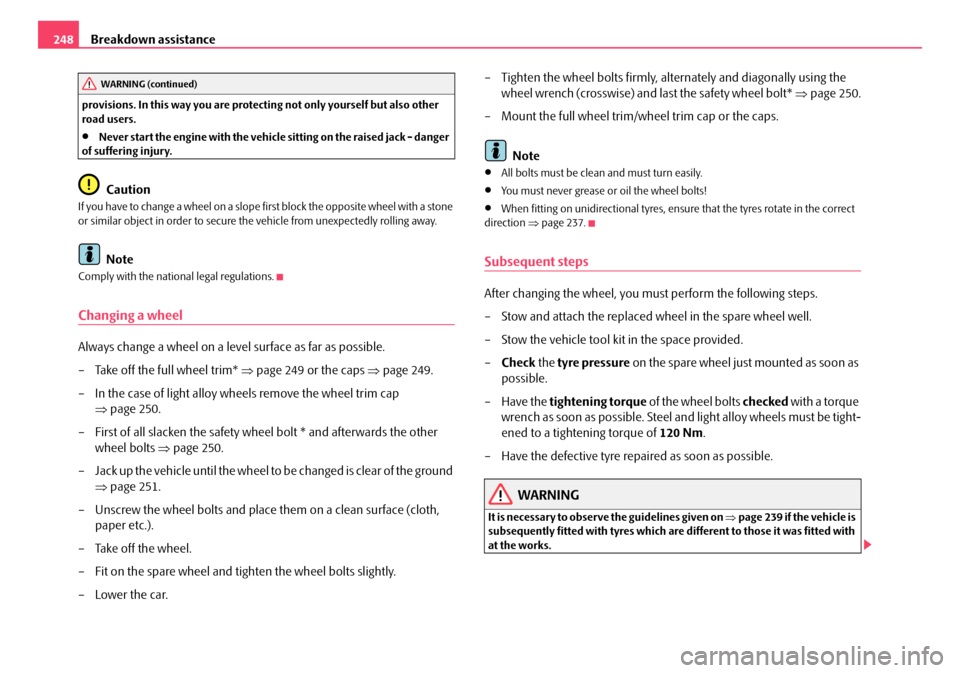
Always change a wheel on a level surface as far as possible.
– Take off the full wheel trim* ⇒page 249 or the caps ⇒page 249.
– In the case of light alloy wheels remove the wheel trim cap ⇒page 250.
– First of all slacken the safety wh eel bolt * and afterwards the other
wheel bolts ⇒page 250.
– Jack up the vehicle until the wheel to be changed is clear of the ground
⇒ page 251.
– Unscrew the wheel bolts and place them on a clean surface (cloth, paper etc.).
– Take off the wheel.
– Fit on the spare wheel and tighten the wheel bolts slightly.
–Lower the car. – Tighten the wheel bolts firmly, al
ternately and diagonally using the
wheel wrench (crosswise) and last the safety wheel bolt* ⇒page 250.
– Mount the full wheel trim/w heel trim cap or the caps.
Note
•All bolts must be clean and must turn easily.
•You must never grease or oil the wheel bolts!
•When fitting on unidirectional tyres, ensure that the tyres rotate in the correct
direction ⇒page 237.
Subsequent steps
After changing the wheel, you must perform the following steps.
– Stow and attach the replaced wheel in the spare wheel well.
– Stow the vehicle tool kit in the space provided.
– Check the tyre pressure on the spare wheel just mounted as soon as
possible.
– Have the tightening torque of the wheel bolts checked with a torque
wrench as soon as possible. Steel and light alloy wheels must be tight-
ened to a tightening torque of 120 Nm.
– Have the defective tyre repaired as soon as possible.
WARNING
It is necessary to observe the guidelines given on ⇒page 239 if the vehicle is
subsequently fitted with tyres which are different to those it was fitted with
at the works.
WARNING (continued)
20A5Facelift.book Page 248 Saturday, September 6, 2008 2:13 PM
Page 250 of 304
Breakdown assistance249
Using the systemSafetyDriving TipsGeneral MaintenanceBreakdown assistanceTechnical Data
Note
•If you find, when changing the wheel, that the wheel bolts are corroded and
difficult to turn, the bolts mu st be replaced before checking the tightening torque.
•Drive cautiously and only at a moderate speed to a workshop where the tight-
ening torque can be checked.
Full wheel trim*
Pulling off
– Hook the clamp found in the vehicle tool kit into the reinforced edge of the full wheel trim.
– Push the wheel key through the clamp, support the wheel key at the tyre and pull off the wheel trim.
Installing
– First press the full wheel trim onto the wheel at the valve opening provided. Then press the full wheel trim into the wheel in such a way
that its entire circumference locks correctly in place.
Caution
•Use the pressure of your hand, do not knock on the full wheel trim! Heavy
knocks mainly on the points where the full wheel trim has not been inserted into
the wheel, can result in damage to the guide and centering elements of the full
wheel trim.
•First check for yourself that the th eft-deterrent wheel bolt is located
⇒ page 251 in the hole in the area of the valve before fitting the full wheel trim onto
a steel wheel which is attached with a theft-deterrent wheel bolt.
Wheel bolts with caps*
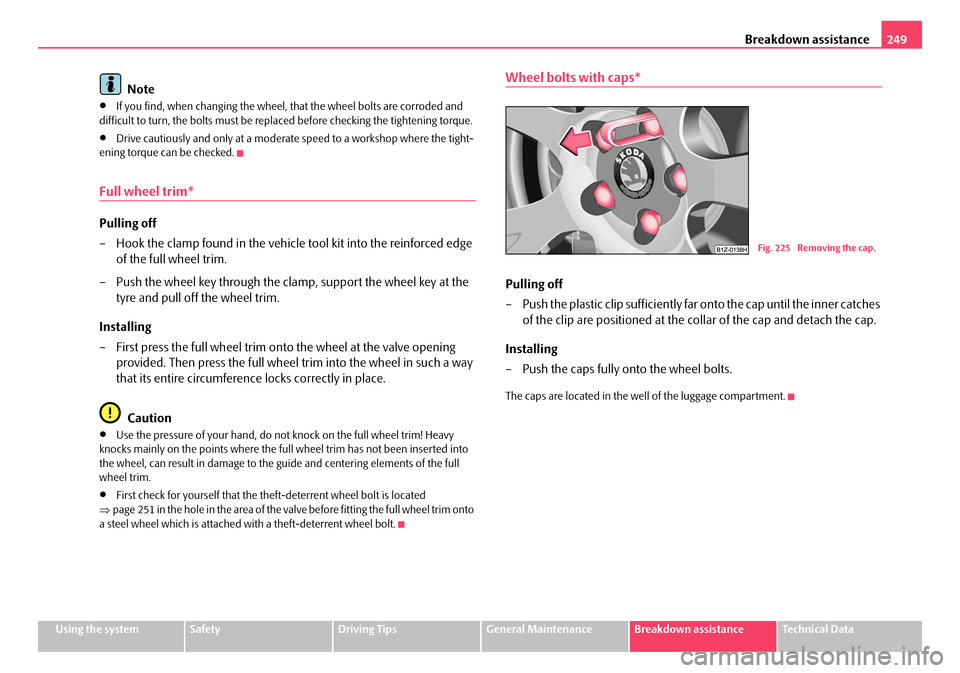
Pulling off
– Push the plastic clip sufficiently fa r onto the cap until the inner catches
of the clip are positioned at the collar of the cap and detach the cap.
Installing
– Push the caps fully onto the wheel bolts.
The caps are located in the we ll of the luggage compartment.
Fig. 225 Removing the cap.
20A5Facelift.book Page 249 Saturday, September 6, 2008 2:13 PM
Page 251 of 304
Breakdown assistance
250
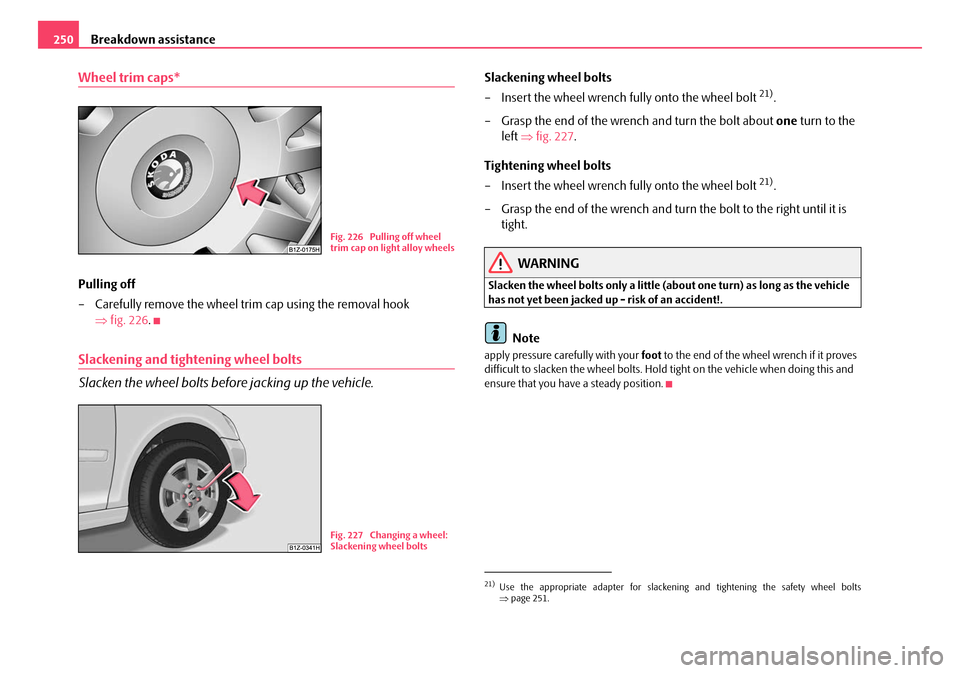
Wheel trim caps*
Pulling off
– Carefully remove the wheel tr im cap using the removal hook
⇒ fig. 226 .
Slackening and tightening wheel bolts
Slacken the wheel bolts before jacking up the vehicle.
Slackening wheel bolts
– Insert the wheel wrench fully onto the wheel bolt
21).
– Grasp the end of the wrench and turn the bolt about one turn to the
left ⇒fig. 227 .
Tightening wheel bolts
– Insert the wheel wrench fully onto the wheel bolt
21).
– Grasp the end of the wrench and turn the bolt to the right until it is tight.
WARNING
Slacken the wheel bolts only a little (about one turn) as long as the vehicle
has not yet been jacked up - risk of an accident!.
Note
apply pressure carefully with your foot to the end of the wheel wrench if it proves
difficult to slacken the wheel bolts. Hold tight on the vehicle when doing this and
ensure that you have a steady position.
Fig. 226 Pulling off wheel
trim cap on light alloy wheels
Fig. 227 Changing a wheel:
Slackening wheel bolts
21)Use the appropriate adapter for slackening and tightening the safety wheel bolts
⇒ page 251.
20A5Facelift.book Page 250 Saturday, September 6, 2008 2:13 PM