display SKODA OCTAVIA 2009 2.G / (1Z) Owner's Guide
[x] Cancel search | Manufacturer: SKODA, Model Year: 2009, Model line: OCTAVIA, Model: SKODA OCTAVIA 2009 2.G / (1Z)Pages: 304, PDF Size: 19.56 MB
Page 119 of 304

Heating and air conditioning system
118
Lengthy and uneven distribution of the air flow out of the vents (in particular at the leg area) and large differences in temperature, for example when getting out of the vehicle, can result in chills in sensitive persons.Recirculated air mode In recirculated air mode air is sucked
out of the interior of the vehicle
and then fed back into the interior. When the automatic air distribu-tion control is switched on, an air quality sensor measures the concentration of pollutants in the drawn-in air.Recirculated air mode prevents polluted air outside the vehicle from getting into the vehicle, for example when driving through a tunnel or when standing in a traffic jam. If a considerable increase in concentration of pollutants is recognized by the ai
r quality sensor, when the automatic
air distribution control is switched
on, the air distribution control will
temporarily be switched off. If the concentration of pollutants decreases to the normal level, the air distributi
on control is automatically switched
off so that fresh air can be guided into the vehicle interior. Switching recirculated air mode on – Press the button repeatedly until the warning light on the left
side of the button lights up.
Switch on automatic air distribution control – Press the button repeatedly until the warning light on the right
side of the button lights up.
Switch off automatic air distribution control temporarily – If the air quality sensor does not sw
itch on the air distribution control
automatically when there is a nausea
ting smell, you can switch it on
yourself by pressing the button *.
The warning light lights up in
the button on the left side.
Switching recirculated air mode off – Press the button or press the button repetitively, until the
warning lights in the button go out.
WARNING
You should not leave recirculated air mode on over a longer period of time, as “stale” air may result in fatigue in the driver and occupants, divert your attention and also cause the windows to mist up. The risk of having an acci- dent increases. Switch recirculated air mode off as soon as the windows begin misting up.
Note
•
If the windscreen mists up, press the button
⇒page 116, fig. 141
.
After the windscreen has been demisted, press the button .•
The automatic air distribution control operates only if the outside temperature
is higher than approx. 2°C.Controlling blower There are a total of seven blower stages available.The Climatronic system controls the bl
ower stages automatically in line
with the interior temperature. You
can also, however, adapt the blower
stages manually to suit your particular needs. – Press again the button on the left side (reduce blower speed) or on
the right side (increase blower speed).
If you switch off the blower, th
e Climatronic is switched off.
The set blower speed is displayed above the button when the respective number of warning lights come on.
AUTO
A1
AUTO
se0.1.book Page 118 Frida
y, April 10, 2009 3:19 PM
Page 121 of 304
Heating and air conditioning system
120
•
After switching off the auxiliary heatin
g, the coolant pump runs for a short
period.•
The auxiliary heating and ventilation does not switch on or comes on, if the
vehicle battery indicates a low loading state.•
The auxiliary heating (auxiliary heating) does not switch on, if the following was
shown in the information display or before switching off the ignition:
Please refuel!
(Please refuel!)
.
•
The air inlet in front of the windscreen must be free of ice, snow or leaves in
order to ensure that the auxiliary heating operates properly.•
So that warm air can flow into the vehi
cle interior after switching on the auxil-
iary heating, you must maintain the te
mperature normally selected by you (we
recommend 22°C). It is recommended to
put the air flow in the position
.
•
On vehicles with DPF (diesel particle filter) the warm coolant heats up the
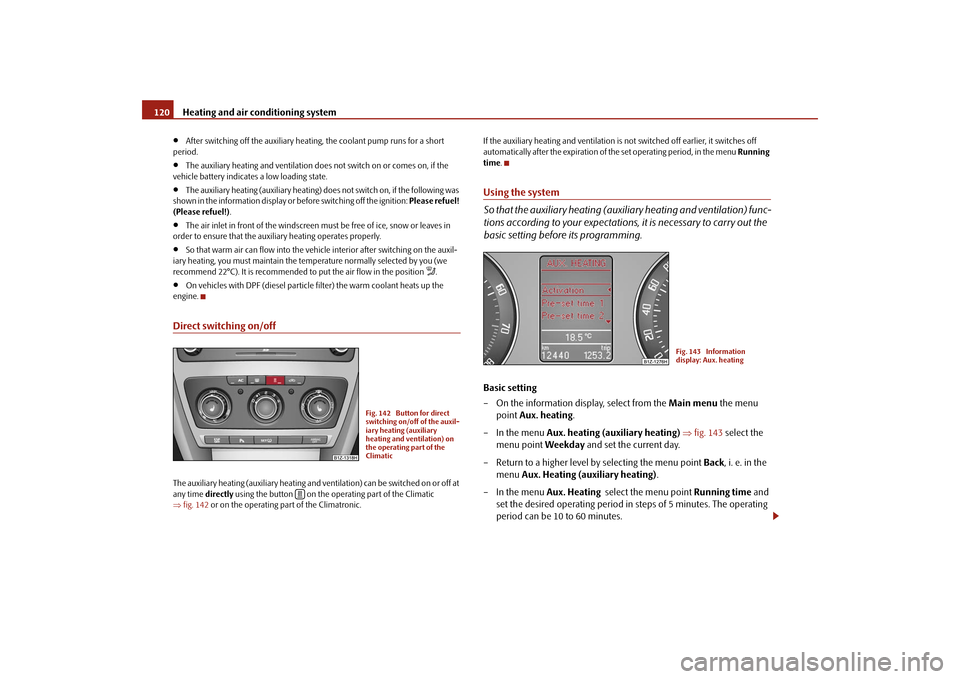
engine.Direct switching on/offThe auxiliary heating (auxiliary heating and ve
ntilation) can be switched on or off at
any time
directly
using the button on the operating part of the Climatic
⇒ fig. 142
or on the operating part of the Climatronic.
If the auxiliary heating and ventilation is not switched off earlier, it switches off automatically after the expiration of the set operating period, in the menu
Running
time
.
Using the system So that the auxiliary heating (auxiliary heating and ventilation) func- tions according to your expectations, it is necessary to carry out the basic setting before
its programming.
Basic setting – On the information display, select from the
Main menu
the menu
point
Aux. heating
.
– In the menu
Aux. heating (auxiliary heating)
⇒
fig. 143
select the
menu point
Weekday
and set the current day.
– Return to a higher level
by selecting the menu point
Back
, i. e. in the
menu
Aux. Heating (auxiliary heating)
.
– In the menu
Aux. Heating
select the menu point
Running time
and
set the desired operating period in steps of 5 minutes. The operating period can be 10 to 60 minutes.
Fig. 142 Button for direct switching on/off of the auxil-iary heating (auxiliary heating and ventilation) on the operating part of the Climatic
Fig. 143 Information display: Aux. heating
se0.1.book Page 120 Frida
y, April 10, 2009 3:19 PM
Page 122 of 304

Heating and air conditioning system
121
Using the system
Safety
Driving Tips
General Maintenance
Breakdown assistance
Technical Data
– By selecting the menu point
Back
, you will reach in the menu
Aux. Heating (auxiliary heating)
.
– In the menu
Aux. heating (auxiliary heating)
select the menu point
Mode
.
– In the menu
Mode
select the desired mode
Heating
or
Ventilation
.
ProgrammingFor the programming of the auxiliary heating (auxiliary heating and ventilation) in the menu
Aux. heating (Aux. heating)
there are three pre-set times:
•
Pre-set time 1
•
Pre-set time 2
•
Pre-set time 3
In each pre-set time, the day and the ti
me (hour and minute) can be set for
switching on the auxiliary heating and/or ventilation. An empty position can be found between
Sunday and Monday when selecting the
day. If this empty position
is selected, the activation is performed without taking
into account the day. If you leave the pre-set menu by selecting the menu
Back
or do not operate the
display for longer than 10°seconds, the set values are stored, but the pre-set time is not active. Both other pre-set times can be prog
rammed and stored in the same way.
If you select the menu
Activate
after setting the desired values, appears on the
display
Pre-set time (weekday, hours, minute) activated! (Pre-set time
(weekday, hour, minute) activated!
and the set pre-set time is active.
Only one programmed pre-set time can be active.The last programmed pre-set time remains active.After the auxiliary heating activates at the set time, it is necessary to pre-set a time again.
Changing the active pre-set time is carried out after selecting the menu point Activate
in the menu
Aux. heating (auxiliary heating)
by selecting a pre-set time.
The prerequisite for the correct switching on of the auxiliary heating (auxiliary heating and ventilation) according to th
e programmed pre-set time is the correct
setting of the current time and the weekday
⇒page 120.
If the system is running, a warning light in
the button for direct switching on/off of
the auxiliary heating lights up. The running system deactivates after expirati
on of the operating period or is deac-
tivated earlier by pres
sing the button for direct swit
ching on/off of the auxiliary
heating
⇒page 120.
The random pre-set time can be deactivated by selecting the menu point
Deactive
in the menu
Activate
.
After selecting the menu point
Fa c t o r y s e t t i n g
in the menu
Aux. heating
(auxiliary heating)
, it is possible to change to the factory setting.
se0.1.book Page 121 Frida
y, April 10, 2009 3:19 PM
Page 127 of 304

Starting-off and Driving
126
The reversing lights will come on once reverse gear is engaged, provided the igni- tion is on.
WARNING
Never engage the reverse gear when driving - risk of accident!
Note
•
One should not lay the hand on the shift lever while driving the vehicle. The
pressure of the hand will be transferred to
the gearshift forks in the gearbox. This
can, over a period of time, lead to early wear of the gearshift forks.•
Depress the clutch pedal fully when chan
ging gears, in order to avoid unneces-
sary wear and damage to the clutch.HandbrakeApplying the handbrake – Pull the handbrake lever up fully.
Releasing the handbrake – Pull the handbrake lever up slightly
and
at the same time
press in the
locking button
⇒
fig. 148
.
– Hold the button pressed and push the handbrake lever down fully
⇒
.
The handbrake warning light
lights up when the handbrake is applied, provided
the ignition is on. A warning signal sounds and the following text appears in the display* if you have inadvertently driven off with the handbrake applied:
Handbrake on
The handbrake warning is activated if you drive at a speed of more than 6 km/h for more than 3 seconds.
WARNING
•
Please note that the handbrake must be fully released. A handbrake
which is only partially released can re
sult in the rear brakes overheating
which will have a negative effect on the operation of the brake system - risk of accident! In addition this can result in premature wear of the rear brake pads.•
Never leave children unattended in the vehicle. The children might, for
example, release the handbrake or take the vehicle out of gear. The vehicle might then move off - risk of accident!
Caution
After the car has come to a stop, always firs
t of all apply the handbrake firmly before
then additionally engaging a gear (manual gearbox) or moving the selector lever into position
P (automatic gearbox).
Fig. 148 Centre console: Handbrake
se0.1.book Page 126 Frida
y, April 10, 2009 3:19 PM
Page 128 of 304
Starting-off and Driving
127
Using the system
Safety
Driving Tips
General Maintenance
Breakdown assistance
Technical Data
Rear parking aid*The parking aid provides a warning of obstacles behind the vehicle.The audible parking aid determines the distance between the rear bumper and an obstacle located behind the vehicle with
the aid of ultrasound sensors. The tones
of the parking aid can be adapted in
the menu of the information display*
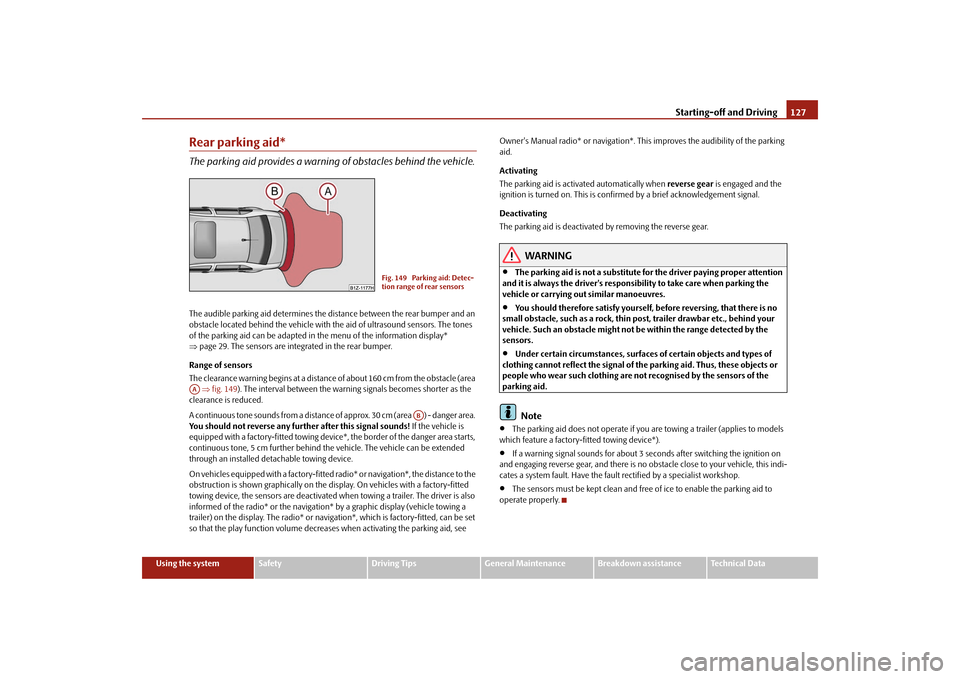
⇒ page 29. The sensors are integrated in the rear bumper. Range of sensors The clearance warning begins at a distance
of about 160 cm from the obstacle (area
⇒fig. 149
). The interval between the warning signals becomes shorter as the
clearance is reduced. A continuous tone sounds from a distance
of approx. 30 cm (area ) - danger area.
You should not reverse any further after this signal sounds!
If the vehicle is
equipped with a factory-fitted towing device*, the border of the danger area starts, continuous tone, 5 cm further behind th
e vehicle. The vehicle can be extended
through an installed detachable towing device. On vehicles equipped with a factory-fitted
radio* or navigation*, the distance to the
obstruction is shown graphically on the disp
lay. On vehicles with a factory-fitted
towing device, the sensors are deactivated when towing a trailer. The driver is also informed of the radio* or the navigation
* by a graphic display (vehicle towing a
trailer) on the display. The radio* or navi
gation*, which is factory-fitted, can be set
so that the play function volume decrea
ses when activating the parking aid, see
Owner's Manual radio* or navigation*. This
improves the audibility of the parking
aid. Activating The parking aid is activated automatically when
reverse gear
is engaged and the
ignition is turned on. This is conf
irmed by a brief acknowledgement signal.
Deactivating The parking aid is deactivated by removing the reverse gear.
WARNING
•
The parking aid is not a substitute for the driver paying proper attention
and it is always the driver's responsibility to take care when parking the vehicle or carrying ou
t similar manoeuvres.
•
You should therefore satisfy yourself, before reversing, that there is no
small obstacle, such as a rock, thin post, trailer drawbar etc., behind your vehicle. Such an obstacle might not
be within the range detected by the
sensors.•
Under certain circumstances, surfaces of certain objects and types of
clothing cannot reflect the signal of th
e parking aid. Thus, these objects or
people who wear such clothing are not recognised by the sensors of the parking aid.
Note
•
The parking aid does not operate if you are towing a trailer (applies to models
which feature a factory-fi
tted towing device*).
•
If a warning signal sounds for about 3 seconds after switching the ignition on
and engaging reverse gear, and there is no ob
stacle close to your vehicle, this indi-
cates a system fault. Have the fault rectified by a specialist workshop.•
The sensors must be kept clean and free of ice to enable the parking aid to
operate properly.
Fig. 149 Parking aid: Detec- tion range of rear sensors
AA
AB
se0.1.book Page 127 Frida
y, April 10, 2009 3:19 PM
Page 129 of 304
Starting-off and Driving
128
Front and rear parking aid*The parking aid provides a warning of obstacles in front and behind the vehicle.The audible parking aid determines the distance between the front or rear bumper and an obstacle with the aid of ultrasound sensors. The sensors are integrated in the front and rear bumper. The signal tones for the front parking aid sound higher as standard than for the rear parking aid. The tones of the parking aid can be adapted in the menu of the information display*
⇒page 29.
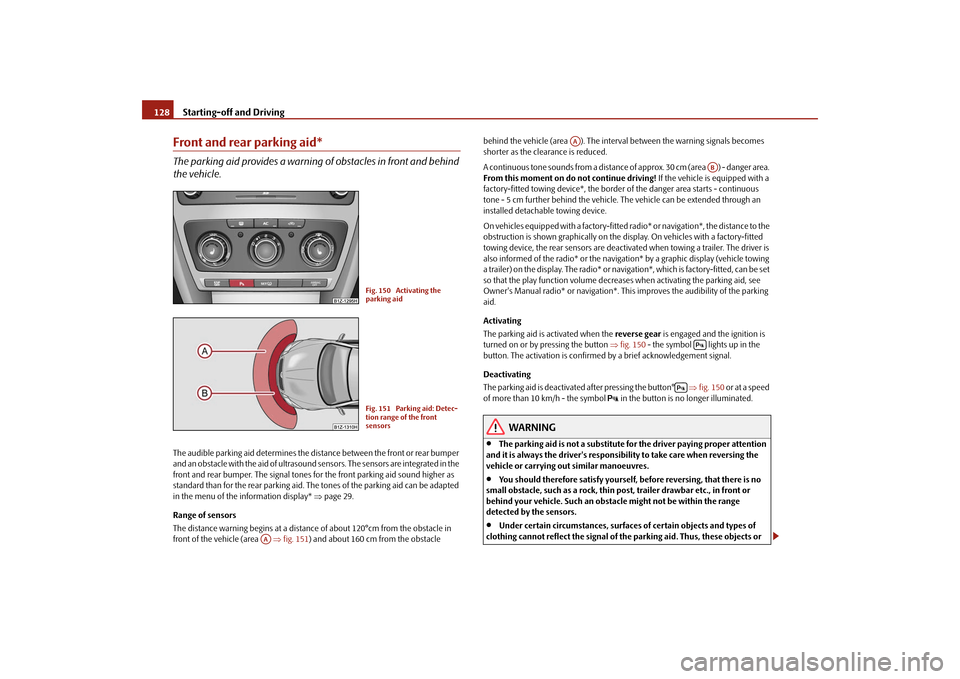
Range of sensors The distance warning begins at a distance
of about 120°cm from the obstacle in
front of the vehicle (area
⇒fig. 151
) and about 160 cm from the obstacle
behind the vehicle (area ). The interv
al between the warning signals becomes
shorter as the clearance is reduced. A continuous tone sounds from a distance
of approx. 30 cm (area ) - danger area.
From this moment on do not continue driving!
If the vehicle is equipped with a
factory-fitted towing device*, the border
of the danger area
starts - continuous
tone - 5 cm further behind
the vehicle. The vehicle ca
n be extended through an
installed detachable towing device. On vehicles equipped with a factory-fitted radio* or navigation*, the distance to the obstruction is shown graphically on the di
splay. On vehicles with a factory-fitted
towing device, the rear sensors are deactivated when towing a trailer. The driver is also informed of the radio* or the navigation* by a graphic display (vehicle towing a trailer) on the display. The radio* or navi
gation*, which is factory-fitted, can be set
so that the play function volume decreases when activating the parking aid, see Owner's Manual radio* or navigation*. This
improves the audibili
ty of the parking
aid. Activating The parking aid is activated when the
reverse gear
is engaged and the ignition is
turned on or by pressing the button
⇒fig. 150
- the symbol lights up in the
button. The activation is confirmed
by a brief acknowledgement signal.
Deactivating The parking aid is deactivate
d after pressing the button°
⇒fig. 150
or at a speed
of more than 10 km/h - the symbol
in the button is no longer illuminated.
WARNING
•
The parking aid is not a substitute fo
r the driver paying proper attention
and it is always the driver's responsibility to take care when reversing the vehicle or carrying out similar manoeuvres.•
You should therefore satisfy yourself, before reversing, that there is no
small obstacle, such as a rock, thin post, trailer drawbar etc., in front or behind your vehicle. Such an obstacle might not be within the range detected by the sensors.•
Under certain circumstances, surfaces of certain objects and types of
clothing cannot reflect the signal of the parking aid. Thus, these objects or
Fig. 150 Activating the parking aidFig. 151 Parking aid: Detec-tion range of the front sensors
AA
AA
AB
se0.1.book Page 128 Frida
y, April 10, 2009 3:19 PM
Page 135 of 304
Automatic gearbox
134
result of this the vehicle can no longer be
driven. If the clutch opens automatically,
depress the brake pedal, wait a few se
conds and only then continue driving.
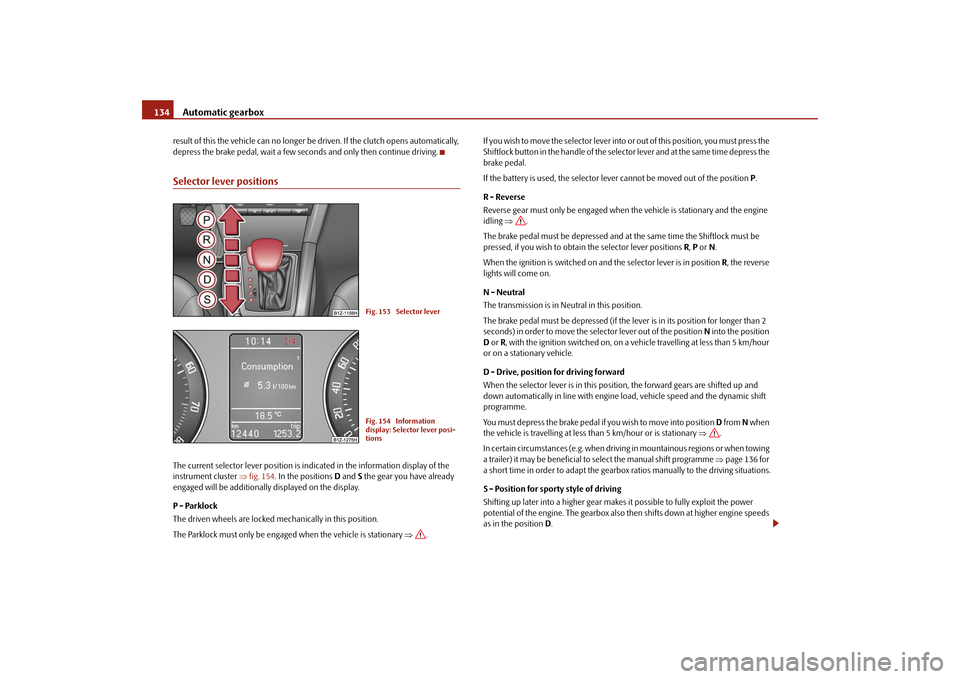
Selector lever positionsThe current selector lever position is in
dicated in the information display of the
instrument cluster
⇒fig. 154
. In the positions
D and
S the gear you have already
engaged will be additionally displayed on the display. P - Parklock The driven wheels are locked mechanically in this position. The Parklock must only be engaged when the vehicle is stationary
⇒
.
I f y o u w i s h t o m o v e t h e s e l e c t o r l e v e r i n to
or out of this position, you must press the
Shiftlock button in the handle of the selector lever and at the same time depress the brake pedal. If the battery is used, the selector leve
r cannot be moved out of the position
P.
R - Reverse Reverse gear must only be engaged when
the vehicle is stationary and the engine
idling
⇒
.
The brake pedal must be depressed and at the same time the Shiftlock must be pressed, if you wish to obtain the selector lever positions
R, P or N.
When the ignition is switched on and the selector lever is in position
R, the reverse
lights will come on. N - Neutral The transmission is in Neutral in this position. The brake pedal must be depressed (if the lever is in its position for longer than 2 seconds) in order to move the selector lever out of the position
N into the position
D or R, with the ignition switched on, on a vehicle travelling at less than 5 km/hour
or on a stationary vehicle. D - Drive, position for driving forward When the selector lever is in this position, the forward gears are shifted up and down automatically in line with engine load, vehicle speed and the dynamic shift programme. You must depress the brake pedal if you wish to move into position
D from
N when
the vehicle is travelling
at less than 5 km/hour or is stationary
⇒
.
In certain circumstances (e.g. when driving in mountainous regions or when towing a trailer) it may be beneficial to
select the manual shift programme
⇒page 136 for
a short time in order to adapt the gearbox ratios manually to the driving situations. S - Position for sporty style of driving Shifting up later into a higher gear make
s it possible to fully exploit the power
potential of the engine. The gearbox also then shifts down at higher engine speeds as in the position
D.
Fig. 153 Selector leverFig. 154 Information display: Selector lever posi-tions
se0.1.book Page 134 Frida
y, April 10, 2009 3:19 PM
Page 137 of 304
Automatic gearbox
136
Dynamic shift programmeThe automatic gearbox of your
vehicle is controlled electronically. Shifting up and
down through the gears is performed auto
matically on the basis of pre-defined
driving programmes. Adopting a
moderate style of driving
will cause the gearbox to select the most
economical driving programme. Shifting up into a higher gear as soon as possible and shifting down as late as possible will
have a favourable effect on your fuel
consumption. Adopting a
sporty style of driving
with rapid movements of the accelerator pedal
combined with sharp acceleration and freq
uent changes in speed, exploiting the
top speed of the car or depressing the a
ccelerator pedal (kickdown function), will
cause the gearbox to switch over to this style of driving and shift down earlier with frequent changes in gears in comparison to the moderate style of driving. Selecting the most appropriate driving programme for the particular style of driving is a continuous process. Irrespective of this
it is, however, possible to switch or shift
down into a dynamic shift programme by
depressing the accelerator rapidly. The
gearbox shifts down into a lower gear matc
hing the speed of the car and this allows
you to accelerate rapidly (e.g. when ov
ertaking) without having to depress the
accelerator pedal fully into the kickdown
range. The original programme will be
reactivated to match your part
icular style of driving once the gearbox has shifted up
again. When driving in hilly regions, the gears are selected to match uphill and downhill sections. This avoids the ge
arbox frequently shifting up and down when negotiating
an uphill stretch. When driving downhill, it is possible to shift down into the Tiptronic position, in order to
exploit the engine brake torque.
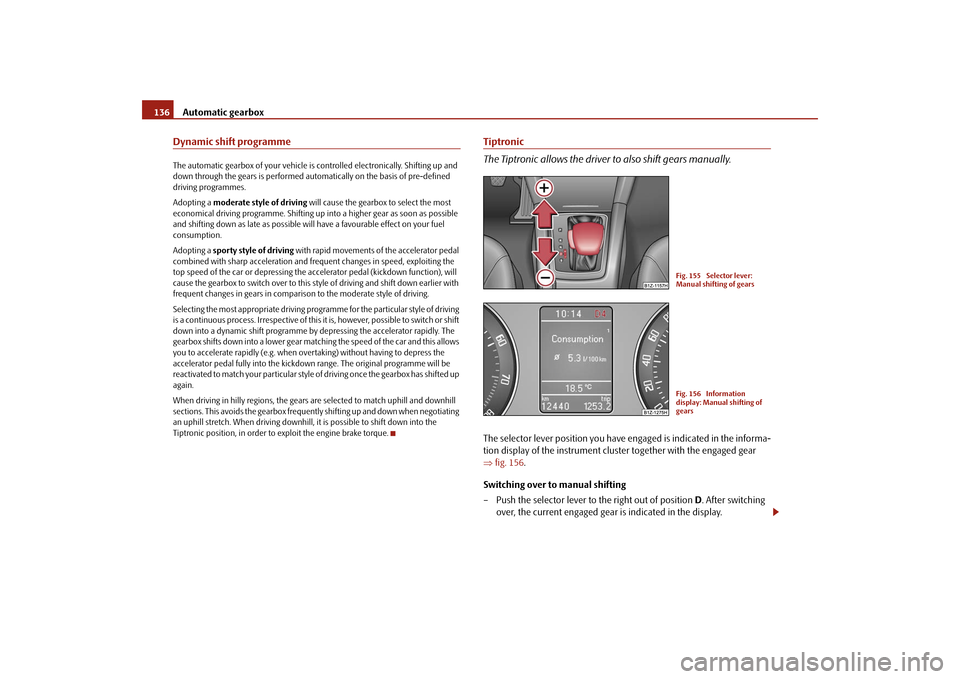
Tiptronic The Tiptronic allows the driver to also shift gears manually.The selector lever position you have engaged is indicated in the informa- tion display of the instrument cluster together with the engaged gear ⇒
fig. 156
.
Switching over to manual shifting – Push the selector lever to the right out of position
D. After switching
over, the current engaged gear is indicated in the display.
Fig. 155 Selector lever: Manual shifting of gearsFig. 156 Information display: Manual shifting of gears
se0.1.book Page 136 Frida
y, April 10, 2009 3:19 PM
Page 138 of 304

Automatic gearbox
137
Using the system
Safety
Driving Tips
General Maintenance
Breakdown assistance
Technical Data
Shifting up gears – One-touch forward of the selector lever (in the Tiptronic position)
⇒
page 136, fig. 155
.
Shifting down gears – One-touch back of the selector
lever (in the Tiptronic position) .
It is possible to switch over to manual both
when the car is stationary and also when
driving. When you accelerate, the gearbox shifts up
automatically into the higher gear just
before the maximum permissible engine speed is reached. If you select a lower gear, the automatic ge
arbox does not shift down until there is
no risk of the engine overrevving. If you operate the kickdown function, the ge
arbox shifts into a lower gear in line
with the vehicle speed and engine speed.Manual shifting on the multifunction steering wheel*Switching over to manual shifting – Push the selector lever to the right out of position
D. After switching
over, the current engaged gear
is indicated in the display.
Shifting up gears – Press the right rocker switch
⇒
fig. 157
for the multifunction
steering wheel.
Shifting down gears – Press the left rocker switch
⇒
fig. 157
for the multifunction
steering wheel.
Temporarily switching over to manual shifting – If the selector lever is in position
D or
S, press the left rocker switch
or the right rocker switch fo
r the multifunction steering wheel.
– If the rocker switches or are not pressed for some time, the
manual shifting switches off. You can also switch off the temporary switch over to manual shifting by pressing the right rocker switch for more than 1 second.
Emergency programme An emergency programme exists in th
e event of a fault in the system.
The gearbox operates in a corresponding emergency programme if there are func- tional faults in the gearbox electronics. This is indicated by all of the segments in the display lighting up or going out. A functional fault can ha
ve the following effect:
•
The gearbox only shifts into certain gears.
•
The reverse gear
R cannot be used.
•
The manual shift programme (Tiptronic) is switched off in the emergency mode.
If the gearbox has switched over to
emergency mode, drive to the nearest
specialist garage in order to
have the fault rectified.
A+
A-
Fig. 157 Multifunction steering wheel: Manual shifting of gears
++
-
+
-
+
+
se0.1.book Page 137 Frida
y, April 10, 2009 3:19 PM
Page 142 of 304

Communication
141
Using the system
Safety
Driving Tips
General Maintenance
Breakdown assistance
Technical Data
Button
Action
Radio, traffic information
CD
The CD changer / MP3
Navigation
press briefly
Switch off/on tone
press button for a long period of time
switch off/on*
turn upwards
Increase volume
turn down- wards
Decrease volume
press briefly
Changing to the next stored radio station Changing to the next stored traffic infor-
mation
Interrupting the traffic report
Changing to the next title
press button for a long time
Interruption of the traffic report
fast forward
press briefly
Changing to the previously stored radio
station
Changing to the previously stored traffic
information
Interrupting the traffic report
Changing to the previous title
press button for a long time
Interruption of the traffic report
fast rewind
Changing the audio source
press briefly
Calling up the main menu
press button for a long timepress briefly
Interruption of the traffic report
without function
press button for a long period of time turn upwards
Display of the station list
scroll upwards
Interruption of the traffic reports
Changing to the previous title
without function
A1A1A1A1A2A2A3A3A4A5A5A6A6A6A6
se0.1.book Page 141 Frida
y, April 10, 2009 3:19 PM