engine coolant SKODA OCTAVIA 2010 2.G / (1Z) Owner's Manual
[x] Cancel search | Manufacturer: SKODA, Model Year: 2010, Model line: OCTAVIA, Model: SKODA OCTAVIA 2010 2.G / (1Z)Pages: 275, PDF Size: 16.43 MB
Page 4 of 275
Contents3
Using the system
Safety
Driving Tips
General Maintenance
Breakdown assistance
Technical Data
ContentsLayout of this Owner's Manual
(explanations)
. . . . . . . . . . . . . . . . . . . . . . . . . .
Using the system
. . . . . . . . . . . . . . . . . . . . . .
Cockpit
. . . . . . . . . . . . . . . . . . . . . . . . . . . . . . . . . . . . . . . .
Overview . . . . . . . . . . . . . . . . . . . . . . . . . . . . . . . . . . . .
The brief instruction
. . . . . . . . . . . . . . . . . . . . . . . . . .
Basic functions and important information . . . . .
Instruments and warning lights
. . . . . . . . . . . . . . .
Overview of the instrument cluster . . . . . . . . . . . . .
Engine revolutions counter . . . . . . . . . . . . . . . . . . . .
Speedometer . . . . . . . . . . . . . . . . . . . . . . . . . . . . . . . .
Coolant temperature gauge . . . . . . . . . . . . . . . . . . .
Fuel gauge . . . . . . . . . . . . . . . . . . . . . . . . . . . . . . . . . . .
Counter for distance driven . . . . . . . . . . . . . . . . . . .
Service Interval Display . . . . . . . . . . . . . . . . . . . . . . .
Digital clock . . . . . . . . . . . . . . . . . . . . . . . . . . . . . . . . . .
Shift recommendation for changing gears* . . . . .
Multi-functional indicator (onboard computer)*
Information display* . . . . . . . . . . . . . . . . . . . . . . . . . .
Auto Check Control* . . . . . . . . . . . . . . . . . . . . . . . . . .
Warning lights . . . . . . . . . . . . . . . . . . . . . . . . . . . . . . . .
Unlocking and locking
. . . . . . . . . . . . . . . . . . . . . . . .
Key . . . . . . . . . . . . . . . . . . . . . . . . . . . . . . . . . . . . . . . . . .
Changing the battery of the radio remote control
Electronic immobiliser . . . . . . . . . . . . . . . . . . . . . . . .
Child safety lock . . . . . . . . . . . . . . . . . . . . . . . . . . . . . .
Central locking system . . . . . . . . . . . . . . . . . . . . . . . .
Remote control* . . . . . . . . . . . . . . . . . . . . . . . . . . . . . .
Syncronisation of the remote control . . . . . . . . . . .
Anti-theft alarm system* . . . . . . . . . . . . . . . . . . . . . .
Power windows* . . . . . . . . . . . . . . . . . . . . . . . . . . . . .
Electric sliding/tilting roof* . . . . . . . . . . . . . . . . . . . .
Lights and Visibility
. . . . . . . . . . . . . . . . . . . . . . . . . . . .
Lights . . . . . . . . . . . . . . . . . . . . . . . . . . . . . . . . . . . . . . . .
Interior lighting . . . . . . . . . . . . . . . . . . . . . . . . . . . . . . .
Visibility . . . . . . . . . . . . . . . . . . . . . . . . . . . . . . . . . . . . . .
Windshield wiper and wash system . . . . . . . . . . . . .
Rear-view mirror . . . . . . . . . . . . . . . . . . . . . . . . . . . . . .
Seats and Stowage
. . . . . . . . . . . . . . . . . . . . . . . . . . . . .
Front seats . . . . . . . . . . . . . . . . . . . . . . . . . . . . . . . . . . . .
Adjusting front seats electrically* . . . . . . . . . . . . . . .
Head restraints . . . . . . . . . . . . . . . . . . . . . . . . . . . . . . . .
Middle rear head restraint . . . . . . . . . . . . . . . . . . . . .
Rear seats . . . . . . . . . . . . . . . . . . . . . . . . . . . . . . . . . . . .
Pedals . . . . . . . . . . . . . . . . . . . . . . . . . . . . . . . . . . . . . . . .
luggage compartment . . . . . . . . . . . . . . . . . . . . . . . . .
Luggage net partition* (Combi) . . . . . . . . . . . . . . . .
The roof rack* . . . . . . . . . . . . . . . . . . . . . . . . . . . . . . . .
Cup holder . . . . . . . . . . . . . . . . . . . . . . . . . . . . . . . . . . .
Note holder . . . . . . . . . . . . . . . . . . . . . . . . . . . . . . . . . .
Ashtray* . . . . . . . . . . . . . . . . . . . . . . . . . . . . . . . . . . . . . .
Cigarette lighter*, power sockets . . . . . . . . . . . . . . .
Storage compartments . . . . . . . . . . . . . . . . . . . . . . . .
Overview . . . . . . . . . . . . . . . . . . . . . . . . . . . . . . . . . . . . .
Storage compartment on the front passenger side
Cooling of storage compartment on front passenger
side* . . . . . . . . . . . . . . . . . . . . . . . . . . . . . . . . . . . . . . . . .
Storage compartment on the driver's side . . . . . . .
Storage compartment on the dash panel* . . . . . . .
Storage compartment in front centre console* . .
Storage net on the front centre console* . . . . . . . .
Storage compartment for spectacles* . . . . . . . . . . .
Storage compartment in the front doors . . . . . . . .
Storage compartment below front passenger seat*
Front seat armrest with storage compartment* . .
Rear seat armrest with storage compartment* . . .
Storage compartment in rear centre console* . . .
Seat backrest with opening for skis* . . . . . . . . . . . . Removeable through-loading bag* . . . . . . . . . . . .
Side compartment* . . . . . . . . . . . . . . . . . . . . . . . . . . .
Storage compartment behind the rear seats* (Combi)
Clothes hooks* . . . . . . . . . . . . . . . . . . . . . . . . . . . . . . .
Heating and air conditioning system
. . . . . . . . .
Air outlet vents . . . . . . . . . . . . . . . . . . . . . . . . . . . . . . .
Heating . . . . . . . . . . . . . . . . . . . . . . . . . . . . . . . . . . . . . .
Climatic* (semi-automatic air conditioning system)
Climatronic* (automatic air conditioning) . . . . . .
Auxiliary heating (auxiliary heating and ventilation)*
Starting-off and Driving
. . . . . . . . . . . . . . . . . . . . . . .
Setting steering wheel position . . . . . . . . . . . . . . . .
Ignition lock . . . . . . . . . . . . . . . . . . . . . . . . . . . . . . . . . .
Starting the engine . . . . . . . . . . . . . . . . . . . . . . . . . . . .
Switching off the engine . . . . . . . . . . . . . . . . . . . . . . .
Shifting (manual gearbox) . . . . . . . . . . . . . . . . . . . . .
Handbrake . . . . . . . . . . . . . . . . . . . . . . . . . . . . . . . . . . .
Rear parking aid* . . . . . . . . . . . . . . . . . . . . . . . . . . . . .
Front and rear parking aid* . . . . . . . . . . . . . . . . . . . .
Cruise control system (CCS)* . . . . . . . . . . . . . . . . . .
Automatic gearbox
. . . . . . . . . . . . . . . . . . . . . . . . . . . .
Automatic gearbox* . . . . . . . . . . . . . . . . . . . . . . . . . .
Communication
. . . . . . . . . . . . . . . . . . . . . . . . . . . . . . .
Multifunction steering wheel* . . . . . . . . . . . . . . . . .
Mobile phones and two-way radio systems . . . . .
Universal telephone preinstallation GSM II* . . . . .
Voice control . . . . . . . . . . . . . . . . . . . . . . . . . . . . . . . . .
Universal telephone preinstallation GSM IIl* . . . .
Voice control . . . . . . . . . . . . . . . . . . . . . . . . . . . . . . . . .
Connection to the internet . . . . . . . . . . . . . . . . . . . .
Music playback via Bluetooth® . . . . . . . . . . . . . . . .
Multimedia . . . . . . . . . . . . . . . . . . . . . . . . . . . . . . . . . .
6799101015151516161617171818192224273737373838384344444648
5151585961646767687071727474798182838385868686878787888888898989909091
9192929394949597100104107107107108109110110111112113116116122122125125130132137138139139
s43s.1.book Page 3 Thursday, May 13, 2010 1:21 PM
Page 16 of 275
Instruments and warning lights15
Using the system
Safety
Driving Tips
General Maintenance
Breakdown assistance
Technical Data
Instruments and warning lightsOverview of the instrument cluster
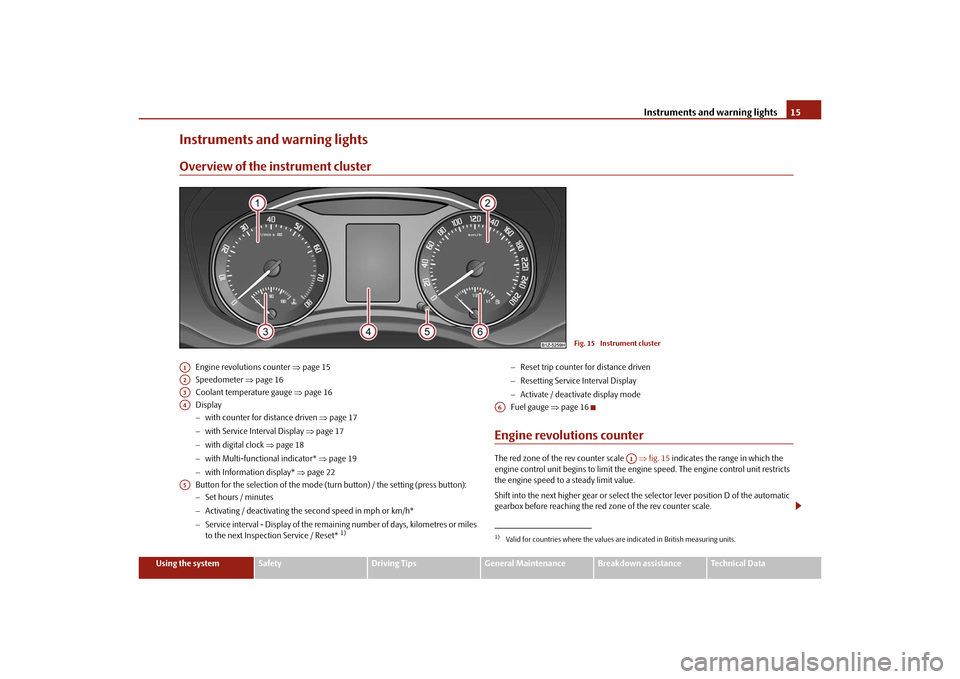
Engine revolutions counter page 15
Speedometer page 16
Coolant temperature gauge page 16
Display
with counter for distance driven page 17
with Service Interval Display page 17
with digital clock page 18
with Multi-functional indicator* page 19
with Information display* page 22
Button for the selection of the mode (turn button) / the setting (press button):
Set hours / minutes
Activating / deactivating the second speed in mph or km/h*
Service interval - Display of the remaining number of days, kilometres or miles
to the next Inspection Service / Reset*
1)
Reset trip counter for distance driven
Resetting Service Interval Display
Activate / deactivate display mode
Fuel gauge page 16
Engine revolutions counterThe red zone of the rev counter scale fig. 15 indicates the range in which the
engine control unit begins to limit the engi ne speed. The engine control unit restricts
the engine speed to a steady limit value.
Shift into the next higher gear or select th e selector lever position D of the automatic
gearbox before reaching the red zone of the rev counter scale.
Fig. 15 Instrument cluster
A1A2A3A4A5
1)Valid for countries where the values ar e indicated in British measuring units.A6
A1
s43s.1.book Page 15 Thursday, May 13, 2010 1:21 PM
Page 17 of 275
Instruments and warning lights
16
Avoid high engine speeds du ring the driving time and before the engine has been
warmed up to operating temperature page 175.
For the sake of the environment
Shifting up early helps you sa ve fuel and reduce the operating noise of your vehicle.SpeedometerWarning against excessive speeds*
An acoustic warning signal will sound when the vehicle speed exceeds 120 kilometres
per hour. The acoustic warning signal will switch off again when the vehicle speed goes
below this speed limit.
Note
This function is only valid for some countries.Coolant temperature gaugeThe coolant temperature gauge page 15, fig. 15 operates only when the ignition
is switched on.
In order to avoid any damage to the engine, please pay attention to the following notes
regarding the temperature ranges.
Cold range
If the pointer is in the left-hand area of the scale it means that the engine has not yet
reached its operating temperatur e. Avoid running at high engine speeds, at full throttle
and at severe engine loads.
The operating range
The engine has reached its operating temper ature as soon as the pointer moves into
the mid-range of the scale. The pointer may also move further to the right at high
engine loads and high outside temperatures. This is not critical provided the warning
symbol
in the instrument cluster does not flash. If the symbol
in the instrument cluster flashes it means that either the coolant
temperature is too high or the coolant level is too low. Observe the guidelines
page 31, “Coolant temperature/coolant level ”.
WARNING
Pay attention to the warning notes page 197, “Working in the engine
compartment” before opening the bonn et and inspecting the coolant level.
Caution
Additional headlights and other attached components in front of the fresh air inlet
impair the cooling efficiency of the coolant. There is then a risk of the engine over-
heating at high outside temper atures and high engine loads!Fuel gaugeThe fuel gauge page 15, fig. 15 only operates when the ignition is switched on.
The fuel tank has a capacity of about 55°litres or 60 litres
2). The warning symbol in
the instrument cluster lights up when the pointer reaches the reserve marking. There
are now about 9 litres of fuel remaining in the tank. This symbol is a reminder for you,
that you must refuel .
The following will be displayed in the information display*: Please refuel!
An audible signal sounds as an additional warning signal.
Caution
Never run the fuel tank completely empty! The irregular supply of the fuel system can
lead to irregular running of the engine. Un burnt fuel may get into the exhaust system
and damage the catalytic converter.
A3
2)Valid for Octavia Combi 4x4 and Octavia Scout.
A6
s43s.1.book Page 16 Thursday, May 13, 2010 1:21 PM
Page 29 of 275
Instruments and warning lights
28
WARNING
If you do not pay attention to the warning lights coming on and the corre-
sponding descriptions and warning notes, this may result in severe body inju-
ries or major vehicle damage.
The engine compartment of your car is a hazardous area. There is a risk of
injuries, scalding, accidents and fire wh en working in the engine compartment,
e.g. inspecting and replenishing oil and other fluids. It is also essential to
observe all warnings page 197, “Working in the engine compartment”.Note
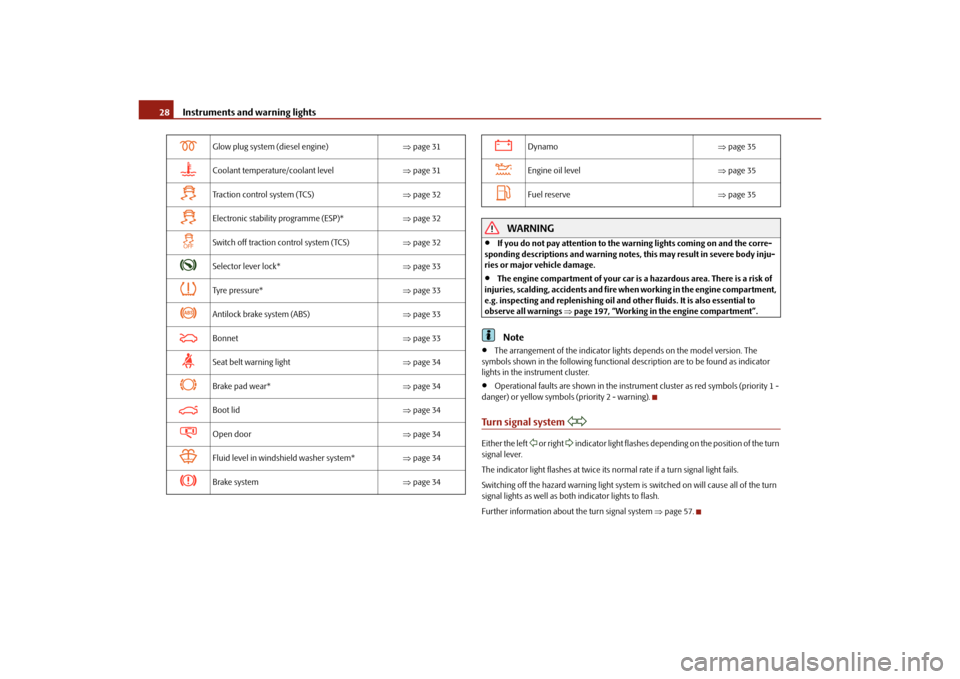
The arrangement of the indicator lights depends on the model version. The
symbols shown in the following functional description are to be found as indicator
lights in the instrument cluster.
Operational faults are shown in the instrument cluster as red symbols (priority 1 -
danger) or yellow symbol s (priority 2 - warning).
Turn signal system
Either the left
or right
indicator light flashes depending on the position of the turn
signal lever.
The indicator light flashes at twice its normal rate if a turn signal light fails.
Switching off the hazard warning light system is switched on will cause all of the turn
signal lights as well as both indicator lights to flash.
Further information about the turn signal system page 57.
Glow plug system (diesel engine) page 31
Coolant temperature/coolant level page 31
Traction control system (TCS) page 32
Electronic stability programme (ESP)* page 32
Switch off traction control system (TCS) page 32
Selector lever lock* page 33
Tyre pres su re* page 33
Antilock brake system (ABS) page 33
Bonnet page 33
Seat belt warning light page 34
Brake pad wear* page 34
Boot lid page 34
Open door page 34
Fluid level in windshield washer system* page 34
Brake system page 34
Dynamo page 35
Engine oil level page 35
Fuel reserve page 35
s43s.1.book Page 28 Thursday, May 13, 2010 1:21 PM
Page 32 of 275
Instruments and warning lights31
Using the system
Safety
Driving Tips
General Maintenance
Breakdown assistance
Technical Data
Stop the vehicle and switch the engine off
if the warning light does not go off after
the engine has started or flashes while driving. Check the oil level and top up with oil
as necessary page 199, “Replenishing engine oil”.
An audible signal sounds three times as an additional warning signal.
Do not continue your journey if for some reason it is not possible under the condi-
tions prevailing to top up with oil. Keep the engine switched off and obtain profes-
sional assistance from a specialist garage, otherwise it could lead to severe engine
damage.
Do not drive any further if the warning light flashes even if the oil is at the correct
level. Do not run the engine not at idling speed either. Contact the nearest specialist
garage to obtain professional assistance.
The following text will be displayed in the information display*:
Oil Pressure: Engine off! Owner's manual
WARNING
If you must stop for technical reasons, then park the vehicle at a safe
distance from the traffic and switch off the engine and switch on the hazard
warning light system.
The red oil pressure light
is not an oil level indicator! One should there-
fore check the oil level at regular inte rvals, preferably after every refueling
stop.
EPC fault light
(petrol engine)
The
(Electronic Power Control) warning light comes on for a few seconds when the
ignition is switched on.
If the warning light
does not go out or lights up after starting the engine, a fault
exists in the engine control. The engine management system selects an emergency
programme which enables you to drive to the nearest specialist garage by adopting a
gentle style of driving.
The following text will be displayed in the information display*:
Engine fault. Workshop!
Glow plug system
(diesel engine)
The warning light
lights up for a cold engine when switching on the ignition (pre-
heat position) page 107. Start the engine after the indicator light goes out.
The glow plug indicator light will come on for about 1 second if the engine is at a
normal operating temperature or if the outside temperature is above +5°C. This
means that you can start the engine right away.
There is a fault in the glow plug system if the warning light
does not come on at
all or lights up continuously . Contact a specialist garage as soon as possible to obtain
assistance.
If the warning light
begins to flash while driving, a fault exists in the engine control.
The engine management syst em selects an emergency programme which enables you
to drive to the nearest specialist garage by adopting a gentle style of driving.
The following text will be displayed in the information display*:
Engine fault. Workshop!
Coolant temperature/coolant level
The warning light comes on for a few seconds
5) when the ignition is switched on.
The coolant temperature is too high or the coolant level too low if the warning light
does not go out or flashes while driving.
3 peeps sound as an additional warning signal.
In this case stop and switch the engine off and check the coolant level; top up the
coolant as necessary.
Do not continue your journey if for some reason it is not possible under the condi-
tions prevailing to top up with coolant. Keep the engine switched off and obtain
professional assistance from a specialist garage, otherwise it could lead to severe
engine damage.
5)The warning light on vehicles fitted with information display does not come on after switching
the ignition on, but only if the coolant temperature is too high or the coolant level is too low.
A2
s43s.1.book Page 31 Thursday, May 13, 2010 1:21 PM
Page 33 of 275
Instruments and warning lights
32
If the coolant is within the specified range, the increased temperature may be caused
by an operating problem at th e coolant fan. Check the fuse for the coolant fan, replace
it if necessary page 227, “Fuse assignment in engine compartment”.
Do not continue driving if the warning light does not go off although the fluid is at the
correct level and also the fuse of the fan is in proper order. Contact a specialist garage
to obtain assistance.
Please also refer to the additional instructions page 200, “Cooling system”.
The following text will be displayed in the information display*: Check coolant! Owner's manual
WARNING
If you must stop for technical reasons, then park the vehicle at a safe
distance from the traffic and switch off the engine and switch on the hazard
warning light system page 56.
Take care when opening the coolant expa nsion bottle. If the engine is hot,
the cooling system is pressurized - risk of scalding! It is best to allow the engine
to cool down before removing the cap.
Do not touch the coolant fan The coolant fan may switch on automatically
even if the ignition is off.
Traction control system (TCS)
The warning light
comes on for a few seconds when the ignition is switched on.
The warning light flashes when a control cycle is activated while driving.
The warning light lights up permanentl y if there is a fault in the system.
The fact that the TCS system operates together with the ABS means that the TCS
warning light will also come on if the ABS system is not operating properly.
If the warning light comes on immediately after starting the engine, the TCS system
can be switched off for technical reasons. In this case, the TCS system can be switched
on again by switching the ignition on and off. If the warning light goes out, the TCS
system is fully functional again.
Further information about the TCS page 169, “Traction control system (TCS)”.
Note
If the battery has been disconnected and reconnected, the warning light
comes on
after switching on the ignition. The warning light must go out after driving a short
distance.
Switch off traction control system (TCS)
The TCS system is switched off by pressing the button page 169, fig. 150 and the
warning light
lights up.
Electronic stability programme (ESP)*
The warning light
comes on for a few seconds when the ignition is switched on.
When the ESP helps to stabilise the vehicle, the warning light
flashes in the instru-
ment cluster.
The warning light lights up permanently if there is a fault in the ESP system.
The fact that the ESP system operates together with the ABS means that the ESP
warning light will also come on if the ABS system is not operating properly.
If the warning light
comes on immediately after starting the engine, the ESP system
can be switched off for technical reasons. In this case, the ESP system can be switched
on again by switching the igni tion on and off. If the warning light goes out, the ESP
system is fully functional again.
Further information on the ESP page 167, “Electronic stab ility programme (ESP)*”.
Electronic Differential Lock (EDL)*
The EDL is a part of the ESP. A fault in the ED L is indicated by the lighting up of the ESP
warning light in the instrument cluster. Have the vehicle inspected without delay by an
authorised Škoda Service Partner. Further information on the EDL page 168, “Elec-
tronic Differential Lock (EDL and XDL)*”.
Note
If the battery has been disconnected and reconnected, the warning light
comes on
after switching on the ignition. The warning light must go out after driving a short
distance.
s43s.1.book Page 32 Thursday, May 13, 2010 1:21 PM
Page 101 of 275
Heating and air conditioning system
100
Recirculated air mode
In recirculated air mode air is sucked out of the interior of the vehicle
and then fed back into the interior.Recirculated air mode prevents polluted air outside the vehicle from getting into the
vehicle, for example when driving through a tunnel or when standi ng in a traffic jam.Switching recirculated air mode on– Press the button page 98, fig. 107 the warning light lights up in the
button.Switching recirculated air mode off– Press again the button - the warning light in the button goes out.
The recirculated air mode is switched off automatically if the air distribution control
is in position
page 98, fig. 107. You can also switch recirculated air mode on
again from this setting by repeatedly pressing button .
WARNING
You should not leave recirculated air mode on over a longer period of time, as
“stale” air may result in fatigue in the driver and occupants, divert your atten-
tion and also cause the windows to mist up. The risk of having an accident
increases. Switch recirculated air mode off as soon as the windows begin
misting up.Using the air conditioning system economicallyThe compressor on the air conditioning syst em uses power from the engine when in
cooling mode which will effect the fuel consumption.
It recommended to open the windows or the doors of a vehicle for which the interior
has been strongly heated through the effect of direct sunlight in order to allow the
heated air to escape.
The cooling system should not be switched on while travelling when the window is
open. The desired interior temperature can also be achieved without switching in the cooling
system just by switching to fresh air mode.
For the sake of the environment
When you economize on fuel, you
also reduce pollutant emissions.Operational malfunctionsIf the cooling system does not operate at outside temperatures higher than +5 °C,
there is a problem in the system. The reasons for this may be:
The fuse on the air conditioning system has blown. Check the fuse, replace it if
necessary page 226.
The cooling system has switched off auto matically for a short time because the
coolant temperature of the engine is too hot page 16.
If you are not able to rectify the operational problem yourself, or if the cooling capacity
decreases, switch the cooling system off. Contact a specialist garage.
Climatronic* (automatic air conditioning)Description
The Climatronic system is a combinat ion of an automatic heating, fresh
air and cooling system which provides optimal comfort for the occu-
pants of the car.The Climatronic maintains fully automatically a convenience temperature. This is
achieved by automatically varying the temperature of the outflowing air, the blower
stages and the air distribution. The system also takes into account sunlight which elim-
inates the need to alter the settings manually. The automatic mode page 102
ensures maximum wellbeing of the occupants at all times of the year.
Description of Climatronic system
The cooling operates only if the following conditions are met:
engine running,
A4
AC
s43s.1.book Page 100 Thursday, May 13, 2010 1:21 PM
Page 102 of 275
Heating and air conditioning system101
Using the system
Safety
Driving Tips
General Maintenance
Breakdown assistance
Technical Data
outside temperature above approx. +2°C,
switched on.
If the cooling system is switched on, the temperature and air humidity drops in the
vehicle. The wellbeing of the occupants of the car is enhanced as a result of this partic-
ularly at high outside temperatures and a high air humidity. The system prevents the
windows misting up during th e cold season of the year.
The heating effect is dependent upon the c oolant temperature, thus full heat output
only occurs when the engine has reached its operating temperature.
It is possible to briefly activate recirculat ed air mode in order to enhance the cooling
effect page 103.
The air inlet in front of the windscreen must be free of ice, snow or leaves in order to
ensure that the heating and cooling systems operate properly.
The AC compressor is switched off at a hi gh coolant temperature in order to provide
cooling at a high load of the engine.
After switching on the cooling Condensation from the evaporator of the air condi-
tioning may drip down and form a puddle be low the vehicle. This is quite normal and
not an indication of a leak!
Recommended setting for all periods of the year:
Set the desired temperature, we recommend 22°C.
Press the button page 102, fig. 108 .
Move the air outlet vents 3 and 4 so that the air flow is directed slightly upwards.
WARNING
For your own safety and that of other road users, ensure that all the
windows are free of ice, snow and mistin g. Please familiarize yourself about
how to correctly operate th e heating and ventilation systems, how to demist
and defrost the windows, as well as with the cooling mode.
You should not leave recirculated air mode on over a longer period of time,
as “stale” air may result in fatigue in the driver and occupants, divert your
attention and also cause the windows to mist up. The risk of having an accident
increases. Switch recirculated air mode off as soon as the windows begin
misting up.
Note
If the cooling system has not been switched on for a lengthy period, odours may
be produced at the evaporator because of deposits. Switch the cooling system on at
least once a month for approximately 5 minu tes at the highest blower stage - also
during the cold season of the year - in order to avoid such odours. Also open a window
for a short time.
We recommend that you do not smoke in the vehicle when the recirculating air
mode is operating since the smoke which is drawn at the evaporator from the interior
of the vehicle forms deposits in the evapor ator of the air conditioning system. This
produces a permanent odour when the air conditioning system is operating which can
only be eliminated through considerable effort and expense (replacement of
compressor).
The used air streams out through the air removal openings in the luggage compart-
ment.
On vehicles equipped with a factory-fitted radio* or navigation*, the information
of the Climatronic is also shown on the display. This function can be switched off, see
operating instructions of the radio* or the navigation system*.
Using the cooling economically page 100.
Operational problems page 100.
AC
AUTO
s43s.1.book Page 101 Thursday, May 13, 2010 1:21 PM
Page 105 of 275
Heating and air conditioning system
104
tion and also cause the windows to mist up. The risk of having an accident
increases. Switch recirculated air mode off as soon as the windows begin
misting up.
Note
If the windscreen mists up, press the button page 102, fig. 108 . After
the windscreen has been demisted, press the button .
The automatic air distribution control oper ates only if the outside temperature is
higher than approx. 2°C.
Controlling blower
There are a total of seven blower stages available.The Climatronic system controls the blower stages automatically in line with the inte-
rior temperature. You can also , however, a dapt the bl ower stages ma nua lly to suit y our
particular needs.
– Press again the button on the left side (reduce blower speed) or on the right side (increase blower speed).
If you switch off the blower, th e Climatronic is switched off.
The set blower speed is displayed above the button when the respective number
of warning lights come on.
WARNING
“Stale air” may result in fatigue in the driver and occupants, reduce atten-
tion levels and also cause the windows to mist up. The risk of having an accident
increases.
Do not switch the Climatronic system off for longer than necessary.
Switch the Climatronic system on as soon as the windows mist up.
Defrosting windscreenDefrosting windscreen - switching on– Press the button page 102, fig. 108 .Defrosting windscreen - switching off– Once again press the button or the button .
The temperature control is controlled automatically. More air flows out of the air outlet
vents 1.Auxiliary heating (auxiliary heating and ventilation)*Description and important information
The auxiliary heating (auxiliary he ating and ventilation) heats or
supplies the interior of the vehicl e with fresh air independent of the
engine.Auxiliary heating (auxiliary heating)
The auxiliary heating (auxiliary heating) functions in connection with the Climatic or
Climatronic.
It can be used when stationary, when engi ne is switched off for preheating of the
vehicle as well as while driving (only during the heating phase of the engine).
The auxiliary heating (auxiliary heating) wa rms up the coolant during the combustion
of fuel from the vehicle tank. The coolant warms up the air, which (if the blower speed
is not set to zero) flows into the occupant compartment.
Auxiliary ventilation
The auxiliary ventilation enables fresh air to flow into the vehicle interior by switching
off the engine, whereby the interior temperature is effectively decreased (e.g. with the
vehicle parked in the sun).
WARNING (continued)
A1AUTO
AUTO
s43s.1.book Page 104 Thursday, May 13, 2010 1:21 PM
Page 106 of 275
Heating and air conditioning system105
Using the system
Safety
Driving Tips
General Maintenance
Breakdown assistance
Technical Data
WARNING
The auxiliary heating must never be operated in closed rooms - risk of
poisoning!
The auxiliary heating must not be runn ing during refueling - risk of fire.
The exhaust pipe of the auxiliary heating is located on the underside of the
vehicle. Therefore do not place the vehicl e, if you wish to operate the auxiliary
heating, in such a way that the exhaust gases of the auxiliary heating can come
easily into contact with inflammable mate rials (e.g. dry grass) or easily inflam-
mable substances (e.g. fuel run out).Note
If the auxiliary heating runs, the fuel consumption comes from the vehicle tank.
Therefore the auxiliary heating should not be op erated, if there is very little fuel in the
tank.
The exhaust pipe of the auxiliary heating, which is located on the underside of the
vehicle, must not be clogged and the exhaust flow must not be blocked.
If the auxiliary heating and ventilation is running, the vehicle battery discharges. If
the auxiliary heating and ventilation has be en operated several times over a longer
period, the vehicle must be driven a few ki lometers in order to recharge the vehicle
battery.
The auxiliary heating only switches the blower on, if it has achieved a coolant
temperature of approx. 50 °C.
At low outside temperatures, this can result in a formation of water vapour in the
area of the engine compartment. This is quite normal and is not an operating problem.
After switching off the auxiliary heating, the coolant pump runs for a short period.
The auxiliary heating and ventilation does not switch on or comes on, if the vehicle
battery indicates a low loading state.
The auxiliary heating (auxiliary heating) does not switch on, if the following was
shown in the information display or before switching off the ignition: Please refuel!
(Please refuel!) .
The air inlet in front of the windscreen must be free of ice, snow or leaves in order
to ensure that the auxiliary heating operates properly.
So that warm air can flow into the vehicl e interior after switching on the auxiliary
heating, you must maintain the temperature normally selected by you (we recom-
mend 22°C). It is recommended to put the air flow in the position
.
On vehicles with DPF (diesel particle filter) the warm coolant heats up the engine.
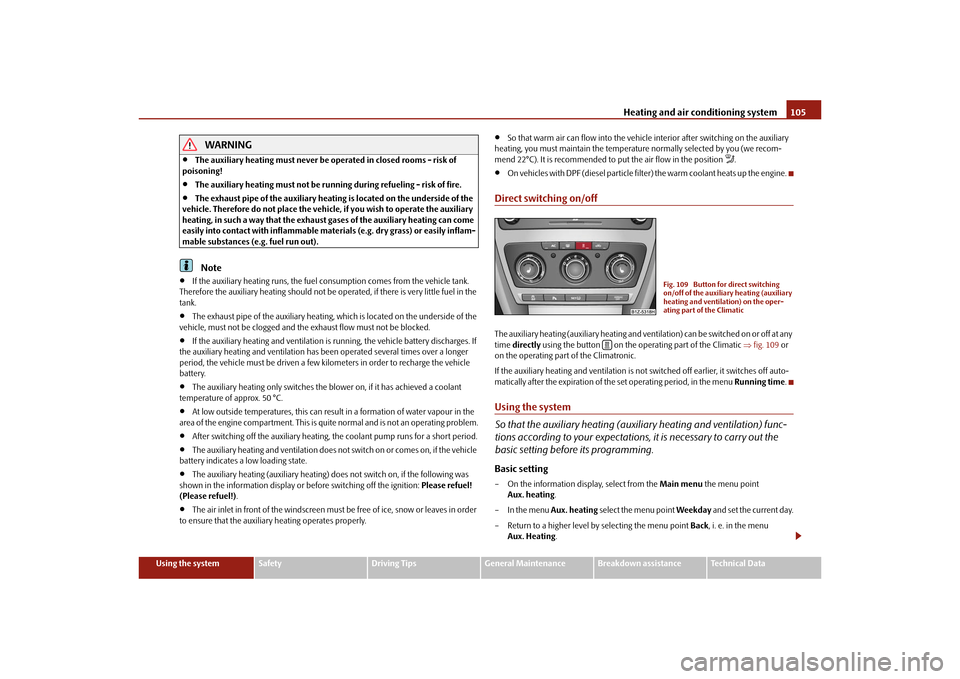
Direct switching on/offThe auxiliary heating (auxiliary heating and vent ilation) can be switched on or off at any
time directly using the button on the operating part of the Climatic fig. 109 or
on the operating part of the Climatronic.
If the auxiliary heating and ventilation is not switched off earlier, it switches off auto-
matically after the expiration of the set operating period, in the menu Running time.Using the system
So that the auxiliary heating (auxiliary heating and ventilation) func-
tions according to your expectations, it is necessary to carry out the
basic setting before its programming.Basic setting– On the information display, select from the Main menu the menu point
Aux. heating .
– In the menu Aux. heating select the menu point Weekday and set the current day.
– Return to a higher level by selecting the menu point Back, i. e. in the menu
Aux. Heating .
Fig. 109 Button for direct switching
on/off of the auxiliary heating (auxiliary
heating and ventilation) on the oper-
ating part of the Climatic
s43s.1.book Page 105 Thursday, May 13, 2010 1:21 PM