brake light SKODA OCTAVIA 2010 2.G / (1Z) Owner's Guide
[x] Cancel search | Manufacturer: SKODA, Model Year: 2010, Model line: OCTAVIA, Model: SKODA OCTAVIA 2010 2.G / (1Z)Pages: 275, PDF Size: 16.43 MB
Page 172 of 275
Intelligent Technology171
Using the system
Safety
Driving Tips
General Maintenance
Breakdown assistance
Technical Data
Brake boosterThe brake booster boosts the pressure which you generate with the brake pedal. The
necessary pressure is only genera ted when the engine is running.
WARNING
Never switch off the engine before the vehicle is stationary.
The brake booster only operates when the engine is running. Greater phys-
ical effort for braking is required when en gine is switched off. Because if you do
not stop as normal, this can cause an accident and severe injuries.
Antilock brake system (ABS)ABS prevents the wheels locking when braking.General
The ABS contributes significantly to enhanc ing the active safety of your vehicle.
Compared to a vehicle not fitted with the ABS brake system, you are able to retain
optimal steering ability even during a full br ake application on a slippery road surface
because the wheels do not lock up.
You must not expect, however, that the br aking distance will be shorter under all
circumstances as a result of the ABS. The braking distance for example on gravel and
fresh snow, when you should anyway be driving slowly and cautiously, will be longer.
Operating principle
The brake pressure will be reduced on a wheel which is rotating at a speed which is too
low for the speed of the vehicle and tending to lock. This control cycle is noticeable
from a pulsating movement of the brake pedal which is accompanied by noises.
This is consciously intended to provide the driver with the information that the wheels
are tending to lock (ABS control range) . You must always keep the brake pedal
depressed to enable the ABS to optimally control the brake application in this braking
range. Never interrupt the application of the brakes!
WARNING
The ABS can also not overcome the physical limits of your vehicle. Please do
not forget this, particularly when driving on icy or wet road surfaces. If the ABS
is operating within the control range, adapt your speed immediately to the
conditions of the road surface and the traffic situation. The increased safety
offered by the ABS must not tempt you to take greater risks than otherwise -
risk of an accident!
The normal braking system is still fully functional if there is an ABS fault.
Visit a specialist garage as quickly as poss ible and adjust your style of driving to
take account of the ABS fault in the meantime since you will not know the extent
of the fault and in how far the braking efficiency is affected.Note
A warning light comes on if a fault occurs in the ABS system
page 33.
Changes to vehicle (e.g. on engine, on the brakes, on chassis or another combina-
tion of tyres and wheels) can in fluence the function of the ABS page 214, “Accesso-
ries, changes and replacement of parts”.
Brake Assist*During a severe brake application (e.g. if a hazard exists), the Brake Assist increases the
braking force and thus makes it possible to rapidly produce the pressure required in
the brake system.
The majority of drivers do a pply the brakes in good time in dangerous situations, but
do not depress the brake pedal with sufficient pressure. Consequently, it is not possible
for the vehicle to achieve its maximum deceleration and the vehicle covers a greater
distance than necessary.
The Brake Assist is activated by the very qu ick operation of the brake pedal. In such
cases, a much greater braking pressure exists than during a normal brake application.
This makes it possible, even with a relatively low resistance of the brake pedal, to
produce an adequate pressure in the brake system in the shortest possible time, which
is required for maximum dece leration of the vehicle. You must apply the brake pedal
firmly and hold it in this position in or der to achieve the shortest possible braking
distance.
s43s.1.book Page 171 Thursday, May 13, 2010 1:21 PM
Page 173 of 275

Intelligent Technology
172
The Brake Assist is able to help you achieve a shorter braking distance in emergency
situations by rapidly producing the pressure required in the brake system. It fully
exploits the attributes of the ABS. After you release the brake pedal, the function of the
Brake Assist is automatically switched off and the brakes operate in the normal way.
The Brake Assist is part of the ESP system. If a fault occurs in the ESP, the Brake Assist
function is also not available. Further information on the ESP page 167.
WARNING
The Brake Assist is also not able to overcome the physical limits of your
vehicle in terms of the braking distance required.
Adapt your speed to the conditions of the road surface and to the traffic situ-
ation.
The increased safety offered by the Brake Assist must not tempt you to take
a greater safety risk than otherwise.
Uphill Start Assist*The uphill start assist makes it easier to start off on steep hills. The system assists a start
off by holding the brake pressure produced by the brake pedal actuation for approx. 2
seconds after releasing the brake pedal. The driver can therefore move his foot from
the brake pedal to the accelerator pedal and start off on the slope, without having to
actuate the handbrake. The brake pressure drops gradually the more you operate the
accelerator pedal. If the vehicle does not start off within 2 seconds, it starts to roll back.
The uphill start assist is active as of a 5 % slope, if the driver door is closed. It is always
active on slopes when in forward or reverse start off. When driving downhill, it is
inactive.Electromechanical power steeringThe power steering enables you to steer the vehicle with le ss physical force.
With the electromechanical power steering , the steering assist is automatically
adapted to the speed and to the steering angle. It is still possible to fully steer the vehicle if the power steering fails or if the engine is
not running (vehicle being towed in). The only difference is that greater physical effort
is required.
If there is a fault in the power steering, the warning light
or lights up in the instru-
ment cluster page 30.
WARNING
Contact your specialist garage if the power steering is defective.Tyre pressure monitoring system*The tyre pressure monitoring system compares with the aid of the ABS sensors the
speed and also the rolling circumference of the individual wheels. If the rolling circum-
ference of a wheel is changed, the warning light
lights up in the instrument cluster
page 33 and an audible signal sounds. The rolling circumference of the tyre can
change if:
the tyre inflation pressure is too low,
the structure of the tyre is damaged,
the vehicle is loaded on one side,
the wheels of an axle are loaded heavily (e.g. when towing a trailer or when driving
uphill or downhill),
snow chains are mounted,
the temporary spare wheel is mounted,
Fig. 151 Button for setting the tyre
inflation pressure control value
s43s.1.book Page 172 Thursday, May 13, 2010 1:21 PM
Page 174 of 275
Intelligent Technology173
Using the system
Safety
Driving Tips
General Maintenance
Breakdown assistance
Technical Data
one wheel per axle was changed.
Basic setting of the system
After changing the tyre inflation pressures, after changing one or several wheels, the
position of a wheel on the vehicle (e.g. exch anging the wheels between the axles) or
when the warning light lights up while drivin g, a basic setting of the system must be
carried out as follows.
Inflate all tyres to the specified inflation pressure page 208.
Switch on the ignition.
Press button page 172, fig. 151 for more than 2 seconds. While pressing
the button, the warning light
lights up. At the same time the memory of the system
is erased and the new calibration is started, which is confirmed with an audible signal
and then the warning light
goes out.
If the warning light
does not go out after the basic setting, there is a fault in the
system. Have the vehicle inspected by your nearest specialist garage.
Warning light
lights up
If the tyre inflation pressure of at least one wheel is insufficiently inflated in comparison
to the stored basic value, the warning light
lights up.
Warning light
flashes
If the warning light flashes, there is a system fault. Have the vehicle inspected by your
nearest specialist garage.
WARNING
When the warning light
lights up, immediately reduce the speed and
avoid sudden steering and brake manoeuvr es. Please stop the vehicle without
delay at the nearest possible stop and in spect the tyres and their inflation pres-
sures.
The driver is responsible for the correct tyre inflation pressures. For this
reason, the tyre inflation pressu res must be checked regularly.
Under certain circumstances (e.g. sporty style of driving, wintry or unpaved
roads) the warning light
can be delayed or does not light up at all.
The tyre pressure monitoring system does not take away the responsibility
from the driver for the correct tyre inflation pressure.
Note
The tyre pressure monitoring system:
does not replace the regular tyre inflatio n pressure control, because the system
cannot detect an even pressure loss,
cannot warn in case of very rapid tyre inflation pressure loss, e.g. in case of sudden
tyre damage. In this case ca refully bring the vehicle to a standstill without sudden
steering movements and without sharp braking.
In order to ensure a proper functioning of the tyre inflation pressure-control
system, it is necessary to carry out the ba sic setting again every 10 000 km or 1x a
year.
Diesel particle filter* (diesel engine)In the diesel particle filter the resu lting soot particles are collected and
burnt during the combustion of diesel fuel.Code 7GG, 7MB or 7MG on the vehicle data sticker, see fig. 152 , indicates that your
vehicle is equipped with a diesel particle fi lter. The vehicle data sticker is located on
the floor of the luggage compartment and is also stated in the Service schedule.
The diesel particle filter filters the soot particles completely from the exhaust. The soot
is collected in the diesel particle filter and burnt regularly. To assist this procedure, we
recommend not to drive regu larly over short distances.
Fig. 152 Vehicle data sticker
s43s.1.book Page 173 Thursday, May 13, 2010 1:21 PM
Page 176 of 275
Driving and the Environment175
Using the system
Safety
Driving Tips
General Maintenance
Breakdown assistance
Technical Data
Driving and the EnvironmentThe first 1 500 kilometres and then afterwardsA new engine
The engine has to be run in during the first 1 500 kilometres.Up to 1 000 kilometres– Do not drive faster than 3/4 of the maximum speed of the gear in use, that is 3/4 of
the maximum permissi ble engine speed.
– Do not use full throttle.
– Avoid high engine revolutions.
– Do not tow a trailer.From 1 000 up to 1 500 kilometres– Increase the power output of the engine gradually up to the full speed of the gear
engaged, that is up to the maxi mum permissible engine revolutions.
During the first operating hours the engine ha s higher internal friction than later until
all of the moving parts have harmonized. Th e driving style which you adopt during the
first approx.1 500 kilometres plays a decisive part in the success of running in your
vehicle.
You should not drive at unnecessarily high engine revolutions even after the
running-in period is complete . The maximum permissible en gine speed is marked by
the beginning of the red zone on the scale of the revolutions counter. Shift up into the
next higher gear on a vehi cle fitted with manual gear box before the red zone is
reached. Extremely high engine revolutions are automatically governed, by the way.
For a vehicle fitted with a manual gearbox the converse situation also applies: Do not
drive at engine revolutions which are too low. Shift down as soon as the engine is no
longer running smoothly.
Caution
All the speed and engine revolution figures ap ply only when the engine is at its normal
operating temperature. Never rev up an engine which is cold, neither when the vehicle
is stationary nor when driving in individual gears.
For the sake of the environment
Not driving at unnecessari ly high engine revolutions and shifting to a higher gear as
early as possible are ways to minimise fu el consumption and operating noise levels
and protects the environment.New tyresNew tyres have to be “run in” since they do not offer optimal grip at first. You should
take account of this fact for the first 500 kilometres and drive particularly carefully.New brake padsAllow for the fact that new brake pads do no t achieve their full braking efficiency until
approximately 200 kilometres. New brake pads must be first “run in” before they
develop their optimal friction force. You ca n, however, compensate for this slightly
reduced braking force by increasing the pressure on the brake pedal.
This guideline also applies to any new brake pads installed at a future date.
During the running-in pe riod, you should avoid excessive stresses on the brakes. This
includes, for example, violent braking, part icularly from very high speeds, and also
when crossing mountain passes.
s43s.1.book Page 175 Thursday, May 13, 2010 1:21 PM
Page 178 of 275

Driving and the Environment177
Using the system
Safety
Driving Tips
General Maintenance
Breakdown assistance
Technical Data
guidelines given in this chapter in order to
make best use of these characteristics and
to maintain their effectiveness.
The optimal engine speed should be obtained when accelerating, in order to avoid a
high fuel consumption and resonance of the vehicle.
Looking ahead when driving
A vehicle's highest fuel consumption occurs it accelerates.Avoid accelerating and braking unnecessarily. If you drive with forsight you will not
need to brake so often and will also then not have to accelerate so much. Let your
vehicle coast to a stop, for example, if this is possible, when you see that the next set of
traffic lights is at red.Shifting gears and saving energy
Shifting up early saves on fuel.Manual gearbox– Drive no more than about one length of your vehicle in first gear.
– Always shift up into the next higher gear at approx. 2 000 to 2 500 revs.Automatic gearbox– Depress the accelerator pedal slowly. Do not depress it beyond the kickdown
position, however. An effective way of achieving good fuel economy is to shift up
early. You will consume
more fuel if you drive at unnecessaril y high revolutions in any given gear.
The fig. 153 shows the ratio of fuel consumption to the speed of your vehicle in the
relevant gears. Fuel consumptio n in 1st gear is the highest, while that in 5th or 6th gear
is the lowest.
Only depress the accelerator pedal slowly if your vehicle is fitted with an automatic
gearbox in order to automatically select an economic driving programme. You will
achieve good fuel economy by shifting up early and shifting down late.
Note
Also use the information supplied by the multi-functional indicator* page 19.Avoiding full throttle
Driving more slowly means saving fuel.Sensitive use of the accelerator will not only significantly reduce fuel consumption but
also positively influence environmenta l pollution and wear of your vehicle.
You should avoid exploiting the top speed of your vehicle wherever possible. Fuel
consumption, pollutant emissions and vehicl e noises increase disproportionally at
high speeds.
The fig. 154 shows the ratio of fuel consumption to the speed of your vehicle. You
will cut your fuel consumption by half if you only make use three-quarters of the
possible top speed of your vehicle.
Fig. 153 Fuel consumption in litres/100
km. and speed in km/h.
Fig. 154 Fuel consumption in litres/100
km. and speed in km/h.
s43s.1.book Page 177 Thursday, May 13, 2010 1:21 PM
Page 184 of 275
Towing a trailer183
Using the system
Safety
Driving Tips
General Maintenance
Breakdown assistance
Technical Data
Headlights
Before starting off with a hitched trailer, also check the setting of the headlights. Alter
the setting as necessary with the ai
d of the headlight beam adjuster page 56.
Detachable ball head
The ball rod is detachable on vehicles which feature a factory-fitted towing device. It is
stowed together with separate fitting instru ctions in the spare wheel well in the luggage
compartment of the vehicle.
Further information on the towing device page 184.
Note
We recommend that you also have your vehicle inspected between service inter-
vals if you tow a trailer frequently.
The handbrake on the towing vehicle must be put on when coupling and decou-
pling the trailer.
Driving Tips
Particular caution is required when towing a trailer.– Do not, as far as possible, drive with your vehicle unladen and the trailer laden.
– Do not make full use of the legal maximum speeds. This applies in particular to downhill sections.
– Apply the brakes in good time.
– Keep a check on the coolant temperature gauge if the outside temperature is high.
Distribution of weight
The distribution of the weight is very poor if your vehicle is unladen and the trailer is
laden. Maintain a particularly low speed if you cannot avoid driving with this combina-
tion.
Driving speed
Do not drive faster than 80 km/hour for safety reasons. This also applies for countries
in which higher speeds are allowed. The fact that the driving stability of the vehicle + trailer combination reduces with
increasing speed means that the legally allowed speed should not be used when there
are unfavourable road, weather or wind cond
itions, particularly near accident black
spots.
You must always reduce your speed immediat ely as soon as you detect even just the
slightest swaying of the trailer. On no account attempt to stop the trailer from
“swaying” by accelerating.
Apply the brakes in good time! If the trailer is fitted with a trailer brake, apply the
brakes gently at first and then brake firmly. This will avoid brake jolts resulting from the
trailer wheels locking. Shift down gears in good time before negotiating a downhill
section to allow the engine to also act as a brake.
Engine overheating
Please keep a check on the coolant temperature gauge if you have to negotiate a
lengthy slope in a low gear at a high engi ne speed when the outside temperature is
very high page 16, “Coolant temperature gauge”.
If the needle of the coolant temperature gauge moves into the right-hand area or even
the red area of the scale, reduce your speed immediately. Stop and switch off the
engine if the warning light
in the instrument cluster begins flashing. Wait a few
minutes and check the level of coolant in the coolant expansion bottle page 201,
“Inspecting the coolant level”.
Please refer to the following guidelines page 31, “Coolant temperature/coolant
level ”.
The coolant temperature can be reduced by switching on the heating.
Any increase in the cooling effect of the coolant fan through shifting down a gear and
increasing the engine speed is not possible since the fan speed is independent of the
engine speed. One should also not drop a gear for this reason when towing a trailer as
long as the engine can manage th e slope without any drop in speed.
s43s.1.book Page 183 Thursday, May 13, 2010 1:21 PM
Page 189 of 275
Taking care of your vehicle and cleaning the vehicle
188
Do not use window leathers which you have us ed to polish the vehicle body to dry off
the windows. Residues of preservatives in the window leather can dirty the window
and reduce visibility.
Do not affix any stickers over the inside of the rear window to avoid damage to the
heating elements of the rear window heater .
We recommend using a preserva tive from Škoda genuine accessories offered by your
Škoda dealer.
Caution
Never remove snow or ice from the glass parts with warm or hot water - risk of forma-
tion of cracks in the glass!The headlight lensesPlease do not use any aggressi ve cleaning or chemical solvent products for cleaning
the front headlights - risk of damage to the plastic lenses. Please use soap and clean
warm water.
Caution
Never wipe the headlights dry and do not use any sharp objects for cleaning the plastic
lenses, this may result in damage to the protective paintwork and consequently in
formation of cracks on the headlight lenses, e.g through effect of chemical products.Door and window sealsThe rubber seals on the doors, boot lid, bonnet and windows remain supple and last
longer if you treat them from time to time with a rubber care product (e.g. with a spray
with silicone-free oil). You also avoid premature wear of the seals and prevent leakages
in this way. It is also easier to open the doors. Rubber seals which are well cared for also
do not stick together in cold winter weather.Locking cylinderWe recommend that you use the spray from Škoda original accessories with regreasing
and anticorrosive effect for de-icing locking cylinders.
Note
When washing your vehicle, ensure that as little water as possible gets into the locking
cylinders.WheelsSteel wheels
You should also thoroughly wash the wheels and wheel trims when giving your vehicle
its regular wash. This prevents any brake dust, dirt and road salt from sticking to the
wheel hubs. You can remove stubborn brake abrasion adhering to the wheels with an
industrial cleaner. Touch up any damage to the paintwork on the wheels before rust is
able to form.
Light alloy wheels
Regular care of light alloy wh eels is necessary in order to retain their decorative
appearance over long periods. It is particul arly important to remove regularly any road
salt and brake abrasion from light alloy wheels, otherwise the light metal will suffer.
Wash thoroughly and then treat the wheels with a protective product for light alloy
wheels which does not cont ain any acidic components. We recommend to apply a
hard wax layer onto the wheel hubs every three months. You must not use any prod-
ucts which cause abrasion when treating the wheel hubs. Any damage to the paint
layer on the wheel hubs must be touched up immediately.
We recommend using a preservative from Šk oda genuine accessories offered by your
Škoda dealer.
WARNING
One should remember when cleaning th e wheels that moisture, ice and road
salt may adversely affect braking ef ficiency - risk of an accident!
Note
Severe layers of dirt on the wheels can also result in wheel imbalance. This may show
itself in the form of a wheel vibration which is transmitted to the steering wheel which,
in certain circumstances, can cause premature wear of the steering. This means it is
necessary to remove the dirt.
s43s.1.book Page 188 Thursday, May 13, 2010 1:21 PM
Page 203 of 275

Inspecting and replenishing
202WARNING
The cooling system is pressurized! Do not open the cap of the coolant
expansion bottle if the engine is still hot - risk of scalding!
The coolant additive and thus all of the coolant is harmful to your health.
Avoid contact with the coolant. Coolant vapours are also harmful to the health.
It is important, therefore, to always safely store any coolant additive in its orig-
inal container out of the reach of children - risk of poisoning!
If any splashes of coolant get into yo ur eyes, rinse out your eyes immedi-
ately with clear water and contact a doctor as soon as possible.
You should also consult a doctor without delay if you have inadvertently
swallowed coolant.Caution
Do not continue your journey if for some reason it is not possible under the
conditions prevailing to top up with coolant. Switch the engine off and obtain
professional assistance from a specialist garage, otherwise it could lead to severe
engine damage.
For the sake of the environment
Do not re-use coolant if it is necessary to drain the coolant in the system. It should be
collected and disposed of in compliance with environmental protection regulations.Radiator fan
The radiator fan may switch on suddenly.The radiator fan is driven by an electric motor and controlled according to the coolant
temperature.
The radiator fan may continue running for up to 10 minutes after the engine has been
switched off - even if the ignition is also off. It may also switch on suddenly after a
certain time, if
the coolant temperature has risen beca use of an accumulation of heat or
the warm engine compartment is heated up additionally by strong sunlight.
WARNING
You must therefore be aware when working in the engine compartment that the
fan may switch on suddenly - risk of injury!Brake fluidInspecting the brake fluid levelThe brake fluid reservoir is located on the left of the engine compartment. The brake
fluid reservoir on right-hand steering models is positioned on the other side of the
engine compartment.
– Switch the engine off.
– Open the bonnet page 196.
– Inspect the brake fluid level in the reservoir fig. 165 . The level must be between
the “MIN” and “MAX” markings.
A slight drop in the fluid level results when driving due to normal wear-and-tear and
automatic adjustment of the brak e pads, and is perfectly normal.
There may be an indication of a leak in th e brake system, however, if the fluid level
drops significantly within a short time or if it drops below the “MIN” marking. If the
brake fluid level is too low, this is indicated by the warning light page 34, “Brake
system ” lighting up in the instru ment cluster. In this case stop immediately and do
not drive any further! Obtain professional assistance.
Fig. 165 Engine compartment: Brake
fluid reservoir
s43s.1.book Page 202 Thursday, May 13, 2010 1:21 PM
Page 212 of 275

Wheels and Tyres211
Using the system
Safety
Driving Tips
General Maintenance
Breakdown assistance
Technical Data
The date of manufacture
is also stated on the tyre wall (possibly only on the inside of
wheel):
DOT ... 20 09...
means, for example, that the tyre was ma nufactured in the 20th week of the year 2009.
Any spare wheel which differs from the tyres fitted to the vehicle (e.g. winter tyres or
low-profile tyres) should only be used for a short time in the event of a puncture and
when adopting an appropriately cautious styl e of driving. It should be replaced as
quickly as possible by a normal wheel.
WARNING
Only use those tyres or wheel rims which have been approved for your
model of Škoda Auto vehicle. Failure to observe this instruction will adversely
affect the road safety of your vehicle - risk of accident! Approval and licencing
of your vehicle on public roads may also become void as a result.
You must on no account drive at a high er speed than is permissible for your
tyres - risk of an accident resulting from tyre damage and loss of control over
your vehicle.
Tyres which are 6 years old or more should only be fitted in exceptional
cases and when adopting an approp riately cautious style of driving.
Never fit tyres which have already been used without having adequate
knowledge of their previous history. Tyre s age even if they have not been used
at all or only very little. A spare tyre must only be used in exceptional cases and
only then when adopting an appropriately cautious style of driving.
Do not, where possible, replace individu al tyres but at least replace them on
both wheels of a given axle at the same time. Always fit the tyres with the
deeper tread depth to the front wheels.For the sake of the environment
Old tyres must be disposed of in conf ormity with the appropriate regulations.
Note
It is not normally possible to fit wheels from other models of cars for technical reasons.
This may also apply in certain circumstances to the wheels of the same type of
vehicle.Wheel boltsWheels and wheel bolts are matched to each other in terms of design. Each time you
fit other wheels - e.g. light alloy wheels or wheels with winter tyres - you must therefore
also use the matching wheel bolts of the corr ect length and shape of spherical cap. This
is essential to ensure that the wheels are tightly fitted and that the brake system oper-
ates properly.
If you retrofit wheel trims (or have this done), please also ensure that an adequate
flow of air remains assured for cooling the brake system.
The authorised Škoda Service Partners are instructed in the technical possibilities
which exist regarding converting or retrofitting tyres, wheels and wheel trims.
WARNING
In case of incorrect treatment of the wheel bolts, the wheel can loosen when
the car is moving - risk of accident!
The wheel bolts must be clean and must turn easily. However, they must
never be treated with grease or oil.
If the wheel bolts are tightened to a too low tightening torque, the rim can
lossen when the car is moving - risk of accident! A tightening torque which is
too high can damage the bolts and threads and this can result in permanent
deformation of the contac t surfaces on the rims.Caution
The prescribed tightening torque of the wh eel bolts for steel and light alloy wheels is
120 Nm.
s43s.1.book Page 211 Thursday, May 13, 2010 1:21 PM
Page 218 of 275
Breakdown assistance217
Using the system
Safety
Driving Tips
General Maintenance
Breakdown assistance
Technical Data
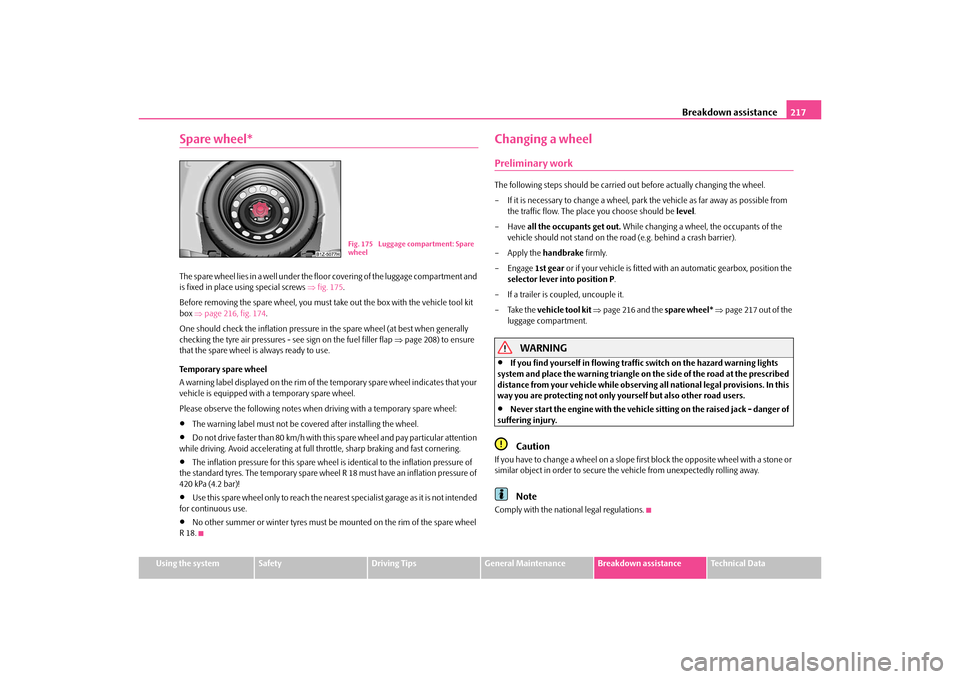
Spare wheel*The spare wheel lies in a well under the floor covering of the luggage compartment and
is fixed in place using special screws fig. 175 .
Before removing the spare wheel, you must take out the box with the vehicle tool kit
box page 216, fig. 174.
One should check the inflation pressure in the spare wheel (at best when generally
checking the tyre air pressures - see sign on the fuel filler flap page 208) to ensure
that the spare wheel is always ready to use.
Temporary spare wheel
A warning label displayed on the rim of the temporary spare wheel indicates that your
vehicle is equippe d with a temporary spare wheel.
Please observe the following notes when driving with a temporary spare wheel:
The warning label must not be covered after installing the wheel.
Do not drive faster than 80 km/h with this spare wheel and pay particular attention
while driving. Avoid accelerating at full throttle, sharp braking and fast cornering.
The inflation pressure for this spare wheel is identical to the inflation pressure of
the standard tyres. The temporary spare wheel R 18 must have an inflation pressure of
420 kPa (4.2 bar)!
Use this spare wheel only to reach the nearest specialist garage as it is not intended
for continuous use.
No other summer or winter tyres must be mounted on the rim of the spare wheel
R 18.
Changing a wheelPreliminary workThe following steps should be carried ou t before actually changing the wheel.
– If it is necessary to change a wheel, park the vehicle as far away as possible from
the traffic flow. The place you choose should be level.
–Have all the occupants get out. While changing a wheel, the occupants of the
vehicle should not stand on the ro ad (e.g. behind a crash barrier).
– Apply the handbrake firmly.
–Engage 1st gear or if your vehicle is fitted with an automatic gearbox, position the
selector lever into position P .
– If a trailer is coupled, uncouple it.
–Take the vehicle tool kit page 216 and the spare wheel* page 217 out of the
luggage compartment.
WARNING
If you find yourself in flowing traffic switch on the hazard warning lights
system and place the warning triangle on the side of the road at the prescribed
distance from your vehicle while observin g all national legal provisions. In this
way you are protecting not only yourself but also other road users.
Never start the engine with the vehicle si tting on the raised jack - danger of
suffering injury.Caution
If you have to change a wheel on a slope fi rst block the opposite wheel with a stone or
similar object in order to secure the vehicle from unexpectedly rolling away.
Note
Comply with the national legal regulations.
Fig. 175 Luggage compartment: Spare
wheel
s43s.1.book Page 217 Thursday, May 13, 2010 1:21 PM