stop start SKODA OCTAVIA 2010 2.G / (1Z) Owner's Manual
[x] Cancel search | Manufacturer: SKODA, Model Year: 2010, Model line: OCTAVIA, Model: SKODA OCTAVIA 2010 2.G / (1Z)Pages: 275, PDF Size: 16.43 MB
Page 32 of 275
Instruments and warning lights31
Using the system
Safety
Driving Tips
General Maintenance
Breakdown assistance
Technical Data
Stop the vehicle and switch the engine off
if the warning light does not go off after
the engine has started or flashes while driving. Check the oil level and top up with oil
as necessary page 199, “Replenishing engine oil”.
An audible signal sounds three times as an additional warning signal.
Do not continue your journey if for some reason it is not possible under the condi-
tions prevailing to top up with oil. Keep the engine switched off and obtain profes-
sional assistance from a specialist garage, otherwise it could lead to severe engine
damage.
Do not drive any further if the warning light flashes even if the oil is at the correct
level. Do not run the engine not at idling speed either. Contact the nearest specialist
garage to obtain professional assistance.
The following text will be displayed in the information display*:
Oil Pressure: Engine off! Owner's manual
WARNING
If you must stop for technical reasons, then park the vehicle at a safe
distance from the traffic and switch off the engine and switch on the hazard
warning light system.
The red oil pressure light
is not an oil level indicator! One should there-
fore check the oil level at regular inte rvals, preferably after every refueling
stop.
EPC fault light
(petrol engine)
The
(Electronic Power Control) warning light comes on for a few seconds when the
ignition is switched on.
If the warning light
does not go out or lights up after starting the engine, a fault
exists in the engine control. The engine management system selects an emergency
programme which enables you to drive to the nearest specialist garage by adopting a
gentle style of driving.
The following text will be displayed in the information display*:
Engine fault. Workshop!
Glow plug system
(diesel engine)
The warning light
lights up for a cold engine when switching on the ignition (pre-
heat position) page 107. Start the engine after the indicator light goes out.
The glow plug indicator light will come on for about 1 second if the engine is at a
normal operating temperature or if the outside temperature is above +5°C. This
means that you can start the engine right away.
There is a fault in the glow plug system if the warning light
does not come on at
all or lights up continuously . Contact a specialist garage as soon as possible to obtain
assistance.
If the warning light
begins to flash while driving, a fault exists in the engine control.
The engine management syst em selects an emergency programme which enables you
to drive to the nearest specialist garage by adopting a gentle style of driving.
The following text will be displayed in the information display*:
Engine fault. Workshop!
Coolant temperature/coolant level
The warning light comes on for a few seconds
5) when the ignition is switched on.
The coolant temperature is too high or the coolant level too low if the warning light
does not go out or flashes while driving.
3 peeps sound as an additional warning signal.
In this case stop and switch the engine off and check the coolant level; top up the
coolant as necessary.
Do not continue your journey if for some reason it is not possible under the condi-
tions prevailing to top up with coolant. Keep the engine switched off and obtain
professional assistance from a specialist garage, otherwise it could lead to severe
engine damage.
5)The warning light on vehicles fitted with information display does not come on after switching
the ignition on, but only if the coolant temperature is too high or the coolant level is too low.
A2
s43s.1.book Page 31 Thursday, May 13, 2010 1:21 PM
Page 33 of 275
Instruments and warning lights
32
If the coolant is within the specified range, the increased temperature may be caused
by an operating problem at th e coolant fan. Check the fuse for the coolant fan, replace
it if necessary page 227, “Fuse assignment in engine compartment”.
Do not continue driving if the warning light does not go off although the fluid is at the
correct level and also the fuse of the fan is in proper order. Contact a specialist garage
to obtain assistance.
Please also refer to the additional instructions page 200, “Cooling system”.
The following text will be displayed in the information display*: Check coolant! Owner's manual
WARNING
If you must stop for technical reasons, then park the vehicle at a safe
distance from the traffic and switch off the engine and switch on the hazard
warning light system page 56.
Take care when opening the coolant expa nsion bottle. If the engine is hot,
the cooling system is pressurized - risk of scalding! It is best to allow the engine
to cool down before removing the cap.
Do not touch the coolant fan The coolant fan may switch on automatically
even if the ignition is off.
Traction control system (TCS)
The warning light
comes on for a few seconds when the ignition is switched on.
The warning light flashes when a control cycle is activated while driving.
The warning light lights up permanentl y if there is a fault in the system.
The fact that the TCS system operates together with the ABS means that the TCS
warning light will also come on if the ABS system is not operating properly.
If the warning light comes on immediately after starting the engine, the TCS system
can be switched off for technical reasons. In this case, the TCS system can be switched
on again by switching the ignition on and off. If the warning light goes out, the TCS
system is fully functional again.
Further information about the TCS page 169, “Traction control system (TCS)”.
Note
If the battery has been disconnected and reconnected, the warning light
comes on
after switching on the ignition. The warning light must go out after driving a short
distance.
Switch off traction control system (TCS)
The TCS system is switched off by pressing the button page 169, fig. 150 and the
warning light
lights up.
Electronic stability programme (ESP)*
The warning light
comes on for a few seconds when the ignition is switched on.
When the ESP helps to stabilise the vehicle, the warning light
flashes in the instru-
ment cluster.
The warning light lights up permanently if there is a fault in the ESP system.
The fact that the ESP system operates together with the ABS means that the ESP
warning light will also come on if the ABS system is not operating properly.
If the warning light
comes on immediately after starting the engine, the ESP system
can be switched off for technical reasons. In this case, the ESP system can be switched
on again by switching the igni tion on and off. If the warning light goes out, the ESP
system is fully functional again.
Further information on the ESP page 167, “Electronic stab ility programme (ESP)*”.
Electronic Differential Lock (EDL)*
The EDL is a part of the ESP. A fault in the ED L is indicated by the lighting up of the ESP
warning light in the instrument cluster. Have the vehicle inspected without delay by an
authorised Škoda Service Partner. Further information on the EDL page 168, “Elec-
tronic Differential Lock (EDL and XDL)*”.
Note
If the battery has been disconnected and reconnected, the warning light
comes on
after switching on the ignition. The warning light must go out after driving a short
distance.
s43s.1.book Page 32 Thursday, May 13, 2010 1:21 PM
Page 34 of 275
Instruments and warning lights33
Using the system
Safety
Driving Tips
General Maintenance
Breakdown assistance
Technical Data
Selector lever lock*
If the green warning light
lights up, operate the brake pedal. This is necessary, in
order to be able to move the selector lever out of the position P or N.
Further information about the selector lever lock page 116.
Tyre inflation pressure*
The warning light
lights up, if there is a substantia l drop in inflation pressure in one
of the tyres. Reduce the speed and check or correct as soon as possible the inflation
pressure in the tyres page 208.
If the warning light flashes, there is a system fault. Visit the nearest specialist garage and
have the fault rectified.
Further information about the tyre pressure monitoring system page 172.
WARNING
When the warning light
lights up, immediately reduce the speed and
avoid sudden steering and brake manoeuvr es. Please stop the vehicle without
delay at the nearest possible stop and in spect the tyres and their inflation pres-
sures.
Under certain circumstances (e.g. sporty style of driving, wintry or unpaved
roads) the warning light
can be delayed or does not light up at all.
Note
If the battery has been disconnected, the warning light
comes on after switching on
the ignition. The warning light must go out after driving a short distance.
Antilock brake system (ABS)
The warning light
shows the functionality of the ABS.
The warning light comes on for a few seconds after the ignition has been switched on
or when starting the engine. The warning light goes out after an automatic check
sequence has been completed. A fault in the ABS
The system is not functioning properly if the ABS warning light
does not go out
within a few seconds after switching on the igni tion, does not light up at all or lights up
while driving. The vehicle will only be br aked by the normal brake system. Visit a
specialist garage immediately and adjust your style of driving appropriately as you will
not know how great the damage is.
Further information about ABS page 171, “Antilock brake system (ABS)”.
A fault in the entire brake system
If the ABS warning light
comes on together with the brake system warning light
(handbrake must be released), there is a fault not only in the ABS but also in another
part of the brake system .
WARNING
If the brake system warning light
comes on together with the ABS
warning light
stop the vehicle immediately an d check the brake fluid level in
the reservoir page 202, “Brake fluid”. If the fluid level has dropped below the
MIN marking, do not drive any further - risk of accident! Obtain professional
assistance.
Pay attention to the following instructions before checking the brake fluid
level and opening the bonnet page 197, “Working in the engine compart-
ment”.
If the brake fluid is at the correct leve l, the ABS control function has failed.
The rear wheels may then block very rapi dly when braking. In certain circum-
stances, this can result in the rear end of the car breaking away - risk of skid-
ding! Drive carefully to the nearest specialist garage and have the fault
rectified.
Bonnet
The warning light
comes on if the bonnet is unlocked. If the bonnet unlocks while
driving, the warning light lights up
and as a warning an audible signal sounds.
The warning light comes on even when the ig nition is switched off. The warning light
lights up for a maximum of 5 minutes.
s43s.1.book Page 33 Thursday, May 13, 2010 1:21 PM
Page 35 of 275
Instruments and warning lights
34
On vehicles with information display* this wa rning light is replaced by a vehicle symbol
page 24.Seat belt warning light
The warning light
comes on after the ignition is sw itched on as a reminder for the
driver to fasten the seat belt. The warning light only goes out if the driver has fastened
his seat belt.
If the seat belt has not been fastened by the driver, a permanent warning signal sounds
at vehicle speeds greater than 20 km/h and simultaneously the warning light
flashes.
If the seat belt is not fastened by the dr iver during the next 90 seconds, the warning
signal is deactivated and the warning light
lights up permanently.
Further information on the seat belts page 145, “Seat belts”.
Thickness of the brake pads*
The warning light comes on for a few seconds
6) when the ignition is switched on.
If the warning light
comes on, contact a specialist garage immediately and have the
brake pads on all of the wheels inspected.
The following text will be displayed in the information display*: Check brake pads!
Boot lid
The warning light
comes on when the ignition is switched on if the luggage
compartment door is open. If th e boot lid opens while driving
, the warning light
lights up and an audible signal sounds.
The warning light comes on even when the ig nition is switched off. The warning light
lights up for a maximum of 5 minutes.
On vehicles with information display* this wa rning light is replaced by a vehicle symbol
page 24.
Open door
The warning light
comes on if one or several doors are opened or if the boot lid is
opened. If one of the doors opens whil e driving, the warning light lights
up and an
audible signal sounds.
The warning light comes on even when the ignition is switched off. The warning light
lights up for a maximum of 5 minutes.
On vehicles with information display* this wa rning light is replaced by a vehicle symbol
page 24.
Windshield washer fluid level*
The warning light
comes on when the ignition is swit ched on if there is insufficient
fluid in the windshield washer system. Top up with liquid page 207.
The following text will be displayed in the information display*: To p u p w a s h f l u i d !
Brake system
The warning light
flashes or comes on if the brake fluid level is too low, if there is a
fault in the ABS or if the handbrake is applied.
If the warning light flashes and an audible signal so unds three times (handbrake is
not applied), stop and check the brake fluid level .
The following text will be displayed in the information display*: Brake fluid: Owner's manual
If there is a fault in the ABS which also infl uences the function of the brake system (e.g.
distribution of brake pressure), the ABS warning light
comes on and at the same
time the brake system warning light starts flashing
. Be aware that not only the ABS
but also another part of th brake system is defective .
An audible signal sounds three times as an additional warning signal.
One should get used to high pedal forces, long braking distances and long free play of
the brake pedal when driving to the next specialist garage.
6)The warning light on vehicles fitted with information display does not come on after switching
the ignition on, but only if a fault exists.s43s.1.book Page 34 Thursday, May 13, 2010 1:21 PM
Page 36 of 275
Instruments and warning lights35
Using the system
Safety
Driving Tips
General Maintenance
Breakdown assistance
Technical Data
For further information on the brake system
page 170, “Brakes”.
Handbrake applied
The warning light
also comes on if the handbrake is applied. An audible warning is
also given if you drive the vehicle for at least 3 seconds at a speed of more than 6 km/h.
The following text will be displayed in the information display*:
Release parking brake!
WARNING
Pay attention to the following instruct ions before checking the brake fluid
level and opening the bonnet page 197, “Working in the engine compart-
ment”.
If the brake system warning light
does not go out a few seconds after
switching on the ignition or comes on when driving, stop immediately and
check the brake fluid in the reservoir page 202. If the fluid level has dropped
below the MIN marking, do not drive any further - risk of accident! Obtain
professional assistance.
Alternator
The warning light
comes on after the ignition has been switched on. It should go
out after the engine has started.
If the warning light does not go out after the engine has started, or comes on when
driving, drive to the nearest specialist garage. The vehicle battery will be discharged in
this case so switch off all non- essential electrical components.
Caution
If the warning light
comes on when driving and in addition the warning light
(cooling system fault) also comes on in di splay, you must then stop the car immedi-
ately and switch the engine off - risk of engine damage!
Engine oil level
Warning light
lights up
If the warning light lights up, the quantity of oil in the engine is probably too low.
Check as soon as possible the oil level or top up page 199, “Replenishing engine oil”
with engine oil.
A peep sounds as an additional warning signal.
The following text will be displayed in the information display*:
Check oil level!
The warning light will go out if the bonnet is left open for more than 30 seconds. If no
engine oil has been replenished, the warning light will come on again after driving
about 100 km.
Warning light
flashes
A fault on the engine oil level sensor is indicated additionally by an audible signal and
the warning light coming on several times after the ignition has been switched on.
In this case have the engine inspecte d without delay by a specialist garage.
The following text will be displayed in the information display*: Oil sensor. Workshop!
Fuel reserve
The warning light
comes on, if the fuel level is still below 9 litres.
An audible signal sounds as an additional warning signal.
The following text will be displayed in the information display*: Please refuel! Range...km
Note
The Text in the information display* goes ou t only after refuelling and driving a short
distance.
s43s.1.book Page 35 Thursday, May 13, 2010 1:21 PM
Page 38 of 275
Unlocking and locking37
Using the system
Safety
Driving Tips
General Maintenance
Breakdown assistance
Technical Data
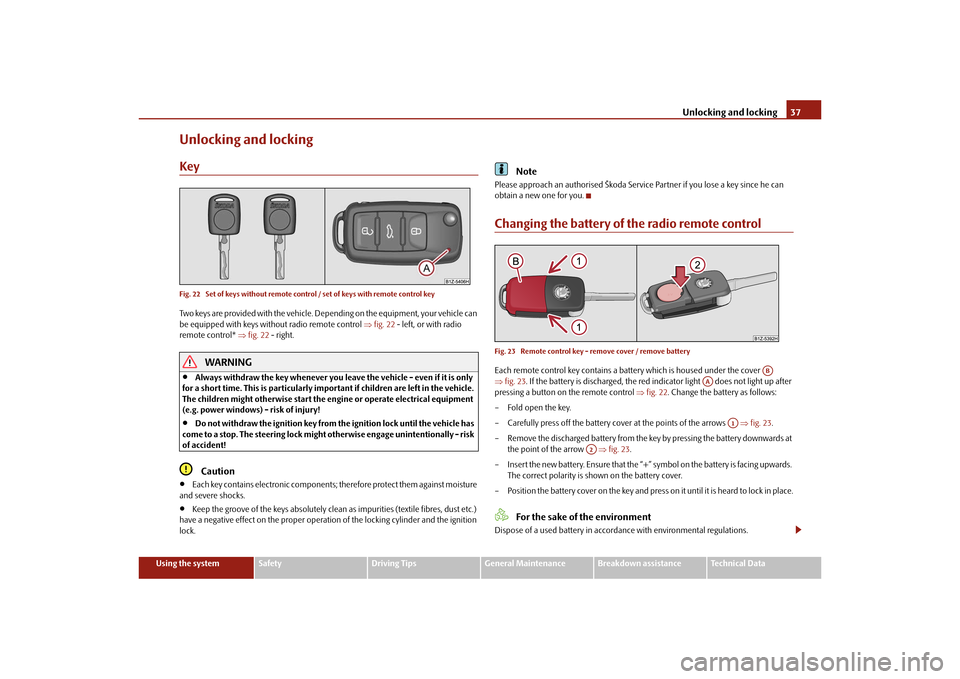
Unlocking and lockingKeyFig. 22 Set of keys without remote control / set of keys with remote control keyTwo keys are provided with the vehicle. Depending on the equipment, your vehicle can
be equipped with keys without radio remote control fig. 22 - left, or with radio
remote control* fig. 22 - right.
WARNING
Always withdraw the key whenever you leave the vehicle - even if it is only
for a short time. This is particularly important if children are left in the vehicle.
The children might otherwise start the en gine or operate electrical equipment
(e.g. power windows) - risk of injury!
Do not withdraw the ignition key from the ignition lock until the vehicle has
come to a stop. The steerin g lock might otherwise enga ge unintentionally - risk
of accident!Caution
Each key contains electronic components; therefore protect them against moisture
and severe shocks.
Keep the groove of the keys absolutely clean as impurities (textile fibres, dust etc.)
have a negative effect on the proper operation of the locking cylinder and the ignition
lock.
Note
Please approach an authorised Škoda Servic e Partner if you lose a key since he can
obtain a new one for you.Changing the battery of the radio remote controlFig. 23 Remote control key - remove cover / remove batteryEach remote control key contains a batt ery which is housed under the cover
fig. 23 . If the battery is discharged, the red in dicator light does not light up after
pressing a button on the remote control fig. 22 . Change the battery as follows:
– Fold open the key.
– Carefully press off the battery cover at the points of the arrows fig. 23 .
– Remove the discharged battery from the key by pressing the battery downwards at the point of the arrow fig. 23 .
– Insert the new battery. Ensure that the “+” symbol on the battery is facing upwards.
The correct polarity is shown on the battery cover.
– Position the battery cover on the key and press on it until it is heard to lock in place.
For the sake of the environment
Dispose of a used battery in accord ance with environmental regulations.
AB
AA
A1
A2
s43s.1.book Page 37 Thursday, May 13, 2010 1:21 PM
Page 43 of 275
Unlocking and locking
42
the door opening lever. If the child safety lock is switched on, it is necesary to also open
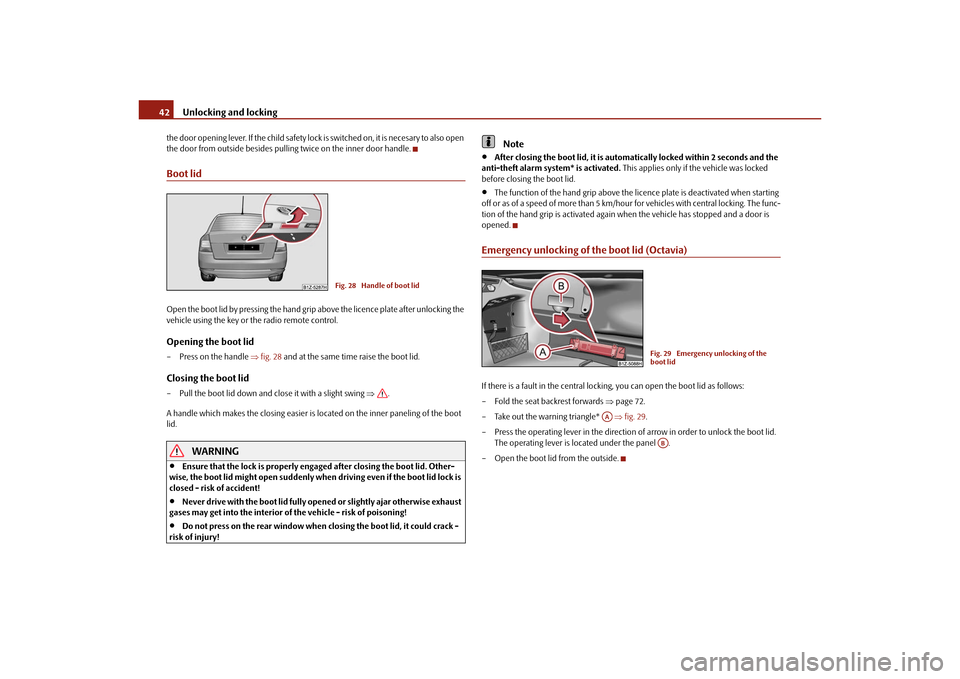
the door from outside besides pulling twice on the inner door handle.Boot lidOpen the boot lid by pressing the hand grip above the licence plate after unlocking the
vehicle using the key or the radio remote control.Opening the boot lid–Press on the handle fig. 28 and at the same time raise the boot lid.Closing the boot lid– Pull the boot lid down and cl ose it with a slight swing .
A handle which makes the closing easier is located on the inner paneling of the boot
lid.
WARNING
Ensure that the lock is properly enga ged after closing the boot lid. Other-
wise, the boot lid might open suddenly when driving even if the boot lid lock is
closed - risk of accident!
Never drive with the boot lid fully open ed or slightly ajar otherwise exhaust
gases may get into the interior of the vehicle - risk of poisoning!
Do not press on the rear window when closing the boot lid, it could crack -
risk of injury!
Note
After closing the boot lid, it is automatically locked within 2 seconds and the
anti-theft alarm system* is activated. This applies only if the vehicle was locked
before closing the boot lid.
The function of the hand grip above the li cence plate is deactivated when starting
off or as of a speed of more than 5 km/hour for vehicles with central locking. The func-
tion of the hand grip is activated again when the vehicle has stopped and a door is
opened.
Emergency unlocking of the boot lid (Octavia)If there is a fault in the central locking, you can open the boot lid as follows:
– Fold the seat backrest forwards page 72.
– Take out the warning triangle* fig. 29 .
– Press the operating lever in the direction of arrow in order to unlock the boot lid.
The operating lever is located under the panel .
– Open the boot lid from the outside.
Fig. 28 Handle of boot lid
Fig. 29 Emergency unlocking of the
boot lid
AA
AB
s43s.1.book Page 42 Thursday, May 13, 2010 1:21 PM
Page 44 of 275
Unlocking and locking43
Using the system
Safety
Driving Tips
General Maintenance
Breakdown assistance
Technical Data
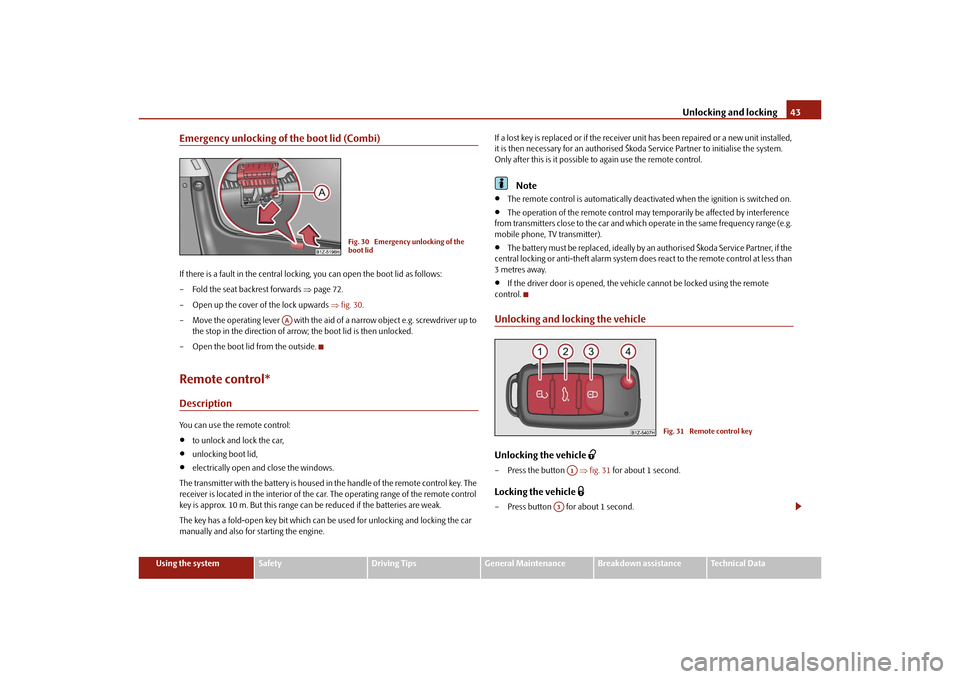
Emergency unlocking of the boot lid (Combi)If there is a fault in the central lockin g, you can open the boot lid as follows:
– Fold the seat backrest forwards page 72.
– Open up the cover of the lock upwards fig. 30 .
– Move the operating lever with the aid of a narrow object e.g. screwdriver up to
the stop in the direction of arro w; the boot lid is then unlocked.
– Open the boot lid from the outside.Remote control*DescriptionYou can use the remote control:
to unlock and lock the car,
unlocking boot lid,
electrically open and close the windows.
The transmitter with the battery is housed in the handle of the remote control key. The
receiver is located in the interior of the car. The operating range of the remote control
key is approx. 10 m. But this range can be reduced if the batteries are weak.
The key has a fold-open key bit which can be used for unlocking and locking the car
manually and also for starting the engine. If a lost key is replaced or if the receiver unit has been repaired or a new unit installed,
it is then necessary for an authorised Škoda Service Partner to initialise the system.
Only after this is it possible
to again use the remote control.
Note
The remote control is automatically deacti vated when the ignition is switched on.
The operation of the remote control may temporarily be affected by interference
from transmitters close to the car and which operate in the same frequency range (e.g.
mobile phone, TV transmitter).
The battery must be replaced, ideally by an authorised Škoda Service Partner, if the
central locking or anti-theft alarm system does react to the remote control at less than
3 metres away.
If the driver door is opened, the vehi cle cannot be locked using the remote
control.
Unlocking and locking the vehicleUnlocking the vehicle
– Press the button fig. 31 for about 1 second.Locking the vehicle
– Press button for about 1 second.
Fig. 30 Emergency unlocking of the
boot lid
AA
Fig. 31 Remote control key
A1
A3
s43s.1.book Page 43 Thursday, May 13, 2010 1:21 PM
Page 62 of 275
Lights and Visibility61
Using the system
Safety
Driving Tips
General Maintenance
Breakdown assistance
Technical Data
Windshield wiper and wash systemWindshield wiper
You can operate the windscreen wipers and automatic wipe/wash
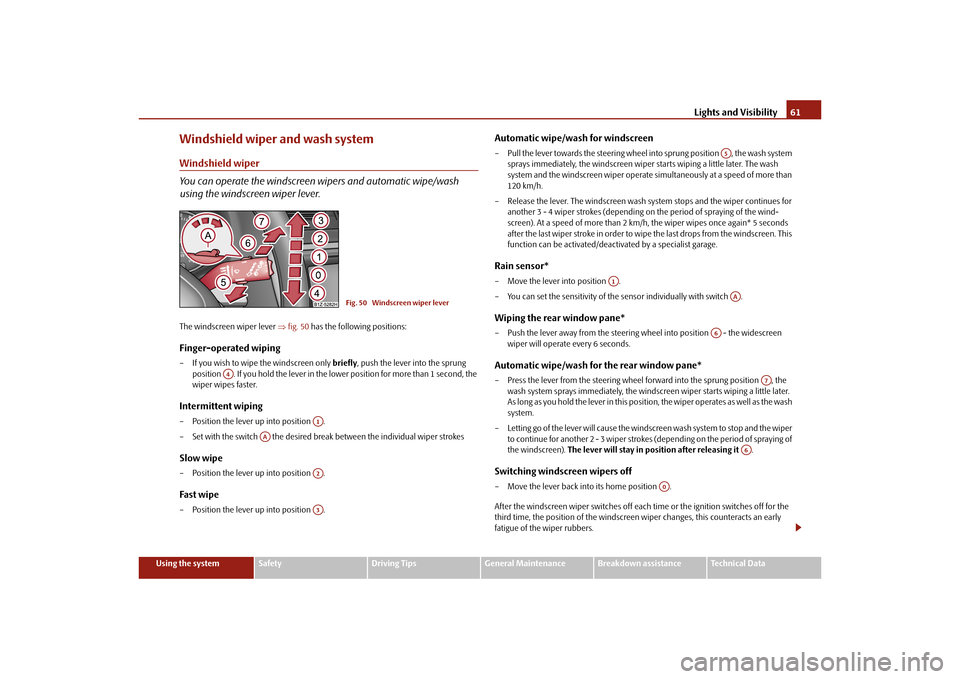
using the windscreen wiper lever.The windscreen wiper lever fig. 50 has the following positions:Finger-operated wiping– If you wish to wipe the windscreen only briefly, push the lever into the sprung
position . If you hold the lever in the lo wer position for more than 1 second, the
wiper wipes faster.Intermittent wiping– Position the lever up into position .
– Set with the switch the desired brea k between the individual wiper strokesSlow wipe– Position the lever up into position .Fast wipe– Position the lever up into position .
Automatic wipe/wash for windscreen– Pull the lever towards the steering wheel into sprung position , the wash system
sprays immediately, the windscreen wiper starts wiping a little later. The wash
system and the windscreen wiper operate simultaneously at a speed of more than
120 km/h.
– Release the lever. The windscreen wash system stops and the wiper continues for another 3 - 4 wiper strokes (depending on the period of spraying of the wind-
screen). At a speed of more than 2 km/h, the wiper wipes once again* 5 seconds
after the last wiper stroke in order to wipe the last drops from the windscreen. This
function can be activated/deacti vated by a specialist garage.Rain sensor*– Move the lever into position .
– You can set the sensitivity of the sensor individually with switch .Wiping the rear window pane*– Push the lever away from the steering wheel into position - the widescreen
wiper will operate every 6 seconds.Automatic wipe/wash for the rear window pane*– Press the lever from the steering wheel forward into the sprung position , the wash system sprays immediately, the windscreen wiper starts wiping a little later.
A s l o n g a s y o u h o l d t h e l e v e r i n t h i s p o s i t i o n, th e w i p e r o p e ra t e s a s w e l l a s t h e w a s h
system.
– Letting go of the lever will cause the windscreen wash system to stop and the wiper to continue for another 2 - 3 wiper strokes (depending on the period of spraying of
the windscreen). The lever will stay in position after releasing it .Switching windscreen wipers off– Move the lever back into its home position .
After the windscreen wiper switches off each time or the ignition switches off for the
third time, the position of the windscreen wiper changes, this counteracts an early
fatigue of the wiper rubbers.
Fig. 50 Windscreen wiper lever
A4
A1
AA
A2A3
A5
A1
AA
A6
A7
A6
A0
s43s.1.book Page 61 Thursday, May 13, 2010 1:21 PM
Page 84 of 275

Seats and Stowage83
Using the system
Safety
Driving Tips
General Maintenance
Breakdown assistance
Technical Data
Cup holder in rear centre console*– Press on the panel in the area fig. 81 - the cup holder comes out.
– Pull the cup holder out as far as the stop.
– Adjust the cup holder by moving the locking plate .
WARNING
Do not place any hot beverages into th e cup holder while the car is moving.
The hot beverages may spill - risk of scalding!
Do not use any cups or beakers which are made of brittle material (e.g. glass,
porcelain). You might be injured by them in the event of an accident.
Note holder
The note holder is designed e.g. for attaching a car park ticket in parking areas.
The attached note has to always be removed before starting off in order not to restrict
the driver's vision.Ashtray*Front ashtrayFig. 83 Centre console: Front ashtray / remove front ashtray insertOpening ashtray– Press on the bottom part of the cover of the ashtray - refer to fig. 83 .Removing ashtray insert– Press on the ashtray insert in the area (the insert comes out) and you can take
it out.Insert ashtray insert– Insert the ashtray insert into the mount and press it in.
WARNING
Never lay flammable objects in the ashtray basin - risk of fire!
Fig. 81 Centre console at rear: Cup
holder
AA
AB
Fig. 82 Windscreen: Note holder
AA
AB
s43s.1.book Page 83 Thursday, May 13, 2010 1:21 PM