radio SKODA OCTAVIA 2011 2.G / (1Z) Columbus Navigation System Manual
[x] Cancel search | Manufacturer: SKODA, Model Year: 2011, Model line: OCTAVIA, Model: SKODA OCTAVIA 2011 2.G / (1Z)Pages: 47, PDF Size: 1.09 MB
Page 17 of 47
RADIO mode
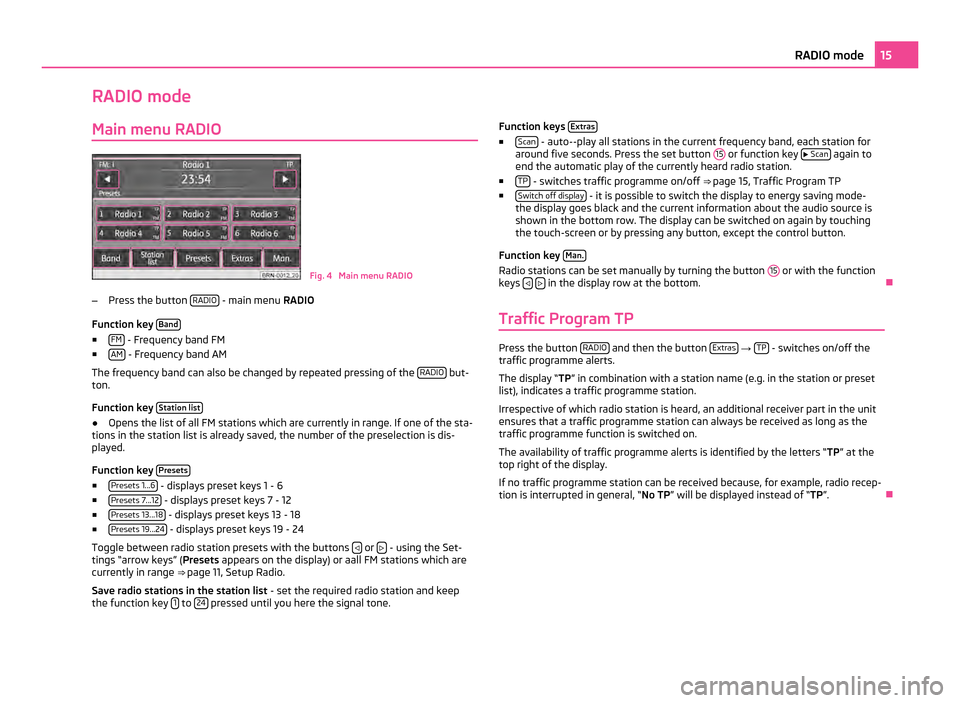
Main menu RADIO Fig. 4 Main menu RADIO
– Press the button RADIO - main menu
RADIO
Function key Band■
FM - Frequency band FM
■ AM - Frequency band AM
The frequency band can also be changed by repeated pressing of the RADIO but-
ton.
Function key Station list●
Opens the list of all FM stations which are currently in range. If one of the sta-
tions in the station list is already saved, the number of the preselection is dis-
played.
Function key Presets■
Presets 1...6 - displays preset keys 1 - 6
■ Presets 7...12 - displays preset keys 7 - 12
■ Presets 13...18 - displays preset keys 13 - 18
■ Presets 19...24 - displays preset keys 19 - 24
Toggle between radio station presets with the buttons or
- using the Set-
tings
“arrow keys” ( Presets appears on the display) or aall FM stations which are
currently in range ⇒ page 11, Setup Radio.
Save radio stations in the station list - set the required radio station and keep
the function key 1 to
24 pressed until you here the signal tone. Function keys
Extras ■
Scan - auto--play all stations in the current frequency band, each station for
around five seconds. Press the set button 15 or function key
Scan again to
end the automatic play of the currently heard radio station.
■ TP - switches traffic programme on/off
⇒
page 15, Traffic Program TP
■ Switch off display - it is possible to switch the display to energy saving mode-
the display goes black and the current information about the audio source is
shown in the bottom row. The display can be switched on again by touching
the touch-screen or by pressing any button, except the control button.
Function key Man. Radio stations can be set manually by turning the button
15 or with the function
keys
in the display row at the bottom.
Ð
Traffic Program TP Press the button
RADIO and then the button
Extras →
TP - switches on/off the
traffic programme alerts.
The display “TP ” in combination with a station name (e.g. in the station or preset
list), indicates a traffic programme station.
Irrespective of which radio station is heard, an additional receiver part in the unit
ensures that a traffic programme station can always be received as long as the
traffic programme function is switched on.
The availability of traffic programme alerts is identified by the letters “TP ” at the
top right of the display.
If no traffic programme station can be received because, for example, radio recep-
tion is interrupted in general,
“ No TP ” will be displayed instead of “TP ”.Ð 15
RADIO mode
Page 21 of 47
Memory card empty or data not readable
If a memory card is inserted, on which no audio data has been stored, it will not be
switched over into the memory card mode after the loading procedure.
Requirements of the memory card
● Memory cards measuring 32 mm x 24 mm x 2.1 mm or 1.4 mm can be inserted
into the memory card case.
● SD (Secure Digital Memory Cards) and MMC (Multimedia Cards) memory cards
with a capacity up to 4 GB.
● SDHC (Secure Digital High-Capacity Memory Cards) memory cards with a ca-
pacity up to 32 GB.
● It is possible that some of the files on the memory cards cannot be reproduced
and have limited playback. Due to differing quality requirements from different
card manufacturers, it is not possible to guarantee the playback of memory cards
under all circumstances. Ð
External sources
AUX and MDI input AUX input
Press the button
MEDIA and then the function key
AUX .
External audio sources connected to the AUX socket cannot be operated via the
navigation system. Only the volume can be controlled from the navigation system.
Use the standard jack plug 3.5
mm for the AUX socket. If the external audio source
does not have this jack plug, you must use an adapter.
MDI input- multimedia socket
Press the button MEDIA followed by the function key
MDI .
Audio data in MP3, WMA, OGG Vorbis and AAC format from the external data stick-
ers, connected to the multimedia socket, can be played via the radio.
External audio sources connected to the MDI socket can be operated via the navi-
gation system.
iPod
If an iPod is connected to the MDI input, a menu is opened in which you can select
the folders of the iPods (playlists, artists, albums, songs etc.). Adjust the play function volume of the external audio source
The play function volume of the external audio source can be changed via the vol-
ume control on the navigation system 1 .
Depending on the connected audio source, the output volume on the external au-
dio source can be changed.
You can also change the input sensitivity of the external audio source ⇒
page 11,
Media Set-Up, in order for the play function volume of the external audio source
to adapt to other audio sources or to avoid distortions of the play function vol-
ume.
Adapter
A special adapter is required to connect audio sources via the input MDI.
We recommend that you purchase an adapter for connecting the USB devices, the
devices with Mini USB output or an iPod, at an authorised ŠKODA Service Partner.
Conditions for proper connection
● Only USB devices with the specification 2.0 can be connected.
● The version of the file allocation table FAT (File Allocation Table) of the con-
nected device must be FAT16 ( <2
GB) or FAT32 (> 2 GB).
● In order to replay from a unit with a hard disk (HDD) which includes a large da-
ta volume, it can lead to a time delay when reading in the overview of the music
data.
● In order to replay from a unit, which includes a complicated folder structure, it
can lead to a time delay when scanning the audio files.
● The folder structure in the connected unit must not exceed a depth of 8 levels.
One folder must not contain more than 1000°data.
● A USB extension cable or USB distributor (HUB) must not be used to connect
the unit. WARNING
● On no account place an external audio source on the dash panel. You could
make sudden manoeuvres in the passenger compartment and injure the occu-
pants.
● On no account place an external audio source close to the airbags. You
could be thrown back in the passenger compartment by the airbags being de-
ployed and injure the occupants. 19
MEDIA mode
Page 24 of 47
TV mode
Explanation of the technical terms “Terrestrial television” or DVB-T (Digital Video Broadcasting-Terrestric)
With DVB-T, digital television signals are transmitted terrestrially (earthbound)
and can also be received via an aerial. DVB-T therefore offers mobile reception of
high quality without the need of a fixed aerial connection. DVB-T is therefore de-
scribed as “Terrestrial television
”
.
Advantages of DVB-T
In addition to a significant gain in quality, the transmitter capacity of a television
channel can be realised more effectively through digital transmitter technology
rather than analog signals. The greater data rate enables several programs of one
television channel to be transmitted bundled in one data flow (so called “Multi-
plex”). Part of the transmitter capacity can also be used for additional services, e.g.
electronic program guides or radio.
“Hybrid tuner” for analog and digital reception
The supply of DVB-T has up to now been restricted to densely populated regions,
so that an analog television receiver in the vehicle is still a prerequisite. It is for
this reason that a Hybrid tuner was developed for the unit, which consists of a
common analog TV receiver and a DVB-T receiver.
Display of analog and digital TV stations
The TV stations which can be received are indicated in the information display and
when switching over and calling up the TV menu on the display. Analogue and dig-
ital TV stations are displayed differently and are marked on the touch-screen with
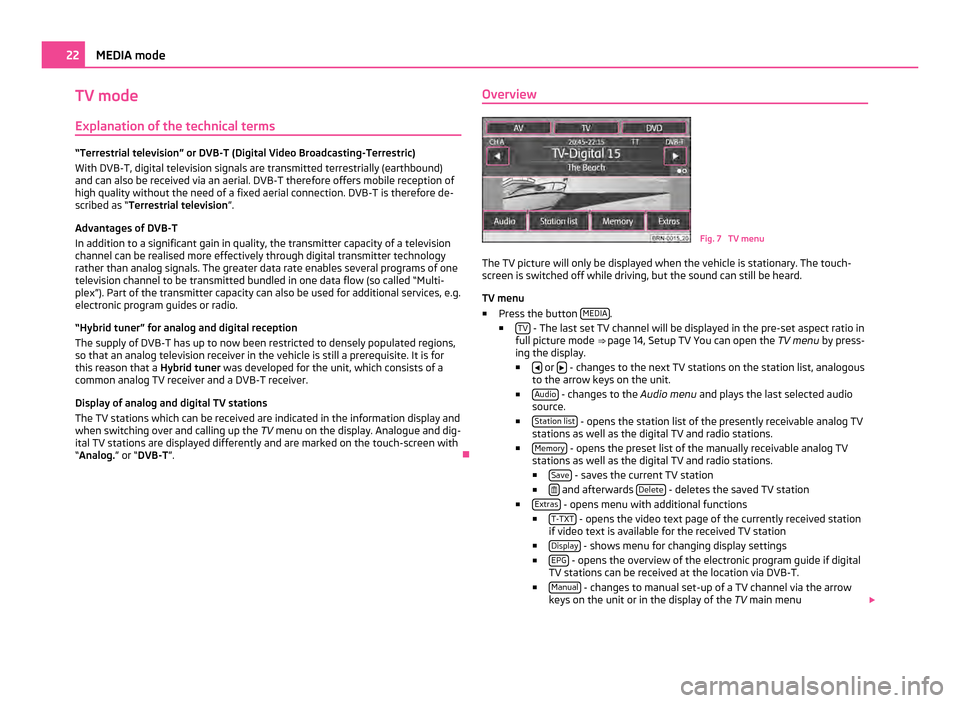
“Analog.” or “DVB-T ”. ÐOverview Fig. 7 TV menu
The TV picture will only be displayed when the vehicle is stationary. The touch-
screen is switched off while driving, but the sound can still be heard.
TV menu
■ Press the button MEDIA .
■ TV - The last set TV channel will be displayed in the pre-set aspect ratio in
full picture mode ⇒ page 14, Setup TV You can open the TV menu by press-
ing the display.
■ or
- changes to the next TV stations on the station list, analogous
to the arrow keys on the unit.
■ Audio - changes to the
Audio menu and plays the last selected audio
source.
■ Station list - opens the station list of the presently receivable analog TV
stations as well as the digital TV and radio stations.
■ Memory - opens the preset list of the manually receivable analog TV
stations as well as the digital TV and radio stations.
■ Save - saves the current TV station
■ and afterwards
Delete - deletes the saved TV station
■ Extras - opens menu with additional functions
■ T-TXT - opens the video text page of the currently received station
if video text is available for the received TV station
■ Display - shows menu for changing display settings
■ EPG - opens the overview of the electronic program guide if digital
TV stations can be received at the location via DVB-T.
■ Manual - changes to manual set-up of a TV channel via the arrow
keys on the unit or in the display of the TV main menu22
MEDIA mode
Page 26 of 47
PHONE mode
Overview
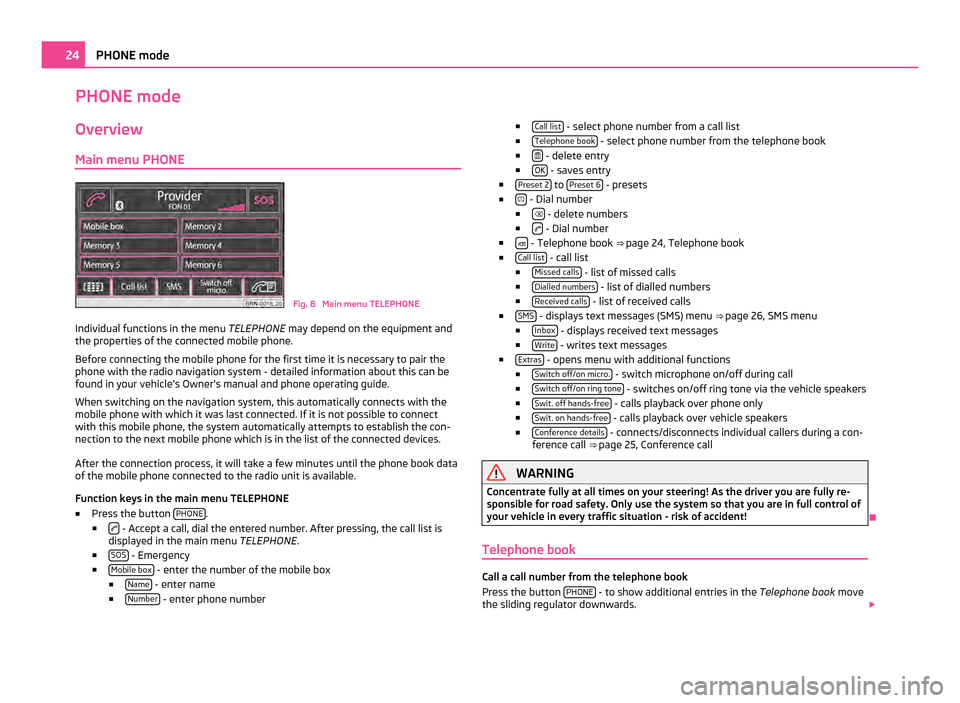
Main menu PHONE Fig. 8 Main menu TELEPHONE
Individual functions in the menu TELEPHONE may depend on the equipment and
the properties of the connected mobile phone.
Before connecting the mobile phone for the first time it is necessary to pair the
phone with the radio navigation system - detailed information about this can be
found in your vehicle's Owner's manual and phone operating guide.
When switching on the navigation system, this automatically connects with the
mobile phone with which it was last connected. If it is not possible to connect
with this mobile phone, the system automatically attempts to establish the con-
nection to the next mobile phone which is in the list of the connected devices.
After the connection process, it will take a few minutes until the phone book data
of the mobile phone connected to the radio unit is available.
Function keys in the main menu TELEPHONE
■ Press the button PHONE .
■ - Accept a call, dial the entered number. After pressing, the call list is
displayed in the main menu TELEPHONE.
■ SOS - Emergency
■ Mobile box - enter the number of the mobile box
■ Name - enter name
■ Number - enter phone number ■
Call list - select phone number from a call list
■ Telephone book - select phone number from the telephone book
■ - delete entry
■ OK - saves entry
■ Preset
2 to
Preset 6 - presets
■ - Dial number
■ - delete numbers
■ - Dial number
■ - Telephone book
⇒ page 24, Telephone book
■ Call list - call list
■ Missed calls - list of missed calls
■ Dialled numbers - list of dialled numbers
■ Received calls - list of received calls
■ SMS - displays text messages (SMS) menu
⇒
page 26, SMS menu
■ Inbox - displays received text messages
■ Write - writes text messages
■ Extras - opens menu with additional functions
■ Switch off/on micro. - switch microphone on/off during call
■ Switch off/on ring tone - switches on/off ring tone via the vehicle speakers
■ Swit. off hands-free - calls playback over phone only
■ Swit. on hands-free - calls playback over vehicle speakers
■ Conference details - connects/disconnects individual callers during a con-
ference call ⇒ page 25, Conference call WARNING
Concentrate fully at all times on your steering! As the driver you are fully re-
sponsible for road safety. Only use the system so that you are in full control of
your vehicle in every traffic situation - risk of accident! Ð
Telephone book Call a call number from the telephone book
Press the button
PHONE - to show additional entries in the
Telephone book move
the sliding regulator downwards. 24
PHONE mode
Page 28 of 47
If you press in the input mask on the function key
Enter numbers , the displayed
character sequence in the entry line will be played as DTMF key tone sequence.
Please note that in a DTMF key tone sequence the character
“+” must not appear,
as it interrupts the playing of a DTMF key tone. Ð
SMS menu The SMS menu can only be used when your vehicle has been equipped with the
GSM III telephone preinstallation and the mobile phone is paired with the radio
navigation system via the rSAP profile, refer to the Owner's manual of your vehi-
cle.
Inbox
In the main menu TELEPHONE, choose the function key SMS followed by the
menu item Inbox to call up list of received text messages. Read text messages are
labelled with the symbol ; unread text messages with the symbol .
To open a received text message, press the field containing the particular mes-
sage. The following options are displayed as well as the message text:
■ Answer - reply to the text messsage
■ New text - create a new text message
■ Edit text - edit text message
■ Delete - deletes text message
■ Options - select options
■ Read out text - the navigation system reads out the text message
■ Return call - calls the sender of the text message
■ Copy - copies the text message to the mobile phone
■ Forward - forwards the text message
Next to each text message in the inbox is the function key . Pressing this key
calls up the following options:
■ Copy - copies the text message to the mobile phone
■ Forward - forwards the text message
■ Delete entry - deletes text message
■ Delete list - deletes all text messages in the list
Writing and sending text messages
From the main menu TELEPHONE press the function key SMS and select the op-
tion Write . An input screen appears. If the message has more than 160 characters, it will be split into two or more sep-
arate messages.
To send the text message, press the function key
, a screen for entering the
telephone number of the recipient will appear
You can also select the recipient in one of the following menus:
■ Call list - call list
■ Missed calls - list of missed calls
■ Dialled numbers - list of dialled numbers
■ Received calls - list of received calls
■ Telephone book - Phonebook
After entering a recipient, send the text message using the function key .
The sent text message is neither displayed in the radio navigation system or in
the mobile phone. Note
The menu SMS only displays the received text messages which were received
during the time the mobile phone was paired with the radio navigation system. Ð26
PHONE mode
Page 30 of 47
MAP mode
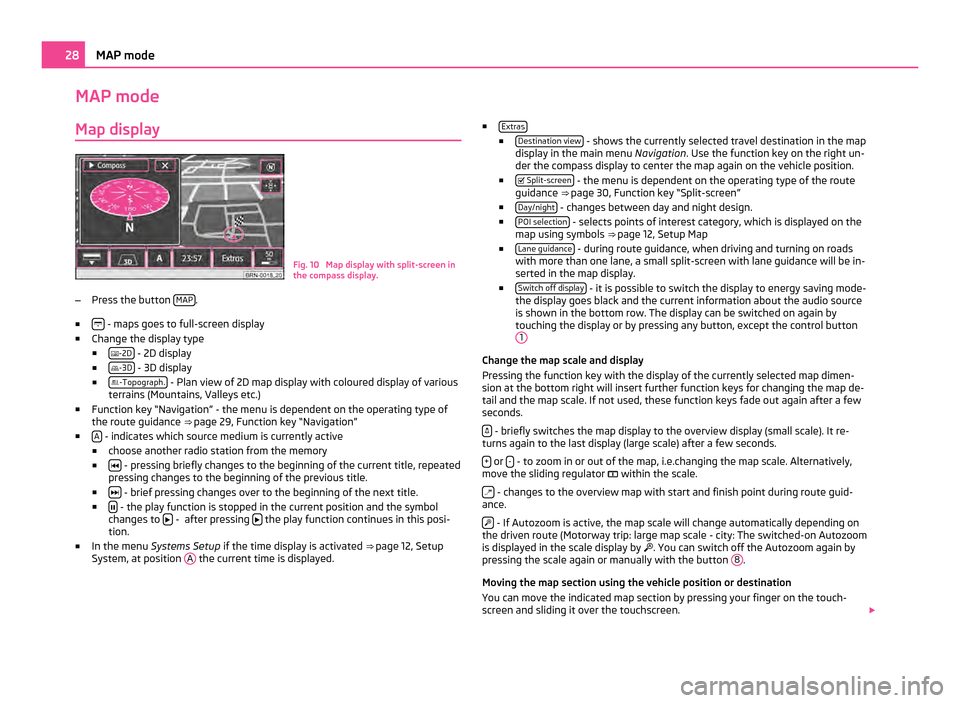
Map display Fig. 10 Map display with split-screen in
the compass display.
– Press the button MAP .
■ - maps goes to full-screen display
■ Change the display type
■ -2D - 2D display
■ -3D - 3D display
■ -Topograph. - Plan view of 2D map display with coloured display of various
terrains (Mountains, Valleys etc.)
■ Function key
“Navigation” - the menu is dependent on the operating type of
the route guidance ⇒ page 29, Function key “Navigation”
■ A - indicates which source medium is currently active
■ choose another radio station from the memory
■ - pressing briefly changes to the beginning of the current title, repeated
pressing changes to the beginning of the previous title.
■ - brief pressing changes over to the beginning of the next title.
■ - the play function is stopped in the current position and the symbol
changes to - after pressing
the play function continues in this posi-
tion.
■ In the menu Systems Setup if the time display is activated ⇒
page 12, Setup
System, at position A the current time is displayed. ■
Extras ■
Destination view - shows the currently selected travel destination in the map
display in the main menu Navigation. Use the function key on the right un-
der the compass display to center the map again on the vehicle position.
■ Split-screen - the menu is dependent on the operating type of the route
guidance ⇒ page 30, Function key
“Split-screen”
■ Day/night - changes between day and night design.
■ POI selection - selects points of interest category, which is displayed on the
map using symbols ⇒ page 12,
Setup Map
■ Lane guidance - during route guidance, when driving and turning on roads
with more than one lane, a small split-screen with lane guidance will be in-
serted in the map display.
■ Switch off display - it is possible to switch the display to energy saving mode-
the display goes black and the current information about the audio source
is shown in the bottom row. The display can be switched on again by
touching the display or by pressing any button, except the control button 1 Change the map scale and display
Pressing the function key with the display of the currently selected map dimen-
sion at the bottom right will insert further function keys for changing the map de-
tail and the map scale. If not used, these function keys fade out again after a few
seconds.
- briefly switches the map display to the overview display (small scale). It re-
turns again to the last display (large scale) after a few seconds.
+ or
- - to zoom in or out of the map, i.e.changing the map scale. Alternatively,
move the sliding regulator within the scale.
- changes to the overview map with start and finish point during route guid-
ance.
- If Autozoom is active, the map scale will change automatically depending on
the driven route (Motorway trip: large map scale - city: The switched-on Autozoom
is displayed in the scale display by . You can switch off the Autozoom again by
pressing the scale again or manually with the button 8 .
Moving the map section using the vehicle position or destination
You can move the indicated map section by pressing your finger on the touch-
screen and sliding it over the touchscreen. 28
MAP mode
Page 33 of 47
NAV mode (Navigation)
Overview
Before using the navigation system Please observe the respective traffic regulations when driving.
Street and location names can be changed. It is therefore possible under excep-
tional circumstances that the names stored in the navigation data might not cor-
respond to the changed names.
The route calculated by the navigation system is a recommendation for reaching
the intended destination. While driving please pay attention to stopping restric-
tions, traffic lights, one-way streets, lane changes, bodies of water and ferries,
railways etc. Ð
Operating the navigation system Only if the traffic situation allows it should you operate the navigation system
with its wide range of possibilities.
Adjust the volume to ensure that acoustic signals from outside, e.g. sirens from
vehicles which have the right of way, such as police, ambulance and fire brigade
vehicles, can be heard at all time.
Ð
Safety information regarding the use of the navigation system The route is recalculated each time if you ignore driving recommendations or
change the route. This process takes only a few seconds. Driving recommenda-
tions can only then be re-transmitted.
Incomplete navigation data
The navigation system cannot receive any data from GPS satellites if you drive for
longer periods under thick forest canopy or when your vehicle is in a garage, un-
derpass or tunnel. In this case, the navigation system orientates itself solely with
the help of the vehicle sensors.
In regions not at all or only partially digitalised and stored as such on the naviga-
tion DVD, the navigation system will try to provide guidance to the destination.
Please note that under these circumstances the guidance to the destination may not be completely correct if, for example, one-way streets and road categories
(motorway, country road etc.) are not at all or only partially included in the naviga-
tion data used. WARNING
● Please concentrate fully at all times on your driving! If the driver's atten-
tion is distracted, this can lead to accidents and injuries. As the driver you are
fully responsible for safety. Only use the functions of the radio in such a way
that you are always in full control of your vehicle in all traffic situations!
● The following must always have priority over the driving recommenda-
tions:
–the road traffic legislation, even if the driving recommendations contra-
dict the StVO,
– the actual acknowledgement of traffic signs, light signals or signs
placed by the police at the relevant location,
– the facts and circumstances prevailing at the relevant location.
● Please observe the respective traffic regulations when driving.
● Traffic signs and traffic regulations always have priority over the driving
recommendations provided by the navigation system.
● Route guidance is subject to constant changes, particularly to information
relating to one-way streets, pedestrian zones etc. stored in the navigation da-
ta. Information on traffic lights, stop and right of way signs, parking and stop-
ping restrictions as well as lane constrictions and speed restrictions is not in-
cluded in the navigation system.
● Adjust your speed to suit weather, road and traffic conditions. Do not al-
low, for example, the navigation system to make you drive faster in fog - risk
of accident!
● Only if the traffic situation allows it should you operate the navigation sys-
tem with its wide range of possibilities.
● The driving recommendations provided may vary from current situations,
e.g. due to road works or out of date navigation data. In such a case, always
observe the traffic regulations and ignore the driving recommendations. Ð31
NAV mode (Navigation)
Page 41 of 47
If one of the announced traffic problems lies along on your route, you can also
switch on the dynamic route guidance during the current route guidance or block
the route manually .
Manual During route guidance you can choose whether you want to divert around the re-
ported traffic problems along your route.
If the navigation system is alerted of a traffic problem on the calculated route, the
driver will be notified of this by means of an audible message and information in a
pop-up window.
The expected delay incurred in avoiding this traffic problem and the length of the
alternative route will be displayed. The expected time lost when driving through
this traffic problem will also be displayed.
● Press Current tour to remain on the calculated route and to pass through the
traffic problem.
● Press on Bypass for an alternative route to be calculated taking into account
the announced traffic problem.
Automatic You will be automatically diverted around the received traffic problems along your
route during route guidance.
After input of relevant traffic information for your route you will be advised of the
change in the current route guidance by means of an acoustic message. You will
automatically be guided around announced traffic jams or blocked roads, if this
saves time.
Such announcements will take place if a traffic problem affects the original route
calculation, the traffic problem has been solved and the navigation system can
see only one possibility of driving the actually most advantagous route.
Requirements for a dynamic route guidance
TMC (Traffic Message Channel) is a digital radio data service for continuous trans-
mission of traffic information.
If a TMC traffic radio station is available for current location, the TMC traffic re-
ports are updated continuously in the background.
The quality of the transmitted traffic reports depends on the broadcast editing
carried out by the radio station. The reception of the TMC traffic reports cannot be
switched on or off.
The station you are listening to does not have to be a TMC station. TMC traffic reports can only be evaluated and displayed by the unit if the naviga-
tion data for the currently driven area is stored in the unit memory or can be called
up via an inserted navigation DVD.
The current TMC traffic reports can be displayed by pressing the range selector
key
TMC .
Note
● There may not be any advantage in avoiding the traffic jam if, as a result of the
TMC traffic reports, the diversion is also heavily congested.
● You can manually block the information for the route in front of you if traffic
problems ahead have not yet been included in the TMC traffic reports. Ð 39
NAV mode (Navigation)
Page 42 of 47
TMC mode
Displaying TMC traffic reports TMC traffic reports are used during route guidance, depending on the set-up for
the automatic optimization of the route, to report possible traffic problems.
You can browse through all the traffic information received in the detailed display,
in sequence by using the function keys.
■ TMC - displays a list of current traffic reports
■ Details - displays the details for a selected traffic report
■
12 - displays the name of the TMC station currently being received
Traffic problems are illustrated in the detailed display and in the map by a corre-
sponding symbol. The direction, in which the traffic problem is found in the map, is
displayed in colour. A traffic problem which is located on the route (in direction of
travel) is marked in red, a traffic problem in the opposite direction is marked in
grey. Note
● The unit has a continuous background of TMC traffic reports providing a TMC
station at the current location can be received. The station you are listening to
does not have to be a TMC station.
● TMC traffic reports can only be evaluated and saved by the navigation system
when navigation data are available for the driven area.
● The quality of the dynamic route guidance depends on the transmitted traffic
announcements. The radio stations broadcasting this information are responsible
for the content.
● TMC traffic reports are necessary for the dynamic navigation.
● Making a diversion from a traffic jam based on TMC traffic reports may not al-
ways offer a time advantage, e.g. if the diversion route is also congested. Ð40
TMC mode
Page 43 of 47
Index
A
Acoustic feedback . . . . . . . . . . . . . . . . . . . . . . . . . . . . 12
Address . . . . . . . . . . . . . . . . . . . . . . . . . . . . . . . . . . . 33, 34 Edit . . . . . . . . . . . . . . . . . . . . . . . . . . . . . . . . . . . . . . . . . 13
Adjustment Volume . . . . . . . . . . . . . . . . . . . . . . . . . . . . . . . . . . . . . . . 5
Alternative route . . . . . . . . . . . . . . . . . . . . . . . . . . . . . 13
AM . . . . . . . . . . . . . . . . . . . . . . . . . . . . . . . . . . . . . . . . . . . . 15
Audio Playback options . . . . . . . . . . . . . . . . . . . . . . . . . . . . . 16
AUX . . . . . . . . . . . . . . . . . . . . . . . . . . . . . . . . . . . . . . 16, 19
B Blocked road Temporary . . . . . . . . . . . . . . . . . . . . . . . . . . . . . . . . . . 38
Blocked route section . . . . . . . . . . . . . . . . . . . . . . . . . 38
Bluetooth . . . . . . . . . . . . . . . . . . . . . . . . . . . . . . . . . . . . 16
Brightness . . . . . . . . . . . . . . . . . . . . . . . . . . . . . . . . . . . 12
C Calculate . . . . . . . . . . . . . . . . . . . . . . . . . . . . . . . . . . . . . 13
CD . . . . . . . . . . . . . . . . . . . . . . . . . . . . . . . . . . . . . . . . . . . 16
CD/DVD insert . . . . . . . . . . . . . . . . . . . . . . . . . . . . . . . . . . . . . . . . 17
remove . . . . . . . . . . . . . . . . . . . . . . . . . . . . . . . . . . . . . . 17
CD/DVD mode CD/DVD not legible . . . . . . . . . . . . . . . . . . . . . . . . . . . 17
Certain voice commands in the operating mode MAP . . . . . . . . . . . . . . . . . . . 10
in the operating mode MEDIA . . . . . . . . . . . . . . . . . 10
in the operating mode NAV . . . . . . . . . . . . . . . . . . . 10
in the operating mode PHONE . . . . . . . . . . . . . . . . 10
in the operating mode RADIO . . . . . . . . . . . . . . . . . . 9
Choose saved destinations . . . . . . . . . . . . . . . . . . . . 36
Code . . . . . . . . . . . . . . . . . . . . . . . . . . . . . . . . . . . . . . . . . . 4 Congestion
Permanently . . . . . . . . . . . . . . . . . . . . . . . . . . . . . . . . 38
Control Audio/Video . . . . . . . . . . . . . . . . . . . . . . . . . . . . . . 16, 17
General . . . . . . . . . . . . . . . . . . . . . . . . . . . . . . . . . . . . . . . 5
Control elements . . . . . . . . . . . . . . . . . . . . . . . . . . . . . . 4
D Delete destination memory . . . . . . . . . . . . . . . . . . . . 36
Delete saved destinations . . . . . . . . . . . . . . . . . . . . . 36
Demo mode . . . . . . . . . . . . . . . . . . . . . . . . . . . . . . . . . . 13
Destination . . . . . . . . . . . . . . . . . . . . . . . . . . . . . . . . . . . . . . . . . . . . 34
Choose saved destinations . . . . . . . . . . . . . . . . . . 36
Delete saved destinations . . . . . . . . . . . . . . . . . . . 36
Dest. memory . . . . . . . . . . . . . . . . . . . . . . . . . . . . . . . . 35
Display information . . . . . . . . . . . . . . . . . . . . . . . . . . 12
Edit saved destinations . . . . . . . . . . . . . . . . . . . . . . 36
Enter a stopover . . . . . . . . . . . . . . . . . . . . . . . . . . . . . 37
Fav. destinations . . . . . . . . . . . . . . . . . . . . . . . . . . . . . 35
Home address . . . . . . . . . . . . . . . . . . . . . . . . . . . . . . . 35
Last destinations . . . . . . . . . . . . . . . . . . . . . . . . . . . . . 35
New stopover . . . . . . . . . . . . . . . . . . . . . . . . . . . . . . . . 37
Save . . . . . . . . . . . . . . . . . . . . . . . . . . . . . . . . . . . . . . . 36
via coordinates . . . . . . . . . . . . . . . . . . . . . . . . . . . . . . 35
Destination display . . . . . . . . . . . . . . . . . . . . . . . . . . . . 12
Destination guidance symbols . . . . . . . . . . . . . . . . . 12
Dialogue . . . . . . . . . . . . . . . . . . . . . . . . . . . . . . . . . . . . . . 8
Display . . . . . . . . . . . . . . . . . . . . . . . . . . . . . . . . . . . . . . . . 3 Destination guidance symbols . . . . . . . . . . . . . . . . 12
Display. Switch off . . . . . . . . . . . . . . . . . . . . . . . . . . . . . . . . . . 28
DTMF key tones . . . . . . . . . . . . . . . . . . . . . . . . . . . . . . 25
Dynamische Route . . . . . . . . . . . . . . . . . . . . . . . . . . . . 34 E
Edit Destinations memory
. . . . . . . . . . . . . . . . . . . . . . . . 36
Saved destination . . . . . . . . . . . . . . . . . . . . . . . . . . . 36
Saved tour . . . . . . . . . . . . . . . . . . . . . . . . . . . . . . . . . . . 37
Entry Address . . . . . . . . . . . . . . . . . . . . . . . . . . . . . . . . . 33, 34
Destination via coordinates . . . . . . . . . . . . . . . . . . . 35
Point as destination . . . . . . . . . . . . . . . . . . . . . . 33, 35
Point of interest . . . . . . . . . . . . . . . . . . . . . . . . . . . . . 33
Point of Interest . . . . . . . . . . . . . . . . . . . . . . . . . . . . 34
Tour . . . . . . . . . . . . . . . . . . . . . . . . . . . . . . . . . . . . . . . . . 37
EPG - Program guide . . . . . . . . . . . . . . . . . . . . . . . . . . 23
External input AUX . . . . . . . . . . . . . . . . . . . . . . . . . . . . . . . . . . . . . . 16, 19
MDI . . . . . . . . . . . . . . . . . . . . . . . . . . . . . . . . . . . . . . . . . 19
External sources . . . . . . . . . . . . . . . . . . . . . . . . . . . . . . 19
F Factory settings . . . . . . . . . . . . . . . . . . . . . . . . . . . . . . 12
Favourites . . . . . . . . . . . . . . . . . . . . . . . . . . . . . . . . . . . . 33
Fav. destinations . . . . . . . . . . . . . . . . . . . . . . . . . . . . . . 35
FM . . . . . . . . . . . . . . . . . . . . . . . . . . . . . . . . . . . . . . . . . . . . 15
Frequency band . . . . . . . . . . . . . . . . . . . . . . . . . . . . . . . . 15
Further voice commands . . . . . . . . . . . . . . . . . . . . . . . . 9
G General information . . . . . . . . . . . . . . . . . . . . . . . . . . 3, 8
H
hard disk . . . . . . . . . . . . . . . . . . . . . . . . . . . . . . . . . . . . . 16
Hard drive . . . . . . . . . . . . . . . . . . . . . . . . . . . . . . . . . . . . 20
HDD . . . . . . . . . . . . . . . . . . . . . . . . . . . . . . . . . . . . . . 16, 20
HDD capacity . . . . . . . . . . . . . . . . . . . . . . . . . . . . . . . . . 16 41
Index