stop start SKODA OCTAVIA 2011 2.G / (1Z) Columbus Navigation System Manual
[x] Cancel search | Manufacturer: SKODA, Model Year: 2011, Model line: OCTAVIA, Model: SKODA OCTAVIA 2011 2.G / (1Z)Pages: 47, PDF Size: 1.09 MB
Page 7 of 47
- eject CD/DVD
. . . . . . . . . . . . . . . . . . . . . . . . . . . . . . . . . . . . . . . . . . . . . . . . . . . . . . . 17
- Switch on voice control
. . . . . . . . . . . . . . . . . . . . . . . . . . . . . . . . . . . . . . . . . . . 8
Menu button:
– RADIO mode - turn for manual station adjustment; press briefly
to start/stop the automatic play (Scan).
– MEDIA-Mode - turn to change track; press briefly to start/stop
the automatic play (Scan) when in audio mode.
– Turn map display (MAP) - in order to change the map scale;
press briefly for repeating a navigation announcement during
active route guidance.
– Navigation (NAV) - press briefly to repeat a navigation an-
nouncement during active route guidance.
Memory card case . . . . . . . . . . . . . . . . . . . . . . . . . . . . . . . . . . . . . . . . . . . . . . . . . . . . . . 18Ð
Switching the unit on and off –
To switch the unit on/off, press the button 1 .
After switching on the unit, the last audio source that was active before switching
off will be played.
If the key is pulled out of the ignition lock while the unit is switched on, the unit
will switch off automatically.
If your vehicle is fitted with the KESSY system, the unit will switch off automati-
cally after the engine is turned off and the door opened. If you open the door be-
fore turning off the engine, the unit will not switch off until the vehicle is locked.
If the ignition is switched off, the system switches off automatically after approx.
half an hour (vehicle battery protection against discharging). Ð
Adjusting the volume –
To increase the volume, turn the button 1 to the right.
– To decrease the volume, turn the button 1 to the left.
The change to the volume appears in the unit display.
If the volume is reduced to 0, the speakers are muted. The following symbol will
appear in the display .
13 14
15
16 CAUTION
High volumes can cause hearing damage. Ð
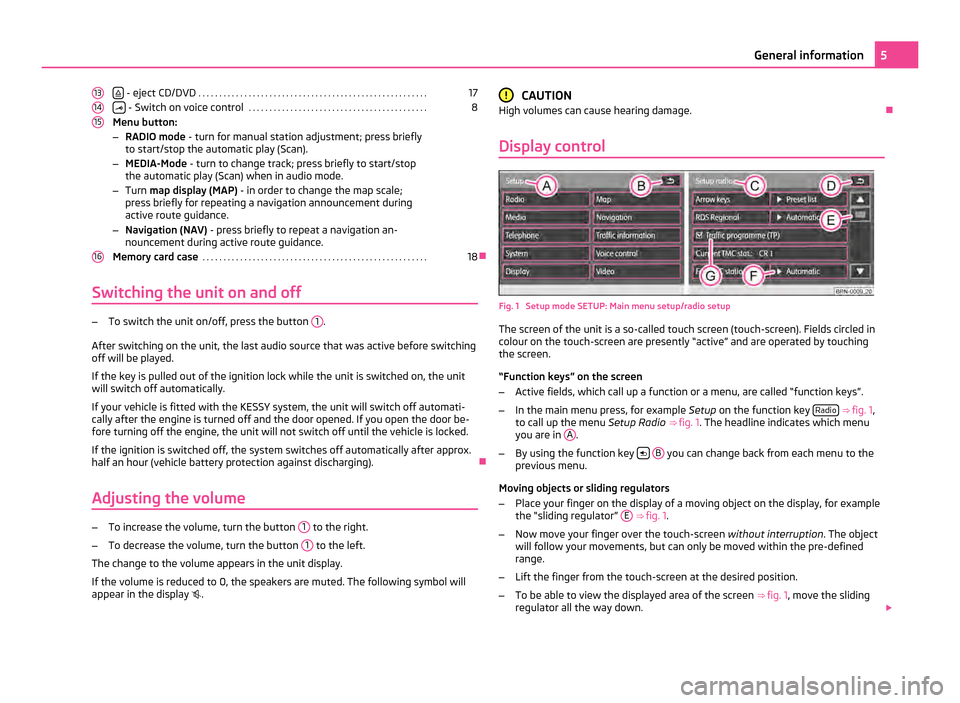
Display control Fig. 1 Setup mode SETUP: Main menu setup/radio setup
The screen of the unit is a so-called touch screen (touch-screen). Fields circled in
colour on the touch-screen are presently
“active” and are operated by touching
the screen.
“Function keys” on the screen
– Active fields, which call up a function or a menu, are called “function keys”.
– In the main menu press, for example Setup on the function key Radio
⇒ fig. 1 ,
to call up the menu Setup Radio ⇒ fig. 1 . The headline indicates which menu
you are in A .
– By using the function key
B you can change back from each menu to the
previous menu.
Moving objects or sliding regulators
– Place your finger on the display of a moving object on the display, for example
the “sliding regulator
” E
⇒ fig. 1.
– Now move your finger over the touch-screen without interruption. The object
will follow your movements, but can only be moved within the pre-defined
range.
– Lift the finger from the touch-screen at the desired position.
– To be able to view the displayed area of the screen ⇒ fig. 1 , move the sliding
regulator all the way down. 5
General information
Page 18 of 47
MEDIA mode
MEDIA main menu
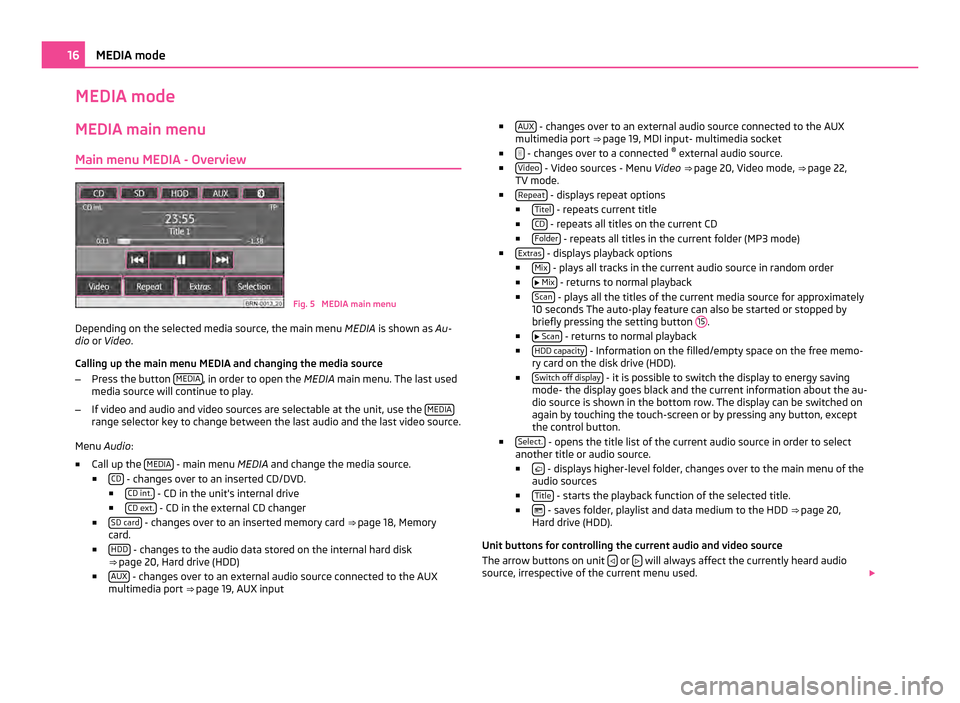
Main menu MEDIA - Overview Fig. 5 MEDIA main menu
Depending on the selected media source, the main menu MEDIA is shown as Au-
dio or Video .
Calling up the main menu MEDIA and changing the media source
– Press the button MEDIA , in order to open the
MEDIA main menu. The last used
media source will continue to play.
– If video and audio and video sources are selectable at the unit, use the MEDIArange selector key to change between the last audio and the last video source.
Menu Audio:
■ Call up the MEDIA - main menu MEDIA and change the media source.
■ CD - changes over to an inserted CD/DVD.
■ CD int. - CD in the unit's internal drive
■ CD ext. - CD in the external CD changer
■ SD card - changes over to an inserted memory card
⇒ page 18 , Memory
card.
■ HDD - changes to the audio data stored on the internal hard disk
⇒ page 20, Hard drive (HDD)
■ AUX - changes over to an external audio source connected to the AUX
multimedia port ⇒ page 19, AUX input ■
AUX - changes over to an external audio source connected to the AUX
multimedia port ⇒ page 19
, MDI input- multimedia socket
■ - changes over to a connected
®
external audio source.
■ Video - Video sources - Menu
Video ⇒ page 20, Video mode
, ⇒ page 22,
TV mode.
■ Repeat - displays repeat options
■ Titel - repeats current title
■ CD - repeats all titles on the current CD
■ Folder - repeats all titles in the current folder (MP3 mode)
■ Extras - displays playback options
■ Mix - plays all tracks in the current audio source in random order
■ Mix - returns to normal playback
■ Scan - plays all the titles of the current media source for approximately
10 seconds The auto-play feature can also be started or stopped by
briefly pressing the setting button 15 .
■ Scan - returns to normal playback
■ HDD capacity - Information on the filled/empty space on the free memo-
ry card on the disk drive (HDD).
■ Switch off display - it is possible to switch the display to energy saving
mode- the display goes black and the current information about the au-
dio source is shown in the bottom row. The display can be switched on
again by touching the touch-screen or by pressing any button, except
the control button.
■ Select. - opens the title list of the current audio source in order to select
another title or audio source.
■ - displays higher-level folder, changes over to the main menu of the
audio sources
■ Title - starts the playback function of the selected title.
■ - saves folder, playlist and data medium to the HDD
⇒ page 20,
Hard drive (HDD)
.
Unit buttons for controlling the current audio and video source
The arrow buttons on unit or
will always affect the currently heard audio
source, irrespective of the current menu used. 16
MEDIA mode
Page 19 of 47
- pressing this briefly changes over to the beginning of the current title or
chapter, repeated pressing changes over to the beginning of the previous title or
chapter.
- pressing this briefly changes over to the beginning of the next title or chapter,
repeated pressing changes over to the beginning of the next title or chapter.
It is also possible to change tracks in the menu of the currently played audio
source using the control button 15 .
Unit buttons for controlling the current audio and video source - pressing this briefly changes over to the beginning of the current title or
chapter, repeated pressing changes over to the beginning of the previous title or
chapter.
- briefly pressing this changes over to the next title or chapter.
- Pause: the play function is stopped in the current position and the symbol
changes to - after pressing, the play function will continue in this position.
Note
If the volume is reduced to 0 during playback from a CD, the hard drive or another
audio source, the symbol changes to
and playback is interrupted.
Ð
General information for CD/DVD operation Audio-CDs (CD-A) and Audio-DVDs, MP3-CDs and MP3-DVDs as well as Video-
DVDs can be played in the internal CD/DVD drive.
Insert CD/DVD
Insert a CD with the written side facing up as far as possible into the CD case
11until it is automatically drawn in. The play function will start automatically.
Remove CD/DVD
Pressing
- ejects the CD/DVD.
If the
“ejected” CD is not taken out within 10 seconds, it will be retracted again for
safety reasons.
CD not legible
If you insert a CD/DVD which cannot be read by the unit, a pop-up window is dis-
played with a note. The CD/DVD is moved to the eject position within a few sec-
onds. If the CD/DVD is not taken out within 10 seconds, it is drawn in again for safety
reasons.
CD to jump
Uneven road surfaces and strong vibrations may cause the CD to jump.
Formation of condensation
When it is cold and after rain showers, moisture can deposit in the CD/DVD drive
(condensation). This can effect the CD jump or impair the play function. In such ca-
ses wait until the moisture has dissipated.
Notes for the care of the CD/DVDs
If a CD/DVD is soiled, never clean it in the direction of a circle but rather from in-
side to outside with a soft lint-free cloth. In case of severe layers of dirt we rec-
ommend to clean the CD/DVD with a commercially available CD/DVD cleaner. Also
in this case do not clean the CD/DVD in the direction of a circle but rather from
inside to outside and then let it dry off.
MP3 and WMA Data (Windows Media Audio)
Playable MP3 and WMA data can also be stored on the hard disk of the unit
⇒
page 20, Hard drive (HDD).
The copyright of audio data compressed by Windows Media Audio, can also be
protected by the DRM procedure ( Digital Rights Management). Such WMA data is
not supported by the unit. WARNING
The CD/DVD player is a 1st class laser product. There is a risk of injury from in-
visible laser beams if you open the CD/DVD player. CAUTION
● Never place Eco Disc CDs into the internal drive.
● Inserting a second CD/DVD while a CD/DVD is being ejected can destroy the
CD/DVD drive in the unit. After pressing the Eject button there is a delay of a
few seconds before the CD/DVD is ejected. During this time the lock in front of the
CD/DVD case is open. It is essential that you wait until the CD/DVD has been fully
ejected before you try to insert a new CD/DVD. 17
MEDIA mode
Page 23 of 47
Aspect ratio (4:3 or 16:9)
The film started with the pre-set aspect ratio (4:3 or 16:9). Change the aspect ra-
dio in the menu
Video-Setup ⇒ page 13,
Setup Video.
The Video-DVD menu ■ AV - changes over to a connected external video source
■ TV - changes to the TV mode.
■ DVD - changes to a CD/DVD drive inserted in the Video DVD drive
■ Audio - changes to the
Audio menu
■ Menu - changes to the Film menu
⇒ fig. 6
■ Display - change the brightness, contrast and colour settings of the display
■ Chapter - changes to the chapter list
■ - pressing briefly changes to the beginning of the current chapter, repeated
pressing changes to the beginning of the previous chapter.
■ - briefly pressing changes to the next chapter.
■ - the play function is stopped in the current position and the symbol
changes to - after pressing
the play function continues in this position.
Ð 21
MEDIA mode
Page 30 of 47
MAP mode
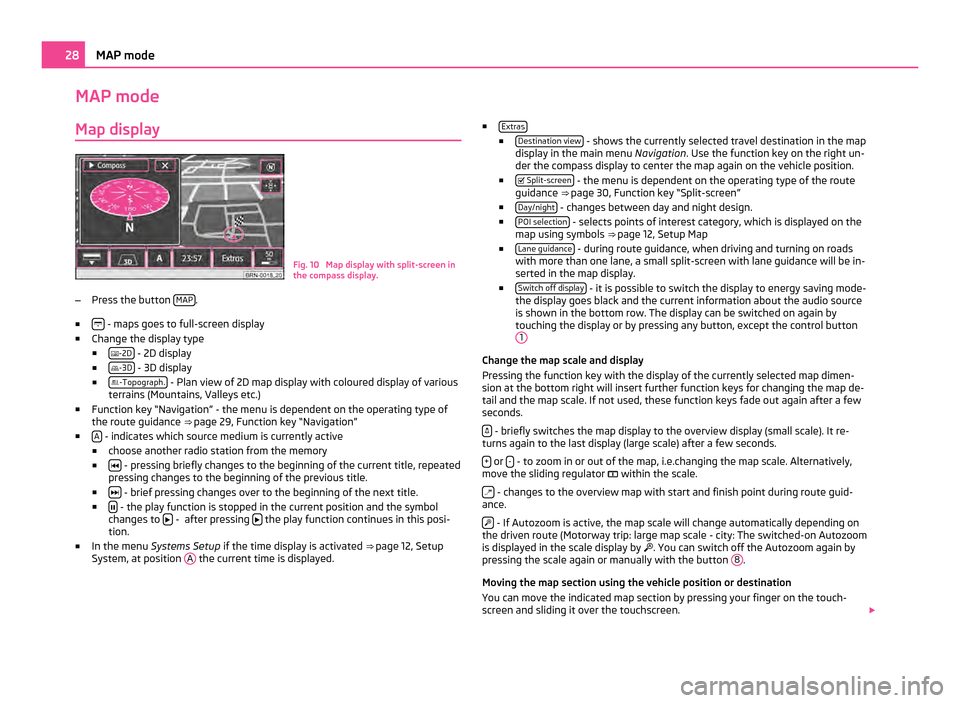
Map display Fig. 10 Map display with split-screen in
the compass display.
– Press the button MAP .
■ - maps goes to full-screen display
■ Change the display type
■ -2D - 2D display
■ -3D - 3D display
■ -Topograph. - Plan view of 2D map display with coloured display of various
terrains (Mountains, Valleys etc.)
■ Function key
“Navigation” - the menu is dependent on the operating type of
the route guidance ⇒ page 29, Function key “Navigation”
■ A - indicates which source medium is currently active
■ choose another radio station from the memory
■ - pressing briefly changes to the beginning of the current title, repeated
pressing changes to the beginning of the previous title.
■ - brief pressing changes over to the beginning of the next title.
■ - the play function is stopped in the current position and the symbol
changes to - after pressing
the play function continues in this posi-
tion.
■ In the menu Systems Setup if the time display is activated ⇒
page 12, Setup
System, at position A the current time is displayed. ■
Extras ■
Destination view - shows the currently selected travel destination in the map
display in the main menu Navigation. Use the function key on the right un-
der the compass display to center the map again on the vehicle position.
■ Split-screen - the menu is dependent on the operating type of the route
guidance ⇒ page 30, Function key
“Split-screen”
■ Day/night - changes between day and night design.
■ POI selection - selects points of interest category, which is displayed on the
map using symbols ⇒ page 12,
Setup Map
■ Lane guidance - during route guidance, when driving and turning on roads
with more than one lane, a small split-screen with lane guidance will be in-
serted in the map display.
■ Switch off display - it is possible to switch the display to energy saving mode-
the display goes black and the current information about the audio source
is shown in the bottom row. The display can be switched on again by
touching the display or by pressing any button, except the control button 1 Change the map scale and display
Pressing the function key with the display of the currently selected map dimen-
sion at the bottom right will insert further function keys for changing the map de-
tail and the map scale. If not used, these function keys fade out again after a few
seconds.
- briefly switches the map display to the overview display (small scale). It re-
turns again to the last display (large scale) after a few seconds.
+ or
- - to zoom in or out of the map, i.e.changing the map scale. Alternatively,
move the sliding regulator within the scale.
- changes to the overview map with start and finish point during route guid-
ance.
- If Autozoom is active, the map scale will change automatically depending on
the driven route (Motorway trip: large map scale - city: The switched-on Autozoom
is displayed in the scale display by . You can switch off the Autozoom again by
pressing the scale again or manually with the button 8 .
Moving the map section using the vehicle position or destination
You can move the indicated map section by pressing your finger on the touch-
screen and sliding it over the touchscreen. 28
MAP mode
Page 31 of 47
Function keys and symbols during route guidance
- current vehicle position
- centres the map section using the vehicle position
- centres the map section using the destination
Ð
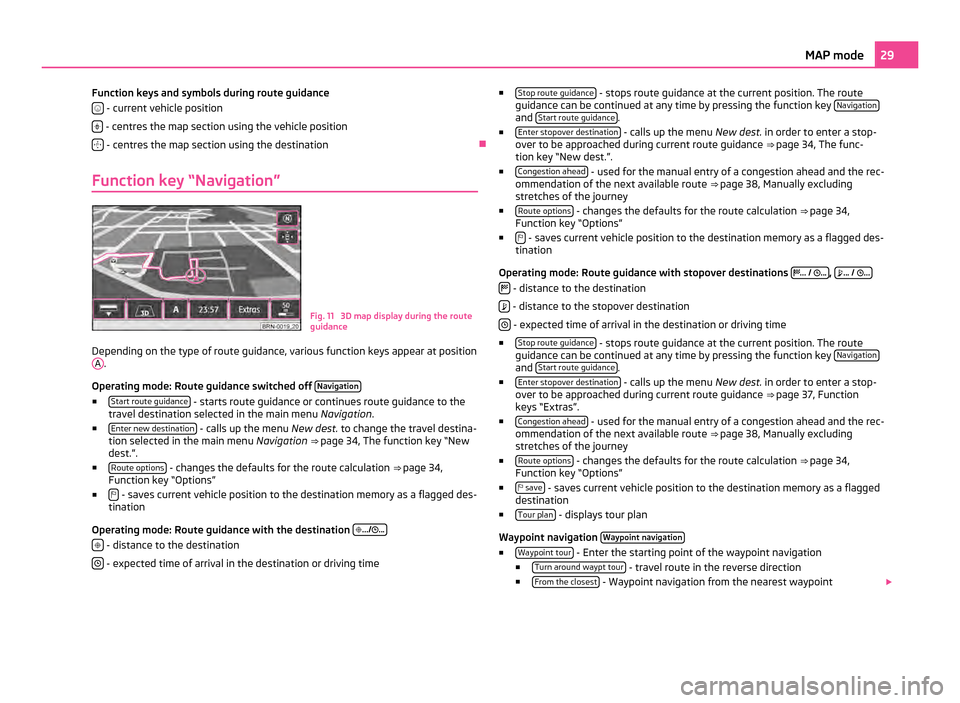
Function key “Navigation” Fig. 11 3D map display during the route
guidance
Depending on the type of route guidance, various function keys appear at position A .
Operating mode: Route guidance switched off Navigation■
Start route guidance - starts route guidance or continues route guidance to the
travel destination selected in the main menu Navigation.
■ Enter new destination - calls up the menu
New dest. to change the travel destina-
tion selected in the main menu Navigation ⇒ page 34,
The function key “New
dest.”.
■ Route options - changes the defaults for the route calculation
⇒
page 34,
Function key “Options”
■ - saves current vehicle position to the destination memory as a flagged des-
tination
Operating mode: Route guidance with the destination
.../ ...
- distance to the destination
- expected time of arrival in the destination or driving time ■
Stop route guidance - stops route guidance at the current position. The route
guidance can be continued at any time by pressing the function key Navigation and
Start route guidance .
■ Enter stopover destination - calls up the menu
New dest. in order to enter a stop-
over to be approached during current route guidance ⇒ page 34, The func-
tion key “
New dest.”.
■ Congestion ahead - used for the manual entry of a congestion ahead and the rec-
ommendation of the next available route ⇒ page 38, Manually excluding
stretches of the journey
■ Route options - changes the defaults for the route calculation
⇒
page 34,
Function key “Options”
■ - saves current vehicle position to the destination memory as a flagged des-
tination
Operating mode: Route guidance with stopover destinations
...
/ ... ,
...
/
...
- distance to the destination
- distance to the stopover destination
- expected time of arrival in the destination or driving time
■ Stop route guidance - stops route guidance at the current position. The route
guidance can be continued at any time by pressing the function key Navigation and
Start route guidance .
■ Enter stopover destination - calls up the menu
New dest. in order to enter a stop-
over to be approached during current route guidance ⇒ page 37,
Function
keys “Extras”.
■ Congestion ahead - used for the manual entry of a congestion ahead and the rec-
ommendation of the next available route ⇒
page 38, Manually excluding
stretches of the journey
■ Route options - changes the defaults for the route calculation
⇒
page 34,
Function key “Options”
■ save - saves current vehicle position to the destination memory as a flagged
destination
■ Tour plan - displays tour plan
Waypoint navigation Waypoint navigation ■
Waypoint tour - Enter the starting point of the waypoint navigation
■ Turn around waypt tour - travel route in the reverse direction
■ From the closest - Waypoint navigation from the nearest waypoint
29
MAP mode
Page 35 of 47
Input screen for route guidance
Selecting a destination from the list
–
If you press on the function key after opening the input mask, a list will
open with all the destinations containing the relevant parameters selectable
from the navigation memory (e.g. Country and
City ).
– If need be, move the sliding regulator to the right edge of the touch-screen for
all entries in the list to be displayed.
– Press the desired entry in the list to take it over for the address.
Limit destination and select from the list
– You can open a list of the selectable destinations any time by pressing the
function key ** while entering a destination in the entry line. The list only dis-
plays destinations which meet the requirements, which match the character
sequence in the entry line and which are saved in the navigation memory of
the navigation system.
– The number of selectable destinations will be displayed in the function key **if fewer than one hundred destinations can be selected.
– If fewer than six destinations are selectable, the input screen will close auto-
matically and a list of possible destinations will be displayed. Ð
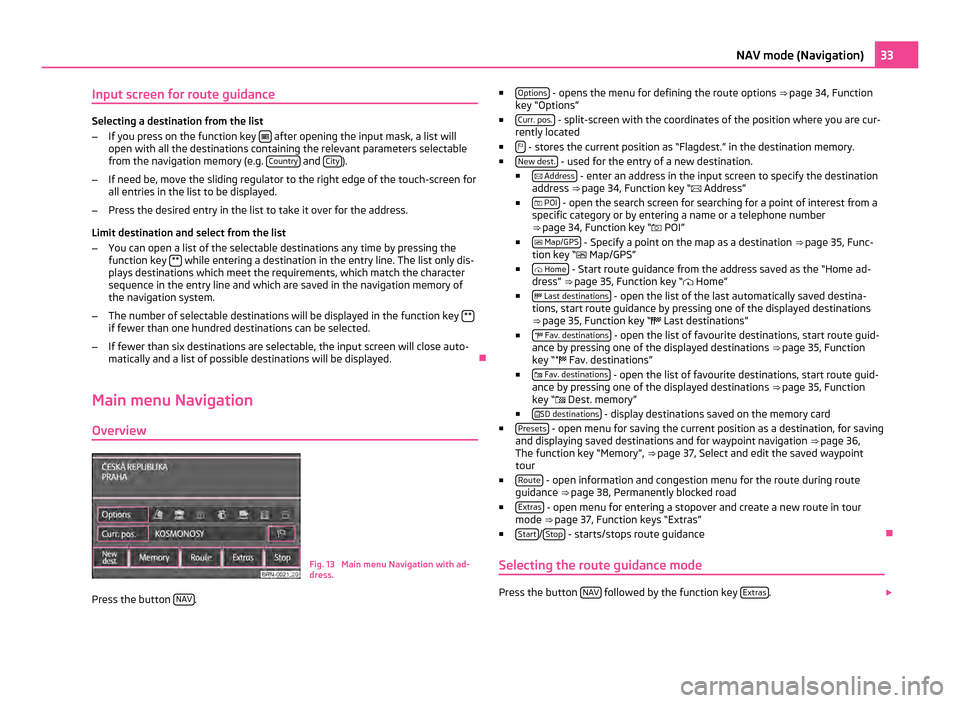
Main menu Navigation
Overview Fig. 13 Main menu Navigation with ad-
dress.
Press the button NAV . ■
Options - opens the menu for defining the route options
⇒ page 34, Function
key “Options”
■ Curr. pos. - split-screen with the coordinates of the position where you are cur-
rently located
■ - stores the current position as “Flagdest.” in the destination memory.
■ New dest. - used for the entry of a new destination.
■ Address - enter an address in the input screen to specify the destination
address ⇒ page 34, Function key
“ Address”
■ POI - open the search screen for searching for a point of interest from a
specific category or by entering a name or a telephone number
⇒ page 34, Function key
“ POI”
■ Map/GPS - Specify a point on the map as a destination
⇒
page 35, Func-
tion key “ Map/GPS”
■ Home - Start route guidance from the address saved as the “Home ad-
dress
” ⇒ page 35, Function key “ Home”
■ Last destinations - open the list of the last automatically saved destina-
tions, start route guidance by pressing one of the displayed destinations
⇒
page 35, Function key “ Last destinations”
■ Fav. destinations - open the list of favourite destinations, start route guid-
ance by pressing one of the displayed destinations
⇒ page 35, Function
key “ Fav. destinations”
■ Fav. destinations - open the list of favourite destinations, start route guid-
ance by pressing one of the displayed destinations
⇒ page 35, Function
key “ Dest. memory”
■ SD destinations - display destinations saved on the memory card
■ Presets - open menu for saving the current position as a destination, for saving
and displaying saved destinations and for waypoint navigation ⇒ page 36,
The function key “Memory”
, ⇒ page 37, Select and edit the saved waypoint
tour
■ Route - open information and congestion menu for the route during route
guidance ⇒
page 38, Permanently blocked road
■ Extras - open menu for entering a stopover and create a new route in tour
mode ⇒ page 37,
Function keys “Extras”
■ Start /
Stop - starts/stops route guidance
Ð
Selecting the route guidance mode Press the button
NAV followed by the function key
Extras .
33
NAV mode (Navigation)
Page 36 of 47
■
Tour mode - mode with stopovers
⇒ page 36, Tour mode
■ Waypoint navigation - waypoint navigation
⇒ page 37, Waypoint mode Ð
Function key “Options” Press the button
NAV followed by the function key
Options .
■ Route - Route
■ Fast - calculates the fastest route to the destination, even if a detour is
necessary - appears in orange
■ Shortest - shortest route to the destination even if a longer driving time
is required - appears in red
■ Economical - calculates the quickest route possible over the shortest route
■ Dynamic route - dynamic route
⇒
page 38, Dynamic route guidance with TMC
use
■ Off - switches off
■ Manual - manual
■ Automatic - automatic
■ Motorways - this type of road is “excluded” from the route calculation
■ Toll roads - this type of road is “excluded” from the route calculation
■ Excluded rds. - manually blocked sections of road are included in the route cal-
culation ⇒ page 38, Manually excluding stretches of the journey
■ Ferries - this type of transportation is “excluded” from the route calculation
■ Tunnels - Tunnels are “blocked” in the route calculation
Ð
The function key “New dest.”
Function key
“ Address”This function key is used to enter an address in the input screen for a destination
address.
Press the button NAV followed by the function key
New destination →
Address .
■ Country - country
■ City/P.cd. - city, post code
■ Street - street
■ Number - Number ■
Intersect. - intersection
■ Presets - save entered address data
Ð
Function key “ POI” This function key opens a search screen to search for a point of interest from a
specific category or by entering a name or a phone number.
Press the button NAV followed by the function key
New destination →
POI .
■ Category - list of categories and sub-categories which can be selected. Press
the function key to switch back to a main category after viewing a sub-cat-
egory.
■ Search area - specify which area to search in when searching for a point of in-
terest.
■ Near dest. – If a travel destination is selected, you can select the surround-
ing area of this travel destination as a search area for the special destina-
tion.
■ Position - Limits the search for a point of interest to the surrounding area
of the current location (standard setting).
■ Near city - an input screen can be used to enter the city in whose environs a
search for a point of interest is to be carried out.
■ Select point on the map - Move a crosshair to choose a point on the map in the
surrounding area where you intend to search for a point of interest.
■ Along the route - the search for a point of interest is limited to the environ-
ment of the calculated route (only possible during route guidance)
■ Name - search for a specific point of interest after entering a name
■ Tel. - search for a specific point of interest after entering a telephone number
■ Search - search for a point of interest meeting the selected criteria
■ - display the previous point of interest in the list
■ - display the following point of interest in the list
■ - save point of interest
■ - dial phone number
■ - display current position
and point of interest on the map
■ OK - starts the route guidance to the shown travel destination
Ð34
NAV mode (Navigation)
Page 39 of 47
Options for saved tours
Press the button
NAV followed by the function key
Presets .
■ Load tour - load saved tour when you directly press the name of the tour the
tour appears in the main menu of the Navigation
■ - call up details for the tour
■ Selection - display tour in the main menu of the
Navigation
■ Edit tour memory - edit tour memory
■ Delete/rename tours - delete individual tours, rename tours
■ Delete all tours - delete all tours
Ð
Function keys “Extras” Enter a stopover
After you select the tour
⇒ page 37
, Options for saved tours confirm the function
key Extras :
■ Enter stopover destination - enter the stopover to be driven to during the route
guidance
■ Exactly - the tour is routed via the stopover destination
■ Close to - the tour is routed in the proximity of the stopover destination.
The distance from the stopover destination from the selected steet type
from ⇒
page 34, Function key “Options”.
Enter tour
Press the button NAV followed by the function key
Extras .
■ New tour - create a new route in tour mode
■ - Options for editing the entry
■ Destination entry - enter home address
■ Exactly - exact destination entry
■ Close to - destination entry in the proximity of the stopover
Edit saved tour
Press the button NAV followed by the function key
Extras .
■ Edit tour - edit saved tour
■ - Options for editing the entry
■ Details - display tour details
■ Show on map - show destination on map
■ - change back to the tour details ■
Change type - changes a precise “Stopover” in “Close to” and vice versa.
■ Start – renewed pressing on
Start will only start the route guidance to
this tour destination, possible stopover destinations will be ignored.
Press Back to change back to the display of the tour plan without start-
ing the route guidance.
■ Delete - deletes after further confirming the displayed tour destination.
■ Move – Press
Forward to select an entry behind which the selected tour
destination should be moved.
■ Destination entry - enter home address
Leave tour mode
Press the button NAV followed by the function key
Extras .
■ Leave tour mode - end tour mode.
Ð
Waypoint mode Enter waypoint tour Press the
NAV button followed by the function keys
Extras →
Waypoint navigation →
Waypoint tour ■
Load waypoint tour - create new toure in the waypoint mode
■ New tour - create new tour, first enter the name
■ Automatic - the waypoints are automatically recorded
■ Manual - all waypoints must be entered manually
■ Extend existing tour - extend existing tour
■ Edit waypoint tour(s) - open the list of the saved waypoint tours. Press the corre-
sponding waypoint tour for selection. Ð
Select and edit the saved waypoint tour Press the
NAV button followed by the function keys
Extras →
Waypoint navigation →
Presets 37
NAV mode (Navigation)
Page 45 of 47
Start route guidance . . . . . . . . . . . . . . . . . . . . . . . . . . 33
Dest. memory . . . . . . . . . . . . . . . . . . . . . . . . . . . . . . . . 35
Favourites . . . . . . . . . . . . . . . . . . . . . . . . . . . . . . . . . . . 33
Fav. destinations . . . . . . . . . . . . . . . . . . . . . . . . . . . . . 35
Home address . . . . . . . . . . . . . . . . . . . . . . . . . . . 33, 35
last destinations . . . . . . . . . . . . . . . . . . . . . . . . . . . . . 33
Last destinations . . . . . . . . . . . . . . . . . . . . . . . . . . . . . 35
Station list . . . . . . . . . . . . . . . . . . . . . . . . . . . . . . . . . . . . 15
Stop route guidance . . . . . . . . . . . . . . . . . . . . . . . . . . . 33
Switching the unit off . . . . . . . . . . . . . . . . . . . . . . . . . . 5
Switching the unit on . . . . . . . . . . . . . . . . . . . . . . . . . . 5
Switch off display . . . . . . . . . . . . . . . . . . . . . . . . . . 15, 28
T Telephone Call number from the telephone book . . . . . . . . . 24
Entry from the telephone book . . . . . . . . . . . . . . . . 24
Telephone book . . . . . . . . . . . . . . . . . . . . . . . . . . . . . . 24
Television mode . . . . . . . . . . . . . . . . . . . . . . . . . . . . . . 22
Temporarily blocked road . . . . . . . . . . . . . . . . . . . . . . 38
Text messages (SMS) . . . . . . . . . . . . . . . . . . . . . . . . . . 26
Time display . . . . . . . . . . . . . . . . . . . . . . . . . . . . . . . . . . 13
TMC . . . . . . . . . . . . . . . . . . . . . . . . . . . . . . . . . . . . . . . . . 40 Dynamic route guidance . . . . . . . . . . . . . . . . . . . . . 38
TMC traffic reports . . . . . . . . . . . . . . . . . . . . . . . . . . 40
TONE . . . . . . . . . . . . . . . . . . . . . . . . . . . . . . . . . . . . . . . . 27
Tour Edit . . . . . . . . . . . . . . . . . . . . . . . . . . . . . . . . . . . . . . . . . 37
Entry . . . . . . . . . . . . . . . . . . . . . . . . . . . . . . . . . . . . . . . . 37
Load . . . . . . . . . . . . . . . . . . . . . . . . . . . . . . . . . . . . . . . . 37
new route in tour mode . . . . . . . . . . . . . . . . . . . . . . 37
Save . . . . . . . . . . . . . . . . . . . . . . . . . . . . . . . . . . . . . . . 36
Tour memory edit . . . . . . . . . . . . . . . . . . . . . . . . . . . . . . . . . . . . . . . . . 37
Tour mode Leave . . . . . . . . . . . . . . . . . . . . . . . . . . . . . . . . . . . . . . . 37
New tour . . . . . . . . . . . . . . . . . . . . . . . . . . . . . . . . . . . . 37
TP . . . . . . . . . . . . . . . . . . . . . . . . . . . . . . . . . . . . . . . . . 11, 15 Display . . . . . . . . . . . . . . . . . . . . . . . . . . . . . . . . . . . . . . 15 Traffic information
Setup . . . . . . . . . . . . . . . . . . . . . . . . . . . . . . . . . . . . . . . 13
Traffic Program . . . . . . . . . . . . . . . . . . . . . . . . . . . . . . . . 15
Traffic radio . . . . . . . . . . . . . . . . . . . . . . . . . . . . . . . . . . . 11
TV Setup . . . . . . . . . . . . . . . . . . . . . . . . . . . . . . . . . . . . . . . 14
TV mode . . . . . . . . . . . . . . . . . . . . . . . . . . . . . . . . . . . . . 22 Explanation of the technical terms . . . . . . . . . . . . 22
Overview . . . . . . . . . . . . . . . . . . . . . . . . . . . . . . . . . . . . 22
V
Video . . . . . . . . . . . . . . . . . . . . . . . . . . . . . . . . . . . . . 16, 20
Video mode . . . . . . . . . . . . . . . . . . . . . . . . . . . . . . . . . . 20
Video text . . . . . . . . . . . . . . . . . . . . . . . . . . . . . . . . . . . . 23
Voice command - Help . . . . . . . . . . . . . . . . . . . . . . . . . . 9
Voice commands . . . . . . . . . . . . . . . . . . . . . . . . . . . . . . . 8
Voice control . . . . . . . . . . . . . . . . . . . . . . . . . . . . . . . . . . 8 Setup . . . . . . . . . . . . . . . . . . . . . . . . . . . . . . . . . . . . . . . 13
Volume . . . . . . . . . . . . . . . . . . . . . . . . . . . . . . . . . . . . . . . 5
W Warranty . . . . . . . . . . . . . . . . . . . . . . . . . . . . . . . . . . . . . . 3
Waypoint tour create new toure . . . . . . . . . . . . . . . . . . . . . . . . . . . . . 37
Edit saved waypoint tours . . . . . . . . . . . . . . . . . . . 38
End route guidance . . . . . . . . . . . . . . . . . . . . . . . . . 38
List of saved waypoint tours . . . . . . . . . . . . . . . . . 38 43
Index