fuel SKODA OCTAVIA 2011 2.G / (1Z) User Guide
[x] Cancel search | Manufacturer: SKODA, Model Year: 2011, Model line: OCTAVIA, Model: SKODA OCTAVIA 2011 2.G / (1Z)Pages: 248, PDF Size: 3.79 MB
Page 26 of 248
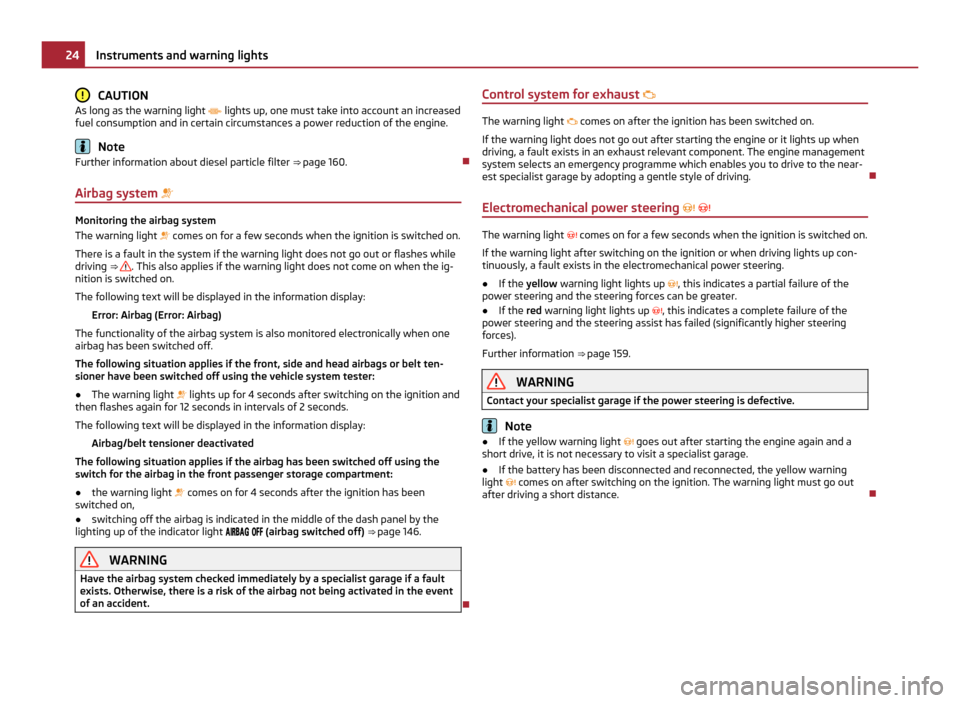
CAUTION
As long as the warning light lights up, one must take into account an increased
fuel consumption and in certain circumstances a power reduction of the engine. Note
Further information about diesel particle filter ⇒ page 160.
Airbag system Monitoring the airbag system
The warning light
comes on for a few seconds when the ignition is switched on.
There is a fault in the system if the warning light does not go out or flashes while
driving ⇒ . This also applies if the warning light does not come on when the ig-
nition is switched on.
The following text will be displayed in the information display:
Error: Airbag (Error: Airbag)
The functionality of the airbag system is also monitored electronically when one
airbag has been switched off.
The following situation applies if the front, side and head airbags or belt ten-
sioner have been switched off using the vehicle system tester:
● The warning light lights up for 4
seconds after switching on the ignition and
then flashes again for 12 seconds in intervals of 2 seconds.
The following text will be displayed in the information display: Airbag/belt tensioner deactivated
The following situation applies if the airbag has been switched off using the
switch for the airbag in the front passenger storage compartment:
● the warning light comes on for 4
seconds after the ignition has been
switched on,
● switching off the airbag is indicated in the middle of the dash panel by the
lighting up of the indicator light
(airbag switched off) ⇒ page 146. WARNING
Have the airbag system checked immediately by a specialist garage if a fault
exists. Otherwise, there is a risk of the airbag not being activated in the event
of an accident. Control system for exhaust
The warning light
comes on after the ignition has been switched on.
If the warning light does not go out after starting the engine or it lights up when
driving, a fault exists in an exhaust relevant component. The engine management
system selects an emergency programme which enables you to drive to the near-
est specialist garage by adopting a gentle style of driving.
Electromechanical power steering The warning light
comes on for a few seconds when the ignition is switched on.
If the warning light after switching on the ignition or when driving lights up con-
tinuously, a fault exists in the electromechanical power steering.
● If the yellow warning light lights up , this indicates a partial failure of the
power steering and the steering forces can be greater.
● If the red warning light lights up , this indicates a complete failure of the
power steering and the steering assist has failed (significantly higher steering
forces).
Further information ⇒ page 159. WARNING
Contact your specialist garage if the power steering is defective. Note
● If the yellow warning light goes out after starting the engine again and a
short drive, it is not necessary to visit a specialist garage.
● If the battery has been disconnected and reconnected, the yellow warning
light comes on after switching on the ignition. The warning light must go out
after driving a short distance. 24
Instruments and warning lights
Page 27 of 248
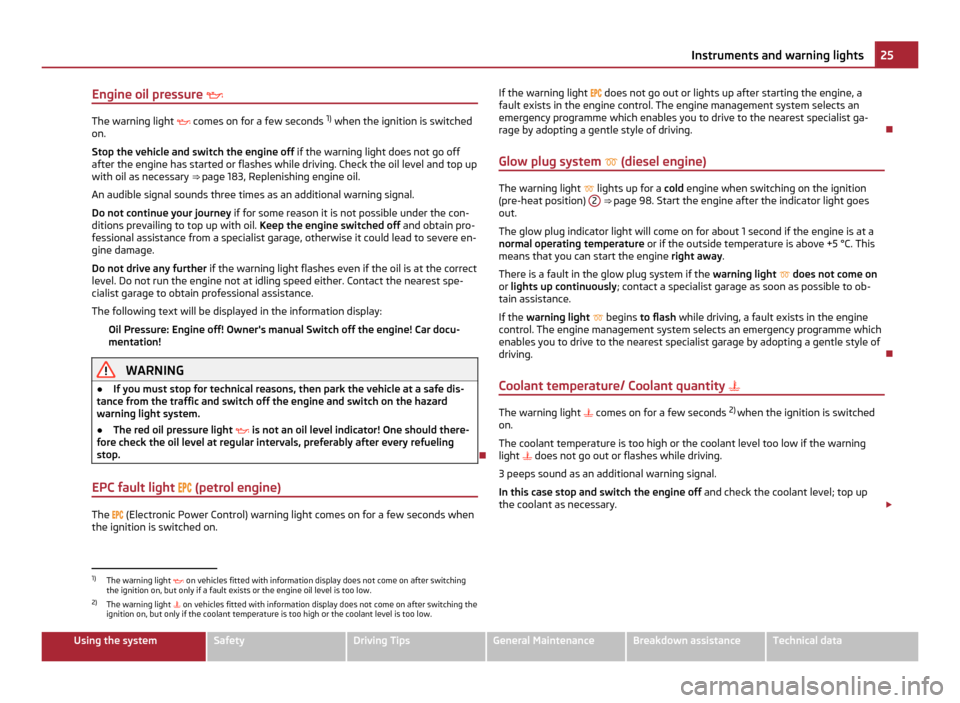
Engine oil pressure
The warning light
comes on for a few seconds 1)
when the ignition is switched
on.
Stop the vehicle and switch the engine off if the warning light does not go off
after the engine has started or flashes while driving. Check the oil level and top up
with oil as necessary ⇒ page 183
, Replenishing engine oil.
An audible signal sounds three times as an additional warning signal.
Do not continue your journey if for some reason it is not possible under the con-
ditions prevailing to top up with oil. Keep the engine switched off and obtain pro-
fessional assistance from a specialist garage, otherwise it could lead to severe en-
gine damage.
Do not drive any further if the warning light flashes even if the oil is at the correct
level. Do not run the engine not at idling speed either. Contact the nearest spe-
cialist garage to obtain professional assistance.
The following text will be displayed in the information display:
Oil Pressure: Engine off! Owner's manual Switch off the engine! Car docu-
mentation! WARNING
● If you must stop for technical reasons, then park the vehicle at a safe dis-
tance from the traffic and switch off the engine and switch on the hazard
warning light system.
● The red oil pressure light is not an oil level indicator! One should there-
fore check the oil level at regular intervals, preferably after every refueling
stop.
EPC fault light
(petrol engine) The
(Electronic Power Control) warning light comes on for a few seconds when
the ignition is switched on. If the warning light
does not go out or lights up after starting the engine, a
fault exists in the engine control. The engine management system selects an
emergency programme which enables you to drive to the nearest specialist ga-
rage by adopting a gentle style of driving.
Glow plug system (diesel engine) The warning light
lights up for a cold
engine when switching on the ignition
(pre-heat position) 2 ⇒ page 98. Start the engine after the indicator light goes
out.
The glow plug indicator light will come on for about 1 second if the engine is at a
normal operating temperature or if the outside temperature is above +5 °C. This
means that you can start the engine right away.
There is a fault in the glow plug system if the warning light does not come on
or lights up continuously ; contact a specialist garage as soon as possible to ob-
tain assistance.
If the warning light begins to flash while driving, a fault exists in the engine
control. The engine management system selects an emergency programme which
enables you to drive to the nearest specialist garage by adopting a gentle style of
driving.
Coolant temperature/ Coolant quantity The warning light
comes on for a few seconds 2)
when the ignition is switched
on.
The coolant temperature is too high or the coolant level too low if the warning
light
does not go out or flashes while driving.
3 peeps sound as an additional warning signal.
In this case stop and switch the engine off and check the coolant level; top up
the coolant as necessary. £1)
The warning light on vehicles fitted with information display does not come on after switching
the ignition on, but only if a fault exists or the engine oil level is too low.
2) The warning light on vehicles fitted with information display does not come on after switching the
ignition on, but only if the coolant temperature is too high or the coolant level is too low. 25
Instruments and warning lights Using the system Safety Driving Tips General Maintenance Breakdown assistance Technical data
Page 31 of 248
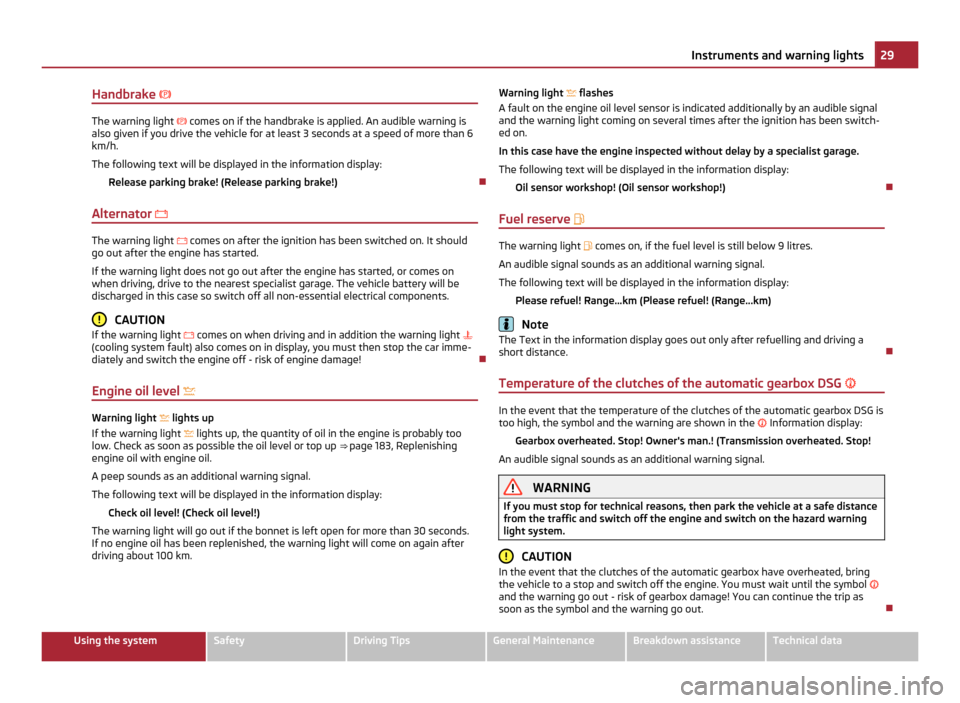
Handbrake
The warning light
comes on if the handbrake is applied. An audible warning is
also given if you drive the vehicle for at least 3 seconds at a speed of more than 6
km/h.
The following text will be displayed in the information display:
Release parking brake! (Release parking brake!)
Alternator The warning light
comes on after the ignition has been switched on. It should
go out after the engine has started.
If the warning light does not go out after the engine has started, or comes on
when driving, drive to the nearest specialist garage. The vehicle battery will be
discharged in this case so switch off all non-essential electrical components. CAUTION
If the warning light comes on when driving and in addition the warning light
(cooling system fault) also comes on in display, you must then stop the car imme-
diately and switch the engine off - risk of engine damage!
Engine oil level Warning light
lights up
If the warning light lights up, the quantity of oil in the engine is probably too
low. Check as soon as possible the oil level or top up ⇒ page 183, Replenishing
engine oil with engine oil.
A peep sounds as an additional warning signal.
The following text will be displayed in the information display:
Check oil level! (Check oil level!)
The warning light will go out if the bonnet is left open for more than 30 seconds.
If no engine oil has been replenished, the warning light will come on again after
driving about 100 km. Warning light
flashes
A fault on the engine oil level sensor is indicated additionally by an audible signal
and the warning light coming on several times after the ignition has been switch-
ed on.
In this case have the engine inspected without delay by a specialist garage.
The following text will be displayed in the information display:
Oil sensor workshop! (Oil sensor workshop!)
Fuel reserve The warning light
comes on, if the fuel level is still below 9 litres.
An audible signal sounds as an additional warning signal.
The following text will be displayed in the information display: Please refuel! Range...km (Please refuel! (Range...km) Note
The Text in the information display goes out only after refuelling and driving a
short distance.
Temperature of the clutches of the automatic gearbox DSG In the event that the temperature of the clutches of the automatic gearbox DSG is
too high, the symbol and the warning are shown in the Information display:
Gearbox overheated. Stop! Owner's man.! (Transmission overheated. Stop!
An audible signal sounds as an additional warning signal. WARNING
If you must stop for technical reasons, then park the vehicle at a safe distance
from the traffic and switch off the engine and switch on the hazard warning
light system. CAUTION
In the event that the clutches of the automatic gearbox have overheated, bring
the vehicle to a stop and switch off the engine. You must wait until the symbol
and the warning go out - risk of gearbox damage! You can continue the trip as
soon as the symbol and the warning go out. 29
Instruments and warning lights Using the system Safety Driving Tips General Maintenance Breakdown assistance Technical data
Page 34 of 248
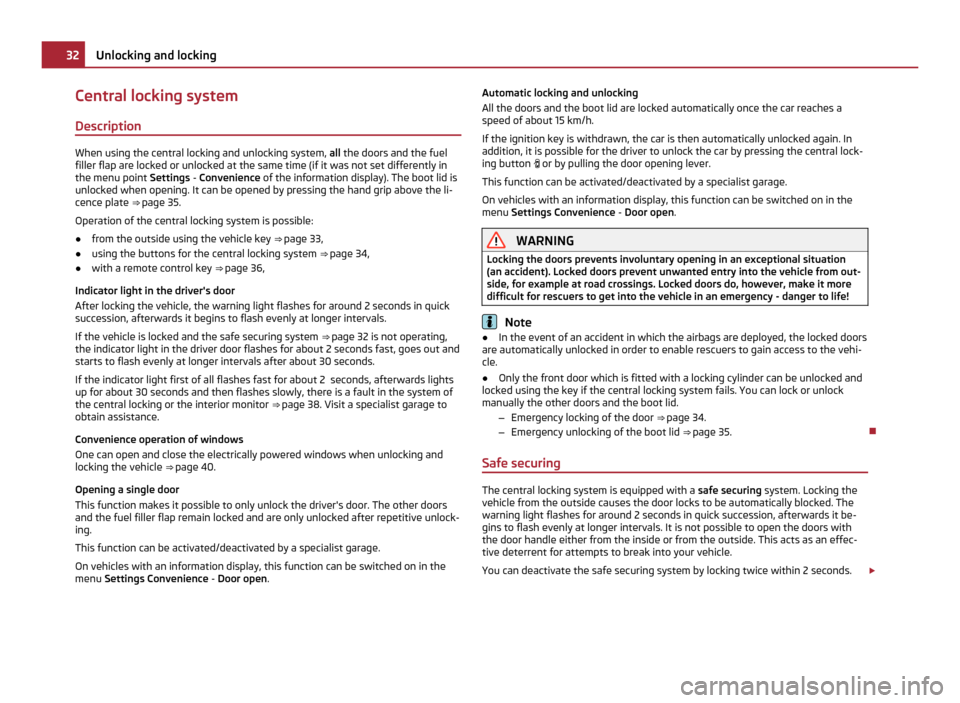
Central locking system
Description When using the central locking and unlocking system,
all the doors and the fuel
filler flap are locked or unlocked at the same time (if it was not set differently in
the menu point Settings - Convenience of the information display). The boot lid is
unlocked when opening. It can be opened by pressing the hand grip above the li-
cence plate ⇒ page 35.
Operation of the central locking system is possible:
● from the outside using the vehicle key ⇒ page 33,
● using the buttons for the central locking system ⇒ page 34,
● with a remote control key ⇒
page 36,
Indicator light in the driver's door
After locking the vehicle, the warning light flashes for around 2 seconds in quick
succession, afterwards it begins to flash evenly at longer intervals.
If the vehicle is locked and the safe securing system ⇒ page 32 is not operating,
the indicator light in the driver door flashes for about 2 seconds fast, goes out and
starts to flash evenly at longer intervals after about 30 seconds.
If the indicator light first of all flashes fast for about 2 seconds, afterwards lights
up for about 30 seconds and then flashes slowly, there is a fault in the system of
the central locking or the interior monitor ⇒ page 38. Visit a specialist garage to
obtain assistance.
Convenience operation of windows
One can open and close the electrically powered windows when unlocking and
locking the vehicle ⇒ page 40.
Opening a single door
This function makes it possible to only unlock the driver's door. The other doors
and the fuel filler flap remain locked and are only unlocked after repetitive unlock-
ing.
This function can be activated/deactivated by a specialist garage.
On vehicles with an information display, this function can be switched on in the
menu Settings Convenience - Door open. Automatic locking and unlocking
All the doors and the boot lid are locked automatically once the car reaches a
speed of about 15 km/h.
If the ignition key is withdrawn, the car is then automatically unlocked again. In
addition, it is possible for the driver to unlock the car by pressing the central lock-
ing button or by pulling the door opening lever.
This function can be activated/deactivated by a specialist garage.
On vehicles with an information display, this function can be switched on in the
menu Settings Convenience - Door open. WARNING
Locking the doors prevents involuntary opening in an exceptional situation
(an accident). Locked doors prevent unwanted entry into the vehicle from out-
side, for example at road crossings. Locked doors do, however, make it more
difficult for rescuers to get into the vehicle in an emergency - danger to life! Note
● In the event of an accident in which the airbags are deployed, the locked doors
are automatically unlocked in order to enable rescuers to gain access to the vehi-
cle.
● Only the front door which is fitted with a locking cylinder can be unlocked and
locked using the key if the central locking system fails. You can lock or unlock
manually the other doors and the boot lid.
–Emergency locking of the door ⇒
page 34.
– Emergency unlocking of the boot lid ⇒ page 35.
Safe securing The central locking system is equipped with a
safe securing system. Locking the
vehicle from the outside causes the door locks to be automatically blocked. The
warning light flashes for around 2 seconds in quick succession, afterwards it be-
gins to flash evenly at longer intervals. It is not possible to open the doors with
the door handle either from the inside or from the outside. This acts as an effec-
tive deterrent for attempts to break into your vehicle.
You can deactivate the safe securing system by locking twice within 2
seconds.£32
Unlocking and locking
Page 35 of 248
If the safe securing system is not operating, the warning light in the driver door
flashes for about 2
seconds fast, goes out and starts to flash evenly at longer in-
tervals after about 30°seconds.
The safe securing system is again activated the next time the vehicle is unlocked
and locked again.
The doors can be opened from the inside if the vehicle is locked and the safe se-
curing system is deactivated:
● The door is unlocked by actuating the door-opening lever.
● The door opens upon actuating the door-opening lever again. WARNING
If the vehicle is locked from the outside and the safe securing system is acti-
vated, there must not be any person and animals in the vehicle as it is then
not possible to open either a door or a window from the inside. The locked
doors make it more difficult for rescuers to get into the vehicle in an emergen-
cy - hazard! Note
● The anti-theft alarm system is also activated with the deactivated safe secur-
ing system when locking the vehicle. The interior monitor is however not activa-
ted.
● When activating the Safelock function after you lock the vehicle, the message
CHECK DEADLOCK will appear to inform you about this. In vehicles equipped with
an information display, the message Check deadlock! appears Owner's manual!
(CHECK DEADLOCK appears.
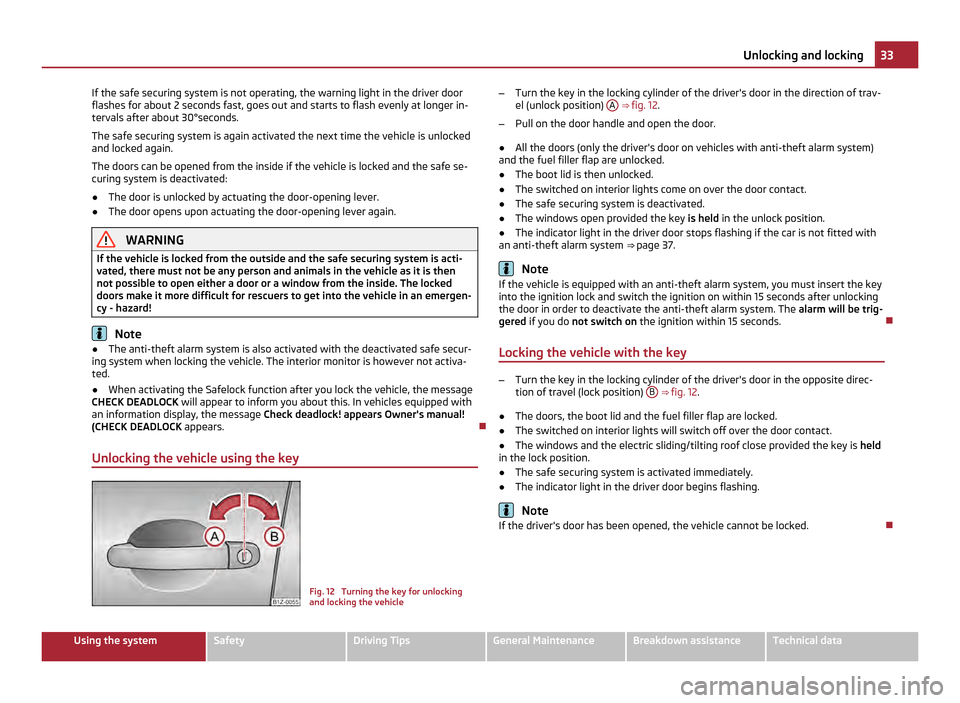
Unlocking the vehicle using the key Fig. 12 Turning the key for unlocking
and locking the vehicle–
Turn the key in the locking cylinder of the driver's door in the direction of trav-
el (unlock position) A ⇒ fig. 12
.
– Pull on the door handle and open the door.
● All the doors (only the driver's door on vehicles with anti-theft alarm system)
and the fuel filler flap are unlocked.
● The boot lid is then unlocked.
● The switched on interior lights come on over the door contact.
● The safe securing system is deactivated.
● The windows open provided the key is held in the unlock position.
● The indicator light in the driver door stops flashing if the car is not fitted with
an anti-theft alarm system ⇒
page 37. Note
If the vehicle is equipped with an anti-theft alarm system, you must insert the key
into the ignition lock and switch the ignition on within 15 seconds after unlocking
the door in order to deactivate the anti-theft alarm system. The alarm will be trig-
gered
if you do not switch on the ignition within 15 seconds.
Locking the vehicle with the key –
Turn the key in the locking cylinder of the driver's door in the opposite direc-
tion of travel (lock position) B
⇒
fig. 12.
● The doors, the boot lid and the fuel filler flap are locked.
● The switched on interior lights will switch off over the door contact.
● The windows and the electric sliding/tilting roof close provided the key is held
in the lock position.
● The safe securing system is activated immediately.
● The indicator light in the driver door begins flashing. Note
If the driver's door has been opened, the vehicle cannot be locked. 33
Unlocking and locking Using the system Safety Driving Tips General Maintenance Breakdown assistance Technical data
Page 54 of 248
The light comes on after the doors have been locked or on opening the boot lid.
The light goes out after switching on the ignition or up to 30 seconds after closing
all the doors and the boot lid.
If a door or the boot lid remains open, the light goes out within 2 minutes if the
ignition is switched off. WARNING
If the entry light comes on, do not touch its cover - risk of burns!
Luggage compartment light The lighting comes on automatically when the boot lid is opened. If the lid remains
open for more than about 10 minutes, the luggage compartment lighting switches
off automatically.
Visibility Rear window heater Fig. 34 Switch for rear window heater
– You can switch the rear window heater on or off by pressing the switch ⇒
fig. 34 - the indicator light in the switch comes on or goes out.
The rear window heater only operates when the engine is running.
The rear window heater switches off automatically after 10 minutes. For the sake of the environment
As soon as the window is de-iced or free from mist, the heating should be switch-
ed off. The reduced current consumption will have a favourable effect on fuel
economy ⇒ page 165, Saving electricity. Note
● If the on-board voltage drops, the rear window heater switches off automati-
cally, in order to provide sufficient electrical energy for the engine control
⇒
page 190, Automatic consumer shut-off.
● The position and the shape of the switch can differ depending on equipment
installed in the vehicle.
Sun visors Fig. 35 Sun visor: Swivelling out/double sun visor
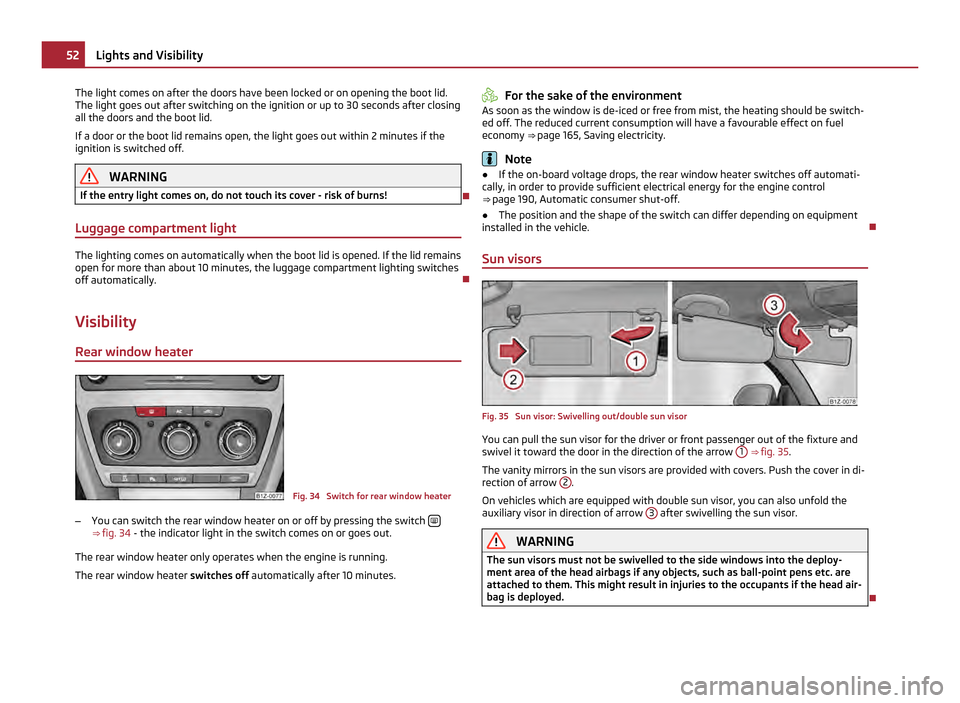
You can pull the sun visor for the driver or front passenger out of the fixture and
swivel it toward the door in the direction of the arrow
1
⇒
fig. 35.
The vanity mirrors in the sun visors are provided with covers. Push the cover in di-
rection of arrow 2 .
On vehicles which are equipped with double sun visor, you can also unfold the
auxiliary visor in direction of arrow 3 after swivelling the sun visor.
WARNING
The sun visors must not be swivelled to the side windows into the deploy-
ment area of the head airbags if any objects, such as ball-point pens etc. are
attached to them. This might result in injuries to the occupants if the head air-
bag is deployed. 52
Lights and Visibility
Page 57 of 248
CAUTION
● In cold temperatures and in winter, check before the trip or before switching
on the ignition that the wiper blades are not frozen. Switching on windscreen
wipers when the blades are frozen to the windscreen may result in damage both
to the blades and the motor of the windscreen wipers!
● If you switch off the ignition while the windscreen wipers are on, the wipers
will sweep in the same mode the next time the ignition is switched on. At low
temperatures, the wipers may freeze to the window between switching off the ig-
nition and the next time you switch the ignition on again.
● Carefully detach frozen wiper blades from the front or rear window.
● Remove snow and ice from the window wipers before driving. Note
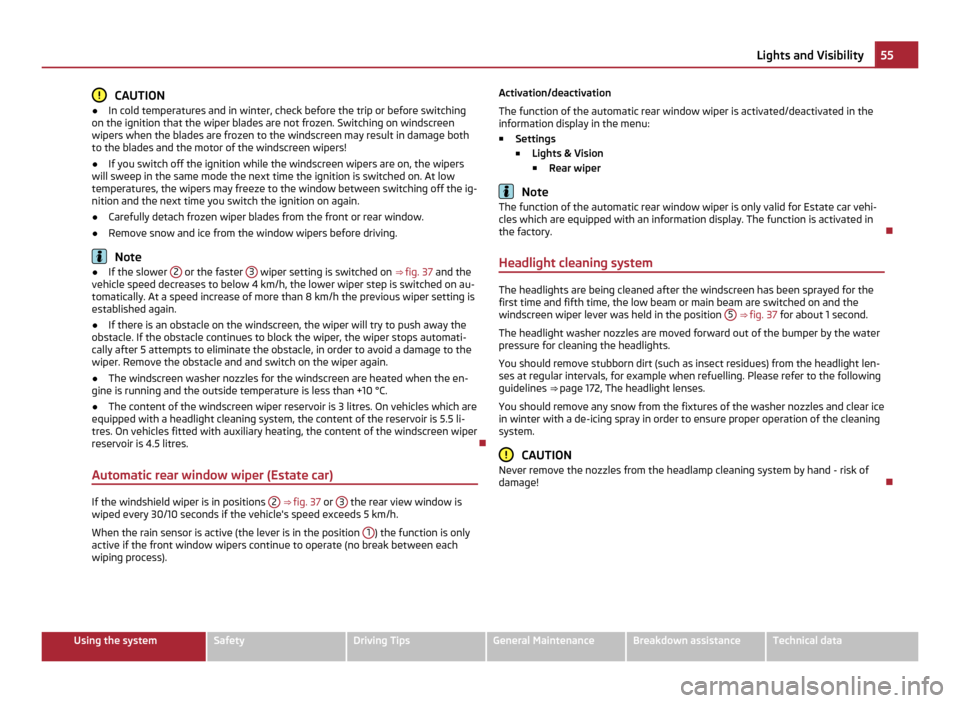
● If the slower 2 or the faster
3 wiper setting is switched on
⇒ fig. 37 and the
vehicle speed decreases to below 4 km/h, the lower wiper step is switched on au-
tomatically. At a speed increase of more than 8 km/h the previous wiper setting is
established again.
● If there is an obstacle on the windscreen, the wiper will try to push away the
obstacle. If the obstacle continues to block the wiper, the wiper stops automati-
cally after 5 attempts to eliminate the obstacle, in order to avoid a damage to the
wiper. Remove the obstacle and and switch on the wiper again.
● The windscreen washer nozzles for the windscreen are heated when the en-
gine is running and the outside temperature is less than +10
°C.
● The content of the windscreen wiper reservoir is 3 litres. On vehicles which are
equipped with a headlight cleaning system, the content of the reservoir is 5.5
li-
tres. On vehicles fitted with auxiliary heating, the content of the windscreen wiper
reservoir is 4.5 litres.
Automatic rear window wiper (Estate car) If the windshield wiper is in positions
2
⇒ fig. 37 or 3 the rear view window is
wiped every 30/10 seconds if the vehicle's speed exceeds 5 km/h.
When the rain sensor is active (the lever is in the position 1 ) the function is only
active if the front window wipers continue to operate (no break between each
wiping process). Activation/deactivation
The function of the automatic rear window wiper is activated/deactivated in the
information display in the menu:
■ Settings
■ Lights & Vision
■ Rear wiper Note
The function of the automatic rear window wiper is only valid for Estate car vehi-
cles which are equipped with an information display. The function is activated in
the factory.
Headlight cleaning system The headlights are being cleaned after the windscreen has been sprayed for the
first time and fifth time, the low beam or main beam are switched on and the
windscreen wiper lever was held in the position 5
⇒ fig. 37 for about 1 second.
The headlight washer nozzles are moved forward out of the bumper by the water
pressure for cleaning the headlights.
You should remove stubborn dirt (such as insect residues) from the headlight len-
ses at regular intervals, for example when refuelling. Please refer to the following
guidelines ⇒
page 172, The headlight lenses.
You should remove any snow from the fixtures of the washer nozzles and clear ice
in winter with a de-icing spray in order to ensure proper operation of the cleaning
system. CAUTION
Never remove the nozzles from the headlamp cleaning system by hand - risk of
damage! 55
Lights and Visibility Using the system Safety Driving Tips General Maintenance Breakdown assistance Technical data
Page 75 of 248
Install
–
Position the luggage net partition housing into the mounts in the rear seat
backrests.
– Push the luggage net partition housing in the opposite direction of arrow 1as far as the stop.
– Fold the rear seats back into its original position. WARNING
Pay attention that the rear seat backrest is correctly interlocked. It is only
then that the three-point seat belt for the middle seat can reliably fulfil its
function.
The roof rack Description CAUTION
● Only use roof racks approved by ŠKODA.
● If you use other roof rack systems or if the roof bars are not properly fitted,
then any damage which may result to your car is not covered by the warranty
agreements. It is therefore essential to pay attention to the fitting instructions
supplied with the roof luggage rack system.
● On models fitted with a power sliding/tilting roof, ensure that the opened slid-
ing/tilting roof does not strike any items of luggage transported on the roof.
● Ensure that the opened boot lid does not collide with the roof load. For the sake of the environment
The increased aerodynamic drag results in a higher fuel consumption. Note
If a vehicle is not factory-equipped with a roof rack, it can be purchased from the
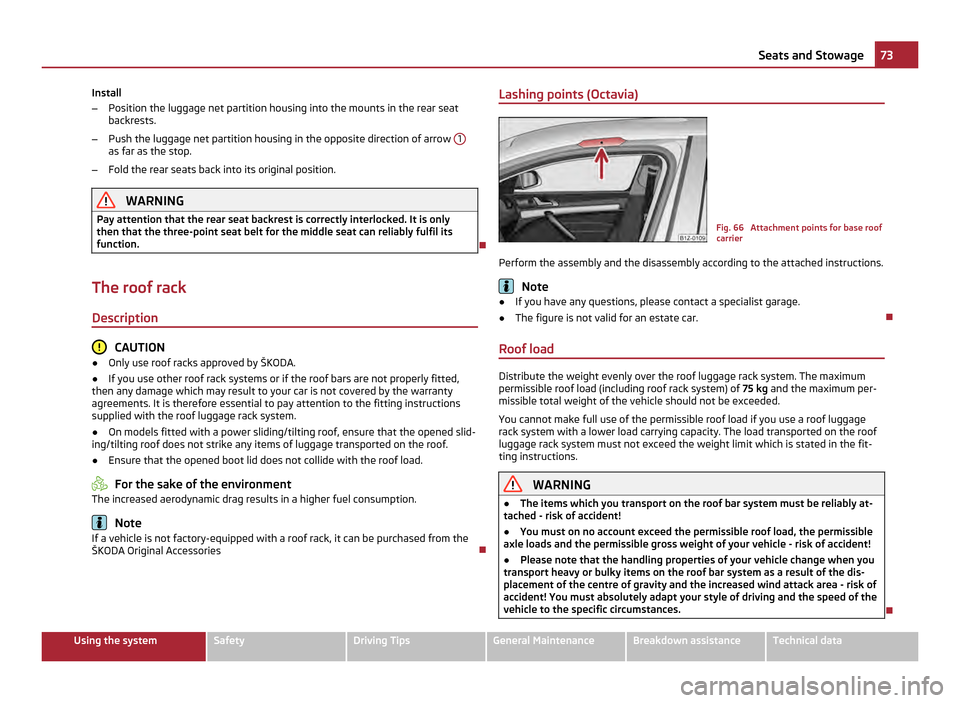
ŠKODA Original Accessories Lashing points (Octavia)
Fig. 66 Attachment points for base roof
carrier
Perform the assembly and the disassembly according to the attached instructions. Note
● If you have any questions, please contact a specialist garage.
● The figure is not valid for an estate car.
Roof load Distribute the weight evenly over the roof luggage rack system. The maximum
permissible roof load (including roof rack system) of
75 kg and the maximum per-
missible total weight of the vehicle should not be exceeded.
You cannot make full use of the permissible roof load if you use a roof luggage
rack system with a lower load carrying capacity. The load transported on the roof
luggage rack system must not exceed the weight limit which is stated in the fit-
ting instructions. WARNING
● The items which you transport on the roof bar system must be reliably at-
tached - risk of accident!
● You must on no account exceed the permissible roof load, the permissible
axle loads and the permissible gross weight of your vehicle - risk of accident!
● Please note that the handling properties of your vehicle change when you
transport heavy or bulky items on the roof bar system as a result of the dis-
placement of the centre of gravity and the increased wind attack area - risk of
accident! You must absolutely adapt your style of driving and the speed of the
vehicle to the specific circumstances. 73
Seats and Stowage Using the system Safety Driving Tips General Maintenance Breakdown assistance Technical data
Page 87 of 248
Heating and air conditioning system
Introduction
Description and information The heating effect is dependent upon the coolant temperature, thus full heat out-
put only occurs when the engine has reached its operating temperature.
If the cooling system is switched on, the temperature and air humidity drops in
the vehicle. The well-being of the occupants of the car is enhanced as a result of
this particularly at high outside temperatures and a high air humidity. The system
prevents the windows misting up during the cold season of the year.
It is possible to briefly activate recirculated air mode in order to enhance the cool-
ing effect - air-conditioning system ⇒ page 90
, Climatronic ⇒ page 93.
The air inlet in front of the windscreen must be free of ice, snow or leaves in order
to ensure that the heating and cooling systems operate properly.
After switching on the cooling Condensation from the evaporator of the air condi-
tioning may drip down and form a puddle below the vehicle. This is quite normal
and not an indication of a leak! WARNING
● For your own safety and that of other road users, ensure that all the win-
dows are free of ice, snow and misting. Please familiarize yourself about how
to correctly operate the heating and ventilation systems, how to demist and
defrost the windows, as well as with the cooling mode.
● You should not leave recirculated air mode on over a longer period of time,
as
“stale” air may result in fatigue in the driver and occupants, divert your at-
tention and also cause the windows to mist up. The risk of having an accident
increases. Switch recirculated air mode off as soon as the windows begin
misting up. Note
● The used air streams out through the air removal openings in the luggage
compartment.
● We recommend that you do not smoke in the vehicle when the recirculating air
mode is operating since the smoke which is drawn at the evaporator from the in-
terior of the vehicle forms deposits in the evaporator of the air conditioning sys- tem. This produces a permanent odour when the air conditioning system is oper-
ating which can only be eliminated through considerable effort and expense (re-
placement of compressor).
● Please refer to the information regarding the recirculated air mode for heating
⇒
page 88 and/or for air-conditioning system ⇒ page 90 or Climatronic
⇒ page 93.
● To ensure the heating system, air conditioning system or Climatronic work per-
fectly, the air outlet vents must not be covered by any objects.
Using the air conditioning system economically The compressor on the air conditioning system uses power from the engine when
in cooling mode which will effect the fuel consumption.
It recommended to open the windows or the doors of a vehicle for which the inte-
rior has been strongly heated through the effect of direct sunlight in order to al-
low the heated air to escape.
The cooling system should not be switched on while travelling when the window
is open.
The desired interior temperature can also be achieved without switching in the
cooling system just by switching to fresh air mode. For the sake of the environment
When you economize on fuel, you also reduce pollutant emissions.
Operational problems If the cooling system does not operate at outside temperatures higher than +5 °C,
there is a problem in the system. The reasons for this may be:
●
The fuse on the air conditioning system has blown. Check the fuse, replace it if
necessary ⇒ page 211.
● The cooling system has switched off automatically for a short time because
the coolant temperature of the engine is too hot ⇒ page 11.
If you are not able to rectify the operational problem yourself, or if the cooling ca-
pacity decreases, switch the cooling system off. Contact a specialist garage. 85
Heating and air conditioning system Using the system Safety Driving Tips General Maintenance Breakdown assistance Technical data
Page 96 of 248
Auxiliary heating (auxiliary heating and ventilation)
Description and important information The auxiliary heating (auxiliary heating and ventilation) heats or
supplies the interior of the vehicle with fresh air independent of the
engine.
Auxiliary heating (parking heating)
The auxiliary heater (parking heater) functions in connection with the air-condi-
tioning system or Climatronic.
It can be used when stationary, when engine is switched off for preheating of the
vehicle as well as while driving (e.g. during the heating phase of the engine).
The engine is also preheated when the vehicle is stationary and the engine is
switched off, if the auxiliary heating is switched on.
The auxiliary heating (parking heating) warms up the coolant during the combus-
tion of fuel from the vehicle tank. The coolant warms up the air, which (if the
blower speed is not set to zero) flows into the occupant compartment.
Auxiliary ventilation
The auxiliary ventilation enables fresh air to flow into the vehicle interior by
switching off the engine, whereby the interior temperature is effectively de-
creased (e.g. with the vehicle parked in the sun). WARNING
● The auxiliary heating must never be operated in closed rooms - risk of poi-
soning!
● The auxiliary heating must not be running during refueling - risk of fire.
● The exhaust pipe of the auxiliary heating is located on the underside of
the vehicle. Therefore do not place the vehicle, if you wish to operate the aux-
iliary heating, in such a way that the exhaust gases of the auxiliary heating
can come easily into contact with inflammable materials (e.g. dry grass) or
easily inflammable substances (e.g. fuel run out). Note
If the auxiliary heating runs, the fuel consumption comes from the vehicle tank.
The auxiliary heating automatically controls the filling level in the fuel tank. If only
a low quantity of fuel is present in the fuel tank, the function of the auxiliary heat-
ing is blocked.
● The exhaust pipe of the auxiliary heating, which is located on the underside of
the vehicle, must not be clogged and the exhaust flow must not be blocked.
● If the auxiliary heating and ventilation is running, the vehicle battery discharg-
es. If the auxiliary heating and ventilation has been operated several times over a
longer period, the vehicle must be driven a few kilometers in order to recharge the
vehicle battery.
● The auxiliary heating only switches the blower on, if it has achieved a coolant
temperature of approx. 50 °C.
● At low outside temperatures, this can result in a formation of water vapour in
the area of the engine compartment. This is quite normal and is not an operating
problem.
● After switching off the auxiliary heating, the coolant pump runs for a short pe-
riod.
● The auxiliary heating and ventilation does not switch on or comes on, if the
vehicle battery indicates a low loading state ⇒
page 190, Automatic consumer
shut-off.
● The auxiliary heating (parking heating) does not switch on, if the following was
shown in the information display or before switching off the ignition: Please re-
fuel!
● The air inlet in front of the windscreen must be free of ice, snow or leaves in
order to ensure that the auxiliary heating operates properly.
● So that warm air can flow into the vehicle interior after switching on the auxili-
ary heating, you must maintain the comfort temperature normally selected by you
and leave the air outlet vents in an open position. It is recommended to put the air
flow in the position or . 94
Heating and air conditioning system