engine SKODA OCTAVIA 2011 2.G / (1Z) Owner's Guide
[x] Cancel search | Manufacturer: SKODA, Model Year: 2011, Model line: OCTAVIA, Model: SKODA OCTAVIA 2011 2.G / (1Z)Pages: 248, PDF Size: 3.79 MB
Page 54 of 248
The light comes on after the doors have been locked or on opening the boot lid.
The light goes out after switching on the ignition or up to 30 seconds after closing
all the doors and the boot lid.
If a door or the boot lid remains open, the light goes out within 2 minutes if the
ignition is switched off. WARNING
If the entry light comes on, do not touch its cover - risk of burns!
Luggage compartment light The lighting comes on automatically when the boot lid is opened. If the lid remains
open for more than about 10 minutes, the luggage compartment lighting switches
off automatically.
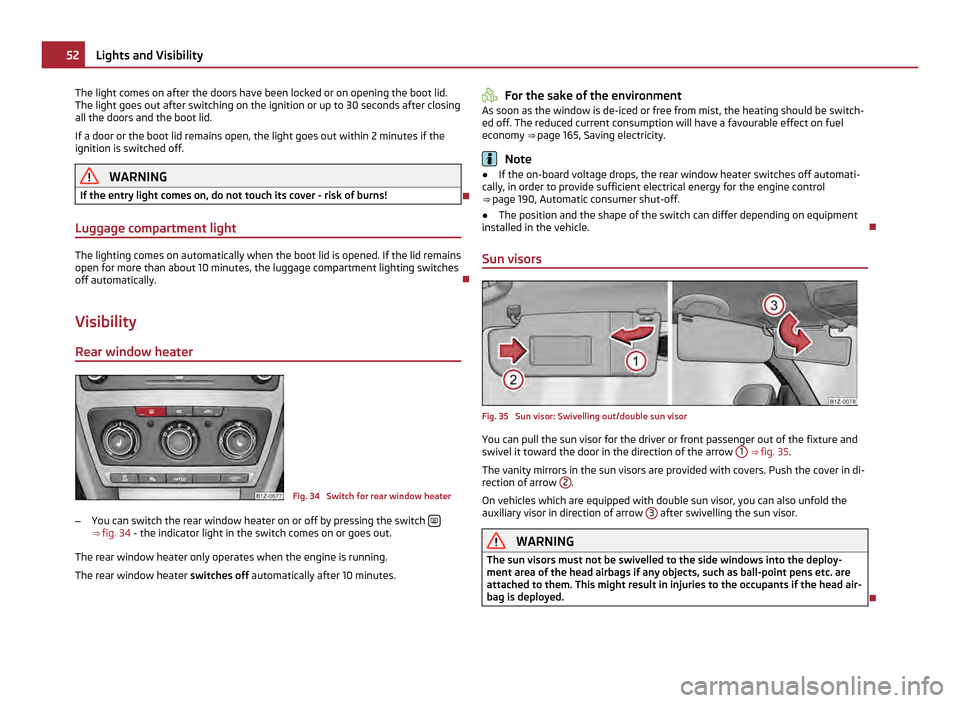
Visibility Rear window heater Fig. 34 Switch for rear window heater
– You can switch the rear window heater on or off by pressing the switch ⇒
fig. 34 - the indicator light in the switch comes on or goes out.
The rear window heater only operates when the engine is running.
The rear window heater switches off automatically after 10 minutes. For the sake of the environment
As soon as the window is de-iced or free from mist, the heating should be switch-
ed off. The reduced current consumption will have a favourable effect on fuel
economy ⇒ page 165, Saving electricity. Note
● If the on-board voltage drops, the rear window heater switches off automati-
cally, in order to provide sufficient electrical energy for the engine control
⇒
page 190, Automatic consumer shut-off.
● The position and the shape of the switch can differ depending on equipment
installed in the vehicle.
Sun visors Fig. 35 Sun visor: Swivelling out/double sun visor
You can pull the sun visor for the driver or front passenger out of the fixture and
swivel it toward the door in the direction of the arrow
1
⇒
fig. 35.
The vanity mirrors in the sun visors are provided with covers. Push the cover in di-
rection of arrow 2 .
On vehicles which are equipped with double sun visor, you can also unfold the
auxiliary visor in direction of arrow 3 after swivelling the sun visor.
WARNING
The sun visors must not be swivelled to the side windows into the deploy-
ment area of the head airbags if any objects, such as ball-point pens etc. are
attached to them. This might result in injuries to the occupants if the head air-
bag is deployed. 52
Lights and Visibility
Page 60 of 248
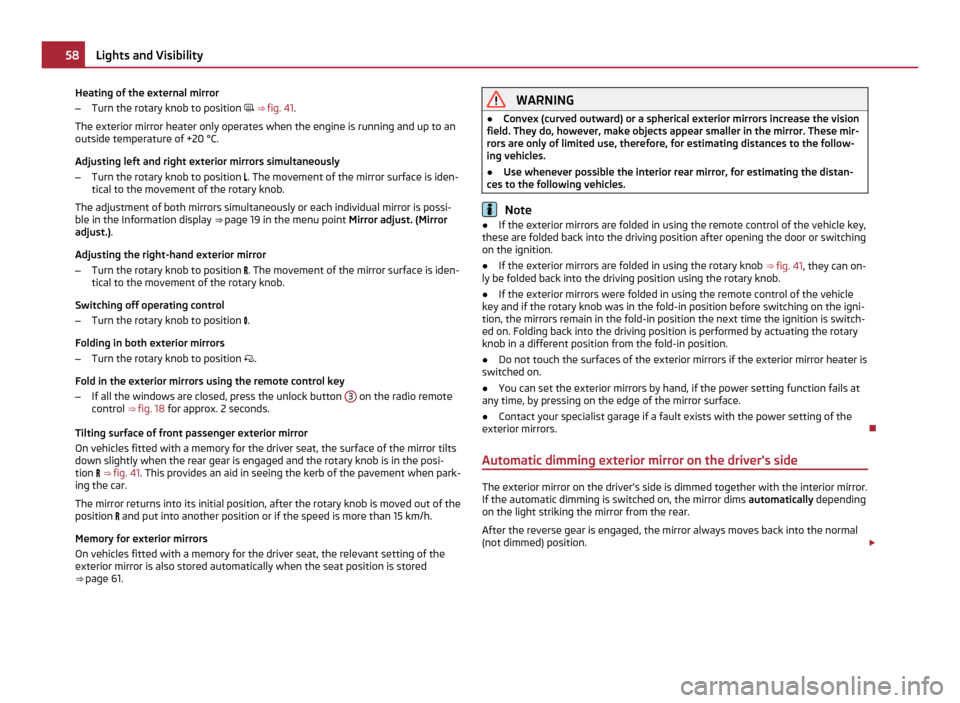
Heating of the external mirror
–
Turn the rotary knob to position ⇒ fig. 41.
The exterior mirror heater only operates when the engine is running and up to an
outside temperature of +20 °C.
Adjusting left and right exterior mirrors simultaneously
– Turn the rotary knob to position . The movement of the mirror surface is iden-
tical to the movement of the rotary knob.
The adjustment of both mirrors simultaneously or each individual mirror is possi-
ble in the Information display ⇒
page 19 in the menu point Mirror adjust. (Mirror
adjust.).
Adjusting the right-hand exterior mirror
– Turn the rotary knob to position . The movement of the mirror surface is iden-
tical to the movement of the rotary knob.
Switching off operating control
– Turn the rotary knob to position .
Folding in both exterior mirrors
– Turn the rotary knob to position .
Fold in the exterior mirrors using the remote control key
– If all the windows are closed, press the unlock button 3 on the radio remote
control ⇒ fig. 18 for approx. 2 seconds.
Tilting surface of front passenger exterior mirror
On vehicles fitted with a memory for the driver seat, the surface of the mirror tilts
down slightly when the rear gear is engaged and the rotary knob is in the posi-
tion ⇒ fig. 41 . This provides an aid in seeing the kerb of the pavement when park-
ing the car.
The mirror returns into its initial position, after the rotary knob is moved out of the
position and put into another position or if the speed is more than 15 km/h.
Memory for exterior mirrors
On vehicles fitted with a memory for the driver seat, the relevant setting of the
exterior mirror is also stored automatically when the seat position is stored
⇒ page 61. WARNING
● Convex (curved outward) or a spherical exterior mirrors increase the vision
field. They do, however, make objects appear smaller in the mirror. These mir-
rors are only of limited use, therefore, for estimating distances to the follow-
ing vehicles.
● Use whenever possible the interior rear mirror, for estimating the distan-
ces to the following vehicles. Note
● If the exterior mirrors are folded in using the remote control of the vehicle key,
these are folded back into the driving position after opening the door or switching
on the ignition.
● If the exterior mirrors are folded in using the rotary knob ⇒
fig. 41, they can on-
ly be folded back into the driving position using the rotary knob.
● If the exterior mirrors were folded in using the remote control of the vehicle
key and if the rotary knob was in the fold-in position before switching on the igni-
tion, the mirrors remain in the fold-in position the next time the ignition is switch-
ed on. Folding back into the driving position is performed by actuating the rotary
knob in a different position from the fold-in position.
● Do not touch the surfaces of the exterior mirrors if the exterior mirror heater is
switched on.
● You can set the exterior mirrors by hand, if the power setting function fails at
any time, by pressing on the edge of the mirror surface.
● Contact your specialist garage if a fault exists with the power setting of the
exterior mirrors.
Automatic dimming exterior mirror on the driver's side The exterior mirror on the driver's side is dimmed together with the interior mirror.
If the automatic dimming is switched on, the mirror dims automatically depending
on the light striking the mirror from the rear.
After the reverse gear is engaged, the mirror always moves back into the normal
(not dimmed) position. £58
Lights and Visibility
Page 68 of 248
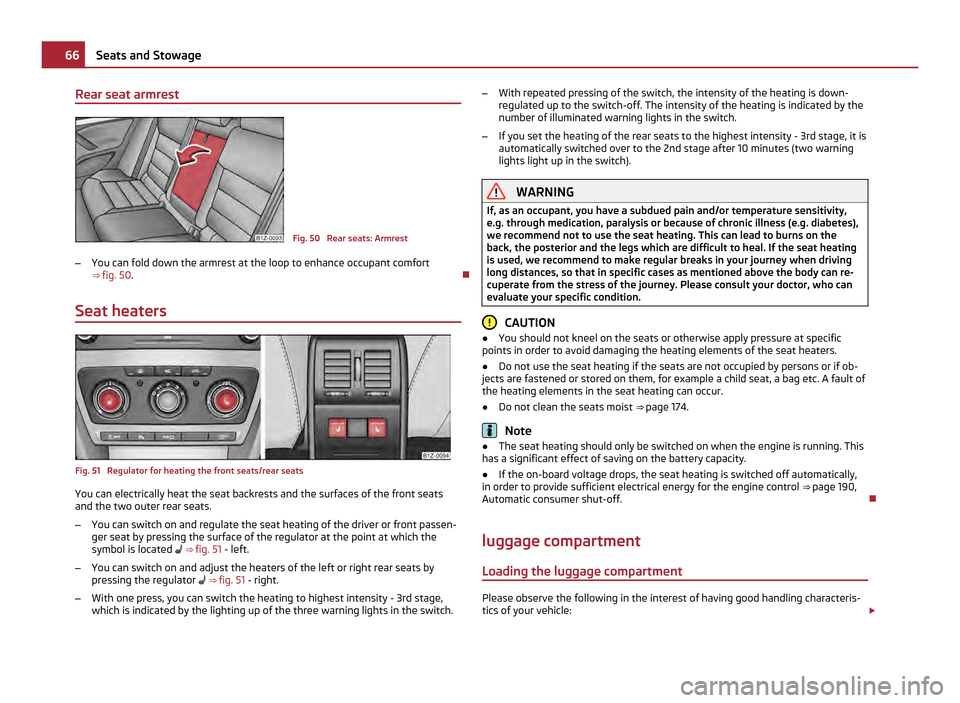
Rear seat armrest
Fig. 50 Rear seats: Armrest
– You can fold down the armrest at the loop to enhance occupant comfort
⇒ fig. 50 .
Seat heaters Fig. 51 Regulator for heating the front seats/rear seats
You can electrically heat the seat backrests and the surfaces of the front seats
and the two outer rear seats.
–
You can switch on and regulate the seat heating of the driver or front passen-
ger seat by pressing the surface of the regulator at the point at which the
symbol is located
⇒
fig. 51 - left.
– You can switch on and adjust the heaters of the left or right rear seats by
pressing the regulator
⇒ fig. 51 - right.
– With one press, you can switch the heating to highest intensity - 3rd stage,
which is indicated by the lighting up of the three warning lights in the switch. –
With repeated pressing of the switch, the intensity of the heating is down-
regulated up to the switch-off. The intensity of the heating is indicated by the
number of illuminated warning lights in the switch.
– If you set the heating of the rear seats to the highest intensity - 3rd stage, it is
automatically switched over to the 2nd stage after 10
minutes (two warning
lights light up in the switch). WARNING
If, as an occupant, you have a subdued pain and/or temperature sensitivity,
e.g. through medication, paralysis or because of chronic illness (e.g. diabetes),
we recommend not to use the seat heating. This can lead to burns on the
back, the posterior and the legs which are difficult to heal. If the seat heating
is used, we recommend to make regular breaks in your journey when driving
long distances, so that in specific cases as mentioned above the body can re-
cuperate from the stress of the journey. Please consult your doctor, who can
evaluate your specific condition. CAUTION
● You should not kneel on the seats or otherwise apply pressure at specific
points in order to avoid damaging the heating elements of the seat heaters.
● Do not use the seat heating if the seats are not occupied by persons or if ob-
jects are fastened or stored on them, for example a child seat, a bag etc. A fault of
the heating elements in the seat heating can occur.
● Do not clean the seats moist ⇒ page 174. Note
● The seat heating should only be switched on when the engine is running. This
has a significant effect of saving on the battery capacity.
● If the on-board voltage drops, the seat heating is switched off automatically,
in order to provide sufficient electrical energy for the engine control ⇒
page 190,
Automatic consumer shut-off.
luggage compartment
Loading the luggage compartment Please observe the following in the interest of having good handling characteris-
tics of your vehicle: £66
Seats and Stowage
Page 79 of 248
CAUTION
Always use matching plugs to avoid damaging the power socket. Note
● Connecting electrical components when the engine is not running will drain
the battery of the vehicle - risk of battery draining!
● Further information ⇒ page 197, Accessories, changes and replacement of
parts .
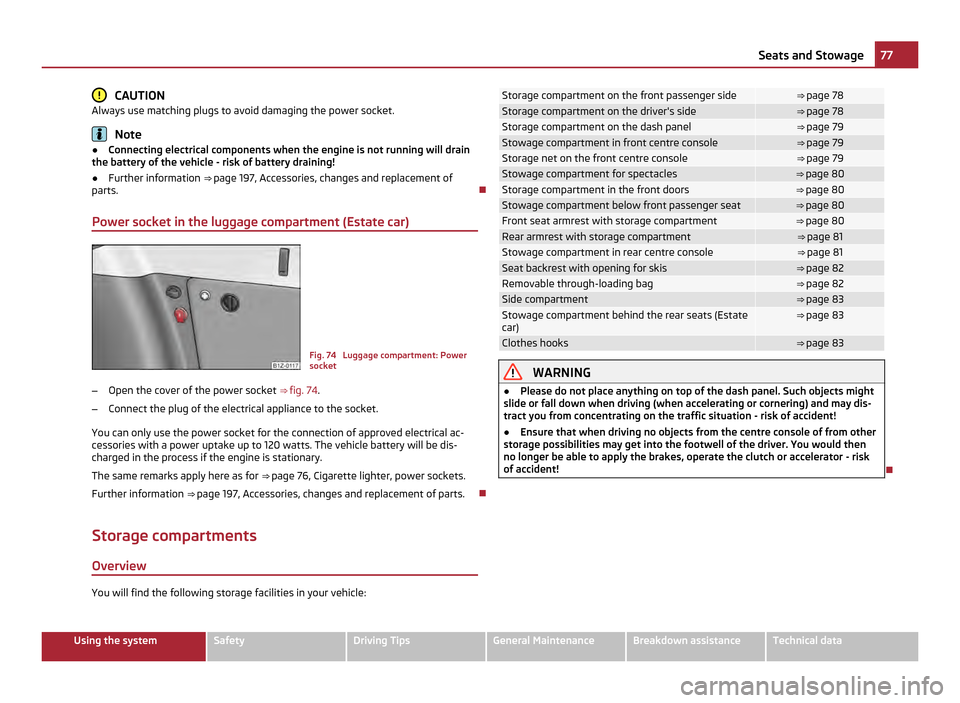
Power socket in the luggage compartment (Estate car) Fig. 74 Luggage compartment: Power
socket
– Open the cover of the power socket ⇒
fig. 74.
– Connect the plug of the electrical appliance to the socket.
You can only use the power socket for the connection of approved electrical ac-
cessories with a power uptake up to 120 watts. The vehicle battery will be dis-
charged in the process if the engine is stationary.
The same remarks apply here as for ⇒ page 76, Cigarette lighter, power sockets
.
Further information ⇒ page 197, Accessories, changes and replacement of parts.
Storage compartments Overview You will find the following storage facilities in your vehicle: Storage compartment on the front passenger side ⇒ page 78
Storage compartment on the driver's side ⇒ page 78
Storage compartment on the dash panel ⇒
page 79 Stowage compartment in front centre console ⇒
page 79 Storage net on the front centre console ⇒
page 79 Stowage compartment for spectacles ⇒ page 80
Storage compartment in the front doors ⇒ page 80
Stowage compartment below front passenger seat ⇒ page 80
Front seat armrest with storage compartment ⇒ page 80
Rear armrest with storage compartment ⇒
page 81 Stowage compartment in rear centre console ⇒
page 81 Seat backrest with opening for skis ⇒
page 82 Removable through-loading bag ⇒
page 82 Side compartment ⇒
page 83 Stowage compartment behind the rear seats (Estate
car) ⇒
page 83 Clothes hooks ⇒
page 83 WARNING
● Please do not place anything on top of the dash panel. Such objects might
slide or fall down when driving (when accelerating or cornering) and may dis-
tract you from concentrating on the traffic situation - risk of accident!
● Ensure that when driving no objects from the centre console of from other
storage possibilities may get into the footwell of the driver. You would then
no longer be able to apply the brakes, operate the clutch or accelerator - risk
of accident! 77
Seats and Stowage Using the system Safety Driving Tips General Maintenance Breakdown assistance Technical data
Page 87 of 248
Heating and air conditioning system
Introduction
Description and information The heating effect is dependent upon the coolant temperature, thus full heat out-
put only occurs when the engine has reached its operating temperature.
If the cooling system is switched on, the temperature and air humidity drops in
the vehicle. The well-being of the occupants of the car is enhanced as a result of
this particularly at high outside temperatures and a high air humidity. The system
prevents the windows misting up during the cold season of the year.
It is possible to briefly activate recirculated air mode in order to enhance the cool-
ing effect - air-conditioning system ⇒ page 90
, Climatronic ⇒ page 93.
The air inlet in front of the windscreen must be free of ice, snow or leaves in order
to ensure that the heating and cooling systems operate properly.
After switching on the cooling Condensation from the evaporator of the air condi-
tioning may drip down and form a puddle below the vehicle. This is quite normal
and not an indication of a leak! WARNING
● For your own safety and that of other road users, ensure that all the win-
dows are free of ice, snow and misting. Please familiarize yourself about how
to correctly operate the heating and ventilation systems, how to demist and
defrost the windows, as well as with the cooling mode.
● You should not leave recirculated air mode on over a longer period of time,
as
“stale” air may result in fatigue in the driver and occupants, divert your at-
tention and also cause the windows to mist up. The risk of having an accident
increases. Switch recirculated air mode off as soon as the windows begin
misting up. Note
● The used air streams out through the air removal openings in the luggage
compartment.
● We recommend that you do not smoke in the vehicle when the recirculating air
mode is operating since the smoke which is drawn at the evaporator from the in-
terior of the vehicle forms deposits in the evaporator of the air conditioning sys- tem. This produces a permanent odour when the air conditioning system is oper-
ating which can only be eliminated through considerable effort and expense (re-
placement of compressor).
● Please refer to the information regarding the recirculated air mode for heating
⇒
page 88 and/or for air-conditioning system ⇒ page 90 or Climatronic
⇒ page 93.
● To ensure the heating system, air conditioning system or Climatronic work per-
fectly, the air outlet vents must not be covered by any objects.
Using the air conditioning system economically The compressor on the air conditioning system uses power from the engine when
in cooling mode which will effect the fuel consumption.
It recommended to open the windows or the doors of a vehicle for which the inte-
rior has been strongly heated through the effect of direct sunlight in order to al-
low the heated air to escape.
The cooling system should not be switched on while travelling when the window
is open.
The desired interior temperature can also be achieved without switching in the
cooling system just by switching to fresh air mode. For the sake of the environment
When you economize on fuel, you also reduce pollutant emissions.
Operational problems If the cooling system does not operate at outside temperatures higher than +5 °C,
there is a problem in the system. The reasons for this may be:
●
The fuse on the air conditioning system has blown. Check the fuse, replace it if
necessary ⇒ page 211.
● The cooling system has switched off automatically for a short time because
the coolant temperature of the engine is too hot ⇒ page 11.
If you are not able to rectify the operational problem yourself, or if the cooling ca-
pacity decreases, switch the cooling system off. Contact a specialist garage. 85
Heating and air conditioning system Using the system Safety Driving Tips General Maintenance Breakdown assistance Technical data
Page 91 of 248
The cooling only operates if button
AC ⇒
fig. 94 1 is pressed, and the following
conditions are met:
● engine running,
● outside temperature above approx. +2 °C and
● blower switch switched on (positions 1 to 4).
Air at a temperature of about 5 °C may flow out of the vents under certain circum-
stances when the cooling system is operating. Lengthy and uneven distribution of
the air flow out of the vents and large differences in temperature, for example
when getting out of the vehicle, can result in chills in sensitive persons. Note
● We recommend that you have the air conditioning system cleaned by a spe-
cialist garage once every year.
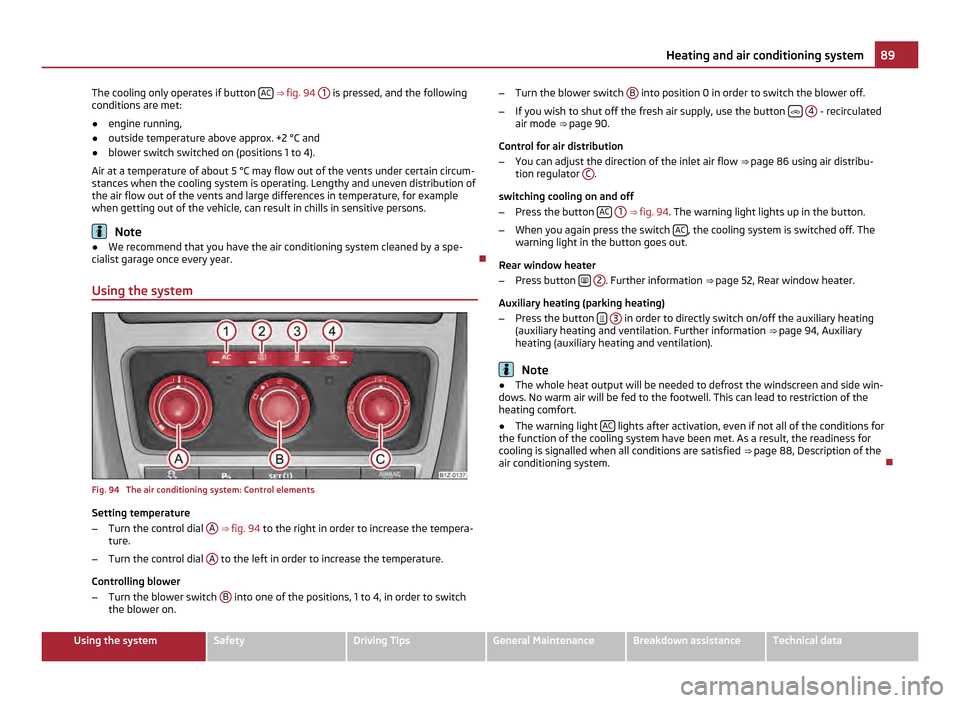
Using the system Fig. 94 The air conditioning system: Control elements
Setting temperature
–
Turn the control dial A
⇒
fig. 94 to the right in order to increase the tempera-
ture.
– Turn the control dial A to the left in order to increase the temperature.
Controlling blower
– Turn the blower switch B into one of the positions, 1 to 4, in order to switch
the blower on. –
Turn the blower switch B into position 0 in order to switch the blower off.
– If you wish to shut off the fresh air supply, use the button
4 - recirculated
air mode ⇒
page 90.
Control for air distribution
– You can adjust the direction of the inlet air flow ⇒
page 86 using air distribu-
tion regulator C .
switching cooling on and off
– Press the button AC
1 ⇒
fig. 94 . The warning light lights up in the button.
– When you again press the switch AC , the cooling system is switched off. The
warning light in the button goes out.
Rear window heater
– Press button
2 . Further information
⇒
page 52, Rear window heater.
Auxiliary heating (parking heating)
– Press the button
3 in order to directly switch on/off the auxiliary heating
(auxiliary heating and ventilation. Further information ⇒ page 94
, Auxiliary
heating (auxiliary heating and ventilation). Note
● The whole heat output will be needed to defrost the windscreen and side win-
dows. No warm air will be fed to the footwell. This can lead to restriction of the
heating comfort.
● The warning light AC lights after activation, even if not all of the conditions for
the function of the cooling system have been met. As a result, the readiness for
cooling is signalled when all conditions are satisfied ⇒
page 88, Description of the
air conditioning system. 89
Heating and air conditioning system Using the system Safety Driving Tips General Maintenance Breakdown assistance Technical data
Page 93 of 248
WARNING
You should not leave recirculated air mode on over a longer period of time, as
“stale ” air may result in fatigue in the driver and occupants, divert your atten-
tion and also cause the windows to mist up. The risk of having an accident in-
creases. Switch recirculated air mode off as soon as the windows begin mist-
ing up.
Climatronic (automatic air conditioning) Description The Climatronic system is an automatic heating, fresh air and cool-
ing system which provides optimal comfort for the occupants of the
car.
The Climatronic maintains fully automatically a convenience temperature. This is
achieved by automatically varying the temperature of the outflowing air, the
blower stages and the air distribution. The system also takes into account sun-
light which eliminates the need to alter the settings manually. The automatic
mode
⇒
page 92 ensures maximum well-being of the occupants at all times of
the year.
Description of Climatronic system
The cooling operates only if the following conditions are met:
● engine running,
● outside temperature above approx. +2 °C,
● AC switched on.
The AC compressor is switched off at a high coolant temperature in order to pro-
vide cooling at a high load of the engine.
Recommended setting for all periods of the year:
● Set the desired temperature, we recommend 22 °C.
● Press the button AUTO
⇒ fig. 95 .
● Move the air outlet vents 3 and 4 so that the air flow is directed slightly up-
wards. Note
● We recommend that you have Climatronic cleaned by a specialist garage once
every year.
● On vehicles equipped with a factory-fitted radio or radio navigation system,
the information of the Climatronic is also shown on the display. This function can
be switched off, see operating instructions of the radio or the radio navigation
system.
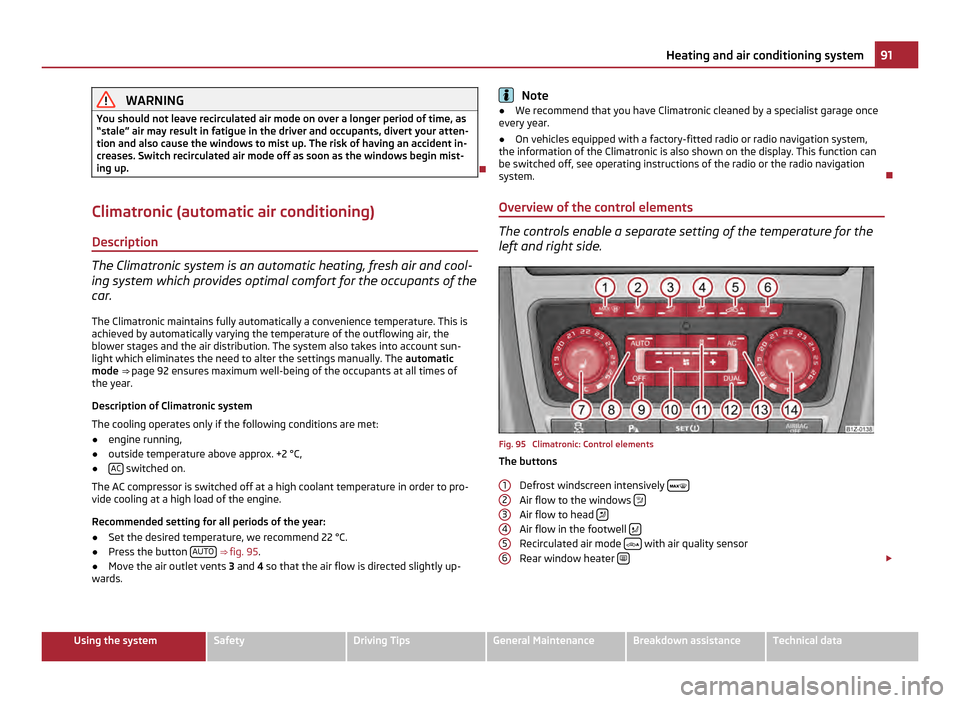
Overview of the control elements The controls enable a separate setting of the temperature for the
left and right side.
Fig. 95 Climatronic: Control elements
The buttons
Defrost windscreen intensively Air flow to the windows
Air flow to head
Air flow in the footwell
Recirculated air mode
with air quality sensor
Rear window heater £
1 2
3
4
5
6 91
Heating and air conditioning system Using the system Safety Driving Tips General Maintenance Breakdown assistance Technical data
Page 96 of 248
Auxiliary heating (auxiliary heating and ventilation)
Description and important information The auxiliary heating (auxiliary heating and ventilation) heats or
supplies the interior of the vehicle with fresh air independent of the
engine.
Auxiliary heating (parking heating)
The auxiliary heater (parking heater) functions in connection with the air-condi-
tioning system or Climatronic.
It can be used when stationary, when engine is switched off for preheating of the
vehicle as well as while driving (e.g. during the heating phase of the engine).
The engine is also preheated when the vehicle is stationary and the engine is
switched off, if the auxiliary heating is switched on.
The auxiliary heating (parking heating) warms up the coolant during the combus-
tion of fuel from the vehicle tank. The coolant warms up the air, which (if the
blower speed is not set to zero) flows into the occupant compartment.
Auxiliary ventilation
The auxiliary ventilation enables fresh air to flow into the vehicle interior by
switching off the engine, whereby the interior temperature is effectively de-
creased (e.g. with the vehicle parked in the sun). WARNING
● The auxiliary heating must never be operated in closed rooms - risk of poi-
soning!
● The auxiliary heating must not be running during refueling - risk of fire.
● The exhaust pipe of the auxiliary heating is located on the underside of
the vehicle. Therefore do not place the vehicle, if you wish to operate the aux-
iliary heating, in such a way that the exhaust gases of the auxiliary heating
can come easily into contact with inflammable materials (e.g. dry grass) or
easily inflammable substances (e.g. fuel run out). Note
If the auxiliary heating runs, the fuel consumption comes from the vehicle tank.
The auxiliary heating automatically controls the filling level in the fuel tank. If only
a low quantity of fuel is present in the fuel tank, the function of the auxiliary heat-
ing is blocked.
● The exhaust pipe of the auxiliary heating, which is located on the underside of
the vehicle, must not be clogged and the exhaust flow must not be blocked.
● If the auxiliary heating and ventilation is running, the vehicle battery discharg-
es. If the auxiliary heating and ventilation has been operated several times over a
longer period, the vehicle must be driven a few kilometers in order to recharge the
vehicle battery.
● The auxiliary heating only switches the blower on, if it has achieved a coolant
temperature of approx. 50 °C.
● At low outside temperatures, this can result in a formation of water vapour in
the area of the engine compartment. This is quite normal and is not an operating
problem.
● After switching off the auxiliary heating, the coolant pump runs for a short pe-
riod.
● The auxiliary heating and ventilation does not switch on or comes on, if the
vehicle battery indicates a low loading state ⇒
page 190, Automatic consumer
shut-off.
● The auxiliary heating (parking heating) does not switch on, if the following was
shown in the information display or before switching off the ignition: Please re-
fuel!
● The air inlet in front of the windscreen must be free of ice, snow or leaves in
order to ensure that the auxiliary heating operates properly.
● So that warm air can flow into the vehicle interior after switching on the auxili-
ary heating, you must maintain the comfort temperature normally selected by you
and leave the air outlet vents in an open position. It is recommended to put the air
flow in the position or . 94
Heating and air conditioning system
Page 100 of 248
Starting-off and Driving
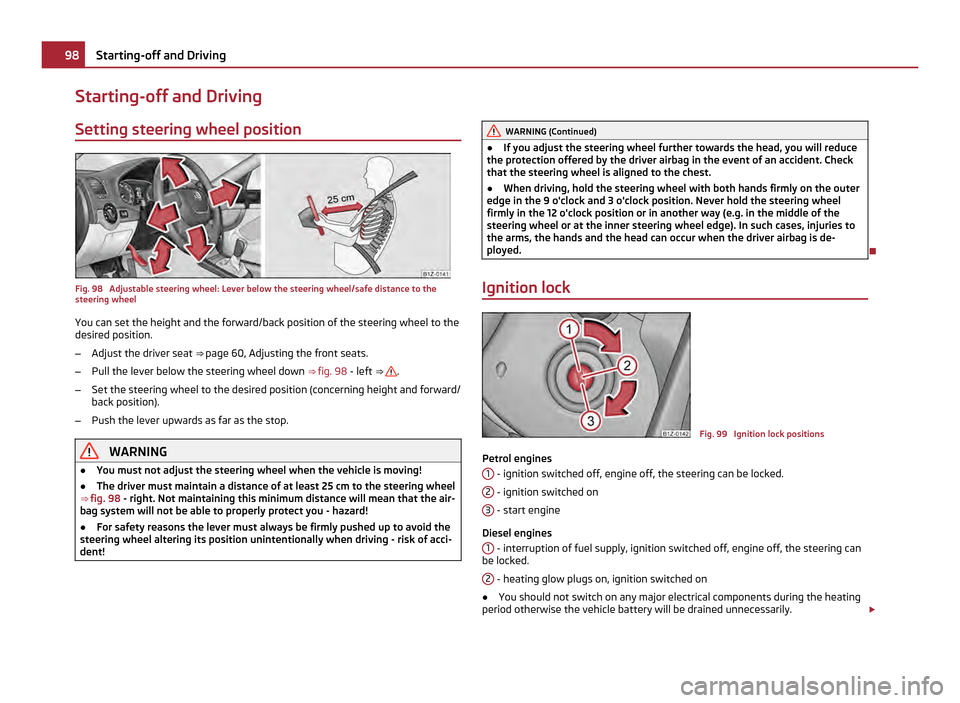
Setting steering wheel position Fig. 98 Adjustable steering wheel: Lever below the steering wheel/safe distance to the
steering wheel
You can set the height and the forward/back position of the steering wheel to the
desired position.
– Adjust the driver seat ⇒ page 60, Adjusting the front seats.
– Pull the lever below the steering wheel down ⇒ fig. 98 - left ⇒
.
– Set the steering wheel to the desired position (concerning height and forward/
back position).
– Push the lever upwards as far as the stop. WARNING
● You must not adjust the steering wheel when the vehicle is moving!
● The driver must maintain a distance of at least 25 cm to the steering wheel
⇒ fig. 98 - right. Not maintaining this minimum distance will mean that the air-
bag system will not be able to properly protect you - hazard!
● For safety reasons the lever must always be firmly pushed up to avoid the
steering wheel altering its position unintentionally when driving - risk of acci-
dent! WARNING (Continued)
● If you adjust the steering wheel further towards the head, you will reduce
the protection offered by the driver airbag in the event of an accident. Check
that the steering wheel is aligned to the chest.
● When driving, hold the steering wheel with both hands firmly on the outer
edge in the 9 o'clock and 3 o'clock position. Never hold the steering wheel
firmly in the 12 o'clock position or in another way (e.g. in the middle of the
steering wheel or at the inner steering wheel edge). In such cases, injuries to
the arms, the hands and the head can occur when the driver airbag is de-
ployed.
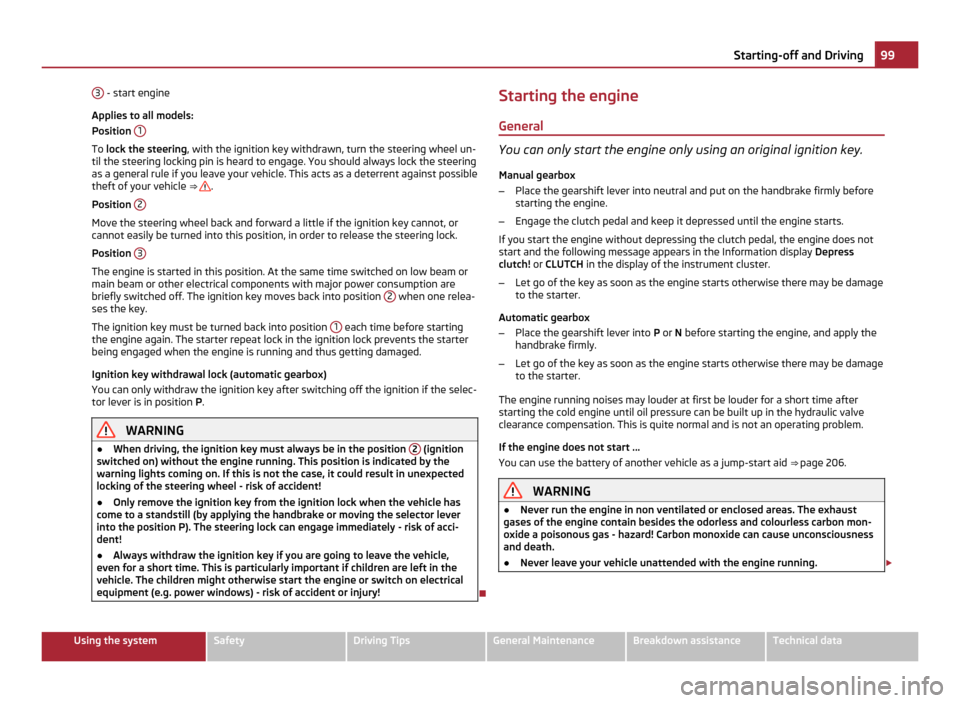
Ignition lock Fig. 99 Ignition lock positions
Petrol engines 1 - ignition switched off, engine off, the steering can be locked.
2 - ignition switched on
3 - start engine
Diesel engines 1 - interruption of fuel supply, ignition switched off, engine off, the steering can
be locked.
2 - heating glow plugs on, ignition switched on
● You should not switch on any major electrical components during the heating
period otherwise the vehicle battery will be drained unnecessarily. £98
Starting-off and Driving
Page 101 of 248
3
- start engine
Applies to all models:
Position 1 To
lock the steering , with the ignition key withdrawn, turn the steering wheel un-
til the steering locking pin is heard to engage. You should always lock the steering
as a general rule if you leave your vehicle. This acts as a deterrent against possible
theft of your vehicle ⇒ .
Position 2 Move the steering wheel back and forward a little if the ignition key cannot, or
cannot easily be turned into this position, in order to release the steering lock.
Position
3 The engine is started in this position. At the same time switched on low beam or
main beam or other electrical components with major power consumption are
briefly switched off. The ignition key moves back into position
2 when one relea-
ses the key.
The ignition key must be turned back into position 1 each time before starting
the engine again. The starter repeat lock in the ignition lock prevents the starter
being engaged when the engine is running and thus getting damaged.
Ignition key withdrawal lock (automatic gearbox)
You can only withdraw the ignition key after switching off the ignition if the selec-
tor lever is in position P.WARNING
● When driving, the ignition key must always be in the position 2 (ignition
switched on) without the engine running. This position is indicated by the
warning lights coming on. If this is not the case, it could result in unexpected
locking of the steering wheel - risk of accident!
● Only remove the ignition key from the ignition lock when the vehicle has
come to a standstill (by applying the handbrake or moving the selector lever
into the position
P). The steering lock can engage immediately - risk of acci-
dent!
● Always withdraw the ignition key if you are going to leave the vehicle,
even for a short time. This is particularly important if children are left in the
vehicle. The children might otherwise start the engine or switch on electrical
equipment (e.g. power windows) - risk of accident or injury! Starting the engine
General You can only start the engine only using an original ignition key.
Manual gearbox
– Place the gearshift lever into neutral and put on the handbrake firmly before
starting the engine.
– Engage the clutch pedal and keep it depressed until the engine starts.
If you start the engine without depressing the clutch pedal, the engine does not
start and the following message appears in the Information display Depress
clutch! or CLUTCH in the display of the instrument cluster.
– Let go of the key as soon as the engine starts otherwise there may be damage
to the starter.
Automatic gearbox
– Place the gearshift lever into P or N before starting the engine, and apply the
handbrake firmly.
– Let go of the key as soon as the engine starts otherwise there may be damage
to the starter.
The engine running noises may louder at first be louder for a short time after
starting the cold engine until oil pressure can be built up in the hydraulic valve
clearance compensation. This is quite normal and is not an operating problem.
If the engine does not start ...
You can use the battery of another vehicle as a jump-start aid ⇒
page 206. WARNING
● Never run the engine in non ventilated or enclosed areas. The exhaust
gases of the engine contain besides the odorless and colourless carbon mon-
oxide a poisonous gas - hazard! Carbon monoxide can cause unconsciousness
and death.
● Never leave your vehicle unattended with the engine running. £ 99
Starting-off and Driving Using the system Safety Driving Tips General Maintenance Breakdown assistance Technical data