fuel pressure SKODA OCTAVIA 2011 2.G / (1Z) Owner's Manual
[x] Cancel search | Manufacturer: SKODA, Model Year: 2011, Model line: OCTAVIA, Model: SKODA OCTAVIA 2011 2.G / (1Z)Pages: 248, PDF Size: 3.79 MB
Page 6 of 248
Head airbags . . . . . . . . . . . . . . . . . . . . . . . . . . . . . . . . . . . . . . 144
Deactivating an airbag . . . . . . . . . . . . . . . . . . . . . . . . . . . . . 145
Transporting children safely . . . . . . . . . . . . . . . . . . . . . . 147
What you should know about transporting children! . 147
Child seat . . . . . . . . . . . . . . . . . . . . . . . . . . . . . . . . . . . . . . . . . 149
Attaching a child seat using the “ISOFIX” system . . . . 152
Attaching child seat using the “Top Tether” system . . 153
Driving Tips . . . . . . . . . . . . . . . . . . . . . . . . . . . . . . . . . . . 154
Intelligent Technology . . . . . . . . . . . . . . . . . . . . . . . . . . . . 154
General information . . . . . . . . . . . . . . . . . . . . . . . . . . . . . . . 154
Electronic stability programme (ESP) . . . . . . . . . . . . . . . . 154
Brakes . . . . . . . . . . . . . . . . . . . . . . . . . . . . . . . . . . . . . . . . . . . . 157
Brake booster . . . . . . . . . . . . . . . . . . . . . . . . . . . . . . . . . . . . . 158
Antilock brake system (ABS) . . . . . . . . . . . . . . . . . . . . . . . . 158
Brake Assist . . . . . . . . . . . . . . . . . . . . . . . . . . . . . . . . . . . . . . . 158
Uphill Start Assist . . . . . . . . . . . . . . . . . . . . . . . . . . . . . . . . . 159
Electromechanical power steering . . . . . . . . . . . . . . . . . . 159
Tyre pressure monitoring system . . . . . . . . . . . . . . . . . . . 159
Diesel particle filter (diesel engine) . . . . . . . . . . . . . . . . . 160
Driving and the Environment . . . . . . . . . . . . . . . . . . . . . 161
The first 1 500 kilometres and afterwards . . . . . . . . . . . 161
Catalytic converter . . . . . . . . . . . . . . . . . . . . . . . . . . . . . . . . . 161
Driving in an economical and environmentally
conscious manner . . . . . . . . . . . . . . . . . . . . . . . . . . . . . . . . . 162
Environmental compatibility . . . . . . . . . . . . . . . . . . . . . . . . 165
Motoring abroad . . . . . . . . . . . . . . . . . . . . . . . . . . . . . . . . . . . 166
Avoiding damage to your vehicle . . . . . . . . . . . . . . . . . . . 166
Driving through bodies of water on roads . . . . . . . . . . . 166
Towing a trailer . . . . . . . . . . . . . . . . . . . . . . . . . . . . . . . . . . . . 168
Technical requirements . . . . . . . . . . . . . . . . . . . . . . . . . . . . 168
General Maintenance . . . . . . . . . . . . . . . . . . . . . . . . . . . . . . 168
Driving Tips . . . . . . . . . . . . . . . . . . . . . . . . . . . . . . . . . . . . . . . 169 General Maintenance
. . . . . . . . . . . . . . . . . . . . . 170
Taking care of your vehicle and cleaning the
vehicle . . . . . . . . . . . . . . . . . . . . . . . . . . . . . . . . . . . . . . . . . . . . . . 170
General . . . . . . . . . . . . . . . . . . . . . . . . . . . . . . . . . . . . . . . . . . . 170
Care of the exterior of vehicle . . . . . . . . . . . . . . . . . . . . . . 170
Care of the interior of vehicle . . . . . . . . . . . . . . . . . . . . . . . 174
Fuel . . . . . . . . . . . . . . . . . . . . . . . . . . . . . . . . . . . . . . . . . . . . . . . . . 176
Petrol . . . . . . . . . . . . . . . . . . . . . . . . . . . . . . . . . . . . . . . . . . . . . 176
Biofuel Ethanol E85 . . . . . . . . . . . . . . . . . . . . . . . . . . . . . . . . 177
Diesel . . . . . . . . . . . . . . . . . . . . . . . . . . . . . . . . . . . . . . . . . . . . . 178
Refuelling . . . . . . . . . . . . . . . . . . . . . . . . . . . . . . . . . . . . . . . . . 178
Inspecting and Replenishing . . . . . . . . . . . . . . . . . . . . . . 180
Engine compartment . . . . . . . . . . . . . . . . . . . . . . . . . . . . . . 180
Engine oil . . . . . . . . . . . . . . . . . . . . . . . . . . . . . . . . . . . . . . . . . 182
Cooling system . . . . . . . . . . . . . . . . . . . . . . . . . . . . . . . . . . . . 184
Brake fluid . . . . . . . . . . . . . . . . . . . . . . . . . . . . . . . . . . . . . . . . 186
Battery . . . . . . . . . . . . . . . . . . . . . . . . . . . . . . . . . . . . . . . . . . . 187
Windshield washer system . . . . . . . . . . . . . . . . . . . . . . . . . 190
Wheels and Tyres . . . . . . . . . . . . . . . . . . . . . . . . . . . . . . . . . . 192
Wheels . . . . . . . . . . . . . . . . . . . . . . . . . . . . . . . . . . . . . . . . . . . 192
Accessories, changes and replacement of parts . 197
General . . . . . . . . . . . . . . . . . . . . . . . . . . . . . . . . . . . . . . . . . . . 197
Breakdown assistance . . . . . . . . . . . . . . . . . . . 198
Breakdown assistance . . . . . . . . . . . . . . . . . . . . . . . . . . . . 198
First-aid box and Warning triangle (Octavia) . . . . . . . . . 198
First-aid box and warning triangle (Estate car) . . . . . . . 198
Fire extinguisher . . . . . . . . . . . . . . . . . . . . . . . . . . . . . . . . . . 198
Vehicle tool kit . . . . . . . . . . . . . . . . . . . . . . . . . . . . . . . . . . . . 199
Spare wheel . . . . . . . . . . . . . . . . . . . . . . . . . . . . . . . . . . . . . . . 199
Changing a wheel . . . . . . . . . . . . . . . . . . . . . . . . . . . . . . . . . 200
Tyre repair kit . . . . . . . . . . . . . . . . . . . . . . . . . . . . . . . . . . . . . 204
Jump-starting . . . . . . . . . . . . . . . . . . . . . . . . . . . . . . . . . . . . . 206
Towing the vehicle . . . . . . . . . . . . . . . . . . . . . . . . . . . . . . . . 208
Fuses and light bulbs . . . . . . . . . . . . . . . . . . . . . . . . . . . . . . 211
Electric fuses . . . . . . . . . . . . . . . . . . . . . . . . . . . . . . . . . . . . . . 211
Bulbs . . . . . . . . . . . . . . . . . . . . . . . . . . . . . . . . . . . . . . . . . . . . . 214 Technical data
. . . . . . . . . . . . . . . . . . . . . . . . . . . . . . . 221
Technical data . . . . . . . . . . . . . . . . . . . . . . . . . . . . . . . . . . . . . 221
General information . . . . . . . . . . . . . . . . . . . . . . . . . . . . . . . 221
Used abbreviations . . . . . . . . . . . . . . . . . . . . . . . . . . . . . . . . 221
Performances . . . . . . . . . . . . . . . . . . . . . . . . . . . . . . . . . . . . . 221
Weight . . . . . . . . . . . . . . . . . . . . . . . . . . . . . . . . . . . . . . . . . . . . 221
Identification details . . . . . . . . . . . . . . . . . . . . . . . . . . . . . . . 222
Fuel consumption according to the ECE standards and
EU guidelines
. . . . . . . . . . . . . . . . . . . . . . . . . . . . . . . . . . . . . 222
Dimensions . . . . . . . . . . . . . . . . . . . . . . . . . . . . . . . . . . . . . . . 223
Engine oil specifications . . . . . . . . . . . . . . . . . . . . . . . . . . . 224
Engine 1.2 l/77 kW TSI - EU5 . . . . . . . . . . . . . . . . . . . . . . . . 226
Engine 1.4 l/59 kW - EU4, EU5 . . . . . . . . . . . . . . . . . . . . . . 227
Engine 1.4 l/90 kW TSI - EU5 . . . . . . . . . . . . . . . . . . . . . . . . 228
Engine 1.6 l/75 kW - EU2, EU4, EU5 . . . . . . . . . . . . . . . . . . 229
Engine 1.8 l/112 kW TSI - EU5, EU2 DDK . . . . . . . . . . . . . . 230
Engine 1.8 l/118 kW TSI - EU5, EU2 DDK . . . . . . . . . . . . . . 231
Engine 2.0 l/147 kW TSI - EU5, EU2 DDK . . . . . . . . . . . . . 232
Engine 1.6 l/77 kW TDI CR - EU5 . . . . . . . . . . . . . . . . . . . . . 233
Engine 1.9 l/77 kW TDI PD - EU4 . . . . . . . . . . . . . . . . . . . . 234
Engine 2.0 l/81 kW TDI CR - EU4, EU5 . . . . . . . . . . . . . . . 235
Engine 2.0 l/103 kW TDI CR - EU4, EU5 . . . . . . . . . . . . . . 236
Engine 2.0 l/125 kW TDI CR - EU5 . . . . . . . . . . . . . . . . . . . 237
Multi-purpose vehicles (AF) . . . . . . . . . . . . . . . . . . . . . . . . 238
Index . . . . . . . . . . . . . . . . . . . . . . . . . . . . . . . . . . . . . . . . . . . . . 2394
Table of Contents
Page 24 of 248
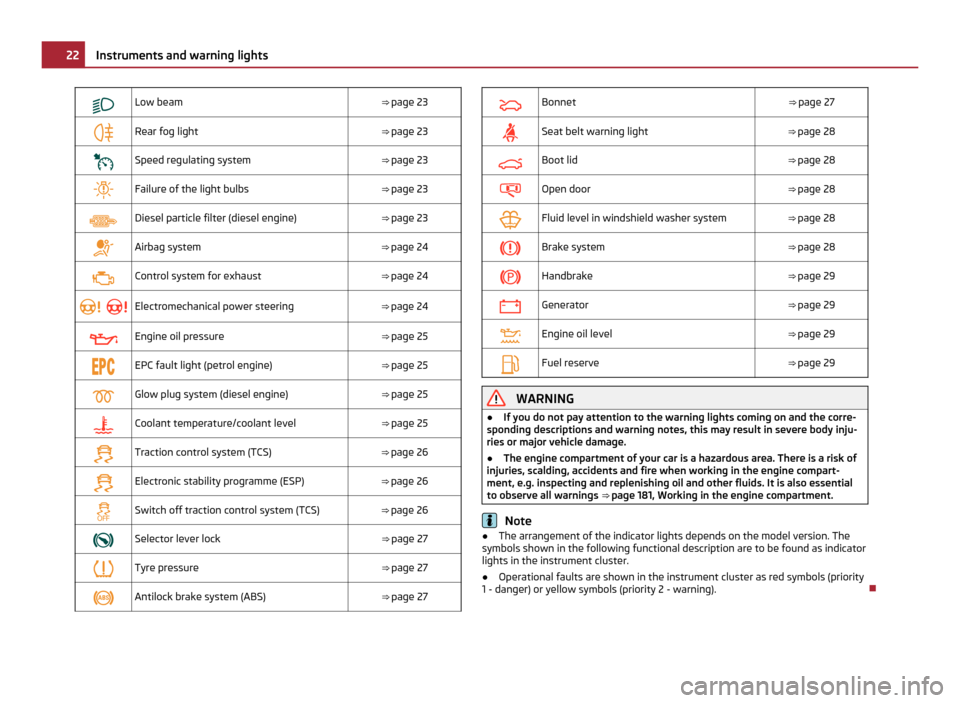
Low beam
⇒ page 23
Rear fog light
⇒ page 23
Speed regulating system
⇒ page 23
Failure of the light bulbs
⇒ page 23
Diesel particle filter (diesel engine)
⇒ page 23
Airbag system
⇒ page 24
Control system for exhaust
⇒ page 24
Electromechanical power steering
⇒ page 24
Engine oil pressure
⇒ page 25
EPC fault light (petrol engine)
⇒ page 25
Glow plug system (diesel engine)
⇒ page 25
Coolant temperature/coolant level
⇒ page 25
Traction control system (TCS)
⇒ page 26
Electronic stability programme (ESP)
⇒ page 26
Switch off traction control system (TCS)
⇒ page 26
Selector lever lock
⇒ page 27
Tyre pressure
⇒ page 27
Antilock brake system (ABS)
⇒ page 27
Bonnet
⇒ page 27
Seat belt warning light
⇒ page 28
Boot lid
⇒ page 28
Open door
⇒ page 28
Fluid level in windshield washer system
⇒ page 28
Brake system
⇒ page 28
Handbrake
⇒ page 29
Generator
⇒ page 29
Engine oil level
⇒ page 29
Fuel reserve
⇒ page 29 WARNING
● If you do not pay attention to the warning lights coming on and the corre-
sponding descriptions and warning notes, this may result in severe body inju-
ries or major vehicle damage.
● The engine compartment of your car is a hazardous area. There is a risk of
injuries, scalding, accidents and fire when working in the engine compart-
ment, e.g. inspecting and replenishing oil and other fluids. It is also essential
to observe all warnings ⇒
page 181, Working in the engine compartment. Note
● The arrangement of the indicator lights depends on the model version. The
symbols shown in the following functional description are to be found as indicator
lights in the instrument cluster.
● Operational faults are shown in the instrument cluster as red symbols (priority
1 - danger) or yellow symbols (priority 2 - warning). 22
Instruments and warning lights
Page 27 of 248
Engine oil pressure
The warning light
comes on for a few seconds 1)
when the ignition is switched
on.
Stop the vehicle and switch the engine off if the warning light does not go off
after the engine has started or flashes while driving. Check the oil level and top up
with oil as necessary ⇒ page 183
, Replenishing engine oil.
An audible signal sounds three times as an additional warning signal.
Do not continue your journey if for some reason it is not possible under the con-
ditions prevailing to top up with oil. Keep the engine switched off and obtain pro-
fessional assistance from a specialist garage, otherwise it could lead to severe en-
gine damage.
Do not drive any further if the warning light flashes even if the oil is at the correct
level. Do not run the engine not at idling speed either. Contact the nearest spe-
cialist garage to obtain professional assistance.
The following text will be displayed in the information display:
Oil Pressure: Engine off! Owner's manual Switch off the engine! Car docu-
mentation! WARNING
● If you must stop for technical reasons, then park the vehicle at a safe dis-
tance from the traffic and switch off the engine and switch on the hazard
warning light system.
● The red oil pressure light is not an oil level indicator! One should there-
fore check the oil level at regular intervals, preferably after every refueling
stop.
EPC fault light
(petrol engine) The
(Electronic Power Control) warning light comes on for a few seconds when
the ignition is switched on. If the warning light
does not go out or lights up after starting the engine, a
fault exists in the engine control. The engine management system selects an
emergency programme which enables you to drive to the nearest specialist ga-
rage by adopting a gentle style of driving.
Glow plug system (diesel engine) The warning light
lights up for a cold
engine when switching on the ignition
(pre-heat position) 2 ⇒ page 98. Start the engine after the indicator light goes
out.
The glow plug indicator light will come on for about 1 second if the engine is at a
normal operating temperature or if the outside temperature is above +5 °C. This
means that you can start the engine right away.
There is a fault in the glow plug system if the warning light does not come on
or lights up continuously ; contact a specialist garage as soon as possible to ob-
tain assistance.
If the warning light begins to flash while driving, a fault exists in the engine
control. The engine management system selects an emergency programme which
enables you to drive to the nearest specialist garage by adopting a gentle style of
driving.
Coolant temperature/ Coolant quantity The warning light
comes on for a few seconds 2)
when the ignition is switched
on.
The coolant temperature is too high or the coolant level too low if the warning
light
does not go out or flashes while driving.
3 peeps sound as an additional warning signal.
In this case stop and switch the engine off and check the coolant level; top up
the coolant as necessary. £1)
The warning light on vehicles fitted with information display does not come on after switching
the ignition on, but only if a fault exists or the engine oil level is too low.
2) The warning light on vehicles fitted with information display does not come on after switching the
ignition on, but only if the coolant temperature is too high or the coolant level is too low. 25
Instruments and warning lights Using the system Safety Driving Tips General Maintenance Breakdown assistance Technical data
Page 57 of 248
CAUTION
● In cold temperatures and in winter, check before the trip or before switching
on the ignition that the wiper blades are not frozen. Switching on windscreen
wipers when the blades are frozen to the windscreen may result in damage both
to the blades and the motor of the windscreen wipers!
● If you switch off the ignition while the windscreen wipers are on, the wipers
will sweep in the same mode the next time the ignition is switched on. At low
temperatures, the wipers may freeze to the window between switching off the ig-
nition and the next time you switch the ignition on again.
● Carefully detach frozen wiper blades from the front or rear window.
● Remove snow and ice from the window wipers before driving. Note
● If the slower 2 or the faster
3 wiper setting is switched on
⇒ fig. 37 and the
vehicle speed decreases to below 4 km/h, the lower wiper step is switched on au-
tomatically. At a speed increase of more than 8 km/h the previous wiper setting is
established again.
● If there is an obstacle on the windscreen, the wiper will try to push away the
obstacle. If the obstacle continues to block the wiper, the wiper stops automati-
cally after 5 attempts to eliminate the obstacle, in order to avoid a damage to the
wiper. Remove the obstacle and and switch on the wiper again.
● The windscreen washer nozzles for the windscreen are heated when the en-
gine is running and the outside temperature is less than +10
°C.
● The content of the windscreen wiper reservoir is 3 litres. On vehicles which are
equipped with a headlight cleaning system, the content of the reservoir is 5.5
li-
tres. On vehicles fitted with auxiliary heating, the content of the windscreen wiper
reservoir is 4.5 litres.
Automatic rear window wiper (Estate car) If the windshield wiper is in positions
2
⇒ fig. 37 or 3 the rear view window is
wiped every 30/10 seconds if the vehicle's speed exceeds 5 km/h.
When the rain sensor is active (the lever is in the position 1 ) the function is only
active if the front window wipers continue to operate (no break between each
wiping process). Activation/deactivation
The function of the automatic rear window wiper is activated/deactivated in the
information display in the menu:
■ Settings
■ Lights & Vision
■ Rear wiper Note
The function of the automatic rear window wiper is only valid for Estate car vehi-
cles which are equipped with an information display. The function is activated in
the factory.
Headlight cleaning system The headlights are being cleaned after the windscreen has been sprayed for the
first time and fifth time, the low beam or main beam are switched on and the
windscreen wiper lever was held in the position 5
⇒ fig. 37 for about 1 second.
The headlight washer nozzles are moved forward out of the bumper by the water
pressure for cleaning the headlights.
You should remove stubborn dirt (such as insect residues) from the headlight len-
ses at regular intervals, for example when refuelling. Please refer to the following
guidelines ⇒
page 172, The headlight lenses.
You should remove any snow from the fixtures of the washer nozzles and clear ice
in winter with a de-icing spray in order to ensure proper operation of the cleaning
system. CAUTION
Never remove the nozzles from the headlamp cleaning system by hand - risk of
damage! 55
Lights and Visibility Using the system Safety Driving Tips General Maintenance Breakdown assistance Technical data
Page 110 of 248
Automatic gearbox
Information for driving with the 6-speed automatic
gearbox The maximum speed is reached in the 5th gear. The 6th gear serves as an eco-
nomic driving programme, which is intended to reduce the fuel consumption.
Shifting up and down through the gears is performed automatically. You can also,
however, switch the gearbox over into the Tiptronic mode. This mode makes it
possible for you to also shift gears manually ⇒ page 112.
Starting-off and Driving
– Depress the brake pedal fully and keep it depressed.
– Press the Shiftlock button (button in handle of the selector lever), move the
selector lever into the desired position, e.g. D ⇒ page 110, and then release
the Shiftlock button.
– Wait a moment until the gearbox has shifted (a slight engagement nudge can
be felt).
– Release the brake pedal and depress the accelerator ⇒ .
Stop
– The selector lever position N does not have to be selected when stopping just
for a short time, such as at a cross roads. It is absolutely sufficient to hold the
stopped vehicle stationary by depressing the foot brake. The engine can, how-
ever, be allowed just to idle.
Parking
– Depress the brake pedal and hold it depressed.
– Apply the handbrake firmly.
– Press and Shiftlock button in the selector lever, move the selector lever to P
and then release the Shiftlock button.
The engine can only be started when the selector lever is in position P or N . If the
selector lever is not in the P or N positions when locking the steering, switching
the ignition on or off or when leaving the engine on, the following message will
appear in the Information display Move selector lever to position P/N! or, in the
instrument cluster display: P/N. It is sufficient to engage selector lever position
P when parking on a flat surface.
When parking on a slope you should first apply the handbrake firmly and then
move the selector lever into position P. This is to ensure that there is no excessive
pressure acting on the lock mechanism and that it is easier to subsequently move
the selector lever out of position P. If the selector lever is not in the P positin
when the driver's door is open and the ignition is switched off, or if it is not in the
P position when the ignition is switched off and the driver's door is opened, the
following message will appear in the Information display: Move selector lever to
position P! or, in the instrument cluster display: P. The message disappears af-
ter a few seconds by switching on the ignition or by moving the selector lever into
the position P .
If the selector lever position N is selected by accident while driving it is first nec-
essary to release pressure on the accelerator pedal and wait for idling speed of
the engine to be reached before engaging a drive position in the selector lever. WARNING
● Do not depress the accelerator when changing the position of the selector
lever if the car is stationary and the engine is running - risk of accident!
● Never move the selector lever into position R or P when driving - risk of an
accident!
● When the engine is running and the vehicle is stationary, it is necessary to
hold the car with the brake pedal in all the positions of the selector lever (ex-
cept P and N) since the power transmission is never completely interrupted,
also not when the engine is idling - the vehicle creeps.
Information for driving with the automatic gearbox
DSG The abbreviation DSG means Direct shift gearbox (Direct shift gear-
box).
Two independent clutches are needed for the power transmission between the
engine and the gearbox. These replace the torque converter of the conventional
automatic gearbox. Their shifting is matched in such a way that there are no jerks
when shifting the gear and the power transmission of the engine to the front
wheels is not interrupted. Shifting up and down through the gears is performed £108
Automatic gearbox
Page 156 of 248
Driving Tips
Intelligent Technology General information WARNING
Lack of fuel can cause irregular engine running or lead to shut down the en-
gine. Consequently, the systems described in this chapter may to lose their ef-
fectiveness, resulting in loss of vehicle control – risk of accident!
Electronic stability programme (ESP)
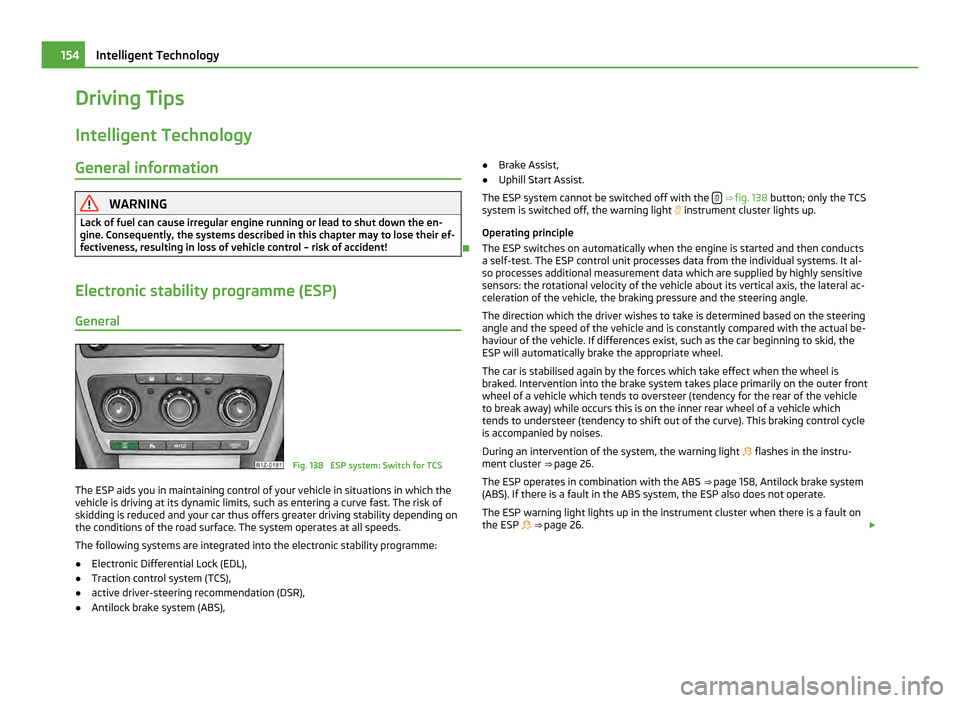
General Fig. 138 ESP system: Switch for TCS
The ESP aids you in maintaining control of your vehicle in situations in which the
vehicle is driving at its dynamic limits, such as entering a curve fast. The risk of
skidding is reduced and your car thus offers greater driving stability depending on
the conditions of the road surface. The system operates at all speeds.
The following systems are integrated into the electronic stability programme:
● Electronic Differential Lock (EDL),
● Traction control system (TCS),
● active driver-steering recommendation (DSR),
● Antilock brake system (ABS), ●
Brake Assist,
● Uphill Start Assist.
The ESP system cannot be switched off with the ⇒
fig. 138 button; only the TCS
system is switched off, the warning light instrument cluster lights up.
Operating principle
The ESP switches on automatically when the engine is started and then conducts
a self-test. The ESP control unit processes data from the individual systems. It al-
so processes additional measurement data which are supplied by highly sensitive
sensors: the rotational velocity of the vehicle about its vertical axis, the lateral ac-
celeration of the vehicle, the braking pressure and the steering angle.
The direction which the driver wishes to take is determined based on the steering
angle and the speed of the vehicle and is constantly compared with the actual be-
haviour of the vehicle. If differences exist, such as the car beginning to skid, the
ESP will automatically brake the appropriate wheel.
The car is stabilised again by the forces which take effect when the wheel is
braked. Intervention into the brake system takes place primarily on the outer front
wheel of a vehicle which tends to oversteer (tendency for the rear of the vehicle
to break away) while occurs this is on the inner rear wheel of a vehicle which
tends to understeer (tendency to shift out of the curve). This braking control cycle
is accompanied by noises.
During an intervention of the system, the warning light flashes in the instru-
ment cluster ⇒ page 26.
The ESP operates in combination with the ABS ⇒ page 158, Antilock brake system
(ABS). If there is a fault in the ABS system, the ESP also does not operate.
The ESP warning light lights up in the instrument cluster when there is a fault on
the ESP ⇒ page 26. £154
Intelligent Technology
Page 162 of 248
●
Inflate all tyres to the specified inflation pressure ⇒ page 192.
● Switch on the ignition.
● Press button
⇒ fig. 140
for more than 2
seconds. While pressing the but-
ton, the warning light lights up. At the same time the memory of the system is
erased and the new calibration is started, which is confirmed with an audible sig-
nal and then the warning light goes out.
● If the warning light does not go out after the basic setting, there is a fault in
the system. Have the vehicle inspected by your nearest specialist garage.
Warning light lights up
If the tyre inflation pressure of at least one wheel is insufficiently inflated in com-
parison to the stored basic value, the warning light ⇒ lights up.
Warning light flashes
If the warning light flashes, there is a system fault. Have the vehicle inspected by
your nearest specialist garage. WARNING
● When the warning light lights up, immediately reduce the speed and
avoid sudden steering and brake manoeuvres. Please stop the vehicle without
delay at the nearest possible stop and inspect the tyres and their inflation
pressures.
● The driver is responsible for the correct tyre inflation pressures. For this
reason, the tyre inflation pressures must be checked regularly.
● Under certain circumstances (e.g. sporty style of driving, wintry or unpaved
roads) the warning light can be delayed or does not light up at all.
● The tyre pressure monitoring system does not take away the responsibility
from the driver for the correct tyre inflation pressure. Note
The tyre pressure monitoring system:
● does not replace the regular tyre inflation pressure control, because the sys-
tem cannot detect an even pressure loss,
● cannot warn in case of very rapid tyre inflation pressure loss, e.g. in case of
sudden tyre damage. In this case carefully bring the vehicle to a standstill without
sudden steering movements and without sharp braking.
● In order to ensure a proper functioning of the tyre inflation pressure-control
system, it is necessary to carry out the basic setting again every 10 000 km or 1x a
year. Diesel particle filter (diesel engine) In the diesel particle filter the resulting soot particles are collected
and burnt during the combustion of diesel fuel. Fig. 141 Vehicle data sticker
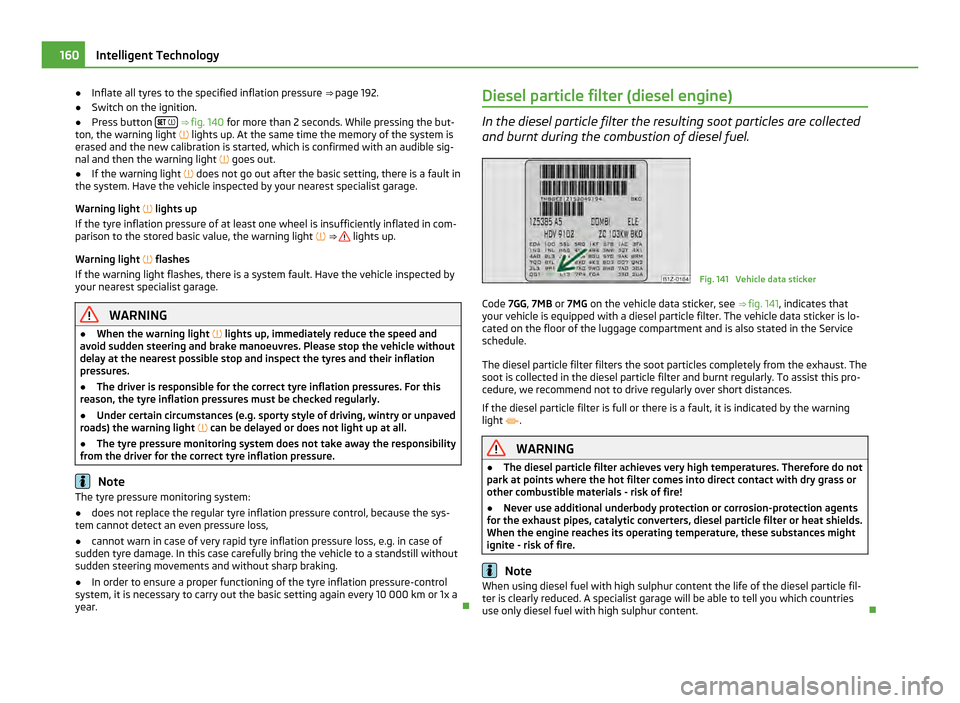
Code 7GG , 7MB or 7MG on the vehicle data sticker, see ⇒ fig. 141 , indicates that
your vehicle is equipped with a diesel particle filter. The vehicle data sticker is lo-
cated on the floor of the luggage compartment and is also stated in the Service
schedule.
The diesel particle filter filters the soot particles completely from the exhaust. The
soot is collected in the diesel particle filter and burnt regularly. To assist this pro-
cedure, we recommend not to drive regularly over short distances.
If the diesel particle filter is full or there is a fault, it is indicated by the warning
light
. WARNING
● The diesel particle filter achieves very high temperatures. Therefore do not
park at points where the hot filter comes into direct contact with dry grass or
other combustible materials - risk of fire!
● Never use additional underbody protection or corrosion-protection agents
for the exhaust pipes, catalytic converters, diesel particle filter or heat shields.
When the engine reaches its operating temperature, these substances might
ignite - risk of fire. Note
When using diesel fuel with high sulphur content the life of the diesel particle fil-
ter is clearly reduced. A specialist garage will be able to tell you which countries
use only diesel fuel with high sulphur content. 160
Intelligent Technology
Page 163 of 248
Driving and the Environment
The first 1 500 kilometres and afterwards
New engine The engine has to be run in during the first 1 500 kilometres.
Up to 1 000 kilometres
– Do not drive faster than 3/4 of the maximum speed of the gear in use, that is
3/4 of the maximum permissible engine speed.
– Do not use full throttle.
– Avoid high engine revolutions.
– Do not tow a trailer.
From 1 000 up to 1 500 kilometres
– Increase the power output of the engine gradually up to the full speed of the
gear engaged, that is up to the maximum permissible engine revolutions.
During the first operating hours the engine has higher internal friction than later
until all of the moving parts have harmonized. The driving style which you adopt
during the first approx.1 500 kilometres plays a decisive part in the success of run-
ning in your car.
You should not drive at unnecessarily high engine revolutions even after the run-
ning-in period is complete. The maximum permissible engine speed is marked by
the beginning of the red zone on the scale of the revolutions counter. Shift up in-
to the next higher gear on a vehicle fitted with manual gearbox before the red
zone is reached. During acceleration (depressing the accelerator) exceptionally
high engine speeds are automatically reduced, yet the engine is not protected
against too high engine speeds which are caused by incorrectly shifting down the
gears resulting in a sudden increase of the engine speeds above the permitted
maximum revolutions which can lead to engine damage.
For a vehicle fitted with a manual gearbox the converse situation also applies: Do
not drive at engine revolutions which are too low. Shift down as soon as the en-
gine is no longer running smoothly. CAUTION
All the speed and engine revolution figures apply only when the engine is at its
normal operating temperature. Never rev up an engine which is cold, neither when
the vehicle is stationary nor when driving in individual gears. For the sake of the environment
Not driving at unnecessarily high engine revolutions and shifting to a higher gear
as early as possible are ways to minimise fuel consumption and operating noise
levels and protects the environment.
New tyres New tyres have to be “run in” since they do not offer optimal grip at first. You
should take account of this fact for the first 500 kilometres and drive particularly
carefully.
New brake pads Allow for the fact that new brake pads do not achieve their full braking efficiency
until approximately 200 kilometres. New brake pads must be first “run in” before
they develop their optimal friction force. You can, however, compensate for this
slightly reduced braking force by increasing the pressure on the brake pedal.
This guideline also applies to any new brake pads installed at a future date.
During the running-in period, you should avoid excessive stresses on the brakes.
This includes, for example, violent braking, particularly from very high speeds, and
also when crossing mountain passes.
Catalytic converter Proper operation of the emission control system (catalytic convert-
er) is of major significance for driving your vehicle in an environ-
mentally conscious way.
Please refer to the following guidelines: £ 161
Driving and the Environment Using the system Safety Driving Tips General Maintenance Breakdown assistance Technical data
Page 166 of 248
Regular servicing
A poorly tuned engine uses an unnecessarily high amount of fuel.
Having your vehicle serviced regularly at a specialist garage enables you to satisfy
one of the requirements for economical motoring even before you set off on your
journey. Keeping your vehicle properly serviced not only has a positive effect on
the safety of your vehicle and maintaining its value, but also saves on fuel.
A poorly tuned engine can result in a fuel consumption which is 10 % higher than
normal.
The foreseen maintenance work should be undertaken exactly according to the
Service schedule by a specialist garage.
Also check the oil level after refuelling. Oil consumption is dependent to a consid-
erable extent on the load and speed of the engine. Oil consumption could be as
high as 0.5 litres/1 000 km depending on your style of driving.
It is quite normal that a new engine has a higher oil consumption at first, and rea-
ches its lowest level only after a certain running in time. It is therefore not possi-
ble to correctly assess the oil consumption of a new vehicle until after you have
driven about 5 000 km. For the sake of the environment
● You can achieve additional improvements in your fuel economy by using high-
lubricity oils.
● Check the ground below your car at regular intervals to detect any leakages in
good time. Please have your vehicle inspected by a specialist garage if you find
any stains caused by oil or other fluids on the floor. Avoid driving short distances Short distances result in an above-average high fuel consumption.
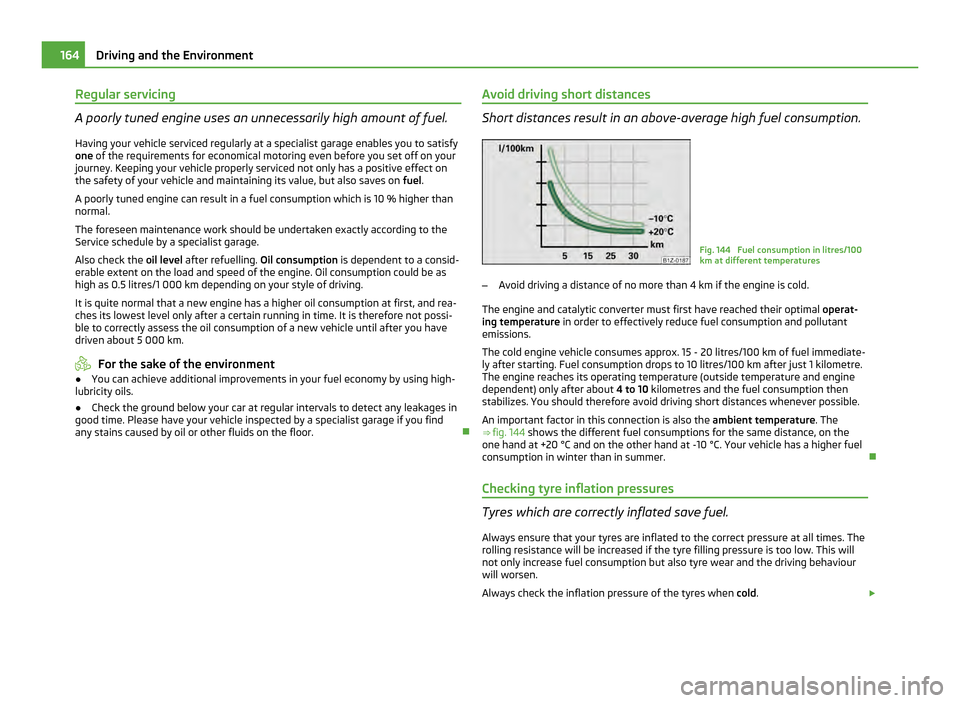
Fig. 144 Fuel consumption in litres/100
km at different temperatures
– Avoid driving a distance of no more than 4 km if the engine is cold.
The engine and catalytic converter must first have reached their optimal operat-
ing temperature in order to effectively reduce fuel consumption and pollutant
emissions.
The cold engine vehicle consumes approx. 15 - 20 litres/100 km of fuel immediate-
ly after starting. Fuel consumption drops to 10 litres/100 km after just 1 kilometre.
The engine reaches its operating temperature (outside temperature and engine
dependent) only after about 4 to 10 kilometres and the fuel consumption then
stabilizes. You should therefore avoid driving short distances whenever possible.
An important factor in this connection is also the ambient temperature. The
⇒ fig. 144 shows the different fuel consumptions for the same distance, on the
one hand at +20 °C and on the other hand at -10
°C. Your vehicle has a higher fuel
consumption in winter than in summer.
Checking tyre inflation pressures Tyres which are correctly inflated save fuel.
Always ensure that your tyres are inflated to the correct pressure at all times. The
rolling resistance will be increased if the tyre filling pressure is too low. This will
not only increase fuel consumption but also tyre wear and the driving behaviour
will worsen.
Always check the inflation pressure of the tyres when cold. £164
Driving and the Environment
Page 181 of 248
The filler flap is automatically unlocked or locked with the central locking.
Opening the fuel filler cap
–
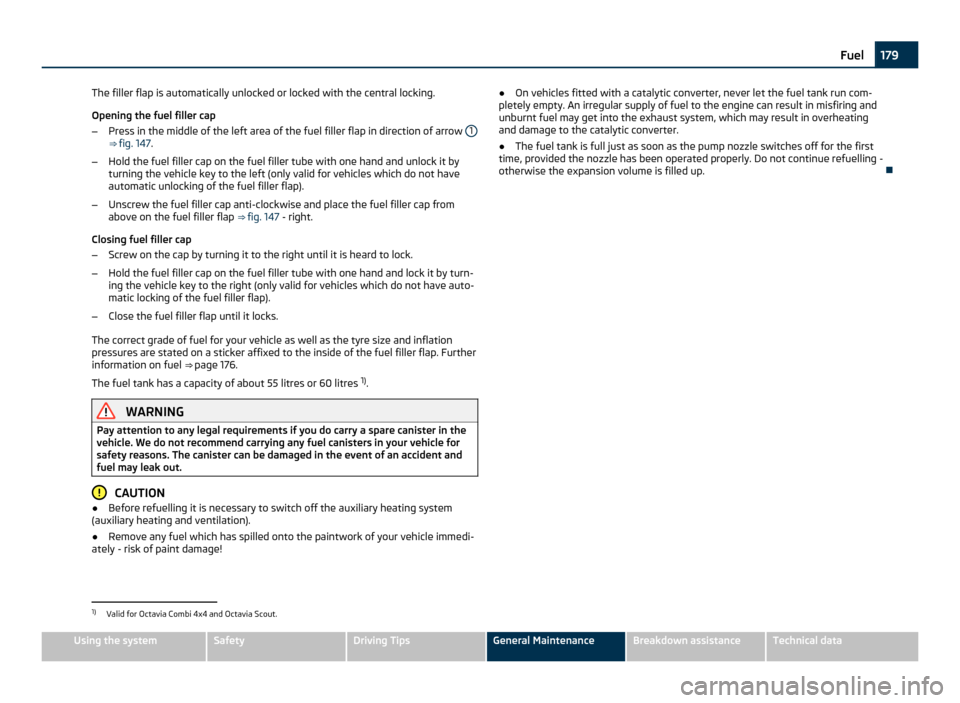
Press in the middle of the left area of the fuel filler flap in direction of arrow 1⇒ fig. 147.
– Hold the fuel filler cap on the fuel filler tube with one hand and unlock it by
turning the vehicle key to the left (only valid for vehicles which do not have
automatic unlocking of the fuel filler flap).
– Unscrew the fuel filler cap anti-clockwise and place the fuel filler cap from
above on the fuel filler flap ⇒ fig. 147 - right.
Closing fuel filler cap
– Screw on the cap by turning it to the right until it is heard to lock.
– Hold the fuel filler cap on the fuel filler tube with one hand and lock it by turn-
ing the vehicle key to the right (only valid for vehicles which do not have auto-
matic locking of the fuel filler flap).
– Close the fuel filler flap until it locks.
The correct grade of fuel for your vehicle as well as the tyre size and inflation
pressures are stated on a sticker affixed to the inside of the fuel filler flap. Further
information on fuel ⇒
page 176.
The fuel tank has a capacity of about 55 litres or 60 litres 1)
. WARNING
Pay attention to any legal requirements if you do carry a spare canister in the
vehicle. We do not recommend carrying any fuel canisters in your vehicle for
safety reasons. The canister can be damaged in the event of an accident and
fuel may leak out. CAUTION
● Before refuelling it is necessary to switch off the auxiliary heating system
(auxiliary heating and ventilation).
● Remove any fuel which has spilled onto the paintwork of your vehicle immedi-
ately - risk of paint damage! ●
On vehicles fitted with a catalytic converter, never let the fuel tank run com-
pletely empty. An irregular supply of fuel to the engine can result in misfiring and
unburnt fuel may get into the exhaust system, which may result in overheating
and damage to the catalytic converter.
● The fuel tank is full just as soon as the pump nozzle switches off for the first
time, provided the nozzle has been operated properly. Do not continue refuelling -
otherwise the expansion volume is filled up. 1)
Valid for Octavia Combi 4x4 and Octavia Scout. 179
Fuel Using the system Safety Driving Tips General Maintenance Breakdown assistance Technical data