tow SKODA OCTAVIA 2012 2.G / (1Z) Owner's Guide
[x] Cancel search | Manufacturer: SKODA, Model Year: 2012, Model line: OCTAVIA, Model: SKODA OCTAVIA 2012 2.G / (1Z)Pages: 222, PDF Size: 13.52 MB
Page 75 of 222
WARNING■Do not place anything on the dash panel. These objects might slide or fall
down when driving (when accelerating or cornering) and may distract you
from concentrating on the traffic - risk of accident!■
When driving, ensure that no objects from the centre console or from other
storage compartments can get into the driver's footwell. You would then no
longer be able to apply the brakes, operate the clutch or accelerator – risk of accident!
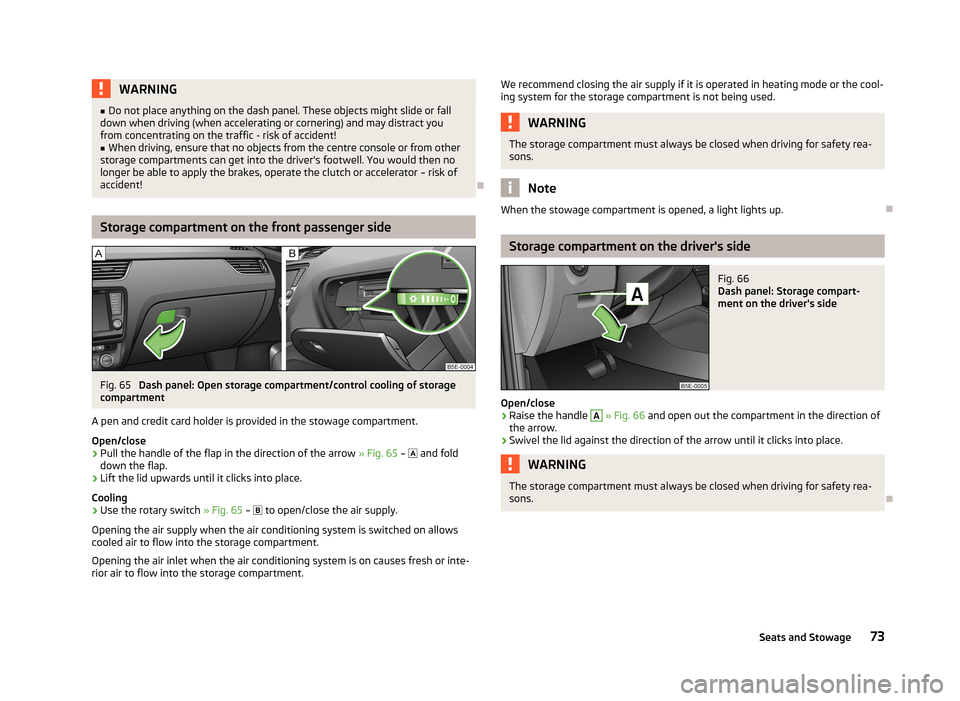
Storage compartment on the front passenger side
Fig. 65
Dash panel: Open storage compartment/control cooling of storage
compartment
A pen and credit card holder is provided in the stowage compartment. Open/close
›
Pull the handle of the flap in the direction of the arrow » Fig. 65 –
and fold
down the flap.
›
Lift the lid upwards until it clicks into place.
Cooling
›
Use the rotary switch » Fig. 65 –
to open/close the air supply.
Opening the air supply when the air conditioning system is switched on allows
cooled air to flow into the storage compartment.
Opening the air inlet when the air conditioning system is on causes fresh or inte-rior air to flow into the storage compartment.
We recommend closing the air supply if it is operated in heating mode or the cool-ing system for the storage compartment is not being used.WARNINGThe storage compartment must always be closed when driving for safety rea-
sons.
Note
When the stowage compartment is opened, a light lights up.
Storage compartment on the driver's side
Fig. 66
Dash panel: Storage compart-
ment on the driver's side
Open/close
›
Raise the handle
A
» Fig. 66 and open out the compartment in the direction of
the arrow.
›
Swivel the lid against the direction of the arrow until it clicks into place.
WARNINGThe storage compartment must always be closed when driving for safety rea-
sons.
73Seats and Stowage
Page 76 of 222
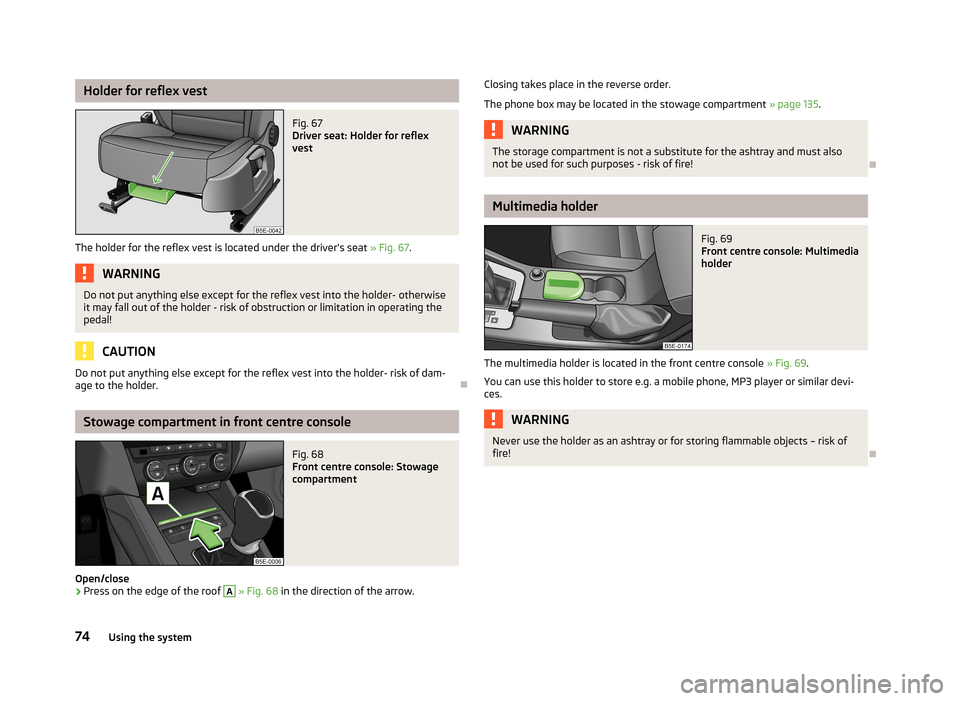
Holder for reflex vestFig. 67
Driver seat: Holder for reflex
vest
The holder for the reflex vest is located under the driver's seat » Fig. 67.
WARNINGDo not put anything else except for the reflex vest into the holder- otherwise
it may fall out of the holder - risk of obstruction or limitation in operating the pedal!
CAUTION
Do not put anything else except for the reflex vest into the holder- risk of dam-
age to the holder.
Stowage compartment in front centre console
Fig. 68
Front centre console: Stowage
compartment
Open/close
›
Press on the edge of the roof
A
» Fig. 68 in the direction of the arrow.
Closing takes place in the reverse order.
The phone box may be located in the stowage compartment » page 135.WARNINGThe storage compartment is not a substitute for the ashtray and must also
not be used for such purposes - risk of fire!
Multimedia holder
Fig. 69
Front centre console: Multimedia
holder
The multimedia holder is located in the front centre console » Fig. 69.
You can use this holder to store e.g. a mobile phone, MP3 player or similar devi-
ces.
WARNINGNever use the holder as an ashtray or for storing flammable objects – risk of
fire!
74Using the system
Page 77 of 222
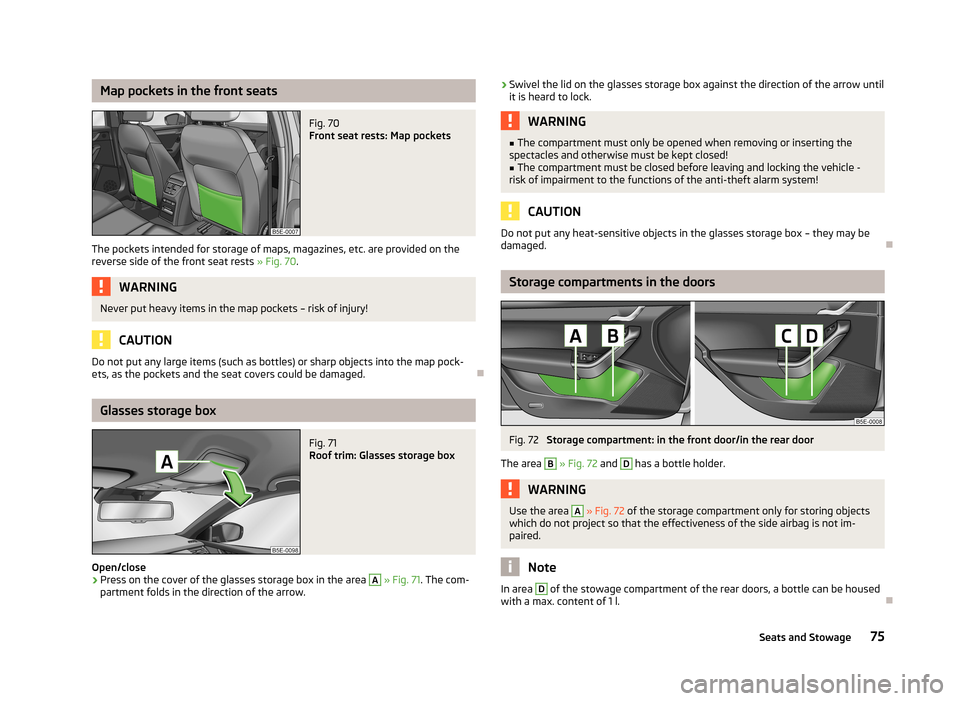
Map pockets in the front seatsFig. 70
Front seat rests: Map pockets
The pockets intended for storage of maps, magazines, etc. are provided on the
reverse side of the front seat rests » Fig. 70.
WARNINGNever put heavy items in the map pockets – risk of injury!
CAUTION
Do not put any large items (such as bottles) or sharp objects into the map pock-
ets, as the pockets and the seat covers could be damaged.
Glasses storage box
Fig. 71
Roof trim: Glasses storage box
Open/close
›
Press on the cover of the glasses storage box in the area
A
» Fig. 71 . The com-
partment folds in the direction of the arrow.
› Swivel the lid on the glasses storage box against the direction of the arrow until
it is heard to lock.WARNING■ The compartment must only be opened when removing or inserting the
spectacles and otherwise must be kept closed!■
The compartment must be closed before leaving and locking the vehicle -
risk of impairment to the functions of the anti-theft alarm system!
CAUTION
Do not put any heat-sensitive objects in the glasses storage box – they may be
damaged.
Storage compartments in the doors
Fig. 72
Storage compartment: in the front door/in the rear door
The area
B
» Fig. 72 and
D
has a bottle holder.
WARNINGUse the area A » Fig. 72 of the storage compartment only for storing objects
which do not project so that the effectiveness of the side airbag is not im- paired.
Note
In area D of the stowage compartment of the rear doors, a bottle can be housed
with a max. content of 1 l.
75Seats and Stowage
Page 78 of 222

Stowage compartment below front passenger seatFig. 73
Front passenger seat: Stowage
compartment
Open/close
›
Pull the handle to position
1
» Fig. 73 . The compartment opens out in the di-
rection of the arrow
2
.
›
When closing the compartment, hold the handle until the compartment is closed.
WARNINGThe storage compartment must always be closed when driving for safety rea-
sons.
CAUTION
The storage compartment is designed for storing small objects of up to 1.5 kg. in weight.
Front armrest with storage compartmentFig. 74
Armrest: Stowage compartment
The armrest is adjustable for height and length.
Opening/closing the cover of the stowage compartment
›
Pull and open the cover of the armrest using the handle
A
in the direction of
the arrow
1
» Fig. 74 .
›
Open the lid to the stop, only then can it be folded downwards and against the
direction of the arrow
1
.
Adjusting the height of the armrest
›
First of all fold the cover downwards and then lift it in the direction of the arrow
1
» Fig. 74 into one of the 4 fixed positions.
Adjusting the length of the armrest
›
Move the lid into the desired position in the direction of the arrow
2
» Fig. 74 .
The area
B
» Fig. 74 of the stowage compartment is designed for the storage of
objects with a maximum size of 98 mm x 104 mm x 142 mm.
The area
C
of the stowage compartment is designed for the storage of smaller
objects.
Note
Push the armrest cover all the way back to the stop before applying the hand-
brake.
76Using the system
Page 79 of 222
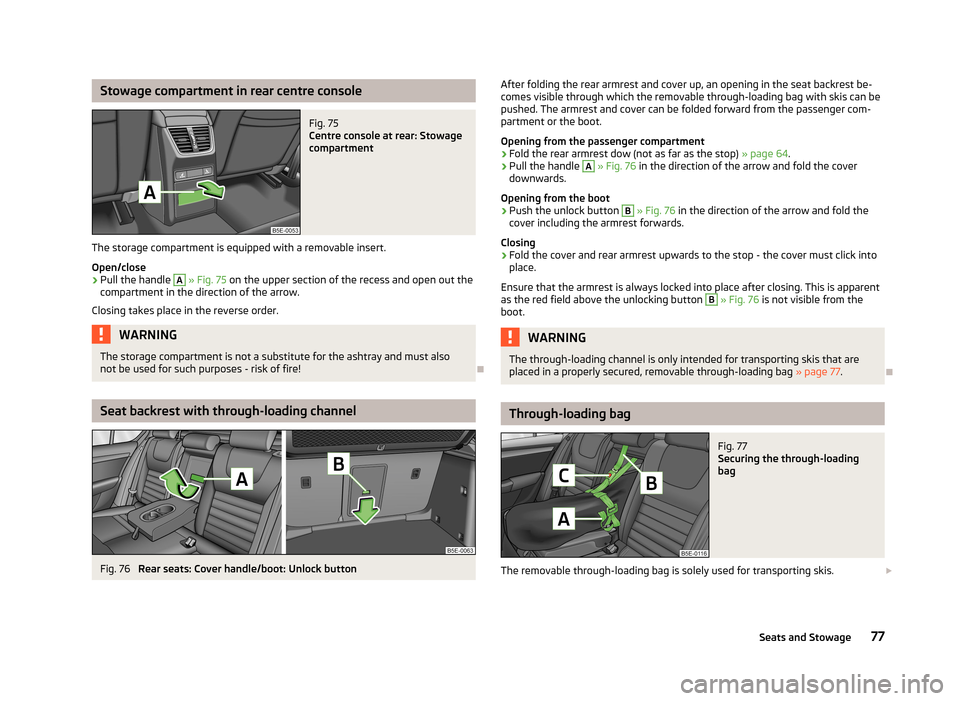
Stowage compartment in rear centre consoleFig. 75
Centre console at rear: Stowage
compartment
The storage compartment is equipped with a removable insert.
Open/close
›
Pull the handle
A
» Fig. 75 on the upper section of the recess and open out the
compartment in the direction of the arrow.
Closing takes place in the reverse order.
WARNINGThe storage compartment is not a substitute for the ashtray and must also
not be used for such purposes - risk of fire!
Seat backrest with through-loading channel
Fig. 76
Rear seats: Cover handle/boot: Unlock button
After folding the rear armrest and cover up, an opening in the seat backrest be-
comes visible through which the removable through-loading bag with skis can be
pushed. The armrest and cover can be folded forward from the passenger com-
partment or the boot.
Opening from the passenger compartment›
Fold the rear armrest dow (not as far as the stop) » page 64.
›
Pull the handle
A
» Fig. 76 in the direction of the arrow and fold the cover
downwards.
Opening from the boot
›
Push the unlock button
B
» Fig. 76 in the direction of the arrow and fold the
cover including the armrest forwards.
Closing
›
Fold the cover and rear armrest upwards to the stop - the cover must click into place.
Ensure that the armrest is always locked into place after closing. This is apparent
as the red field above the unlocking button
B
» Fig. 76 is not visible from the
boot.
WARNINGThe through-loading channel is only intended for transporting skis that are
placed in a properly secured, removable through-loading bag » page 77.
Through-loading bag
Fig. 77
Securing the through-loading
bag
The removable through-loading bag is solely used for transporting skis.
77Seats and Stowage
Page 80 of 222
Loading›Open the luggage compartment lid.›
Fold the rear armrest and the cover in the seat backrest downwards » page 77.
›
Place the empty, removable through-loading bag in such a way that the end of
the bag with the zip is in the boot.
›
Push the skis into the removable through-loading bag from the boot » .
›
Close the through-loading bag.
Securing
›
Tighten the strap
A
on the free end around the skis in front of the bind-
ings » Fig. 77 .
›
Fold the seat backrest a little forward.
›
Guide the securing strap
B
through the opening in the seat backrest around
the upper part of the seat backrest.
›
Then push the seat backrest back into the upright position until the unlocking button clicks into place - check by pulling on the seat backrest.
›
Insert the securing strap
B
into the lock
C
until it clicks into place.
WARNING■ After placing skis into the through-loading bag, you must secure the bag
with the securing strap B » Fig. 77 .■
The strap
A
must hold the skis tight.
■
Make sure that the strap
A
holds the skis in front of the binding (also refer
to imprint on the removable through-loading bag).
■
The total weight of the skis which are transported must not exceed 17 kg.
Note
■ The through-loading bag is foreseen for four pairs of skis.■Place the skis and sticks in the removable through-loading bag with the tips
facing to the rear.■
If there are several pairs of skis in the removable through-loading bag, ensure
that the bindings are positioned at the same height.
■
The removable through-loading bag must never be folded together or stowed
when moist.
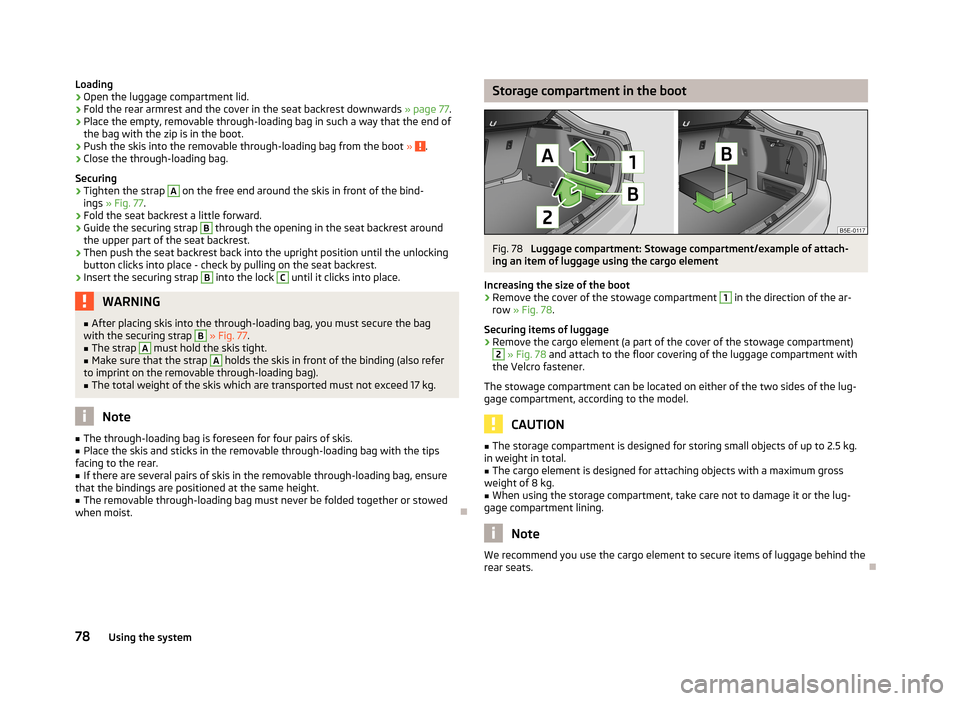
Storage compartment in the bootFig. 78
Luggage compartment: Stowage compartment/example of attach-
ing an item of luggage using the cargo element
Increasing the size of the boot
›
Remove the cover of the stowage compartment
1
in the direction of the ar-
row » Fig. 78 .
Securing items of luggage
›
Remove the cargo element (a part of the cover of the stowage compartment)
2
» Fig. 78 and attach to the floor covering of the luggage compartment with
the Velcro fastener.
The stowage compartment can be located on either of the two sides of the lug-
gage compartment, according to the model.
CAUTION
■ The storage compartment is designed for storing small objects of up to 2.5 kg.
in weight in total.■
The cargo element is designed for attaching objects with a maximum gross
weight of 8 kg.
■
When using the storage compartment, take care not to damage it or the lug-
gage compartment lining.
Note
We recommend you use the cargo element to secure items of luggage behind the
rear seats.
78Using the system
Page 81 of 222
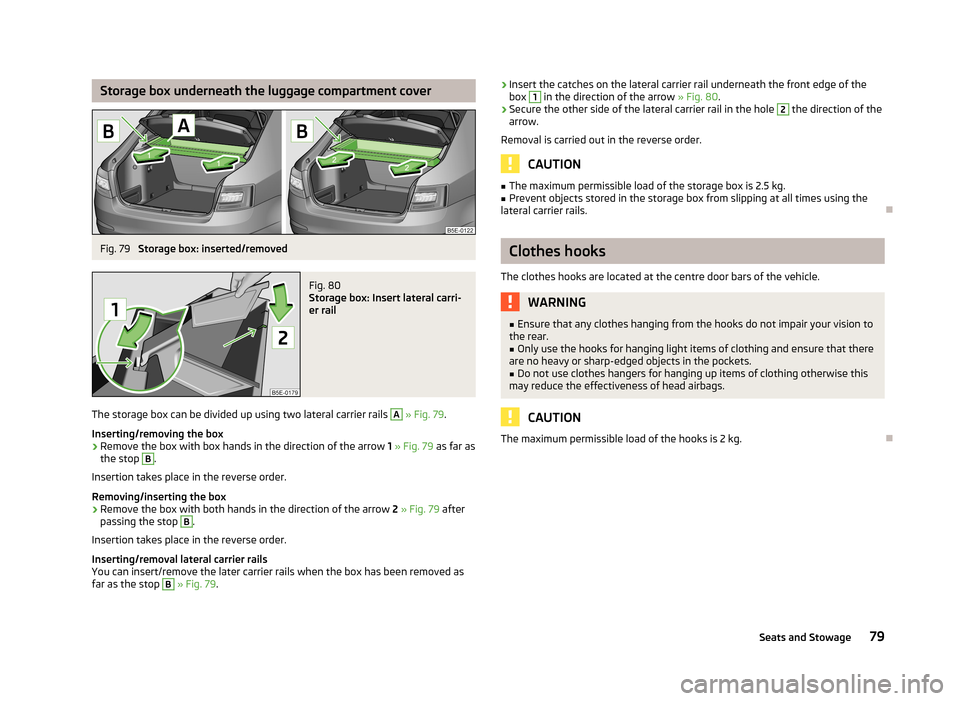
Storage box underneath the luggage compartment coverFig. 79
Storage box: inserted/removed
Fig. 80
Storage box: Insert lateral carri-
er rail
The storage box can be divided up using two lateral carrier rails
A
» Fig. 79 .
Inserting/removing the box
›
Remove the box with box hands in the direction of the arrow 1 » Fig. 79 as far as
the stop
B
.
Insertion takes place in the reverse order.
Removing/inserting the box
›
Remove the box with both hands in the direction of the arrow 2 » Fig. 79 after
passing the stop
B
.
Insertion takes place in the reverse order.
Inserting/removal lateral carrier rails
You can insert/remove the later carrier rails when the box has been removed as
far as the stop
B
» Fig. 79 .
›Insert the catches on the lateral carrier rail underneath the front edge of the
box 1 in the direction of the arrow » Fig. 80.›
Secure the other side of the lateral carrier rail in the hole
2
the direction of the
arrow.
Removal is carried out in the reverse order.
CAUTION
■ The maximum permissible load of the storage box is 2.5 kg.■Prevent objects stored in the storage box from slipping at all times using the
lateral carrier rails.
Clothes hooks
The clothes hooks are located at the centre door bars of the vehicle.
WARNING■ Ensure that any clothes hanging from the hooks do not impair your vision to
the rear.■
Only use the hooks for hanging light items of clothing and ensure that there
are no heavy or sharp-edged objects in the pockets.
■
Do not use clothes hangers for hanging up items of clothing otherwise this
may reduce the effectiveness of head airbags.
CAUTION
The maximum permissible load of the hooks is 2 kg.
79Seats and Stowage
Page 84 of 222
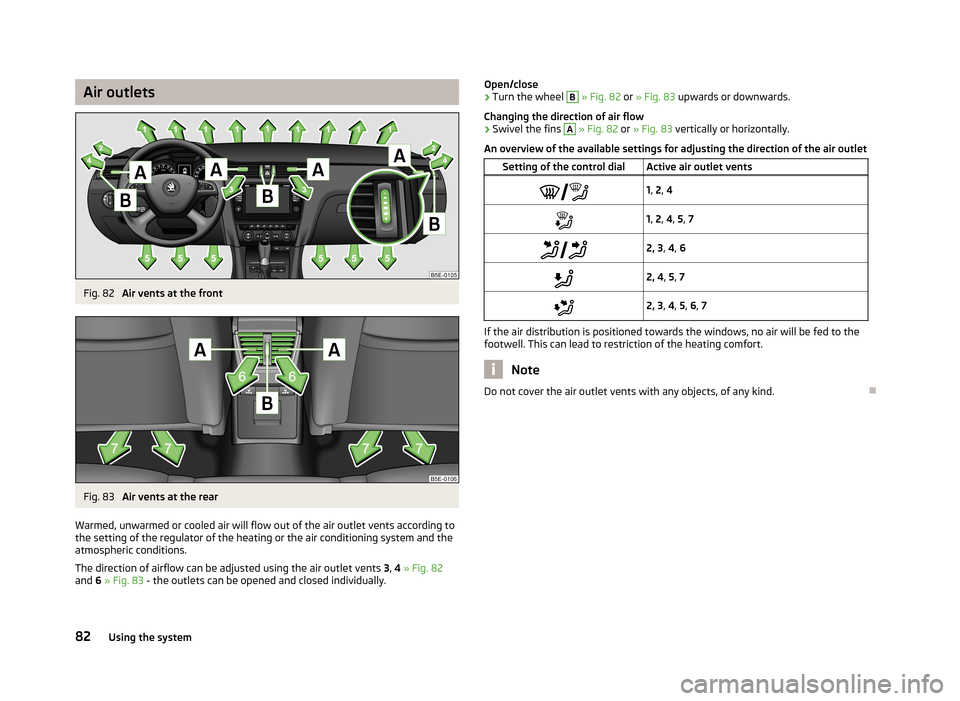
Air outletsFig. 82
Air vents at the front
Fig. 83
Air vents at the rear
Warmed, unwarmed or cooled air will flow out of the air outlet vents according to
the setting of the regulator of the heating or the air conditioning system and the atmospheric conditions.
The direction of airflow can be adjusted using the air outlet vents 3, 4 » Fig. 82
and 6 » Fig. 83 - the outlets can be opened and closed individually.
Open/close›Turn the wheel B » Fig. 82 or » Fig. 83 upwards or downwards.
Changing the direction of air flow›
Swivel the fins
A
» Fig. 82 or » Fig. 83 vertically or horizontally.
An overview of the available settings for adjusting the direction of the air outlet
Setting of the control dialActive air outlet vents 1, 2 , 41, 2 , 4 , 5 , 7 2, 3 , 4 , 62, 4 , 5 , 72, 3 , 4 , 5 , 6 , 7
If the air distribution is positioned towards the windows, no air will be fed to the
footwell. This can lead to restriction of the heating comfort.
Note
Do not cover the air outlet vents with any objects, of any kind.
82Using the system
Page 94 of 222
Starting-off and Driving
Starting and stopping the engine
Introduction
This chapter contains information on the following subjects:
Adjusting the steering wheel position
93
Power steering
93
Electronic immobiliser
93
Ignition lock
94
Starting engine
94
Switching the engine off
94
Starting and stopping the engine on vehicles with the KESSY system » page 95.
WARNING■
Never adjust the steering wheel when the vehicle is moving only when the
vehicle is stationary!■
Maintain a distance of 25 cm
1
to the steering wheel » Fig. 89 on page 93
– . Not maintaining this minimum distance will mean that the airbag system
will not be able to properly protect you – hazard!
■
The lever for adjusting the steering wheel must be locked whilst driving so
that the position of the steering wheel cannot accidently change during the journey – risk of accident!
■
If the steering wheel is adjusted further towards the head, the protection
provided by the driver airbag in the event of an accident is reduced. Check
that the steering wheel is aligned to the chest.
■
When driving, hold the steering wheel with both hands firmly on the outer
edge in the 9 o'clock and 3 o'clock position. Never hold the steering wheel in
the 12 o'clock position or in any other way (e.g. in the middle or inner edge of the steering wheel). In such cases, you could injure the arms, hands and head
when the driver airbag is deployed.
WARNING (Continued)■ When driving, the ignition key must always be in the position 2 » Fig. 90 on
page 94 (ignition switched on) without the engine running. This position is
indicated by the warning lights coming on. If this is not the case, it could result
in unexpected locking of the steering wheel – risk of accident!■
Only pull the ignition key from the ignition lock when the vehicle has come
to a complete stop (by applying the handbrake). Otherwise the steering wheel
could block – risk of accident!
■
When leaving the vehicle, the ignition must always be removed. This is par-
ticularly important if children are left in the vehicle. Otherwise the children
could, for example, start the engine – risk of accident or injury!
■
Never leave the engine running in unventilated or closed rooms. The ex-
haust gases of the engine contain besides the odorless and colourless carbon
monoxide a poisonous gas – hazard! Carbon monoxide can cause uncon-
sciousness and death.
■
Never leave the vehicle unattended with the engine running.
■
Never switch off the engine before the vehicle is stationary – risk of acci-
dent!
CAUTION
■ The starter may only be operated (ignition key position 3 » Fig. 90 on
page 94), if the engine is not running. The starter or engine can be damaged if
the starter is activated when the engine is running.■
Avoid high engine revolutions, full throttle and high engine loads as long as the
engine has not yet reached its operating temperature – risk of damaging the en-
gine!
■
Do not tow start the engine - danger of damaging the engine! On vehicles with
a catalytic converter, unburnt fuel may get into the catalytic converter where it
may ignite. This in turn may damage the catalytic converter. The battery from an- other vehicle can be used as a jump-start aid » page 195.
■
Do not switch the engine off immediately at the end of your journey after the
engine has been operated over a prolonged period at high loads but leave it to
run at an idling speed for about 1 minute. This prevents any possible accumulation of heat when the engine is switched off.
For the sake of the environment
Do not warm up the engine while the vehicle is stationary. If possible, start your
journey as soon as the engine has started. Through this the engine reaches its
operating temperature more rapidly and the pollutant emissions are lower. 92Using the system
Page 95 of 222
Note■The engine can only be started with a genuine ŠKODA key with the matching
code.■
The engine running noises may louder at first be louder for a short time after
starting the cold engine. This is quite normal and is not an operating problem.
■
After switching off the ignition, the radiator fan can intermittently continue to
operate for approx. 10 minutes.
■
If the engine also does not start after the second attempt, the fuse for the elec-
tric fuel pump (in petrol engines) or the control unit for the glow plug system or
glow plug system relay and fuel pump (in diesel engines) could be faulty. Check
the fuse and replace, if necessary » page 199 or seek assistance from a ŠKODA
specialist garage.
■
We recommend locking the steering wheel whenever leaving the vehicle. This
acts as a deterrent against the attempted theft of your car.
Adjusting the steering wheel position
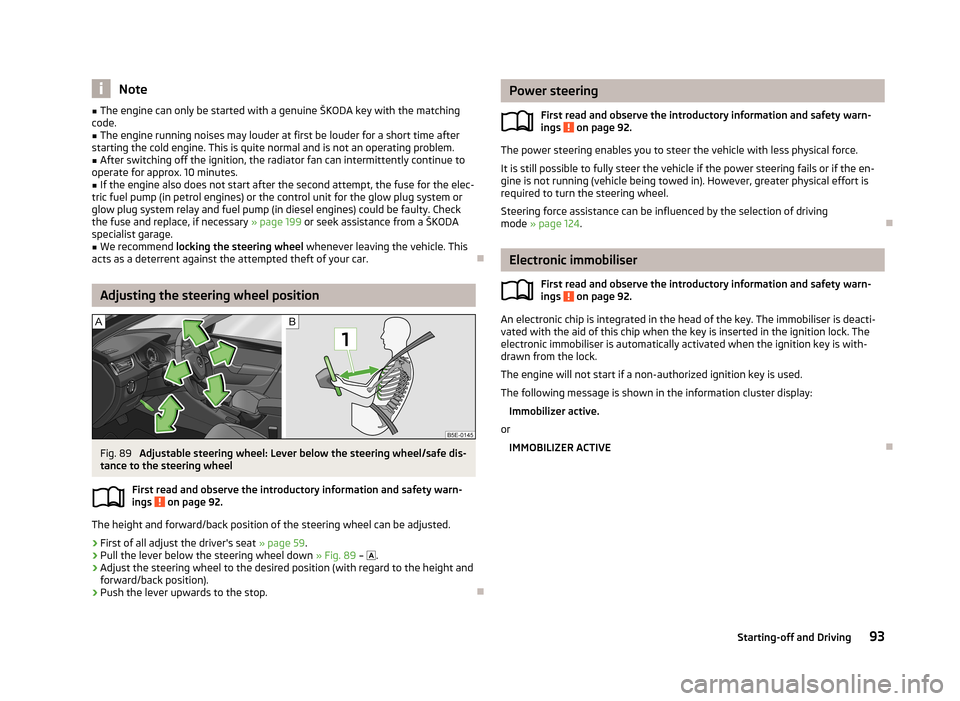
Fig. 89
Adjustable steering wheel: Lever below the steering wheel/safe dis-
tance to the steering wheel
First read and observe the introductory information and safety warn-
ings
on page 92.
The height and forward/back position of the steering wheel can be adjusted.
›
First of all adjust the driver's seat » page 59.
›
Pull the lever below the steering wheel down » Fig. 89 –
.
›
Adjust the steering wheel to the desired position (with regard to the height and
forward/back position).
›
Push the lever upwards to the stop.
Power steering
First read and observe the introductory information and safety warn-ings
on page 92.
The power steering enables you to steer the vehicle with less physical force.
It is still possible to fully steer the vehicle if the power steering fails or if the en- gine is not running (vehicle being towed in). However, greater physical effort is
required to turn the steering wheel.
Steering force assistance can be influenced by the selection of driving
mode » page 124 .
Electronic immobiliser
First read and observe the introductory information and safety warn-
ings
on page 92.
An electronic chip is integrated in the head of the key. The immobiliser is deacti-
vated with the aid of this chip when the key is inserted in the ignition lock. The
electronic immobiliser is automatically activated when the ignition key is with-
drawn from the lock.
The engine will not start if a non-authorized ignition key is used.
The following message is shown in the information cluster display: Immobilizer active.
or
IMMOBILIZER ACTIVE
93Starting-off and Driving