height SKODA OCTAVIA 2012 2.G / (1Z) Owner's Manual
[x] Cancel search | Manufacturer: SKODA, Model Year: 2012, Model line: OCTAVIA, Model: SKODA OCTAVIA 2012 2.G / (1Z)Pages: 222, PDF Size: 13.52 MB
Page 61 of 222
Seats and Stowage
Front seats
Introduction
This chapter contains information on the following subjects:
Manually adjusting the front seats
60
Electrically adjusting the front seats
60
Memory function of the power seat
61
Memory function of the remote control key
61
The driver's seat should be adjusted in such a way that the pedals can be fully
pressed to the floor with slightly bent legs.
The seat backrest on the driver's seat should be adjusted in such a way that the
upper point of the steering wheel can be easily reached with slightly bent arms.
Correct adjustment of the seats is particularly important for:
› safely and quickly reaching the controls;
› a relaxed, fatigue-free body position;
› achieving the maximum protection offered by the seat belts and the airbag
system.
WARNING■ Only adjust the driver's seat when the vehicle is stationary – risk of accident!■Caution when adjusting the seat! You may suffer injuries or bruises as a re-
sult of adjusting the seat without paying proper attention.■
As the electric front seats can also be adjusted when the ignition is switch-
ed off (even when the ignition key is withdrawn), never leave children unat-
tended in the car.
■
The seat backrests must not be angled too far back when driving otherwise
this will affect proper operation of the seat belts and of the airbag system –
risk of injury!
■
Never carry more people than the number of seats in the vehicle.
WARNING (Continued)■ Each occupant must correctly fasten the seat belt belonging to the seat.
Children must be fastened » page 154, Transporting children safely with a
suitable restraint system.■
At all times, the front seats and head restraints must be adjusted to match
the person's body size and the seat belt must be attached properly to provide
the most effective levels of protection to passengers.
■
Always keep your feet in the footwell when the car is being driven – never
place your feet on the instrument panel, out of the window or on the surfaces
of the seats. This is particularly important for the front seat passenger. You
will be exposed to increased risk of injury if it becomes necessary to apply the
brake or in the event of an accident. If an airbag is deployed, you may suffer
fatal injuries when adopting an incorrect seated position!
■
The driver must maintain a distance of at least 25 cm from the steering
wheel, and a distance of at least 10 cm between the legs and the dash panel at the height of the knee airbag. The front passenger must maintain a dis-
tance of at least 25 cm to the dash panel. Not maintaining this minimum dis-
tance will mean that the airbag system will not be able to properly protect you
– hazard!
■
Ensure that there are no objects in the driver's footwell as they may get
caught behind the pedals when driving or applying the braking. You would
then no longer be able to operate the clutch, brake or accelerate.
■
Do not transport any objects on the front passenger seat except objects
(e.g. child safety seat) provided for this purpose – risk of accident!
Note
■ After a certain time, play can develop within the adjustment mechanism of the
backrest angle.■
For safety reasons, it is not possible to store the seated position in the seat
memory and remote control key memory if the inclination angle of the seat back-
rest is more than 102° in relation to the seat cushion.
■
Each new driver seat and external mirror position that is saved will overwrite
the existing setting.
59Seats and Stowage
Page 62 of 222
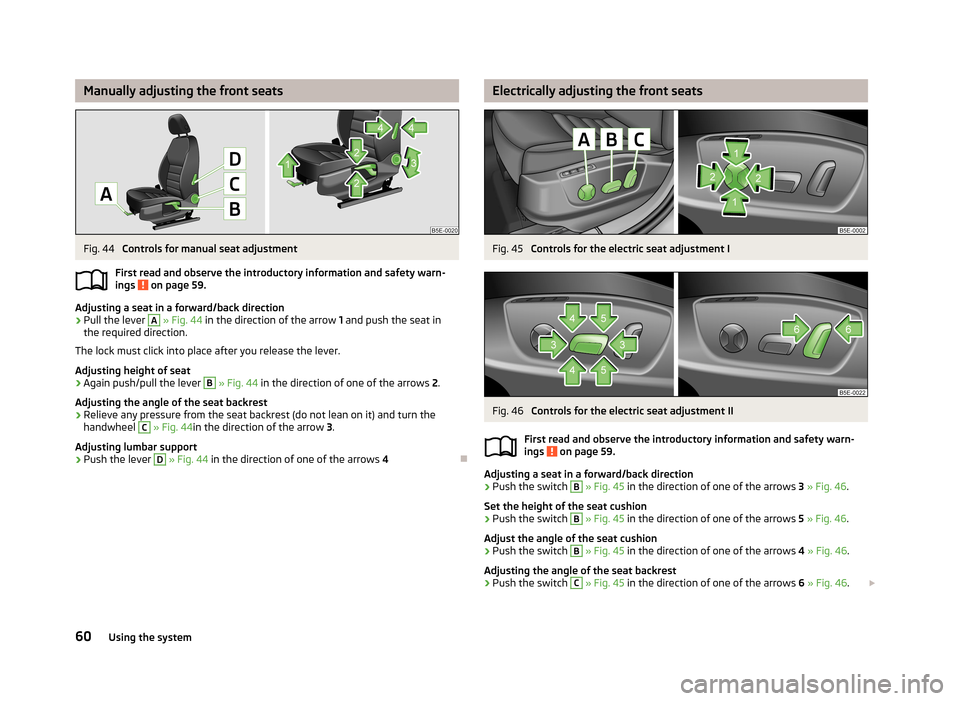
Manually adjusting the front seatsFig. 44
Controls for manual seat adjustment
First read and observe the introductory information and safety warn- ings
on page 59.
Adjusting a seat in a forward/back direction
›
Pull the lever
A
» Fig. 44 in the direction of the arrow 1 and push the seat in
the required direction.
The lock must click into place after you release the lever.
Adjusting height of seat
›
Again push/pull the lever
B
» Fig. 44 in the direction of one of the arrows 2.
Adjusting the angle of the seat backrest
›
Relieve any pressure from the seat backrest (do not lean on it) and turn the handwheel
C
» Fig. 44 in the direction of the arrow 3.
Adjusting lumbar support
›
Push the lever
D
» Fig. 44 in the direction of one of the arrows 4
Electrically adjusting the front seatsFig. 45
Controls for the electric seat adjustment I
Fig. 46
Controls for the electric seat adjustment II
First read and observe the introductory information and safety warn-
ings
on page 59.
Adjusting a seat in a forward/back direction
›
Push the switch
B
» Fig. 45 in the direction of one of the arrows 3 » Fig. 46 .
Set the height of the seat cushion
›
Push the switch
B
» Fig. 45 in the direction of one of the arrows 5 » Fig. 46 .
Adjust the angle of the seat cushion
›
Push the switch
B
» Fig. 45 in the direction of one of the arrows 4 » Fig. 46 .
Adjusting the angle of the seat backrest
›
Push the switch
C
» Fig. 45 in the direction of one of the arrows 6 » Fig. 46 .
60Using the system
Page 65 of 222
Head restraintsFig. 49
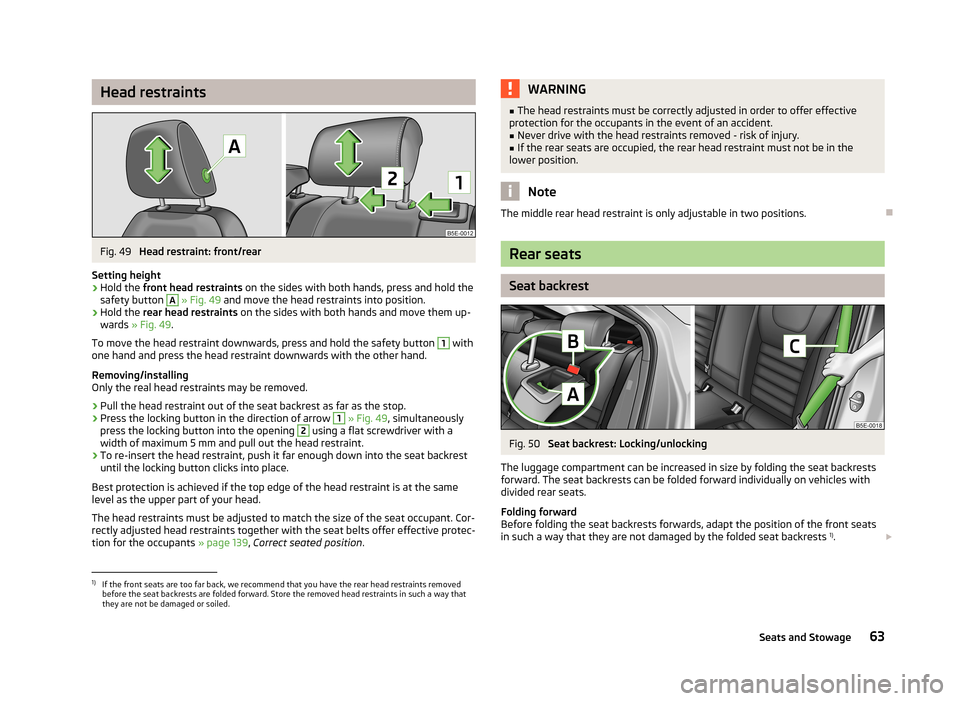
Head restraint: front/rear
Setting height
›
Hold the front head restraints on the sides with both hands, press and hold the
safety button
A
» Fig. 49 and move the head restraints into position.
›
Hold the rear head restraints on the sides with both hands and move them up-
wards » Fig. 49 .
To move the head restraint downwards, press and hold the safety button
1
with
one hand and press the head restraint downwards with the other hand.
Removing/installing
Only the real head restraints may be removed.
›
Pull the head restraint out of the seat backrest as far as the stop.
›
Press the locking button in the direction of arrow
1
» Fig. 49 , simultaneously
press the locking button into the opening
2
using a flat screwdriver with a
width of maximum 5 mm and pull out the head restraint.
›
To re-insert the head restraint, push it far enough down into the seat backrest
until the locking button clicks into place.
Best protection is achieved if the top edge of the head restraint is at the same
level as the upper part of your head.
The head restraints must be adjusted to match the size of the seat occupant. Cor-rectly adjusted head restraints together with the seat belts offer effective protec-
tion for the occupants » page 139, Correct seated position .
WARNING■
The head restraints must be correctly adjusted in order to offer effective
protection for the occupants in the event of an accident.■
Never drive with the head restraints removed - risk of injury.
■
If the rear seats are occupied, the rear head restraint must not be in the
lower position.
Note
The middle rear head restraint is only adjustable in two positions.
Rear seats
Seat backrest
Fig. 50
Seat backrest: Locking/unlocking
The luggage compartment can be increased in size by folding the seat backrests forward. The seat backrests can be folded forward individually on vehicles with
divided rear seats.
Folding forward
Before folding the seat backrests forwards, adapt the position of the front seats in such a way that they are not damaged by the folded seat backrests 1)
.
1)
If the front seats are too far back, we recommend that you have the rear head restraints removed
before the seat backrests are folded forward. Store the removed head restraints in such a way that
they are not be damaged or soiled.
63Seats and Stowage
Page 70 of 222
WARNINGNo objects should be placed on the luggage compartment cover, the vehicle
occupants could be endangered if there is sudden braking or the vehicle col-
lides with something.
CAUTION
■ Please ensure that the heating elements for the rear window heater are not
damaged as a result of objects placed in this area.■
When closing the boot lid, jamming and damage to the luggage compartment
cover or the side trim panel can occur if handled in an unprofessional way. The following guidelines must be observed. ■ The mounts of the cover
3
» Fig. 57 must be interlocked in the holders of the
side trim panel
2
.
■ The items which are transported must not exceed the height of the luggage
compartment cover. ■ The cover must not be jammed in the seal of the boot lid when it is in the
opened position.
■ There must be no object in the gap between the opened cover and the rear
backrest.
Note
Opening the boot lid also lifts up the boot cover.
Roof rack system
Introduction
This chapter contains information on the following subjects:
Attachment points
69
Roof load
69WARNING■ The items which you transport on the roof bar system must be reliably at-
tached – risk of accident!■
Always secure the load with appropriate and undamaged lashing straps or
tensioning straps.
■
Distribute the load evenly over the roof rack system.
■
When transporting heavy objects or objects which take up a large area on
the roof rack system, the handling of the car may change as a result of the displacement of the centre of gravity. The style of driving and speed musttherefore be adapted to the current circumstances.
■
Avoid abrupt and sudden driving/braking manoeuvres.
■
Adjust the speed and driving style to the visibility, weather, road and traffic
conditions.
■
The permissible roof load, permissible axle loads and gross permissible
weight of your vehicle must not be exceeded under any circumstances – risk
of accident!
CAUTION
■ Only use roof rack systems approved by ŠKODA.■If other roof rack systems are used or if the roof bars are not fitted correctly,
any resulting damage to the vehicle is not covered by the warranty. Therefore ob-
serve the supplied fitting instructions for the roof rack system are observed.■
On models fitted with a sliding/tilting roof, ensure that the sliding/tilting roof
does not strike any items of luggage transported on the roof.
■
Ensure that the luggage compartment lid does not hit the roof load when
opened.
■
The height of the vehicle changes after mounting a roof luggage rack system
and the load that is secured to it. Compare the vehicle height with available clear-
ances, such as underpasses and garage doors.
■
Always remove the roof luggage rack system before entering an automated car
wash.
■
Ensure the roof aerial is not impaired by the secured load.
For the sake of the environment
The increased aerodynamic drag results in a higher fuel consumption.
68Using the system
Page 78 of 222

Stowage compartment below front passenger seatFig. 73
Front passenger seat: Stowage
compartment
Open/close
›
Pull the handle to position
1
» Fig. 73 . The compartment opens out in the di-
rection of the arrow
2
.
›
When closing the compartment, hold the handle until the compartment is closed.
WARNINGThe storage compartment must always be closed when driving for safety rea-
sons.
CAUTION
The storage compartment is designed for storing small objects of up to 1.5 kg. in weight.
Front armrest with storage compartmentFig. 74
Armrest: Stowage compartment
The armrest is adjustable for height and length.
Opening/closing the cover of the stowage compartment
›
Pull and open the cover of the armrest using the handle
A
in the direction of
the arrow
1
» Fig. 74 .
›
Open the lid to the stop, only then can it be folded downwards and against the
direction of the arrow
1
.
Adjusting the height of the armrest
›
First of all fold the cover downwards and then lift it in the direction of the arrow
1
» Fig. 74 into one of the 4 fixed positions.
Adjusting the length of the armrest
›
Move the lid into the desired position in the direction of the arrow
2
» Fig. 74 .
The area
B
» Fig. 74 of the stowage compartment is designed for the storage of
objects with a maximum size of 98 mm x 104 mm x 142 mm.
The area
C
of the stowage compartment is designed for the storage of smaller
objects.
Note
Push the armrest cover all the way back to the stop before applying the hand-
brake.
76Using the system
Page 80 of 222
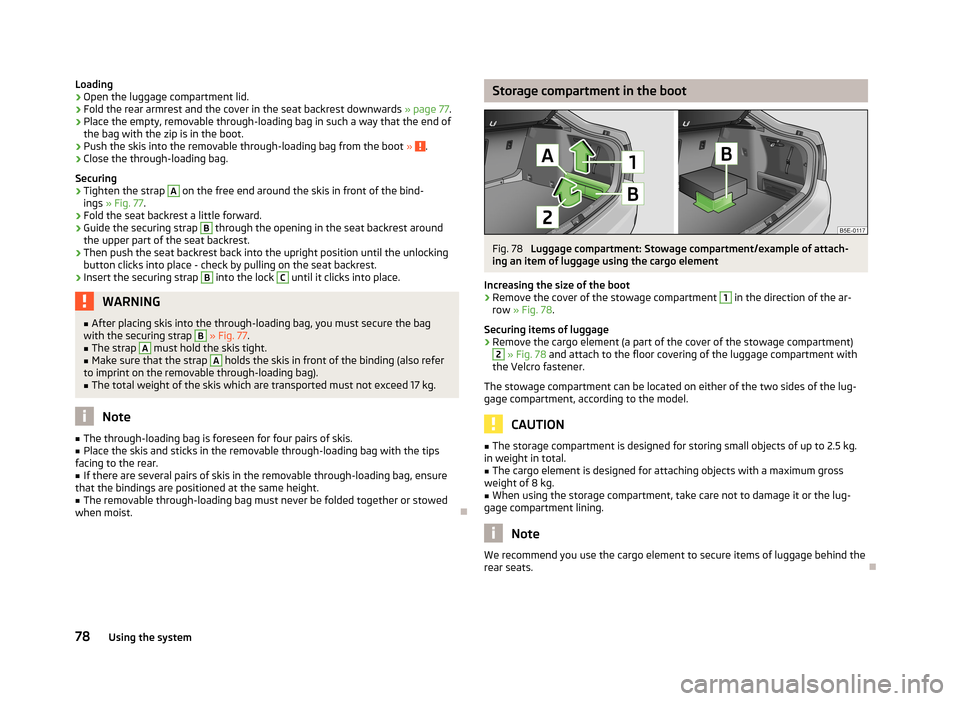
Loading›Open the luggage compartment lid.›
Fold the rear armrest and the cover in the seat backrest downwards » page 77.
›
Place the empty, removable through-loading bag in such a way that the end of
the bag with the zip is in the boot.
›
Push the skis into the removable through-loading bag from the boot » .
›
Close the through-loading bag.
Securing
›
Tighten the strap
A
on the free end around the skis in front of the bind-
ings » Fig. 77 .
›
Fold the seat backrest a little forward.
›
Guide the securing strap
B
through the opening in the seat backrest around
the upper part of the seat backrest.
›
Then push the seat backrest back into the upright position until the unlocking button clicks into place - check by pulling on the seat backrest.
›
Insert the securing strap
B
into the lock
C
until it clicks into place.
WARNING■ After placing skis into the through-loading bag, you must secure the bag
with the securing strap B » Fig. 77 .■
The strap
A
must hold the skis tight.
■
Make sure that the strap
A
holds the skis in front of the binding (also refer
to imprint on the removable through-loading bag).
■
The total weight of the skis which are transported must not exceed 17 kg.
Note
■ The through-loading bag is foreseen for four pairs of skis.■Place the skis and sticks in the removable through-loading bag with the tips
facing to the rear.■
If there are several pairs of skis in the removable through-loading bag, ensure
that the bindings are positioned at the same height.
■
The removable through-loading bag must never be folded together or stowed
when moist.
Storage compartment in the bootFig. 78
Luggage compartment: Stowage compartment/example of attach-
ing an item of luggage using the cargo element
Increasing the size of the boot
›
Remove the cover of the stowage compartment
1
in the direction of the ar-
row » Fig. 78 .
Securing items of luggage
›
Remove the cargo element (a part of the cover of the stowage compartment)
2
» Fig. 78 and attach to the floor covering of the luggage compartment with
the Velcro fastener.
The stowage compartment can be located on either of the two sides of the lug-
gage compartment, according to the model.
CAUTION
■ The storage compartment is designed for storing small objects of up to 2.5 kg.
in weight in total.■
The cargo element is designed for attaching objects with a maximum gross
weight of 8 kg.
■
When using the storage compartment, take care not to damage it or the lug-
gage compartment lining.
Note
We recommend you use the cargo element to secure items of luggage behind the
rear seats.
78Using the system
Page 95 of 222
Note■The engine can only be started with a genuine ŠKODA key with the matching
code.■
The engine running noises may louder at first be louder for a short time after
starting the cold engine. This is quite normal and is not an operating problem.
■
After switching off the ignition, the radiator fan can intermittently continue to
operate for approx. 10 minutes.
■
If the engine also does not start after the second attempt, the fuse for the elec-
tric fuel pump (in petrol engines) or the control unit for the glow plug system or
glow plug system relay and fuel pump (in diesel engines) could be faulty. Check
the fuse and replace, if necessary » page 199 or seek assistance from a ŠKODA
specialist garage.
■
We recommend locking the steering wheel whenever leaving the vehicle. This
acts as a deterrent against the attempted theft of your car.
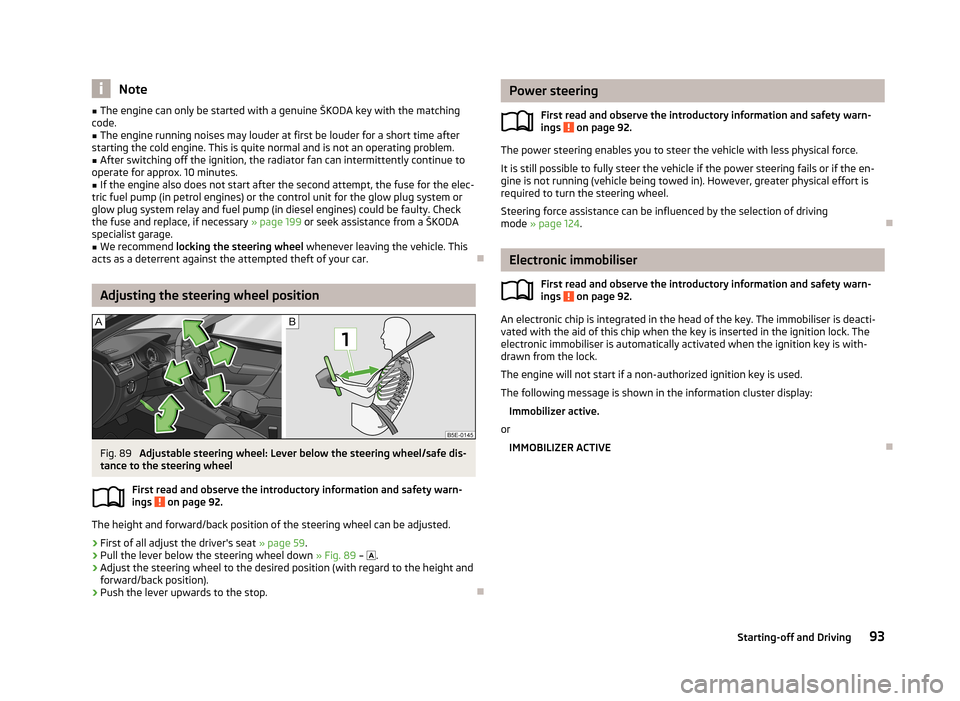
Adjusting the steering wheel position
Fig. 89
Adjustable steering wheel: Lever below the steering wheel/safe dis-
tance to the steering wheel
First read and observe the introductory information and safety warn-
ings
on page 92.
The height and forward/back position of the steering wheel can be adjusted.
›
First of all adjust the driver's seat » page 59.
›
Pull the lever below the steering wheel down » Fig. 89 –
.
›
Adjust the steering wheel to the desired position (with regard to the height and
forward/back position).
›
Push the lever upwards to the stop.
Power steering
First read and observe the introductory information and safety warn-ings
on page 92.
The power steering enables you to steer the vehicle with less physical force.
It is still possible to fully steer the vehicle if the power steering fails or if the en- gine is not running (vehicle being towed in). However, greater physical effort is
required to turn the steering wheel.
Steering force assistance can be influenced by the selection of driving
mode » page 124 .
Electronic immobiliser
First read and observe the introductory information and safety warn-
ings
on page 92.
An electronic chip is integrated in the head of the key. The immobiliser is deacti-
vated with the aid of this chip when the key is inserted in the ignition lock. The
electronic immobiliser is automatically activated when the ignition key is with-
drawn from the lock.
The engine will not start if a non-authorized ignition key is used.
The following message is shown in the information cluster display: Immobilizer active.
or
IMMOBILIZER ACTIVE
93Starting-off and Driving
Page 111 of 222
CAUTION■If the lever is held firm and not pushed downwards as far as it can go, it will go
back up after the ball rod is removed and will not latch into the ready position.
The ball rod then needs to be brought into this position before the next time it is installed.■
Stow the ball rod in the ready position with the key inserted in the box. When
doing so, make the side opposite to the inserted key face downwards - risk of damaging the key!
■
Do not use excessive force when handling the operating lever (e.g. do not climb
on it)!
Note
Remove any dirt from the ball rod before stowing it away in the box with the ve-
hicle tool kit.
Operation and maintenance
First read and observe the introductory information and safety warn-ings
on page 106.
Seal the mounting recess with the cap to prevent any ingress of dirt.
Always check the ball head before hitching a trailer. Use a suitable lubricating grease where necessary.
Include the protective cap when stowing away the ball rod to protect the boot
from getting contaminated.
In the event of dirt, clean the surfaces of the mounting recess and treat with a
suitable preservative.
CAUTION
Apply lubricating grease to the upper part of the mounting recess. Make sure you
do not remove any grease.
Loading a trailer
The vehicle/trailer combination must be balanced. whereby the maximum permis- sible drawbar load must be utilised. If the drawbar load is too low, it jeopardisesthe performance of the vehicle/trailer combination.
Distribution of the load
Distribute the load in the trailer in such a way that heavy items are located as
close to the axle as possible. Secure the items from slipping.
The distribution of the weight is very poor if your vehicle is unladen and the trail-
er is laden. Drive at a particularly low speed if you cannot avoid driving with this
combination.
Tyre pressure
Correct the tyre inflation pressure on your vehicle for a “full load” » page 182,
Tyre life .
Trailer load
The permissible trailer load must not be exceeded under any circumstan-
ces » page 207 , Technical data .
The trailer loads specified apply only to altitudes up to 1 000 metres above mean
sea level.
The engine output falls as the height increases, as does the ability to climb.
Therefore, for every additional 1 000 m in height (every one begun), the maximum
permissible towed weight must be reduced by 10 %.
The towed weight comprises the actual weight of the (loaded) towing vehicle and the (loaded) trailer.
The trailer and drawbar load information on the type plate of the towing device are merely test data for the towing device. The vehicle-specific values are de-tailed in the vehicle documents.WARNING■ Do not exceed the maximum permissible axle and drawbar load and the
maximum permissible total or towed weight of the vehicle and the trailer -
risk of accident and serious injuries!■
Always drive particularly carefully with the trailer.
■
Slipping loads can significantly affect the stability and safety of the vehicle/
trailer combination - risk of accident and serious injuries!
109Towing a trailer
Page 140 of 222
Safety
Passive Safety
General information
Introduction
This chapter contains information on the following subjects:
Safety equipment
138
Before setting off
138
What influences the driving safety?
139
In this section you will find important information, tips and notes on the subject
of passive safety in your vehicle. We have combined everything here which you
should be familiar with, for example, regarding seat belts, airbags, child seats and safety of children. It is therefore important, in particular, to comply with the notes
and warnings in this section for your own interest and in the interest of those
travelling with you.
WARNING■ This chapter contains important information on how to use the vehicle for
the driver and his occupants. You will find further information on safety, which concerns you and those travelling with you, in the following chapters of this
Owner's Manual.■
The complete on-board literature should always be in the vehicle. This ap-
plies in particular, if you rent out or sell the vehicle.
Safety equipment
First read and observe the introductory information and safety warn-ings
on page 138.
The following list contains part of the safety equipment in your vehicle:
› three-point seat belts for all the seats;
› belt force limiters for the front seats;
›
belt tensioners for front seats;
› seat belt height adjusters for front seats;
› Front airbag for the driver and the front seat passenger;
› driver’s knee airbag;
› front side airbags;
› rear side airbags;
› head airbags;
› anchoring points for child seat using the ISOFIX system;
› anchoring points for child seat using the TOP TETHER system;
› head restraints adjustable for height;
› adjustable steering column.
The specified safety equipment works together, in order to optimally protect you
and those travelling with you in accident situations. The safety equipment does
not protect you or the people travelling with you, if you or your occupants adopt
an incorrect seated position or the equipment is not correctly adjusted or used. If
the seat belt is not fastened properly, this may result in injuries during an acci-
dent caused by the deployed airbag.
Before setting off
First read and observe the introductory information and safety warn-
ings
on page 138.
For your own safety and the safety of the people travelling with you, please pay
attention to the following points before setting off.
› Ensure that the lighting and the turn signal system are functioning properly.
› Check the tyre inflation pressure.
› Ensure that all of the windows offer good visibility to the outside.
› Secure all items of luggage
» page 64, Boot .
› Ensure that no objects can obstruct the pedals.
› Adjust the mirrors, the front seat and head restraint to your body size.
› Advise your passengers to adjust the head restraints to their body size.
› Protect children in suitable child seats with correctly fastened seat
belts » page 154 , Transporting children safely .
› Adopt the correct seated position
» page 139, Correct seated position . Tell your
passengers to assume the correct seated position.
› Correctly fasten the seat belt. Also inform passengers to fasten the seat belt
correctly » page 142 , Seat belts .
138Safety
Page 141 of 222
What influences the driving safety?First read and observe the introductory information and safety warn-ings
on page 138.
The driver is fully responsible for himself and his occupants. If your driving safety is effected, you place yourself and the oncoming traffic at risk.
The following guidelines must therefore be observed. › Do not get distracted from concentrating on the traffic situation, e.g. by your
passengers or mobile phone calls.
› Never drive when your driving ability is impaired, e.g. through medication, alco-
hol or drugs.
› Keep to the traffic regulations and the permissible speed limit.
› Always adjust the driving speed to the road, traffic and weather conditions.
› Take regular breaks on long journeys – at least every two hours.
Correct seated position
Introduction
This chapter contains information on the following subjects:
Correct seated position for the driver
140
Correct seated position for the front passenger
140
Correct seated position for the occupants on the rear seats
140
Examples of an incorrect seated position
140WARNING■ At all times, the front seats and head restraints must be adjusted to match
the person's body size and the seat belt must be attached properly to provide
the most effective levels of protection to passengers.■
Always assume the correct seated position before setting off and do not
change this position while driving. Also advise your passengers to adopt the
correct seated position and not to change this position while the car is mov-
ing.
■
If the occupant adopts an incorrect seated position, he is exposed to life-
threatening injuries, in case he is hit by a deployed airbag.
WARNING (Continued)■ If the occupants on the rear seats are not sitting upright, the risk of injury is
increased due to incorrect routing of the seat belt.■
The driver must maintain a distance of at least 25 cm from the steering
wheel, and a distance of at least 10 cm between the legs and the dash panel at the height of the knee airbag. The front passenger must maintain a dis-
tance of at least 25 cm to the dash panel. Not maintaining this minimum dis-
tance will mean that the airbag system will not be able to properly protect you
– hazard!
■
When driving, hold the steering wheel with both hands firmly on the outer
edge in the 9 o'clock and 3 o'clock position. Never hold the steering wheel in
the 12 o'clock position or in any other way (e.g. in the middle or inner edge of
the steering wheel). In such cases, you could severely injure the arms, hands
and head when the driver airbag is deployed.
■
The seat backrests must not be angled too far back when driving otherwise
this will affect proper operation of the seat belts and of the airbag system –
risk of injury!
■
Ensure that there are no objects in the driver's footwell as they may get
caught behind the pedals when driving or applying the braking. You would
then no longer be able to operate the clutch, brake or accelerate.
■
Always keep your feet in the footwell when the car is being driven – never
place your feet on the instrument panel, out of the window or on the surfaces
of the seats. You will be exposed to increased risk of injury if it becomes nec-essary to apply the brake or in the event of an accident. If an airbag is de-
ployed, you may suffer fatal injuries when adopting an incorrect seated posi-
tion!
139Passive Safety