handbrake SKODA OCTAVIA 2012 3.G / (5E) User Guide
[x] Cancel search | Manufacturer: SKODA, Model Year: 2012, Model line: OCTAVIA, Model: SKODA OCTAVIA 2012 3.G / (5E)Pages: 222, PDF Size: 13.52 MB
Page 132 of 222
When parking on a slope, the handbrake should be applied firmly before the park
position P is selected. This ensures that there is no excessive pressure on the
lock mechanism and that it is subsequently easier to move the selector lever out of position P.
Starting-off and driving
First read and observe the introductory information and safety warn-
ings
on page 129.
Starting off
›
Firmly depress and hold the brake pedal.
›
Press the Shiftlock button (button in the selector lever handle), move the selec-
tor lever into the desired position » page 130 and then release the Shiftlock
button.
›
Release the brake pedal and accelerate.
Stop
The selector lever position N does not have to be selected when stopping for a
short time, such as at a cross roads.
›
Fully depress and hold the brake pedal until driving is resumed.
Parking
›
Fully depress and hold the brake pedal and bring the vehicle to a stop.
›
Firmly apply the handbrake.
›
Press and Shiftlock button in the selector lever, move the selector lever to P
and then release the Shiftlock button.
Driving in Neutral
›
Select the Eco driving mode » page 124, Select driving mode .
›
Take the foot of the accelerator (selector lever in position D/S).
The vehicle moves without the braking effect of the engine.
Idling can be interrupted by briefly pressing down on the accelerator pedal or
pressing the rocker switch -
on the multifunction steering wheel
» page 131.
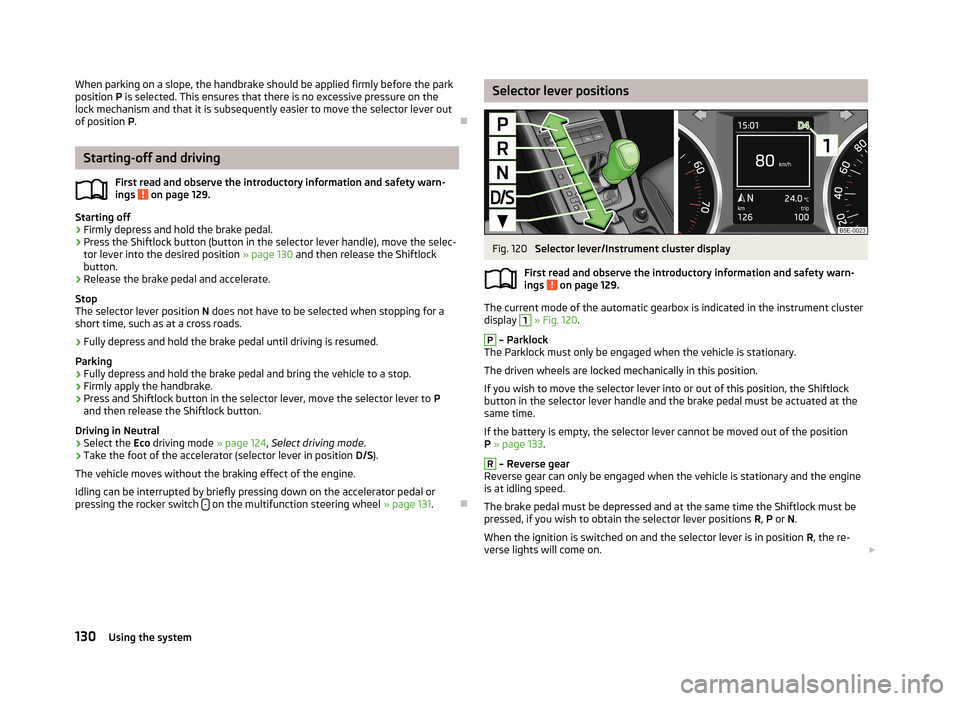
Selector lever positionsFig. 120
Selector lever/Instrument cluster display
First read and observe the introductory information and safety warn- ings
on page 129.
The current mode of the automatic gearbox is indicated in the instrument cluster display
1
» Fig. 120 .
P
– Parklock
The Parklock must only be engaged when the vehicle is stationary.
The driven wheels are locked mechanically in this position.
If you wish to move the selector lever into or out of this position, the Shiftlock
button in the selector lever handle and the brake pedal must be actuated at the
same time.
If the battery is empty, the selector lever cannot be moved out of the position
P » page 133 .
R
– Reverse gear
Reverse gear can only be engaged when the vehicle is stationary and the engine
is at idling speed.
The brake pedal must be depressed and at the same time the Shiftlock must be
pressed, if you wish to obtain the selector lever positions R, P or N.
When the ignition is switched on and the selector lever is in position R, the re-
verse lights will come on.
130Using the system
Page 135 of 222
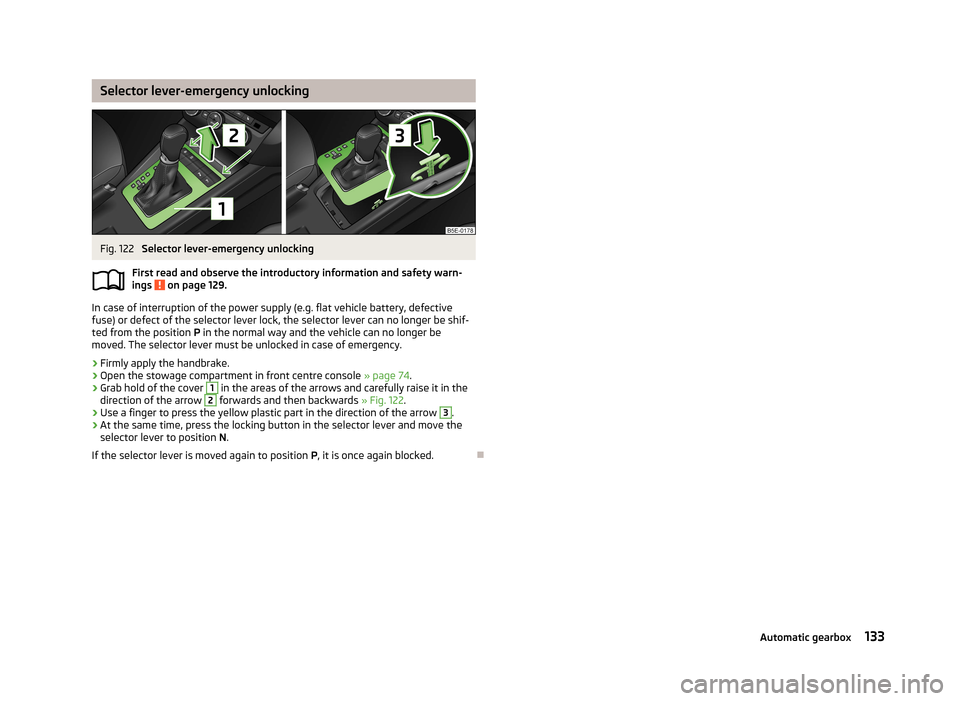
Selector lever-emergency unlockingFig. 122
Selector lever-emergency unlocking
First read and observe the introductory information and safety warn- ings
on page 129.
In case of interruption of the power supply (e.g. flat vehicle battery, defective
fuse) or defect of the selector lever lock, the selector lever can no longer be shif-
ted from the position P in the normal way and the vehicle can no longer be
moved. The selector lever must be unlocked in case of emergency.
›
Firmly apply the handbrake.
›
Open the stowage compartment in front centre console » page 74.
›
Grab hold of the cover
1
in the areas of the arrows and carefully raise it in the
direction of the arrow
2
forwards and then backwards » Fig. 122.
›
Use a finger to press the yellow plastic part in the direction of the arrow
3
.
›
At the same time, press the locking button in the selector lever and move the
selector lever to position N.
If the selector lever is moved again to position P, it is once again blocked.
133Automatic gearbox
Page 172 of 222
WARNINGWhen working in the engine compartment, injuries, scolding, accident or fire
hazards may arise. For this reason, it is essential to comply with the warning
instructions stated below and with the general applicable rules of safety. The
engine compartment of your car is a hazardous area!■
Before beginning work in the engine compartment, please read the follow-
ing advice. ■ Turn off the engine and withdraw the ignition key.
■ Firmly apply the handbrake.
■ If the vehicle is fitted with a manual gearbox, move the gearshift lever into
Neutral, or if the vehicle is fitted with an automatic gearbox, move the se- lector lever into position P.
■ Allow the engine to cool.
■ Never open the bonnet if you can see steam or coolant flowing out of the
engine compartment – risk of scalding! Wait until the steam or coolant has stopped escaping.
■
While working in the engine compartment, please read the following advice.
■ Keep children clear of the engine compartment.
■ Never touch the radiator fan while the engine is still warm. The fan might
suddenly start running!
■ Do not touch any hot engine parts – risk of burns!
■ The coolant additive and thus all of the coolant is harmful to your health.
■ Avoid contact with the coolant.
■ Coolant vapours are harmful to health.
■ Never open the end cover of the coolant expansion reservoir while the en-
gine is still warm. The cooling system is pressurized!
■ When opening the end cover of the coolant expansion reservoir, cover it
with a cloth to protect your face, hands and arms from hot steam or hot coolant. ■ If any coolant splashes into your eyes, immediately rinse out your eyes
with clear water and contact a doctor as soon as possible.
■ Always safely store the coolant additive in its original container out of the
reach of children – risk of poisoning!
■ If coolant is swallowed - consult a doctor immediately.
■ Do not leave any items such as cloths or tools in the engine compartment.
■ Never spill fluids on the hot engine. Such fluids (e.g. the antifreeze con-
tained in the coolant) may ignite!
WARNING (Continued)■ Whenever working in the engine compartment while the engine is running,
you must pay heed to the following warning instructions. ■Pay particular attention to moving engine parts (e.g. V-ribbed belt, alterna-
tor, radiator fan) and the high-voltage ignition unit - danger to life! ■ Never touch the electric wiring on the ignition system.
■ Avoid short circuits in the electrical system – particularly on the vehicle's
battery. ■ Always make sure that no jewellery, loose clothing or long hair can get
caught in rotating engine parts – hazard! Always remove any jewellery, tie back long hair and wear tight fitting clothing before completing any work.■
The following warning instructions must be observed if work has to be car-
ried out on the fuel or electrical system. ■ Always disconnect the vehicle battery from the electrical system.
■ Do not smoke.
■ Never work near open flames.
■ Always have a functioning fire extinguisher nearby.
■
Read the information and warning instructions on the fluid containers.
■
Keep fluids in their original containers and keep out of reach of children!
■
If you wish to work under the vehicle, you must secure the vehicle from roll-
ing away and support it with suitable supporting blocks: the car jack is not
sufficient for this – risk of injury!
■
The bonnet must always be properly closed when driving. This is why after
closing the bonnet, the lock must always be checked to ensure it has engaged
properly.
■
If you notice that the lock is not properly engaged while driving, stop the ve-
hicle immediately and close the bonnet – risk of an accident!
CAUTION
■ Always top up using the correct specification of fluids. This may result in major
operating problems and also vehicle damage!■
Never open the bonnet using the locking lever.
For the sake of the environment
In view of the environmentally friendly disposal of fluids, the specials tools and
knowledge required for such work, we recommend that fluids are changed by a
Škoda Partner as part of the inspection service. 170General Maintenance
Page 192 of 222
Note■The anti-theft wheel bolt set and adapter can be purchased from a ŠKODA Part-
ner.■
The national legal requirements must be observed when changing a wheel.
Preliminary work
First read and observe the introductory information and safety warn-ings
on page 189.
The following steps must be carried out before actually changing the wheel:
›
Park the vehicle as far away as possible from the flow of traffic. The place you choose should be level.
›
Let all of the occupants get out. While changing a tyre, the occupants of the
vehicle should not stand on the road (instead they should remain behind a crash
barrier).
›
Switch off the engine and move the gearshift lever into Neutral or move the se-
lector lever on the automatic gearbox into position P.
›
Firmly apply the handbrake.
›
If a trailer is connected, remove it.
›
Remove the vehicle tool kit » page 188 and the spare wheel » page 184 from
the luggage compartment.
Changing a wheel
First read and observe the introductory information and safety warn-
ings
on page 189.
Always change a wheel on a level surface as far as possible.
›
Remove the full wheel trim » page 185 or caps » page 185 .
›
First of all slacken the anti-theft wheel bolt and then the other wheel
bolts » page 191 .
›
Jack up the vehicle until the wheel that needs changing is clear of the
ground » page 191 .
›
Unscrew the wheel bolts and place them on a clean surface (cloth, paper, etc.).
›
Remove the wheel.
›
Attach the spare wheel and slightly screw on the wheel bolts.
›
Lower the vehicle.
›Alternately tighten the wheel bolts opposite each other using the wheel
wrench (crosswise) and then tighten the anti-theft wheel bolt » page 191.›
Replace the wheel trim or the caps.
Note
■
All bolts must be clean and must turn easily.■Under no circumstances grease or oil the wheel bolts!■
When fitting unidirectional tyres, ensure that the direction of rotation is cor-
rect » page 181 .
Subsequent steps
First read and observe the introductory information and safety warn-
ings
on page 189.
The following steps must also be performed after changing the wheel.
›
Stow and attach the replaced wheel in the spare wheel well using a special screw » page 184 .
›
Stow the vehicle tool kit in the space provided.
›
Check the tyre pressure on the installed spare wheel as soon as possible.
›
Have the tightening torque of the wheel bolts checked with a torque wrench
as soon as possible.
›
Change the damaged wheel or consult a ŠKODA specialist garage about repair
possibilities.
Note
■ If it is determined that the wheel bolts are corroded and difficult to turn when
changing the wheel, the bolts must be replaced before checking the tightening
torque.■
Drive cautiously and only at a moderate speed until the tightening torque has
been checked.
190Do-it-yourself
Page 195 of 222

NoteImmediately replace the wheel that was repaired using the breakdown kit or con-
sult a ŠKODA specialist garage about repair possibilities.
Breakdown kit
Fig. 166
Components of the breakdown kit
First read and observe the introductory information and safety warn-
ings
on page 192.
The kit is located in a box under the floor covering in the luggage compartment.
Explanation of graphic Valve remover
Sticker with speed designation “max. 80 km/h”
Inflation hose with plug
Air compressor
Tyre inflation hose
Tyre inflation pressure indicator
Air release valve
ON and OFF switch
12 volt cable connector
Tyre inflator bottle with sealing agent
Replacement valve core
1234567891011The valve remover 1 has a slot at its lower end which fits into the valve core.
This is the only way in which you can remove and re-install the valve core from
the tyre valve. The same also applies to the replacement valve core 11
.
Note
■ Observe the manufacturer's usage instructions for the breakdown kit.■A new bottle of sealant can be purchased from ŠKODA Original Parts.
Preparing to use the breakdown kit
First read and observe the introductory information and safety warn-
ings
on page 192.
The following preparatory work must be carried out before using the breakdown
kit.
›
Park the vehicle as far away as possible from the flow of traffic. Park on as flat and firm a surface as possible.
›
If you are in flowing traffic, switch on the hazard warning light system and set
up the warning triangle at the prescribed distance! The national legal require-ments must be observed.
›
Let all of the occupants get out. While changing a tyre, the occupants of the
vehicle should not stand on the road (instead they should remain behind a crash
barrier).
›
Switch off the engine and move the gearshift lever into Neutral or move the se-
lector lever on the automatic gearbox into position P.
›
Firmly apply the handbrake.
›
Check that you can carry out the repairs with the breakdown kit » page 192.
›
If a trailer is connected, remove it.
›
Remove the breakdown kit from the luggage compartment.
›
Stick the sticker
2
» Fig. 166 on page 193 on the dash panel in view of the driv-
er.
›
Unscrew the valve cap.
›
Use the valve remover
1
to unscrew the valve core and place it on a clean sur-
face (rag, paper, etc.).
193Do-it-yourself
Page 214 of 222
Index
A
ABS Function
113
Warning light17
Accessories165
Active driver-steering recommendation (DSR)112
Adjusting Exterior mirror
58
Interior mirror57
Adjusting seats139
Adjustment Seat
60
Aerial160
see Radio reception162
Airbag146
Deployment146
Front airbag147
Head airbag150
Knee airbag148
Side airbag149
Airbag system146
Air conditioning system Air outlets
82
Climatronic86
Manual air conditioning system84
Air outlets82
Alarm35
Anti-theft alarm system35
Antilock brake system113
Armrest Front
76
rear64
Ashtray70
Assist systems ABS
17, 113
Cruise control systems (CCS)119
EDL114
ESC17, 112
Headlight assist47
Lane Assist126
Park Assist116
Parking aid114
ProActive passenger protection125
Select driving mode124
START/STOP121
TCS16, 113
Auto Check Control12
Automatic driving lamp control45
Automatic gearbox Dynamic shift programme
132
Emergency programme132
Kickdown132
Selector lever-emergency unlocking133
Selector lever lock131
Selector lever positions130
Starting-off and driving130
Tiptronic131
Automatic load deactivation180
Automatic transmission129
Auxiliary heating and cooling system Switching on/off
89
Auxiliary heating (auxiliary heating and ventila- tion)
88
setting90
B
Ball rod Check attachment
108
installing107
Ready position107
removing108
Battery Replacing the battery in the remote control(aux-
iliary heating)
91
Before setting off138
Belt tensioners145
Bonnet Closing171
Opening171
Boot Cover
67
Fastening elements65
Fixing of the floor covering66
Light65
see Boot lid37
Boot lid37
Automatic locking38
Brake booster97
Brake fluid Checking
175
Brake pads Indicator light
20
Brakes Brake assist systems
112
Brake booster97
Handbrake98
Running in100
Warning light14
Braking Brake fluid
175
Information for braking97
Breakdown kit192
Break recommendation see Fatigue detection
27
Bulbs Replacing
202
Button in the driver's door Electrical power windows
38
C
Car computer see Multifunction display
22
Car jack188
Carrier68
Catalytic converter100
Central locking button32
212Index
Page 216 of 222
EngineRunning in100
Starting and stopping the engine92
Engine compartment Brake fluid
175
Coolant173
Overview172
Vehicle battery176
Engine oil Capacity
209
Changing173
Checking172
Replenishing173
Specification209
Engine revolutions counter10
Environment101
Environmental compatibility103
Environmentally friendly driving101
ESC Function
112
Warning light17
F
Fatigue detection
27
Fire extinguisher188
First-aid kit188
Footmats99
Force limiter40
Front airbag147
Front seats59
Fuel167
Diesel169
Fuel gauge display10
refer to Fuel167
Refuelling167
Unleaded petrol168
Fuel consumption101
Fuel gauge display
10
FusesAssignment199
Replacing199
G
Gear Recommended gear
21
General view Cockpit
7
Glow plug system Warning light
18
H
Handbrake
98
Head airbag150
Headlight assist47
Headlight cleaning system Headlight cleaning system
55
Headlights Driving abroad
104
Headlight cleaning system55
Head restraint63
Heating Defrosting windows
83
Exterior mirror58
operating83
Recirculated air mode84
Seats62
Windscreen and rear window52
Hill hold control (HHC)112
Horn7
Hydraulic Brake Assist (HBA)112
I
Ignition see Ignition lock
94
Ignition lock94
Immobiliser93
Inertia reel145
Information display25
Instrument cluster9
see Instrument cluster9
Interior monitor36
ISOFIX157
J
Jacking points Raise vehicle
191
Jump-starting195
K
KESSY see Kessy system
33
Starting95
KESSY system Starting
95
Unlocking the vehicle33
Keys Lock the vehicle
31
Unlock the vehicle31
Knee airbag148
L
Lane Assist
126
Lever Main beam
45
Turn signal light45
Windscreen wipers54
Light Adaptive headlights (AHL)
46
Automatic driving lamp control45
Cockpit51
COMING HOME/LEAVING HOME function49
Daylight driving light44
Fog lights48
Fog lights with the function CORNER48
214Index