navigation system SKODA OCTAVIA 2012 3.G / (5E) Owner's Manual
[x] Cancel search | Manufacturer: SKODA, Model Year: 2012, Model line: OCTAVIA, Model: SKODA OCTAVIA 2012 3.G / (5E)Pages: 222, PDF Size: 13.52 MB
Page 4 of 222
The on-board literature
The on-board literature for your vehicle consists of this “ Owner's Manual” as well
as a “ Service schedule ” and the “Help on the road ” brochure.
Depending on the vehicle model and equipment, other additional operating man-
uals and instructions may be provided (e.g. an operating manual for the Infotain-
ment Radio).
If one of the publications listed above is missing, please contact a ŠKODA Partner.
The Owner's Manual
These operating instructions describe all possible equipment variants without
identifying them as special equipment, model variants or market-dependent equipment.
Consequently, this vehicle does not need to contain all of the equipment compo-
nents described in this Owner's manual.
The level of equipment of your vehicle refers to your purchase contract of the ve-
hicle. For more information, contact your local ŠKODA retailer.
This owner's manual describes a wide range of electronic functions and systems.
Information about how to configure these electronic functions and systems can
be found in the operating instructions to Infotainment Radio and/or the Infotain-
ment navigation system.
The illustrations can differ in minor details from your vehicle; they are only inten-
ded for general information.
The Service Plan:
› includes vehicle data including information on service work performed;
› is a record of services provided;
› is provided for entries relating to the mobility warranty (valid only for some
countries);
› serves as warranty certificate of the ŠKODA dealer.
The service records are one of the conditions for warranty claims.
Please always present the Service schedule when you take your car to a ŠKODA
specialist garage.
If the Service Schedule is missing or worn, please contact the ŠKODA specialist
garage that regularly services your car. You will receive a duplicate, in which the
previously carried out service work is confirmed by the ŠKODA specialist garage.The Help on the Road brochure
The brochure contains the important emergency telephone numbers as well as
telephone numbers and contact addresses of ŠKODA Partners in different coun-
tries.
Page 9 of 222
Using the system
Cockpit
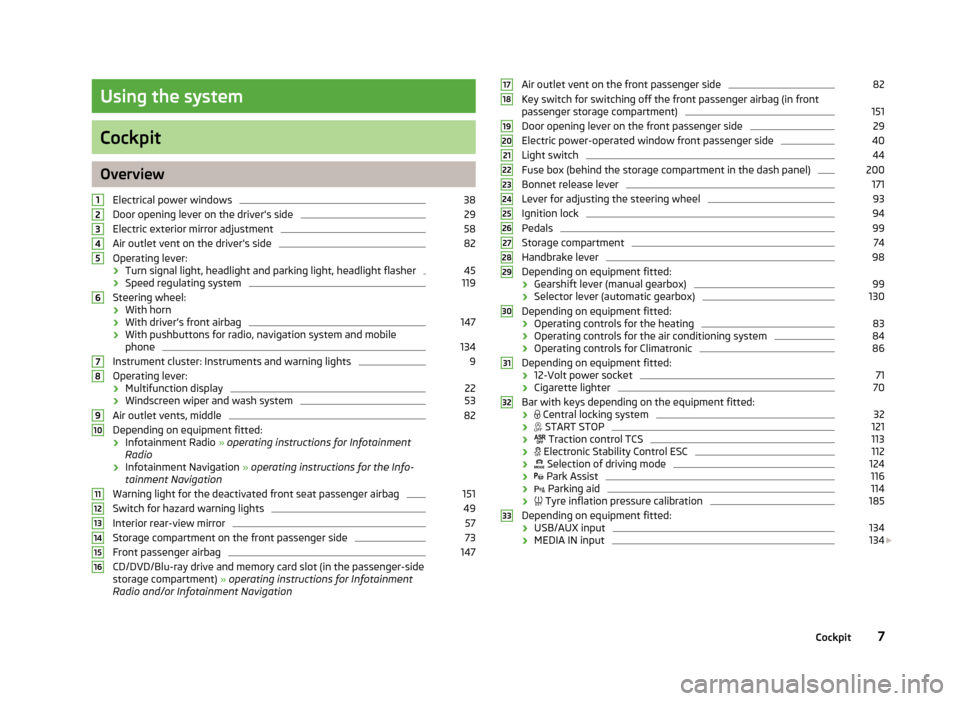
OverviewElectrical power windows
38
Door opening lever on the driver's side
29
Electric exterior mirror adjustment
58
Air outlet vent on the driver's side
82
Operating lever:
› Turn signal light, headlight and parking light, headlight flasher
45
›Speed regulating system
119
Steering wheel:
› With horn
› With driver’s front airbag
147
›With pushbuttons for radio, navigation system and mobile
phone
134
Instrument cluster: Instruments and warning lights
9
Operating lever:
› Multifunction display
22
›Windscreen wiper and wash system
53
Air outlet vents, middle
82
Depending on equipment fitted:
› Infotainment Radio
» operating instructions for Infotainment
Radio
› Infotainment Navigation
» operating instructions for the Info-
tainment Navigation
Warning light for the deactivated front seat passenger airbag
151
Switch for hazard warning lights
49
Interior rear-view mirror
57
Storage compartment on the front passenger side
73
Front passenger airbag
147
CD/DVD/Blu-ray drive and memory card slot (in the passenger-side
storage compartment) » operating instructions for Infotainment
Radio and/or Infotainment Navigation
12345678910111213141516Air outlet vent on the front passenger side82Key switch for switching off the front passenger airbag (in front
passenger storage compartment)151
Door opening lever on the front passenger side
29
Electric power-operated window front passenger side
40
Light switch
44
Fuse box (behind the storage compartment in the dash panel)
200
Bonnet release lever
171
Lever for adjusting the steering wheel
93
Ignition lock
94
Pedals
99
Storage compartment
74
Handbrake lever
98
Depending on equipment fitted:
› Gearshift lever (manual gearbox)
99
›Selector lever (automatic gearbox)
130
Depending on equipment fitted:
› Operating controls for the heating
83
›Operating controls for the air conditioning system
84
›
Operating controls for Climatronic
86
Depending on equipment fitted:
› 12-Volt power socket
71
›Cigarette lighter
70
Bar with keys depending on the equipment fitted:
›
Central locking system
32
›
START STOP
121
›
Traction control TCS
113
›
Electronic Stability Control ESC
112
›
Selection of driving mode
124
›
Park Assist
116
›
Parking aid
114
›
Tyre inflation pressure calibration
185
Depending on equipment fitted:
› USB/AUX input
134
›MEDIA IN input
134
17181920212223242526272829303132337Cockpit
Page 27 of 222
Change or delete speed limit›With the button A » Fig. 4 or, if applicable, the adjustment wheel D, select the
menu item Warning against excessive speeds .›
Pressing the button
B
or the adjustment wheel
D
deletes the speed limit.
›
Pressing the button
B
or the adjustment wheel
D
again activates change
mode for the speed limit.
If the pre-set speed is exceeded, an acoustic signal appears as a warning tone
and a warning message appears in the instrument cluster display, e.g.:
Speed 50 exceeded.
or SPEED TOO HIGH
The set speed limit value remains stored even after switching off the ignition. Af-
ter a gap between driving exceeding 2 hours, the pre-set speed limit is deleted.
Information display
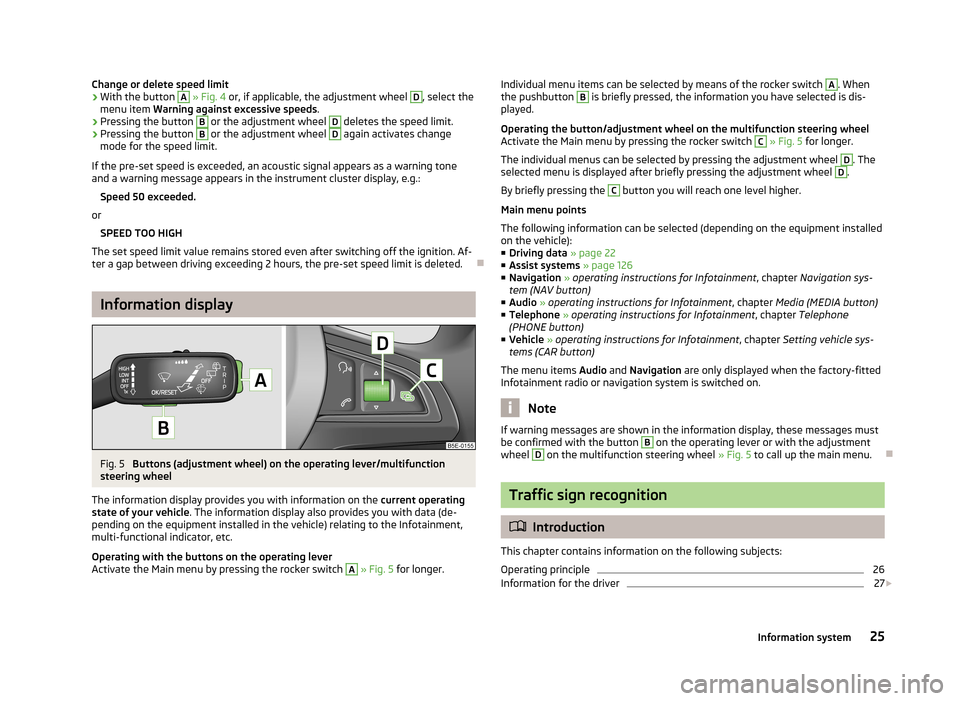
Fig. 5
Buttons (adjustment wheel) on the operating lever/multifunction
steering wheel
The information display provides you with information on the current operating
state of your vehicle . The information display also provides you with data (de-
pending on the equipment installed in the vehicle) relating to the Infotainment,
multi-functional indicator, etc.
Operating with the buttons on the operating lever
Activate the Main menu by pressing the rocker switch
A
» Fig. 5 for longer.
Individual menu items can be selected by means of the rocker switch A. When
the pushbutton B is briefly pressed, the information you have selected is dis-
played.
Operating the button/adjustment wheel on the multifunction steering wheel
Activate the Main menu by pressing the rocker switch C
» Fig. 5 for longer.
The individual menus can be selected by pressing the adjustment wheel
D
. The
selected menu is displayed after briefly pressing the adjustment wheel
D
.
By briefly pressing the
C
button you will reach one level higher.
Main menu points
The following information can be selected (depending on the equipment installed on the vehicle):
■ Driving data » page 22
■ Assist systems » page 126
■ Navigation » operating instructions for Infotainment , chapter Navigation sys-
tem (NAV button)
■ Audio » operating instructions for Infotainment , chapter Media (MEDIA button)
■ Telephone » operating instructions for Infotainment , chapter Telephone
(PHONE button)
■ Vehicle » operating instructions for Infotainment , chapter Setting vehicle sys-
tems (CAR button)
The menu items Audio and Navigation are only displayed when the factory-fitted
Infotainment radio or navigation system is switched on.
Note
If warning messages are shown in the information display, these messages must
be confirmed with the button B on the operating lever or with the adjustment
wheel D
on the multifunction steering wheel » Fig. 5 to call up the main menu.
Traffic sign recognition
Introduction
This chapter contains information on the following subjects:
Operating principle
26
Information for the driver
27
25Information system
Page 28 of 222
The detected traffic signs appear in the instrument cluster display in the follow-
ing menu:
■ Driving data
■ Traffic sign
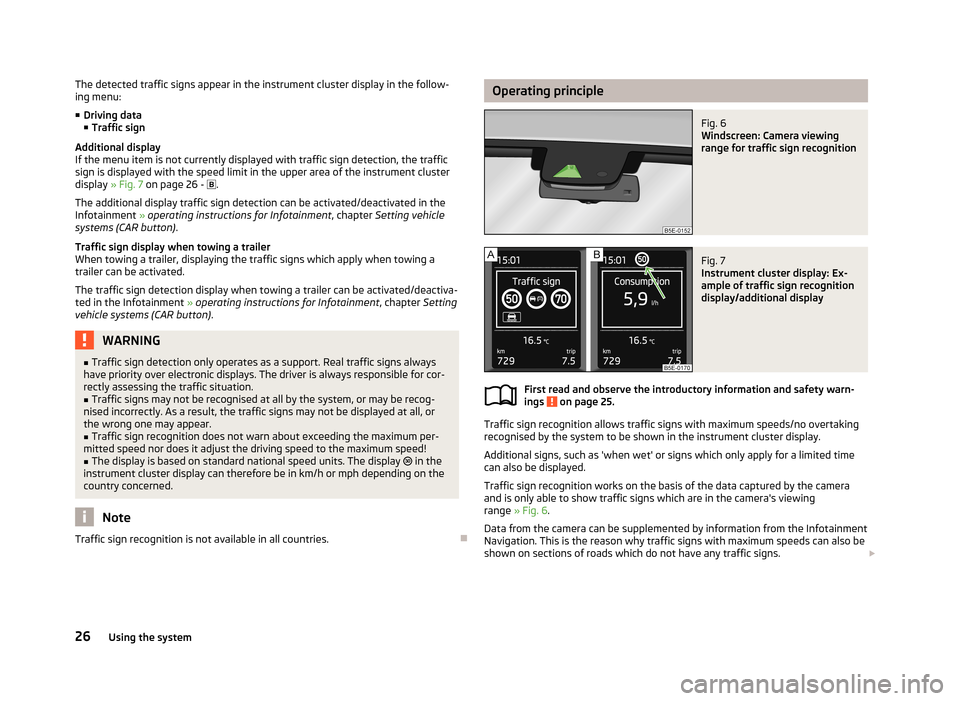
Additional display
If the menu item is not currently displayed with traffic sign detection, the traffic
sign is displayed with the speed limit in the upper area of the instrument cluster display » Fig. 7 on page 26 - .
The additional display traffic sign detection can be activated/deactivated in the Infotainment » operating instructions for Infotainment , chapter Setting vehicle
systems (CAR button) .
Traffic sign display when towing a trailer
When towing a trailer, displaying the traffic signs which apply when towing a
trailer can be activated.
The traffic sign detection display when towing a trailer can be activated/deactiva-
ted in the Infotainment » operating instructions for Infotainment , chapter Setting
vehicle systems (CAR button) .WARNING■
Traffic sign detection only operates as a support. Real traffic signs always
have priority over electronic displays. The driver is always responsible for cor-
rectly assessing the traffic situation.■
Traffic signs may not be recognised at all by the system, or may be recog-
nised incorrectly. As a result, the traffic signs may not be displayed at all, or
the wrong one may appear.
■
Traffic sign recognition does not warn about exceeding the maximum per-
mitted speed nor does it adjust the driving speed to the maximum speed!
■
The display is based on standard national speed units. The display in the
instrument cluster display can therefore be in km/h or mph depending on the country concerned.
Note
Traffic sign recognition is not available in all countries.
Operating principleFig. 6
Windscreen: Camera viewing
range for traffic sign recognition
Fig. 7
Instrument cluster display: Ex-
ample of traffic sign recognition
display/additional display
First read and observe the introductory information and safety warn-
ings on page 25.
Traffic sign recognition allows traffic signs with maximum speeds/no overtaking
recognised by the system to be shown in the instrument cluster display.
Additional signs, such as 'when wet' or signs which only apply for a limited time
can also be displayed.
Traffic sign recognition works on the basis of the data captured by the camera
and is only able to show traffic signs which are in the camera's viewing range » Fig. 6 .
Data from the camera can be supplemented by information from the Infotainment Navigation. This is the reason why traffic signs with maximum speeds can also be shown on sections of roads which do not have any traffic signs.
26Using the system
Page 29 of 222
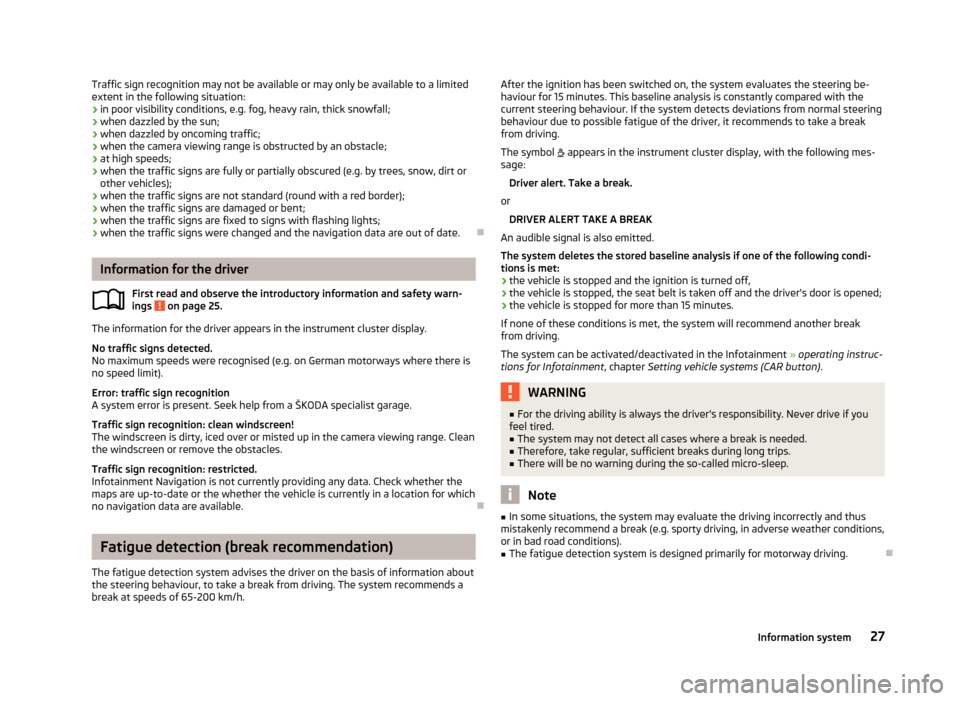
Traffic sign recognition may not be available or may only be available to a limited
extent in the following situation:
› in poor visibility conditions, e.g. fog, heavy rain, thick snowfall;
› when dazzled by the sun;
› when dazzled by oncoming traffic;
› when the camera viewing range is obstructed by an obstacle;
› at high speeds;
› when the traffic signs are fully or partially obscured (e.g. by trees, snow, dirt or
other vehicles);
› when the traffic signs are not standard (round with a red border);
› when the traffic signs are damaged or bent;
› when the traffic signs are fixed to signs with flashing lights;
› when the traffic signs were changed and the navigation data are out of date.
Information for the driver
First read and observe the introductory information and safety warn-ings
on page 25.
The information for the driver appears in the instrument cluster display.
No traffic signs detected.
No maximum speeds were recognised (e.g. on German motorways where there is
no speed limit).
Error: traffic sign recognition
A system error is present. Seek help from a ŠKODA specialist garage.
Traffic sign recognition: clean windscreen!
The windscreen is dirty, iced over or misted up in the camera viewing range. Clean
the windscreen or remove the obstacles.
Traffic sign recognition: restricted.
Infotainment Navigation is not currently providing any data. Check whether the
maps are up-to-date or the whether the vehicle is currently in a location for which
no navigation data are available.
Fatigue detection (break recommendation)
The fatigue detection system advises the driver on the basis of information about
the steering behaviour, to take a break from driving. The system recommends a
break at speeds of 65-200 km/h.
After the ignition has been switched on, the system evaluates the steering be-
haviour for 15 minutes. This baseline analysis is constantly compared with the
current steering behaviour. If the system detects deviations from normal steering
behaviour due to possible fatigue of the driver, it recommends to take a break
from driving.
The symbol appears in the instrument cluster display, with the following mes-
sage:
Driver alert. Take a break.
or DRIVER ALERT TAKE A BREAK
An audible signal is also emitted.
The system deletes the stored baseline analysis if one of the following condi-
tions is met:
› the vehicle is stopped and the ignition is turned off,
› the vehicle is stopped, the seat belt is taken off and the driver's door is opened;
› the vehicle is stopped for more than 15 minutes.
If none of these conditions is met, the system will recommend another break
from driving.
The system can be activated/deactivated in the Infotainment » operating instruc-
tions for Infotainment , chapter Setting vehicle systems (CAR button) .WARNING■
For the driving ability is always the driver's responsibility. Never drive if you
feel tired.■
The system may not detect all cases where a break is needed.
■
Therefore, take regular, sufficient breaks during long trips.
■
There will be no warning during the so-called micro-sleep.
Note
■ In some situations, the system may evaluate the driving incorrectly and thus
mistakenly recommend a break (e.g. sporty driving, in adverse weather conditions,
or in bad road conditions).■
The fatigue detection system is designed primarily for motorway driving.
27Information system
Page 48 of 222
Deactivating›Turn the light switch to position 0, or » Fig. 27 .
If the light switch is in position , the symbol lights up next to the light
switch. If the light is switched on automatically, the symbol next to the light
switch also lights up.
Automatic headlight control in rain
If the light switch is in position and if automatic wiping in rain or wiping (posi-
tion 2 or 3) is switched on for longer than 30 seconds » page 54, the side lights
and low beam will switch on automatically.
The light switches off when automatic wiping/wiping (position 2 or 3) is not
switched on for longer than approx. 4 seconds.
The automatic headlight control in rain can be activated/deactivated in the Info-tainment » operating instructions for Infotainment , chapter Setting vehicle sys-
tems (CAR button) .
CAUTION
Do not affix any stickers or similar objects in front of the light sensor on the wind-
screen, so that its functionality is not impaired or disabled.
Adaptive headlights (AHL)
First read and observe the introductory information and safety warn-ings
on page 43.
The AFS system works in tandem with automatic driving lamp control
, please
read the following » page 45.
The AFS system makes sure the street remains lit up depending on the traffic and weather situation.
The system automatically adjusts the cone of light in front of the vehicle based
on the vehicle speed, whether the windscreen wipers are in use, the rear fog lights, and data from Infotainment Navigation.
Activating
›
Turn the light switch into position
» Fig. 27 on page 45.
Deactivating
›
Turn the light switch to position 0,
or
» Fig. 27 on page 45.
The AHL system operates in the following modes.
Out of town mode
The cone of light in front of the vehicle is similar to the low beam. The mode is
active if none of the following modes are active.
City mode
The cone of light in front of the vehicle is adjusted so that it illuminates the adja- cent pavement, crossings, etc. The mode is active at speeds of 15-50 km/h.
Motorway mode
The cone of light in front of the vehicle is adjusted so that the driver can respond
in time to an obstruction or other hazard in time. The mode is active at speeds
above 110 km/h.
Rain mode
The cone of light in front of the vehicle is adjusted so that the driver can reduce the glare from oncoming traffic in rain. The mode is active at speeds of 50 –
90 km/h and if the windscreen wipers continuously operate for a period of time
longer than 2 minutes. The mode is deactivated when the windscreen wipers are switched off for longer than 8 minutes.
Fog mode
The cone of light in front of the vehicle is adjusted so that the driver is not daz-
zled by the reflection of the cone of light by fog in front of the vehicle. The mode
is active at speeds of 15 – 70 km/h and if the rear fog light is switched on for a
period of time longer than 10 seconds. The mode is deactivated when the rear fig
light is switched off for longer than 5 seconds.
Dynamic cornering lights
The cone of light in front of the vehicle is adjusted to the steering angle so that
the road in the curve is illuminated. This function is active at speeds greater than
10 km.h and in all AFS modes.
Tourist light
This mode makes it possible to drive in countries with opposing traffic system, driving on the left/right, without dazzling the oncoming vehicles. When the “tou- rist light” mode is active, the above-mentioned modes and the side swivel of the
headlights is deactivated.
The "Tourist light" mode can be configured in the Infotainment » operating in-
structions for Infotainment , chapter Setting vehicle systems (CAR button) .46Using the system
Page 50 of 222
WARNINGHeadlight assist only functions as a support and does not relieve the driver of
his responsibility to check the headlights and light beam and, if necessary, to
switch on the lights depending on the light conditions. Manual operation may be required in the following situations:■
in poor visibility conditions, e.g. fog, heavy rain, thick snowfall;
■
on A roads or motorways when oncoming traffic is partially obscured;
■
when passing poorly lit traffic, e.g. cyclists;
■
around sharp curves;
■
on sharp slopes up/down;
■
while driving through poorly-lit villages;
■
while driving over highly reflective surfaces;
■
when the windscreen around the camera is dirty, iced up, misted up, or cov-
ered up by stickers;
■
when an external navigation system is attached to the windscreen.
CAUTION
■ Do not attach any stickers or similar objects to the windscreen to avoid impair-
ing the functions of the Assist system.
Fog lights
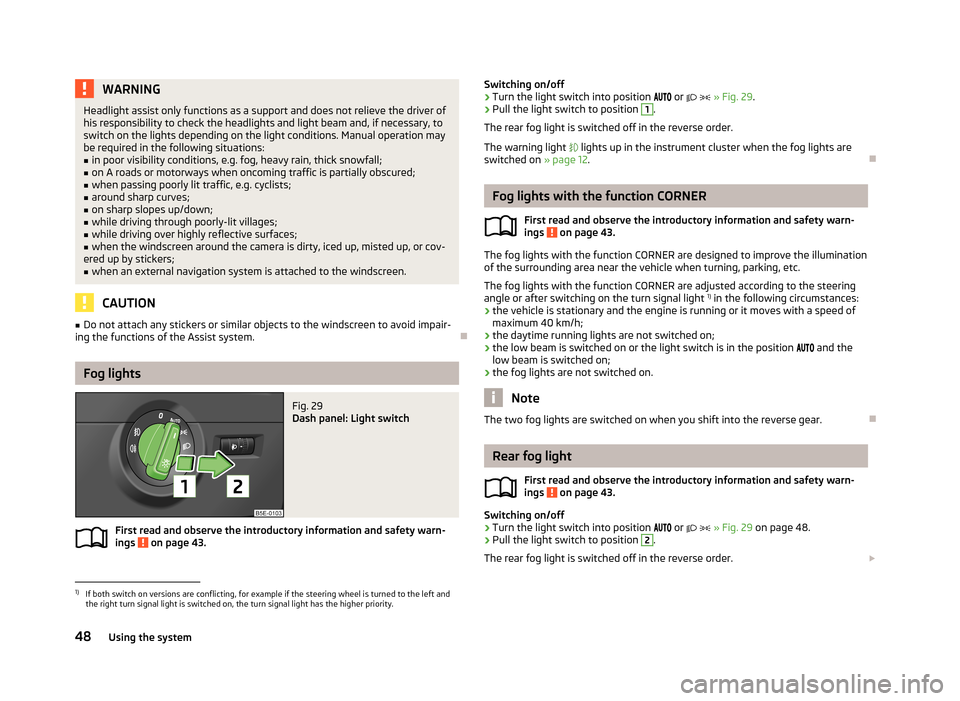
Fig. 29
Dash panel: Light switch
First read and observe the introductory information and safety warn- ings on page 43.
Switching on/off›Turn the light switch into position or » Fig. 29 .›
Pull the light switch to position
1
.
The rear fog light is switched off in the reverse order.
The warning light lights up in the instrument cluster when the fog lights are
switched on » page 12.
Fog lights with the function CORNER
First read and observe the introductory information and safety warn-
ings
on page 43.
The fog lights with the function CORNER are designed to improve the illumination
of the surrounding area near the vehicle when turning, parking, etc.
The fog lights with the function CORNER are adjusted according to the steeringangle or after switching on the turn signal light 1)
in the following circumstances:
› the vehicle is stationary and the engine is running or it moves with a speed of
maximum 40 km/h;
› the daytime running lights are not switched on;
› the low beam is switched on or the light switch is in the position
and the
low beam is switched on;
› the fog lights are not switched on.
Note
The two fog lights are switched on when you shift into the reverse gear.
Rear fog light
First read and observe the introductory information and safety warn-
ings
on page 43.
Switching on/off
›
Turn the light switch into position
or
» Fig. 29 on page 48.
›
Pull the light switch to position
2
.
The rear fog light is switched off in the reverse order.
1)
If both switch on versions are conflicting, for example if the steering wheel is turned to the left and
the right turn signal light is switched on, the turn signal light has the higher priority.
48Using the system
Page 60 of 222

When the interior lights are switched on or the reverse gear is engaged, the mir-
ror always moves back into the basic position (not dimmed).
Do not attach external navigation devices on to the windscreen or in the vicinity
of the automatic dimming interior mirror » page 57,
in section Introduction .
Exterior mirror
Fig. 43
Inner part of door: Rotary knob
First read and observe the introductory information and safety warn-
ings on page 56.
Mirror heater
›
Set the rotary knob into the position
» Fig. 43 .
The mirror heater only operates when the engine is running and up to an outside temperature of +35 ℃.
Adjusting both mirrors in sync
›
Set the rotary dial into position
or, on right-hand drive vehicles, into position
» Fig. 43 . The movement of the mirror surface is identical to the movement of
the rotary knob.
The synchronous setting of both mirrors can be activated/deactivated in the Info-
tainment » operating instructions for Infotainment , chapter Setting vehicle sys-
tems (CAR button) .
Adjusting the front passenger's mirror
›
Set the rotary dial into position
or, on right-hand drive vehicles, into position
» Fig. 43 . The movement of the mirror surface is identical to the movement of
the rotary knob.
Switching off operating control
›
Set the rotary knob into the position
» Fig. 43 .
Folding-in both of the exterior mirrors with the rotary knob›Set the rotary knob into the position » Fig. 43 .
It is only possible to fold in both exterior mirrors when the ignition is switched on and at a speed of up to 50 km/h.
The mirrors are folded back into the driving position after the rotary knob is
turned from the position to a different one.
Folding-in both of the exterior mirrors using the remote control key›
Hold down the lock button on the remote control key, or when using the
KESSY system, keep your finger on the sensor
1
» Fig. 15 on page 33.
Folding in requires that all electrical power windows are working » page 41, Op-
erational faults in the automatic power windows .
The exterior mirror is folded back into the driving position when the ignition is
switched on.
Folding in of both mirrors can be activated/deactivated in the Infotainment » op-
erating instructions for Infotainment , chapter Setting vehicle systems (CAR but-
ton) .
Automatic dimming mirror
The exterior mirrors are dimmed together with the automatic dimming interior
mirror » page 57 .
Tilting surface of front passenger mirror
On vehicles fitted with the memory function for the driver seat » page 61, the
surface of the mirror tilts down slightly when the reverse gear is engaged and the rotary knob is in the position
or in position
on vehicles with right-hand
drive » Fig. 43 . This provides an aid in seeing the kerb of the pavement when
parking the car.
The mirror returns into its initial position, after the rotary knob is moved out of
the position
or position
on vehicles with right-hand drive, and put into another
position or if the speed is more than 15 km/h.
Tilting the surface of the front passenger mirror can be activated/deactivated in the Infotainment » operating instructions for Infotainment , chapter Setting vehi-
cle systems (CAR button) .
Memory function for mirrors
On vehicles fitted with the memory function for the driver seat » page 61 or the
memory function for the remote control key » page 61 it is possible to save the
position of the exterior mirror when saving the driver seat position.
58Using the system
Page 138 of 222
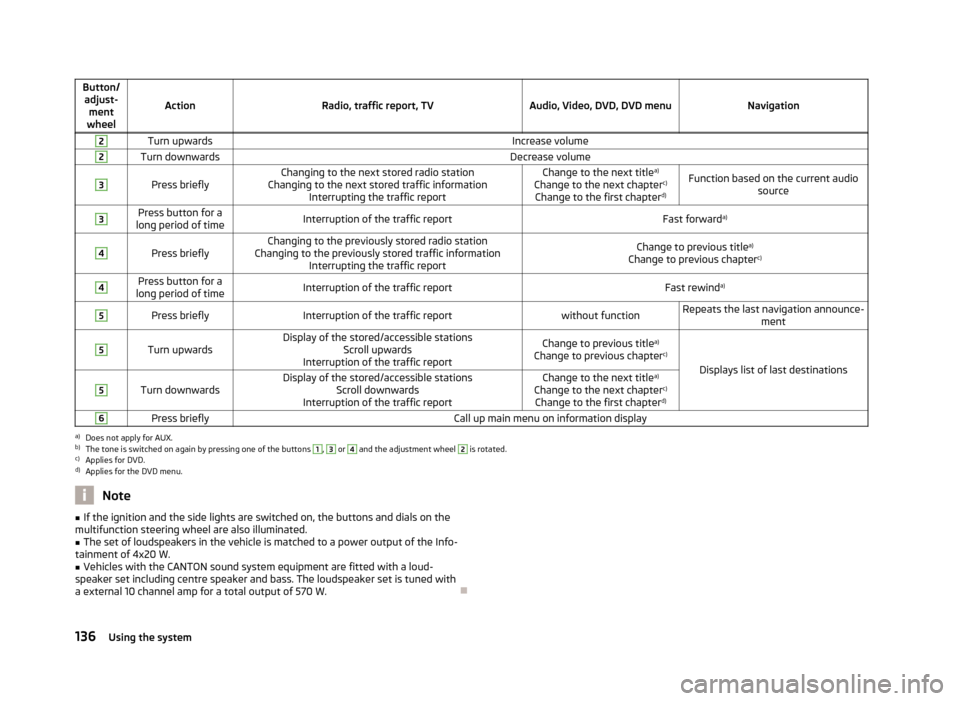
Button/adjust- ment
wheel
ActionRadio, traffic report, TVAudio, Video, DVD, DVD menuNavigation
2Turn upwardsIncrease volume2Turn downwardsDecrease volume3
Press brieflyChanging to the next stored radio station
Changing to the next stored traffic information Interrupting the traffic reportChange to the next title a)
Change to the next chapter c)
Change to the first chapter d)Function based on the current audio
source3Press button for a
long period of timeInterruption of the traffic reportFast forward a)4
Press brieflyChanging to the previously stored radio station
Changing to the previously stored traffic information Interrupting the traffic reportChange to previous title a)
Change to previous chapter c)4Press button for a
long period of timeInterruption of the traffic reportFast rewind a)5Press brieflyInterruption of the traffic reportwithout functionRepeats the last navigation announce-
ment5
Turn upwardsDisplay of the stored/accessible stationsScroll upwards
Interruption of the traffic reportChange to previous title a)
Change to previous chapter c)
Displays list of last destinations
5
Turn downwardsDisplay of the stored/accessible stations
Scroll downwards
Interruption of the traffic reportChange to the next title a)
Change to the next chapter c)
Change to the first chapter d)6Press brieflyCall up main menu on information displaya)
Does not apply for AUX.
b)
The tone is switched on again by pressing one of the buttons
1
,
3
or
4
and the adjustment wheel
2
is rotated.
c)
Applies for DVD.
d)
Applies for the DVD menu.
Note■
If the ignition and the side lights are switched on, the buttons and dials on the
multifunction steering wheel are also illuminated.■
The set of loudspeakers in the vehicle is matched to a power output of the Info-
tainment of 4x20 W.
■
Vehicles with the CANTON sound system equipment are fitted with a loud-
speaker set including centre speaker and bass. The loudspeaker set is tuned with
a external 10 channel amp for a total output of 570 W.
136Using the system
Page 161 of 222
General Maintenance
Taking care of and cleaning the vehicle
Taking care of your vehicle
Introduction
This chapter contains information on the following subjects:
Washing the vehicle
160
Automatic car wash systems
160
Washing by hand
160
Washing with a high-pressure cleaner
161
Preserving and polishing the vehicle paintwork
161
Chrome parts
161
Paint damage
161
Plastic parts
162
De-icing windows and exterior mirrors
162
Radio reception and aerial
162
Headlight lenses
162
Rubber seals
163
Door lock cylinders
163
Wheels
163
Underbody protection
163
Protection of hollow spaces
164
Artificial leather, cloths and Alcantara ®
164
Fabric covers on electrically heated seats
164
Natural leather
164
Seat belts
165
Regular and proper care help to retain the efficiency and
value of your vehicle. It
may also be one of the requirements for the acceptance of warranty claims relat- ing to corrosion damage and paint defects on the bodywork.
We recommend using care products from ŠKODA Original Accessories that areavailable from ŠKODA Partners. The instructions for use on the package must be
observed.
WARNING■ Care products may be harmful to your health if not used according to the in-
structions.■
Always store care products in a safe place, out of the reach of children – risk
of poisoning!
■
Water and ice in the brake system when washing the vehicle in winter can
affect the braking efficiency – risk of accident!
■
Only wash the vehicle when the ignition is switched off – risk of accident!
■
When washing the car by hand, protect your hands and arms from sharp-
edged metal parts (e.g. when cleaning the underfloor, the inside of the wheel
housings or the wheel trims, etc) - risk of cuts!
■
Air fresheners and scents can be hazardous to heath when the temperature
inside the vehicle is high.
CAUTION
■ Be sure to check clothing for colourfastness to avoid any damage or visible
stains on the material (leather), panels and textiles.■
Cleaners containing solvents can damage the material being cleaned.
■
Do not wash your vehicle in bright sunlight – risk of paint damage.
■
If washing the vehicle in the winter using a hose or high-pressure cleaner, en-
sure that the jet of water is not aimed directly at the locking cylinders or the
door/panel joints – risk of freezing!
■
Do not use any insect sponges, rough kitchen sponges or similar cleaning prod-
ucts – risk of damaging the surface of paintwork.
■
Do not stick any stickers on the inside of the rear windows, the rear side win-
dows and in the vicinity of the heating elements on the windscreen or near the
window aerial. These may get damaged. With regard to the antenna, they may in-terfere with the radio or navigation.
■
Do not clean the inside of the windows with sharp-edged objects or corrosive
and acidic cleaning agents – risk of damaging the heating elements or window
aerial.
■
Do not attach scents and air fresheners to the dashboard – risk of damage to
the dashboard.
■
To avoid damaging the parking aid sensors while cleaning with high-pressure
cleaners or steam jets, the sensors must only be directly sprayed for short periods while a minimum distance of 10 cm must be observed.
■
Do not clean the roof trim with a brush – risk of damage to the trim surface.
■
Fold in the exterior mirrors to prevent damage before washing the vehicle in an
automatic car wash system. Never manually fold in electric exterior mirrors - al-
ways use the electric controls.
159Taking care of and cleaning the vehicle